Karel OP50 Use and care manual

09/2009
OPERATOR TELEPHONE SET
TECHNICAL REFERENCE AND USER GUIDE

OPERATOR
TELEPHONE SET
TECHNICAL
REFERENCE
AND
USER GUIDE
SEPTEMBER - 2009

II

III
OP50 TTKK – Ver. AAA – 14.09.2009
KAREL reserves the right to make modifications in product features mentioned in
this document for development and improvement purposes, without prior notice.
Individual products may possess characteristics different from those that have been
mentioned in this document, due to their differences in software and hardware
versions.
Version Table
Software Version Date/Version of Guide
AAA AAA/14.09.2009

IV
OP50

V
ISSUES TO PAY ATTENTION TO
♦Read this guide carefully before you use your device and keep it for later
reference.
♦Any mistake with the connections in your device may damage it or your
exchange. Especially the connection to the exchange must be made by the
Authorized Technical Services. The explanations about connections in the
User’s Guide have been intended to give information only.
♦A connection box comes with your device. The connections must be made
as described in the installation chapter.
♦In case you need a connection of plug-outlet type, never apply electric
plugs and outlets; use plugs, outlets and connection components that are
specific to telephones.
♦Do not make any connection other than the extension connection of the
KAREL telephone system.
♦There is no part that you can repair or maintain in your device; therefore
call the authorized technical service in case of any malfunction.
♦Keep your device away from direct sunlight.
♦Do not let any liquid substance spill on your device.
♦Do the exterior cleaning of your device with a slightly moistened piece of
cloth.
♦Do not apply any chemicals for cleaning.
♦Please call your authorized dealer in case you would like to change the
place of your device. Use its own packing to carry the device.
♦Please do not use exterior signal for the test operations or maintenance.
Any signal which is used externally may damage your device.

VI
PREFACE
Chapters in this guide have been prepared in order to present detailed technical
information about the OP50 Operator Phones, in addition to giving technical
information about programming and use of those telephones. By this way, one
could understand abilities of the OP50 Operator Phones, how it will be operated in
accordance with customer demands and things that should be done in order to
operate them with full performance.
The first chapter - “Technical Introduction” – It contains technical information about
the hardware and software structures of the OP50 Operator Phone. Information in
this chapter, for which knowledge in mechanics, electricity and electronics may be
prerequisite, aims to introduce structure of the phone.
The second chapter – “Installation” – The methods to be followed for the
installation of the OP50 Operator Phone are explained. This chapter must be read
definitely before the installation by the personnel who will perform the installation.
The last chapter – “Program Features” – This chapter gives detalied information
about the software features that will enrich functions of the OP50 Operator Phone
and that could be applied to meet daily communication needs of customers more
comprehensively.
Best Regards,
KAREL

VII
CONTENTS
TECHNICAL INTRODUCTION ................................................................... 1
INTRODUCTION...................................................................................... 1
COMPATIBILITY...................................................................................... 1
PARTS LIST ON DELIVERY ................................................................... 1
TECHNICAL SPECIFICATIONS.............................................................. 2
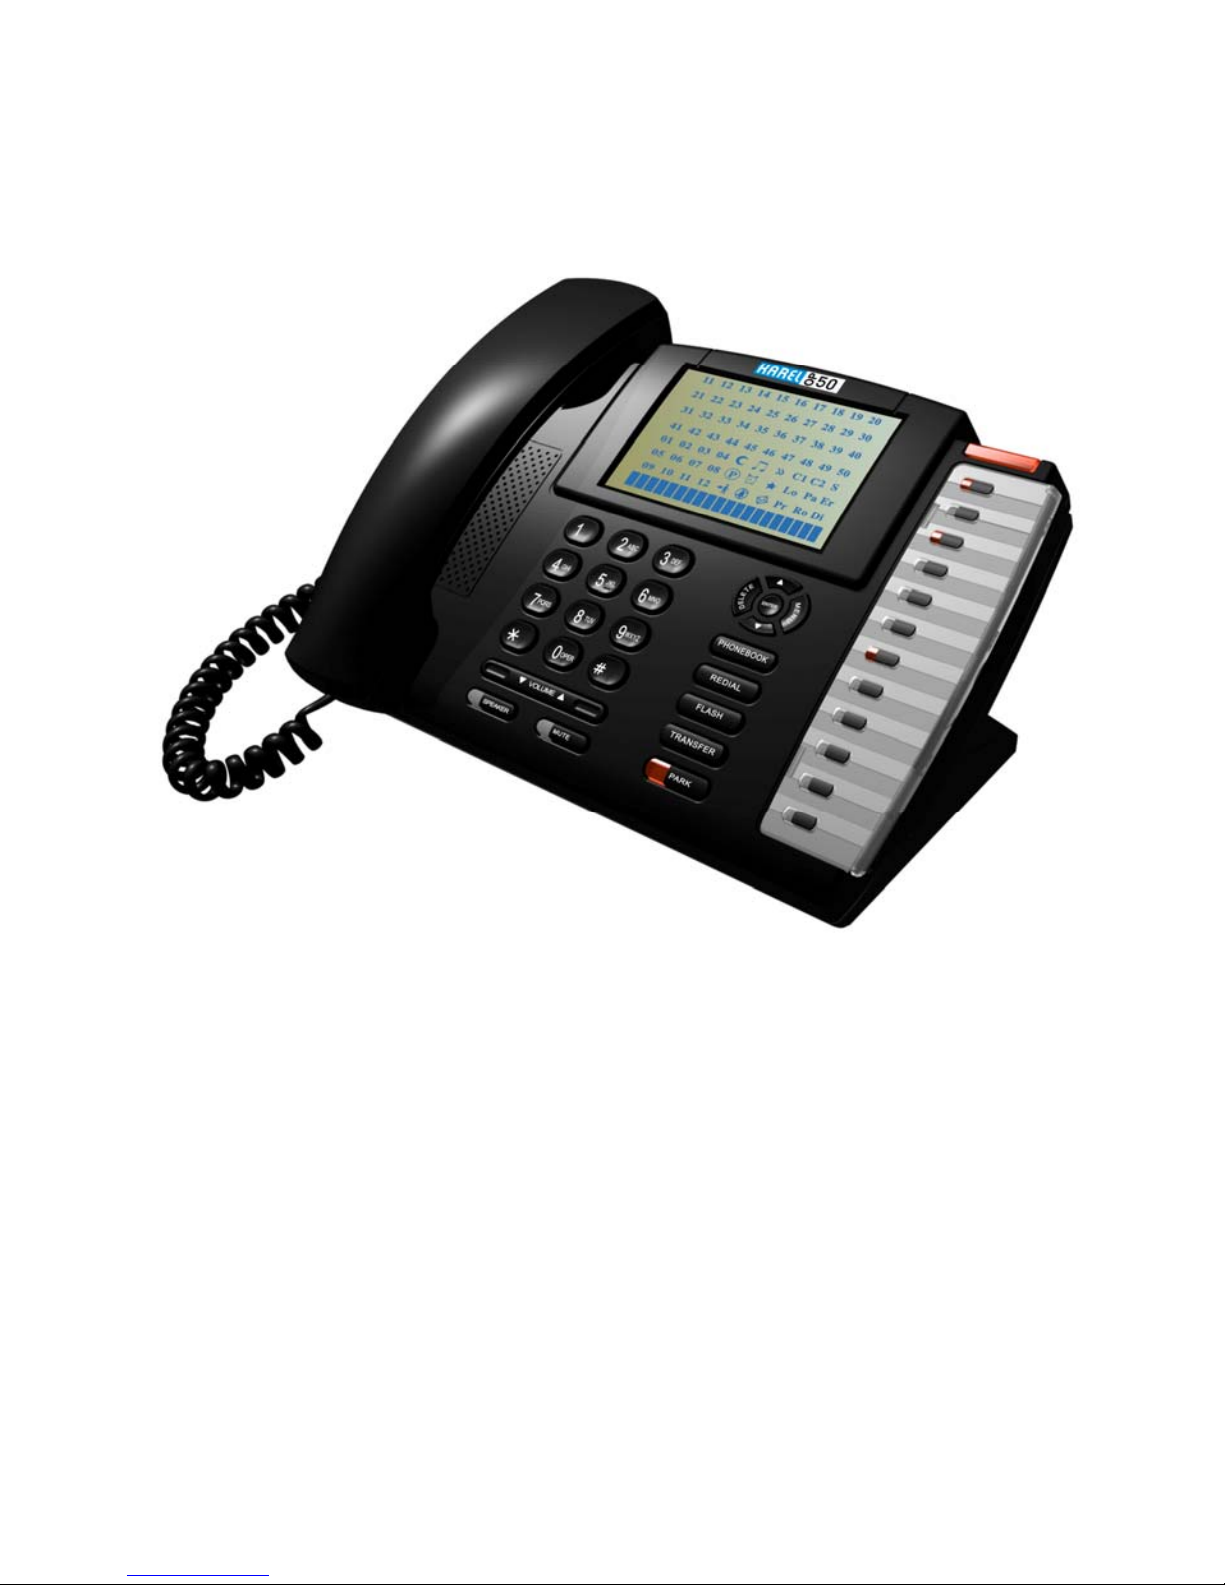
GENERAL APPEARENCE ...................................................................... 2
USER INTERFACE.................................................................................. 3
LCD DISPLAY ...................................................................................... 3
INCOMING CALL LED ......................................................................... 5
NAVIGATION KEYS AND SPECIAL FUNCTION KEYS...................... 5
NUMERICAL KEY PAD........................................................................ 6
VOICE CONTROL KEYS ..................................................................... 7
PROGRAMMABLE SPEED DIAL KEYS.............................................. 8
FUNCTION PROGRAMMING FOR THE SPEED DIAL KEYS............ 8
INSTALLATION......................................................................................... 11
CONNECTION POINTS.........................................................................11
OP50 INSTALLATION............................................................................ 11
Required Hardware For The Connection:...................................................12
Connecting OP50 To The Exchange:.........................................................13
Defining Extension Number For OP50 .......................................................14
Number Of OP50s That Can Be Connected To The Exchange And
Connection Distances.................................................................................14
OP50 Usage On Table With Angle Adjustment Or On Wall .......................15
OP50 Start-up State...................................................................................16
PROGRAM FEATURES............................................................................ 17
PROGRAMMING MENUS ..................................................................... 17
CALL OPTIONS..................................................................................... 18
Call Diversion...................................................................................... 18
Auto Dial.............................................................................................18
Paging................................................................................................. 19
Answered............................................................................................19
Dialed.................................................................................................. 19
PHONE SETTINGS................................................................................ 20
Key Settings........................................................................................ 21
Extension....................................................................................................21
Line.............................................................................................................22
Private Pool................................................................................................23
Common Pool.............................................................................................23
Feature.......................................................................................................24
Auto Settings..............................................................................................24

VIII
Do Not Disturb.................................................................................... 26
Reminder ............................................................................................ 26
Eprom Version.................................................................................... 27
Lazy Mode.........................................................................................27
Language............................................................................................ 27
Headphone......................................................................................... 27
Signal Beep Option.............................................................................28
Price.................................................................................................... 28
Line Access Code............................................................................... 28
PHONE SECURITY ............................................................................... 29
Password............................................................................................29
Phone Lock......................................................................................... 29
Phone Unlock .....................................................................................29
MESSAGE..............................................................................................30
Absent Message................................................................................. 30
Message Listen................................................................................... 30
PHONE BOOK....................................................................................... 31
Find.....................................................................................................31
Add...................................................................................................... 32
Change ............................................................................................... 32
Delete .................................................................................................33
SYSTEM SETTINGS.............................................................................. 34
Setting Time........................................................................................ 34
Setting Date........................................................................................ 34
Night Mode ......................................................................................... 34
Common Pool Entry............................................................................ 35
ACD .................................................................................................... 35
Parallel Operator:................................................................................ 35
APPENDIX.............................................................................................36
Error Messages ..................................................................................36

OP50 Technical Reference and User Guide
1
TECHNICAL INTRODUCTION
INTRODUCTION
OP50 is an operator telephone set, which can be used with all MS series exchanges of
KAREL, and that provides ease and rapidity to the usage of those systems.
NOTE: OP50 is not compatible with the MS26S exchange, as an exception.
By the OP50 telephone sets;
• Users are provided with the facility of performing several operations such as calling back,
auto dialing, follow me, conferencing and alarm setting, by pressing a single key through
special-purpose keys and the display that are on the telephone, without the necessity to
know the system-specific special codes.
• Actions that can be taken for the active services and the call information, which are
indicated on the LCD display, are carried out easily and rapidly through the keys with
special functions that are located below the display.
• The status of the extensions and lines are shown on the Busy Display Panel.
• One-touch extension and/or line calls can be made over the phone book and
programmable keys. (This facility is valid or MS Series software with the version ACA or
better.)
• Statuses of the extensions and/or lines that have been assigned to those keys can be
viewed through the lights (LED) in red, which are embedded into the programmable keys.
COMPATIBILITY
The OP50 operator telephone set is compatible with the ACA or later software of the
exchanges of models MS26C, MS38S, MS38C, MS48, MS48S, MS48C, MS128 and
MS224.
PARTS LIST ON DELIVERY
Parts that are included in the OP50 package:
•OP50 telephone,
•Handset,
•Spiral cable of the handset,
•Data cable with RJ11 connectors at two ends,
•Console connection box,
•Technical Reference and User Guide CD,
•Wall hanging leg fixing screws (2 pieces)
•User Guide

OP50 Technical Reference and User Guide
2
TECHNICAL SPECIFICATIONS
Weight: Approximately 1 kg
Dimensions: 25 cm x 20 cm (lenght, at the smallest angle) x 20 cm (height, at the biggest
angle)
Operational Temperature: 5 oC - 40 oC
Storing Temperature: -20 oC - +60 oC
Humidity: 0 - %80
Dialing Method: DTMF (Tone dialing)
GENERAL APPEARENCE
1 Handset 4 Special Function Keys 7 Navigation Keys
2 HF Speaker 5 Speed Dial Keys 8 Display
3 Voice Control Keys 6 Incoming Call LED 9 Numerical Key Pad

OP50 Technical Reference and User Guide
3
USER INTERFACE
LCD DISPLAY
Screen is made up of a busy display panel and a single-line display. LCD screen that
shows the active features in over 20 character display, includes the following information
which simplifies the use:
• The date and time, and the opening message while the console is not busy
• ID numbers during dialing,
• Activated services (such as Auto-dial)
• Call information (Incoming Call Extension 121)
• Action options that can be taken for the active call and service (Call,/Details?)
The Busy Display Panel shows the status of the extensions, lines and some of the system
features by means of their corresponding LEDs. The extension LEDs display the last 2
digits of the physical numbers of the extensions (even if the extension numbers are
changed by Flexible Numbering facility).
Extension Status (LEDs 11-50)
ON : The extension is busy.
OFF : The extension is idle.
BLINKING (slow) : The extension is ringing.
BLINKING (fast) : The extension is calling the operator.

OP50 Technical Reference and User Guide
4
Line Status (LEDs 01-12)
ON : The line is busy.
OFF : The line is idle.
BLINKING (slow) : There is a call coming from the line.
BLINKING (fast) : A call is parked on the line.
Feature Status Symbol LED
ON: Night Mode is active
ON: Music On Hold is active
ON: External Call Diversion is active
ON: Handsfree is active
ON: There is a parked call
ON: Reminder is active
BLINKING: Auto-Dial is active
ON: Phone is locked
ON: Parallel Operator is active
ON: System error
ON: Follow Me is active
ON: Do Not Disturb is active
BLINKING: Message Waiting or a call is
waiting in your queue
ON: The system is in programming mode
ON: Auto Attendant (ACD) is active
ON: The doorphone is in use
Reserved for future use

OP50 Technical Reference and User Guide
5
INCOMING CALL LED
This LED indicates the user by blinking, when there is an incoming call or a new message.
NAVIGATION KEYS AND SPECIAL FUNCTION KEYS
• “Navigation” keys (“ ”, “”): User can move between features with these keys,
when there are multiple options on the screen, also the related option can be enabled with
them too. They are used to pass to the next/previous option or message in all of the
menus.
• “Menu” key: This key activates the menus by which the telephone is programmed and
it provides access to the submenus. (After entering the menu, the phone gets into the busy
status. Exiting from the menu does not end the busyness of the phone)
•“Delete” key: This key provides to turn to the top-menu of active option in the menu.
When this key is used at the standby mode, it brings the information of active services (Do
not disturb etc.) or calls (Missed Calls etc.) to the screen. After pressing this key, the
"Cancel" option for the active services and the “Details" option for the call information on
the screen can be used with ‘Enter’ key.
•“Enter” key: This key is used for confirming and activating the option on the display.
Functions of this key change according to the options prompted on the display.
• “Phonebook” key: This key provides access to the telephone book. If there is any
record in this phone book, then those records, which are in alphabetical order, are directly
displayed. The records that are present in the telephone at that time can be directly
searched by name or number query through the “Find” option on that display. (Search with
this ‘Find’ option can be made in MS Series software with the version ACA or better)
Detailed information about the phone book has been presented in the relevant section.
• “Redial” key: It dials again the last number that has been dialed. This key functions the
same way as the “Redial” option on the display. The difference between “Redial” and
“Auto-dial” is that the “Auto-dial” option automatically calls the other party repeatedly until
busyness status is over (cctually, at most 16 times), whereas the “Redial” option calls only
once.
• “Flash” key: It is used for putting the calling party on hold during an internal or external
call. It has the same function with the ‘Hold’ option on the screen. A single call can be put
on hold at a time by this key. When it is pressed for a second time, the call on hold is
retrieved, or the call can be retrieved by the “Retrieve” option that appears when the ‘Enter’
key is pressed. It drops the line when it is used while the other party has not yet picked up
the phone. There is no limit for the duration to press the key; however, in the event that the
line that has been put on hold has not still be retrieved at the end of a certain period that is
determined by the exchange software, the line may automatically be dropped.
• “Transfer” key: It is used for transferring an ongoing call to another call that is on hold.
In order to actualize the transfer operation, first of all the conversing party should be put on
hold by using the flash key or the “Hold” / “Park” option on the display. Afterwards, the
number to which the transfer operation will be done is dialed. At this point, the operation is

OP50 Technical Reference and User Guide
6
accomplished by pressing the transfer key before or after conversing with the extension to
which the call is to be transferred. It has the same function with the ‘Transfer’ option on the
screen.
• “Park” key: A line or an internal conversation can be parked through this key during the
conversation. When the call is parked by using that key, “parked line” information and
‘Retrieve’ option for the line appear on the display. The call can be retrieved by pressing
the “Enter” key or by pressing the “Park” key for a second time. A call can be parked more
than once and more than one line can be parked at the same time. When a line has been
parked, the telephone can be used independently from that external conversation, i.e.,
internal and external calls can be made by making use of the entire features. For OP50
users, if there are parked line and also parked internal call and if the other service is
activated, the internal line call will be retrieved in turn with this key. (The first call which is
parked will be displayed in the first rank of the park list.)
The second function of this key is, on the other hand, providing the relation between the
exchange and the console. The key is employed when it is required to change the number
of the telephone or to reset the connection to the exchange. When the key is pressed until
the “beep” is received and then it is released, the telephone prompts for the extension
number to be put on the data line of the exchange. In order to enter the “Terminal no=AA”
value of OP50, this key is pressed consecutively to proceed until the correct extension
number is displayed and the extension number will have been entered to the telephone
upon lifting and then replacing the handset.
NUMERICAL KEY PAD
It is composed of 3x4 (DTMF) key matrix. Moreover, these keys are used for number or
character (letter, figure or symbol) entry during the operations related to the “Phone Book”.
If any programmable key is pressed when the letter entry is being made with capital letters,
the entry starts to be made by small letters. By the same way, if any programmable key is
pressed again, small letters turn into the capital letters. Grouping of the characters with
respect to the keys are as follows. Standards that apply for similar applications have been
complied with for this subject.
Group of “1”: (space) 1 $ % &
Group of “2”: A B C 2 # (a b c)
Group of “3”: D E F 3: (d e f)
Group of “4”: G H I 4 - (g h i)
Group of “5”: J K L 5 ( (j k l)
Group of “6”: M N O 6 ) (m n o)
Group of “7”: P Q R S 7 (p q r s)
Group of “8”: T U V 8 + (t u v)
Group of “9”: W X Y Z 9 (w x y z)
Group of “0”: 0 →! ? =

OP50 Technical Reference and User Guide
7
VOICE CONTROL KEYS
Control of voice features of OP50 telephones are fulfilled by making use of three keys:
“Speaker” key: This is the key with red icon that puts the telephone into the “handsfree”
status and that signifies this through an embedded LED. The key is called H/F key, and the
LED inside it is called H/F LED.
(Handsfree: It is a feature of telephone that it emits voices into the room or transmits voices
inside the room to the other parties while the handset is still on hook.)
“Speaker” key performs different functions in different cases. These are:
•When it is pressed while the handset is on hook, the telephone is picked up as
“handsfree” and the H/F LED lights. In this case, a number can be dialed and a
conversation can be made without lifting the handset. Pressing the key during a
conversation terminates the conversation.
•The H/F LED starts to blink if it is pressed while dial tone or busy tone is being
received over the handset or while a conversation is being made. If the handset is
replaced before the H/F LED goes out, then one continues to receive dial tone or busy
tone, or one can go on with the conversation. The conversation is terminated if the
handset is replaced after the H/F LED has become off.
•If the handset is lifted during the handset status, then the rest of the conversation goes
on via the handset. Replacing the handset terminates the conversation.
•While the handset is on hook, in the event that this key is pressed twice consecutively,
the other party can be heard both via the handset and the H/F speaker. The opposite
party would hear the things spoken via the handset only, but no voice would be
transmitted to the opposite party via the H/F microphone. The conversation terminates
by replacing the handset at this status.
•If ‘Headset’ usage has been activated through menu options, then this key may also
be used for putting the headset on line. Headset usage has been explained in detail in
the relevant section.
“Volume " key: It is used to decrease the level of voice received during conversation
while in the Handsfree mode.
“Volume ” key: It is used to increase the level of voice received during conversation
while in the Handsfree mode.
“MUTE” key: It is the key that provides interruption of the outgoing voices during the all
conversations and which signifies that via the LED inside it. Pressing the key for a second
time will maintain the voice transmission to the opposite party again.

OP50 Technical Reference and User Guide
8
PROGRAMMABLE SPEED DIAL KEYS
Two functions can be programmed for each of the speed dial keys, which consist of 12
keys with lights. Features that can be assigned to these keys through programming:
• Extension Number
• Line Number
• Private and Common Pool Number
• Function Services (Services such as Follow Me, Call Back, Do Not Disturb,
Telephone Lock, Conference, Night Mode)
These assignments are done to the first or the second functions of the key during the
program entry done by pressing the “menu” option. Assignment is done to the first function
if the key is pressed for a short time, and it is done to the second one if the key is pressed
for a longer period. Transition of the key to the first or second function is indicated by a
short or a long beep, respectively.
When the keys that have been programmed for extension, line, private or common pool are
pressed, these numbers are called directly.
When the keys that have been programmed for the services such as Follow Me and Call
Back are pressed, these services are activated directly or a necessary input is prompted.
(Such as the extension number, to which the Follow Me action will be carried out.)
FUNCTION PROGRAMMING FOR THE SPEED DIAL
KEYS
This feature provides for taking advantage of some functions that have been defined for
OP50 in the exchange properties, by pressing a single key. A user may program for those
keys the features presented by the Karel telephone branch exchange, which s/he would
use most frequently.
Different methods can be employed for assigning functions to the programmable keys of
the OP50 operator telephone sets. These operations are carried out for OP50 through the
submenus of Function, Private Pool or Automatic Programming in the Phone Settings >
Key Settings option.
By the Function Programming Menu:
Features most frequently employed by users are among those options. The programming
can be carried out by assigning desired ones out of the options that have been presented
in the Key Settings > Feature submenu, in order to apply that programming option. First
the key to be used is selected, then the desired one out of the presented functions is
brought to the display through the right/left navigation keys and the programming is
completed by the “Enter” key. These selections have been explained below:

OP50 Technical Reference and User Guide
9
•Follow Me Key: If this key is pressed and then if number of an extension is
entered, then forwarding to that extension is actualized and then red LED lights. If it is
pressed again, then the forwarding is cancelled and the LED goes out.
•Call Back Key: If a called extension is busy or not answering and if busy tone is
received upon attempting to access a line, then that extension/line is called back by
pressing this key. In order to cancel the call back operation, the key is pressed again.
•Do Not Disturb Key: It puts that extension into the “Do Not Disturb” mode if it is
pressed and the red LED starts to blink. In that case, telephone rings once when the
extension is called. If it is pressed again, then the “Do Not Disturb” service is cancelled
and the LED goes out.
•Telephone Lock Key: If this key is pressed and the password that have been
defined before in Phone Security>Password menu, is entered afterwards, then the
telephone will be closed for external calls. The telephone will be open for external calls
again, if the procedure is repeated in that mode. The corresponding red LED is on
while the telephone is locked and goes out when it is unlocked.
•Conference Key: During a call with an extension or line, this key is employed for
including another extension or line into the conference. If a line is desired to be
included into the conference, the line with which the conversation is going on is put on
hold by pressing this key and one proceeds to conversation status with the line to be
included into the conference. A triple conference is established upon pressing this key
again. (At the time of conference the “Mute” key can be used in order to provide the
interruption of the outgoing voice.) During the conference, using the "Leave" option on
the screen with "Enter" key or replacing the handset provides extension to leave the
conference. But this case does not end the conversation between the other two
people.
•Night Mode Key: It can be employed only through the telephones that have been
defined as the operator. It puts the system into the Night Mode when it is pressed and
the LED will be turned on. If it is pressed again, then it puts the system into the Day
Mode and the LED goes out. (For this service only, the "Cancel" option is not available
after pressing the “Delete” key.)
•Auto Dial Key: The telephone automatically calls the corresponding number when
the auto-dialer is activated. If the called party is busy, then the calling action is
performed repeatedly in every 15 seconds. As soon as the business of the opposite
party is over, the telephone notifies that by ringing itself or by short beep. If it is
pressed again, then the auto-dial is cancelled and the LED goes out.
•Message Key: If there is an EVM module placed on the system and a voice
message is left to the extension, the LED of this message key will blink to inform the
extension a new message left. All voice messages left to you can be listened
successively if this key is pressed. If a password has been defined before, a message
“Please enter your password” will be displayed when the message key is pressed.
After entering the password the voice messages can be listened. Also a mesage can
be left to the busy or unanswered extension with this key.

OP50 Technical Reference and User Guide
10
Code Programming:
By the Private Pool Programming Menu:
Nine most frequently called external numbers can be programmed into the private pool of
the telephone. Moreover, functions supported by the exchange can also be assigned to the
keys by applying private pool programming. (Please refer to the user’s guide of your
exchange for information related to the functions supported by the exchange and the codes
to program them.)
After entering “Register no=” via Key Settings > Private Pool submenu, codes of the entire
features presented to users can be programmed for the “no=” option by primarily pressing
the “*” key.
Example: An extension using the MS48 exchange can make conversation with a party at
the door over telephone, provided that there is a door phone (the device for the action
being mentioned) connected to the exchange and s/he can open the door upon wish
through telephone, if the door connection has been made to her/his exchange. OP50 user
that employs those features frequently can facilitate utilization by programming those
functions for the keys of the telephone. In order to do that, first the user’s guide of the
exchange should be referred to for information about the topics “Door phone Conversation”
and “Door Opener”. By this way, one would learn whether the exchange code for Door
phone Conversation is 110 or 10 and the code for Door Opener is 151 or 129, as well as
properties of the functions. Then, by accessing OP50 menu, submenus of “Phone
Settings”, “Key Settings” and “Private Pool” are selected, respectively. Upon the displayed
warning, “Press Key”, the memory key that will be used for door phone conversation is
pressed. (In case there is another function or extension number that has previously
programmed for that key, it will be deleted.) Once the key to be employed has been
selected, the prompt “Register no=” is displayed. Each user has a capacity of 9 numbers
reserved for her/him. A memory number in the range 01-09 is entered corresponding to the
“Register no=” prompt on the display and the entered value is automatically confirmed. The
sign “no=” appears on the display, afterwards. At this step, the exchange code of door
phone is entered after pressing the “*” key shortly: (*110) or (*10). The programming is
completed by pressing the “Enter” key. The display reverts to the “Private Pool” menu. The
actions explained above are repeated for the door opener function as well; codes (*151) or
(*29) is entered, then they are confirmed by the “Enter” key and the operation is thus
accomplished. One reverts to the Key Settings submenu screen by pressing the “Delete”
key. Then the user can talk over the door phone or open a door, each by pressing a single
key that s/he has previously chosen.
By Automatic Programming Menu:
In OP telephone sets, possibility of assigning different functions to the entire keys
simultaneously is provided via the Auto Setting option under the Key Settings menu. This
feature will be explained in detail later in the section “Auto Settings”. Via the automatic
programming, about 20 functions can be programmed for the OP telephone sets at the
same time. These functions can be changed later one by one, as already explained in the
sections above, or they can be cleared through the “Clear All?” option in the same menu.

OP50 Technical Reference and User Guide
11
INSTALLATION
CONNECTION POINTS
Under OP50, there are five connection points and a switch that provides selection between
the low/high voice levels. Connections and their characteristics have been illustrated
below.
1 ISDN Connection
2 Optional Connection
3 Optional Connection
4 Handset Connection
5 Headset Connection
6 Ring Tone Low/High
Table of contents
Other Karel Telephone manuals

Karel
Karel FT10 Use and care manual

Karel
Karel MS128 Operating and safety instructions

Karel
Karel MS224 Operating and safety instructions

Karel
Karel LT48 User manual

Karel
Karel FT 15 Use and care manual

Karel
Karel MS26S Operating and safety instructions

Karel
Karel NT421 Use and care manual

Karel
Karel MS38s Operating and safety instructions

Karel
Karel LT200 User manual

Karel
Karel ST26 Use and care manual