Bartec Auto ID ALCAR TECH350 User manual
Bartec Auto ID Ltd. NOV 2021
ALCAR TECH350
Tyre Pressure Monitoring System Tool
User Guide
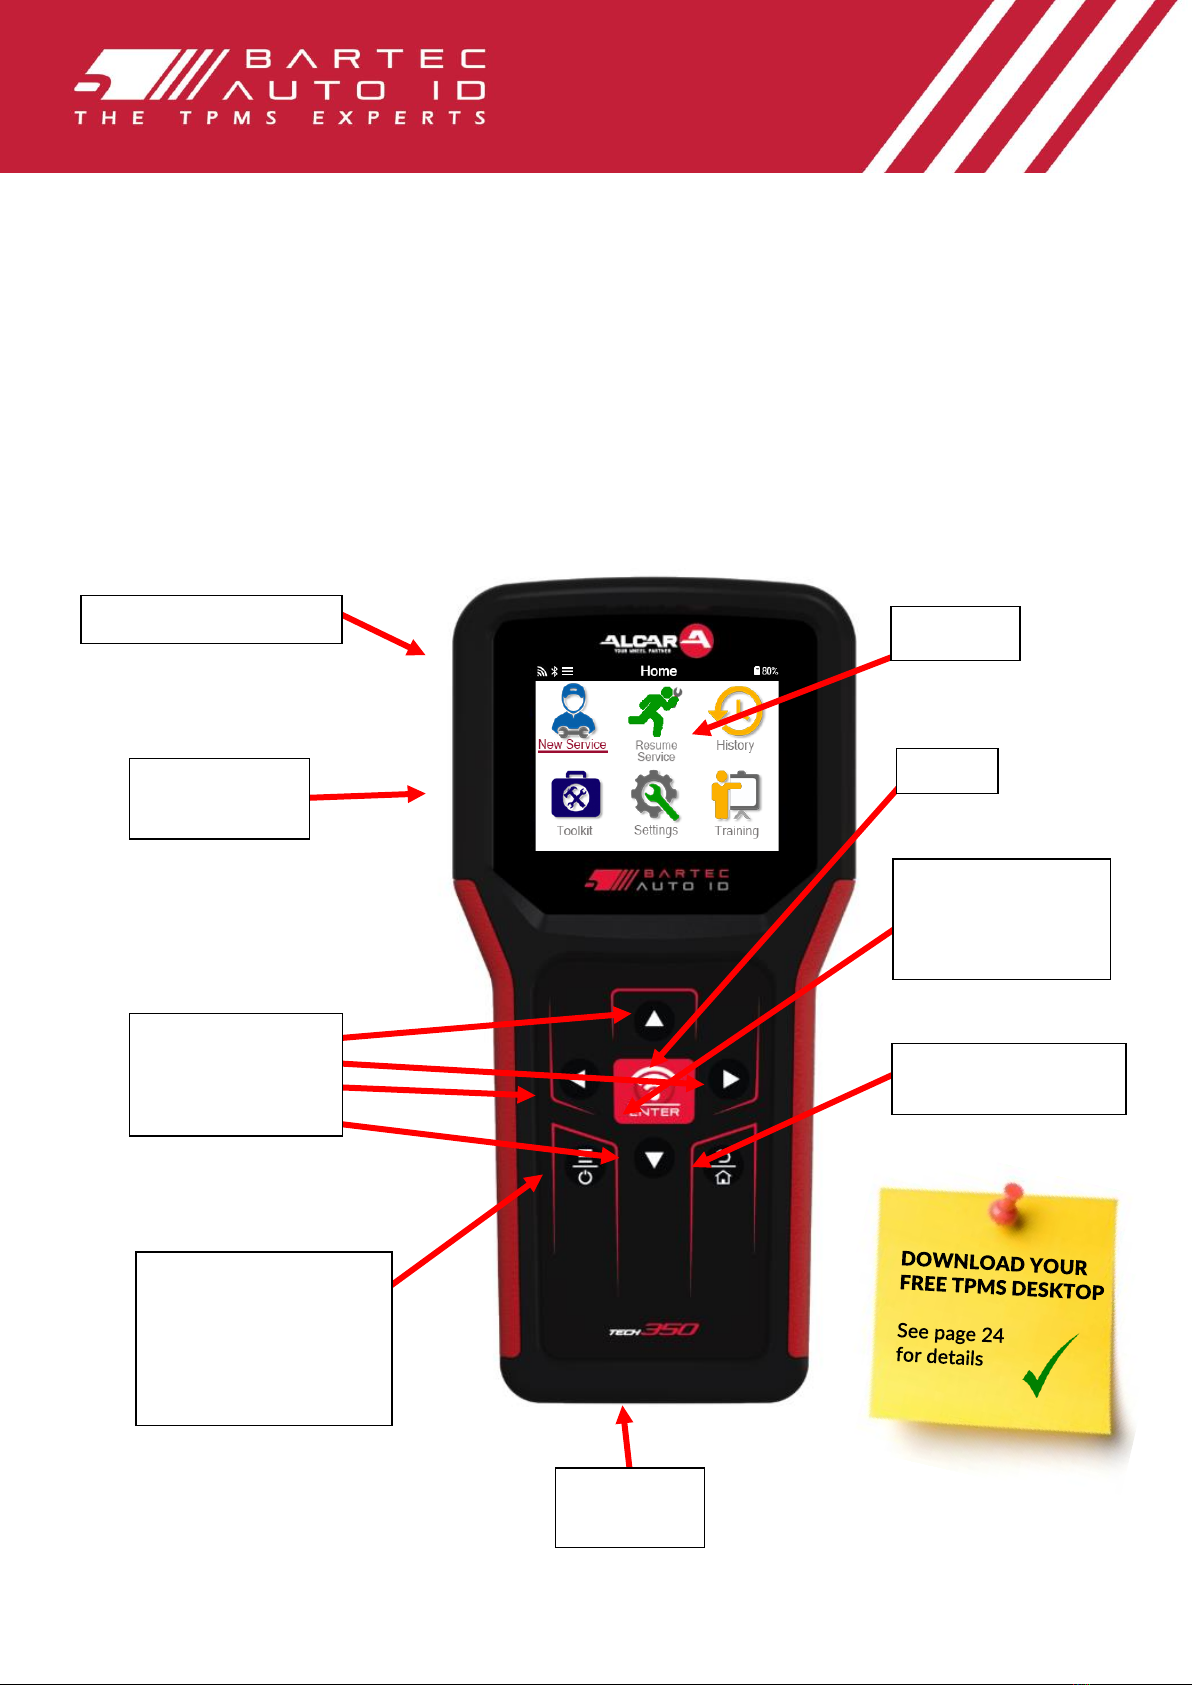
On/Off: hold down
for a few seconds
More information:
on some screens more
TPMS information can be
viewed
Rubber/Plastic case
USB C cable
connector
Up/Down/Left
/Right
Navigation
OBD
Socket
Enter
Home/Back/Esc:
returns to Home menu
Test:
commence a TPM
test, only works on
Vehicle Audit Screen
Display

TECH350 User Guide NOV 2021
2 |P a g e
FOREWORD
Thank you for choosing the TECH350. This manual will help you get your tool up &
running and explains how to get the most out of all its great features.
PLEASE ENSURE THAT YOUR TOOL IS FULLY CHARGED BEFORE YOU FIRST USE
IT AND BEFORE REGISTRATION.
If you need any further assistance, please visit the support pages on our website at
www.bartecautoid.com

TECH350 User Guide NOV 2021
3 |P a g e
LIST OF CONTENTS
FOREWORD ........................................................................................................... 2
LIST OF CONTENTS ............................................................................................... 3
IMPORTANT NOTICES ............................................................................................ 4
SAFETY PRECAUTIONS ........................................................................................... 5
BEFORE GETTING STARTED ................................................................................... 7
KIT COMPONENTS................................................................................................. 7
REGISTRATION....................................................................................................... 8
CHARGING TOOL................................................................................................. 11
POWER ON/OFF SEQUENCE ............................................................................. 11
HOME MENU ...................................................................................................... 12
MORE TPMS INFORMATION............................................................................... 13
SELECT AVEHICLE............................................................................................... 13
NEW SERVICE...................................................................................................... 14
1/6 CHECK SENSORS .......................................................................................... 15
2/6 PROGRAMMABLE SENSOR ............................................................................ 17
3/6 RELEARN ...................................................................................................... 18
4/6 OBD DIAGNOSTICS ..................................................................................... 20
5/6 TECHNICAL INFORMATION ........................................................................... 21
6/6 REVIEW VEHICLE DATA................................................................................ 22
SETTINGS............................................................................................................. 23
TPMS DESKTOP ................................................................................................. 24
REPORTS ............................................................................................................. 24
UPDATING THE TOOL VIA USB CABLE................................................................ 26
APPENDIX............................................................................................................ 27
TECHNICAL SPECIFICATION.................................................................................. 29

TECH350 User Guide NOV 2021
4 |P a g e
IMPORTANT NOTICES
SAFETY DEFINITIONS
All Danger, Warning, Important, and Note messages must be followed for your safety. These
safety messages are in the following form
DANGER: Means you may risk possible loss of life.
WARNING: Means you may risk possible bodily harm.
CAUTION: Means you risk damage to the vehicle or the tool.
These safety messages cover situations Bartec is aware of. Bartec cannot know, evaluate and
advise you as to all the possible hazards. You must be certain that any conditions or service
procedures encountered do not jeopardise your personal safety.
COPYRIGHT
No part of this manual may be reproduced, stored in a retrieval system or transmitted, in any
form or by any means, electronic, mechanical, photocopying, recording, or otherwise, without
the prior written permission of Bartec.
DISCLAIMER
All information, illustrations, and specifications contained in this technical instruction manual
are based on the latest information available at the time of publication. The right is reserved to
make changes at any time without obligation to notify any person or organization of such
revisions or changes. Further, Bartec shall not be liable for errors contained with the furnishing,
performance or use of this material.

TECH350 User Guide NOV 2021
5 |P a g e
SAFETY PRECAUTIONS
Read carefully the installation, operating and maintenance instructions in the Operator’s
manual.
Do not allow unqualified persons to use this equipment. This will prevent injury to persons and
damage to the equipment.
The work place must be dry, sufficiently lit and well ventilated.
Do not forget that breathing carbon monoxide (odourless) can be very dangerous and even
fatal.
WHEN WORKING ON THE VEHICLE:
•Wear suitable clothing and act in such a way as to prevent industrial accidents.
•Before starting, check to be certain the gear shift is in neutral (or in PARK (P) if the
transmission is automatic) and put the handbrake on and check to be sure the wheels
are completely locked.
•Do not smoke or use naked flames when working on a vehicle.
•Wear safety glasses to protect your eyes from dirt, dust or metal chips.
DISPOSING OF EQUIPMENT
•Do not dispose of this equipment as miscellaneous solid waste but arrange to have
collected separately.
•The re-use or correct recycling of electronic equipment (EEE) is important in order to
protect the environment and human health.
•In accordance with European Directive WEEE 2012/16/EU, special disposal points are
available for waste electrical and electronic equipment.
•Public administrators and producers of electrical and electronic equipment are involved
in facilitating the re-use and recovery of waste electrical and electronic equipment
through these collection activities and use of appropriate planning arrangements.
•Unauthorised disposal of waste electrical and electronic equipment is punishable by
law with appropriate penalties.
DISPOSING OF BATTERIES
•The TECH350 contains a Lithium Polymer rechargeable battery which is accessible to
the user.
WARNING
•Risk of fire or explosion if the battery is replaced by an incorrect type.
•Batteries must be recycled or disposed of properly. Do not throw batteries away as part
of normal refuse disposal.
•Do no throw batteries on to an open fire.
CORRECT USE OF THE TOOL
•Do not expose the tool to excessive moisture.
•Do not use the tool near sources of heat or polluting emissions (stoves, ovens, etc.).
•Do not drop the tool.
•Do not allow the tool to come into contact with water or other liquids.

TECH350 User Guide NOV 2021
6 |P a g e
•Do not open the tool or attempt to perform maintenance or repair operations on any
internal parts.
•You are advised to keep the packaging and to re-use it if the tool is moved to another
site.
WHEN USING THE TOOL REMEMBER:
•Do not subject the tool to magnetic or electric interference.
RECEPTION, MAINTENANCE AND GUARANTEE:
Inspect the tool when delivered. Damage sustained during shipment is not covered by the
guarantee. Bartec will accept no responsibility for material or bodily harm resulting from
inappropriate use of the product, failure to maintain it, or incorrect storage conditions.
Bartec provides training for clients desirous of acquiring the knowledge required for the correct
use of its products.
Only personnel authorized by Bartec are permitted to make any repairs that may be necessary.
This tool is guaranteed against any manufacturing fault for 12 months as of date of invoice
(parts and labour) only if product has been correctly used. Serial number must stay readable
and proof of purchase must be retained for presentation upon request.
Bartec Auto ID Ltd
Unit 9
Redbrook Business Park
Wilthorpe Road
Barnsley
S75 1JN
+44 (0) 1226 209226

TECH350 User Guide NOV 2021
7 |P a g e
BEFORE GETTING STARTED
1. Charging
NOTICE: Only use the power supply or USB cable that is included in the TECH350 tool kit to
charge this tool. The use of un-approved power supplies may damage it and will void the tool
warranty.
2. Registration
The Bartec TECH350 can be registered through the TPMS Desktop software, found at
www.tpmsdesktop.eu. This allows the user to update the tool to the latest software through
the method they prefer.
3. Update
Once the tool is registered through TPMS Desktop, verify the software level loaded to the level
available online and update the tool if necessary. Updating through the TPMS Desktop is
recommended.
4. Disconnecting from PC
NOTICE: Before disconnecting the tool from a PC, please ensure to “safely remove hardware”
first, by locating the “Safely Remove Hardware” icon on the lower right hand side of the PC
screen. This will prevent the data on the tool from being corrupted.
KIT COMPONENTS
The TECH350 kit inside the tool box includes:
•TECH350 TPMS activation tool
•OBD Cable
•USB cable
Identifying Kit Components and Features
The TECH350 tool is battery operated and generates a low-frequency magnetic field to
activate tyre sensors. It receives UHF radio signals from the tyre sensors typically at 434MHz.
USB Cable
OBD Cable
TPMS
activation
tool

TECH350 User Guide NOV 2021
8 |P a g e
REGISTRATION
Automatic registration takes place when the tool is first turned on. Registration enables the
notification of software updates and the ability to download update files to the tool. Once an
account has been made with TPMS Desktop, the tool will be registered to that account, and
the latest available updates will be downloaded.
To register a tool, navigate to the Bartec TPMS Desktop at tpmsdesktop.eu on your PC.
Download the TPMS Desktop software, and then install it using ‘setup.exe’. When the TPMS
Desktop has been load for the first time, the user will be presented with the following:
Screen when you first turned the
tool on.

TECH350 User Guide NOV 2021
9 |P a g e
Select ‘Register’ to create a new account. The following screen will be displayed:
It is important to fill in all fields completely and accurately. This information will help Bartec
remain in contact regarding updates and other important TPMS information. Choose a
username (without a space) and password.
If the details are accepted, this message will show:
The following email should arrive within a few minutes:
When clicking ‘Confirm account’ it will bring the user to the website and the following page
will show that the registration was successful. Return to the TPMS Desktop to login.

TECH350 User Guide NOV 2021
10 |P a g e
After Login, the main screen of the TPMS Deskop is displayed.
Connect the TECH350 to the computer. The TPMS Desktop will automatically register the
tool, and will display the message: “tool successfully registered”. The TPMS Desktop will
then check for any updates that can be applied to the tool. Alternatively, the user can
navigate to ‘Update’.
Once registered, the user will see the tool listed, along with a whether the tool is up to date:
Updating the TECH350 and keeping it up to date using the TPMS Desktop is recommended.

TECH350 User Guide NOV 2021
11 |P a g e
CHARGING TOOL
The TECH350 is shipped with a minimum charged battery. It is recommended that the tool is
charged 2+ hours before first use. For optimum performance, always keep it sufficiently
charged.
The TECH350 will notify the user when the battery has low power, and the battery icon will
change colour from white to red. When there is an insufficient amount of power remaining in
the battery, the TECH350 will save all of the TPM Data and then power itself off.
POWER ON/OFF SEQUENCE
Press and hold the power button for two seconds to power on the tool. To power off the
tool, press and hold the power button for three seconds.
Auto power off is after 10 minutes of inactivity. This can be changed in the Settings menu.
The unit automatically powers up when the charger or USB port is in use –auto power off is
not operational. The tool cannot be operated when plugged in.
TECH350 User Guide NOV 2021
12 |P a g e
HOME MENU
New Service
Used to check sensors, relearn sensors to the vehicle,
perform OBD diagnostic, program sensors, and
receive TPMS information
Resume Service
Used to resume your last job
History
Used to call up all stored works. User is able to search
by registration or model, and can also use this history
function to upload and clear Service Data.
Toolkit
Allows the user to test the signal strength of a keyfob
(RKE Test), and test the strength of a UHF signal (UHF
monitor).
Settings
Used to set up your personal settings in the tool –
language, units, auto off, sound, etc.
Training
Used to get tips related to TPMS
TECH350 User Guide NOV 2021
13 |P a g e
MORE TPMS INFORMATION
If you see this icon on the screen press for more TPMS information or TPMS
options.
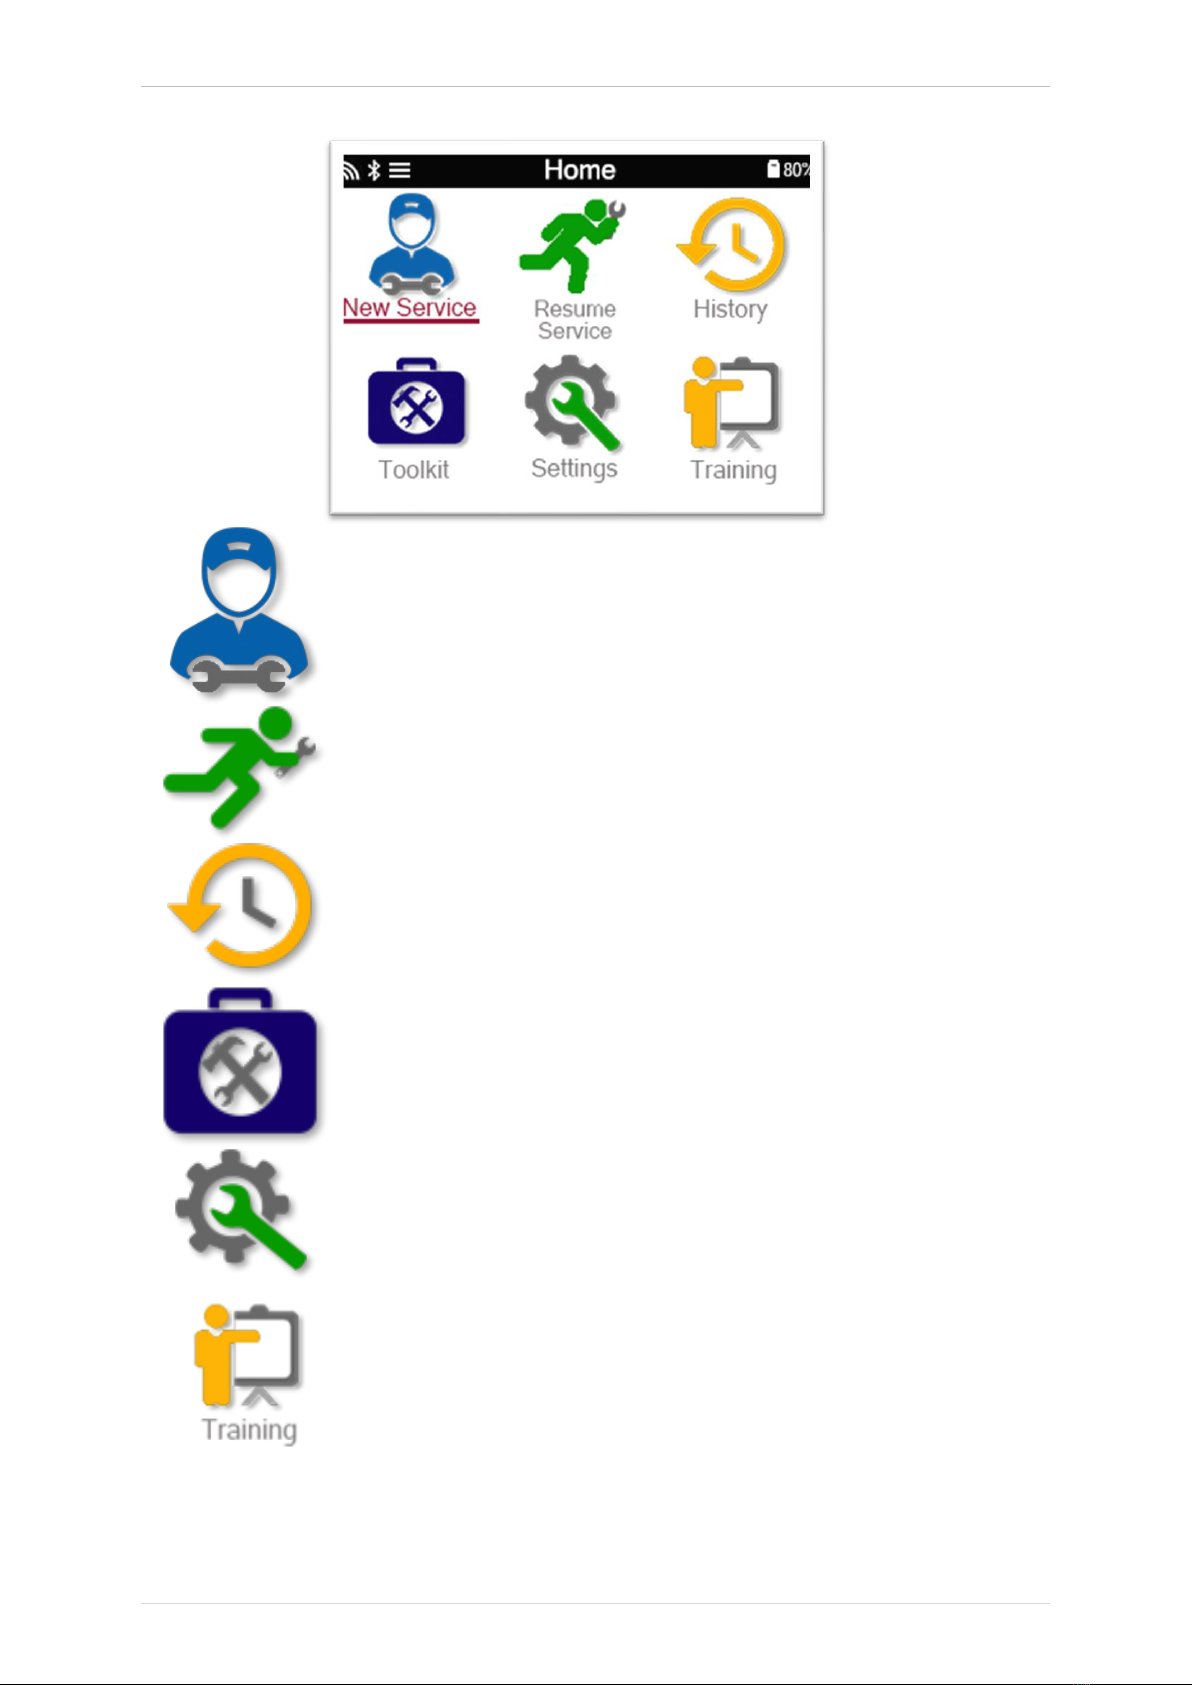
SELECT AVEHICLE
When starting a New Service, the user will be prompted to select the vehicle that
requires TPMS maintenance. Scroll through the menus to select the correct
manufacturer, model and year to see all available service functions.
TECH350 User Guide NOV 2021
14 |P a g e
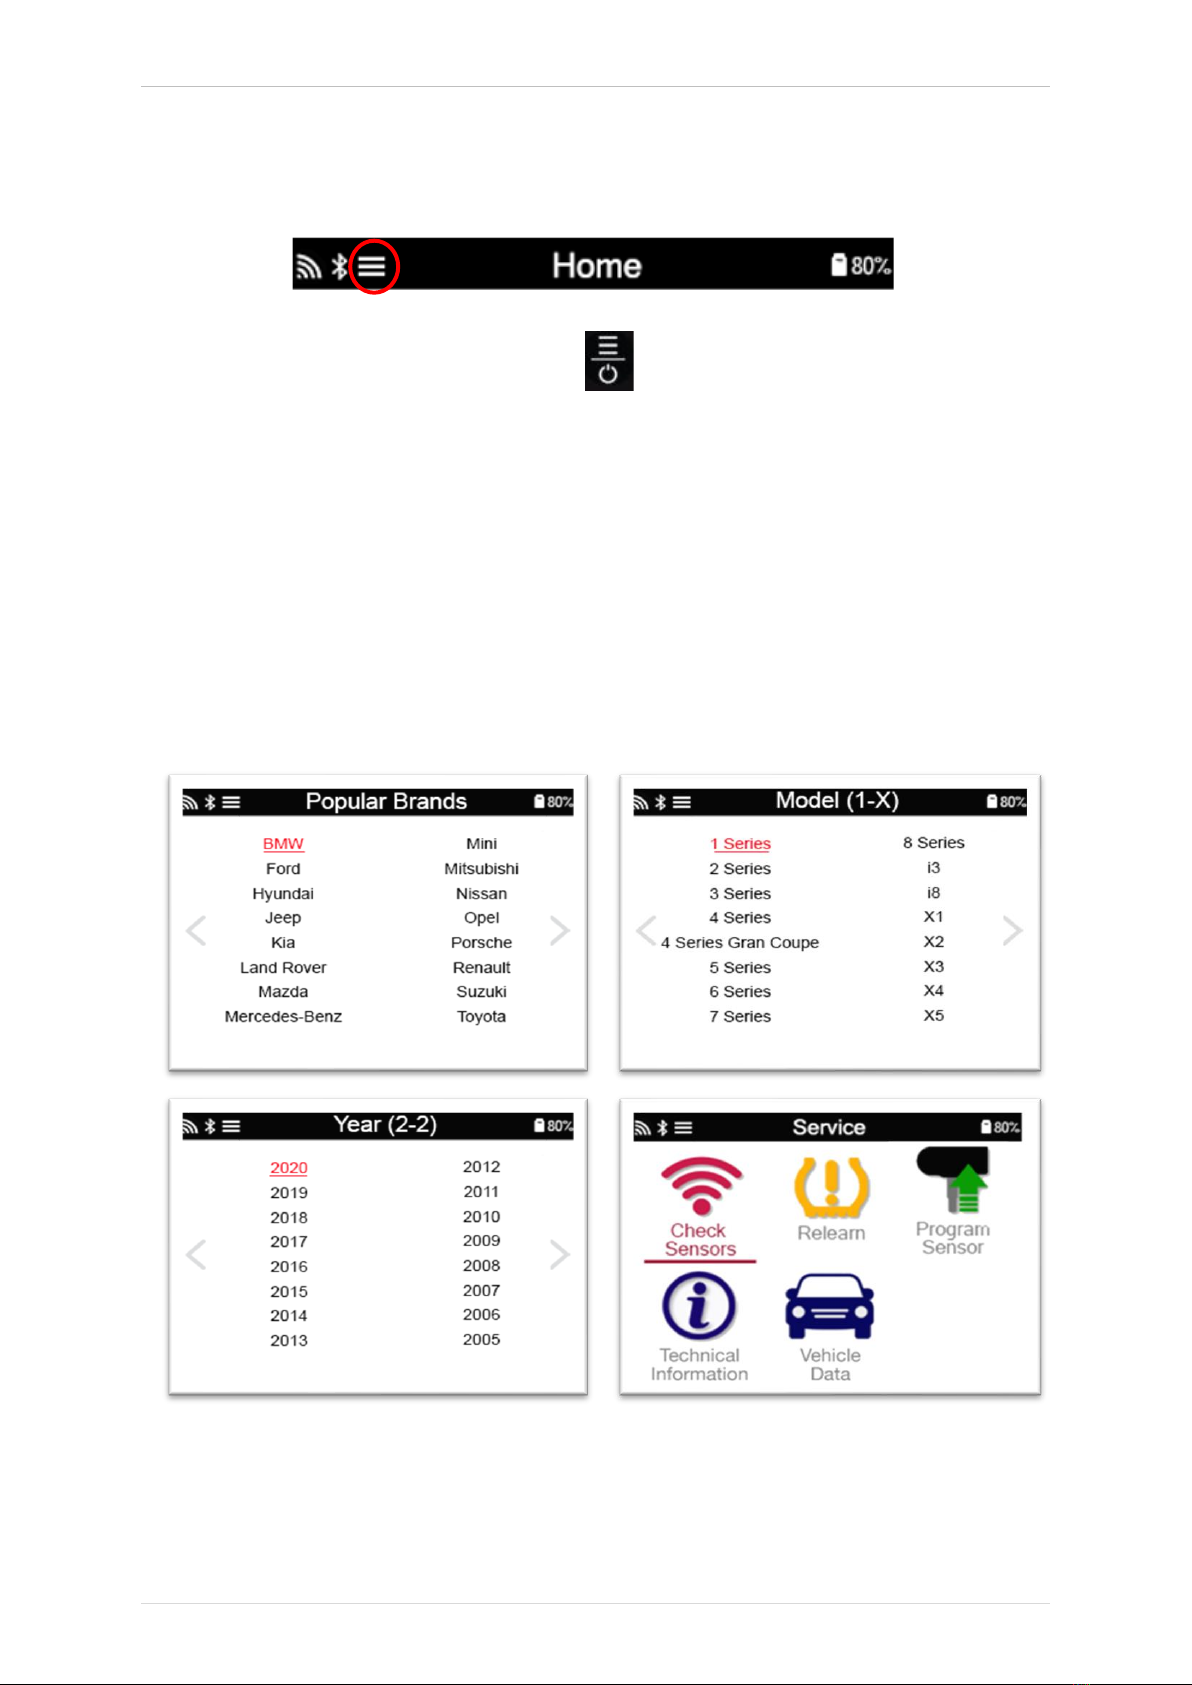
NEW SERVICE
Check Sensors
This uses a quick and easy to follow
process which allows the user to read
sensors, process the data, read battery
status & IDs.
Relearn
All relearn procedures are available
OBD Diagnostics
Used to diagnose vehicle problems, receive
sensor IDs and reads the vehicle VIN
Program Sensor
Create
Copy/clone ID (single)
Copy/clone ID (set)
Copy using stored data
Enter ID manually
Multiprogramming
Identify Universal sensor
Technical Information
Detailed sensor & service kits information
Vehicle Data
Allows the user to review the service data
captured with the TECH350
TECH350 User Guide NOV 2021
15 |P a g e
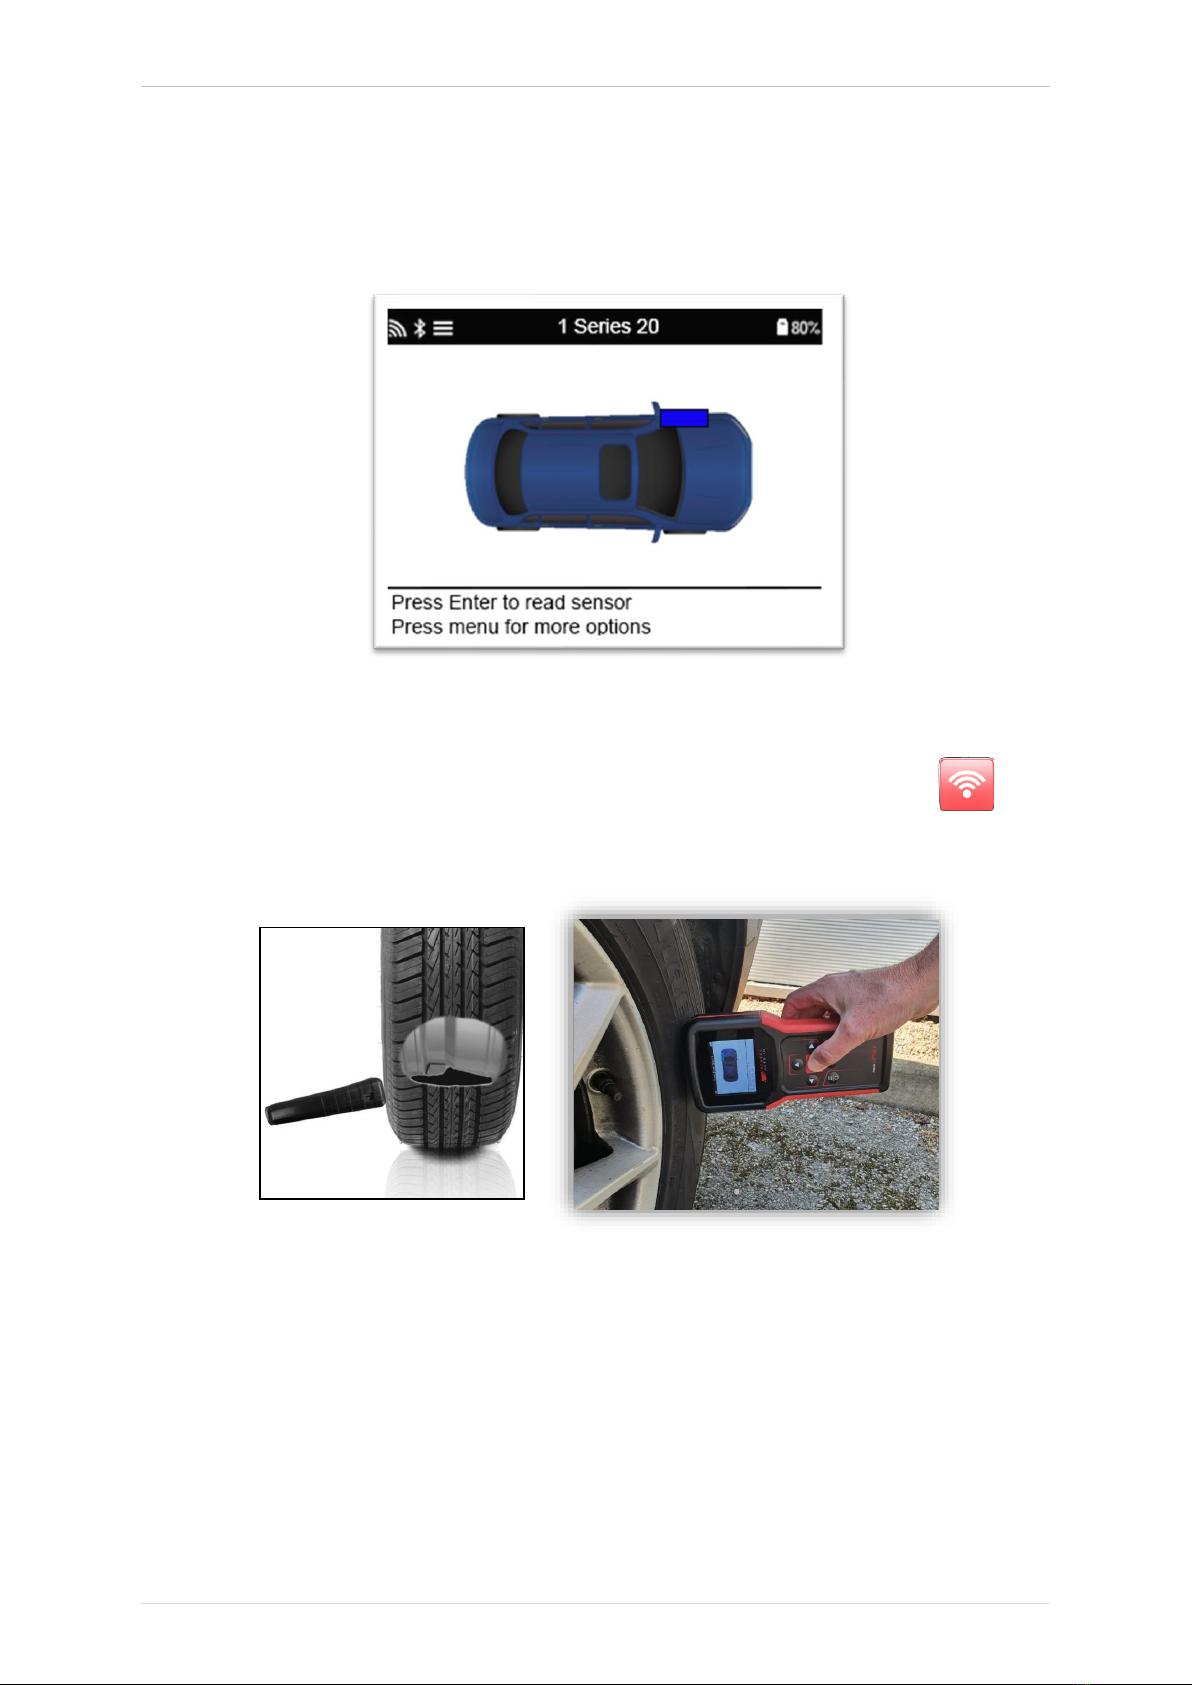
1/6 CHECK SENSORS
Use this function to test the fitted sensors before continuing with further steps.
To check the status of the TPMS sensors on the vehicle, select Check Sensors from the Service
Screen. A screen similar to the following should be displayed:
Use the arrow keys to select the sensor which needs to be read.
LF activated sensors
To test a sensor the tool should be placed alongside the valve stem and the ‘Test’ key
pressed.
Tool Positioning
Do NOT touch the metal rim. The tool needs to point through the rubber at the sensor.
(Note: with Ford Banded sensors the tool should be held 180°/opposite from the stem’s
position)
Non-LF activated sensors (some Beru sensors up to 2009)
If the tool requires rapid tyre deflation (of the order of 10psi or 0.5bar), then deflate the tyre
and place the tool alongside the stem while pressing the test key.
During testing, the screen confirms the sensor type being tested and displays a progress bar.
Different makes of Sensors respond at different speeds/ time intervals.

TECH350 User Guide NOV 2021
16 |P a g e
POSSIBLE READING SCENARIOS
Note that if a faulty Sensor has been replaced, some method of relearn procedure will need to
be followed, as explained later in this manual.
Successful Sensor Read
Sensor was successfully activated and
decoded. Displays pressure (in Bar or PSI) at
wheel location.
Failed Sensor Read
No Sensor Activation or Decode. May be wrong
sensor fitment or non-functioning sensor. Tool will
prompt to attempt reading the sensor 3 times.
Duplicate ID
A Sensor with a duplicate ID has been read. Tool will
direct to re-read those sensors.
Wrong Sensor Type
A Sensor was activated and decoded, but
does not match the protocol for the Make Model
Year that the tool was set-up for.
No Pressure
Low Sensor Battery
Sensor’s internal battery has dropped below a
certain voltage threshold.
TECH350 User Guide NOV 2021
17 |P a g e
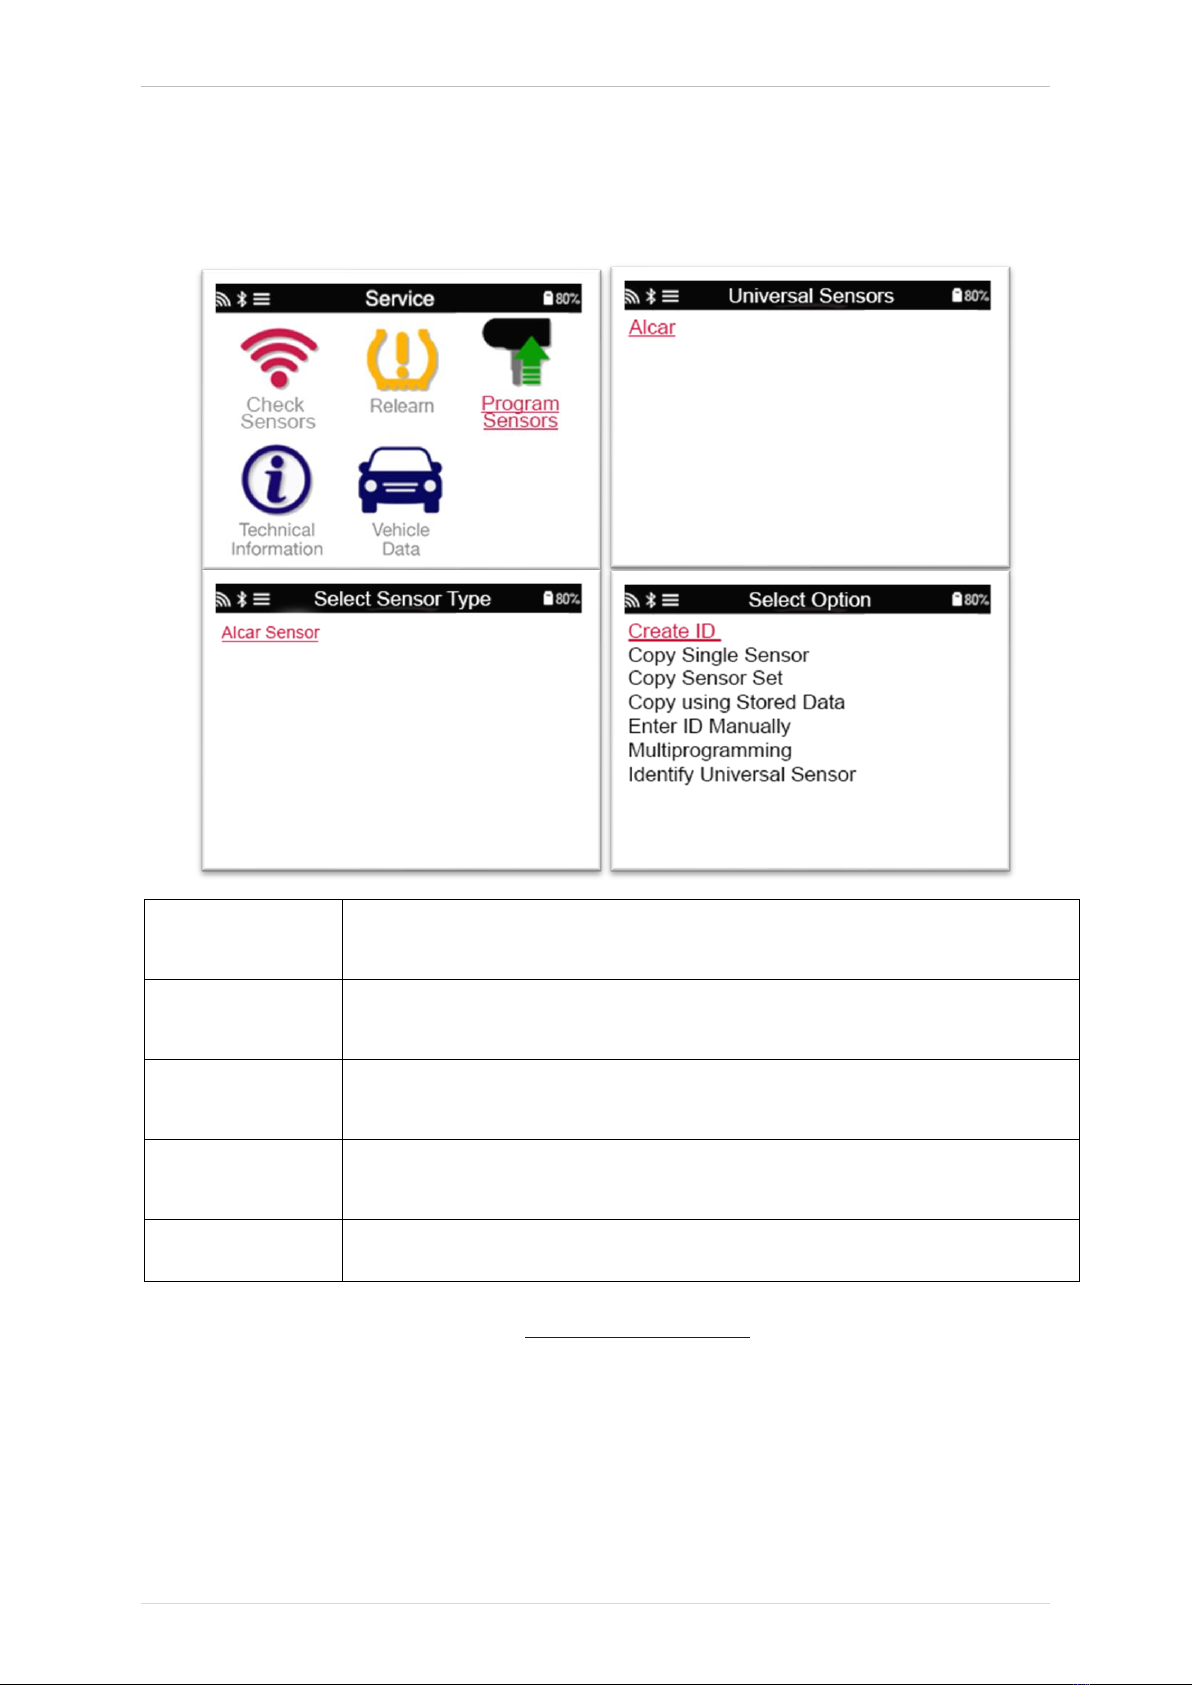
2/6 PROGRAMMABLE SENSOR
The “Program Sensors” on the service menu enables the function of programming aftermarket
replacement sensors like the HUF IntelliSens, Alcar Sensors, Alligator sens.it or the Schrader
EZ-sensor. Even when they are already mounted in a wheel or programmed to another vehicle.
The user can choose from a selection of sensors which match the preselected MMY.
Copy Sensor Set
Used to Copy/Clone a winter tyre set with the same ID´s as the summer
tyre set. Requires the reading of the old sensor to program the same ID on
the replacement sensor to avoid the relearning process.
Create ID
Used to create a single sensor with a new ID. Can be repeated as many
times as requested. The ID needs to be relearned to the vehicle’s ECU. The
following pages will describe this procedure.
Copy/Clone ID
Used to Copy/Clone a single ID. Can be repeated as many times as
requested. Requires the reading of the old sensor to program the same ID
on the replacement sensor to avoid the relearning process.
Enter ID Manually
Used to create a Sensor with a new ID that can be typed in manually. This
option only appears for some sensors. If it is not possible to copy the ID,
enter the same ID manually, which is written on the sensors body.
Copy Using
stored data
Gives you the option of using stored IDs either read from the TPMS sensors
or from the vehicle OBD
The current coverage list is available at www.bartecautoid.com
The user has the option to either create or copy the ID.
Notice: Sensors need to be read before copying.
Sensors that can be programmed by the tool may have slightly different procedures and times.
TECH350 User Guide NOV 2021
18 |P a g e
Recommended sensor position for programming:
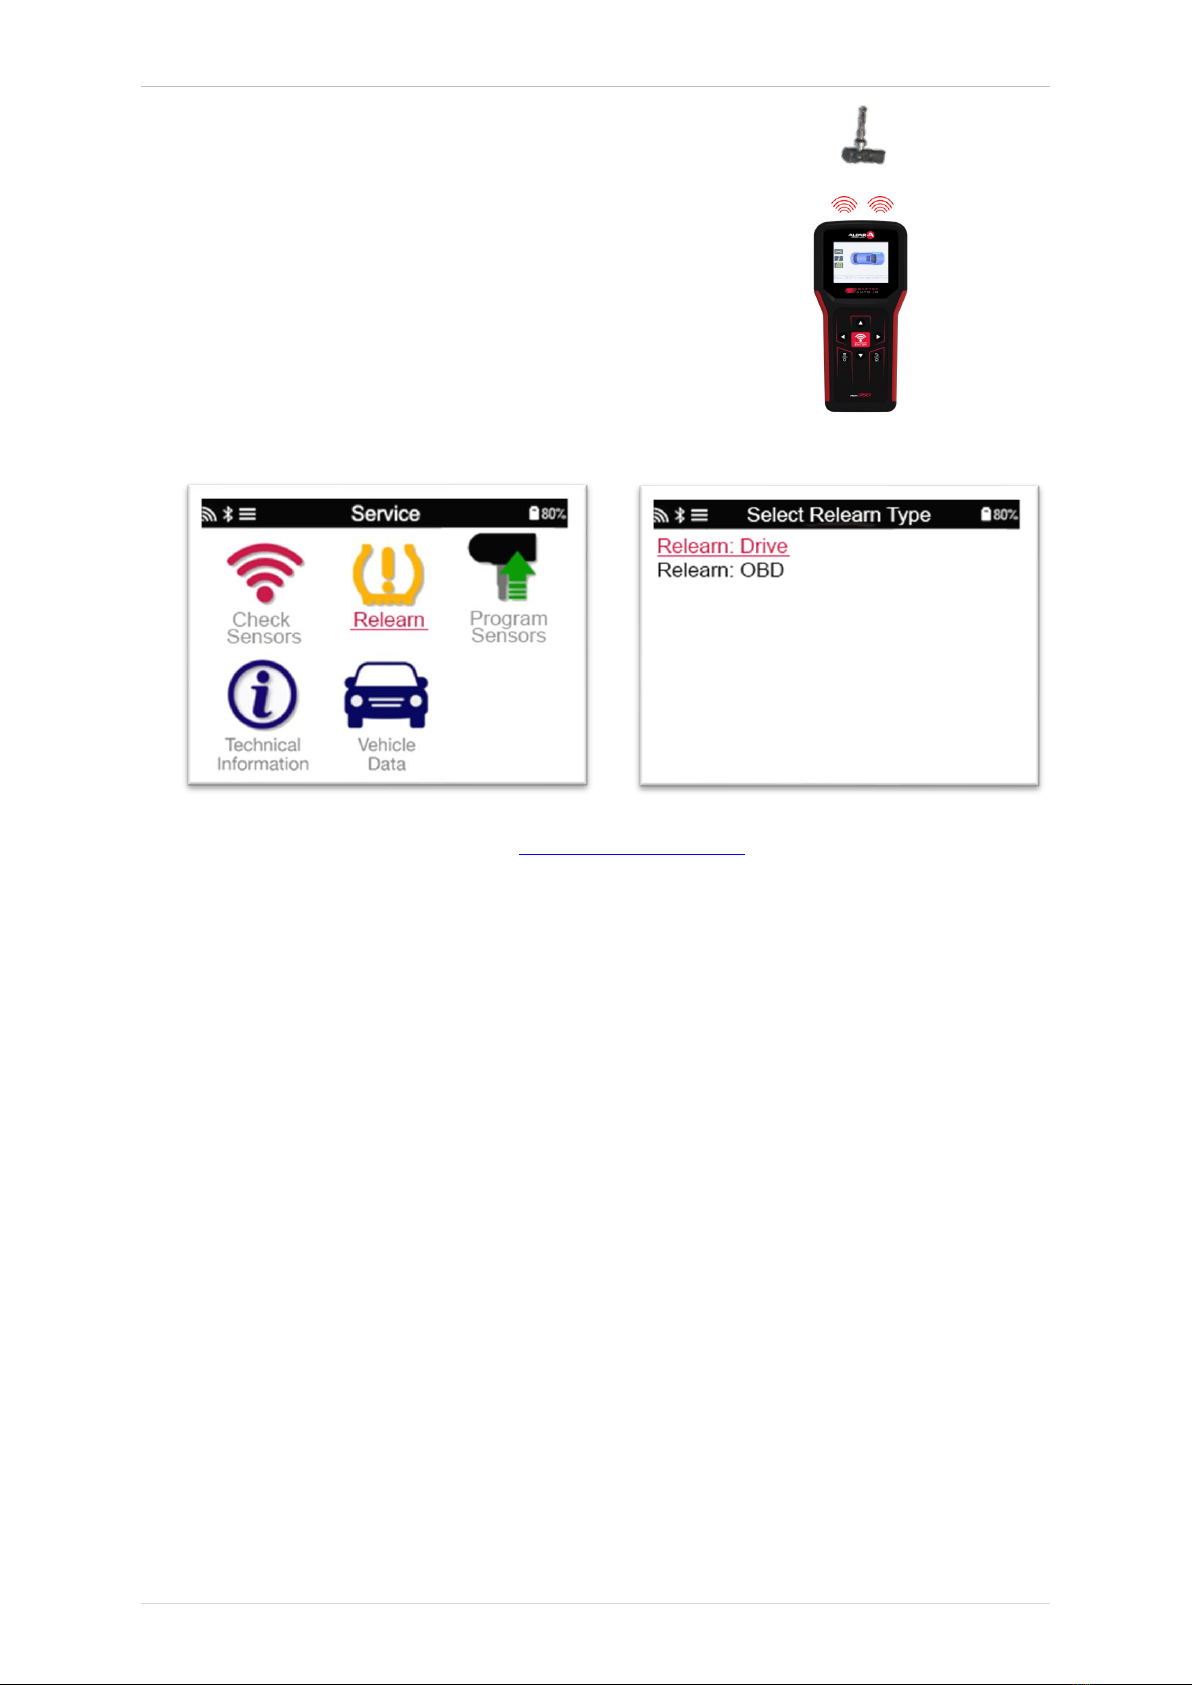
3/6 RELEARN
To find out which relearn type is available for a vehicle, just turn on the tool and select Relearn.
Or refer to the current coverage list at www.bartecautoid.com > Downloads.
Stationary Relearns:
Stationary Relearns use the vehicles on-board TPMS system to listen for transmissions from
sensors while the vehicle is in a “Learn Mode”.
Once the vehicle is in Learn Mode, use the tool to activate the sensors. The vehicle will listen
for the sensor IDs and learn them to the vehicle.
Active (Drive) Relearns:
Some vehicles can be reset by driving. Refer to the on-screen relearn procedures for details on
how far/long to drive. It can take up to 20 minutes to relearn the sensor IDs.
OBD Relearns:
OBD connection allows the TECH350 to directly program the vehicle electronics module with
sensor IDs.
Note that not all vehicles support vehicle communications modes.
OBD can be connected when all sensors are successfully read and the message “All Sensors
OK” is displayed.
Please use the “Technical Information” menu and select “View Vehicle Info” to find the OBD
location.
Relearn Information:
This contains extra information about the relearn for the selected vehicle, which can assist you
if you have any problems. An example would be for some Toyota and Lexus vehicles which use
a summer and winter tyre set.
After selecting a Relearn method, follow the instructions given by the tool to relearn Sensors.

TECH350 User Guide NOV 2021
19 |P a g e
As well as the pressure and temperature, we also display the “mode” of the sensor. In some
cases the mode cannot be changed and isn’t important, but in some cases it will need to be
changed in order for the relearn to work.
For example if sensors for a vehicle show “Park” or “Drive” they are already in the correct mode.
Otherwise use the “Mode Change” command in the Quick Access Menu. If the sensors are
shown as Ship, Off or Test mode, put them in Park mode, using the “Mode Change” command
in the Quick Access Menu
Press the to access the Quick Access Menu and see the options available for the vehicle
requiring a Relearn. Options that are not required on a vehicle will not be displayed.
Special service advice for Toyota Models:
Toyota ECU
Reset
If at any time the vehicle TPMS Reset button is pressed with the new
sensor IDs fitted, the ECU OBD relearn will not work until the Toyota
ECU Reset is selected (with the tool connected to OBD). The TPMS
Reset button should only be used to set new tyre pressures, and on
some vehicles to change between winter and summer ID sets.
Special service advice for Kia and Hyundai Models:
•Reset YD Sensor
For some Kia and Hyundai vehicles with the newer low line TRW YD
sensors, this allows you to put the sensors back into the correct mode
(Sleep or Rest) to work with the vehicle.
Selected tyre.
Processing order:
Left Front,
Right Front,
Right Rear,
Left Rear

TECH350 User Guide NOV 2021
20 |P a g e
These specific Service advices will only appear if applicable for the preselected Make,
Model and Year combination.
4/6 OBD DIAGNOSTICS
OBD
Diagnostics
This option will only be
listed for vehicles that
Bartec has OBD
coverage for. It reads
information from the
vehicle such as the VIN,
DTCs (Diagnostic
Trouble Codes) and the
IDs of the sensors.
Table of contents
Other Bartec Auto ID Measuring Instrument manuals


Popular Measuring Instrument manuals by other brands


Davis Instruments
Davis Instruments Electronic Rain Counter instruction manual

Trotec
Trotec OZ-ONE operating manual

EIT
EIT Bactiscope user manual

Endress+Hauser
Endress+Hauser Liquiphant M operating instructions

Maxwell Digital Multimeters
Maxwell Digital Multimeters 25611 user manual

Precision Digital Corporation
Precision Digital Corporation PD6060 instruction manual


