Baruffaldi TOEM 120 Guide

Pagina N°.
Page Nr.
Edizione
Edition
S.p.A 11-93
Pagina N°.
Page Nr.
Edizione
Edition
S.p.A 11-93
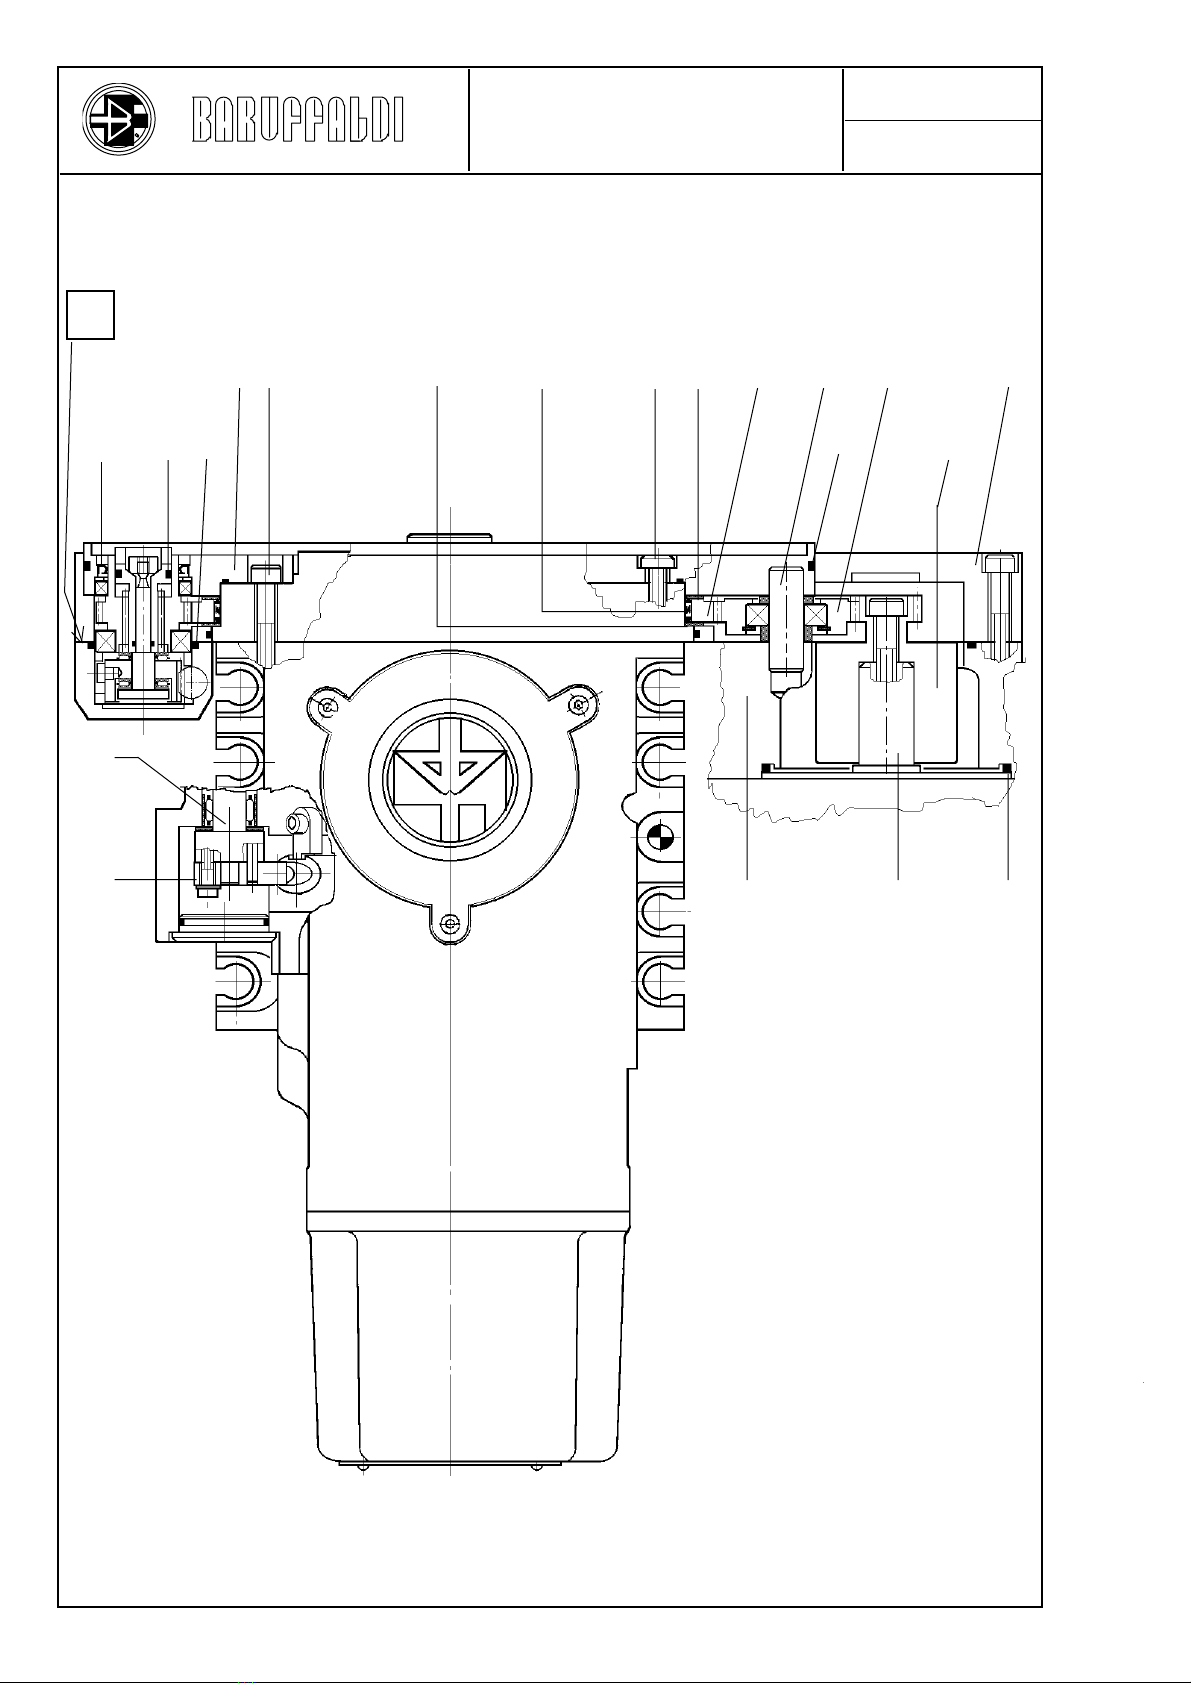
ASSEMBLY DRAWING
(section view)
18
733
705
717
718
722
709
744
M
716
704
720
728
727
720a
728
743
722
742
740
741
Y

Pagina N°.
Page Nr.
Edizione
Edition
S.p.A 11-93
19
700
707 712 707
for TOEM
120 - 160
S
714
709
713
707
711
714
708
730
706
701
702
710 731
709
for TOEM
200 - 250
X
E
731
707a
( __ __ )
715
745
703
710
L
ASSEMBLY DRAWING
(section view)

Pagina N°.
Page Nr.
Edizione
Edition
S.p.A 11-93
20
- Set out the turret in open position (unlocked)
- Remove the screws 714 and 715
- Remove all the support ( S ) complete of gear 712, (to facilitate the removing of this last, hit the ends ( E )
with a plastic hammer).
- Remove the supplementary motor ( M )
- Take off the toolholders disk
- Disassemble the flange 716
- Extract the pin 717 and the idle gear 718
- Take off the dowels 719 and the screws 720 & 720a
- Extract the plate unit 721 and the counterplate 722
- Take off the dowels 723 and the screws 724
- Separate the plate 721 from the counterplate 722
- Remove the central gear 705 complete of bearing 727 and thrust blocks 728
- If the disassembly of the components inserted in the support ( S ) is required:
extract the lock pin 713, remove the gear 712 complete of coupling 708, reel 706, lead nut 730 and pins 707
or 707a
- To disassemble the rack 711 the cover 731, and the levers 709 & 710 must be removed.
WHENREASSEMBLINGEVERYTHING
Oil all the retaining rings (O-Rings etc.) with grease, brake all the screws with "Loctite" and lubricate all the
mechanical components; beside it, for what the assembly of the elements belonging to the support unit ( S ) is
concerned, follow the following instructions:
- Insert the rack 711 complete of springs and containers 701 in the seat L; by using a small pin (as on table page
21) and with a suitable manual press compress the spring 702 with value (C) (see page 21); in this condition it must
be inserted the unit ( I ), composed by the gear 712, by the reel 706, by the lead nut 730 and by the pins 707, in the
seat in such a way that the tooth ( D ) of the reel 706 fit the space ( V ) of the rack 711 and that the slot ( A ) is in
correspondence with the hole ( F ).
Insert the lock pin 713 in the seat ( A ).
Eliminate the press action.
Push the gear 712 towards the bottom of the seat ( Z ) in such a way that the lead nut 730 goes in the ledge.
In this condition, the extremity (E) of the coupling 708 must be on line with the extremity ( E ) of the gear 712; if this
does not happen, the reason is caused by the insertion of the tooth ( D ) of the reel 706 in the wrong space of the
rack 711; in this case the assembly of these elements must be made again .
Reassemble the lever 710 on the pin 733, with the marks ( __ __ ) aligned, (see picture page 19)
During the assembly phase of the support ( S ) on the turret, the screws 714 and 715 must be alternately screwed
in such a way to determine the support on the 2 tables (X) & (Y) (see picture on page 18).
TURRET DISASSEMBLY
(Related to the toolholders
rotation)

Pagina N°.
Page Nr.
Edizione
Edition
S.p.A 11-93
B
702
F
Surfaces on contact
GROUP ( I )
Turret
size
TOEM 120
TOEM 160
TOEM 200
TOEM 250
C
(mm)
V
Assembly group ( I ) before
inserting in support ( S )
S
D
Press action
Z
706
21
B
(mm)
711
L
24
24
24
24
3,5
3,5
4
4
Extremity (E)
clutch (708)
and
extremity (E)
gear (712)
on line
Slot ( A ) for
locking pino
(on line with
hole F)
TURRET DISASSEMBLY
(Related to the toolholders
rotation)
C
This manual suits for next models
3
Table of contents
Other Baruffaldi Industrial Equipment manuals


