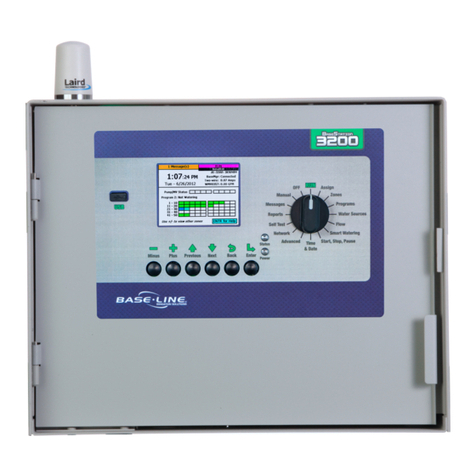
Base Line BaseStation 3200 Operating and maintenance instructions

BaseStation
3200
Advanced
Irrigation
Controller
Quick Start Guide
August 6, 2018
Customer Service 1-866-294-5847

Baseline Inc.
www.baselinesystems.com
Phone 208-323-1634
FAX 208-323-1834
Toll Free 866-294-5847
©2018 Baseline Inc. All Rights Reserved.

Page i
Contents
INTRODUCTION................................................................................................................................................1
SMART WATERING MODES..........................................................................................................................1
Soil Moisture Sensor-Based Watering ................................................................................ 1
Weather-Based Watering.................................................................................................. 1
CONTROLLER FRONT PANEL LAYOUT.....................................................................................................2
RUN MAIN SCREEN ..........................................................................................................................................3
DETAILED STATUS BY PROGRAM SCREEN.............................................................................................3
WATER SOURCE STATUS SCREEN..............................................................................................................4
CONTROL POINT STATUS SCREEN ............................................................................................................5
MAINLINE STATUS SCREEN..........................................................................................................................5
STATUS COLORS...............................................................................................................................................6
ONLINE HELP.....................................................................................................................................................6
QUICK START YOUR CONTROLLER...........................................................................................................7
STEP 1 – Install and Connect Devices ................................................................................. 7
STEP 2 – Set the Date and Time on the Controller .............................................................. 7
STEP 3 – Search For and Assign Devices ............................................................................. 7
Searching For Devices............................................................................................................7
STEP 4 – Set Up Time-based Watering ............................................................................... 8
STEP 5 – Set Up Programs ................................................................................................. 9
Setting Up the Start Times for a Program .............................................................................9
Setting Up the Start Days for a Program ............................................................................ 10
Setting Up the Water Windows for a Program .................................................................. 10
STEP 6 – Set the Controller to RUN .................................................................................. 12
Forcing a Program to Start.................................................................................................. 12


BaseStation 3200 Quick Start Guide
Page 1
Introduction
Congratulations on choosing the most capable commercial grade smart irrigation controller in the
world! You will find that the BaseStation 3200 is capable of dramatically reducing your water use
while improving the health and quality of your landscape. Fully central control compatible, the
BaseStation 3200 controller will typically pay for itself in one to two seasons based on water waste
reduction alone.
This quick start guide helps you get familiar with the BaseStation 3200 interface, the dial positions,
and the buttons on the front panel. It walks you through the basic steps for getting your controller
configured for watering. Keep in mind that this guide is intended as a basic overview of the setup.
You will find complete instructions for all of the controller’s features in the User Manual.
Smart Watering Modes
In addition to time-based watering, the BaseStation 3200 can also be operated in the following
smart watering modes:
Soil Moisture Sensor-Based Watering
If you have a Baseline soil moisture sensor (biSensor™) installed in your landscaping and connected
to your BaseStation 3200 irrigation controller, you can program the controller to water based on
the moisture levels in the soil.
Refer to the following documents on the Baseline website (www.baselinesystems.com):
Configuring Lower Threshold Moisture Sensor-Based Watering in the BaseStation 3200
Configuring Upper Threshold Moisture Sensor-Based Watering in the BaseStation 3200
Weather-Based Watering
When operated in conjunction with BaseManager™ Plus and WeatherAccess™, the BaseStation
3200 irrigation controller meets the EPA WaterSense program's water-efficiency and performance
criteria.
You need to have your BaseStation 3200 controller installed and connected to your communication
module, and your BaseManager Plus account activated before you can configure the
WeatherAccess settings.
Refer to the following document on the Baseline website (www.baselinesystems.com):
WeatherAccess User Manual
On the BaseStation 3200, you can combine Baseline’s soil moisture sensor-based intelligent
watering technology with the industry’s best practices for weather-based irrigation.

BaseStation 3200 Quick Start Guide
Page 2
Controller Front Panel Layout
(1) USB Port – The USB port is
used for doing Backup and
Restore operations using a USB
drive (also known as a “thumb
drive” or a “flash drive”). The
USB port is also used for doing
firmware updates and
exporting operation log files.
(2) Display – The color display
indicates the current state of
the controller and is used to
display programming. This
display uses thin-film transistor
(TFT) technology to improve
image quality in outdoor
conditions including direct
sunlight and low light.
(3) Dial – The dial is used to select the operation or programming mode of the controller.
(4) Buttons – The buttons are used to select programming elements, change their values, and
initiate operations like testing a zone.
+
Increases the value of the highlighted field or sequences through the available
options in the selected field
–
Decreases the value of the selected field, or sequences through the available
options in the selected field
Next
Moves the highlighted selection to the next field on the display
Previous
Moves the highlighted selection to the previously selected field on the display
Back
Moves back to the previous menu and can sometimes be used to stop an
operation
Enter
Applies the current selection and moves to the next item, or begins the operation
(5) Status LEDs – These two LEDs indicate the power status of the controller and the internal status
of the controller hardware. The upper light is normally ON, but it may blink when internal
diagnostics are run.

BaseStation 3200 Quick Start Guide
Page 3
RUN Main Screen
When the controller dial is in the RUN position, the main screen displays the Zone Status report.
Detailed Status by Program Screen
When the controller dial is in the RUN position and the main Zone Status screen is displayed, press
the Next button twice to display the Detailed Status By Program screen.
Press the + or – button to cycle through the controller’s programs.
The colored box on the left indicates the program status. Refer to the Status Colors topic on page 6
for an explanation of the colors.
The following information is available in the fields:
Last Start: The date and time when the program was
started for any condition including manual starts. The
field also indicates what caused the last start.
Last Pause: The date and time of the most recent
pause. The pause information shows until the program
is started again. The field also indicates what caused
the last pause.
Last Stop: The date and time when the program last completed watering. When a program is
watering, this field is blank. The field also indicates what caused the last stop.

BaseStation 3200 Quick Start Guide
Page 4
Next Start: The estimated next start date and time for the program. In some cases, the start
condition for a program makes it difficult to accurately estimate when the next start will occur.
Consider the information in this field as helpful, but remember that it might not be perfectly
accurate depending on the program settings.
Avg Time: An average of the last 3 runtimes.
Avg Water: An average of the amount of water used during the last 3 runtimes.
If you leave the Detailed Status By Program screen displayed, it will continue to display when the
controller dial is in the RUN position until the controller is reset. At that point, the Zone Status
screen redisplays.
When the Detailed Status By Program screen is displayed, press the Previous button to return to
the All Zones & Programs Status screen, or press the Next button to go to the Water Source Status
screen.
Water Source Status Screen
When the controller dial is in the RUN position and the main Zone Status screen is displayed, press
the Next button three times to display the Water Source Status screen.
Press the + or – button to cycle through the water sources on the controller.
The colored box on the left indicates the water source status. Refer to the Status Colors topic on
page 6 for an explanation of the colors.
The following information is available in the fields:
Month Used: The cumulative total used from this
water source during the month.
Budget: The amount of water that can be taken from
this water source during the month.
Empty: If an empty condition has been set up for this
water source, this field shows OK or EM for empty. If
no empty condition exists, the field shows DS for
disabled.
Flow Path: This field shows the control point and mainline that are connected to this water source.
When the Water Source Status screen is displayed, press the Previous button three times to return
to the Zone Status screen, or press the Next button to go to the Control Point Status screen.

BaseStation 3200 Quick Start Guide
Page 5
Control Point Status Screen
When the controller dial is in the RUN position and the main Zone Status screen is displayed, press
the Next button four times to display the Control Point Status screen.
Press the + or – button to cycle through the control points on the controller.
The colored box on the left indicates the control point status. Refer to the Status Colors topic on
page 6 for an explanation of the colors.
The following information is available in the fields:
MV: The status of the master valve associated with
this control point.
Flow: The status of water flowing through this
control point.
Pump: If the control point has an assigned pump,
this field shows the status. If no pump is assigned,
the field shows None.
Pressure: If the control point has an assigned
pressure sensor, this field shows the status. If no pressure sensor is assigned, the field shows None.
Month Used: The cumulative total used from this control point during the month.
Flow Path: This field shows the water source and mainline that are connected to this control point.
When the Control Point Status screen is displayed, press the Previous button four times to return
to the Zone Status screen, or press the Next button to go to the Mainline Status screen.
Mainline Status Screen
When the controller dial is in the RUN position and the main Zone Status screen is displayed, press
the Next button five times to display the Mainline Status screen.
Press the + or – button to cycle through the mainlines on the controller.
The colored box on the left indicates the mainline
status. Refer to the Status Colors topic on page 6 for
an explanation of the colors.
The following information is available in the fields:
Zones On: The zones that are associated with this
mainline.
CPs On: The control points that are associated with
this mainline.

BaseStation 3200 Quick Start Guide
Page 6
Flow: The amount of water in this mainline.
Month Used: The cumulative total used from this mainline during the month.
Flow Path: This field shows the mainline connections.
When the Mainline Status screen is displayed, press the Next button to return to the Zone Status
screen.
Status Colors
The following colors display on the RUN screen to indicate the status of programs, master valves,
flow meters, and zones.
Idle (watering done)
Disabled
Active (watering)
Paused
Waiting to water
Error, Over Budget, Flow/Pressure Faults
Soaking
Unassigned
Learn Flow
Off, Rain Delay, Rain jumper activated
Online Help
At the bottom of every screen, there is a Help option
that displays the Online Help. The Online Help
describes how to use the buttons to change the
functions associated with that screen.
To display the help, press the Next or Previous
button to highlight the Help option at the bottom of
a screen, and then press the Enter button.
Press the Next button to move through the pages of
the Online Help.
Press the Previous button to back up.
Press the Back button to return to the controller screen.
The help can be displayed in Spanish. Refer to Selecting the Language for Online Help in the User
Manual.

BaseStation 3200 Quick Start Guide
Page 7
Quick Start Your Controller
These instructions walk you through the basic steps for getting your controller configured for
watering. Refer to the User Manual for complete instructions for all of the controller’s features.
STEP 1 – Install and Connect Devices
Install all of your irrigation devices and connect them to the controller according to the instructions
that came with the devices.
STEP 2 – Set the Date and Time on the Controller
Set or change the controller date and time to match the current time and date. An inaccurate date
and time can cause watering events to be missed.
Note: When the controller is connected to BaseManager, the date and time are automatically set.
1. Turn the dial to the Time & Date position.
2. In the Time field, the hours place is
highlighted.
3. Press the +or –button to change the value.
4. Press the Next button to move to the minutes
place, and then press the +or –button to
change the value.
5. Press Next to continue moving through the
fields, and then press the +or –button to
change the value.
Note: If you made a change to the time or date and you want to revert to the previous
entries, press the Back button.
STEP 3 – Search For and Assign Devices
Searching For Devices
1. Turn the dial to the Assign position.
2. Press the Next or Previous button to move to
the option for the type of device that you
want to search for, and then press the Enter
button.
3. Press the +or –button to select Search in the
left column of the Assign screen.
4. Press the Enter button to search for devices.
The search may take several minutes to
complete. You will see a status screen like the one shown here while the search is in progress.

BaseStation 3200 Quick Start Guide
Page 8
The display shows the number of devices found and the number of ports or addresses
available.
Note: To cancel a search in progress, press the Back button.
5. After the search has finished and the device
serial numbers display in the left column,
press the +or –button to select any
unassigned device serial number.
6. Press the Next or Previous button to move to
the Assignments column and select an
available number.
7. Press the Enter button to assign the selected
device to that number.
8. When you have finished making changes, turn
the dial to the RUN position.
STEP 4 – Set Up Time-based Watering
IMPORTANT NOTE!Zones that are intended for irrigation will not water until they are assigned to
their appropriate mainlines. Refer to Assigning Zones to Mainlines in the User Manual.
1. Turn the dial to the Zones position. The Zones screen displays for the first zone.
2. In the Zone field, press the +or –button to
select the zone that you want to set up as
timed.
3. Press the Next button to move to the Zone
Mode field, and then press the +or –button
until Timed displays in the field.
4. Press the Next button to move to the Water
Time field.
To change the value in the hours place,
press the +button.
To change the value in the minutes place, press the Next button, and then press the +or
–button.
Tip: Let the controller calculate the cycle time and soak time settings for you. Press the Next
button to move to the minutes placeholder in the Soak Time field, and then press the Back
button. The controller divides the time in the Water Time field by 3. This value is used for the
cycle time and the default soak time is 30 minutes.
5. Press the Next button to move to the Cycle Time field. If you are using soak cycles for this
zone, the cycle time defines the duration of each watering cycle interspersed with soak times.
Note: You cannot change the cycle time setting for a linked zone.

BaseStation 3200 Quick Start Guide
Page 9
6. Press the Next button to move to the Soak Time field. If you are using soak cycles for this
zone, the soak time defines the duration of each soaking cycle interspersed with watering
times.
7. Press the Next button to move to the Enabled field. Press the +or –button to display YES in
the field.
8. Press the Next button to move to the Use ET Deficit Water Times field. Press the +or –
button to toggle the value in the field between YES and NO.
IMPORTANT NOTE! You can enable ET in the BaseStation 3200 controller, but you must also
have a weather-station connected to BaseManager and assigned to the controller in
BaseManager. Selecting this option in the controller has no effect unless you complete these
additional steps in BaseManager. Also be aware that when you enable a zone to use
WeatherAccess in BaseManager, the Use ET Deficit Water Times option is automatically
selected in the controller.
9. Verify that the number displayed in the Program field in the upper-left corner of the screen
matches the program in which you want to set up the timed zone.
If you want to set up the timed zone in a different program, press the Next button to
move to the Program field, and then press the +or –button to change the program
number.
To remove the zone from the current program, press the Previous button to return to
the Water Time field, and then press the –button to remove the watering time in the
field.
10. After you have configured the settings for the current zone, perform one of the following
options:
To configure another zone, press the Enter button until the number of the zone that you
want to configure displays in the Zone field at the top of the screen. Repeat steps 3 – 10.
When you have finished making changes, turn the dial to the RUN position.
STEP 5 – Set Up Programs
Setting Up the Start Times for a Program
1. Turn the dial to the Programs position.
2. The Program Start Times Setup option should be highlighted. If it is not highlighted, press the
Next button to highlight it.
3. Press the Enter button. The Start Times screen
displays.
4. Verify that the number displayed in the
Program field matches the program that you
want to set start times for. If you want to
select a different program, press the +or –
button to change the program number.

BaseStation 3200 Quick Start Guide
Page 10
5. Press the Next button to move to the start times grid.
6. Press the +or –button to set the time in the first cell.
7. Press the Next button to move to the next cell in the start times grid, and then press the +or
–button to set additional start times as needed.
8. After you have configured the start times for the current program, perform one of the
following actions:
To configure start times for another program, press the Enter button until the number
of the program that you want to configure displays in the Program field at the top of the
screen. Repeat steps 5 – 7.
When you have finished making changes, turn the dial to the RUN position.
Setting Up the Start Days for a Program
1. Turn the dial to the Programs position.
2. Press the Next button to highlight the Program
Start Days Setup option, and then press the
Enter button. The Start Days screen displays.
3. Verify that the number displayed in the
Program field matches the program that you
want to set start days for. If you want to select
a different program, press the +or –button to
change the program number.
4. Press the Next button to move to the Schedule
Type field. For the purpose of this quick start,
select Days of the Week.
5. Press the Next button to set up the weekdays when you want the program to start. By
default, the boxes for the days of the week are marked with a Y (Yes), which indicates that the
program will start every day. If you want to change a start day, press the Next button to
select the day, and then press the + or – button to change the setting.
Note: Refer to the User Manual for information about the other schedule type options that are
available on this screen.
Setting Up the Water Windows for a Program
Water windows tell the controller when watering is allowed and not allowed. You can set water
windows for either Weekly (shown on illustration below) or daily – when moving from weekly to
daily, the weekly settings are copied to each day of the week.
Selecting daily water windows gives you hourly control of watering for each day of the week, and
for each program. A white square will pause watering for that hour, or keep a start time from
starting a program.
1. Turn the dial to the Programs position.
2. Press the Next button to select the Program Water Windows Setup option. The Water
Windows screen displays.

BaseStation 3200 Quick Start Guide
Page 11
3. Press the +or –button to select the program that you want to set up water windows for.
4. Press the Next button to move to the Water
Window Type field, and then press the +or –
button to select either Weekly or Daily.
Note: If you use “Weekly” to set up the water
windows and then you decide to convert to
“Daily,” the weekly settings are copied to
each day of the week.
Selecting daily water windows gives you
hourly control of watering for each day of the
week and for each program.
5. Press the Next button to move to the Day of the Week field. If you are using the “Weekly”
Water Window Type, you cannot change the setting in this field, but if you are using “Daily,”
press the +or –button to display the day of the week that you want to set up water windows
for.
6. Press the Next button to move to the ON/OFF field.
If the boxes in the grid are blue (allow watering), the field displays OFF. Press the Enter
button to turn all the water windows off.
If the boxes in the grid are white (do not allow watering), the field displays ON. Press the
Enter button to turn all the water windows on.
7. To make changes to the individual boxes in the grid, press the Next button. The color of the
number in the first box of the grid changes to red (indicating that you can change the setting
in that box).
To change the water setting for the time/day represented by that grid, press the +
button.
To move to next box in the grid, press the Next button.
Note: If you want to set up daily water windows, start by setting a basic profile in weekly
mode, and then change to daily mode to modify specific days (like a mow day). Pressing the
Enter button will maintain the current selected field and advance through the days of the
week.

BaseStation 3200 Quick Start Guide
Page 12
STEP 6 – Set the Controller to RUN
Turn the dial to the RUN position. Watering will start when the next start day and time is reached.
Forcing a Program to Start
1. Turn the dial to the Manual position.
2. Press the Next button to select the Start or Stop Program(s) option.
3. Press the Enter button. The Prog Start/Stop screen displays.
4. In the Program/Status column, press the +
button to select an idle or paused program
that you want to start.
Note: The zones in the selected program
display under the Program/Status column and
any conditions that affect the manual run also
display.
5. Press the Next button to move to the
Start/Stop column. The field in this column
displays Start.
6. Press the +button. The field in the Start/Stop column displays Stop, and the program’s status
changes to Watering.
7. To start the manual run, turn the dial to the RUN position.
Other manuals for BaseStation 3200
4
Table of contents
Other Base Line Controllers manuals
Popular Controllers manuals by other brands

TIANJIN BAILI ERTONG MACHINERY
TIANJIN BAILI ERTONG MACHINERY XZA Series Operation manual

FlowLine
FlowLine DataView LI55 quick start guide
Deltronic Labs
Deltronic Labs Sounder quick start guide
Barco
Barco Event Master EC-50 Series Quick Start Guide-Setup
Komfovent
Komfovent C4 user manual
Russound
Russound ACP-1DU 1 instruction manual
