BASHLIN BLCL 514 User manual

Important Safety
Information for Users of
Bashlin Climbers
and Accessories
No. BLCL 514, Rev. 4-21
- WARNING -
For your personal safety, this booklet must
be read and all of the information completely
understood before using these products.

Table of Contents
Important Safety Information ...................................................1
General Information for Bashlin Climbing Equipment .....................1
Climbers...........................................................................................2
Sizing Your Bashlin Climbers ...........................................................3
Climber Pads ....................................................................................3
Strap Climber Pad Attachment ........................................................3
Hook-n-Loop Pad Attachment .........................................................4
Wearing Hook-Loop Pads ................................................................5
Tips for Using Bashlin Climbers.......................................................5
Inspecting Your Bashlin Climbers and Pads....................................6
Using the Bashlin Gaff Gauge ..........................................................8
Maintenance of Bashlin Climbers ....................................................9
Sharpening the Gaffs on Your Bashlin Climbers..............................9
Shaping the Gaffs on Your Bashlin Climbers .................................10
Before Returning Your Climbers to Service ...................................10
Pole Cut Out Test............................................................................10
Replacing Bashlin Gaffs ................................................................. 11
Installing the New Bashlin Gaff ...................................................... 11
Replacing Bottom Straps on Bashlin Climbers .............................12
Inspecting and Shaping Bashlin 14T Tree Gaffs .......................12-13
Installing 89N Bottom Straps .........................................................14
Installing 87N Bottom Straps ....................................................14-15
Installing the Bashlin BHP Heel Covers .........................................16
Inspection Record ......................................................................18
*Se hable Espanol, (Para una versió espanola de este folleto de la
seguridad, contacta las Industrias de Bashlin S.a. por favor.)
Nous parlons Français (Pour une version française de ce livret
de sûreté, contacter les Industries de Bashlin Inc s’il vous plaît.)
Other languages upon request.

1
This information is intended for the user of the products indicated. It
must be included with the product, read and understood by the user
prior to placing this product into service. This equipment is to be used by
properly trained, professional workers. The information in this booklet,
manufacturer’s demonstrations, sales seminars, catalog information
or other promotional materials may be a part of but does not constitute
proper or complete training in the use of these products.
The user must inspect this equipment before each use. Any equipment
found to be worn out, damaged, subject to shock loading or in any way
questionable, must immediately be removed from service or accident,
injury and even death could result. Specic guidelines for inspection are
included in this information booklet.
General Information for Bashlin Climbing Equipment
These products are fabricated from leather and synthetic
woven materials and rated metal hardware. They are
assembled by riveting and/or sewing. The thread used in
assembly is of a contrasting color to permit easy inspection.
These products are manufactured in accordance with OSHA, ANSI, ASTM
F887 and/or CSA standards and are labeled as such. Please contact us
for information regarding specic applicable standards for each product.
Important Safety Information
- WARNING -
Bashlin equipment must not be altered. Altering or modifying these
products voids all warranties, may affect performance, and could
cause accident, injury or death to the user.
- WARNING -
Lack of proper training or the incorrect use and/or abuse of these
products may cause accidents, injury or death.
- WARNING -
Exposing the equipment to chemicals may produce a harmful
effect.Avoid using the equipment around moving machinery,
electrical hazards, sharp edges or abrasive surfaces.
- WARNING -
Shock loading is extremely damaging to climbing equipment.
Any belt, harness, pole strap, APL or climber that has
been shock loaded must be removed from service.
2
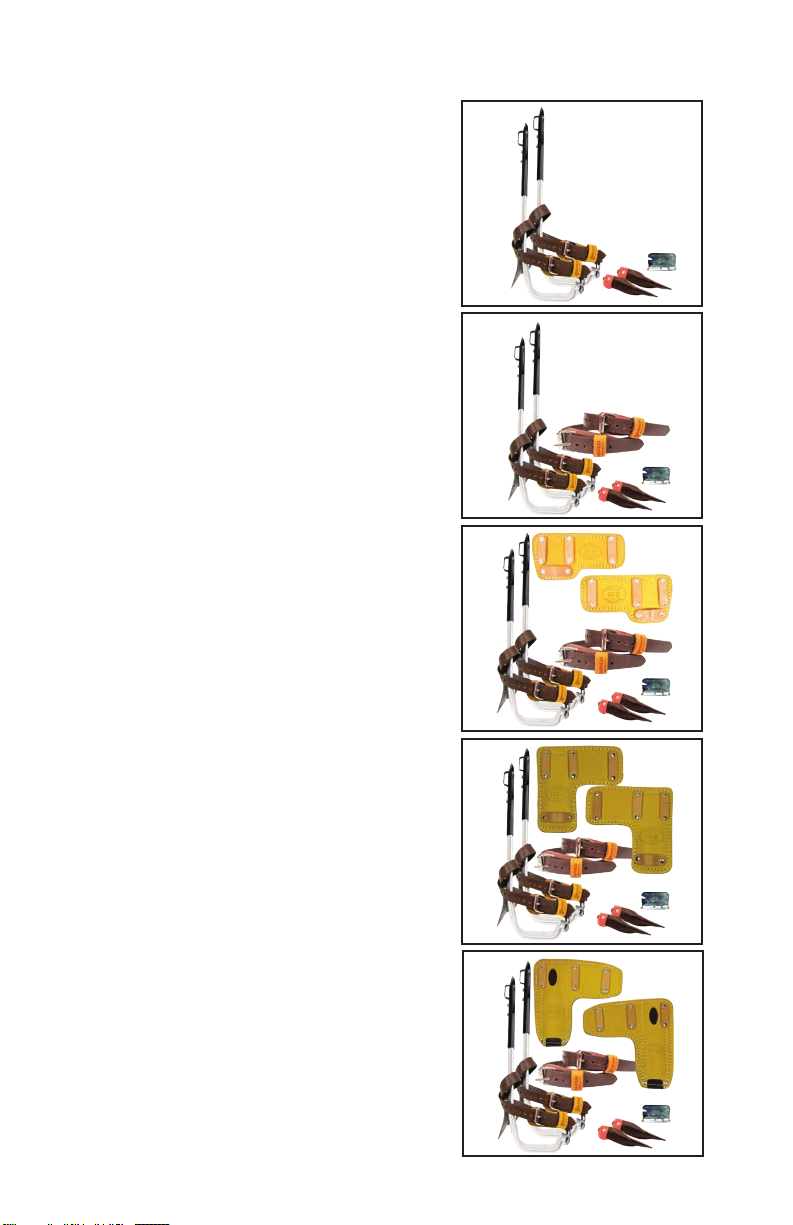
Climbers
Your Bashlin climbers are known
the world over for their comfort and
superior performance. Whether your
choice is the popular BD14B, or one
of the rugged steel climbers, BD12 or
BD16, you have the proven Bashlin
17° angle gaff, roomy comfortable
stirrup and innovative offset design.
All Bashlin Pole Climbers come with
the following items standard; (A)
- 1 pair of climbers with the bottom
nylon straps installed
- 1 pair of gaff guards
- 1 pair of top slides with 4 screws
in a small packet
- 1 gaff gauge (Pole Climbers Only)
If any of these listed items
are not in your box, please
contact us immediately.
In addition, these climbers are sold
as sets and include the following
items designated by part number
- BD14B-1N Climbers with
bottom straps. (A)
- BD14B-2N Climbers with
bottom straps and top straps. (B)
- BD14B-3N Climbers with
bottom straps, top straps and
#110D pads. (C)
- BD14B-4N Climbers with
bottom straps, top straps and
#130D pads. (D)
- BD14B-5N Climbers with
bottom straps, top straps and
#140DS pads. (E)
A
B
C
D
E

3
Sizing Your Bashlin Climbers
For maximum comfort and performance,
the climber shank must be adjusted to t
your leg. This is done by performing the
following steps;
• Place the adjustable top slide on
the shank.
• Put your foot in the stirrup and move the
top of the adjuster to a point two ngers
below the bottom of the knee bone. (F)
• Holding the top slide in place, install one
of the screws, recheck the position, then
install the second screw.
• Adjust the second shank and tighten
screws.
• The shank should be low enough to
keep the pad from rubbing your knee
bone. If you are experiencing excessive
rubbing on the knee bone, lower the top
slide.
• The standard adjustment for Bashlin climbers per ASTM F887 is
14 3/4" to 18". If by adjusting your climbers to the proper height,
the top slide is in the last hole, or if the climbers are simply too
short, you must use the longer top slides, number 14ATSB, for
aluminum climbers or 16ATS for steel. Using the longer top slides
gives you a better t and reduces the exing of the shank section
of the climber, especially in the critical section 4-8" above the gaff.
(See Climber Inspection).
Climber Pads
Bashlin climber pads reduce the shin
discomfort caused by standing on
climbers for extended periods of time.
Strap Climber Pad Attachment
(110, 130, 140, 145 or 150 series pads)
Strap pads are held on your Bashlin
climbers with a 1" nylon strap that has
a tongue buckle closure. The strap is
normally oriented with the buckle close to
the front of the pad. The pad should wrap
around the front of your leg and inside of
the shank.
F

4
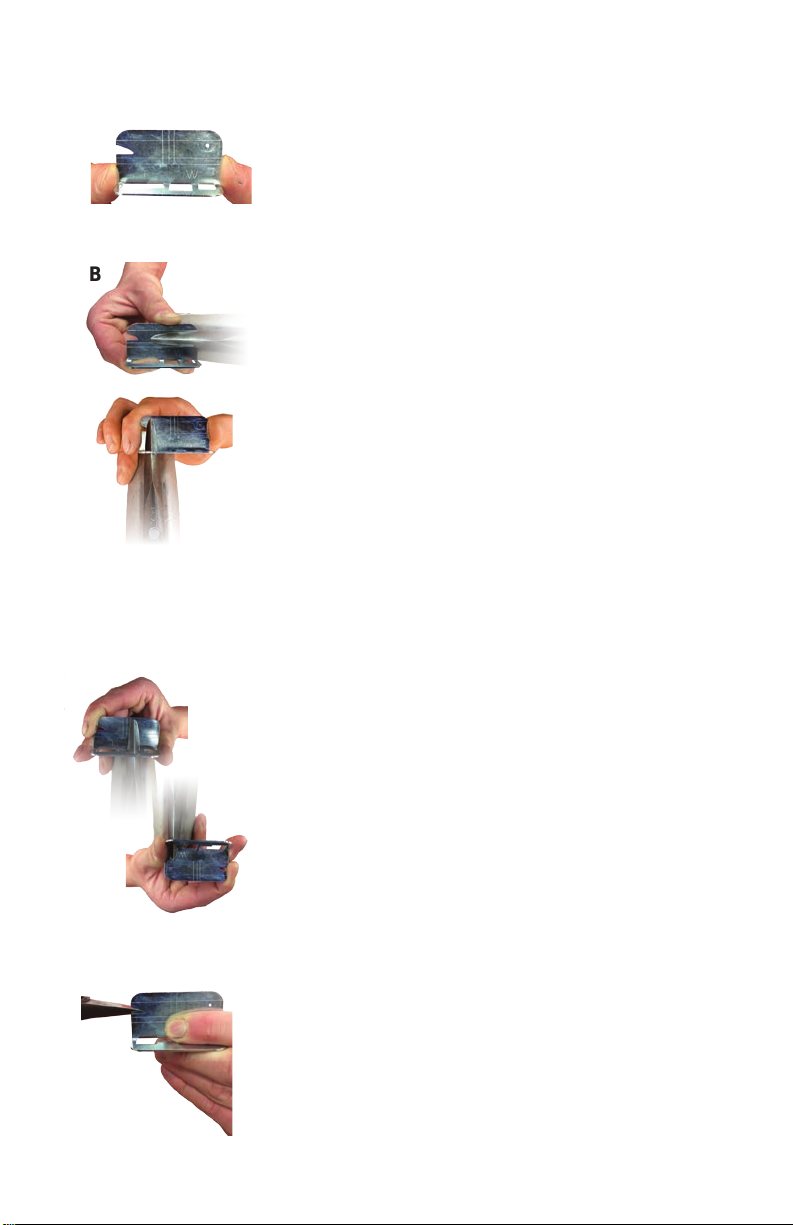
Hook-n-Loop Pad Attachment
(145ACV/BCV/FCV-145ACVW/BCVW/FCVW or 150V series pads)
• With the top slide secured to the climber, insert the shank into the
tunnel of the pad until the top slide loop is seated in the tunnel slot
or steel insert. Squeezing the tunnel will allow the climber to slide
in easier. (A)
• Feed the climber pad retaining strap through the top slide loop
and/or the steel insert and pull tight to secure the shank to the pad.
(B, C)
• To assist in sliding the strap through the loop, place a piece of paper
or other thin material over the end of the strap while sliding through
the top slide loop. A pair of pliers can be used to pull the strap. (D)
C D
B
A

5
Wearing Hook-n-Loop Pads
• Step into the climber and attach the
bottom strap securely to your boot. (A)
• Feed the free end of the pad with the
hook through the steel loop. (B)
• Pull the free end through the steel loop
until the pad is snug on your leg. (C)
• Secure the free end
around the pad, mating
the hook to the loop on
the body of the pad. (D)
• Check the security of
the climber and pad
by taking a step or two
on the structure you
are climbing before
ascending in them.
Tips for Using Bashlin Climbers
• Only use a Bashlin Gaff Gauge on Bashlin
Pole Climbers.
• Remove from service any climbers that have
come in contact with an electric arc.
• Never etch or scratch the critical section of
the climber shank, 4-8" above the gaff. Points
of stress will be created, and exing of the
shank will cause a
fracture and nally
premature failure
of the climber
shank. (A)
A, B
C D
A

6
• Bashlin BD14B forged aluminum alloy climbers are 30% lighter than
steel or titanium. Aluminum yields a better performing climber with
durability that is comparable to steel or titanium.
• Do not use aluminum alloy climbers with climbing boots that have a
steel heel guard. The heel guard wears deeply into the stirrup of the
climber and will require premature replacement of the shanks.
• Bashlin requires that any other manufacturer’s equipment used with
our products be made in accordance with the ASTM F887 Standards.
• Don’t violate safety rules.
• Keep dirt and debris cleared from the hook and loop material with a
soft brush. Debris can compromise the performance of the hook and
loop material, even causing the strap to release.
Inspecting your Bashlin Climbers and Pads
Your climbers must be inspected prior to each use.
Your climbers should be removed from service until repaired
or replaced if you nd any of the following:
• Climber straps that
are worn, cut, burned,
have elongated holes,
or loose buckles.
• Worn climber pads
that have broken rivets
or loops. (A)
• Hook-n-Loop pads
sleeve retaining strap is
damaged or missing.
• Hook-n-Loop closure will not stay secured, climber pad has broken
stitches, or steel loop on top slide is damaged or not secured to pad.
- CAUTION -
The average useful life of Bashlin
Climbing Equipment based on normal usage:
Tool Belts 5 - 8 years
Climbers 2nd set of gaffs
Pole Straps 1 - 4 years
A

7
• Climber shanks
Inspect critical area of the shank,
(4-8" above the gaff) for deep
scratches or cuts. Flex the shank
visually inspecting this area for any
cracks. (A) You can also run your
thumbnail along the edges to look to
nd any indentations or marks that could
indicate a crack in the shank section.
A crack will form prior to the shank
breaking. Close and regular inspection
could reveal the weakness before it
breaks in the eld.
• Stirrup
If the lettering is worn off the
foot tread of the BD14B climber,
carefully inspect for adequate
thickness. (B)
Compare the stirrup
section with a new
climber shank. (C)
The minimum measurement is
7/16" for continued use.
• Loose gaffs
• Short or improperly shaped
gaffs as determined by using
Bashlin’s No. 5 gauge.
Shanks should be replaced
when they no longer meet the
inspection criteria or when the
second set of gaffs wears out.
B
C
A
8
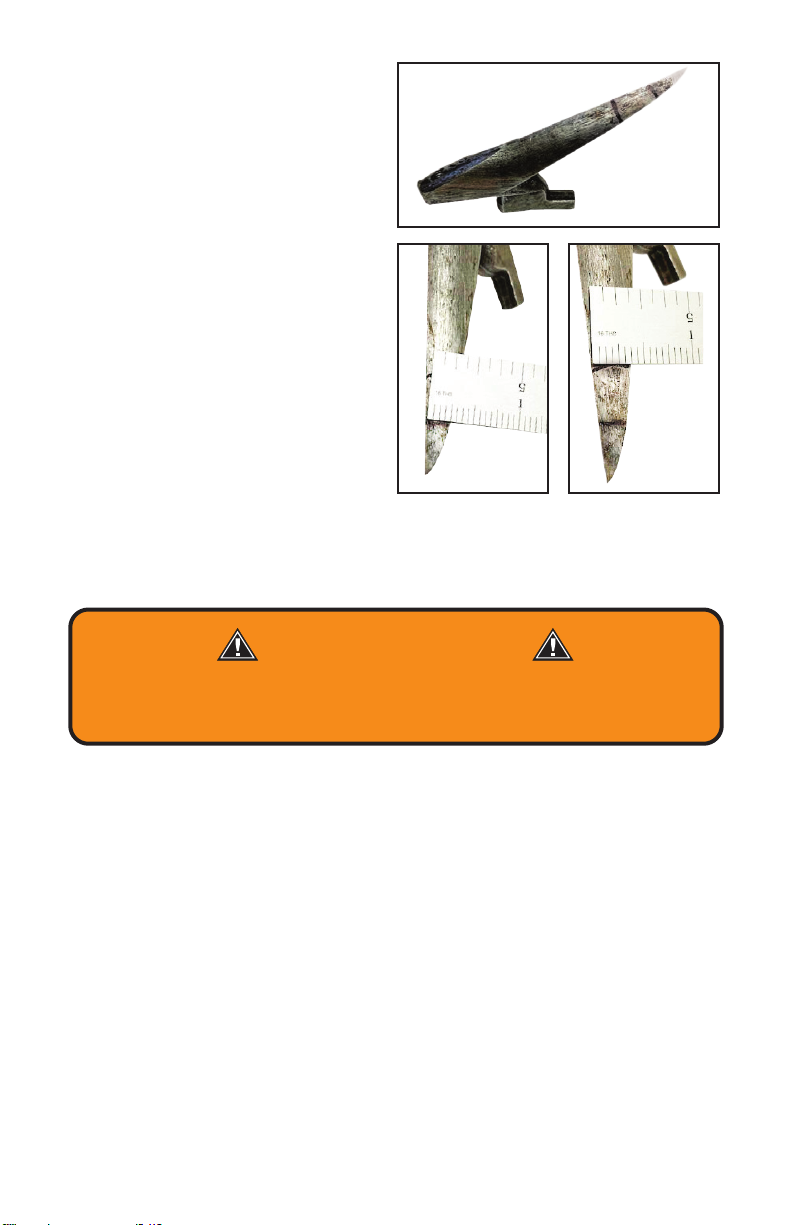
Using the Bashlin No. 5 Gaff Guage
A. Length
Place the gaff on the gauge as indicated in the
picture. The tip of the gaff should extend beyond
the line furthest from the edge, indicating the length
is at least 1 1⁄4". If the gaff is too short it must be
replaced.
B. Thickness
Insert the gaff into the larger portion of the section
of the gauge marked with a “T”. Make sure the
gaff is lying at against the gauge. When the gaff
is placed in the larger opening the cross section of
the gaff roughly 1" from the tip is being measured.
The tip should fall between the edge of the gauge
and the rst line. If it falls over the edge, it is too
thin and should be replaced. If it falls short of the
line, it is too thick and must be reshaped. Repeat
the procedure placing the gaff in the smaller portion
of the section marked with a “T”. Now the thickness
of the gaff is being measured at a point roughly 1⁄2"
from the tip. The end of the gaff should fall between
the two parallel lines above the “T”. If it is long,
replace the gaff. If it is short, shape the gaff. (See
Maintenance Section)
C. Width
Repeat the general procedure used to measure the
thickness of the gaff on the section of the gauge
marked with the “W”. Slide the gaff into the larger
portion of the “W” section. Make sure the gaff is
at on the gauge. The tip should fall between the
end of the gauge and the rst line. If it goes over
the edge, replace it. If it falls short, shape the gaff.
Continue the inspection by placing the gaff in the
smaller portion of the “W” section. Replace the gaff
or reshape it as is required by the gauge.
(See Maintenance Section)
D. Shape of the tip of the gaff
There is a small section cut out of the left side of
the gauge. This is used to determine if the tip of the
gaff is shaped correctly. Place the tip of the gaff in
the cut-out as indicated. The shape of the tip should
approximate the curve of the cut-out. The shape of
the tip can be conrmed by testing the tip using the
Pole Cut-Out Test shown on page 10.
A
B
C
D

9
E. Size of the tip of the gaff
There is a small hole in the gauge used to determine
if the tip of the gaff is thick enough. Simply place
the small hole on the right side of the gaff gauge on
the tip of the gaff. If the tip of the gaff protrudes far
enough through the hole that you can feel it, the tip
is too thin and may break during normal use. The
gaff should be removed from service.
Maintenance of
Bashlin Climbers
Your climbers, especially the straps
and pads should be cleaned and the
pads oiled regularly. Replace any old
or worn screws, sharpen and shape
your gaffs as needed.
Sharpening the Gaffs on
your Bashlin Climbers
Using wood blocks to protect the
shank, put the climbers in a vise with
the underside of the gaff exposed (A).
Place a 6" mill le across the gaff,
against the heel and draw it towards
you, following the rounded shape
of the gaff tip. Filing in this method
sharpens (B) the edges of the gaff
and maintains the correct shape of
the tip (C). If you prefer the edges to
be sharper, use a honing stone.
Bashlin’s No. 27 Gaff Shaping Kit has all
of the tools needed to maintain your gaffs
E
- WARNING -
Climbing equipment that does not meet inspection
criteria must be removed from service.
A
B
C

10
Shaping the Gaffs on your Bashlin Climbers
Block the climber in a vise and turn the climber over so the ridge of the
gaff is exposed. Using the 6" mill le, make smooth rounded cuts and
remove as much material as is needed to size the gaff to t correctly into
the gauge. Never le the ridge on the back of the gaff. Check the gaff on
the gauge, turn the climber over and sharpen the edges one more time.
Pole Cut Out Test
1. Wearing a pair of gloves, attach
the bottom strap of one of your
climbers.
2. Grasp the top of the shank and
touch the tip of the gaff against
the pole at a comfortable height
that will be easy to step into.
3. Holding the top of the shank
against the pole, step into the
stirrup. Steady yourself with your
other hand.
4. The properly shaped gaff should cut into the pole within an inch.
An improperly shaped gaff will break out of the pole.
For additional information regarding the care and maintenance
of pole climbing equipment, refer to the Lineman’s and Cableman’s
Handbook by Kurtz and Shoemaker, (Bashlin No. 831).
Your Climbers should
be eld tested before
returning to service.

11
Replacing Bashlin Gaffs
Tools needed include a vise, hammer,
2 blade type screwdrivers with1/4" and
1/2" blades, a 12" adjustable wrench.
You may need a 3/16" Allen Wrench.
1. Remove the adjustable top slide and
pad from the climber.
2. Holding the shank in one hand, strike
the gaff on the outside of the shank, at
the point where the large screw is in the
gaff. This will help loosen any corrosion
between the screw and the gaff. (A)
3. Place the climber shank in the vise,
placing the jaws on the gaff, with the
screw up and exposed. (B)
4. Use a square shank screwdriver that
completely lls the slot. (C) Hold the
screwdriver tightly in place and loosen
the screw using the wrench on the
shank. Avoid stripping the screw by
keeping constant pressure on the
screwdriver. If your gaff screw has a Hex
head screw you will need a 3/16" Allen
wrench. (C)
5. Remove the smaller screw completely.
6. Lightly tap the top of the gaff, then pull
the top away to remove it from the
shank. (D)
Installing the New Bashlin Gaff
1. Insert the gaff into the slot of the shank.
2. Drive the gaff into position. This is done
by either placing the lip of the gaff on a
hard edge, or placing the gaff in a block
of wood and driving the gaff into position
by striking the top of the shank with a
hammer. When the holes are aligned, it
is in the proper position.
3. Insert the large then the small screw,
and tighten.
4. Replace the top slide adjuster and pads.
B
A
C C
D

12
Inspecting and Shaping Bashlin Tree Climbers
No. 14 No. 14T
Bashlin Tree Climbers must be inspected prior to
each use. Please follow the inspection procedures
outlined on pages 6 and 7 in this booklet.
Inspecting Bashlin 14T Tree Gaffs
Length
Measure the bottom face of the gaff
from heel to tip (A). If the gaff is shorter
than 2-1/4", the gaff must be removed
from service.
Width
Mark two lines across the bottom face
of the gaff approximately 1/2" and 1"
from the tip of the gaff (B).
To verify width, measure across each mark.
The width of the gaff at the 1/2" mark should
be approximately 5/16" (C). The width at the
1" mark should be approximately 7/16" (D).
If either measurement is short, the gaff
is too narrow and must be removed from
service. If either measurement is long,
reshape the gaff.
Bashlin Tree Climbers are available in offset steel BD16BT, offset steel
with a twist BD16BCT, and lightweight aluminum BD14BT.
Bashlin No. 14T Tree Gaffs differ from the traditional No. 14 Pole Gaffs in
both length and shape as shown in the images above.
A
B
DC
13
Thickness
Continue the 1/2" mark and th 1"
mark up to the gaff spine on both
sides of the gaff. Marks should be
perpendicular to the bottom face of
the gaff (E).
To verify thickness, measure the
length of each mark. The thickness
of the gaff at the 1/2" mark should
be approximately 1/4" (F). The
thickness of the gaff at the 1" mark
should be approximately 3/8" (G).
Measure and evaluate both sides
of the gaff to ensure that neither
side is too thin.
If any measurement is short,
the gaff is too thin and must be
removed from service. If any
measurement is long, reshape
the gaff.
E
GF
Shaping your Bashlin Tree Gaffs
Block the climber in a vise as shown on page 10 in this booklet.
Using a 6" mill le, make smooth rounded cuts to shape the gaff.
Never le the ridge on the back of the gaff and remove only
as much material as needed to shape the gaff.
After you have reshaped your gaff use the Pole Cut Out Test on page 10.
If you need to replace your gaffs follow the instructions on page 11.
- WARNING -
Climbing equipment that does not meet inspection
criteria must be removed from service.

14
Replacing Bottom Straps on Bashlin Climbers
Your Bashlin Climbers come from the factory with bottom straps
installed. Over time they will wear out and require replacement. Before
replacing the straps, inspect your shanks per the instructions. If the
shanks are worn out, remove them from service and destroy them.
Only work on one shank at a time.
Use the other shank as a pattern for your work.
Installing 89N Bottom Straps
1. If your climbers have a triangle
ring, remove it using a hack saw
or bolt cutters. Inspect the lug
for cracks or excessive wear.
2. Block the climber in a vise with
lug exposed.
3. Using a screwdriver, open
the split ring and slide through
the hole. The buckle should
be toward the front of the
shank. (A)
4. Completely thread the ring
onto the shank.
5. Repeat the procedure on the
other shank.
Installing 87N
Bottom Straps
1. Inspect the triangle ring for
excessive wear, cracks, burns
or deformation. If there is any
question regarding the condition
of the ring, do not use it. Either
remove the shank from service
or if it is in otherwise good
condition, consider the use of
the 89N bottom strap assembly.
2. Remove and replace the long
strap. Tighten the screw-type
rivets (B).
B
A
A
87N Bottom
Strap Assembly

15
3. Remove the buckle
strap. Assemble the new
buckle assembly on the
shank using the other
shank as a pattern. It
is easiest to place the
leather keeper under
the strap, then insert the
screw-rivet in the hole
closest to the ring (C),
insert the second rivet
(D), and tighten both
screws.
4. Perform steps 1, 2, and 3
on the other shank.
5. Once you are certain
the assemblies on both
shanks are correct,
tighten all of the rivets,
and clip the ends off of
the screws (E). One at a
time, place the head of
the screw on a hard
surface and round off
the clipped ends of
the screw-rivets with
a hammer (F). This
will keep the rivet from
loosening up. A rivet
working loose may cause
an accident.
6. Finally, remove any
sharp edges on the
clipped end of the rivets
using a le, sand paper
or emery cloth.
C
D
F
E

16
Bashlin BHP Heel Covers are designed to help reduce injury to the
ankle and Achilles’s tendon while climbing. Made from PVC material that
is both durable and exible, these heel covers are sold in pairs marked
Left and Right and are compatible with most pole and tree climbers.
1. With the BHP
facing you, insert
the climber shank
through the tunnel
loop and slide it
down to the gaff. (A)
2. Push the climber
strap down through
the outside slot in
the cover and pull it
through (B).
3. Push the climber
strap down through
the outside slot in
the cover and pull it
through (C, D).
Installing Bashlin BHP Heel Covers
A
C
B
D

17

Inspection Record
Part Number ___________________ Date in Service ________________
Employee_____________________________________________________
Date of Inspection
This equipment must be inspected daily by the user.
Please feel free to copy this form.
Thank you for using Bashlin Products. For more information
or if you have questions please contact us:
Comments Inspected By
POBOX867 • 119W.PINEST. • GROVECITY,PA16127
Table of contents
Other BASHLIN Safety Equipment manuals


Popular Safety Equipment manuals by other brands


Tractel
Tractel solsit 2000 Operating and maintenance manual

3M
3M Protecta AC202C-SA2 User instructions

elobau
elobau eloFlex 471EFR Series manual

NUOVA ELETTRONICA
NUOVA ELETTRONICA DSP LASER instruction manual

Conmetall Meister
Conmetall Meister Connex DY270865 manual

KStrong
KStrong Brute Series User instruction manual


