Bastilipo natural liquid h2o R-ECOFLUID2-7 User manual

www.naturalliquidh2o.com
Manual de instrucciones - Radiador de uido 100% ecológico con Wi
Instruction Manual - 100% ecological uid radiator with Wi
Manuel d'instructions - Radiateur uide 100% écologique avec Wi
Manual de Instruções - Radiador de uido 100% ecológico com Wi
ENERGY
SAVE
SYSTEM
ECOLÓGICO
TECNOLÓGICO
EFICIENTE Y
SOSTENIBLE
ECOLOGICAL
TECHNOLOGICAL
EFFICIENT AND
SUSTAINABLE
100%
WIFI
CONECTION
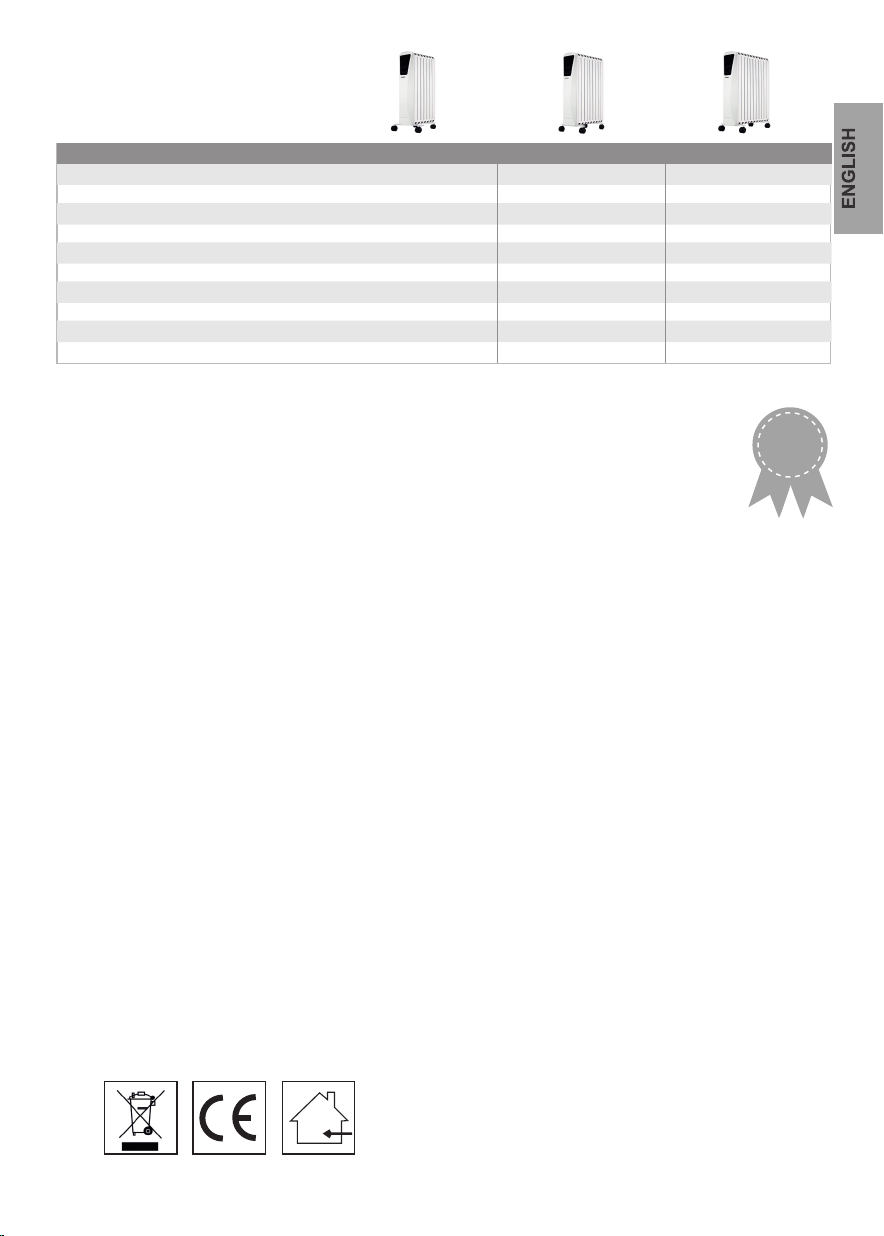
R-ECOFLUID2 7-9-11
Diseñados conforme a la Normativa EcoDesign ErP 2018 LOT20
Designed in accordance with the EcoDesign ErP 2018 LOT20 Standard
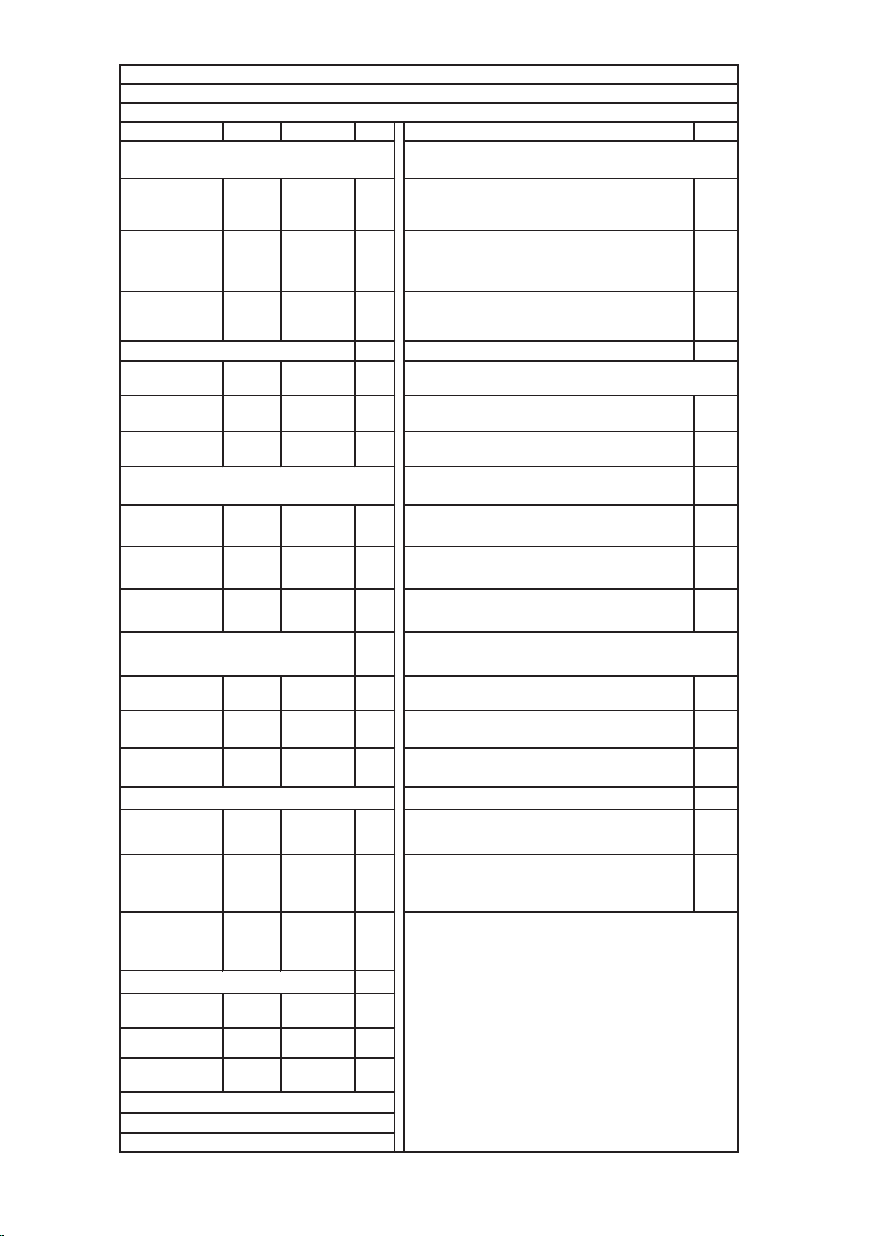
Simbolo Valalor Unid
Pnom 1,0 kW NA
Pmin 0,4 kW NA
Pmax,c 1,0 kW NA
Consumo de electricidad auxiliar NA
el
max 0,991 kW
el
min 0,395 kW [no]
el
SB 0,0007 kW [no]
[no]
Pnom 1,5 kW [no]
Pmin 0,6 kW [yes]
Pmax,c 1,5 kW [no]
el
max 1,495 kW [no]
el
min 0,596 kW [no]
el
SB 0,0007 kW [yes]
[no]
Pnom 2,0 kW [no]
Pmin 0,8 kW [no]
Pmax,c 2,0 kW
el
max 1,998 kW
el
min 0,798 kW
el
SB 0,0007 kW
Salida de calor (R-ECOFLUID 9) Dos o más etapas manuales, sin espacio
control de temperatura
Con control electrónico de temperatura
ambiente
Con control electrónico de temperatura
ambiente más temporizador de día
Control manual de carga de calor con
retroalimentación de temperatura ambiente
y / o exterior
Control electrónico de carga de calor
con retroalimentación de temperatura
ambiente y / o exterior.
Tipo de salida de calor / control de
temperatura ambiente
Tabla ErP
Requisitos de información para radiadores eléctricos
Identificación Modelo
Item Item
Salida de calor (R-ECOFLUID 7) Tipo de entrada de calor, solo para calentadores
locales de almacenamiento eléctrico (seleccione uno)
Salida de
Calor Nominal
Control manual de carga térmica,
con termostato integrado
Salida de calor asistida por ventilador
Salida de calor de una sola etapa, sin
control de temperatura ambiente
Modo
Stand By
Dos o más etapas manuales, sin espacio
control de temperatura
Control de temperatura ambiente, con
detección de presencia
Control de temperatura ambiente, con
detección de ventana abierta
Con opción de control de distancia
Con control electrónico de temperatura
ambiente más temporizador semanal
Otras opciones de control (posibles
selecciones múltiples)
Salida de calor (R-ECOFLUID 11) Con control de arranque adaptativo
Con tiempo de trabajo limitado
Con sensor de bombilla negra
Salida mínima
Calor Nominal
Salida máxima
Calor Nominal
Salida de
Calor Nominal
Salida mínima
Calor Nominal
Consumo de electricidad auxiliar
Consumo de electricidad auxiliar
Salida de
Calor Nominal
Salida mínima
Calor Nominal
Salida máxima
Calor Nominal
Salida de
Calor Nominal
Salida mínima
Calor Nominal
Salida máxima
Calor Nominal
Modo
Stand By
Salida de
Calor Nominal
Salida mínima
Calor Nominal
Modo
Stand By
Salida de
Calor Nominal
Salida mínima
Calor Nominal
Unid

Advertencias Español
Instrucciones de seguridad
Al utilizar cualquier electrodoméstico, se
deberán respetar en todo momento las
medidas de seguridad básicas:
ŸEste aparato puede ser utilizado por
niños o personas con discapacidad
física, sensorial o mental, así como con
personas con falta de experiencia y
conocimientos siempre que se
encuentren bajo supervisión o hayan
recibido instrucciones relacionadas con
su uso seguro y entiendan los peligros
potenciales asociados. Los niños no
deben jugar con este aparato. Las
tareas de limpieza y mantenimiento del
usuario no deben ser realizadas por
niños sin supervisión.
ŸLos niños menores de 3 años deben
mantenerse alejados, salvo que
cuenten con supervisión continuada.
ŸPRECAUCIÓN: Algunas partes de este
producto pueden calentarse mucho y
provocar quemaduras.
ŸLos niños de entre 3 y 8 años de edad
sólo pueden encender y apagar el
aparato su está colocado o instalado
en su posición de funcionamiento
normal y han recibido instrucciones
sobre el uso seguro del mismo y
entienden los riesgos que comporta.
Los niños no pueden enchufar, regular
ni limpiar el aparato ni realizar tareas
de mantenimiento.
Gracias por elegir este Radiador de
H2O Natural Liquid. Estas
instrucciones le proporcionaran
información valiosa y necesaria para
usar y mantener su nuevo Radiador en
perfecto estado. Por favor, dedique
unos minutos a leer estas
instrucciones y a familiarizarse con el
uso de sus distintas funciones.
A la hora de deshacerse del radiador, siga
la normativa relativa a la eliminación de
productos electrodomésticos.
ŸSi el cable de alimentacion está
deteriorado, debe ser sustituido por el
fabricante, su agente de servicio o una
persona cualificada para evitar
peligros.
No toque el calentador con las manos
mojadas o con un conductor de la
electricidad.
ŸADVERTENCIA: Para evitar el
sobrecalentamiento, o tape ni cubra el
radiador.
Requisitos de seguridad adicionales
para Radiadores
ŸPRECAUCIÓN: Para evitar el peligro
que supone un reinicio involuntario del
fusible térmico, este aparato no se
debe conectar a través de un
dispositivo externo, como un
temporizador o un circulo que se
conecte y desconecte según el uso.
ŸEl radiador no debe utilizarse cerca de
una bañera, ducha o piscina.
Este radiador está lleno de una cantidad
exacta de fluido ecológico.
Las reparaciones que requieran la
apertura del contenedor de fluido solo
deben ser realizadas por el fabricante con
el que deberá ponerse en contacto si
observara alguna fuga de fluido.
Por favor, no utilice la estufa en ambientes
con gas, combustibles o explosivos, ni
cubra la salida de aire.
Desenchufe el aparato para limpiarlo.

Instalación
Su aparato debe utilizarse únicamente
como un aparato portátil (preste atención
a todas las advertencias de seguridad
que se indican a continuación).
Advertencia: Utilice siempre el aparato
Deje una distancia mínima de 1 metro
entre cualquier lado del aparato y un
onstáculo (mueble o pared por ejemplo)
para que exista un buen flujo de aire.
1. Coloque el radiador sobre una
superficie plana, seca y limpia.
2. Instale las ruedas como se indica en
la siguiente imagen.
Dirija siempre el flujo de aire para
optimizar el calor de la estancia.
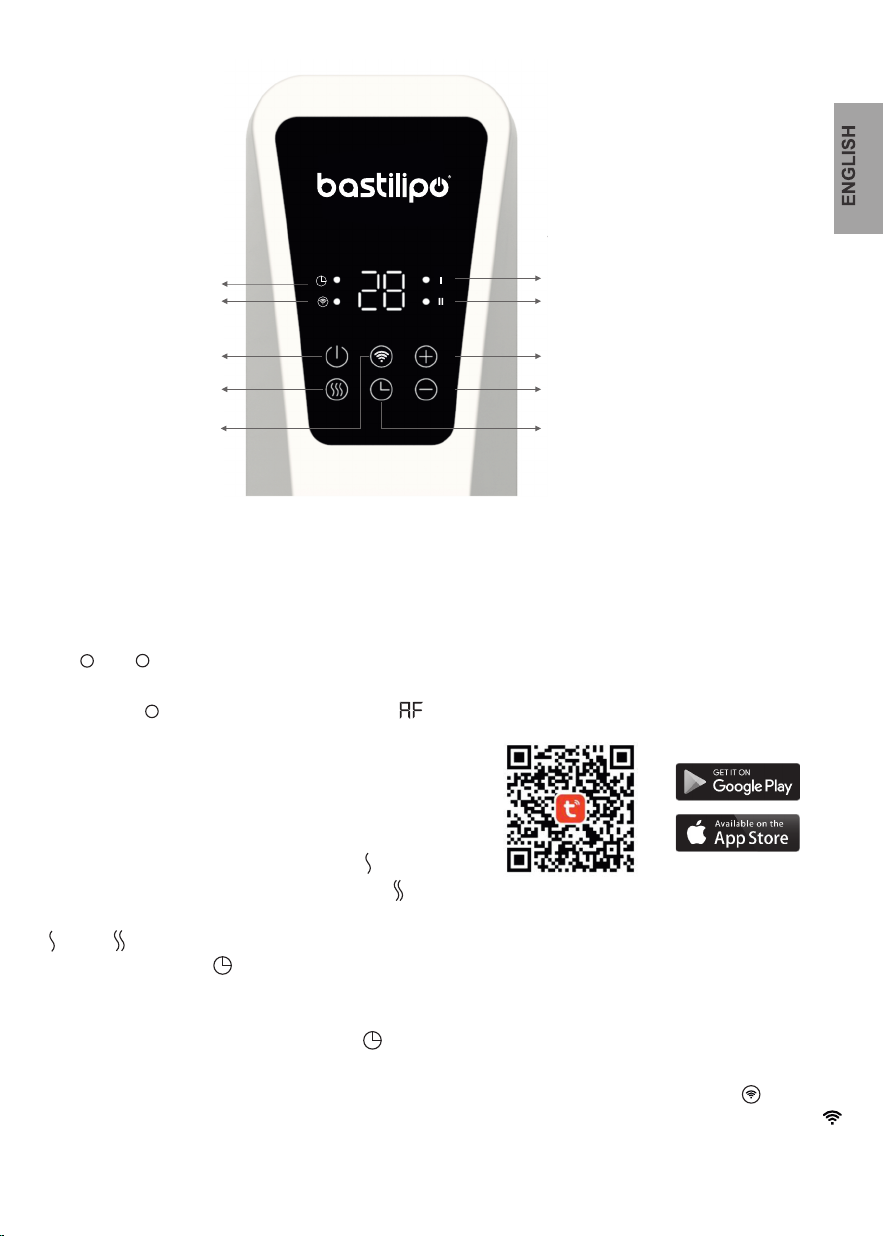
1. Pantalla LED de temperatura.
2. Stand By (ON/OFF)
3. Modo WIFI
4. Aumento de temperatura y temporizador
5. Disminución de temperatura y temporizador
6. Temporizador.
7. Selección de potencia
Pantalla de visualización y
panel de control.
¡SOLO PARA USO EN INTERIORES!
Evite las esquinas, los espacios
pequeños, los suelos de madera, el
techo, etc..
1
24
35
6
7
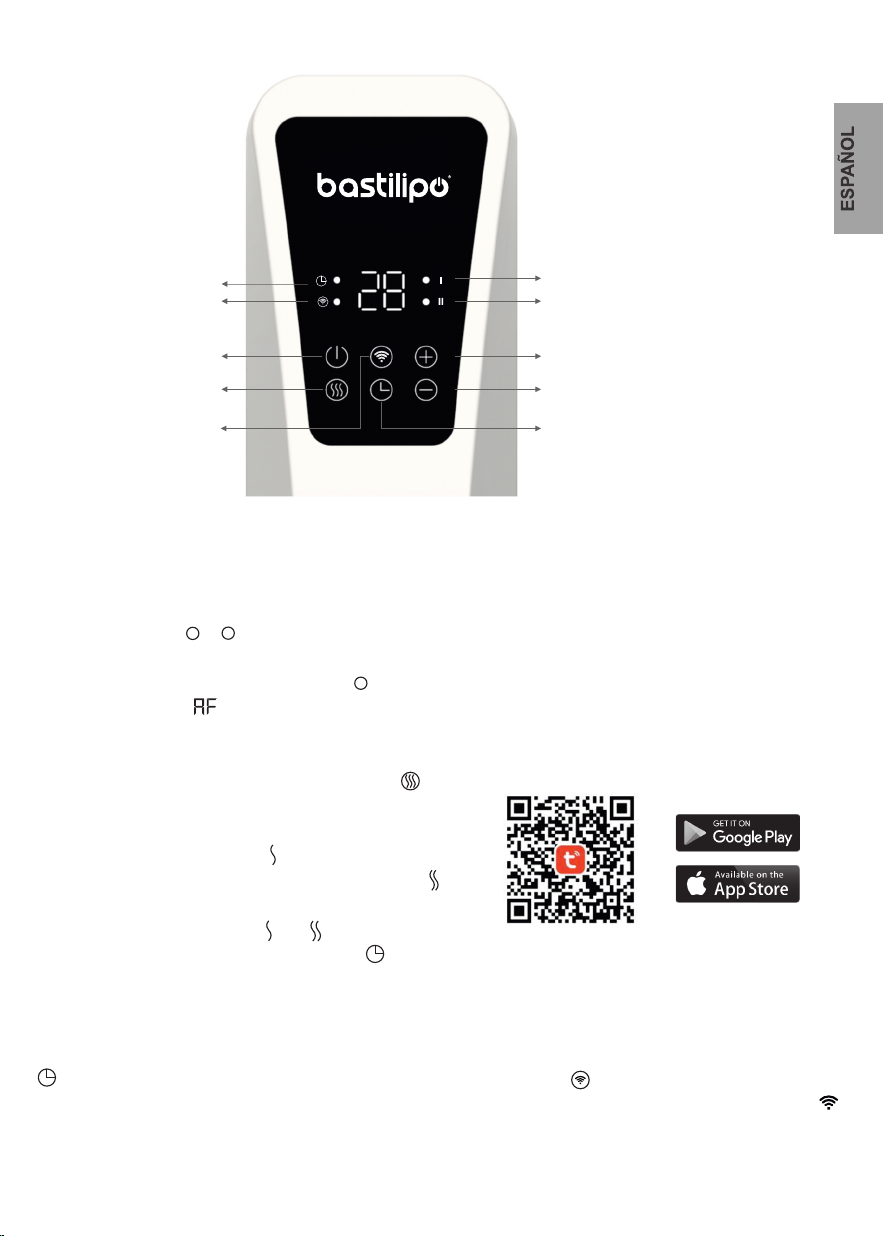
ŸEnchufe el aparato a la toma de corriente
AC220-240V 50-60Hz, la pantallas LED entrará
en modo de espera.
Encienda el Radiador con el botón ON/OFF
Utilice los botones y menos para seleccionar
la temperatura deseada entre 5~35ºC. Cuando la
pantalla indique 5ºC, presiona de nuevo entonces
la pantalla indicara . Esto significará que el
radiador entra en modo anti-frost, entonces
la temperatura quedará fija en 7ºC.
Para configurar la potencia, presione el botón
desde la posición baja, media y posición alta en
un ciclo por cada pulsación. La posición baja se
representa con el indicador “ ” iluminado;
la posición media se representa con el indicador “ “
iluminado, y la posición alta se representa con los
dos indicadores iluminados “ ” y “ ”
Para configurar el temporizador presione
y presione + y - para seleccionar de 0 a 24 horas.
Presione de nuevo para finalizar la función y volver
a mostrar la temperatura.
Para comprobar el tiempo restante, presione una vez
del temporizador, parpadeará y la pantalla mostrará
la hora restante durante 3 segundos, luego continuará
mostrando la temperatura.
Ÿ
-
Ÿ
-
+
Ÿ
Ÿ
Conexión wifi: utilice su teléfono para escanear el
Código QR a continuación o busque "TUYA
SMART" Aplicación para descargar y generar
una cuenta gratuita.
También puede visitar www.tuya.com para
obtener más información. Tenga en cuenta que
Tuya está en constante desarrollo de sus
aplicaciones para hacer más fáciles de usar y,
a veces, las pantallas pueden diferir ligeramente
de la pantalla que se muestra en este manual.
Una vez registrado siga las indicaciones
de las imágenes que se muestran a
continuación.
La luz indicadora parpadeará, conéctela en
la APLICACIÓN. Reinicie el WiFi, presione el
botón WIFI durante 3 segundos, el elemento
emitirá un pitido, la luz indicadora de WiFi
parpadeará rápidamente, ahora puede
conectarse a la aplicación.
Ÿ
Ÿ
Ÿ
Todos los botones son de configuración táctil
Indicador de Tiempo
Luz indicadora Wifi
Botón de On/Off
Botón de selección de potencia
de calefacción
Indicador de media potencia
*Cuando están los dos encendidos están a plena potencia
Botón regulación de tiempo
Aumento de temperatura y temporizador
Reducción de temperatura y temporizador
Indicador de baja potencia
Instrucciones de uso
Interruptor WIFI
Ÿ
Ÿ
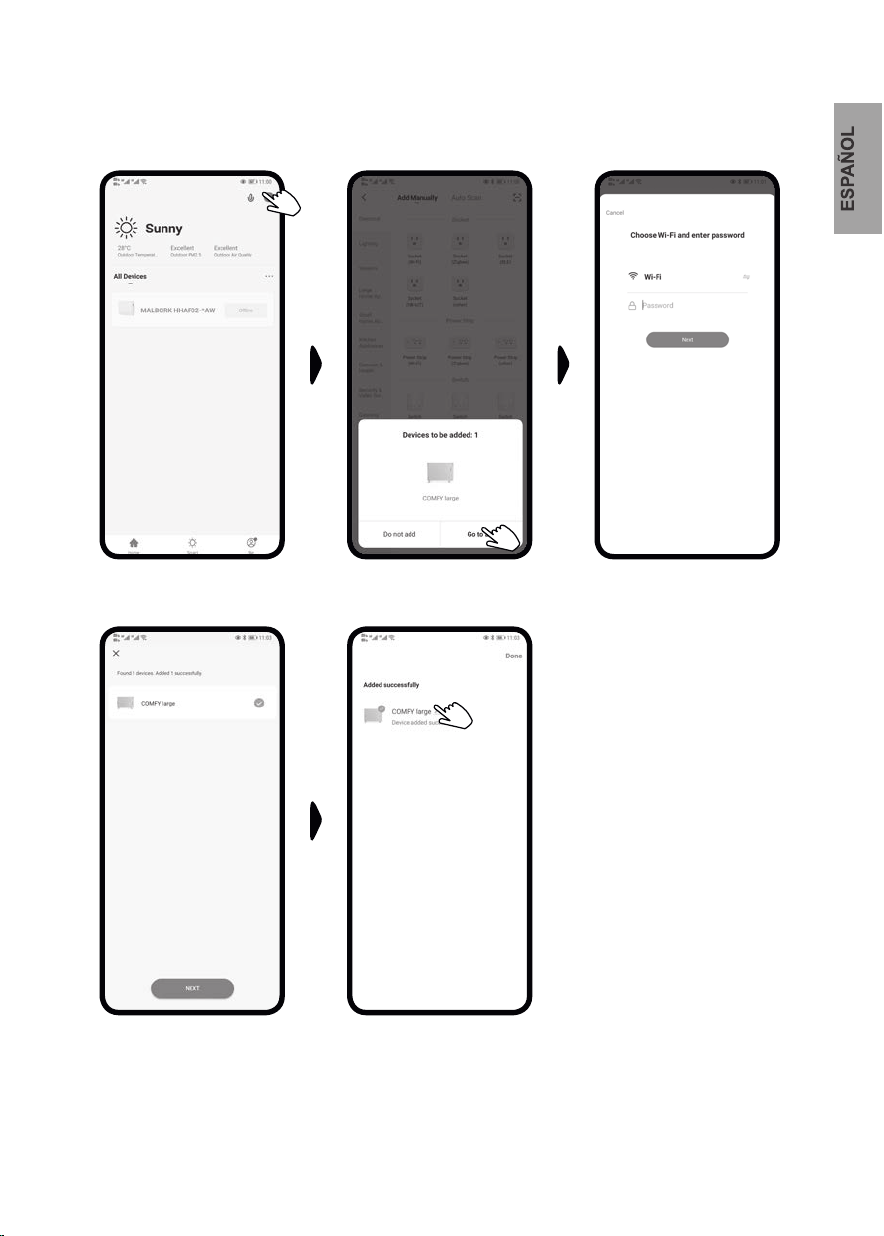
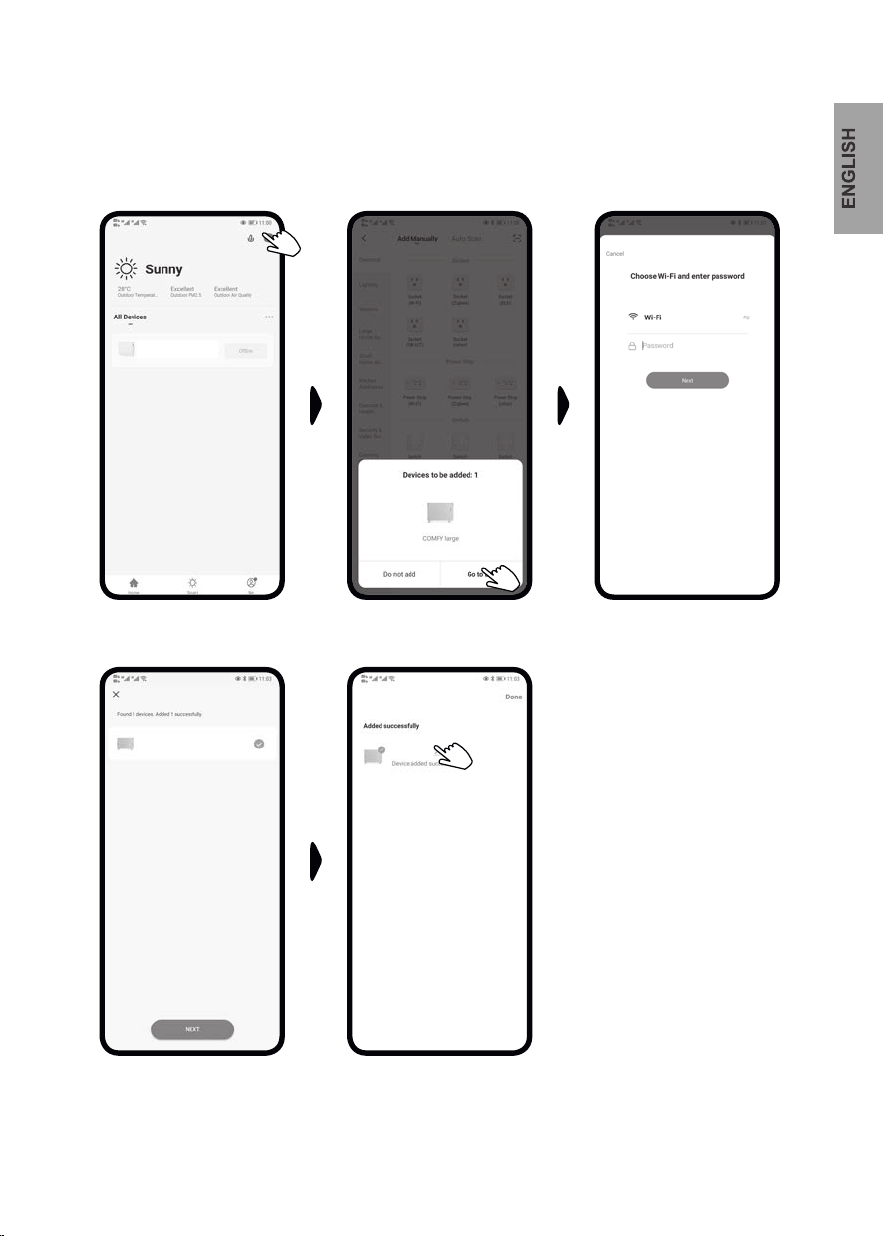
Conexión rápida
AEncienda su bluetooth en su teléfono móvil, luego configure los siguientes pasos
Presione "+" en la parte superior derecha
posición y vaya al paso siguiente Presiona "Ir para agregar” Seleccione Red Wifi de 2,4 GHz
e ingrese la contraseña, presione siguiente
Espera que esté conectado y presiona
"Siguiente", la APLICACIÓN se mostrará
como debajo
Puede presionar para modificar
el nombre del producto
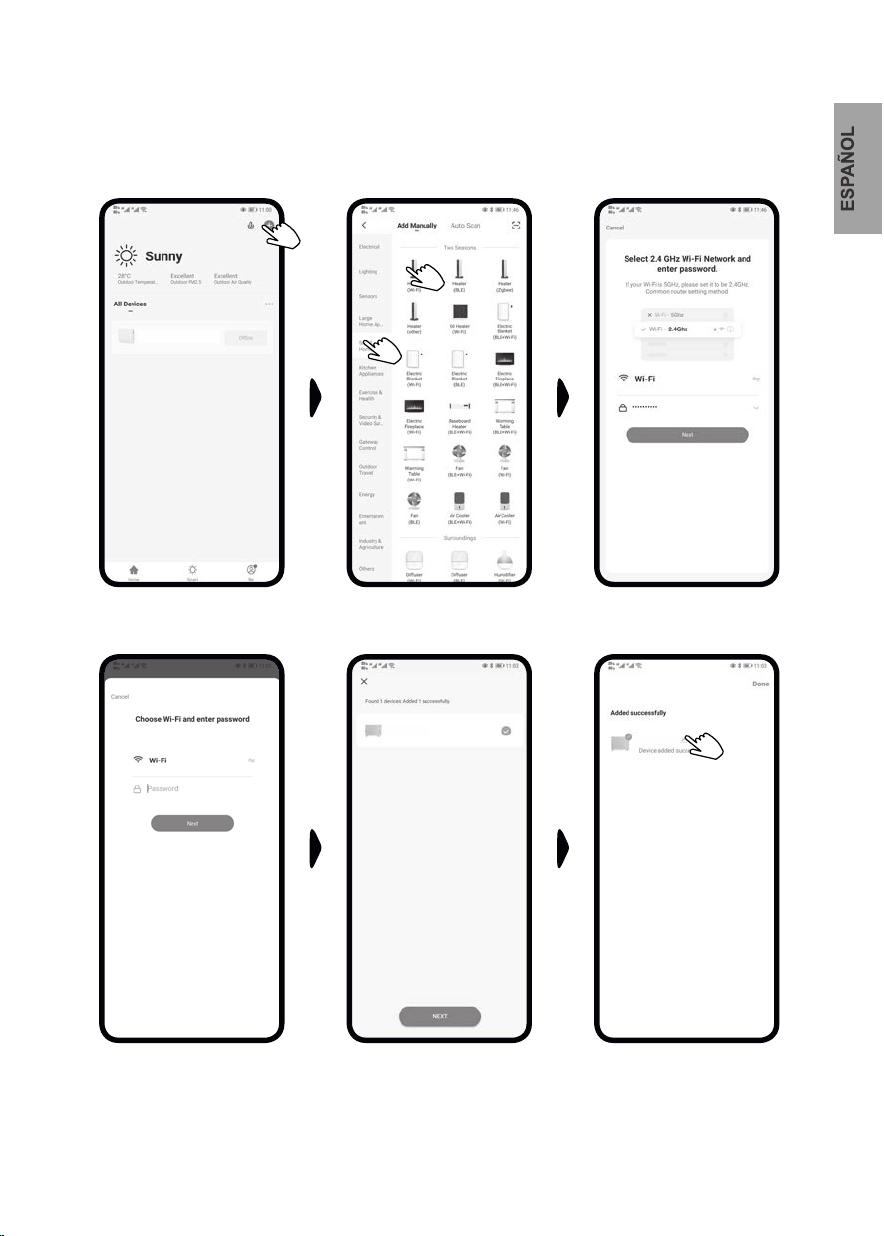
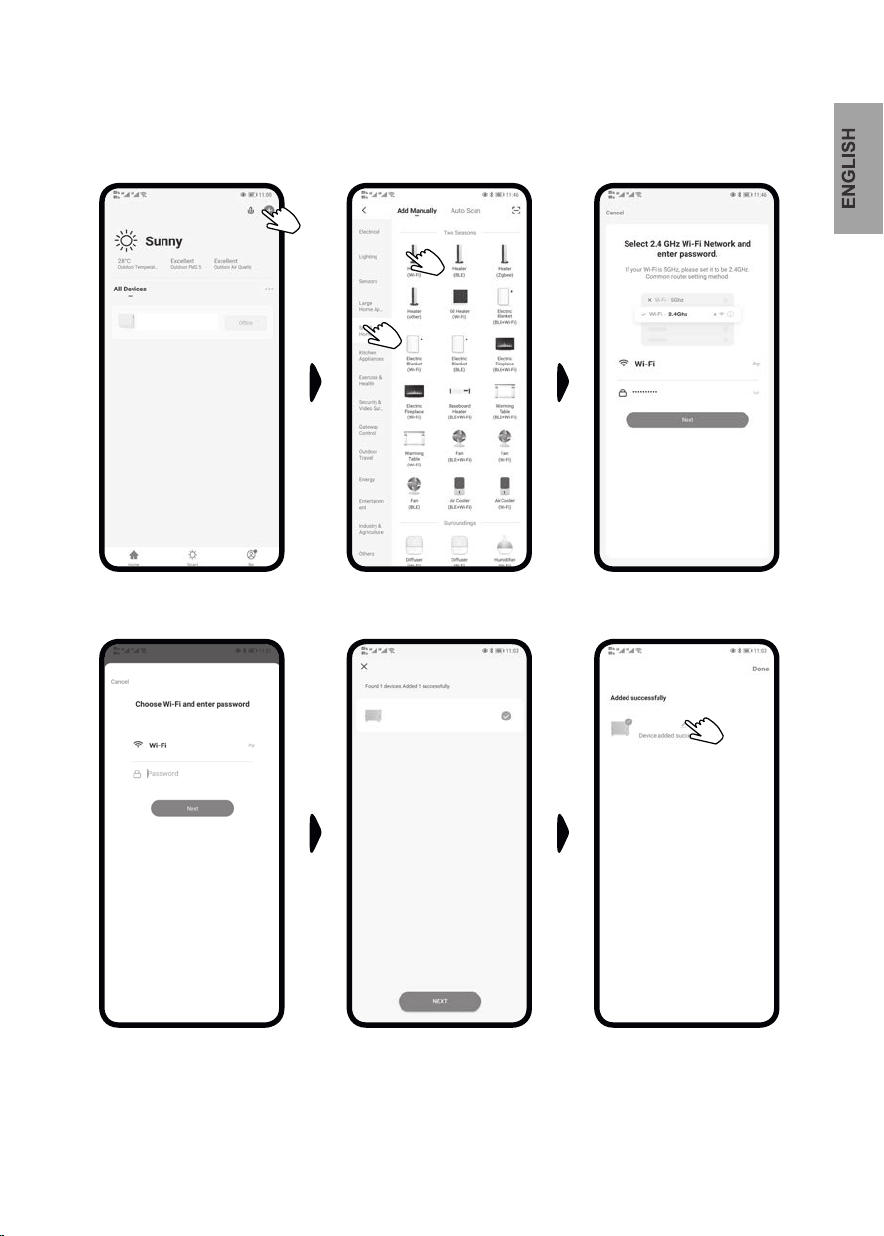
Conexión normal:
BSi el bluetooth no está encendido, siga el siguiente paso:
Presione "+" en la parte superior
derecha de la pantalla y
vaya al paso siguiente
Elija calentador en la sección
electrodomésticos pequeños Seleccione Red Wifi de 2,4 GHz
e ingrese la contraseña, presione
Siguiente
Seleccione Red Wifi de 2,4 GHz
e ingrese la contraseña, presione
Siguiente
Espere que esté conectado y
presione "Siguiente", la
APLICACIÓN se mostrará abajo
Puede presionar para modificar el
nombre del producto
Otras funciones:
1. Modo “noche”: sólo es posible
utilizarla a través de la aplicación.
Permite apagar la pantalla LED, sin
dejar de funcionar el aparato evitando
las molestias de la luz por la noche.
2. Modo “Bloqueo infantil”: Permite
dejar bloqueado los 6 botones de los
controles para evitar que los niños lo
manipule.
3. Modo “Turbo”: con esta función el
calentador funcionará durante 12
horas sin apagar ninguna de las
resistencias. Con esta función la
pantalla mostrará “HH”.
4. Modo “Temporizador inteligente”
con esta función es posible programar
tanto la temperatura como el tiempo
de funcionamiento a cada hora del día.
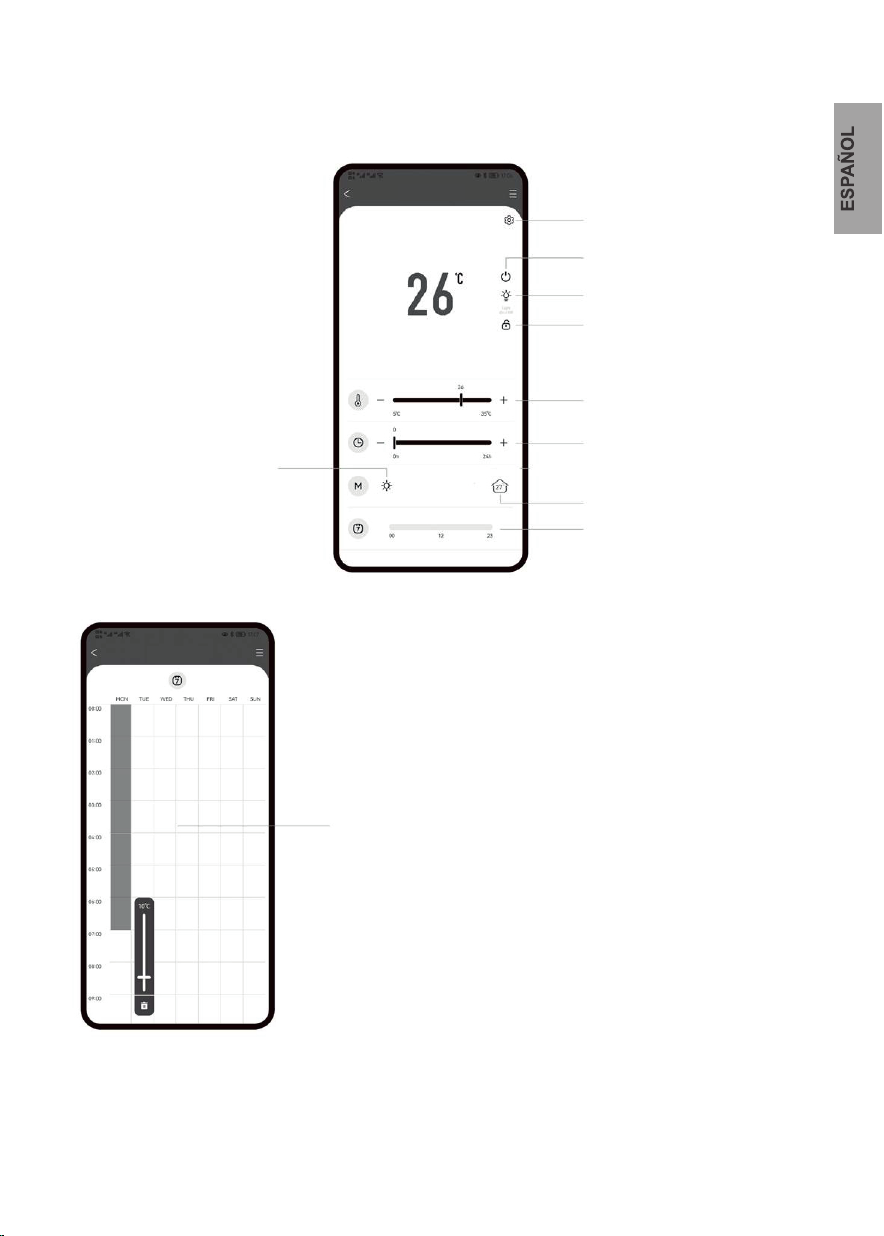
Funciones disponibles sólo con la aplicación TUYA
Trabajando en modo de selección
Otras funciones
Encendido / Apagado del calentador
Modo noche
Modo “bloqueo infantil”
Ajuste objetivo de
temperatura
Hora de finalización
Temperatura de la habitación
Temporizador inteligente
Temporizador inteligente:
Establezca el tiempo y la
temperatura deseada para
cada horario durante todo
el día.

Garantía
• El fabricante garantiza
este producto durante 3 años
- Roturas o daños causados por
influencias externas.
a partir de la fecha de compra por el
usuario final, en todo el territorio español,
incluyendo zonas insulares, y las ciudades
autónomas de Ceuta y Melilla. La garantía
sólo cubre defectos de materiales o mano
de obra. Las reparaciones bajo garantía
deben ser llevadas a cabo por un centro de
servicio autorizado. Cuando haga uso de
la garantía, será necesario presentar la
factura o ticket de compra. La garantía no
se aplicará en los casos de:
- Aparatos parcialmente o completamente
desmontados.
• Para asistencia técnica postventa
contacte con 692 520 553 o
- Los daños causados por la inobservancia
de las instrucciones de uso, por ejemplo,
conexión a una red de alimentación
inadecuada o el incumplimiento de las
instrucciones de instalación.
- Uso incorrecto, por ejemplo, sobrecarga
del aparato o el uso de accesorios no
originales.
- Desgaste normal
Garantía
3
años de
Limpieza y mantenimiento
• Para evitar peligros, limpie el aparato
usando solamente un paño ligeramente
humedecido. Nunca sumerja el aparato,
ni siquiera para limpiarlo.
• Para evitar peligro eléctrico, limpie el
aparato con un paño suave y limpio para
el polvo. También puede usar una
aspiradora para limpiar las aberturas de
ventilación
• Limpie el radiador regularmente.
• Uso solo en interiores
Este símbolo significa que cuando el
aparato llegue al final de su vida, no
debe ser considerado basura normal,
sino residuo peligroso y, como tal, debe
ser depositado en las zonas de reciclaje
y eliminación específicos, según lo
prescrito por la Directiva 2012/19 / UE
(RAEE).
• Desconecte el aparato antes de
limpiarlo.
Medio ambiente
Características Técnicas
Gama Ecofluid
Consumo medio (kWh)
Código producto
Potencia (W)
Tensión (V)
Frecuencia
Nº elementos
Dimensiones
Peso
EAN-13
Packing
MODELO / MODEL R-EcoFluid2-9
0,6 kWh
0654
400/600/1000
230 V
50 Hz
7
335x245x635
8,4 kg
8436592930654
1
0,8 kWh
0661
600/900/1500
230 V
50 Hz
9
410x245x635
10,6 kg
8436592930661
1
1,06 kWh
0678
800/1200/2000
230 V
50 Hz
11
485x245x635
11 kg
8436592930678
1
R-EcoFluid2-7 R-EcoFluid2-11

Symbol Value Unit Unit
Pnom 1,0 kW NA
Pmin 0,4 kW NA
Pmax,c 1,0 kW NA
Auxiliary electricity consumption NA
el
max 0,991 kW
el
min 0,395 kW [no]
el
SB 0,0007 kW [no]
[no]
Pnom 1,5 kW [no]
Pmin 0,6 kW [yes]
Pmax,c 1,5 kW [no]
Auxiliary electricity consumption
el
max 1,495 kW [no]
el
min 0,596 kW [no]
el
SB 0,0007 kW [yes]
[no]
Pnom 2,0 kW [no]
Pmin 0,8 kW [no]
Pmax,c 2,0 kW
Auxiliary electricity consumption
el
max 1,998 kW
el
min 0,798 kW
el
SB 0,0007 kW
Heat output (R-ECOFLUID 9) with mechanic thermostat room
temperature control
with electronic room temperature control
with electronic room temperature control
plus day timer
Nominal heat
output
Minimum heat
output
(indicative)
Minimum heat
output
(indicative)
manual heat charge control with room
and/or outdoor temperature feedback
Maximum
continuous
heat output
electronic heat charge control with room
and/or outdoor temperature feedback
Type of heat output/room temperature control
(select one)
Table 2
Information requirements for electric local space heaters
Model identifier(s):
Item Item
Heat output (R-ECOFLUID 7) Type of heat input, for electric storage local
space heaters only (select one)
Nominal heat
output
manual heat charge control, with
integrated thermostat
fan assisted heat output
At minimum
heat output
single stage heat output, no room
temperature control
In standby
mode
two or more manual stages, no room
temperature control
At nominal
heat output
room temperature control, with presence
detection
Maximum
continuous
heat output
At nominal
heat output
room temperature control, with open
window detection
with distance control option
with electronic room temperature control
plus week timer
Other control options (multiple selections
possible)
At minimum
heat output
In standby
mode
Heat output (R-ECOFLUID 11)
Nominal heat
output
Minimum heat
output
(indicative)
with adaptive start control
Maximum
continuous
heat output
At nominal
heat output
At minimum
heat output
In standby
mode
with working time limitation
with black bulb sensor

Warnings English
Security instructions
When using any appliance, basic safety
measures must be respected at all
times:
This device can be used by children or
people with physical, sensory or mental
disabilities, as well as by people with a
lack of experience and knowledge as
long as they are under supervision or
have received instructions related to its
safe use and understand the associated
potential dangers. Children should not
play with this device. Cleaning and user
maintenance tasks must not be carried
out by children without supervision.
Children under 3 years old should be
kept away, unless they have continuous
supervision.
Children between 3 and 8 years of age
can only switch the appliance on and off
if it is placed or installed in its normal
operating position and have received
instructions on its safe use and
understand the risks involved. Children
cannot plug in, adjust or clean the
appliance or perform maintenance.
Thank you for choosing this Natural
Liquid H2O Radiator. These
instructions will provide you with
valuable and necessary information
to use and maintain your new
radiator in perfect condition. Please
take a few minutes to read these
instructions and become familiar
with the use of their various
functions.
CAUTION: Some parts of this product
can become very hot and cause burns.
ŸIf the power cable is damaged, it must
be replaced by the manufacturer, its
service agent or a qualified person to
avoid dangers.
ŸCAUTION: To avoid the danger of
unintentional resetting of the thermal
fuse, this appliance must not be
connected through an external device,
such as a timer or a circle that
connects and disconnects depending
on use.
ŸWARNING: To avoid overheating,
cover or cover the radiator.
ŸThe radiator must not be used near a
bathtub, shower or pool.
Additional safety requirements
for Radiators
This radiator is filled with an exact amount
of environmentally friendly fluid.
Repairs requiring the opening of the fluid
container should only be carried out by the
manufacturer, who should be contacted if
any fluid leaks are observed.
When disposing of the radiator, follow the
regulations regarding the disposal of
household appliances.
Do not touch the heater with wet hands or
with an electrical conductor.
Unplug the appliance to clean it.
Please do not use the stove in
environments with gas, fuels or
explosives, or cover the air outlet.

Warning: Always use the appliance with
the wheels fixed.
1. Place the radiator on a flat, dry and
clean surface.
Installation
Your device should only be used as a
portable device (pay attention to all the
safety warnings below).
2. Install the wheels as indicated in the
following image.
Leave a minimum distance of 1 meter
between any side of the appliance and
an obstacle (furniture or wall for
example) so that there is a good air flow.
Always direct the air flow to optimize the
heat in the room.
Avoid corners, small spaces, hardwood
floors, ceiling, etc.
FOR INSIDE USE ONLY!
1. LED temperature display.
2. Stand By (ON / OFF)
3. WIFI mode
4. Temperature rise and timer
5. Temperature decrease and timer
6. Timer.
7. Power selection
1
24
35
6
7
All buttons are touch configuration
On / Off button
Power select button
heating
* When both are on they are at full power
WIFI switch
ŸPlug the appliance to AC220-240V
50-60Hz socket, it is in standby status
with LED screen displays.
To start the heater, press the standby button.
Turn and directly to set target temperature
from 5~35ºC, when the setting temperature
is 5ºC, press again, the screen will display
the heater will working in anti-frost mode,
the target temp is fixed as 7ºC.
To set the power, press power setting button
to select the power from Low position, medium
position and high position in a cycle by every press.
Low position is represented illuminated “ ” indicator;
medium position is represented illuminated “ ”
indicator, high position is represented illuminated
“ ” and “ ” indicator together.
To set the timer press and press + and - to select
from 0 to 24 hours. Press again to end the function
and return to display the temperature.
To check the remaining time, press once
the timer will flash and the display will show
the remaining hour for 3 seconds, then continue
showing the temperature.
Ÿ
-
Ÿ
-
+
Ÿ
Ÿ
You can also visit www.tuya.com for more
information. Please note Tuya are constantly
developing and upgrading their Apps to make
them more user friendly and sometimes,
displays may differ slightly to the display
shown in this manual due to upgrades.
Select your country code, enter your mobile
number and select “Get” to receive a message
containing your verification code. Enter your
verification code and select “Login”.When the
first using to turn on the heater, the WiFi
indicator light will flash, connect it in the APP.
Reset the WiFi, press wifi button for 3 secs,
the item will “beep”, the WiFi indicator light
will flash rapidly, you can now connect within
the APP.
Ÿ
Ÿ
Ÿ
Time Indicator
Wifi indicator
Instructions for use
Half power indicator
Press the time indicator
Temperature rise and timer
Temperature reduction and timer
Low power indicator
Quick connection:
ATurn on your bluetooth in you mobile phone, then set as following steps
Press “+” in the right-top
position and go to next step Press “Go to add” Select 2.4 GHz Wifi Network
and enter the password, press next
Wait it`s connected and press
“Next”, the APP will show as
below
You can press to modify the
name of the product
Normal connection:
BIf the bluetooth is not on, pls follow the next step:
Press “+” in the right-top
position and go to next step Choose small home appliance
an heater Select 2.4 GHz Wifi Network
and enter the password, press
next
Select 2.4 GHz Wifi Network
and enter the password, press
next
Wait it´s connected and press
“Next”, the APP will show as
below.
You can press to modify the
name of the product

Other functions:
1. Night mode, it is a function only
handled through APP . By activating it,
the LED display in the PCB would be
off to avoid to turn off disturb in night
use.
2. Child lock function to lock the
operation on the product side to avoid
children operation. The screen would
display “-||-“, all 6 buttons would be
locked.
3. Boost heating function, in this mode,
the product would keep working in 12
hours without digital temp sensor
working, this function is operated in the
APP only while the product would
display ”HH”
4. Smart timer: Set the working time
and working temperature for every
hour in everyday
Functions available only with the TUYA app
Working model selection
Other functions
Turn on/off the heater
Night mode
Children lock
Target temperature setting
Timer off
Room temperature
Smart timer
Smart timer: Set the time
and desired temperature for
every schedule throughout
the day.
• The manufacturer guarantees
- Normal wear
- Incorrect use, for example, overloading
the appliance or the use of non-original
accessories.
this product for 3 years
- Breakage or damage caused by external
influences.
- Damage caused by non-compliance with
the instructions for use, for example,
connection to an inadequate power supply
network or non-compliance with the
installation instructions.
from the date of purchase by the end user,
throughout the Spanish territory, including
island areas, and the autonomous cities of
Ceuta and Melilla. The warranty only
covers defects in materials or
workmanship. Warranty repairs must be
carried out by an authorized service
center. When making use of the
guarantee, it will be necessary to present
the invoice or purchase ticket. The
guarantee will not apply in the cases of:
Warranty
- Apparatus partially or completely
disassembled.
• For after sales technical assistance
contact 692 520 553 or [email protected]
Garantía
3
años de
• Unplug the appliance before cleaning it.
• Clean the radiator regularly.
• To avoid electrical hazard, wipe the
device with a soft, clean dust cloth. You
can also use a vacuum cleaner to clean
the ventilation openings
• Indoor use only
This symbol means that when the device
reaches the end of its life, it should not
be considered normal waste, but rather
hazardous waste and, as such, must be
deposited in specific recycling and
disposal areas, as prescribed by
Directive 2012/19 / EU (WEEE).
Cleaning and maintenance
Environment
• To avoid danger, clean the appliance
using only a slightly damp cloth. Never
immerse the appliance, not even to clean
it.
Technical characteristics
Gama Ecofluid
Average consumption (kWh)
Product code
Power (W)
Tensión (V)
Frecuencia
Fins
Dimensions
Weight
EAN-13
Packing
MODEL R-EcoFluid2-9
0,6 kWh
0654
400/600/1000
230 V
50 Hz
7
335x245x635
8,4 kg
8436592930654
1
0,8 kWh
0661
600/900/1500
230 V
50 Hz
9
410x245x635
10,6 kg
8436592930661
1
1,06 kWh
0678
800/1200/2000
230 V
50 Hz
11
485x245x635
11 kg
8436592930678
1
R-EcoFluid2-7 R-EcoFluid2-11

Avertissements Français
Lors de l'utilisation de tout appareil, les
mesures de sécurité de base doivent être
respectées à tout moment:
Consignes de sécurité
ŸLes enfants de moins de 3 ans doivent
être tenus à l'écart, sauf s'ils
bénéficient d'une surveillance continue.
Merci d'avoir choisi ce radiateur
Natural Liquid H2O. Ces instructions
vous fourniront des informations
précieuses et nécessaires pour utiliser
et entretenir votre nouveau radiateur en
parfait état. Veuillez prendre quelques
minutes pour lire ces instructions et
vous familiariser avec l'utilisation de
leurs différentes fonctions.
ŸCet appareil peut être utilisé par des
enfants ou des personnes souffrant de
handicaps physiques, sensoriels ou
mentaux, ainsi que par des personnes
manquant d'expérience et de
connaissances tant qu'elles sont sous
surveillance ou ont reçu des
instructions relatives à son utilisation
en toute sécurité et comprennent les
dangers potentiels associés. Les
enfants ne doivent pas jouer avec cet
appareil. Les tâches de nettoyage et
d'entretien ne doivent pas être
effectuées par des enfants sans
surveillance.
ŸLes enfants entre 3 et 8 ans ne
peuvent allumer et éteindre l'appareil
que s'il est placé ou installé dans sa
position de fonctionnement normale et
ont reçu des instructions sur son
utilisation en toute sécurité et
comprennent les risques encourus. Les
enfants ne peuvent pas brancher,
régler ou nettoyer l'appareil ou
effectuer l'entretien.
ŸATTENTION: Certaines parties de ce
produit peuvent devenir très chaudes
et provoquer des brûlures.
Débranchez l'appareil pour le nettoyer.
Ne touchez pas l'appareil de chauffage
avec les mains mouillées ou avec un
conducteur électrique.
Ce radiateur est rempli d'une quantité
exacte de fluide respectueux de
l'environnement.
Les réparations nécessitant l'ouverture du
réservoir de fluide ne doivent être
effectuées que par le fabricant, qui doit
être contacté en cas de fuite de fluide.
Lors de l'élimination du radiateur, suivez
les réglementations concernant
l'élimination des appareils
électroménagers.
Veuillez ne pas utiliser le poêle dans des
environnements avec du gaz, des
combustibles ou des explosifs, ni couvrir
la sortie d'air.
ŸSi le câble d'alimentation est
endommagé, il doit être remplacé par
le fabricant, son agent de service ou
une personne qualifiée pour éviter les
dangers.
ŸAVERTISSEMENT: pour éviter une
surchauffe, couvrez ou couvrez le
radiateur.
ŸATTENTION: Pour éviter le risque de
réinitialisation involontaire du fusible
thermique, cet appareil ne doit pas être
connecté via un appareil externe,
comme une minuterie ou un cercle qui
se connecte et se déconnecte selon
l'utilisation.
ŸLe radiateur ne doit pas être utilisé à
proximité d'une baignoire, d'une
douche ou d'une piscine.
Exigences de sécurité supplémentaires
pour les radiateurs

Dirigez toujours le flux d'air pour
optimiser la chaleur dans la pièce.
Laisser une distance minimale de 1
mètre entre n'importe quel côté de
l'appareil et un obstacle (meuble ou mur
par exemple) pour qu'il y ait une bonne
circulation d'air.
1. Placez le radiateur sur une surface
plane, sèche et propre.
L'installation
Votre appareil ne doit être utilisé que
comme un appareil portable (faites
attention à tous les avertissements de
sécurité ci-dessous).
2. Installez les roues comme indiqué
dans l'image suivante.
Avertissement: utilisez toujours l'appareil
avec les roues fixes.
Écran d'affichage et panneau
de commande.
1. Affichage LED de la température.
2. Veille (ON / OFF)
3. Mode Wi-Fi
4. Montée en température et minuterie
5. Diminution de la température et minuterie
6. Minuterie
7. Sélection de puissance
Évitez les coins, les petits espaces, les
planchers de bois franc, le plafond, etc.
POUR USAGE INTÉRIEUR
UNIQUEMENT!
1
24
35
6
7

Tous les boutons sont à configuration tactile
Bouton de sélection d'alimentation
chauffage
Indicateur de demi-puissance
* Lorsque les deux sont allumés, ils sont à pleine puissance
Appuyez sur l'indicateur de temps
Montée en température et minuterie
Réduction de température et minuterie
Indicateur de faible puissance
Mode d'emploi
Commutateur Wi-Fi
ŸBranchez l'appareil à AC220-240V Prise 50-60Hz,
elle est en état de veille avec écrans LED.
Pour démarrer le chauffage, appuyez sur le bouton
de veille.
Tournez et directement pour régler la température
cible de 5~35ºC, lorsque la température de réglage
est de 5ºC, appuyez à nouveau , l'écran affichera
le chauffage fonctionnera en mode antigel, la
température cible est fixée à 7 °C.
Pour régler la puissance, appuyez sur le bouton de
réglage de la puissance pour sélectionner la puissance
à partir de la position Basse, moyenne position haute
et position haute dans un cycle par chaque pression.
La position basse est représentée par un indicateur
" " allumé ; la position moyenne est représentée
éclairée " " indicateur, la position haute est
représentée allumée. Indicateurs " " et " "ensemble.
Pour régler la minuterie, appuyez sur et appuyez
sur + et - pour sélectionner de 0 à 24 heures.
Appuyez à nouveau pour terminer la fonction et revenir
pour afficher la température.
Pour vérifier le temps restant, appuyez une fois
la minuterie clignotera et l'écran affichera
l'heure restante pendant 3 secondes, puis continuez
montrant la température.
-
-
+
et générer un compte gratuit.
Vous pouvez également visiter www.tuya.com
pour plus information. Veuillez noter que Tuya
est constamment développer et mettre à niveau
leurs applications pour faire les plus conviviaux
et parfois, les affichages peuvent différer
légèrement de l'affichage indiqué dans ce
manuel en raison de mises à niveau.
Sélectionnez votre code pays, entrez votre
mobile numéro et sélectionnez « Obtenir »
pour recevoir un message contenant votre
code de vérification. Entrez votre code de
vérification et sélectionnez « Connexion ».
Lorsque le première utilisation pour allumer le
chauffage, le WiFi le voyant lumineux clignotera,
connectez-le dans l'APP. Réinitialisez le WiFi,
appuyez sur le bouton wifi pendant 3 secondes,
l'article émettra un "bip", le voyant WiFi
clignotera rapidement, vous pouvez maintenant
vous connecter dans l'application.
Ÿ
Ÿ
Ÿ
Ÿ
Ÿ
Ÿ
Bouton marche/arrêt
Indicateur de temps
Indicateur de chauffage
This manual suits for next models
2
Table of contents
Languages:
Other Bastilipo Heater manuals


Popular Heater manuals by other brands

INTELLI HEAT
INTELLI HEAT HALM-FL-LCD 4 user manual

Salda
Salda SAV 2000 Installation instruction

Detroit Radiant Products
Detroit Radiant Products GTD-20 Installation, operation, maintenance and parts manual

Westinghouse
Westinghouse WHLP0012 user manual

Reecon
Reecon Thermablaster RE5000FS manual

Melissa
Melissa 670-109 manual


