Batribike 50930 User manual

batribike.com
Hand Built in Europe
ELECTRIC BICYCLES
Display
Options
UPGRADES
Centre LCD
LED Display
Mini LCD
50713
50707-2
50930
50935
2
DEALERSTAMP
IMPORTANT PLEASE READ THIS MANUAL FULLY BEFORE USE
DISPLAY TYPE:-
LED
MINI LCD
CENTRE
LCD
/
/
FITMENT DATE:-
DAY MONTH YEAR
BICYCLE SERIAL №:-
FITTED and TESTED BY:-

3
Thank you for purchasing a Display Option for
your BATRIBIKE Electric Bicycle
This manual contains brief fitting notes intended for the Dealer and
User Instructions for each display type.
This manual should be left with the User after fitting.
Contents
Parts Identification ............................................ PAGE 4
Fitting Instructions ............................................ PAGE 6
Operating Instructions ...................................... PAGE 8
LED Option ............................................ PAGE 10
Mini LCD Option .................................... PAGE 14
Centre LCD Option ................................ PAGE 22
Troubleshooting ................................................ PAGE 31
Warranty ........................................................... PAGE 34

4
PARTS IDENTIFICATION
We continually strive to ensure that we provide you with the best possible products, therefore
SPECIFICATIONS ARE SUBJECT TO CHANGE WITHOUT NOTICE
1
2
3
4
5
6
7
8
9
10
11
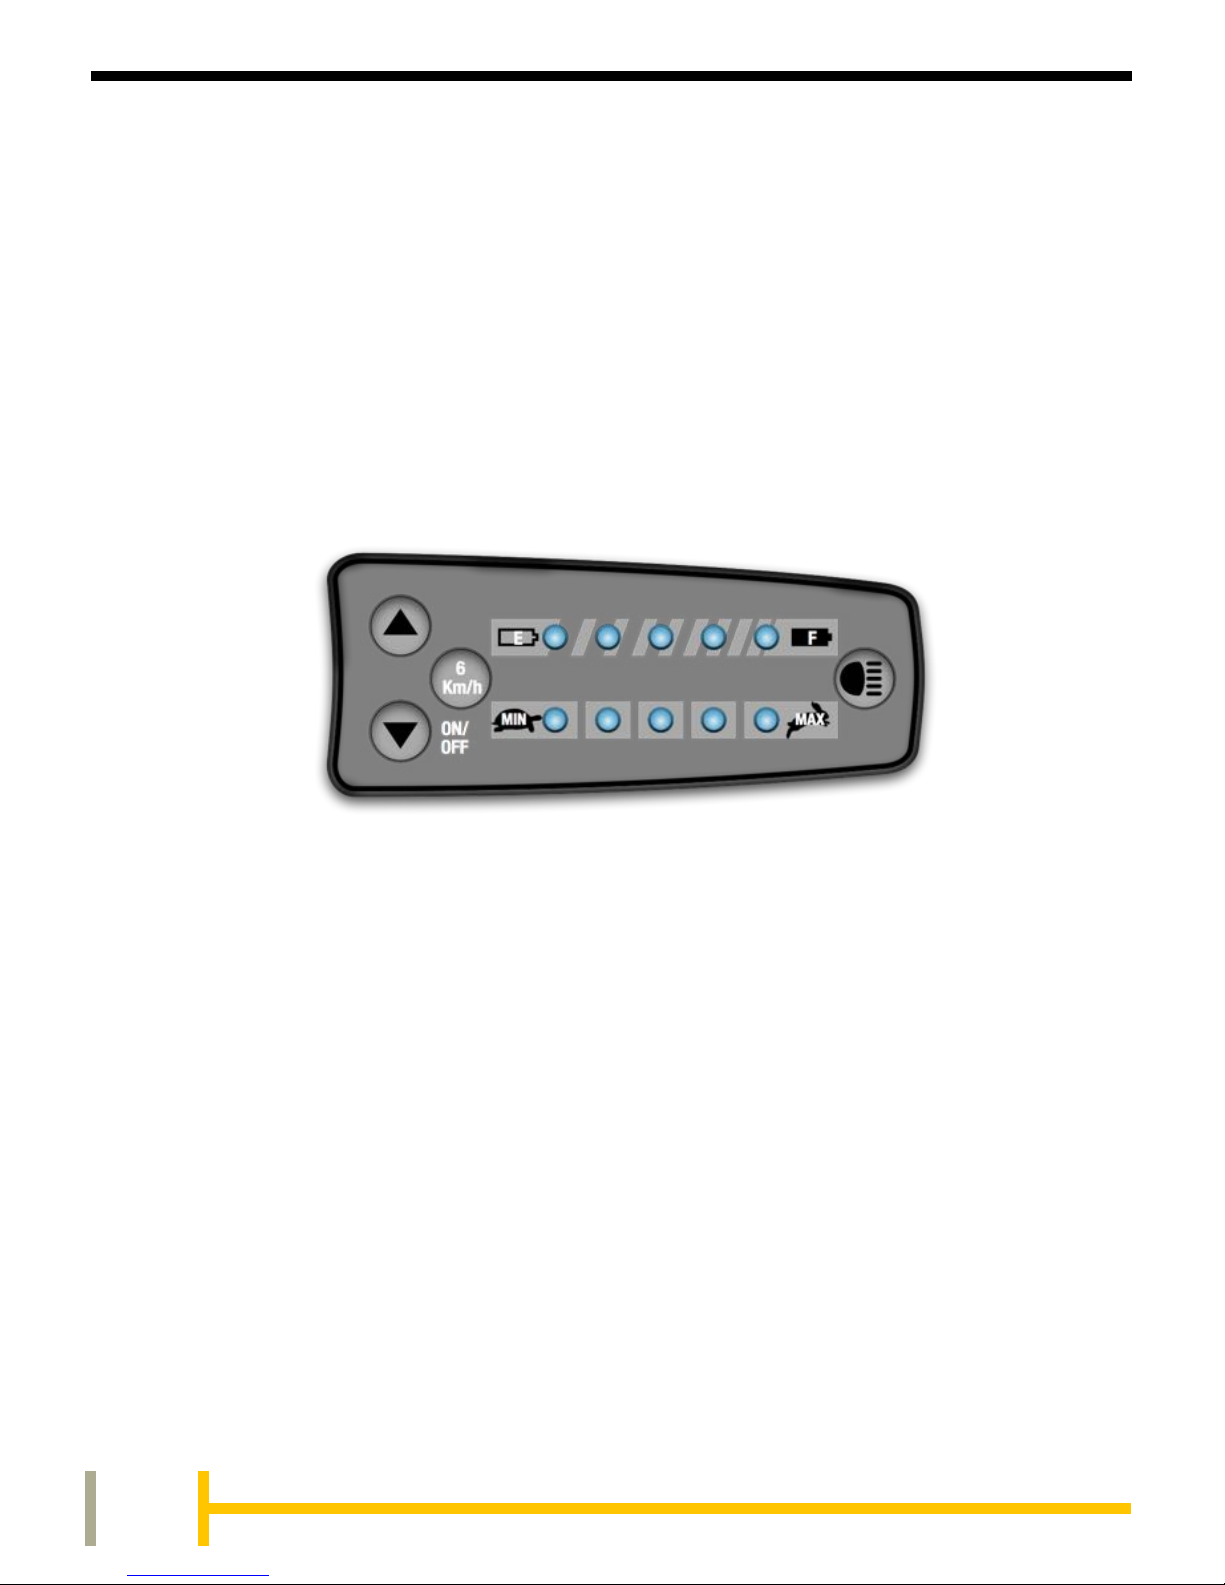
Lights ON/OFF Button
Mode Button
Power Assistance Level Indication
Power UP Button
Charging Socket
Battery Charge Level Indication
Walk Assist (6 Km/h) Button
LCD Information Area
Throttle (Pedalling Only) / Walk Assist
Power ON/OFF Button
Power DOWN Button
1
6
5
2
3
4
7
FITTED AS STANDARD ON:-
OMEGA
ALPHA
SIGMA
QUINTESSENTIAL
LED
CONNECTS TO BIKE
WIRING HARNESS
PRODUCT PART NUMBERS
The following shows the ProMovec part numbers required for each display type and bike model.
Please ensure you select the correct size bracket if fitting a Centre Display
50713
50707-2
50930
50935
50937
50938
Centre LCD Bracket for handlebar diameter 32 mm
Centre LCD Bracket for handlebar diameter 22 mm
LED Display Unit
Centre LCD without Charging Socket (All models except PERDU)
Mini LCD without Charging Socket (All models except PERDU)
Centre LCD with Charging Socket (For PERDU)

5
Centre LCD
5
1
8
9
3
FITTED AS STANDARD ON:-
TEN
7
10
CONNECTS TO BIKE
WIRING HARNESS
SWITCH UNIT
CONNECTION
5
7
1
8
9
3
10
11
ONLY USED
ON PERDU
FITTED AS STANDARD ON:-
PERDU
DELTA
Mini LCD
CONNECTS TO BIKE
WIRING HARNESS
ON REAR
PERDU ONLY
11
PERDU
VERSION
STANDARD
VERSION
50930
50935

6
Dealer Instructions
Fitment of Display Upgrade
These instructions are designed to be used by Authorised
BATRIBIKE Dealers and competent personnel.
It is important that you ensure that the existing display is operating
correctly with no errors prior to fitting a display upgrade. Any errors
or malfunctions must be rectified before following this procedure.
1. Trace the display connection cable from the display to where it
enters the frame.
2. Gently unwrap the cable cover/spiral wrap to release the display
cable.
3. Carefully remove plastic shroud from frame aperture using small
flat bladed screwdriver inserted into rear of shroud to release the
clip.
4. Gently pull the display cable from the frame aperture until the
plug and socket can be seen.
5. Unplug the connecting plug from the wiring harness.
6. Remove the existing display from the handlebars. (It may be
necessary to first remove the grip, brake lever etc.)
7. Depending upon display type is to be fitted:-
EITHER, for LED and Mini LCD
a. Fit the new display onto the handlebars (and then refit brake
lever, grip etc. as necessary).
OR, for Centre LCD
b. Fit the switch unit onto the handlebars, fit the centre display
onto the middle of the handlebars, connect the switch unit
lead and the centre display taking care to use the correct
plug, (and then refit brake lever, grip etc. as necessary).

7
8. Plug the new display cable into the wiring harness.
9. Test for correct operation.
10. Gently push the cable back into the frame aperture.
11. Refit plastic shroud ensuring the clip secures the shroud into the
frame aperture.
12. Refit the cable cover/spiral wrap.
13. Ensure that the user is provided with this instruction manual.
PLUG &
SOCKET
PLASTIC
SHROUD
DISPLAY
SPIRAL
WRAP
AROUND
WIRING
HARNESS
INSIDE
FRAME
APERTURE
EXISTING
GENTLY INSERT
SCREWDRIVER
BLADE HERE
ALPHA MODEL
USED AS
EXAMPLE
OTHER MODELS
SIMILAR
PLUG ON
DISPLAY
CABLE
SOCKET ON
WIRING
HARNESS
8
User Instructions
Your BATRIBIKE electric bicycle has a choice of display upgrade
available. Refer to the following sections for Operating Instructions
for each display type.
LED Display
See page 10 for operation.
The operation of the LED system provides adjustable SPEED in five
selectable steps. Level 1 powers up to 6 mph, whilst level 5 powers
up to 15 mph. Each level operates at up to full power, and power
cuts out at the selected speed level.
9
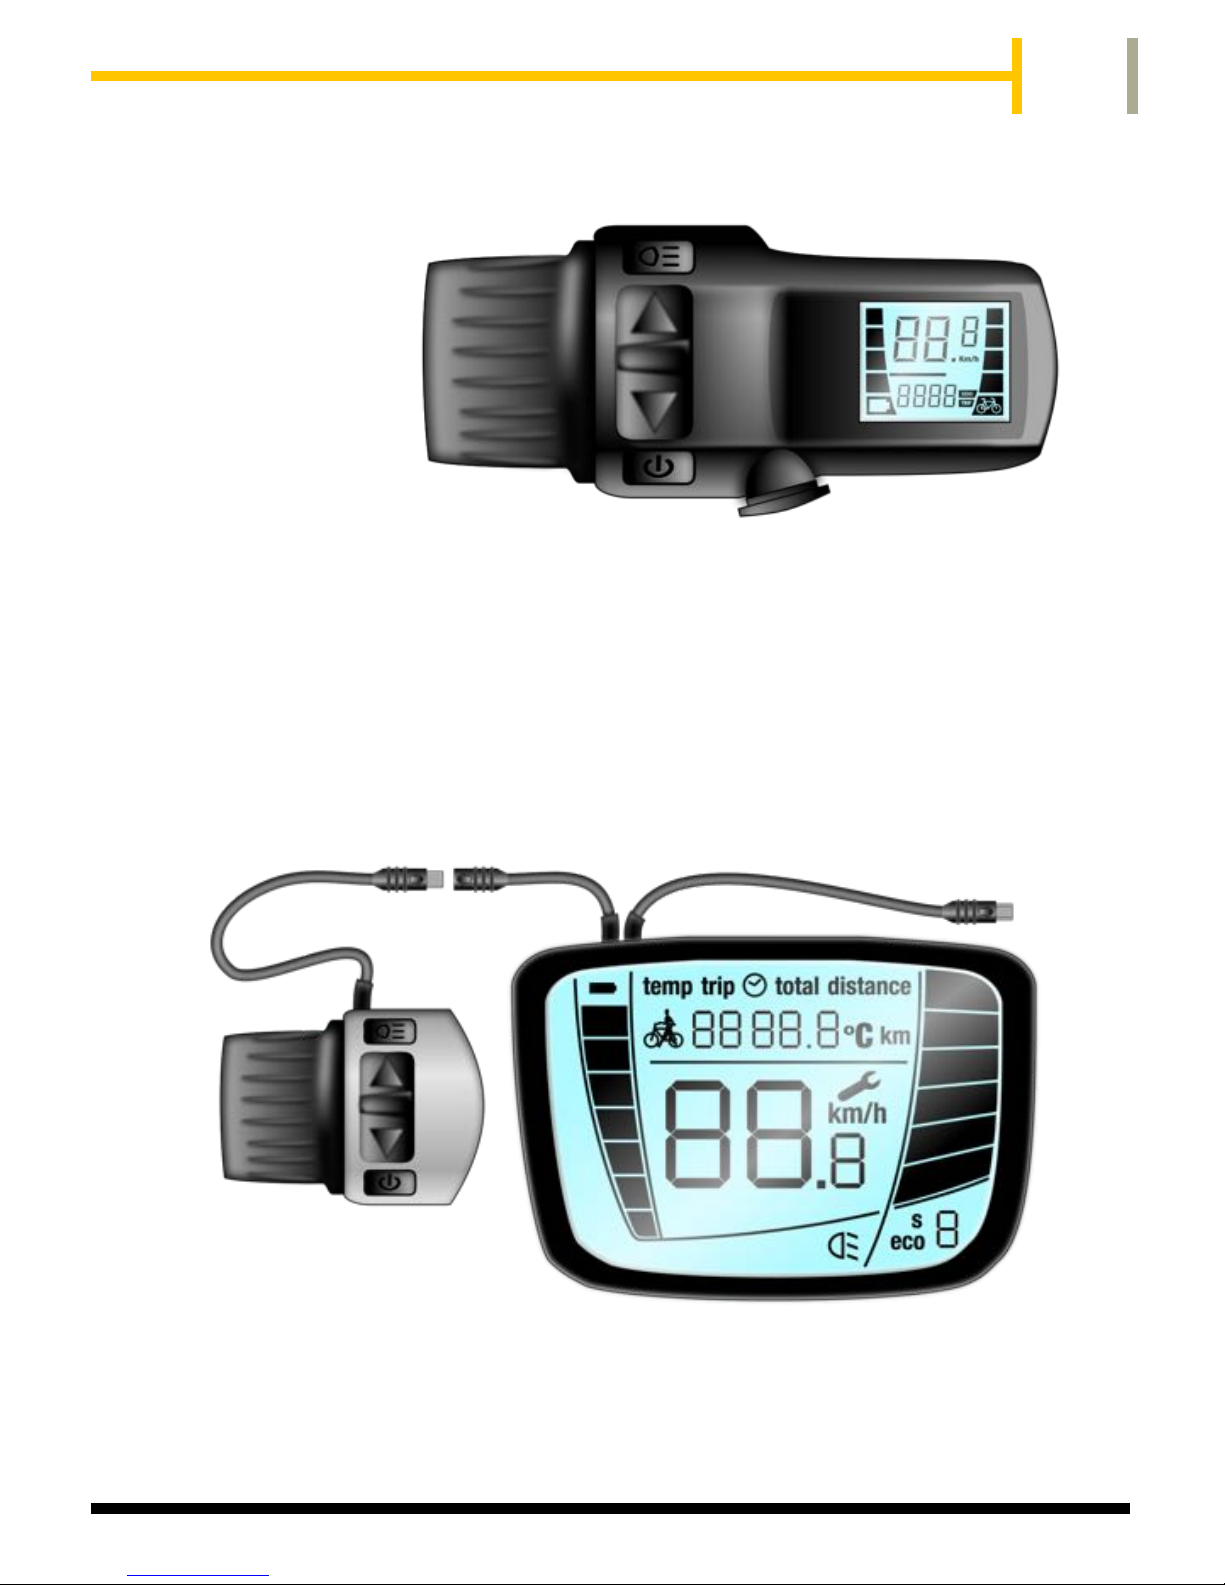
Mini LCD
See page 14 for operation.
The operation of the Mini LCD system has four selectable POWER
levels. Level 1 gives 25% of the power, level 2 - 50% up to level 4,
100% power. Speed range is from 0 to 15 mph in all levels. This is
available as an easy to fit upgrade.
Centre LCD
See page 22 for operation.
The Centre LCD system provides more power levels than the Mini
LCD and a larger display makes it easier to read. This is available
as an easy to fit upgrade.

10
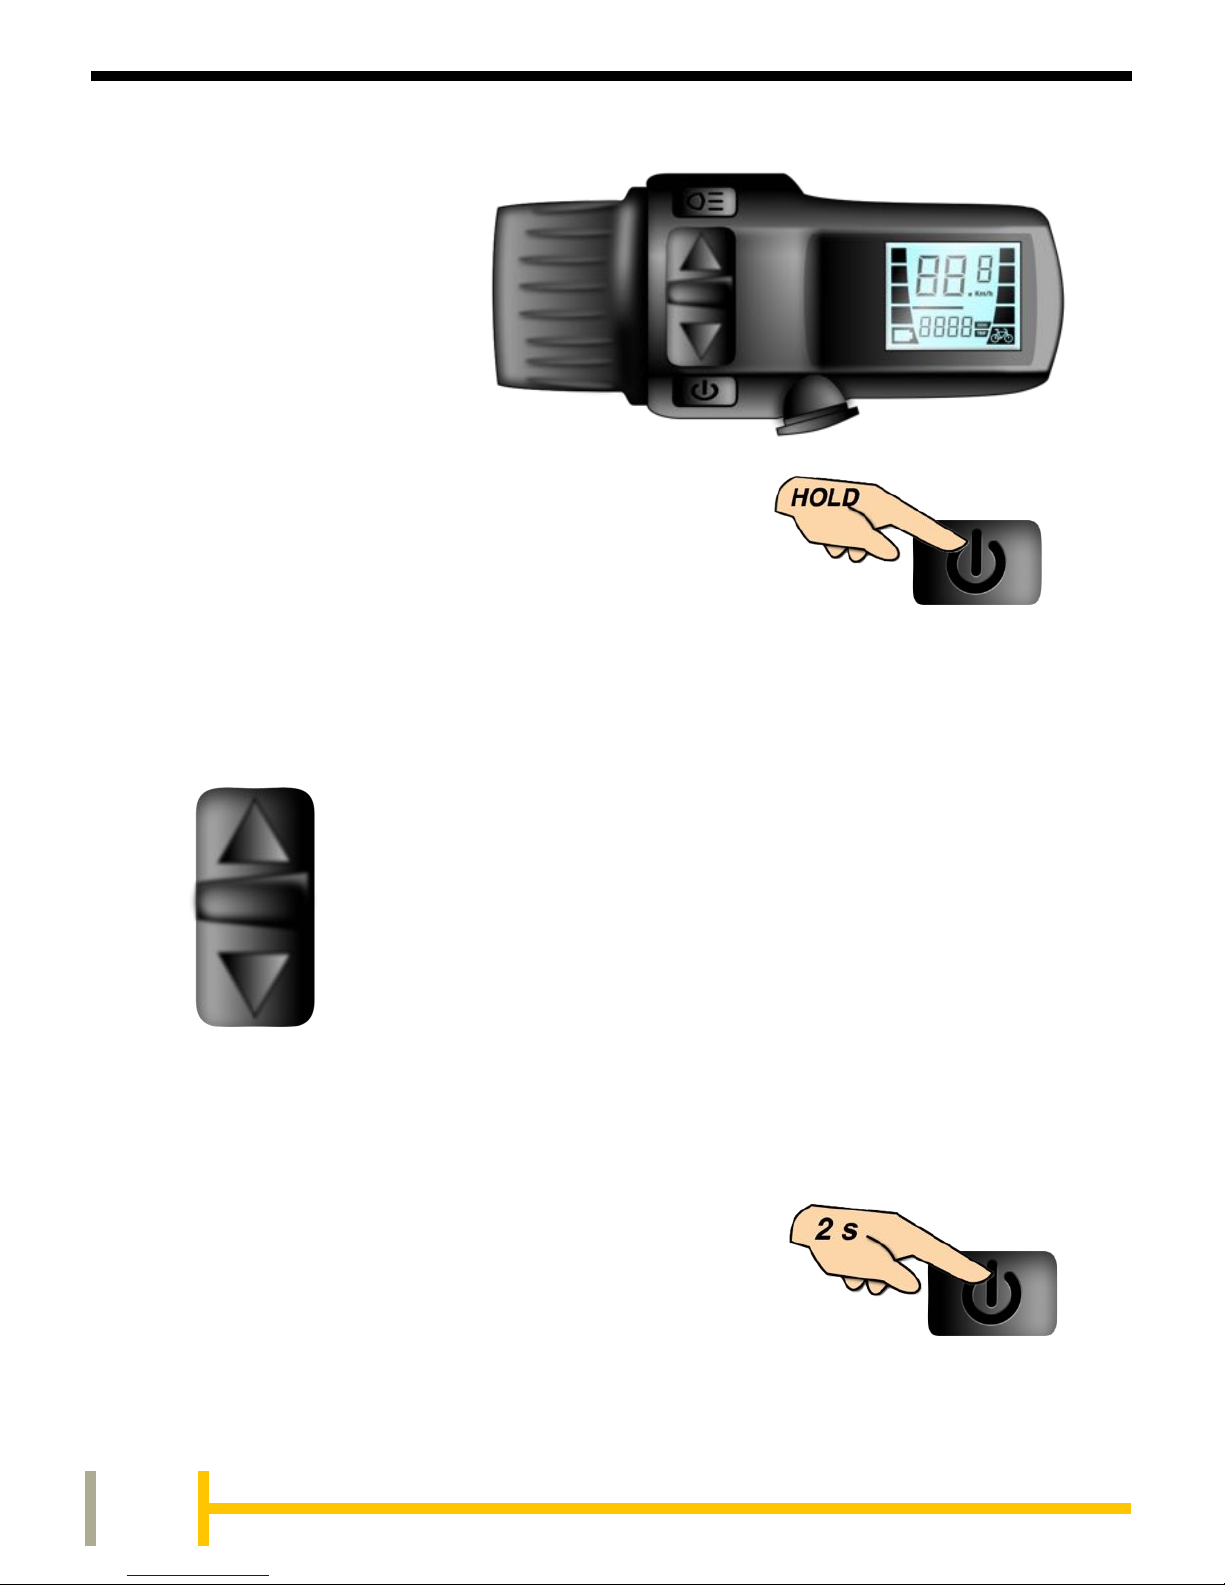
LED Operation
To use under electric power, switch on at
the battery if required, (bike model specific),
then press and hold the DOWN button on
the handlebar LED display until the blue
lights are seen.
Switching On
To turn off the LED and the power to the bike, press and hold the
DOWN button for 2 seconds.
If the power is left on for an extended
period and the bike is not used, then
the power will automatically be turned off.
To fully turn off the power, switch off at the battery if required,
(bike model specific).
Switching Off
Control Buttons
By means of the three buttons, UP, DOWN and
6 Km/h, on the handlebar mounted display unit,
the various functions of the power controller can
be utilised.
See the following sections for details.

11
Bicycle Lights
If your BATRIBIKE Electric Bicycle is supplied with lights on the
front and rear, then these are switched on by pressing the LIGHT
button on the handlebar display.
To turn the lights off, again press the LIGHT button.
The top row of LEDs show the charge
remaining in the battery. The indicators
will gradually go out as the battery
power is used up. Refer to the table
below for details.
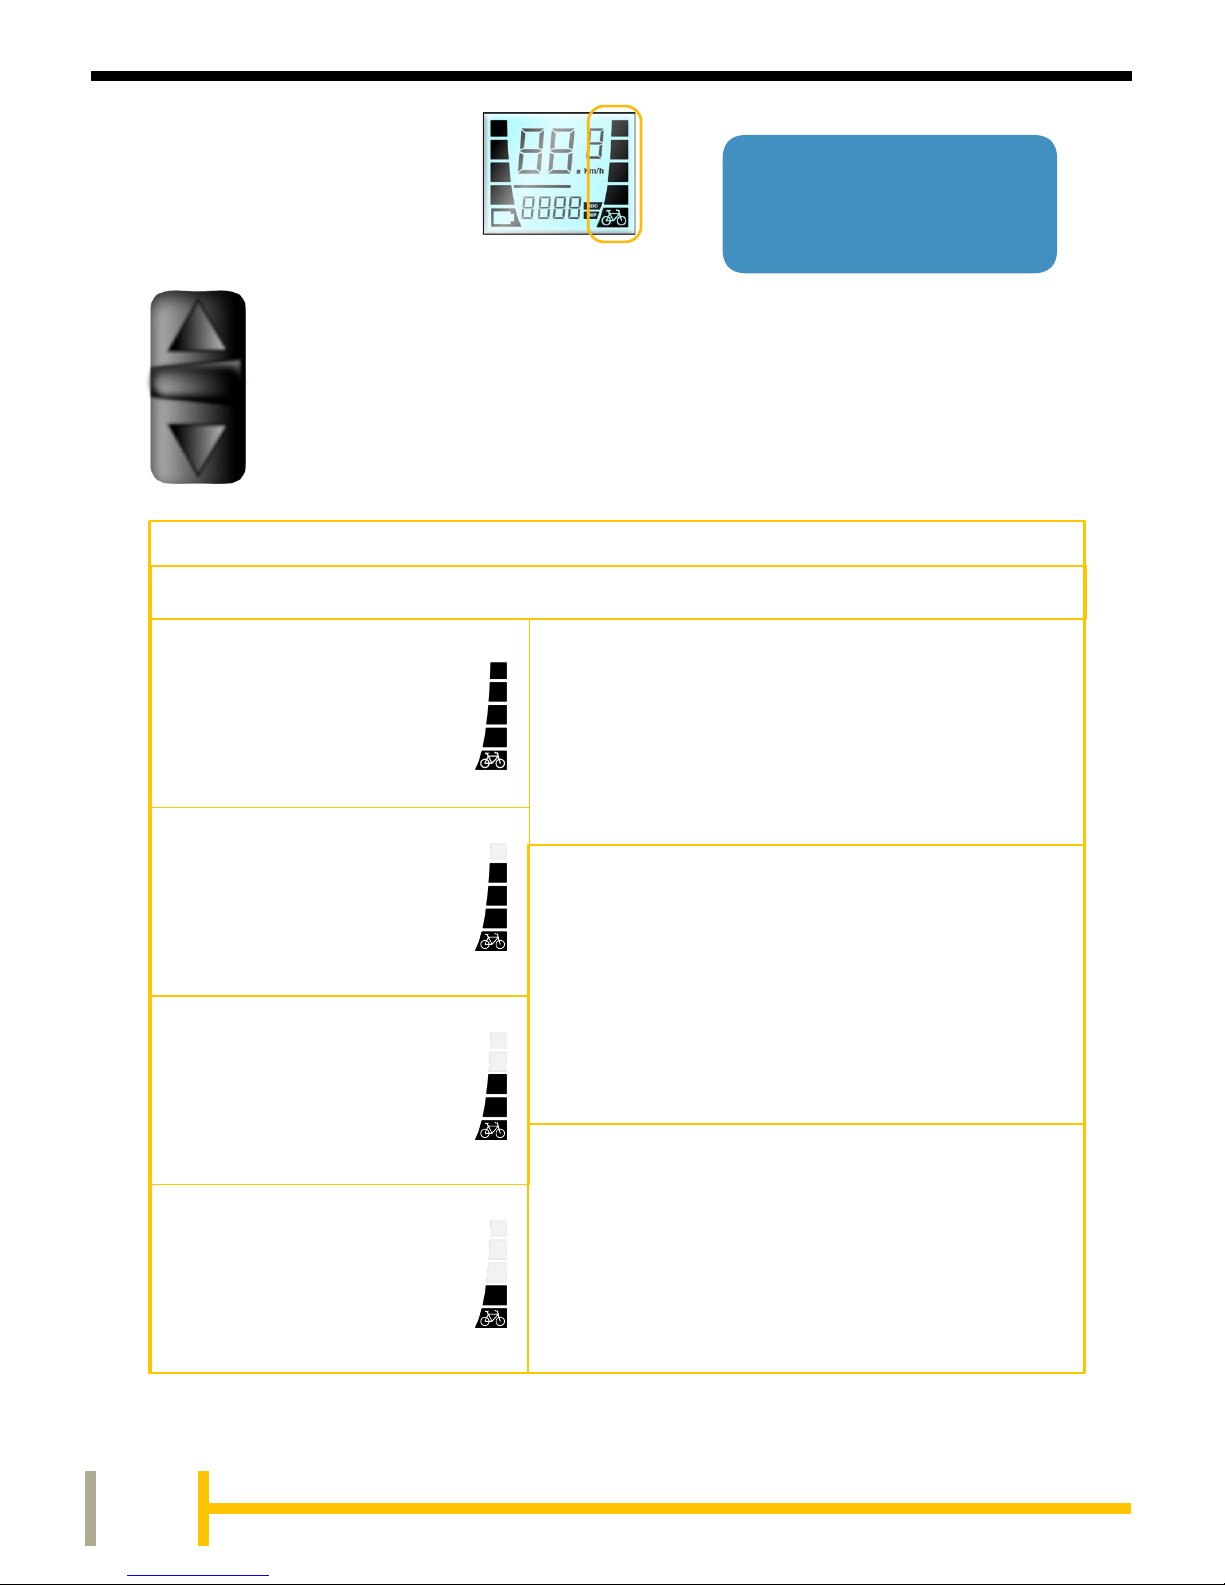
Battery Meter
70 - 100%
SYMBOL
DISPLAYED
CHARGE
REMAINING
BATTERY METER DISPLAYS THE CHARGE REMAINING IN THE BATTERY
BATTERY IS
EXHAUSTED AND
SHOULD BE
RECHARGED AS
SOON AS POSSIBLE
50 - 70%
30 - 50%
15 - 30%
0 - 15%
EMPTY
OR
First Light Flashes 8 Times

12
There are 5 levels of pedal assistance available from the
motor. Using the UP and DOWN buttons you can select
from Level 1 (Lowest), to Level 5 (Highest). The motor will
then be activated upon pedalling.
Pedal Assistance
Please remember that the above values are provided as a guide.
Due to manufacturing tolerances the performance may vary.
PEDAL ASSISTANCE FROM THE MOTOR
LEVEL
RANGE / SPEED
Provides maximum power when
negotiating hills and head winds.
Great when needing to simply get from
A to B as fast as possible.
Great for commuting to work.
EXAMPLE OF USAGE
Normal Use Mode.
These are the levels to use for everyday
cycling. Gives good performance whilst
maximising usable range per charge.
Best for Leisure Use.
Use these lower power levels when
negotiating busy cycle paths and
crowded areas. Also use when setting
off and gradually increase through the
levels for a smoother performance.
Ideal for negotiating obstacles.
up to 28 miles / 15 mph
up to 32 miles / 12 mph
up to 48 miles / 8 mph
up to 60 miles / 6 mph
up to 38 miles / 10 mph
up to 45 km / 25 km/h
up to 50 km / 20 km/h
up to 60 km / 16 km/h
up to 77 km / 13 km/h
up to 100 km / 10 km/h
RANGE VALUES
QUOTED ASSUME THAT
THE STANDARD SIZE
BATTERY IS FITTED

13
Weather and terrain will affect the performance. In hilly areas, or
when the bike is heavily loaded, there will be a significant increase
in the power used from
the battery and hence
the range will decrease
accordingly. A lightly
loaded bike will achieve
higher performance
levels. (These results
were obtained by test
riders in optimal
conditions - 75kg rider,
level ground, no wind).
Your BATRIBIKE bicycle has a Walk Assist
Mode. This is designed to propel the bike
under power at a low speed of 6 km/h (4
MPH) and is ideal to help you when pushing
the bike up steep hills. It is not designed for
prolonged use or whilst riding.
This feature only operates whilst the button is
pressed.
Assisted Walking Mode (6 km/h)
THEN HOLD
If the assistance level is set to ZERO, then the motor will not be
turned on. Your BATRIBIKE will now act and feel like a normal
bicycle. This is useful when you are feeling fit at the start of a
journey or using your bike for exercise purposes. Power is still only
a button press away.
No Assistance - Normal Pedal Bicycle
14
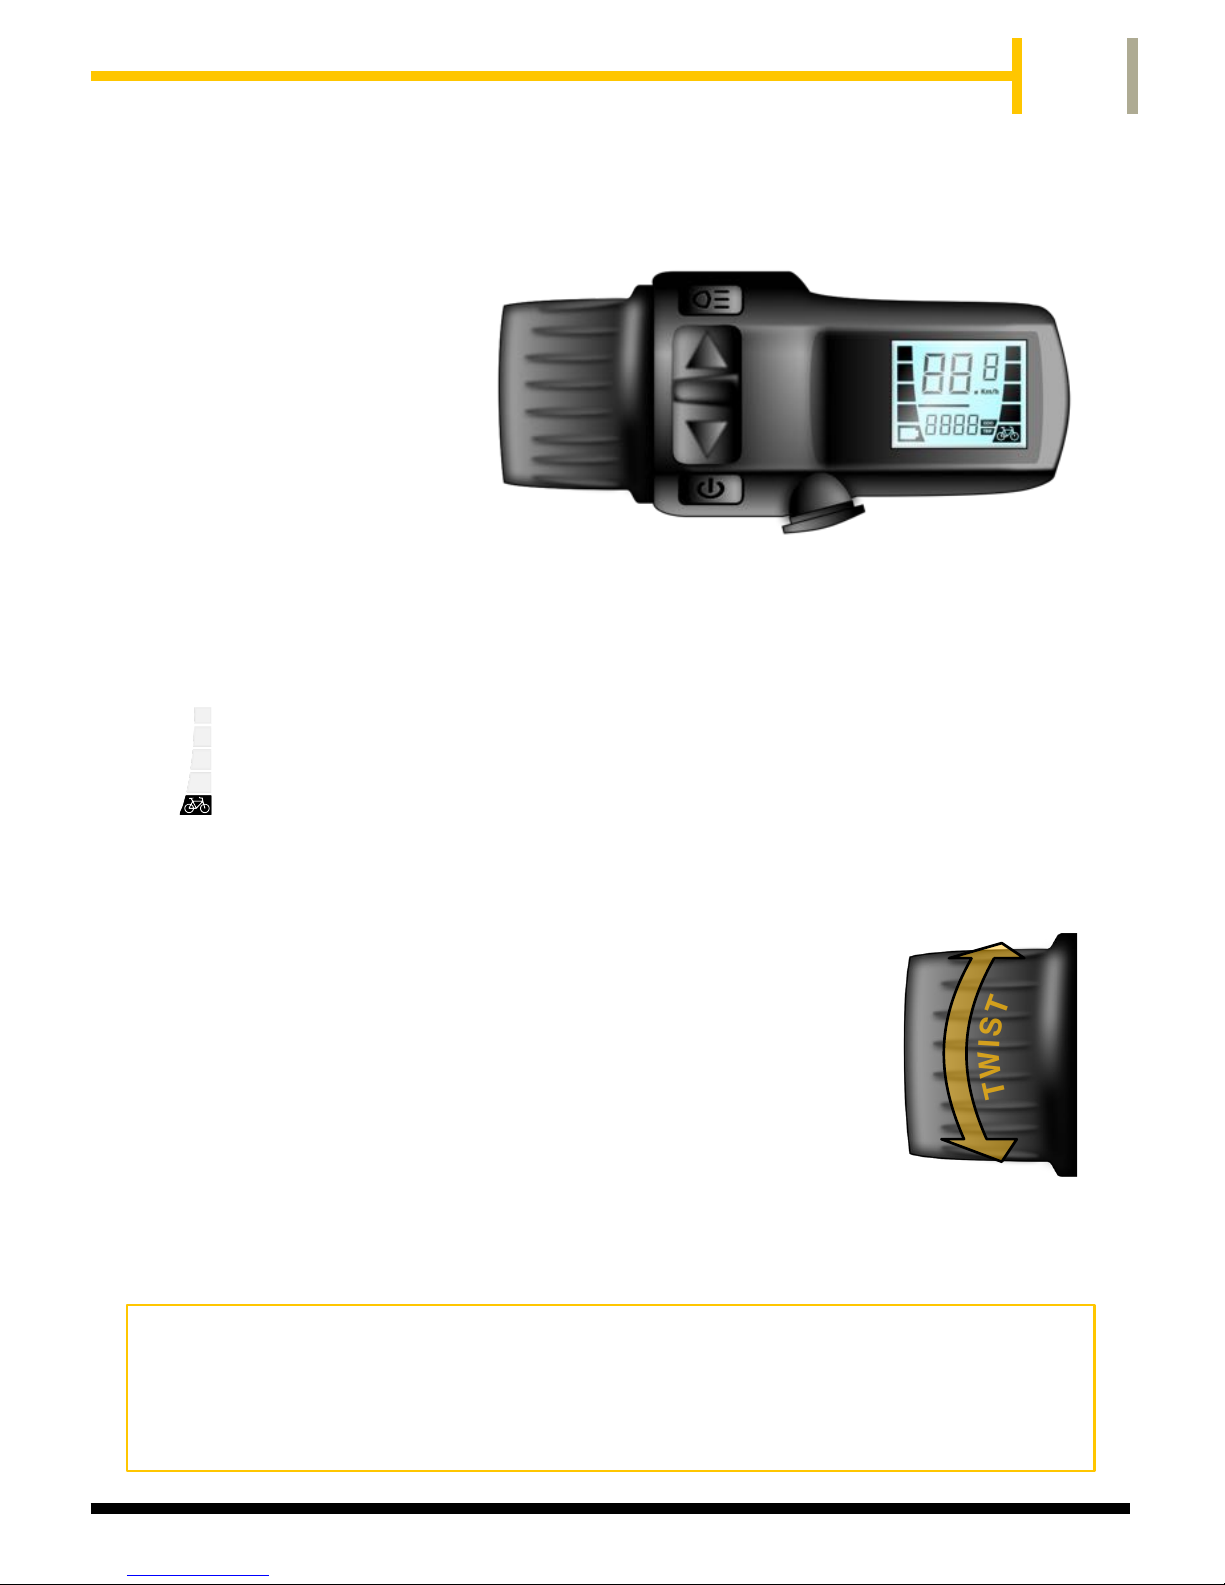
Mini LCD Operation
To use under electric power, switch on by
pressing and holding the POWER button on
the handlebar unit until the display lights.
Switching On
To turn off the LCD and the power to the bike, press and hold the
POWER button for 2 seconds.
If the power is left on for an extended
period and the bike is not used, then
the power will automatically be turned off.
Switching Off
Control Buttons
By means of the three buttons, UP, DOWN and
MODE, on the handlebar mounted display unit,
the various functions of the power controller can
be utilised.
See the following sections for details.

15
Bicycle Lights
If your BATRIBIKE Electric Bicycle is supplied with lights on the
front and rear, then these are switched on by pressing and holding
the LIGHT button. The LCD backlight will also dim when the lights
are on so as not to be too bright at night.
To turn the lights off, again press and
hold the LIGHT button.
To the left of LCD is the battery meter which
shows the charge remaining in the battery.
The indicators will gradually go out as the
battery power is used up. Refer to the table
below for details.
Battery Meter
70 - 100%
SYMBOL
CHARGE REMAINING
BATTERY METER DISPLAYS THE CHARGE REMAINING IN THE BATTERY
BATTERY IS
EXHAUSTED AND
SHOULD BE
RECHARGED AS
SOON AS POSSIBLE
50 - 70%
30 - 50%
15 - 30%
0 - 15%
EMPTY
16
There are 4 levels of pedal assistance available from the
motor. Using the UP and DOWN buttons you can select
from Level 1 (Lowest), to Level 4 (Highest). The motor will
then be activated upon pedalling.
Pedal Assistance
Please remember that the above values are provided as a guide.
Due to manufacturing tolerances the performance may vary.
PEDAL ASSISTANCE FROM THE MOTOR
LEVEL / RANGE
Provides maximum power when
negotiating hills and head winds.
Great when needing to simply get from
A to B as fast as possible.
Great for commuting to work.
EXAMPLE OF USAGE
Normal Use Mode.
These are the levels to use for everyday
cycling. Gives good performance whilst
maximising usable range per charge.
Best for Leisure Use.
Use these lower power levels when
negotiating busy cycle paths and
crowded areas. Also use when setting
off and gradually increase through the
levels for a smoother performance.
Ideal for negotiating obstacles.
up to 28 miles
up to 35 miles
up to 60 miles
up to 45 miles
up to 45 km
up to 55 km
up to 70 km
up to 100 km
Full Power
75% Power
50% Power
25% Power
RANGE VALUES
QUOTED ASSUME THAT
THE STANDARD SIZE
BATTERY IS FITTED
17
Weather and terrain will affect the performance. In hilly areas, or
when the bike is heavily loaded, there will be a significant increase
in the power used from the battery and hence the range will
decrease accordingly.
A lightly loaded bike
will achieve higher
performance levels.
(These results were
obtained by test riders
in optimal conditions -
75kg rider, level
ground, no wind).
Your BATRIBIKE bicycle has a Walk Assist feature
which utilises a twist grip throttle. This is designed to
propel the bike under power at a low speed of 6 km/h
(4 MPH) and is ideal to help you when pushing the
bike up steep hills.
It is also designed to be used to control the power
whilst pedalling right up to the maximum of 15 mph,
regardless of the level selected. If the rider is not pedalling this will
only work up to 4 mph.
Throttle Mode - Assisted Walking (6 km/h)
If the assistance level is set to ZERO, then the motor will
not be turned on. Your BATRIBIKE will now act and feel
like a normal bicycle. This is useful when you are feeling
fit at the start of a journey or using your bike for exercise
purposes. Power is still only a button press away.
No Assistance - Normal Pedal Bicycle
BS EN15194 Compliance
The Throttle Operation conforms to BS EN15194.
DECREASE
INCREASE
T
W
I
S
T

18
CYCLE COMPUTER
The BATRIBIKE mini LCD has useful Cycle Computer functions
built in.
When first turned
on the display
shows the Speed
in the top of the
display, and the
Total Distance
(ODO) in the lower
part.
The assistance level is set to the lowest level (1) at initial power on.
Initial Display (SPEED and ODO)
To change the display to show the Trip Distance, simply press the
MODE button. Repeat to return to the ODO display.
Trip Distance

19
To reset the Trip Distance at the start of a journey simply press and
hold the MODE button until the Trip display resets to zero.
Resetting the Trip
The Odometer distance displays the total distance travelled by the
bicycle since leaving the factory and cannot be reset.
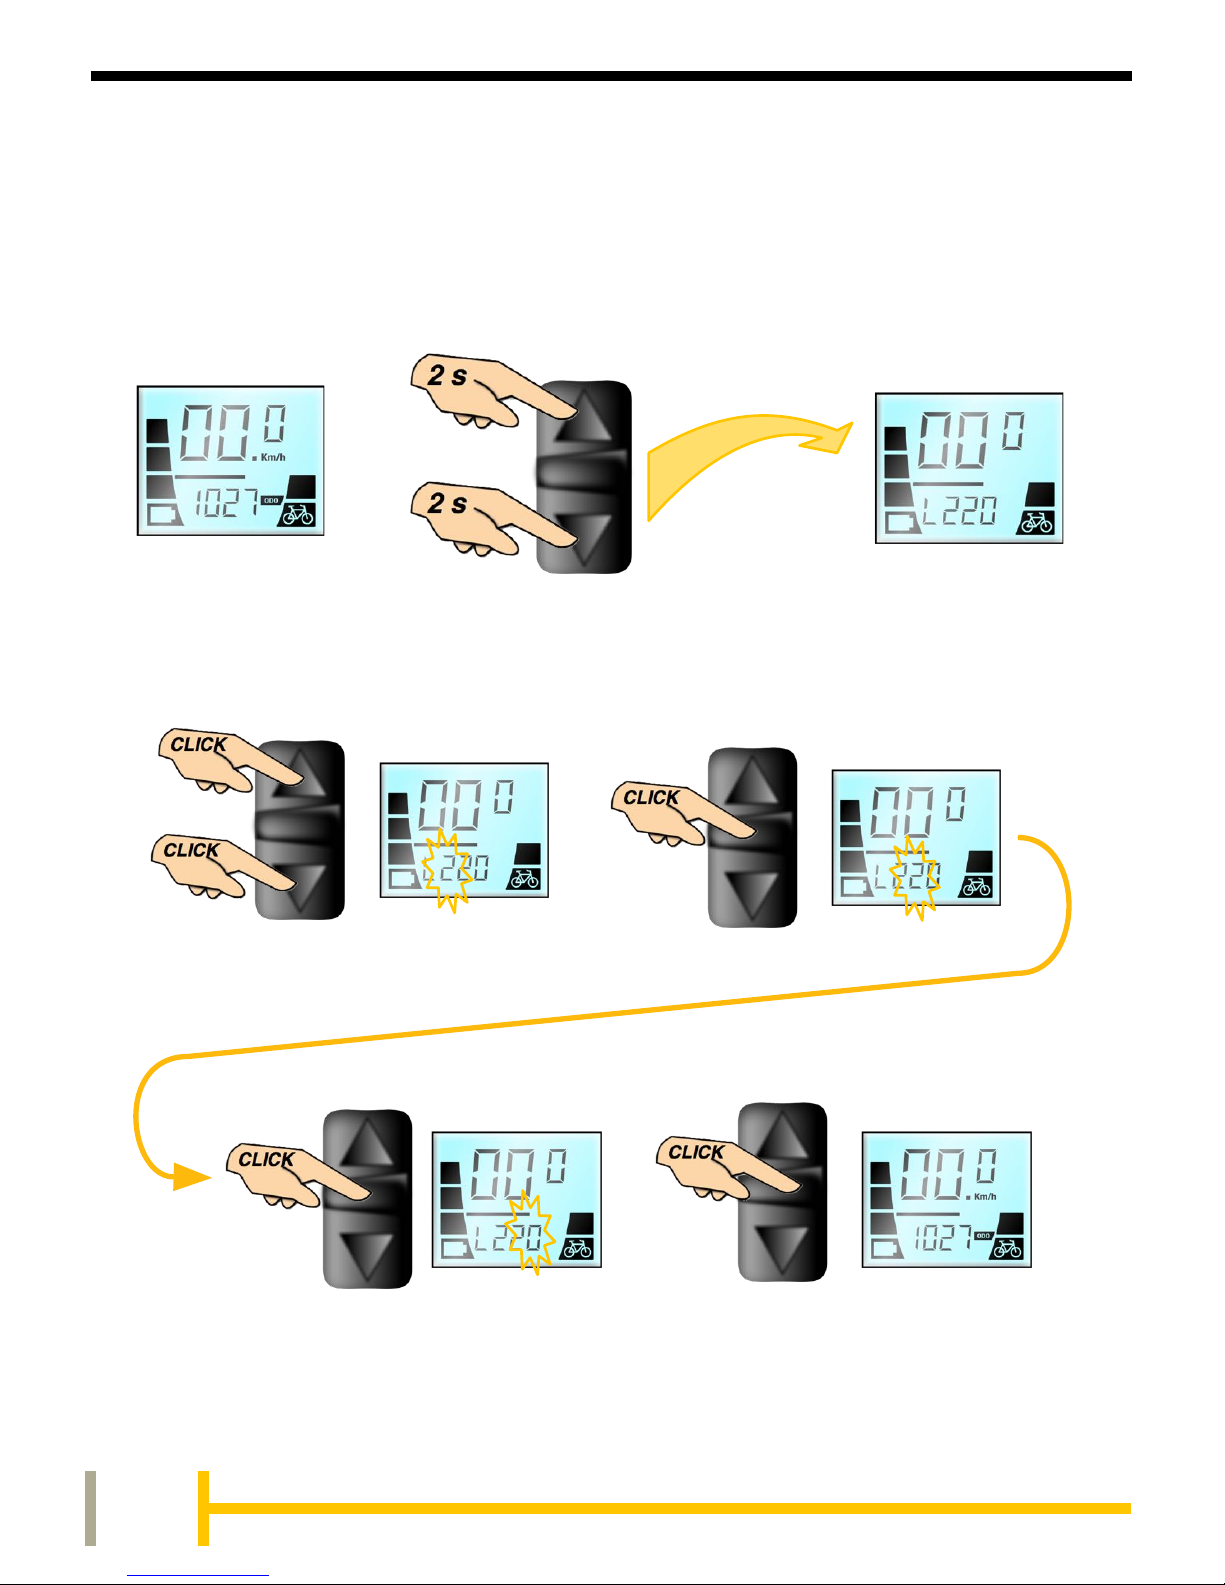
The display can be changed to show distances and speeds in Miles
or Kilometres. To change simply press and hold the DOWN button
for 10 seconds. Repeat to change the units back again.
Setting Distance Units (Miles or Km)
20
TOGETHER
When you change the display the tyre size will need to be set to
suit the tyre circumference. This will ensure that the speed and
distance readouts are as accurate as possible.
Setting Wheel Size (Circumference)
Value needs to be set according to the chart opposite.
OR
Set first digit
Set second digit
Set third digit
Confirm to return
to normal display
Values can range from L150 to L250
This manual suits for next models
3
Table of contents
Other Batribike Bicycle Accessories manuals

Popular Bicycle Accessories manuals by other brands


Specialized
Specialized Elite CylcoComputer user manual

Sigma
Sigma BC 16.16 manual

Playcore
Playcore Dero Setbacks installation instructions

VDO Cyclecomputing
VDO Cyclecomputing x3dw instruction manual

Cateye
Cateye RAPID X2 manual

buratti meccanica
buratti meccanica Clorofilla Trail Use and maintenance manual


