Batribike CONNECT+ User manual

batribike.com
ELECTRIC BICYCLES
Owner
Manual
CONNECT+
CONTROL SYSTEM
Quality Design and Build

2
Thank you for purchasing a BATRIBIKE Electric Bicycle
The CONNECT+ control system fitted to your bicycle has been
designed and developed by our Danish partner Promovec.
Your bicycle can be operated with just the handlebar mounted
control / display or, to enhance your experience, you can access
additional features via your smartphone*.
You will need to dowload the app. either iOS or Android, please
search for Promovec Connect.
*If you choose to mount your smartphone on the handlebars you will
need a suitable bicycle phone holder - not supplied.
For the bicycle functions of your BATRIBIKE Electric Bicycle
please see separate manual.

3
Contents
Handlebar Control ......................................... PAGE 3
Handlebar Control Operation .......................... PAGE 4
Handlebar Battery Meter ................................. PAGE 6
Troubleshooting (LED flashes) ....................... PAGE 7
Extended Features - Using the App. .............. PAGE 8
App. Display .................................................. PAGE 10
Setting the Units & Wheel Size ...................... PAGE 11
Backlight (Android) ......................................... PAGE 13
Information Bar .............................................. PAGE 14
Assist Levels and Driving Mode ...................... PAGE 15
Map ................................................................ PAGE 21
Service Tab ................................................... PAGE 22
Wheel Size Data ............................................ PAGE 23
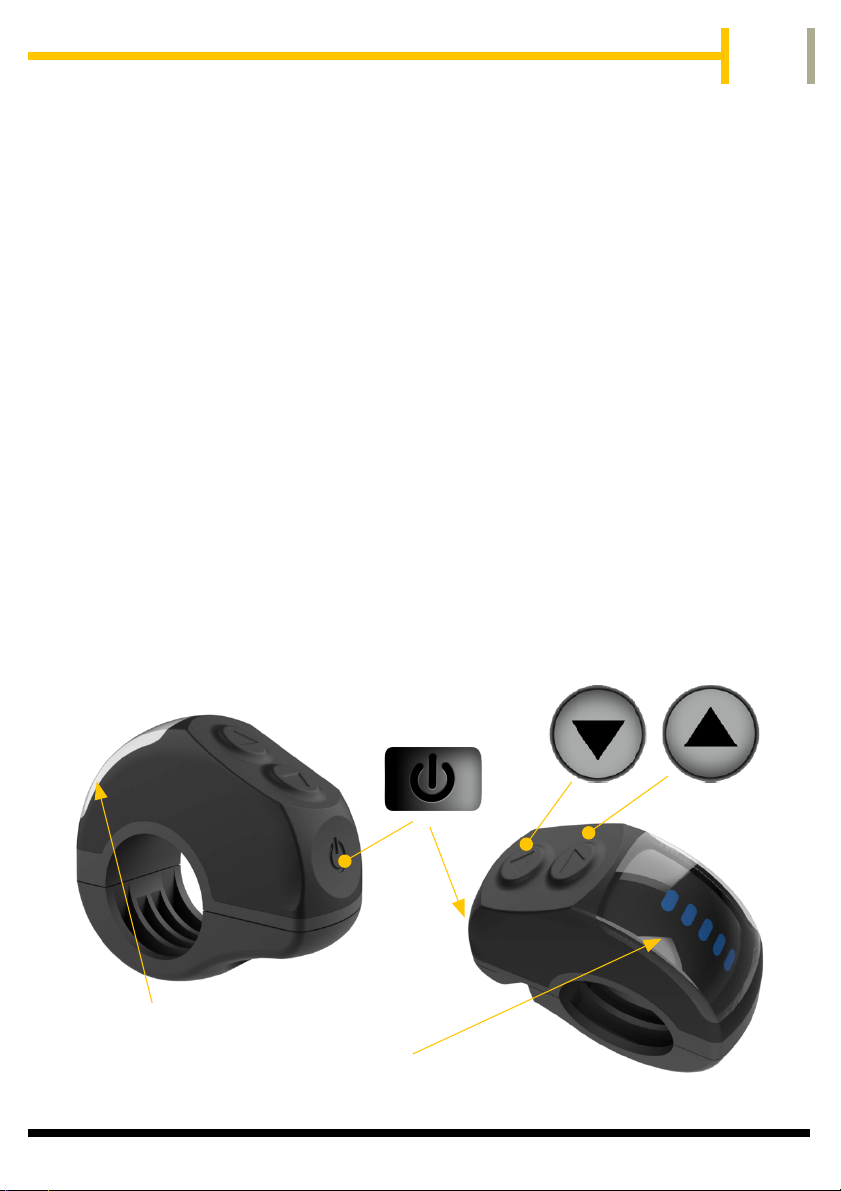
Handlebar Control
Battery Level indicator (Blue) &
Assist Level indicator (Green)
UP and DOWN buttons
ON / OFF

4
Handlebar Control Operation
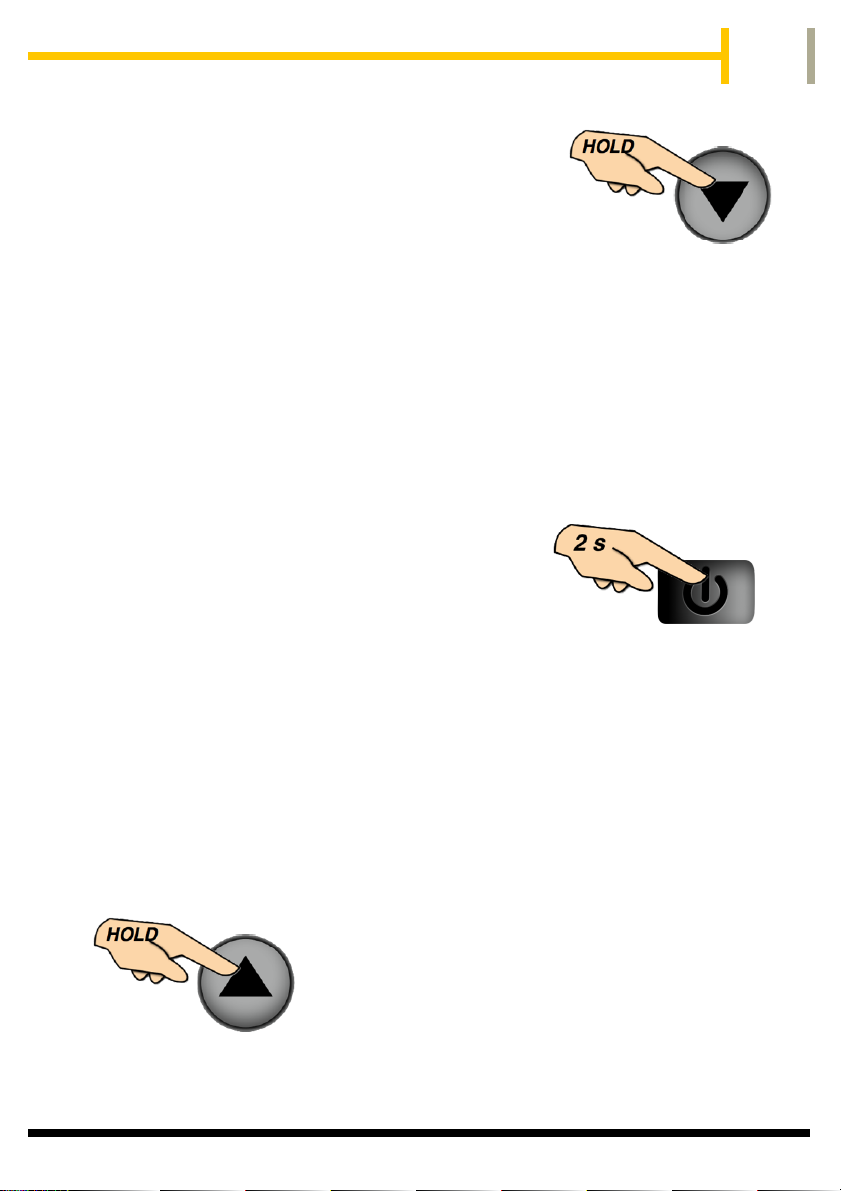
To use under electric power, switch on at
the battery if required, (bike model specific),
then switch on by pressing and holding the
POWER button on the handlebar unit until
the display lights (blue).
Switching On
Control Buttons
By means of the UP and DOWN buttons on the handlebar
mounted display unit, the various functions of the power
controller can be utilised.
There are 5 levels of pedal assistance available from the
motor. Using the UP and DOWN buttons you can select from
Level 1 (Lowest), to Level 5 (Highest). The motor will
then be activated upon pedalling.
The GREEN LEDs will light when the UP and DOWN
buttons are pressed indicating the assistance level.
The LEDs will then return to BLUE showing the
battery meter, until pressed again.
For extended features see the section on using
the app.
Display LED Colours
The handlebar display utilises two different colour
LEDs for different functions.
Battery Meter BLUE Assistance Level GREEN
assistance
level 2
selected

5
To turn off the LED and the power to the bike, press and hold the
POWER button for 2 seconds.
If the power is left on for an extended
period and the bike is not used, then
the power will automatically be turned off.
To fully turn off the power, switch off at the battery if required,
(bike model specific).
Switching Off
Bicycle Lights
If your BATRIBIKE Electric Bicycle is supplied with lights on the
front and rear, then these are switched on by pressing and holding
the UP button on the handlebar display.
To turn the lights off, again press and hold the UP button.
If your BATRIBIKE bicycle has a Walk Assist
Mode (model specific) it is designed to propel
the bike under power at a low speed of 6 km/h
(4 MPH). Walk Assist is ideal to help you when
pushing the bike up steep hills. It is not
designed for prolonged use or whilst riding.
This feature only operates whilst the down
button is pressed.
Assisted Walking Mode (6 km/h)

6
Handlebar Battery Meter
Battery Meter
70%
to
100%
SYMBOL DISPLAYED
CHARGE REMAINING
BATTERY METER DISPLAYS THE CHARGE REMAINING IN THE BATTERY
BATTERY IS
EXHAUSTED AND
SHOULD BE
RECHARGED AS
SOON AS POSSIBLE
50%
to
70%
30%
to
50%
15%
to
30%
0
to
15%
EMPTY
OR
First
Light
Flashes
4 Times
The vertical row of BLUE LEDs show the
charge remaining in the battery. The indicators
will gradually go out as the battery power is
used up. Refer to the table below for details.
When the LEDs are GREEN they indicate
assistance level.

7
TROUBLESHOOTING
If the first LED in the battery indicator (blue) starts to flash,
this indicates that the system has detected an error. The
number of flashes determine the error code.
Diagnostic Error Messages
Number of
Flashes
Error
Type
Action
Required
1
Motor Error
Check Motor Plug, if all OK
Contact Dealer for Assistance
2
Controller Error
Contact Dealer for Assistance
3
Display Error
5
Brake Sensor Error
(if fitted)
6
Low Battery Voltage
Charge the Battery
Contact Dealer for Assistance
Check brake lever returns fully
and restart the system, if all OK
Contact Dealer for Assistance
4
7
8
9
10
11
Speed Sensor Error
Battery Error
High Current or
Overload
Communication Error
Battery Voltage
too High
Display Error
Contact Dealer for Assistance

8
Extended Features - Using the App.
Connecting your smartphone to your BATRIBIKE Electric Bicycle
via Bluetooth, using the Promovec app will give a range of
additional features including
- Current Speed
- Trip Distance
- Different Driving Modes
- Battery Status
Additionally the phone can be used as a
display to control your bike*.
*If you choose to mount your smartphone on
the handlebars you will need a suitable
bicycle phone holder - not supplied.
Features
Download the app.
You will need to dowload the app. either iOS or Android. Requires
iOS 10.2 or later, or Requires Android 4.4 or later
Please search for Promovec Connect
Alternatively use these links
iOS -https://apps.apple.com/dk/app/promovec-connect/
id1458723615?l=da
Android -https://play.google.com/store/apps/details?
id=com.ektos.e.bike.client

9
Connecting to Your Bike
Open the app and allow connection to
Bluetooth.
Switch on your bike using the handlebar
display
Make sure any other nearby bikes with
connect+ are switched off.
Press New Bike on your phone and the phone
will search for your bike.
Select the located bike. You can now change
the name of the bike to one you choose,
before pressing ADD.
Your bike will now appear on your Bike List.
(You can have more than one bike on your
app.) To add another bike repeat the steps above.

10
App. Display
Select your bike from the list.
The app. will connect to the selected bike. All the features on the
app. are now available.
Battery
Charge level
Assist Up
Assist Level
Driving Mode
Settings
Map options
Assist Down
Settings
Speed
Speed/distance units
mph or km/h
Return to this screen
(home)
Light switch and
indicator
(where fitted)
Back
Information bar
Power Meter

11
Setting the units
When you first connect to your bike the units will be set to metric
(km and cm)
To change to Imperial units (mph and inches)
- choose Settings, Application
Toggle the unit format button to select your choice.
Distances and trip time can also be reset on this screen.
The bike icon will return you to the main screen.

12
Setting Wheel Size (Circumference)
To ensure that the speed, distance and battery distance remaining
readouts are as accurate as possible it is important to have the
wheel size (circumference) set to the tyre for your bike.
See page 23 for guide sizes.
Choose settings and bike.
The size will appear as inches or cm depending on the units
selected on page 11.
Use the + and - to change size.
The average speed and max speed recorded can also be reset on
this screen.
The bike icon will return you to the main screen.
OR

13
Backlight - Android only
To set the Backlight Intensity - choose
Settings, Application.
Use the slider or set to Auto.
When using Auto the slider is grey.
Intensity is set by Night Mode which can be
toggled on or off.
For iOS the
intensity is set by
the phones own
brightness.
Use the phone
settings to
change this.

14
Information Bar
Various distance and time information is available at the bottom of
the display and is accessed by the left and right arrows.

15
Assist Levels
The assistance levels can be changed via the app. or the LED
handlebar mounted display.
The higher number gives more assistance.
The number on the app. and the number of lights on the LED
display will be the same.
Power Meter
This shows the amount of power being
drawn from the battery. (How hard your
Batribike is working).

16
Driving Mode
The app. allows you to change the way the power is delivered,
giving 3 different "driving modes". Speed, Eco and Set Distance.
Speed Mode - displays as Speed
The help level is defined by a percentage of maximum speed.
This provides adjustable SPEED in five selectable steps. Level 1
powers up to 6 mph, whilst level 5 powers up to 15 mph. Each level
operates at up to full power, and power cuts out at the selected
speed level. The rider can of course propel the bicycle faster than
the cut off speed but this will be unassisted.
The "Speed" mode is also applied when using just the handlebar
LED and not the app.
Eco Mode - displays as Power
The help level is defined by best motor performance.
The "Eco" mode has five selectable POWER levels. Level 1 gives
20% of the power, level 2 - 40% up to level 5, 100% power. Speed
range is from 0 to 15 mph in all levels.
Set Distance - displays as mil or km
The desired distance is set and the help level is set by the battery's
performance.
The "Distance" mode evens out the use of the battery to give you
assistance across your journey. When selected the assistance bar
shows the advised distance available, you can change this using
the up and down arrows. See page 18.

17
Choose
- Settings
- Bike
- Select mode
- Pop-up will
auto close
- Bike Icon
- Mode shown
on right
Choose
- Mode
- Select mode
- Pop-up will
auto close
- Mode shown
on right
OR

18
Set Distance

19
When the Set Distance mode is chosen this will show as either mil
(miles) or km in the Driving Mode area of the screen.
The distance of the journey can be set using the up and down
arrows on the display to a maximum of 99km (61 miles).
If the Set Distance is the same as or less than the distance
remaining in the battery the rider will gain maximum assistance
from the motor.
If the Set Distance is greater than the remaining distance the
controller will reduce the amount of assistance so that the whole
journey can be assisted.
If there is a large difference between the Remaining distance and
the Set Distance the rider will get only minimal assistance.
The up and down buttons on the handlebar display can be used as
a temporary manual override to the assistance level set by the
bike. This will work for a short time before the app. and the
controller work together to maintain the assist level required to
complete the journey.
Left:
A small amount of
power being used -
set by the app.
Right:
Using the manual
override to briefly
boost the assistance.

20
Weather and terrain will affect the performance of an electric bike.
In hilly areas, in a strong headwind, or when the bike is heavily
loaded, there will be a significant increase in the power used from
the battery and hence the range will decrease accordingly. A lightly
loaded bike will achieve higher performance levels.
In Speed and Eco modes the assistance
level can be set to ZERO, then the motor
will not be turned on. Your BATRIBIKE will
now act and feel like a normal bicycle. The
app. will still record your distance and trip
time.
No Assistance - Normal Pedal Bicycle
Light - where fitted
The lights on the bike can be turned on
or off using the light icon.
The lights can also be accessed via the
handlebar unit (see page 5).
Table of contents
Other Batribike Bicycle Accessories manuals