Battery Life Saver BLS-12/24B User manual

12
The Battery Life Saver electronic device 3 Year
Limited Warranty Program
This Battery Life Saver electronic device is warranted to the original pur-
chaser only, to be free of defects in materials and workmanship for three
years from the date of purchase without additional charge. The warranty
does not extend to subsequent purchasers or users. Battery Life Saver
electronic device will not be responsible for any amount of damage in
excess of the retail purchase price of the product under any circum-
stances. Incidental and consequential damages are especially excluded
from coverage under this warranty. This warranty does not apply to dam-
age to units from misuse or incorrect installation. Misuse includes wiring or
connecting to improper polarity power sources. This product cannot
damage your battery. Battery Life Saver electronic device will not re-
place any batteries under this warranty .
RETURN/REPAIR POLICY: Contact Battery Life Saver customer service before
returning any defective product. Product that is returned to Battery Life
Saver within 30 days of the date of purchase will be replaced free of
charge. If such a product is returned more than 30 days but less than
three years from the purchase date, Battery Life Saver will replace it free
of charge, upon determining that the unit is defective. The customer is
responsible for the shipping charges on all returned items after 30 days.
LIMITATIONS: This warranty does not cover batteries, defects resulting from
normal wear and tear (including chips, scratches, abrasions, discoloration
or fading due to usage or exposure to sunlight), accidents, damage dur-
ing shipping to our service facility, alterations, unauthorized use or repair,
neglect, misuse, abuse, failure to follow instructions for care and mainte-
nance, fire, flood and Acts of God .
STATE LAW RIGHTS: This warranty gives you specific legal rights. Some
states do not allow limitations on how long an implied warranty lasts or
the exclusion or limitation of incidental or consequential damages, so the
exclusions or limitations stated herein may not apply. This warranty gives
the purchaser specific legal rights; other rights, which vary from state to
state, may apply .
TO REQUEST WARRANTY SERVICE FOR THIS PRODUCT: Contact Battery Life
Saver Customer Service by telephone, fax, e-mail or mail to receive an
RMA number . We suggest that you keep the original packaging in case
you need to ship the unit. When returning a product, include your name,
address, phone number, dated sales receipt (or proof of purchase) and a
description of the reason for return. After examining the unit, we will make
every effort to replace it within four weeks.
Please contact Battery Life Saver for an RMA number to return item.
ATTN.: CUSTOMER SERVICE / BATTERY LIFE SAVER
P.O. Box 726, Clearwater, FL 33755
PH: 727-446-8400. Fax: 727-446-8900. e-mail: bls@batterylifesaver.com
WARRANTY IS NON -TRANSFERABLE AND NON -REFUNDABLE.
Caution: Surface can get very hot!
Battery Solutions & Innovations, Inc.
Manufactures of the Battery Life Saver electronic device
User’s Manual for Models:
Manufacturer Contact Information
Phone: 727-446-8400 Fax: 727-446-8900
Email: bls@batterylifesaver.com
.
Physical address:
936 Cleveland Street Suite C
Clearwater, FL 33755
Mailing address:
P.O. Box 726
Clearwater, FL 33757
2
11

10
Troubleshooting
The Battery System performance is decreasing after installing the BLS.
The most common cause for this is a shorted or open cell in one or some
of the batteries in the system. The surrounding batteries will be improving,
but the one or two bad batteries will start to drain the good batteries
quicker, causing for a decrease in performance. Follow the instructions in
this manual to find a short or open cell, then replace the bad battery or
batteries with another used battery. The BLS does not affect the batteries
adversely , but makes it very evident there is a short or open cell in one of
the batteries .
I installed the BLS and have yet to see an improvement in the batteries.
The BLS gradually breaks down the sulfates in a battery. It will not change
the condition of a battery instantly. The amount of time needed depends
on the condition of the battery and how often you cycle the battery
(charge and discharge) with the BLS attached. Usual time is between 2
and 6 weeks with normal use, but it can vary.
The BLS drained my batteries. In order for the BLS to work, it draws a small
amount of power from the batteries. Typically, if you leave the BLS on a
battery or system without charging for more than 5 days. If this happens,
simply charge the battery or battery system. If the battery or system does
not charge, review the section in this manual “How to Revive a Dead Bat-
tery”.
The LED (light) is not coming on. The LED in the Battery Life Saver is not
very bright. Cover the BLS with your hand to make sure that the light is
really not working. Make sure the connections to the battery terminals are
secure. Check to see if the BLS is connected to the proper batteries. If the
light still does not come on, please contact Customer Service.
Customer Service: 727-446-8400
3
Understanding Batteries & The Battery Life Saver
The Battery Life Saver electronic device will extend the life of any lead-
acid battery and can rejuvenate “dead” batteries to a like new condi-
tion. But how does it work? To understand the technology behind the BLS,
we must first understand how a battery works.
How a Battery Works
In a normal battery we have three ba-
sic elements: one plate made of lead,
an electrolyte of sulfuric acid and an-
other plate made of lead oxide. When
the battery is discharged, the sulfuric
acid in the electrolyte reacts with the
lead and lead oxide releasing electric-
ity, forming lead sulfate. This leaves a
watery electrolyte solution. When a
battery is completely discharged, what
is left is lead sulfate and water. When
you recharge the battery, the electri-
cal current causes the lead sulfate to
break apart. This returns the system to
the original elements of lead and lead
oxide on the plates and sulfuric acid in the electrolyte, for the most part.
What’s the problem? Why do batteries fail?
When the battery is recharged, a small amount of lead sulfate maintains
its sulfate configuration (sulfate crystal).
These sulfates crystals cannot be reconverted using a regular electric cur-
rent. Every time the battery is discharged, more of these crystals are pro-
duced and the electrolyte solution becomes more watery. Like layers of
snow on a garden they continue to accumulate until you can no longer
see the garden. These crystals interfere with the flow of electricity in and
out of the battery. The battery will take longer to charge and a charge
will last less time. A perfectly good battery will seem dead because lead
sulfate has built up on the plates.

4
Understanding Batteries & The BLS Continued
The BLS is the Solution
The Battery Life Saver electronic device solves this problem by dissolving
the buildup of lead sulfate crystals. The BLS sends a low frequency wave²
through the battery, targeting the lead sulfate crystals (even those that
could not be dissolved by recharging), converting them back into lead
and sulfuric acid. Each crystal is like a tiny radio receiver. In fact, when
the radio was invented, a lead sulfate crystal was used for the receiver.
The BLS action gradually restores the battery back to its original condition
and allows the electrical charge to be drawn from the battery.
The BLS also works constantly, during both charge and discharge states.
Sulfation occurs on both plates and in order to desulfate the whole bat-
tery, a desulfator should work during both charge and discharge states.
9
Battery Safety Precautions
DANGER OF EXPLODING BATTERIES
Lead acid batteries contain sulfuric acid and produce explosive mixtures of
hydrogen and oxygen. Because self-discharge action generates hydrogen
gas even when the battery is not in operation, make sure batteries are
stored and worked on in a well ventilated area. ALWAYS wear ANSI Z87.1
(U.S. standard) approved safety glasses and face shield or splash proof gog-
gles when working on or near batteries:
Always wear proper eye, face and hand protection.
Keep all sparks, flames and cigarettes away from the battery.
Never try to open a battery with non-removable vents.
Keep removable vents tight and level except when servicing electrolyte.
Make sure work area is well ventilated.
Never lean over battery while boosting, testing or charging.
Exercise caution when working with metallic tools or conductors to prevent
short circuits and sparks.
Always read and follow all precautionary labels on the product
SAFE CHARGING
Never attempt to charge a battery without first reviewing the instructions for
the charger being used. In addition to the charger manufacturer’s instruc-
tions, these general precautions should be followed:
Always wear proper eye, face and hand protection.
Always charge batteries in a well-ventilated area.
Keep vents tight and level.
Turn the charger and timer “OFF” before connecting the leads to the battery
to avoid dangerous sparks.
Never try to charge a visibly damaged or frozen battery.
Connect the charger leads to the battery; red positive (+) lead to the posi-
tive (+) terminal and black negative (-) lead to the negative (-) terminal. If
the battery is still in the vehicle, connect the negative lead to the engine
block to serve as a ground. Be sure the ignition and all electrical accessories
are turned off. (If the vehicle has a positive ground, connect the positive
lead to the engine block.)
Make sure that the charger leads to the battery are not broken, frayed or
loose.
Set the timer, turn the charger on and slowly increase the charging rate until
t he desired ampere value is reached.
If the battery becomes hot, or if violent gassing or spewing of electrolyte
occurs, reduce the charging rate or turn off the charger temporarily.
Always turn the charger “OFF” before removing charger leads from the bat-
tery to avoid dangerous sparks.
Always read and follow all precautionary labels on the product
Battery acid, or electrolyte, is a solution of sulfuric acid and water that can
destroy clothing and burn the skin.
Use extreme caution when handling electrolyte and keep an acid neutraliz-
ing solution - such as baking soda or household ammonia mixed with water -
readily available.
If the electrolyte is splashed into an eye, immediately force the eye open
and flood it with clean, cool water for at least 15 minutes. Get prompt medi-
cal
attention.
If electrolyte is taken internally, drink large quantities of water or milk. DO
NOT induce vomiting. Get prompt medical attention.
Any spill, neutralize with baking soda, then clean with abundant water.

8
5
Testing for a Bad Battery
The Battery Life Saver™ electronic device will not help a battery or
batteries that have an open or shorted cell. In order to tell if a battery as
an open or shorted cell, simply perform the following tests. You will need
a voltmeter and a hydrometer to perform both of these tests. IMPORTANT:
Please review our Safety Precautions on page 9 before handling or test-
ing any battery!
Safety First! Wear protective clothing, goggles and gloves when handling
batteries.
Step 1: Physical & Mechanical Inspection
A mechanical inspection is really important as it can save you from future
battery trouble. Replace cracked or broken batteries, clean or replace
rusted or broken connections. On flooded/wet batteries check the water
levels. The water level should be high enough to just cover the plates.
Use only distilled water and do not overwater as it can spill and electro-
lyte is corrosive.
Step 2: Preparing the Tests
a.) Turn off any instruments or accessories that will drain the bat-
tery or battery system during testing.
b.) Charge the battery or battery system until it is fully charged .
c.) If the system has multiple batteries connected, we recom-
mend to disconnect them from each other. Let the batteries sit for 4 to 12
hours, the longer the better. This important because if you measure the
voltage immediately after charging, you will not be measuring the true
voltage of the battery.
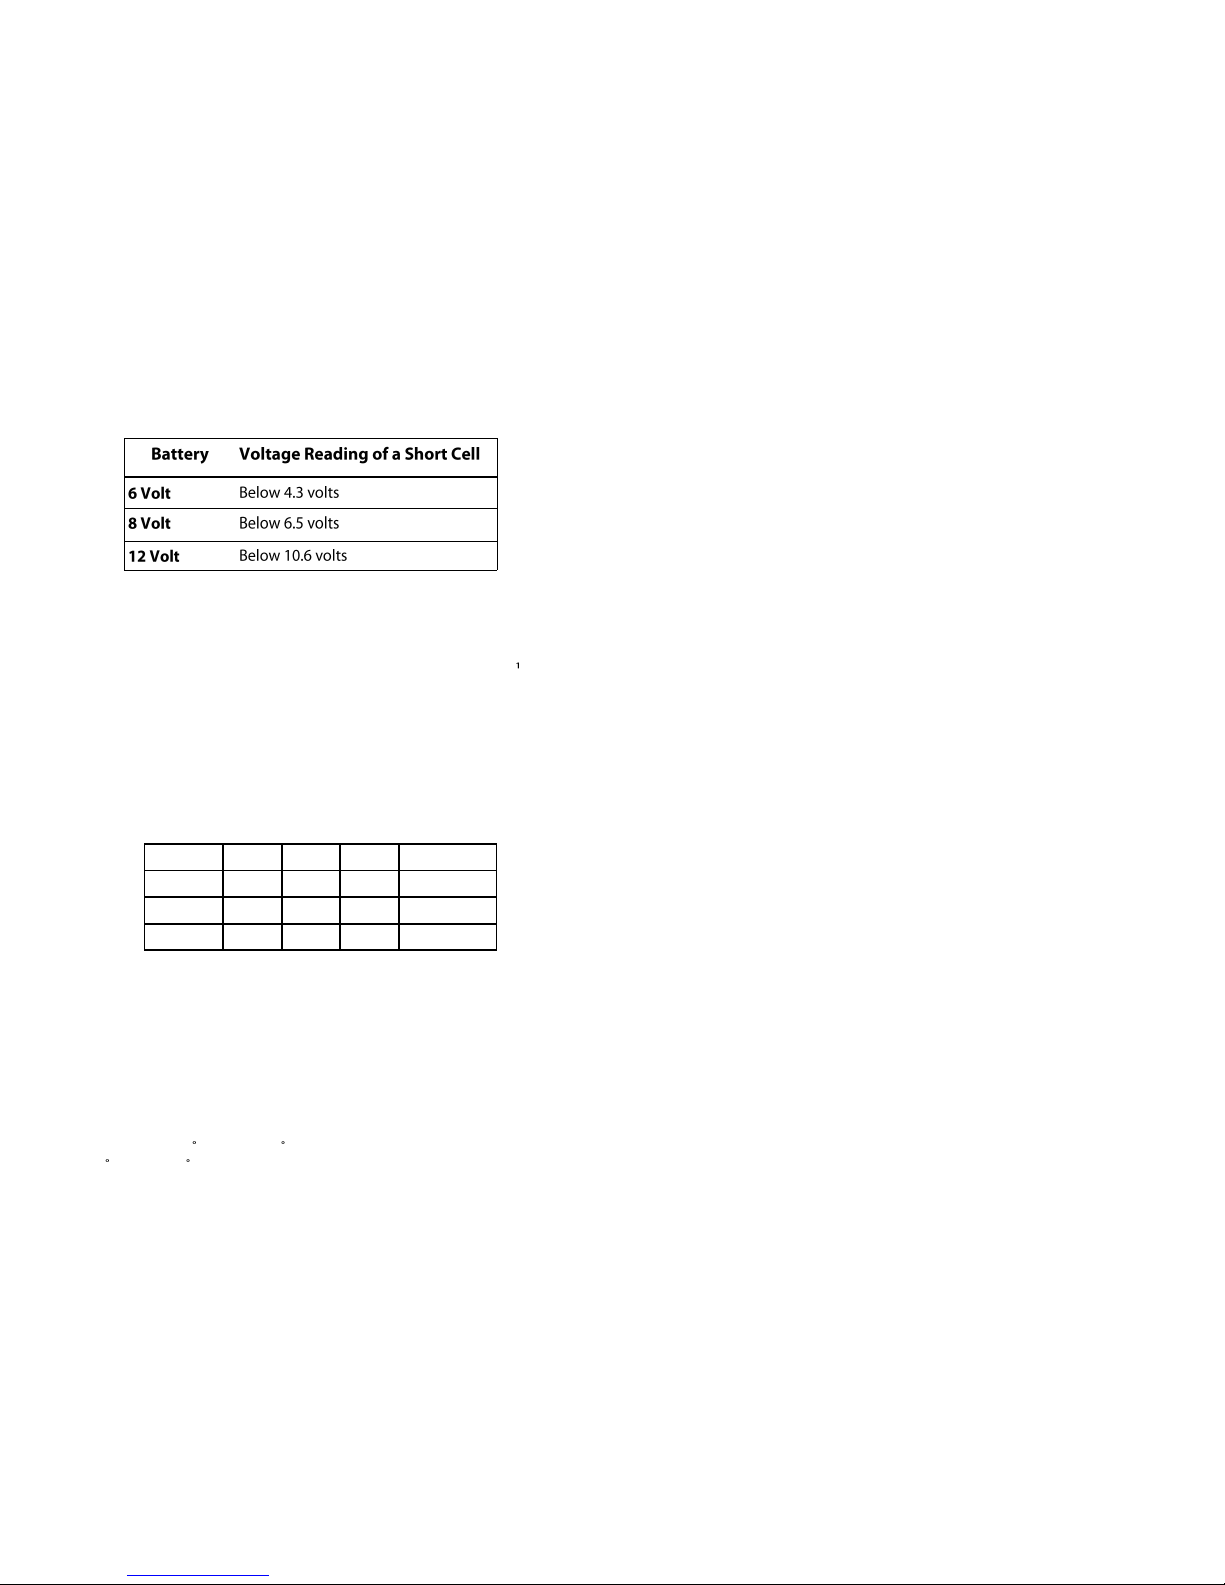
Step 3: Testing for a Short Cell
a.) With a voltmeter, measure the voltage of each individual bat-
tery.
b.): Reference the chart on the next page to determine if a bat-
tery has a shorted cell.
Testing procedures and short cell chart
continued on the next page…..
6
Testing for a Short or Open Cell continued
Example: If a 6 volt battery is reading below 4.3 volts it has a short cell .
Step 4: Testing for an Open Cell in a Flooded/Wet cell battery
-If you have the sealed type batteries, this test method cannot be used.
-Use a temperature compensating battery hydrometer for this test.
a.) With the hydrometer, measure and record the specific gravity
of each battery cell. ( Example: Battery #1—Cell 1= 1.250, Cell 2=1.275,
Cell 3= 1.275). Fill & drain the hydrometer a few times before pulling a
sample.
b.) Compare the specific gravity readings between each bat-
tery. If a battery has a difference of more than .05 between the cells,
that battery has an open cell.
Example readings: Three 6 volt batteries
Battery C has an Open Cell because the difference between Cell #1 and
Cell #3 is .075, more than .05.
Any battery that has a Short or Open Cell needs to be replaced. If you
have been using the BLS or plan on using the BLS you only need to re-
place the bad battery with another used or new battery. Now you are
ready to start using the BLS… .
1. If your hydrometer is not temperature compensating, add .004 to
readings for every 10 F above 80 F and subtract .004 to readings for
every 10 F below 80 F.
Cell #1 Cell #2 Cell #3 Condition
Battery A 1.250 1.225 1.250 Recoverable
Battery B 1.275 1.250 1.225 Recoverable
Battery C 1.200 1.250 1.275 Open Cell
7
Installing the BLS
Attention: If you are installing the BLS on a used or older batteries, please
review the previous two pages: “Testing a for a Short or Open Cell.”
Installation:
1) Identify the First and Last battery in the system, in other words, in parallel
with the charging source. The First battery’s positive terminal is con-
nected to the positive lead from the battery charger (or controller). The
Last battery’s negative terminal is connected to the negative lead from
the battery charger (or controller).
2) Connect the red wire from the BLS to the positive terminal of the First
battery. Connect the red/black wire from the BLS to the negative termi-
nal of the Last battery. Securely fasten the terminals to the battery post.
Using the BLS: The BLS is constantly working. It draws a small amount of cur-
rent (250mA) from the batteries to operate. Ideally, the BLS should be left
connected at all times during normal operation. When installing the BLS on
solar or wind battery banks, simply attach the BLS directly to the batteries
and use the system as normal. If the batteries are not installed in a system,
follow the instructions on page 8 of this manual.
MOUNTING
The BLS can be mounted permanently by using two number 8 screws and
nuts, self tapping screws, or tie wraps. It is best to attach the BLS to some-
thing metallic to help dissipate the heat. If possible, mount it with the fins
vertical to in-sure good cooling. The BLS is weatherproof.
BATTERY STORAGE
When batteries are to be stored for extended periods, use BLS with a trickle
charger to maintain the battery or batteries in good condition. If you are
not going use a trickle charger, disconnect or turn off the BLS while the bat-
teries are stored. When possible, charge the batteries once per month with
BLS attached for 24 hours. It is very important not to let the battery sit for an
extended period without a charge and the BLS attached, because lead
sulfate will build up.
This manual suits for next models
2
Table of contents


