bauhaus Special Offer Carport User manual

www.Bauhaus.info
13.01.17
1
Bevor Sie mit dem Aufbau beginnen lesen Sie sich bitte zuerst die Aufbauan-
leitung durch. Überprüfen Sie bitte anhand der Stückliste die Vollständigkeit
der Lieferung. Sollten Teile fehlen oder beschädigt sein, wenden Sie sich bitte
an Ihren Fachhändler. Zur Reklamationsbearbeitung benötigen wir das voll-
ständig ausgefüllte Reklamationsformular. Wir sind nicht haftbar für Kosten
oder Schäden, die auf nicht rechtzeitiger Überprüfung der Vollständigkeit
der Teile basieren. Haftungsausschluss besteht ebenso bei unsachgemäßer
Montage sowie baulichen Veränderungen.
Für die ordnungsgemäße Montage benötigen Sie die Statik mit den Positions-
plänen, die Sie bei Ihrem Händler erhalten. Beachten Sie immer die örtlichen
Begebenheiten und Vorschriften der zuständigen Baubehörde. Halten Sie
sich bei der Planung und Montage genau an die Montageanleitung und an
die entsprechenden Details der Statik. Wir weisen Sie darauf hin, dass Sie
die Vorschriften der Berufsgenossenschaft sowie alle allgemein bekannten
Regeln der Technik eingehalten werden müssen.
Es dürfen nur zugelassene Pfostenanker verwendet werden. Jegliche bauli-
che Veränderung führt zu einer ungültigen Statik und Verlust der Gewährleis-
tungsansprüche.
Die verwendeten PVC Dachplatten sind keine schlagfesten und hagelfesten
Platten. Daher kann es bei herabfallenden Gegenständen zu Beschädigung
der Platten kommen. Ihr Fachhändler hilft Ihnen gerne weiter wenn Sie ande-
re Qualitäten benötigen.
Technische Änderungen und Verbesserungen bei der Produktausführung sind
vorbehalten.
Tipps:
• LagernSiedasCarportvorderMontagetrockenundschützenSieden
Bausatz vor Nässe und starker Sonneneinstrahlung, so kann ein Verzug
und starke Rissbildung der Bauteile vermindert werden
• WährendderMontagemüssendieBauteileweiterhinvorWitterungsein-
üssenundgegenWindgeschütztwerden.
Wichtig:
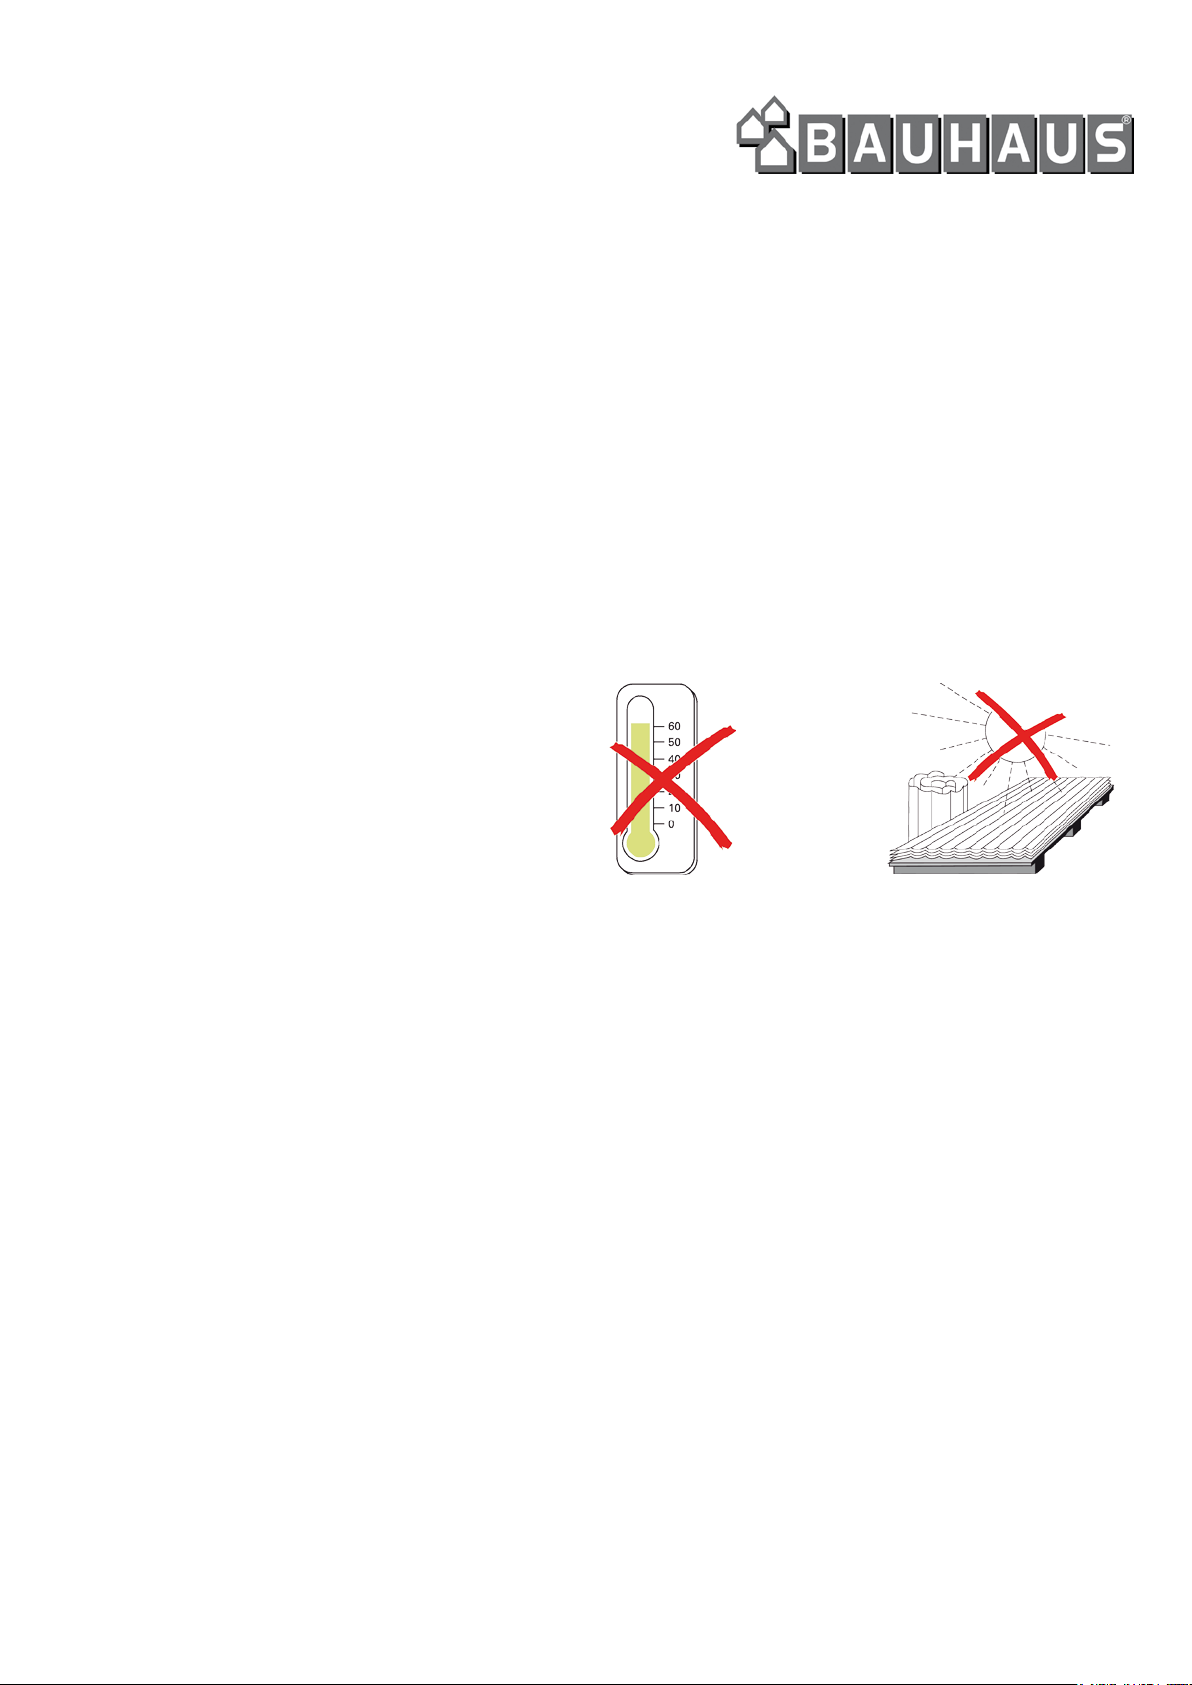
• DiePVCDachplattendürfennurabeinerAußentemperaturvon10°C
verlegt werden und nicht im Stapel gelagert werden, da sich sonst die
Plattenverformenkönnen,diemaximaleTemperaturdarfimStapel45°C
nicht überschreiten
• BeimontagebedingterBegehungderPlatten,müssengewichtsverteilende
Bohlen benutzt werden, da sonst eine Durchsturzgefahr- und Beschädi-
gungsgefahr besteht
• EineReinigungderPVCPlattenkannmitklaremWasserodermitmilder
Seifenlauge drucklos erfolgen. Keine scheuernden, ätzende oder lösungs-
mittelhaltige Zusätze verwenden
• WennSieihrCarportfarblichbehandelnwollen,müssenSieersteinige
Wochen bei Kesseldruckimprägnierten Hölzern warten, da die Holztei-
le noch sehr nass sein können. Bei unbehandelten Carports können die
Holzteile unmittelbar nach der Montage im trockenem Zustand behandelt
werden. Beachten Sie bitte die Anweisungen der Farbhersteller und ver-
wenden Sie nur offenporige Farbsysteme.
• BewahrenSieallebeiliegendenDokumentesorgfältigauf,dazugehören
die Montageanleitung, der Lieferschein, der Paketzettel (außen am Paket)
und die Statik.
Stückliste Aktionscarport
Pos.Nr Bezeichnung Anzahl
10 H0900902100PTG2001 Pfosten 90 x 90 x 2100 6
20 H0301202500PTG1001 Tragbalken 30 x 120 x 2500 4
30 H0301202970PTG1001 Sparren 30 x 120 x 2960 8
40 H0211180500PTG1001 Diastreben 21 x 118 x 500 8
50 H0180983000PTG1001 Blende 18 x 98 x 3000 1
51 H0180982500PTG1001 Blende 18 x 98 x 2500 4
60 Zubehör Aktionscarport II 1
70 PVC - Dachplatten klar 1020x 2200 3
71 PVC - Dachplatten klar 1020x 2900 3
Inhalt Zubehörpaket:
a Sparrenpfettenanker 35 x 35 x 170 8 links, 8 rechts
b Spax für Sparrenpfettenanker 3,5 x 25 96
c Spax für Diastreben 4 x 45 32
d Unterlegscheibe M10 12
e Schlossschraube M10 x 100 12
f Muttern M10 12
g Abstandhalter 100
h Sprenglerschraube 4,5 x 45 100
i Spax für Blenden 3,5 x 35 48
Folgendes Werkzeug wird benötigt:
• Spaten
• GliedermaßstaboderBandmaß
• Hammer
• Bohrmaschinemit7mmBohrer
• Wasserwaage
• Akkuschrauber
• Dachlatten/PöckeundMaurerschnur
• 11mmSchraubenschlüssel
• 2Schraubzwingen
Achtung!
Pfostenanker und Bolzen sind nicht im Lieferumfang enthalten.
Aktionscarport (D)
Montageanleitung

www.Bauhaus.info
13.01.17
2
Aktionscarport (D)
Montageanleitung
Bitte beachten Sie die vorgeschrieben Fundamente in der Statik und die
Betongüte. Im Lieferumfang sind keine Pfostenanker und Bolzen enthalten.
1) Fundamente
Ihr Bauplatz sollte eine ebene Fläche aufweisen. Als erstes heben Sie die
Löcher für die Punktfundamete nach dem unten angegebenen Maßen im
Fundamentplan aus. Hierbei ist es sehr wichtig, dass die Fundamente im
rechten Winkel gesetzt werden.
Tipp!
Markierung des Standortes eines Pfostens durch Einschlagen eines
Holzpockes. Von dieser Ecke ausgehend markieren Sie einen rechten
Winkel. Wenn die Diagonale zwischen einem 4 m langen und einem
3 m langen Schenkel genau 5 m beträgt, haben sie einen rechten Winkel.
Oder verwenden alternativ die unten angegebenen Maße um
den Winkel zu Prüfen.
Seite 16
2) Pfosten und Tragbalken
Jetzt können Sie die Pfosten mit den Tragbalken montieren. Legen Sie zuerst
die Tragbalken auf den Boden und richten Sie die Pfosten laut Plan aus. Mit
einerZwingexierenSiediePfostenaufdemTragbalkenunddannbohren
Sie mit einem 7 mm Holzbohrer die Pfosten und Tragbalken. Mit den Ma-
schienenschrauben verbinden Sie die Tragbalken und Pfosten. Nun können
Sie die Pfostenanker bohren und mit den Pfosten montieren.
Mit Dachlatten versteifen Sie die Konstruktion (Skizze 1) Die kompletten Sei-
tenteile können Sie jetzt aufrichten und in die Fundamentlöcher setzen. Ver-
streben Sie die Seitenteile und richten die komplette Einheit aus. (Skizze 1)
Achtung: Die Pfosten mit der Blattung nach innen aufstellen
Seite 17
3)
Nachdem Sie beide Seitenteile aufgestellt haben, muss die komplette Kons-
truktion wie in Skizze 3 ausgerichtet werden. Richten SIe das Carport nach
hinten mit einem Gefälle von 1% aus (siehe Planskizze letzte Seite). Da-
nachkönnendieBetonfundamentegegossenwerden.DieOberächeder
Fundamente sollte leicht nach außen geneigt geglättet werden. Somit kann
Regenwasser besser ablaufen. Nach Überprüfung dieser Maße können die
Fundamente betoniert werden.
Seite 17/18
4) Tragbalken, Sparren und Diastreben
Legen Sie die Sparren laut Grundriss auf die Tragbalken und befestigen
Sie diese mit den Sparrenpfettenankern. Sollten die Sparren einen Bogen
aufweisen,danndiesesoauegen,dassderBogennachobenzeigtund
möglichst nach vorne legen.
5)
Die Diastreben werden an jeden Pfosten in Querrichtung eingebaut (siehe
Planskizze letzte Seite).
Seite 19
6) Dacheindeckung
Nachdem Sie alle Sparren befestigt haben, montieren Sie die Dacheinde-
ckung. Achten Sie darauf, dass die Dacheindeckung von hinten nach vorne
montiert wird. Die Dachplatten werden zunächst in der Breite und dann in
der Länge passend auf die Sparren verteilt. Bevor Sie mit dem Verschrauben
beginnenunbedingtdiegesamteDachächeauslegenundeinpassen!Der
Abstand zu den Abschlussblenden sollte mindestens 5mm betragen.
Befestigen Sie jede Dachplatte mit mind. 4 Abstandhalter und Schrauben auf
jeden Sparren. Unser Befestigungssystem ermöglicht Ihnen ohne fremde Hilfe
die Montage durchzuführen.
Achtung:
Platte nur mit gewichtsverteilenden Bohlen begehen. Beachten Sie dringend
die Hinweise auf der ersten Seite.
Seite 20
7)
Schritt 1:
Bohren Sie mit einem 10 mm Holzbohrer und langsamer Drehzahl in die
Dachplatte. Achten Sie darauf das Sie grade und mittig Bohren. Achtung bei
nicht angepasster Drehzahl kann die Platte reißen.
Schritt 2:
Setzen Sie den Kunstoff-Abstandhalter ein. Drehen Sie nun den Abstandhal-
ter direkt mit dem Schraubenbit ganz durch die Platte.
Schritt 3:
Kontrollieren Sie die korrekte Position des Abstandhalters. Die Dachplatte
mussaufdemAbstandhalterauiegen.
Schritt 4:
Schrauben Sie nun die Dachplatte am Sparren fest. Achten Sie darauf, dass
Sie die Dachplatte grade verschrauben. Hier können sonst Undichtigkeiten
entstehen.
Schritt 5:
Schrauben Sie nicht übermäßig fest, da Sie sonst die Dachplatte beschädi-
gen.
Seite 20
8) Blenden
Beginnen Sie mit der vorderen Blende. Die Frontblende muss links und rechts
mit 2 cm Überstand an dem Sparren montiert werden. Die Befestigung der
Blenden erfolgt mit Kreuzschlitzschrauben seitlich in die Stirnseiten der Spar-
ren (bitte vorbohren). Der Blendenüberstand soll zur Dacheindeckung 0,5
cm betragen.
Seite 21

www.Bauhaus.info
13.01.17
3
Special Offer Carport (GB)
Assembly Instructions
Beforebeginningwithassembly,pleaserstreadthroughtheassemblyins-
tructions. Check that your delivery is complete by using the component list.
Should a component be missing or damaged, please contact your specialist
dealer. A completed complaint form is necessary for processing complaints.
We are not liable for costs or damage that occurs as a result of not checking
early on that all pieces were provided. Liability is also excluded in cases of
incorrectassemblyandincaseswherestructuralmodicationshavebeen
made.
For proper assembly, you will need the structural plans which include the
plans for positioning from your dealer. Always observe the local provisions
and requirements of the responsible building authorities.
Follow the assembly instructions and the corresponding structural details ex-
actly during planning and assembly. Please note that the regulations from
the trade association as well as the generally acknowledged rules of engi-
neering must be observed.
Onlyapprovedpostanchorsmaybeused.Anytypeofstructuralmodica-
tion makes the structure unstable and renders all guarantee claims invalid.
The provided PVC roof panels are not impact or hail proof. As a result, fal-
ling objects may damage the panels. Your specialist dealer would be happy
to assist you if a different grade of material is needed.
Product design is subject to technical changes and improvements.
Tips:
• Storethecarportinadryplacebeforeassemblyandprotecttheassembly
kit from exposure to moisture and strong sunlight to minimise warping or
severe cracking of the components.
• Thecomponentsmustalsobeprotectedagainstexposuretoweatherand
wind during assembly.
Important:
• ThePVCpanelsmayonlybeinstalledwhenthetemperatureoutdoors
is10°Corabove.Donotstorethepanelsinastack,asthismaycause
deformation. The maximum temperature of the stack may not exceed
45°C
• Ifitisnecessarytowalkonthepanelsduringassembly,planksmustbe
used to distribute the weight, otherwise there is a risk of falling through or
causing damage
• PVCpanelscanbecleanedwithoutpressureusingplainwaterormild
soapy water. Do not use abrasive, corrosive or solvent-based products.
• Ifyouwouldliketopaintyourcarport,itisnecessarytowaitafewweeks
as the pressure treated wood can still be quite wet. If the carport is a
variation that has not been pre-treated, the dry wooden components can
be painted right before assembly. Please observe the instructions from the
paint manufacturer and only use a porous paint system.
• Keepalloftheprovideddocumentsinasafeplace,includingtheassem-
bly instructions, the packing slip, the packing label (from the outside of
the package) and the structural documents.
Parts List: Special Offer Carport
Pos. no. . Description Quantity
10 H0900902100PTG2001 Posts 90 x 90 x 2100 6
20 H0301202500PTG1001 Girders 30 x 120 x 2500 4
30 H0301202970PTG1001 Rafters 30 x 120 x 2960 8
40 H0211180500PTG1001 Diagonal supports 21 x 118 x 500 8
50 H0180983000PTG1001 Fascia 18 x 98 x 3000 1
51 H0180982500PTG1001 Fascia 18 x 98 x 2500 4
60 Hardware: Special Offer Carport II 1
70 PVC - roof panels 1020x 2200 3
71 PVC - roof panels 1020x 2900 3
Hardware list:
a Rafter anchors 35 x 35 x 170 8 left, 8 right
b Screws for Rafter anchors 3,5 x 25 96
c Screws for diagonal supports 4 x 45 32
d Washers M10 12
e Carriage bolts M10 x 100 12
f Nuts M10 12
g Spacers 100
h Screws with sealing washers 4.5 x 45 100
i Screws for fascia 3,5 x 35 48
The following tools are needed:
• Spade
• Foldingruleormeasuringtape
• Hammer
• Powerdrillwitha7mmdrillbit
• Spiritlevel
• Cordlesselectricdrill
• Roofbattens/stakesandstringline
• 11mmspanner
• 2screwclamps
Warning!
Post anchors and bolts are not provided in the delivered contents

www.Bauhaus.info
13.01.17
4
Pleasenotethestructuraldataandconcretequalityrequiredfor thefoundations.
Post anchors and bolts are not provided in the delivered contents.
1) Foundation
The surface of the building site should be level. Begin by excavating the holes
forthepostfootingsaccordingtothedimensionsgiveninthefoundationplanbelow.
It is extremely important that the foundations are positioned at right angles.
Tip!
Use a wooden stake to mark the location of a post. Then mark out a right
angle from that corner. If the diagonal measured between sides that are exactly
4m and 3m long equals exactly 5m, you have created a right angle.
As an alternative method, it is possible to verify that you have a right angle
using the dimensions given below.
2) Posts and girders
It is now possible to attach the posts to the girders. First lay the girders on the
groundandarrangethepostsasspeciedintheplan.Useascrewclampto
attach the posts to the girder and then drill through both components using a
7mm wood drill bit. Use the machine screws to connect the girder and posts.
Now pre-drill for the post anchors and attach them to the posts. Use roof
battens to reinforce the construction (drawing 1).
Erect the completed side sections and position them in the footings. Brace the
side sections and align the entire unit (drawing 1)
Warning: Position the posts with the splice joint facing inwards
3)
After both side sections have been erected, position the entire construction as
shown in drawing 3. Align the carport from the front to the back with a 1%
slope (see plan drawing on the last page).
Now it is possible to pour the concrete footings.
Smooth the surface of the footings to gently slope outwards. This allows for
better drainage of rainwater.
After verifying the dimensions, it is possible to pour the concrete foundations.
4) Girders, rafters and diagonal supports
Place the rafters on the girders as shown in the drawing and connect them
using the Rafter anchors. If the rafters are slightly bowed, place the rafter so
that it arches upwards and position it as far forward as possible.
5)
Install the diagonal supports transversely on every post (see plan drawing
on the last page).
6) Roof panels
After all of the rafters have been attached, install the roof panels. Make sure
to install the panels from the back to the front. First distribute the roof panels
ontherafterssothattheytacrossthebreadthandthenoverthelength
of the carport. It is essential to distribute and align all of the panels before
screwingdownthepanels!Thedistancefromtheedgefasciashouldamount
to at least 5mm.
Attach every roof panel using at least 4 spacers and screws per rafter. Our
hardware system makes it possible complete the assembly without help from
a third party.
Warning:
only walk on the panels using planks to distribute the weight.
Itisnecessarytoobservetheinformationprovidedontherstpage.
7)
Step 1:
Drill through the roof panel at a slow speed using a 10mm wood drill bit.
Make sure that the drill is horizontal and centred. Drilling at an unsuitable
speed can break the panel.
Step 2:
Place the plastic spacer in the hole. Place the screw bit directly in the spacer
to drive it through the panel.
Step 3:
Verify the correct positioning of the spacer. The roof panel must be resting
on the spacer.
Step 4:
Now securely screw the roof panel to the rafter. Make sure to drive the screw
straight through the panel. Otherwise leakage may occur.
Step 5:
Do not over-tighten the screw, as this may damage the roof panel.
8) Fascia boards
Begin with the front fascia board. Install the front fascia board to project by
2cm beyond the rafters on both the left and right sides.
Attach the fascia boards on the sides using Phillips-head screws in the
ends of the rafters (please pre-drill).
The fascia boards should project beyond the roof panels by 0.5cm.
Special Offer Carport (GB)
Assembly Instructions
Page 16
Page 17
Page 17/18
Page 19
Page 20
Page 20
Page 21
www.Bauhaus.info
13.01.17
5
Akční nabídka přístřešku na auto (CZ)
Návodkmontáži
Ještěpředtím,nežzačnetesestavboupřístřešku,pročtětesi,prosím,nejdříve
návodnastavbu.Zkontrolujtenazákladěpřiloženéhoseznamu,žebylydo-
dányvšechnystavebníprvky.Pokudněkterýznichchybí,nebojepoškozen,
obraťtese,prosím,nasvéhoodbornéhoprodejce.Kezpracováníreklamace
potřebujemekompletněvyplněnýreklamačníformulář.Neručímezanákla-
dy či škody, způsobené pozdním přezkoumáním toho, zda byly dodány
všechnystavebníprvky.Ručeníjevyloučenorovněžvpřípaděneodborně
provedenémontážestejnějakozměn,provedenýchpřistavběpřístřešku.
Ktomu,abystemohlimontážnáležitěuskutečnit,potřebujeteúdajeostati-
ceapozičníplan,kteréobdržíteusvéhoprodejce.Dbejtevždynamístní
náležitostiapředpisypříslušnéhostavebníhoúřadu.Připlánováníamontáži
sevždydržtemontážníhonávoduazohledňujteodpovídajícídetailtýkající
sestatickýchúdajů.UpozorňujemeVásnato,žemusítedodržovatpředpisy
platnéprodanýstavebníobor,stejnějakovšechnavšeobecněznámátech-
nická pravidla.
Používatmůžetejenpovolenáukotvenísloupů.Jakákolizměna,uskutečněná
v průběhu stavby přístřešku, znamená změnu statiky a ztrátu nároku na
ručení.
PoužitéstřešnídeskyzPVCnejsouplněodolnéprotinárazu,aniprotikru-
pobití.Připádupředmětůmůžeprotodojítkpoškozenídesek.Vášodborný
prodejceVámrádporadí,pokudbystepotřebovalijinoukvalitudesek.
Technickézměnyavylepšenípřizhotovováníproduktujsouvyhrazeny.
Tipy:
• Uložtepřístřešeknaautopředmontážívsuchuachraňtestavebnísadu
předvlhkemasilnýmslunečnímzářením.Tímmůžetesnížitvznikprasklin
apřípadnýprohybstavebníchprvků.
• Běhemmontážemusíbýtstavebníprvkypečlivěchráněnypředvlivem
počasíavětru.
Důležité:
• Střešní desky z PVC mohou být pokládány jen při teplotě vyšší nežli
10°Canesmíbýtskladoványnasobě,neboťmůžejinakdojítkjejich
deformaci.Maximálnípovolenáteplotadesekje45°C.
• Přimanipulacisdeskamimusíbýtpřimontážipoužityfošny,rozdělující
rovnoměrnězatížení,jinakhrozínebezpečí,žedeskypropadnoudolů
apoškodíse.
• Desky z PVC mohou být omývány beztlakově čistou vodou či mýdlo-
vým roztokem. Nepoužívejte žádné prostředky obsahující přísady,
ježbymohlydeskynarušitčinaleptat,stejnějakopřísadysobsahem
rozpouštědel.
• PokudchceteVášpřístřešeknaautonatřít,musítevpřípadědříví,ježbylo
tlakověimpregnovánovkotli,počkatněkoliktýdnů,neboďstavebníprvky
mohoubýtještěvlhké.
• U přístřešků na auto, jejichž stavební prvky nebyly ošetřeny, můžete
natírathnedpomontáži,pokudjesucho.Respektujtedoporučenívýrobců
barevapoužívejtepouzelazurysotevřenýmipóry.
• Pečlivěuchovejtevšechnypřiloženédoklady,ktěmpatřímontážníná-
vod,dodacílist,zásilkovýlístek(nabalíku)aúdajeostatice.
Seznam dílů Akční nabídka přístřešku na auto
Poz.č. Borovice Označení Počet
10 H0900902100PTG2001 Sloup 90 x 90 x 2100 6
20 H0301202500PTG1001 Nosnýtram 30x120 x2500 4
30 H0301202970PTG1001 Krokev 30 x 120 x 2960 8
40 H0211180500PTG1001 Diagonálnívzpěra 21x118 x500 8
50 H0180983000PTG1001 Zástěna 18x98 x3000 1
51 H0180982500PTG1001 Zástěna 18x98 x2500 4
60 PříslušenstvípřístřešeknaautoII 1
70 StřešnídeskyzPVCčerné 1020x2200 3
71 StřešnídeskyzPVCčerné 1020x2900 3
Obsah balíku příslušenství:
a krokevkotva 35x35x170 8levý,8doprava
b Samořeznýšroubprokrokevkotva 3,5x25 96
c Samořeznýšroubprovzpěru 4x45 32
d Kruhovápodložka M10 12
e Vratovýšroub M10x100 12
f Matky M10 12
g Rozpěrka 100
h Šroubsintegrovanoupodložkou 4,5x45 100
i Samořeznýšroubprozástěnu 3,5x35 48
Zapotřebí bude následujícího nářadí:
• Rýč
• Skládacíneboroztahovacímetr
• Kladivo
• Vrtačkasvrtákemprůměr7mm
• Vodováha
• Akumulátorovášroubovacívrtačka
• Střešnílatě/kolíkyazednickášňůra
• Klíčnautahováníšroubů11mm
• 2šroubovacísvěrky
Pozor!
Kotvicípatkyašroubynejsousoučástídodávky.
Table of contents
Languages:
Popular Tent manuals by other brands


Coleman
Coleman 2000033134 Assembly & instruction manual

Ozark Trail
Ozark Trail W784.1 Assembly instructions and owner's manual

SlingFin
SlingFin CrossBow 2 instructions

Coleman
Coleman 9600-141 instructions

Palram
Palram Arizona 5000 Wave - WINGS manual

COVERPRO
COVERPRO 56184 Owner's manual & safety instructions