Baumann OptiShift User manual

Transmission Control System
Installation and Operation Manual for
4L60/4L80 transmissions

OptiShift Transmission Control System (TCS) instruction and operation manual.
www.OptiShift.com
Baumann Electronic Controls, LLC.
20 Mistr Lane, Pickens, SC 296 1
Phone: (864) 646-8920 FAX: (864) 335-9055
Email: [email protected]
This work, and the ideas and processes contained herein are the exclusive property of
Baumann Electronic Controls, LLC, and may not be copied, reproduced or distributed
in any form without the express written consent of Baumann Electronic Controls,
LLC or Karl Baumann. The technology and processes contained in this product are
proprietary and may be used only on a single unit basis or as defined by the written
permission of Baumann Electronic Controls, LLC.
V4.1 © Copyright 199 - 2010 by Baumann Electronic Controls, LLC.
All rights reserved.
WARRANTY
Baumann Electronic Controls, LLC. is dedicated to producing the highest quality
products available in the industry and is committed to customer satisfaction.
Because we have no control over the circumstances under which our products are
used, we can assume no more responsibility for damages (consequential or
otherwise) or defects in materials and workmanship than the original purchase
price of our product. Baumann Electronic Controls, LLC. will repair or replace all
defective components unconditionally for a period of five years from the date of
sale. This Warranty does not cover damages due to abuse or improper application
or connection of the device. After the Warranty period, Baumann Electronic
Controls, LLC. will service this device for a nominal fee.
APPLICATION COVERAGE
This system works with all 4L60E/4L65/4L80E/4L85 automatic transmissions.
It is recommended that you use the Baumann wiring harness with this system.
2

CONTENTS
Preparation Page 4
Connecting the OptiShift Page 5
Notes on Installation Page 7
Transmission Diagrams Page 9
Optional Accessories Page 11
anual Shift Connections
Overview Page 12
anutronic Jumper Page 12
Push-buttons + On/Off Toggle Page 13
Push-buttons + On/Off Push-button Page 14
ShrifterT Receiver Page 15
Shiftware
Introduction Page 16
Setup Page 16
Customize Page 17
Tables Page 18
Save & Load Page 18
Writing a Calibration Page 18
Important Information Page 19
Troubleshooting Page 20
Contact Page 20
3

PREPARATION
4L60E Transmission:
The OptiShift TCS currently supports 1996 and newer 4L60E transmissions.
Support for the 199 -95 is planned in the near future.
4L80E Transmission:
Pre-199 4L80E transmissions use a different internal wiring harness and pass-
through connector. This early harness has a problem with leaking fluid at the
pass-through connector. GM recommends upgrading to the newer connector
and wiring harness. Because of this, we do not provide a wiring harness for it. If
you have one of these early transmissions, it will be necessary to upgrade to the
199 + internal wiring harness.
The Bosch pressure control solenoid used in pre-1994 4L80E transmissions is
not compatible with the OptiShift TCS. You will need to upgrade it to the 1994+
Holley solenoid. The older Bosch solenoid is silver, while the newer Holley
solenoid is black. If your solenoid is already black, you have the right one and it
doesn't need to be changed. The GM part number for the Holley pressure
control solenoid is 8684216.
4

CONNECTING THE OPTISHIFT
Step 1: Power
Connect the power wire (red with 7.5A fuse) to the 12V switched power source
of the Engine Control Unit (ECU).
If your vehicle doesn't have an ECU, connect to another 12V ignition-switched
power source.
Step 2: Ground
Connect the ground wire (black) to the main ground of the Engine Control Unit.
Connect wire as close to the ECU as possible.
If your vehicle doesn't have an ECU, connect to solid ground as close to the battery's
negative as possible.
Step 3: Throttle Position Sensor / Accelerator Pedal Position Sensor
Connect the Throttle Position Sensor signal wire (green) to the Throttle Position
Sensor (TPS) signal input of the Engine Control Unit. If the vehicle has
Electronic Throttle Control, use the Accelerator Pedal Position (APP) Sensor
instead of the TPS.
For carbureted and mechanically-injected Diesel vehicles, connect the TPS
Feed (orange), TPS signal (green), and ground (black) to the Throttle Position
Sensor.
See the "Throttle Position Sensor" section for details.
Step 4: isc. Connections
Connect the Neutral Safety Switch and the Backup Lamp Switch.
Step 5: Accessories
Connect your optional accessories.
See the "Optional Accessories" section for details.
5

6

NOTES ON INSTALLATION
General Installation:
The OptiShift unit should be mounted within the passenger compartment of the
vehicle in a protected location. Good mounting areas include under the dash,
behind a kick panel, or under the seat, as long as the unit and wiring are not
subject to damage. Under-hood mounting is NOT possible with the OptiShift
unit. It is not waterproof or rated for under-hood temperatures. Passenger
compartment mounting is also necessary to provide easy access to the USB
port, which is used to interface with a PC for programming and diagnostics, as
well as the display and function control knob. For this reason, be sure to mount
the unit in a way that gives easy access to the USB port. If you will be using a
desktop PC for programming, install the unit so that it can be unplugged and
moved easily.
All electrical connections should be made using 60/40 rosin core solder. Cover
the connection with heat-shrinkable tubing for improved insulation and
mechanical strength. Individual connector terminals can be connected using a
“piggy-back” method, where the terminal is removed from the plastic connector
housing to allow the new wire to be soldered on to the terminal atop the original
wire. Two wires may be connected together by twisting them together
longitudinally, soldering, then covering with the appropriate size heat-shrink
tubing.
Adaptation for Factory-Equipped Transmissions:
It is possible to use the OptiShift TCS in a vehicle which was originally equipped
with one of the intended transmissions. This could be done in conjunction with
an engine management system upgrade that no longer supports the
transmission. Use of the TCS for this purpose allows flexibility in choosing the
engine management system, in addition to the increased control, performance,
and transmission durability afforded by OptiShift. If you retain the stock
PCM/VCM, it can probably be modified or re-flashed to disable the transmission
functionality.
7

Identifying the Terminals of an Unknown Throttle Position Sensor:
This is a procedure for identifying the correct terminal connections of any
potentiometer-style throttle position sensor (almost all three-terminal TP
sensors). A DVOM or analog Ohmmeter is required.
1. Set the meter to resistance mode and set it to a scale that can read up to 10K
or 20K Ohms (if it is not auto-ranging). Please keep in mind when setting up and
reading the meter that "K" means thousands of Ohms. In other words, 15K
Ohms is the same as 15,000 Ohms.
2. Connect the meter to two pins at a time while operating the lever or cam of
the TPS. Watch the meter while rotating the sensor. Check all three pairs of pins
until you find a pair that does not change resistance when you rotate the sensor.
The two pins that do not change resistance are the fixed ends of the resistance
element (+5V and ground). The remaining pin that did change is known as the
"wiper". It is the moving contact that slides along the resistance element to give
the varying voltage. This is the output terminal of the sensor and should be
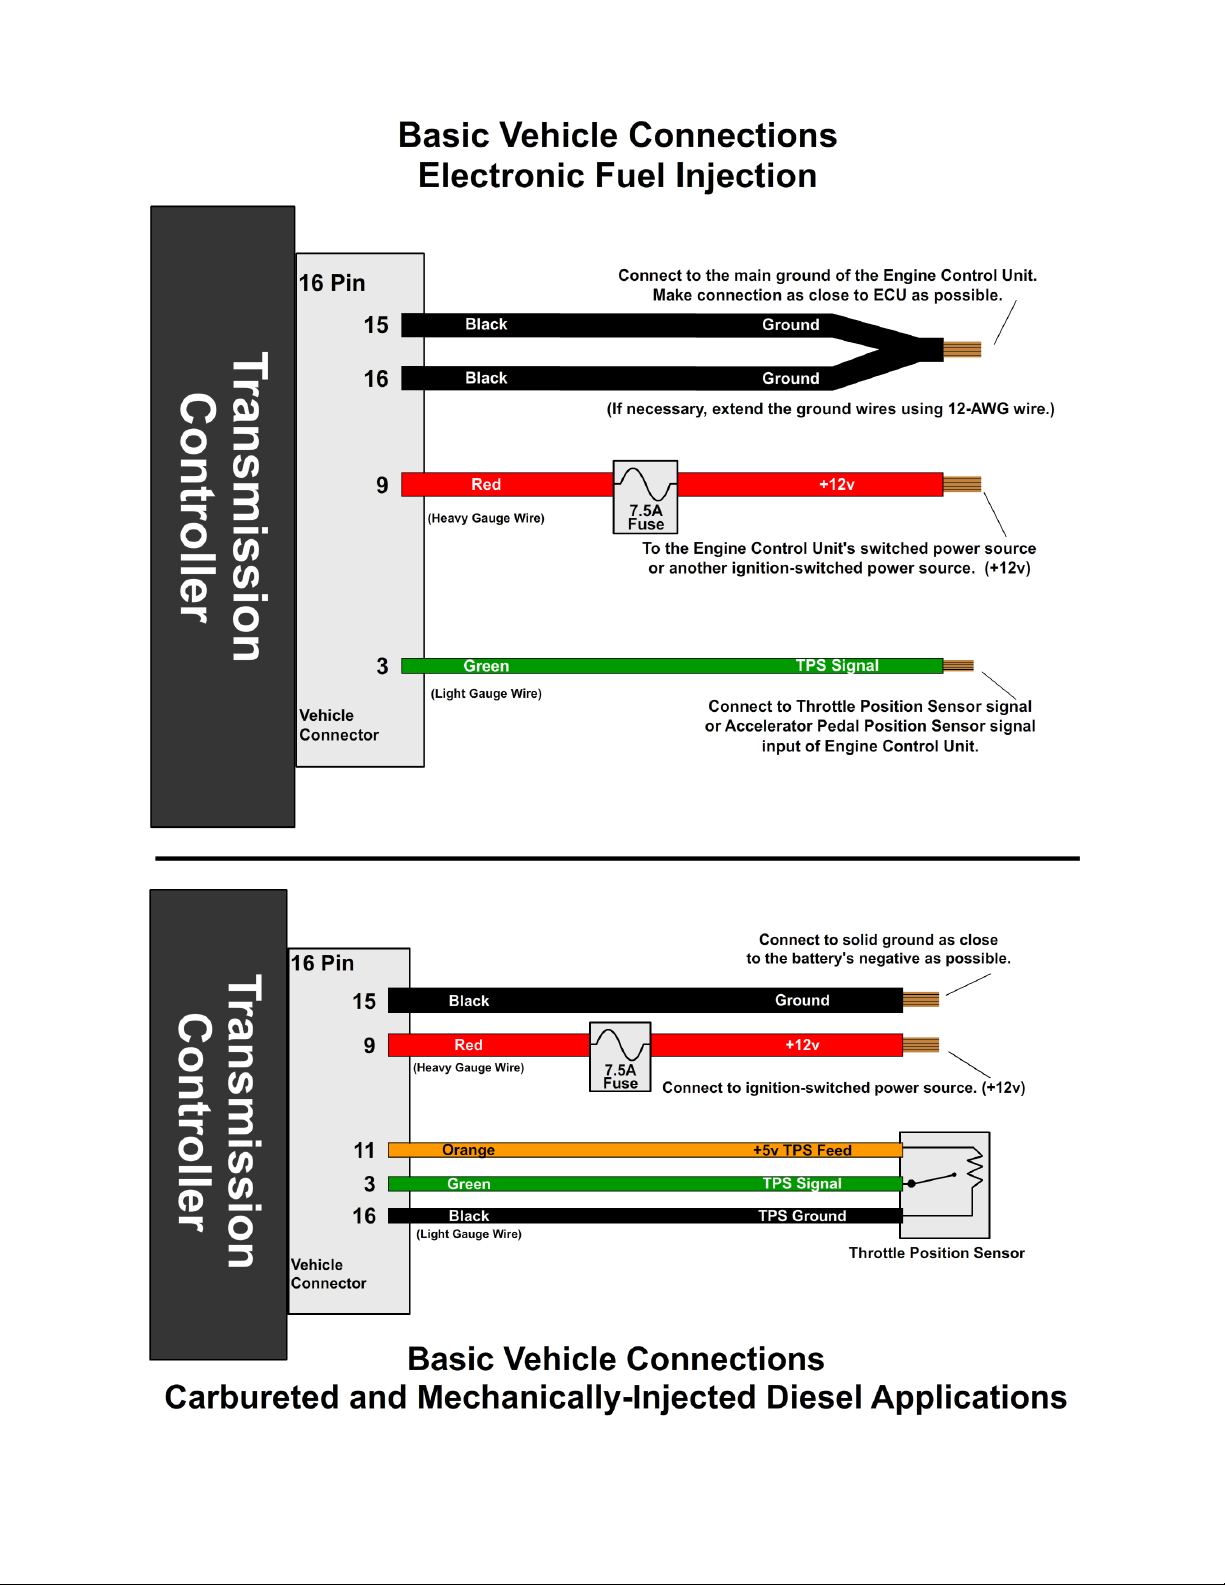
connected to our green wire (Vehicle pin ).
3. Next, with the sensor at the idle or closed throttle position, measure the
resistance between the wiper (output) and each of the end terminals (the two
whose resistance did not change in step 2) of the sensor. The end terminal with
the lowest resistance to the wiper (at idle) is the ground terminal, and should
connect to the black main ground wire of the TCS (Vehicle pin 16). The terminal
with the higher resistance to the wiper is the 5 volt reference input to the sensor
and should connect to the orange wire (Vehicle pin 11) in our harness.
General Guidelines for setting up Throttle Position Sensors:
The linkage to a throttle position sensor should use most of the rotating range of
the throttle position sensor. This can be adjusted by changing the ratio of the
linkage. Also, please make sure that a small amount of the sensor's travel is
being used at idle. You will want a TPS voltage at idle of at least 0. 5 volts. This
is done to allow the TCS to detect problems with the TP sensor. For instance, if
the sensor becomes disconnected or the linkage falls off, the TPS voltage will
fall below the set idle threshold. If the TPS voltage goes below the idle
threshold, the TCS assumes that the TPS is bad and will switch to failsafe line
pressure and default shift points. This is done to prevent damage to the
transmission from low line pressure and will provide a safe "limp home" mode.
8

TRANS ISSION DIAGRA S
9

10

OPTIONAL ACCESSORIES
Table Select:
The table selection switch should be an On-Off type switch (such as a toggle or
latching push-button switch) which applies ground to the table select input at
Vehicle connector pin 5 when turned on. When the switch is turned on, the TCS
will use the secondary calibration tables, allowing a completely different
calibration to be selected for the transmission at any time. The Table Selection
input may also be connected to a nitrous oxide system to provide an alternate
calibration for use when the nitrous system is engaged. Other uses for this
input include a “Sport/Economy” switch or a “Normal/Aggressive” switch. The
usefulness of this input is limited only by your imagination.
11

anual Shift Connections
anutronic Overview:
If connected and enabled in the software, the ManuTronic feature will allow
manual selection of all forward gears using paddles, push-buttons, or another
type of switch. With ManuTronic engaged, a brief press of the UPSHIFT button
will change to the next higher gear, while DOWNSHIFT will change to the next
lower gear. ManuTronic also has a safety feature which inhibits downshifting if
the engine RPM is too high, which prevents over-revving of the engine due to a
driver's error.
anutronic Reference Supply (JW2-5)
There are several different ways to configure the Manutronic to meet your
specific needs. Depending on your Manutronic configuration, you may need to
install or uninstall the Manutronic jumper (JW2-5). You can find the jumper
settings manual on the OptiShift software disc in PDF format.
This jumper supplies 5V to the Manutronic 1 input and should be installed for all
Manutronic configurations (except for a Ford cruise control system). See the
sections below for further explanation.
12

Push-buttons with On / Off Toggle Switch:
For this configuration, you will need to connect the Dark Blue wire (Pin 14 on the
Vehicle Connector) to your down-shift push-button, and connect the Light Blue
wire (Pin 6 on the Vehicle Connector) to your up-shift push-button. To connect
the on / off toggle switch, solder the switch's wire onto the Dark Blue down-shift
wire with a 680 Ohm resistor between them. (Follow the guidelines for soldering
found in the “General Installation” section.) Remember that the Manutronic
jumper must be installed in the OptiShift TCS and the correct settings used in
the Shiftware setup. Manutronic will be enabled when the toggle switch is turned
on and disabled when it is turned off.
13

Push-buttons with Push-button On / Off Switch:
For this configuration, you will need to connect the Dark Blue wire (Pin 14 on the
Vehicle Connector) to your down-shift push-button, and connect the Light Blue
wire (Pin 6 on the Vehicle Connector) to your up-shift push-button. To connect
the on / off push-button, solder one side of the switch onto the Dark Blue down-
shift wire and the other side to the Light Blue up-shift wire. (Follow the
guidelines for soldering found in the “General Installation” section.) Remember
that the Manutronic jumper must be installed in the OptiShift TCS and the
correct settings used in the Shiftware setup. To enable the Manutronic, press
the On/Off button once, and do the same to disable it.
14

Twist achine ShrifterT :
For this configuration, you will need to connect the Dark Blue wire (Pin 14 on the
Vehicle Connector) to COM2 of the receiver, and connect the Light Blue wire
(Pin 6 on the Vehicle Connector) to COM1 of the receiver. You can use either a
push-button on / off switch or a toggle on / off switch. Refer to the previous two
sections on how to install and use the on / off switch. Remember that the
Manutronic jumper must be installed in the OptiShift TCS and the correct
settings used in the Shiftware setup.
15

SHIFTWARE
Introduction:
Using the Shiftware software allows you to modify the way your OptiShift
Transmission Control System behaves. You can customize shift-points as well
as monitor and diagnose the OptiShift unit in real-time.
Setup:
To create a calibration for the OptiShift, you can either use the wizard or load
one of the supplied files included on the Shiftware disc.
To use the setup wizard, click the New button. The wizard will guide you
through the setup process.
To load a standard configuration for your transmission, click the Open
button on the toolbar, then browse to the folder where the transmission
calibration files are located. The files are named according to the transmission
and RPM range. (Calibrations are saved as “.BTC” files.) Choose the calibration
file and click Open.
Once the calibration file is loaded, click the System Settings button on the
toolbar to check the settings and make sure that they are correct for your
transmission. The System Settings window has several tabs within it. Click each
one to see each section of settings specific for your transmission.
The System Settings Window
16

Customize:
The main window is where all of the shift points and line pressure editing is
done. The graph displays the up-shift and down-shift speeds in relation to
throttle position for each shift. It also displays the line pressure curve (otherwise
known as the EPC current) in relation to throttle position. The lower the line
pressure curve is on the graph, the higher line pressure will be.
The Main Window
(You can get help on any control by clicking the Question button and then
clicking on an item. You can also look at help topics in the HELP menu.)
The graph has ten points from left to right, 0 being idle and 9 being Wide-Open-
Throttle (WOT). On the left side of the graph is speed in miles per hour. Click on
a point in the graph to select it. (If Automatic Down-shift is enabled, then the
corresponding down-shift point will be automatically selected along with the up-
shift point. This can be turned off by clicking the Downshift Select
checkbox on the right.) You can select multiple points by holding CTRL while
clicking the points, or a range of points by holding SHIFT and clicking the two
17

points on each end. You can move between adjacent points using the LEFT and
RIGHT arrow keys.
Once a point (or points) is selected, you can drag it with the mouse to raise and
lower its value. A yellow box will appear in the graph telling you what the value
of the point is.
Tables:
You can create more than one calibration, and use the Table buttons on
the toolbar to select whether the current calibration file will be read from or
written to table 1 or 2. The two table spaces in the controller are separate and
independent, and each can hold a separate calibration file. An optional Table
Select Switch can be added to the OptiShift system to switch between them.
(See “Optional Accessories”)
Save & Load:
Once you have created your calibration, you can save the file to your hard drive
or an external storage device. To save, click the Save button on the toolbar.
Then browse to the location where you want it saved and click Save. Use “Save
As” under the FILE menu to leave the original file unchanged and create a new
version. Type the desired filename and click Save. Files are saved with a “.BTC”
extension.
To load a calibration file, click the Open button on the toolbar. Then, browse
to the file and click Open.
Writing a Calibration to the OptiShift:
For the changes you've made to take effect on the OptiShift TCS, you first must
write the calibration to the unit. Connect the OptiShift to your computer using a
standard USB cord (Type A to Type B). First, select the table you wish to write to
the OptiShift unit by clicking either the 1 or 2 buttons on the toolbar.
Then, click the Write Calibration button on the toolbar. Once the Shiftware
is finished writing the calibration, you can repeat these steps for the other table.
When the OptiShift unit is disconnected from the computer, the Write
Calibration button will be grayed out.
18

I PORTANT INFOR ATION
How to Avoid Errors:
The Shiftware software gives you complete freedom and flexibility to customize
your shifting calibration however you want. This freedom requires diligence to
avoid errors.
It is very important that the up-shift and down-shift curves for a given gear do
not cross. The up-shift point at any throttle position should usually be at least
15% greater than the down-shift point. For instance, if the 2- up-shift point at
½-throttle is 45MPH, then the -2 down-shift point should usually be less than
40MPH.
The “On-Off” differential between up-shift and down-shift points is called
Deadband (also known as Hysteresis). The more deadband you use for your
shift points, the more stable the system will be. Not using enough deadband can
result in erratic shift behavior. Too much deadband will result in sluggish
behavior due to a reluctance to down-shift.
Pay close attention to the interaction between different shifts. Overlapping the 1-
2 and 2- shifts can cause skipped gears and other drivability problems.
Also note that torque converter slip at low speeds renders engine RPM values
meaningless. It is usually desirable to have light-throttle shift points within a low
RPM range. In this case, it is best to base light-throttle shift points on vehicle
speed, rather than engine RPM (as most auto manufacturers do).
19

TROUBLESHOOTING
WARNING!
If the transmission does not begin to operate correctly within the
first few feet of the road test, STOP immediately, check the
troubleshooting guide, and call Baumann Electronic Controls if you
need assistance. In some cases, just a few blocks of operation with
low fluid pressure can destroy a transmission.
Contact
If you have any questions, problems, or product orders, please do
not hesitate to call our customer service line at (864) 646-8920
(Monday-Friday 10AM-6PM EST). If no one is available, please
leave a detailed message and we will reply promptly. Whenever
possible, we will try to return urgent technical support calls left
after hours or over the weekend.
20
Table of contents