manuals.online logo
Brands
  1. Home
  2. •
  3. Brands
  4. •
  5. Baumer
  6. •
  7. Accessories
  8. •
  9. Baumer GIM140R User manual

Baumer GIM140R User manual

Other Baumer Accessories manuals

Baumer UNDK 20P6914/S35A User manual

Baumer

Baumer UNDK 20P6914/S35A User manual

Baumer UNAM 12N3912/S14 User manual

Baumer

Baumer UNAM 12N3912/S14 User manual

Baumer OADM 20U2480/S14C User manual

Baumer

Baumer OADM 20U2480/S14C User manual

Baumer OM70T-11195786 User manual

Baumer

Baumer OM70T-11195786 User manual

Baumer SmartReflect FNDK 14G6902/S35A/IO User manual

Baumer

Baumer SmartReflect FNDK 14G6902/S35A/IO User manual

Baumer FKDM 22N1901/S14F User manual

Baumer

Baumer FKDM 22N1901/S14F User manual

Baumer UNDK 20N6912/S35A User manual

Baumer

Baumer UNDK 20N6912/S35A User manual

Baumer OADR 20I6 Series User manual

Baumer

Baumer OADR 20I6 Series User manual

Baumer OADM 20U5440/S14C User manual

Baumer

Baumer OADM 20U5440/S14C User manual

Baumer OADM 12U6430/S35A User manual

Baumer

Baumer OADM 12U6430/S35A User manual

Baumer R600V.DAE0-11188367 User manual

Baumer

Baumer R600V.DAE0-11188367 User manual

Baumer OADM 20I5571/S14C User manual

Baumer

Baumer OADM 20I5571/S14C User manual

Baumer UNDK 20N6914/S35A User manual

Baumer

Baumer UNDK 20N6914/S35A User manual

Baumer GIM500R User manual

Baumer

Baumer GIM500R User manual

Baumer OBDM 12N6910/S35A User manual

Baumer

Baumer OBDM 12N6910/S35A User manual

Baumer OM70-11186912 User manual

Baumer

Baumer OM70-11186912 User manual

Baumer PosCon3D User manual

Baumer

Baumer PosCon3D User manual

Baumer UNDK 20P7914/S35A User manual

Baumer

Baumer UNDK 20P7914/S35A User manual

Baumer OADR 20I6575/S14F User manual

Baumer

Baumer OADR 20I6575/S14F User manual

Baumer UNDK 20P6914/S35A User manual

Baumer

Baumer UNDK 20P6914/S35A User manual

Baumer UNAM 18P6903/S14 User manual

Baumer

Baumer UNAM 18P6903/S14 User manual

Baumer UNDK 20P7912/S35A User manual

Baumer

Baumer UNDK 20P7912/S35A User manual

Baumer FEDK 07P6901 User manual

Baumer

Baumer FEDK 07P6901 User manual

Baumer OM70-11216514 User manual

Baumer

Baumer OM70-11216514 User manual

Popular Accessories manuals by other brands

Quincy lab 140AE-1 operating manual

Quincy lab

Quincy lab 140AE-1 operating manual

HomePro ZIR000 user manual

HomePro

HomePro ZIR000 user manual

DOL 20SCR Technical user guide

DOL

DOL 20SCR Technical user guide

RAB Smart Task installation manual

RAB

RAB Smart Task installation manual

Kemppi KMS 300 quick guide

Kemppi

Kemppi KMS 300 quick guide

Stearns 57,500 Series Installation and service instructions

Stearns

Stearns 57,500 Series Installation and service instructions

iGuzzini TWILIGHT COPENAGHEN manual

iGuzzini

iGuzzini TWILIGHT COPENAGHEN manual

Adelaide Annexe & Canvas Avan Deluxe installation guide

Adelaide Annexe & Canvas

Adelaide Annexe & Canvas Avan Deluxe installation guide

OHAUS 5000 instruction manual

OHAUS

OHAUS 5000 instruction manual

HOME8 WLS1300 quick start guide

HOME8

HOME8 WLS1300 quick start guide

MAXBOTIX MaxSonar quick start guide

MAXBOTIX

MAXBOTIX MaxSonar quick start guide

ioSmart iSmart56 Installation and user guide

ioSmart

ioSmart iSmart56 Installation and user guide

Focusrite Scarlett 18i8 user guide

Focusrite

Focusrite Scarlett 18i8 user guide

Velleman ED38105 user manual

Velleman

Velleman ED38105 user manual

JumpSport SkyBounce user manual

JumpSport

JumpSport SkyBounce user manual

Prima-Temp PRIYA Instructions for use

Prima-Temp

Prima-Temp PRIYA Instructions for use

Tefcold BC85I-BC85I W user manual

Tefcold

Tefcold BC85I-BC85I W user manual

Vaisala WMS302 user guide

Vaisala

Vaisala WMS302 user guide

manuals.online logo
manuals.online logoBrands
  • About & Mission
  • Contact us
  • Privacy Policy
  • Terms and Conditions

Copyright 2025 Manuals.Online. All Rights Reserved.

DE Montageanleitung
EN Assembly Instructions
FR Notice de montage
IT Istruzioni di montaggio
ES Instrucciones de montaje
Neigungssensoren
Inclination sensors
Inclinomètres
Inclinometro
Sensores de inclinación
Sensor Systems S.r.l.
Via Caduti Del Lavoro 9 · 25032 Chiari (BS) Italy
Phone +39 030 7000916
info.bsit@baumer.com · www.baumer.com
11.21 · 81311277 · 11249131 · V01 · Printed in Italy
DE
1. Allgemein
Bestimmungsgemässer Gebrauch, Inbetriebnahme, Montage, Entsorgung siehe
Beileger «Allgemeine Hinweise» (11042373).
2. Zusätzliche Informationen
Diese Montageanleitung ist eine produktspezische Ergänzung zu den allgemeinen
Dokumenten.
3. Wartung
Der Sensor ist wartungsfrei und darf nicht geö󰀨net beziehungsweise mechanisch
oder elektrisch verändert werden. Ein Ö󰀨nen des Sensors kann zu Verletzungen
führen.
IT
1. Generali
Istruzioni per un uso conforme, messa in funzione, montaggio, smaltimento vedi alle-
gati «Informazioni generali» (11042373).
2. Ulteriori informazioni
Queste istruzioni di montaggio sono un supplemento specico del prodotto ai docu-
menti generali.
3. Manutenzione
L‘sensor non necessita di manutenzione, non deve essere aperto e neppure essere
sottoposto a modiche meccaniche o elettriche. Un‘apertura dell‘sensor può com-
portare delle lesioni.
ES
1. General
Instrucciones para el uso adecuado, puesta en servicio, montaje, eliminación ver los
adjuntos «Información general» (11042373).
2. Información adicional
Estas instrucciones de montaje son un suplemento especíco de los documentos
generales.
3. Mantenimiento
El sensor no necesita mantenimiento. No está permitido abrirlo ni realizar cambios
mecánicos o eléctricos. Abrir el sensor puede provocar lesiones.
FR
1. Générales
Instructions pour une utilisation appropriée, Mise en service, Installation/Montage,
Éliminatión voir les annexes «Informations générales» (11042373).
2. Informations supplémentaires
Ces instructions de montage sont un complément spécique aux documents géné-
raux.
3. Maintenance
Le capteur est sans entretien et ne doit pas être ouvert ni mécaniquement ou élec-
triquement modié. En cas d‘ouverture du capteur, les ressorts risquent de provoquer
des blessures.
EN
1. General
Instructions for appropriate use, set-up, installation, disposal see insert «General
Information» (11042373).
2. Additional informations
These assembly instructions are a product-specic supplement to the general docu-
ments.
3. Maintenance
The sensor is maintenance-free and must not be opened up nor mechanically or elec-
tronically modied. Opening up the sensor can lead to injury.
4. Technische Daten/Technical data/Caractéristiques techniques/Dati tecnici/
Especicaciones técnicas
Betriebsspannung/Voltage supply/Alimentation/Tensione d’esercizio/Tensión de servicio
8...30 VDC / 12...30 VDC (Analog/Analogique/Analogico/Analógica)
8...36 VDC (CANopen®)
R
ø
Kabel/Cable/Câble/Cavo
5x0,5 mm2
ø = 5,2 mm
R x ≥52 mm
Kabel (M12)/Cable (M12)
Câble (M12)/Cavo (M12)
5x0,5 mm2
ø = 4,7 mm
R x ≥47 mm
5. Schirmung am Gehäuse/Shielding on housing/Blindage sur boîtier/
Schermatura del corpo encoder/Blindaje en la carcasa
3/&
6FKLUPDQVFKOXVV
VKLHOGFRQQHFWLRQ
3RWHQWLDODXVJOHLFKVOHLWXQJ
SRWHQWLDOHTXDOL]DWLRQZLUH
GIM140R
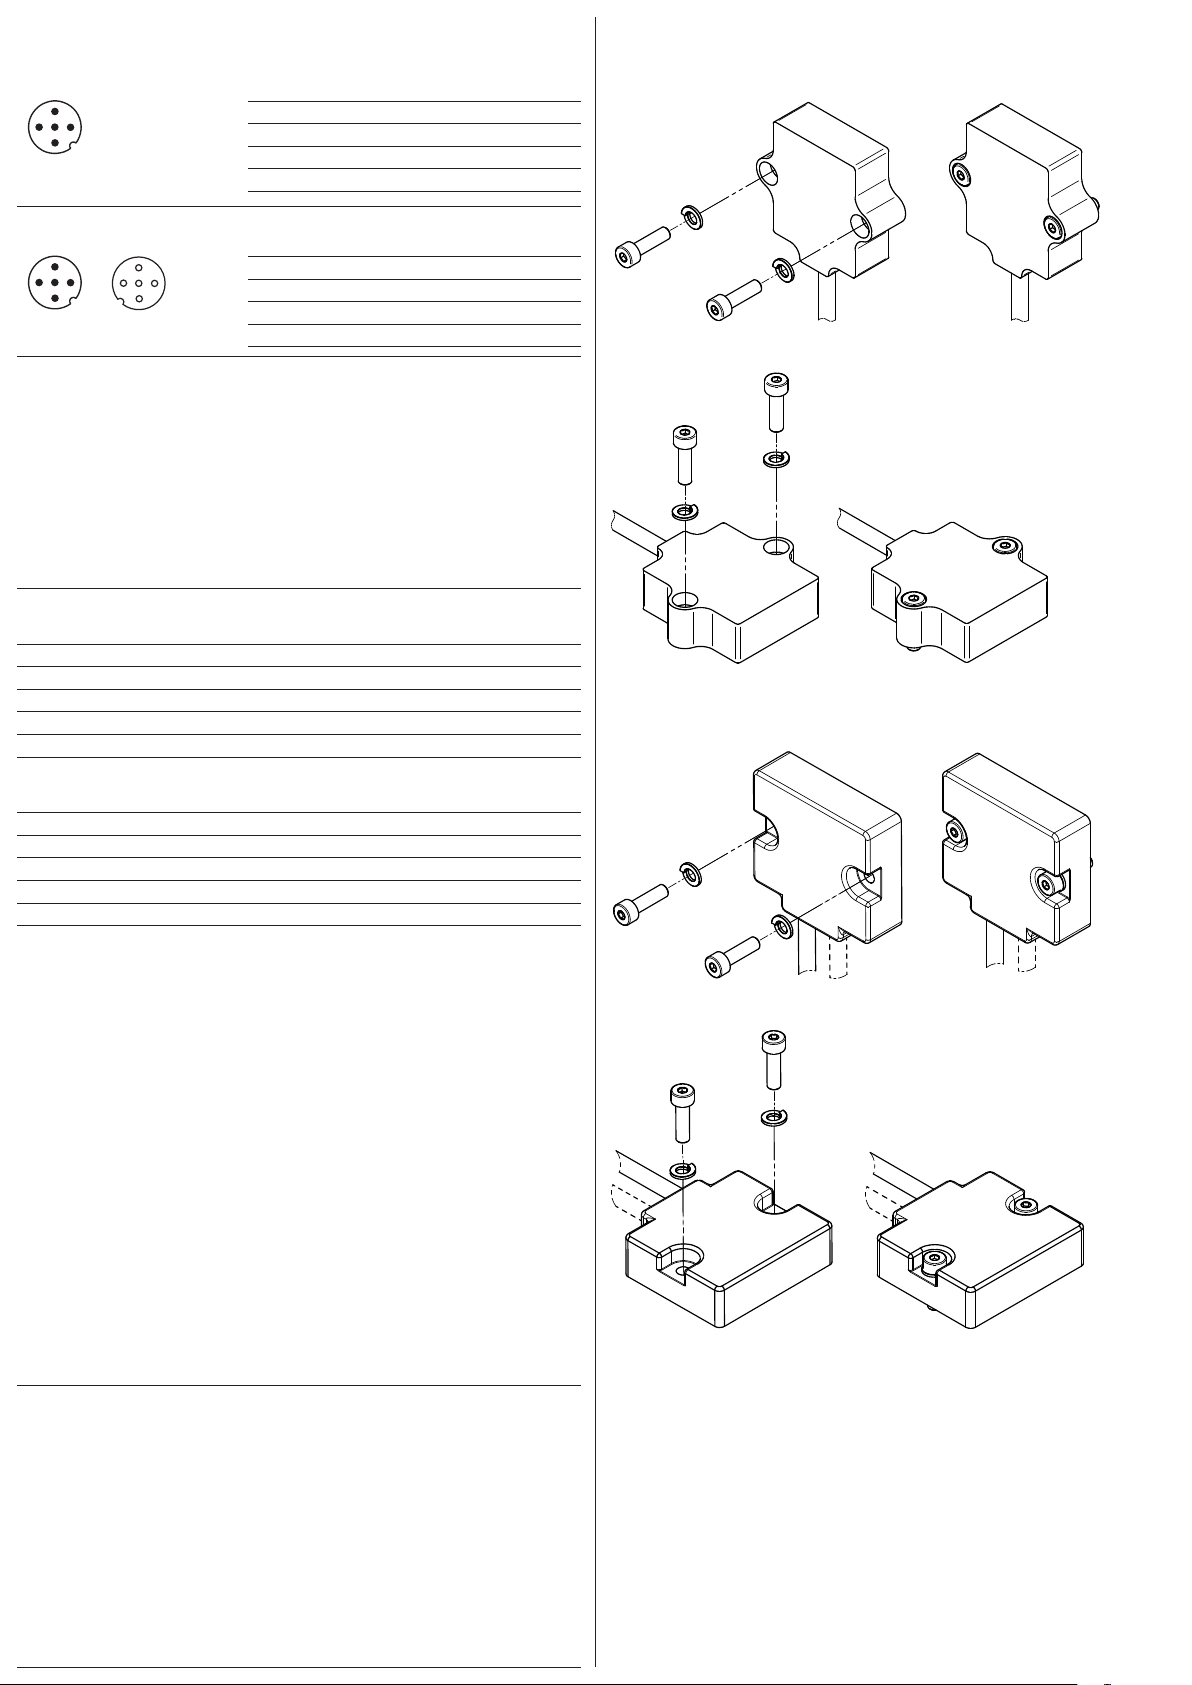
8. Montage/Mounting/Montage/Montaggio/Montaje
8.1 Analog/Analogique/Analogico/Analógica
1-dimensional/Unidirectionnelle/1 asse/1-dimensión
M4x14 INOX
UNI 5931
(1.2 Nm)
M4
UNI 8839
2-dimensional/Bidirectionnelle/2 asse/2-dimensión
M4x14 INOX
UNI 5931
(1.2 Nm)
M4
UNI 8839
8.2 CANopen® - Kabel/Cable/Câble/Cavo
1-dimensional/Unidirectionnelle/1 asse/1-dimensión
M4x14 INOX
UNI 5931
(1.2 Nm)
M4
UNI 8839
2-dimensional/Bidirectionnelle/2 asse/2-dimensión
M4x14 INOX
UNI 5931
(1.2 Nm)
M4
UNI 8839
6.1 CANopen®– M12, 5-polig/5-pins/5 points
1
2
3
4
5
A-codiert/A-coded/Codage A
1 CAN_GND
2 +Vs
3 GND
4 CAN_H
5 CAN_L
6.2 CANopen®– 2xM12, 5-polig/5-pins/5 points
1
2
3
4
5
1
2
3
4
5
A-codiert/A-coded/Codage A
1 CAN_GND
2 +Vs
3 GND
4 CAN_H
5 CAN_L
Klemmen mit gleicher Bezeichnung sind intern verbunden und funktionsidentisch. Diese in-
ternen Klemmverbindungen +Vs-+Vs / GND-GND dürfen mit max. je 0,5 A belastet werden.
Terminals of the same signicance are internally connected and identical in their functions.
Max. load on the internal terminal connections +Vs-+Vs and GND-GND is 0.5 A each.
Les bornes de même fonction sont reliées entre elles dans le boîtier bus. Courant
max. 0,5 A pour les bornes d´alimentation codeur +Vs et GND.
I morsetti con la stessa denominazione sono collegati internamente e identici nella
funzione. Questi giunti di accoppiamento interni +Vs-+Vs / GND-GND possono esse-
re sollecitati ciascuno con max. 0,5 A.
Los bornes con la misma designación están conectados a nivel interno y su función
es idéntica. Esas conexiones internas +Vs-+Vs / GND-GND admiten una carga máxi-
ma de 0,5 A cada una.
6.3 CANopen®– Kabel/Cable/Câble/Cavo
Farbe/Color/Couleur
Weiss/white (wh) GND
Braun/brown (bn) +Vs
Grün/green (gn) CAN_H
Gelb/yellow (ye) CAN_L
Grau/grey (gy) CAN_GND
6.4 Analog/Analogique/Analogico/Analógica – Kabel/Cable/Câble/Cavo
Farbe/Color/Couleur
Weiss/white (wh) GND
Braun/brown (bn) +Vs
Grün/green (gn) OUT
Gelb/yellow (ye) n.c.
Grau/grey (gy) Teach
6. Anschlussbelegung/Terminal assignment/Raccordement/Assegnazione dei
connettori/Patillaje del conector
7. 1-Punkt-Teach (Analog) / 1-Point-Teach (Analog) / Apprentissage 1 points
(Analogique) / Teach a 1 punti (analogico) / Teach de 1 puntos (analógica)
Auf Null setzen
Den Neigungssensor auf die vorgesehene Position für Null setzen (Neigung 0°). Den
Teach-Eingang für 5 s < t < 10 s auf High-Pegel (>2,1 V) setzen. Das Nullsetzen wirkt
sich auf beide Achsen (X/Y) aus.
Setting zero
Get inclination sensor on position intended for zero position (inclination 0°). Set teach
input for 5 s < t < 10 s on high level (>2.1 V). Zero setting a󰀨ects both axes (X/Y).
ZERO
Mettre le inclinomètre à la position prévue pour la position ZERO (inclination 0°).
Régler l‘entrée Teach-in sur 5 s < t < 10 s au niveau haut (>2,1 V). La mise à ZERO
a󰀨ecte les deux axes (X/Y).
Impostazione dello zero
Portare il sensore d‘inclinazione sulla posizione prevista per la posizione zero (incli-
nazione 0°). Impostare l‘ingresso di apprendimento per 5 s < t < 10 s su un livello alto
(>2,1 V). L‘azzeramento riguarda entrambi gli assi (X/Y).
Ajuste del cero
Poner el sensor de inclinación en la posición prevista para la posición cero (inclinaci-
ón 0°). Ajustar la entrada Teach para 5 s < t < 10 s en nivel alto (>2,1 V). La puesta a
cero afecta a ambos ejes (X/Y).
Hinweis/Note/Remarque/Nota/Nota
Für 2-dimensionale Ausführung (Analog, CANopen): Teach / Preset der Nullposition nur in
einem Bereich von ±5° um die Werkseinstellung für die Nullposition (Neigung 0°) möglich.
For 2-dimensional version (Analog, CANopen): Teach / preset of zero position possible
only within a range of ±5° around factory default setting for zero position (inclination 0°).
Pour la version bidimensionnelle (analogique, CANopen) : Apprentissage/présélection
de la position zéro possible uniquement dans une plage de ±5° autour du réglage par
défaut de la position zéro (inclinaison 0°).
Per la versione bidimensionale (analogica, CANopen): Apprendimento/preim-
postazione della posizione zero possibile solo entro un intervallo di ±5° intorno
all‘impostazione di fabbrica per la posizione zero (inclinazione 0°).
Para la versión bidimensional (analógica, CANopen): El aprendizaje/preselección de
la posición cero sólo es posible dentro de un rango de ±5° alrededor del ajuste de
fábrica para la posición cero (inclinación 0°).