Baumr-AG JHKELEBMRA10S User manual

Electric Jackhammer
User Manual
RETAIN THIS MANUAL FOR FUTURE REFERENCE
PLEASE READ THIS MANUAL CAREFULLY BEFORE USE

Electric Jackhammer
i
Table of Contents
Safety....................................................................................................................................................................... 1
General Operational Precautions....................................................................................................................... 1
Precautions When Using the Jackhammer........................................................................................................2
Illustrative Guide .................................................................................................................................................... 3
Applications............................................................................................................................................................ 5
Application Examples.........................................................................................................................................5
Set-Up ......................................................................................................................................................................6
Prior to Operation...............................................................................................................................................6
Power Source...............................................................................................................................................6
Grounding ....................................................................................................................................................6
Power Switch ...............................................................................................................................................6
Extension Cord.............................................................................................................................................6
Operation.................................................................................................................................................................6
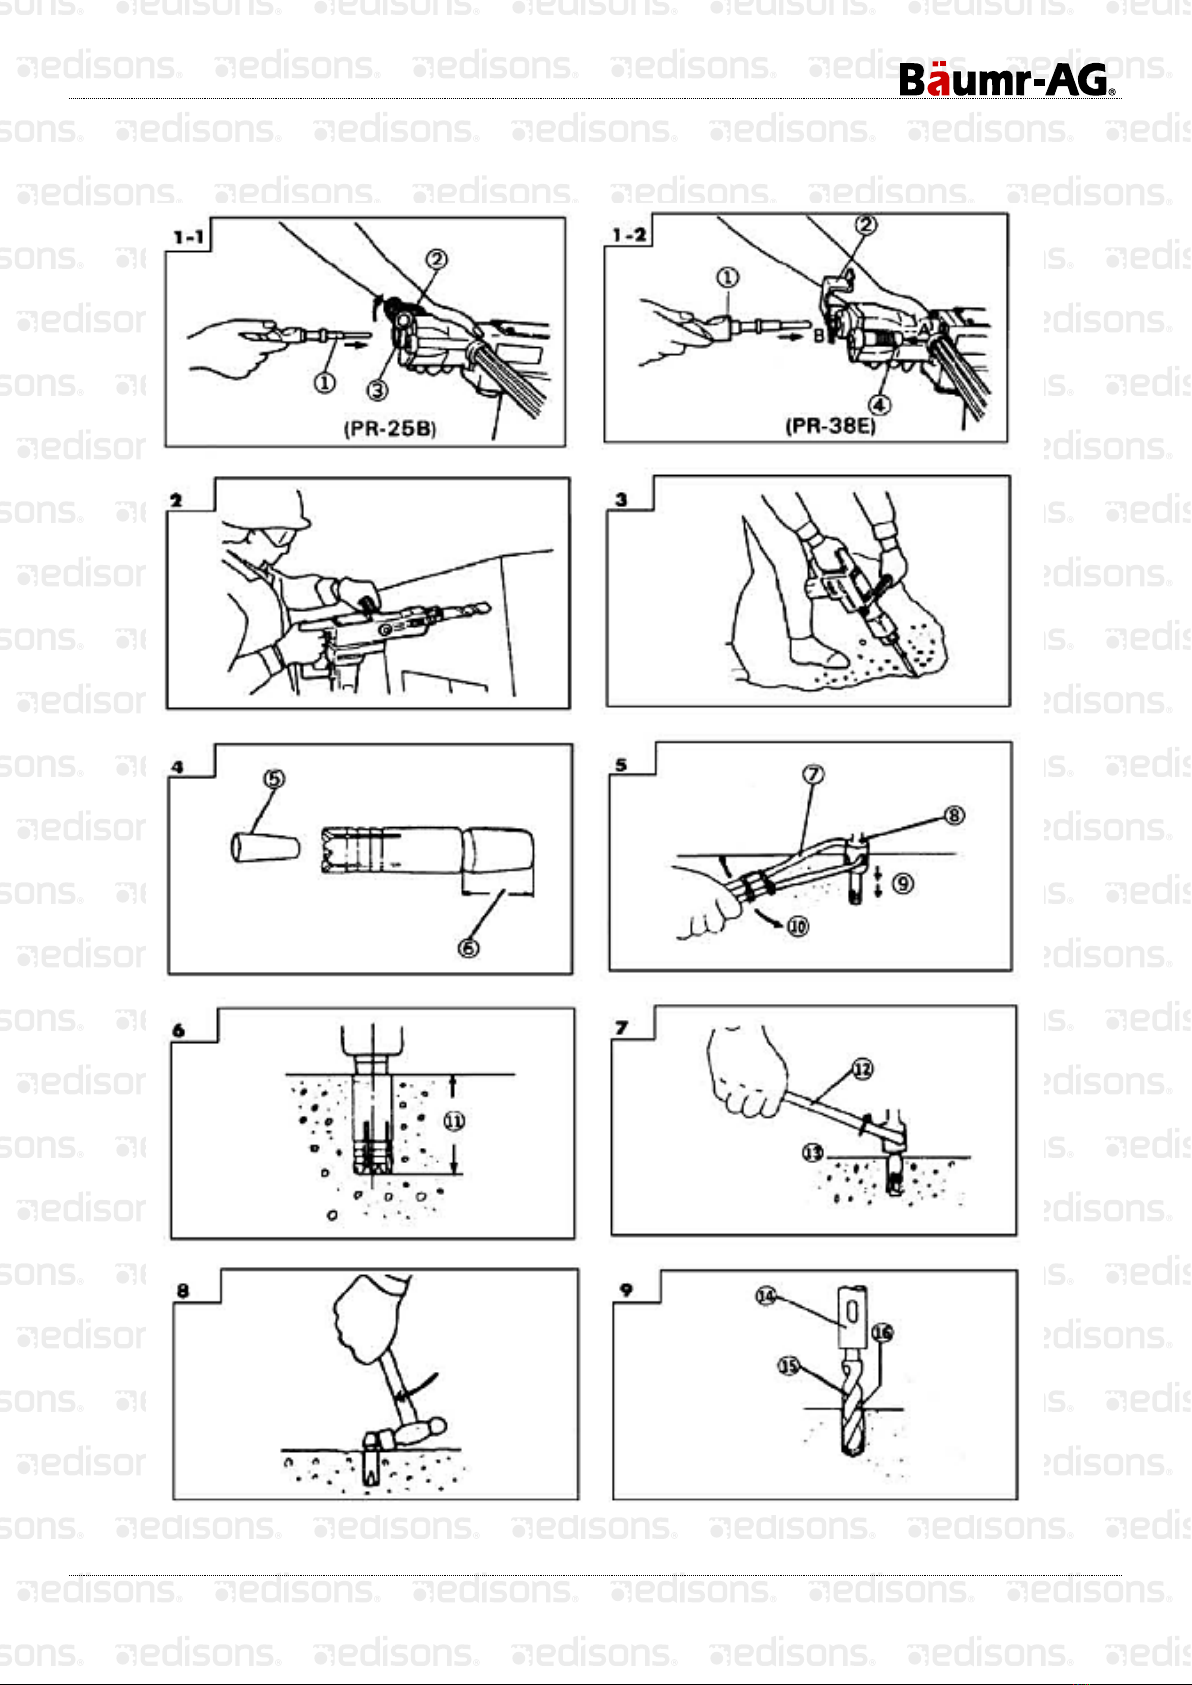
How to Use the Jackhammer.............................................................................................................................6
How to Drill Holes.........................................................................................................................................6
How to Clip or Crutch...................................................................................................................................7
Drilling and Driving-In Operations for Self-Drilling Anchors...............................................................................7
When an Impact Anchor Adapter is Used ...................................................................................................7
When a Rotation and Impact Anchor Adapter is Used................................................................................7
When a Taper Shank Adapter is Used........................................................................................................7
Handling the Core Bit......................................................................................................................................... 7
Mounting.......................................................................................................................................................7
Drilling Holes................................................................................................................................................8
Dismounting the Core Bit...................................................................................................................................8
Oil Feeding.........................................................................................................................................................8
Maintenance............................................................................................................................................................8
Inspecting the Tool.............................................................................................................................................8
Inspecting the Mounting Screws........................................................................................................................8
Maintenance of the Motor ..................................................................................................................................8
Inspecting the Carbon Brushes.......................................................................................................................... 9
Replacing the Carbon Brushes.......................................................................................................................... 9
Inspecting the Dust Cover.................................................................................................................................. 9
Specifications .........................................................................................................................................................9

Electric Jackhammer
1
Safety
General Operational Precautions
Keep work area clean. Cluttered areas and benches invite injuries.
Consider work area environment. Don't expose power tools to rain. Don’t use power tools in damp or wet
locations. Keep work area well lit.
Don't use tool in presence of flammable liquids or gases.
Power tools produce sparks during operation. They also produce sparks when being switched ON/OFF.
Never use power tools in dangerous sites containing lacquer, paint, benzene, thinner, gasoline, gases,
adhesive agents, and other materials which are combustible or explosive.
Guard yourself against electric shocks. Prevent bodily contact with grounded surfaces like piles, radiators,
ranges, refrigerator enclosures, etc.
Keep children away. Do not let visitors touch the tool or extension cord. All visitors should be kept away from
the work area.
Store idle tools. When not in use, tools should be stored in a dry and high or locked-up place, out of reach of
children.
Don’t force the tool. It will do the job better and safer at the rate for which it was Intended.
Use the right tool. Don't force a small tool or attachment to do the job of a heavy-duty tool. Don't use tool for
purposes that are not intended for it, like using a circular saw to cut tree limbs or logs.
Dress property. Do not wear loose clothing or jewellery. They can be caught in moving parts. Rubber gloves
and non-skid footwear are recommended when working outdoors. Wear protective hair covering to contain
long hair.
Use safety glasses. Also use face or dust mask if the work area is dusty.
Don't abuse the cord. Never carry the tool by the cord or yank it to disconnect it from the receptacle. Keep
the cord away from sources of heat, oil and sharp edges.
Secure the work piece. Use clamps or a vise to hold the work piece down. It’s safer than using your hand
and it frees both hands to operate the tool.
Don't overreach. Keep proper footing and balance at all times.
Maintain tools with care. Keep tools sharp and clean for better and safer performance. Follow instructions for
lubricating and changing accessories. Inspect tool cords periodically and if damaged, have them repaired by
an authorised service facility. Inspect extension cords periodically and replace if damaged. Keep handles
dry, clean, and free from oil and grease.
Disconnect the tool when not in use, before serving, and when changing accessories such as blades, bits
and cutters.
Remove adjusting keys and wrenches. Form a habit of checking to see that keys and adjusting wrenches
are removed from the tool before turning it on.
Avoid unintentional starting. Don't carry a plugged-in tool with a finger on the switch. Be sure that the switch
is off when plugging in.
When tool is used outdoors, use only extension cords that are intended to be used outdoors.

Electric Jackhammer
2
Stay alert. Watch what you are doing. Use common sense. Do not operate the tool when you are tired.
Check damaged parts. Before further use of the tool, a guard or other part that is damaged should be
carefully checked to determine that it will operate properly and perform its intended function. Check for
alignment of moving parts, binding of moving parts, breakage of parts, mounting, and any other conditions
that may affect its operation. A guard or other part that is damaged should be properly repaired or replaced
by an authorised service centre, unless otherwise indicated elsewhere in this instruction manual. Have
defective switches replaced by an authorised service centre. Do not use the tool if the switch does not turn
on and/or off.
Do not use power tools for applications other than those specified in the instructions of this manual.
To ensure the designed operational integrity of power tools, do not remove installed covers or screws.
Do not touch movable parts or accessories unless the power source has been disconnected.
Use your tool at a lower input than what is specified on the nameplate; otherwise, the finish may be
damaged and working efficiency reduced due to motor overload.
Do not wipe plastic parts with solvent. Solvents such as gasoline, thinner, benzene, carbon tetrachloride,
alcohol, ammonia and oil containing chloric acid may damage and crack plastic parts. Do not wipe them with
such solvents. Wipe plastic parts with a soft cloth lightly dampened with soapy water.
Consult an authorised service agent or centre in the event of a power tool failure.
Precautions When Using the Jackhammer
Wear protective glasses to protect your eyes.
Wear a mask when turning your head upwards.
Use earplugs to keep your ears noise-free while working.
Set the bit holder properly.
Since the bit becomes very hot during operation, exercise extreme caution when you are near it.
Be sure to use the side handle.
Safe operation depends on one’s stable posture.
At the start of each work, check the oil supply and tighten any loose screws.
When working at a highly elevated location, pay attention to objects and persons that are below you.
Before starting to break or chip a wall, floor, or ceiling, confirm thoroughly that no items such as electric
cables or conduits are buried inside.
Wear protective shoes to protect your feet.

Electric Jackhammer
3
Illustrative Guide

Electric Jackhammer
4

Electric Jackhammer
5
1
Tool
14
Taper shank adapter
2
Retainer
15
Drill bit (with tapered shank)
3
Front cover
16
Hole depth indicating
groove: A standard depth
conforming to the anchor
outside diameter is
indicated.
4
Stopper
17
Core bit
5
Plug
18
Core bit shank
6
Snap off this portion after
driving in the self-drilling
anchor.
19
Centre pin
7
Turning handle
20
Guide plate
8
Anchor adapter
21
Core bit tip
9
Striking by hammer drill
22
Oil gauge: Check the oil
quantity by holding the body
upright.
10
Move right and left
23
Resupply oil when the oil
level drops to less than
approx. 3mm.
11
Hole depth
24
Wear limit
12
Drift key
25
No. of carbon brush
13
Wrench out
Applications
Drilling holes in concrete
Drilling anchor bolt holes
Crushing concrete, chipping, digging, and squaring.
Application Examples
Installation of piping and wiring, sanitary facility installation, machinery installation, water supply and drainage
work, interior jobs, harbour facilities and other civil engineering work.

Electric Jackhammer
6
Set-Up
Prior to Operation
Power Source
Ensure that the power source to be utilised conforms to the power requirements specified on the product
nameplate.
Grounding
This tool should be grounded while in use to protect the operator from electric shock. The tool is equipped with a
three-conductor cord and grounding type plug to fit the proper grounding type receptacle. The green (or green
and yellow) conductor in the cord is the grounding wire. Never connect the green (or green and yellow) wire to a
live terminal.
Power Switch
Ensure that the power switch is in the OFF position. If the plug is connected to a power receptacle while the
power switch is in the ON position, the power tool will start operating immediately, inviting serious accidents.
Extension Cord
When the work area is removed from the power source, use an extension cord of sufficient thickness and rated
capacity. The extension cord should be kept as short as practicable.
25mm
1. Raise the retainer and insert the shank portion of a drill bit into the hexagonal hole on the front cover until it
reaches the extremity (Fig. 1-1 in the Illustrative Guide above).
2. By slightly tapping the top of the bit holder with a wooden mallet, replace the bit holder to grip the bit firmly.
38mm
1. Turn the stopper to the direction of arrow A, turn the retainer to the direction of arrow B. After that, insert the
tool shank into the hexagon hole on the front cover (Fig. 1 -2 in the Illustrative Guide above).
2. Pushing the stopper to the direction of arrow A, turn the retainer to arrow B in the opposite direction. After
that, remove the stopper.
NOTE: When dismounting the bull points, reverse the procedures described above.
Operation
How to Use the Jackhammer
How to Drill Holes
1. Pull the switch trigger after applying the drill bit tip to the drilling position.
2. It is unnecessary to forcibly press the drill main body. It is sufficient to slightly press the drill to an extent that
clips are freely discharged.
CAUTION: Although a safety clutch is built in this drill, the drill bit will suddenly stop when it strikes against a
buried reinforcing bar, and the drill will start to reverse its spin as a reaction.
Always continue a hole-drilling job while strongly gripping both the side handle and the handle.

Electric Jackhammer
7
How to Clip or Crutch
By applying the drill bit tip to the chipping or crushing position, operate the drill by utilising its own weight.
Forcibly pressing or thrusting is unnecessary.
Drilling and Driving-In Operations for Self-Drilling Anchors
When self-drilling anchors (Fig. 4 in the Illustrative Guide above) are used, the anchors can be driven in. In this
case, use the optional accessories for self-drilling anchors such as the anchor adapter.
When an Impact Anchor Adapter is Used
1. Attach the running handle to the anchor adapter and create a base hole by applying the drill impact to the
position of the hole while manually turning the handle (Fig. 5 in the Illustrative Guide above).
In this case, the plug is not attached to the anchor.
2. When a predetermined depth has been attained, pull out the anchor tentatively (Fig. 6 in the Illustrative
Guide above).
3. By employing a syringe, blow out the chips.
4. Attach the plug to the anchor tip and drive in the anchor again with the Electric Jackhammer.
5. After driving in the anchor, use the drift key to separate the anchor (Fig. 7 in the Illustrative Guide above).
6. By employing a manual hammer or pliers, snap off the tapered portion of the anchor (Fig. 8 in the Illustrative
Guide above).
CAUTION: Since the snapped off tapered portion will be propelled in the air, pay attention to the snapping
direction.
When a Rotation and Impact Anchor Adapter is Used
1. Attach a self-drilling anchor to the anchor adapter.
2. Turn ON the switch and drill a base hole with the self-drilling anchor.
At the start of the hole-drilling, slightly tilt the drill to determine the position of the hole.
3. After clearing out dust with a syringe, attach the plug to the anchor tip and drive in the anchor with a hand
hammer.
4. For further operation, follow procedures e and f, described above, when an impact anchor adapter is used.
When a Taper Shank Adapter is Used
1. Attach a drill bit with a tapered shank to the taper shank adapter.
2. Turn ON the switch, and drill a hole until it reaches the hole depth indicating groove (Fig. 9 in the Illustrative
Guide above).
3. After cleaning out dust with a syringe, attach a plug to the anchor tip and drive in the anchor with a manual
hammer or pliers.
Handling the Core Bit
When a core bit is used, Iarge calibre holes and blind holes can be drilled. In this case, use optional accessories
for core bits (such as a centre pin and core bit shank) for a more rational operation.
Mounting
CAUTION: Prior to mounting a core bit, always disconnect the plug from the power supply receptacle.
1. Mount the core bit on the core bit shank (Fig. 10 in the Illustrative Guide above). Before that, apply some oil
to the screw portion of the core bit shank for to easily dismount it.
2. Mount the core bit shank onto the drill main body in the same manner as mounting the drill bit and the bull
point (Fig. 11 in the Illustrative Guide above).

Electric Jackhammer
8
3. Insert the centre pin into the guide plate until it reaches the extremities.
4. Fit in the guide plate by aligning its concaved portion with the core bit tip. When the position of the concave
is shifted by turning the guide plate right or left, the guide plate never slips of even when the drill is used in a
downward direction (Fig. 12 in the Illustrative Guide above).
Drilling Holes
1. Insert the plug into a power supply receptacle.
2. A spring is built in the centre pin. By gently pressing it to the wall or floor surface in a straight direction, the
entire surface of the core bit tip attains contact to start the hole drilling job.
3. When the hole depth reaches approximately 5mm, the hole position can be determined. Then remove the
centre pin and guide plate from the core bit and continue the hole drilling job.
CAUTION: when removing the centre pin and guide plate, always disconnect the plug from the power supply
receptacle.
Dismounting the Core Bit
1. By holding the drill (with the core bit inserted) in an upward position, drive the drill to repeat impact operation
two or three times, whereby the screw is loosened and the drill becomes ready for disassembly.
2. Remove the core bit shank from the drill, hold the core bit with one hand, and vigorously strike the head of
the hexagonal portion of the core bit shank with a hand hammer two or three times, whereby the round head
screw is loosened and the drill is ready for disassembly.
Oil Feeding
CAUTION: Prior to oil feeding, always disconnect the plug from the power supply receptacle.
Since an oil chamber is built in this Electric Jackhammer, it can be used for approximately 20 days without
supplying it with lubricating oil, assuming that the drill is used continuously for 3 –4 hours daily.
Feed oil into the oil tank as described below before using the Jackhammer (See Figs. 15 and 16 in the
Illustrative Guide above).
1. If no oil is visible in the oil gauge window when the tool is held upright, feed it with new oil.
2. Before feeding the tool with oil, use the wrench provided to remove the oil gauge.
Be careful not to lose the rubber packing attached below the oil gauge.
3. Check the oil level once daily, confirming that the oil gauge is properly filled.
4. After feeding it with oil, clamp the oil gauge securely.
Maintenance
Inspecting the Tool
Since use of a dull tool will degrade efficiency and cause possible motor malfunction, sharpen or replace the tool
as soon as you note an abrasion
Inspecting the Mounting Screws
Regularly inspect all mounting screws and ensure that they are properly tightened. Should any of the screws be
loose, retighten them immediately. Failure to do so could result in hazardous situations.
Maintenance of the Motor
The motor unit winding is the very ‘heart” of the power tool. Exercise due care to ensure the winding does not
become damaged and/or wet with oil or water.

Electric Jackhammer
9
Inspecting the Carbon Brushes
(See Fig. 17 in the Illustrative Guide above).
The motor employs carbon brushes which are designed to be replaceable. When they become worn or near the
‘wear limit’, it may result in motor trouble. When an auto-stop carbon brush is equipped, the motor will stop
automatically. At that time, replace both carbon brushes, as shown in Figure 4 in the Illustrative Guide above. In
addition, always keep carbon brushes clean and ensure that they slide freely within the brush holders.
Replacing the Carbon Brushes
The carbon brush can be removed by removing the tail cover and brush cap in that order at the interior.
Inspecting the Dust Cover
The dust cover functions as a protection from dirt and dust for the interior mechanism. When the interior of the
dust cover is worn-out, replace it with a new dust cover. The dust cover can be removed by pulling it.
Specifications
Motor Type
Induction Commercial Grade
Current
4 Amps
Maximum Power
1050W
Rated BPM
400 BPM
Tool Mount Size
1/2"
Tool Mount
Industry Standard 1/2"
Tool Size
410mm
Frequency
50Hz
Operating Voltage
240v
Machine Length (w/ tool)
642mm
Cord Length
3000mm
Compatible Drill Bits
Hitachi PR38E

Some experts believe the incorrect or prolonged use of almost any
product could causeserious injury or death. For information that
may reduce your risk of serious injury or death consult thepoints
below and additionally, the information available at
www.datastreamserver.com/safety
- Consult all documentation, packaging and
product labelling be fore use. Note that some
products feature online documentation which
should be printed and kept with the product.
- Check product for loose / broken / damaged /
missing parts, wear or leaks (if applicable) be fore
each use. Never use a product with loose / broken
/ damaged / missing parts, wear or leaks (if
applicable).
- Products must be inspected and serviced (if
applicable) by a qualified specialist every 6
months assuming average residential use by a
person of average weight and strength, ab ove
average technical aptitud e, on a property
matching average metropolitan specification.
Intended use outside these guidelines could
indicate the product is not suitable for intended
use or may require more regular inspection or
servicing.
- Ensure all possible users of the p roduct have
completed an industry recognised training course
before being given access to the product.
- The product has been supplied by a general merchandise
retailer that may not be familiar with your specific applic ation or
your description of the application. Be sure to attain third party
approval for your application from a qualified specialist before use
regardless of prior assurances by the retailer or its representatives.
- This product is not intended for use where fail-safe operation is
required. As with any product (take an automobile, aircraft,
computer or ball point pen for example) there is always a small
chance of a technical issue that needs to be repaired or may
require replacement of the product or a part. If the possibility of
such failure and the associated time it takes to rectify could in any
situation inconvenience the user, business or employee or could
financially affect the user, business or employee then the product
is not suitable for your requirements. This p roduct is not for use
where incorrect operation or a failure of any kind, including but
not limited to a condition requiring product return, replacement,
service by a technician or replacement of parts could cause a
financial loss, loss of employee time or an in convenience
requiring compensation.
- If this item has been purchased in error considering the points
above simply contact the retailer directly for details of their
returns policies if required.
Table of contents
Other Baumr-AG Power Tools manuals
Popular Power Tools manuals by other brands

Black & Decker
Black & Decker JS10 Original instructions

molex
molex 63811-0300 operating instructions

Hilti
Hilti TE 500 operating instructions

AEG
AEG FS 280 Original instructions

Central Pneumatic Professional
Central Pneumatic Professional 42248 Set up and operating instructions

VARO
VARO POWERPLUS POWXB40020 manual