Bavaria BMG 220 E User manual

31011:.rN-.I15.056.44:.rN-.trA
BMG 220 E
7
GB
Original operating instructions
Multifunction tool
Anleitung_BT-MG_220_E_SPK1.indb 1 22.03.12 11:05
- 2 -
1
3
2
1
2 3
56
a
4
7
10
a
b
5
9
6
8
7 10
5
Anleitung_BT-MG_220_E_SPK1.indb 2Anleitung_BT-MG_220_E_SPK1.indb 2 22.03.12 11:0622.03.12 11:06
- 3 -
4
8
5
6
5
1
4
+-
Anleitung_BT-MG_220_E_SPK1.indb 3Anleitung_BT-MG_220_E_SPK1.indb 3 22.03.12 11:0722.03.12 11:07

GB
- 4 -
Table of contents
1. Safety regulations........................................................................................................................... 6
2. Layout and items supplied.............................................................................................................. 6
3. Proper use...................................................................................................................................... 6
4. Technical data ................................................................................................................................ 7
5. Before starting the equipment......................................................................................................... 7
6. Starting up ...................................................................................................................................... 8
7. Replacing the power cable ............................................................................................................. 8
8. Cleaning, maintenance and ordering of spare parts ....................................................................... 9
9. Disposal and recycling ................................................................................................................... 9
10. Storage........................................................................................................................................... 9
Warranty certificate......................................................................................................................... 10
Anleitung_BT-MG_220_E_SPK1.indb 13
22.03.12 11:07

GB
- 5 -
Caution - Read the operating instructions to reduce the risk of injury.
Wear ear-muffs. The impact of noise can cause damage to hearing.
Wear a breathing mask. Dust which is injurious to health can be generated when working on wood
and other materials. Never use the device to work on any materials containing asbestos!
Anleitung_BT-MG_220_E_SPK1.indb 14 22.03.12 11:07

GB
- 6 -
Important!
-erpytefaswefa,tnempiuqeehtgnisunehW
cautions must be observed to avoid injuries and
damage. Please read the complete operating
instructions and safety regulations with due care.
Keep this manual in a safe place, so that the in-
formation is available at all times. If you give the
equipment to any other person, hand over these
operating instructions and safety regulations as
well. We cannot accept any liability for damage
or accidents which arise due to a failure to follow
these instructions and the safety instructions.
1. Safety regulations
2. Layout and items supplied
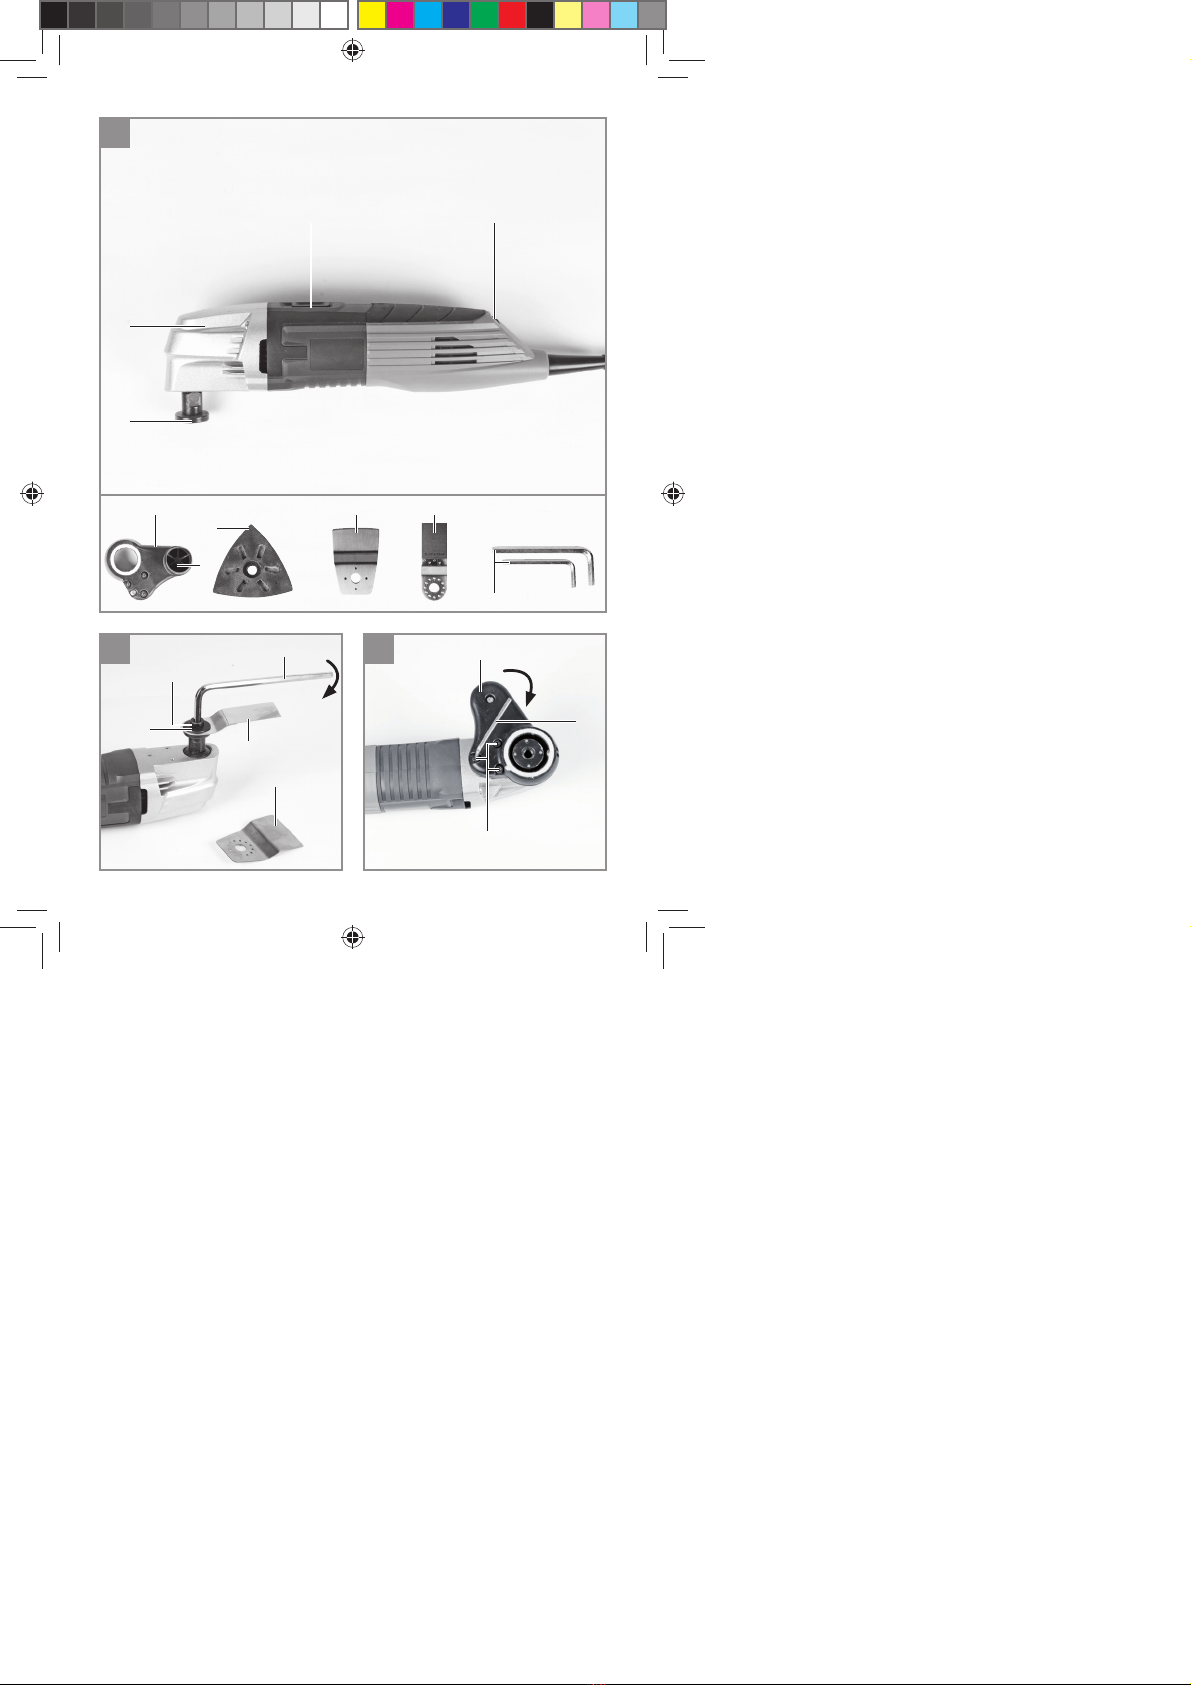
2.1 Layout (Fig. 1)
1. On/Offswitch
2. Tool chuck
3. Machine head
4. Speed controller
5. Allen key for changing tools
6. Dust extraction device
7. Scraper
8. Triangular sanding/grinding plate
9. Connection for dust extractor
10. HSS saw blade
2.2 Items supplied
• -piuqeehttuoekatdnagnigakcapehtnepO
ment with care.
• ynadnalairetamgnigakcapehtevomeR
packaging and/or transportation braces (if
available).
• .deilppuserasmetillafieesotkcehC
• rofseirosseccadnatnempiuqeehttcepsnI
transport damage.
• litnugnigakcapehtpeekesaelp,elbissopfI
the end of the guarantee period.
Important!
The equipment and packaging material are
not toys. Do not let children play with plastic
bags, foils or small parts. There is a danger of
swallowing or suffocating!
• Original operating instructions
• Safety information
• Multifunction tool
• Triangular sanding/grinding plate
• Scraper
• Allen key (2x)
• Abrasive paper
• HSS saw blade
• Dust extraction device
3. Proper use
-nirg/gnidnasehtrofdengisedsitnempiuqeehT
ding of wood, iron, plastic and similar materials
using the appropriate sanding/grinding paper.
Furthermore, the equipment is intended for sa-
wing wood, plastic and similar materials, as well
as scraping offglued carpets, filling compound
residues, old paint and similar applications.
The equipment is to be used only for its prescri-
bed purpose. Any other use is deemed to be a
case of misuse. The user / operator and not the
manufacturer will be liable for any damage or inju-
ries of any kind caused as a result of this.
Please note that our equipment has not been de-
signed for use in commercial, trade or industrial
applications. Our warranty will be voided if the
machine is used in commercial, trade or industrial
businesses or for equivalent purposes.
Anleitung_BT-MG_220_E_SPK1.indb 15 22.03.12 11:07
Please refer to the booklet included in delivery
for the safety instructions.
Warning!
Read all safety regulations and all instructions.
Failure to follow the warnings and instructions may
result in electric shock, fire and/ or serious injury.
Save all warnings and instructions for future
reference.

GB
- 7 -
4. Technical data
zH05~V032...............................:egatlovsniaM
Power input: .............................................. 220 W
Idling speed: ............................ 15000-22000 rpm
Sanding/grinding area: .............. 90 x 90 x 90 mm
Oscillation angle: ..............................................3°
Protection class: ...........................................II /
Weight: .......................................................1.4 kg
Sound and vibration
Sound and vibration values were measured in
accordance with EN 60745.
LpA sound pressure level ........................ 85 dB(A)
KpA uncertainty .............................................3 dB
LWA sound power level .......................... 96 dB(A)
KWA uncertainty .............................................3 dB
Wear ear-muffs.
The impact of noise can cause damage to hea-
ring.
Total vibration values (vector sum of three direc-
tions) determined in accordance with EN 60745.
Handle
Vibration emission value ah= 6.77 m/s2
K uncertainty = 1.5 m/s2
Warning!
The specified vibration value was established in
accordance with a standardized testing method. It
may change according to how the electric equip-
ment is used and may exceed the specified value
in exceptional circumstances.
The specified vibration value can be used to
compare the equipment with other electric power
tools.
The specified vibration value can be used for initi-
al assessment of a harmful effect.
Keep the noise emissions and vibrations to a
minimum.
• -rowtcefrepnierahcihwsecnailppaesuylnO
king order.
• .ylralugerecnailppaehtnaelcdnaecivreS
• .ecnailppaehttiusotelytsgnikrowruoytpadA
• .ecnailppaehtdaolrevotonoD
• -enrevenehwdecivresecnailppaehtevaH
cessary.
• .esunitonsitinehwffoecnailppaehthctiwS
• .sevolgevitcetorpraeW
Residual risks
Even if you use this electric power tool in
accordance with instructions, certain resi-
dual risks cannot be rules out. The following
hazards may arise in connection with the
equipment’s construction and layout:
1. Lung damage if no suitable protective dust
mask is used.
2. Damage to hearing if no suitable ear protec-
tion is used.
3. Health damage caused by hand-arm vib-
rations if the equipment is used over a pro-
longed period or is not properly guided and
maintained.
5. Before starting the equipment
• ehtottnempiuqeehttcennocuoyerofeB
mains supply make sure that the data on the
rating plate are identical to the mains data.
5.1 Fitting the plug-in tools (Figures 1/2)
• To fit the plug-in tools safely you should hold
the multifunction tool so that the ON/OFF
switch (1) points down and the tool mounting
(2) faces up.
• Place the plug-in tool on the tool mounting (2)
so that the pins of the tool mounting (2) fit into
the recesses in the plug-in tool.
• Secure the plug-in tool using the supplied
screw (b) and tighten the screw securely with
the Allen key (9).
• Make sure that the washer (a) is used for the
screw (b) only in connection with the saw
blade and the scraper (see Figure 3). In this
case the corrugated face of the washer must
be placed against the plug-in tool.
Anleitung_BT-MG_220_E_SPK1.indb 16 22.03.12 11:07

GB
- 8 -
Check that the plug-in tool is secure.
5.2 Triangular sanding/grinding plate
Fit the triangular sanding/grinding plate to use the
equipment as a delta sander/grinder.
5.2.1 Fastening the sanding/grinding paper
The Velcro fastener enables easy changing of
sanding/grinding paper. Make sure that the va-
cuum extraction holes on the sanding/grinding
paper and the sanding/grinding disk are aligned.
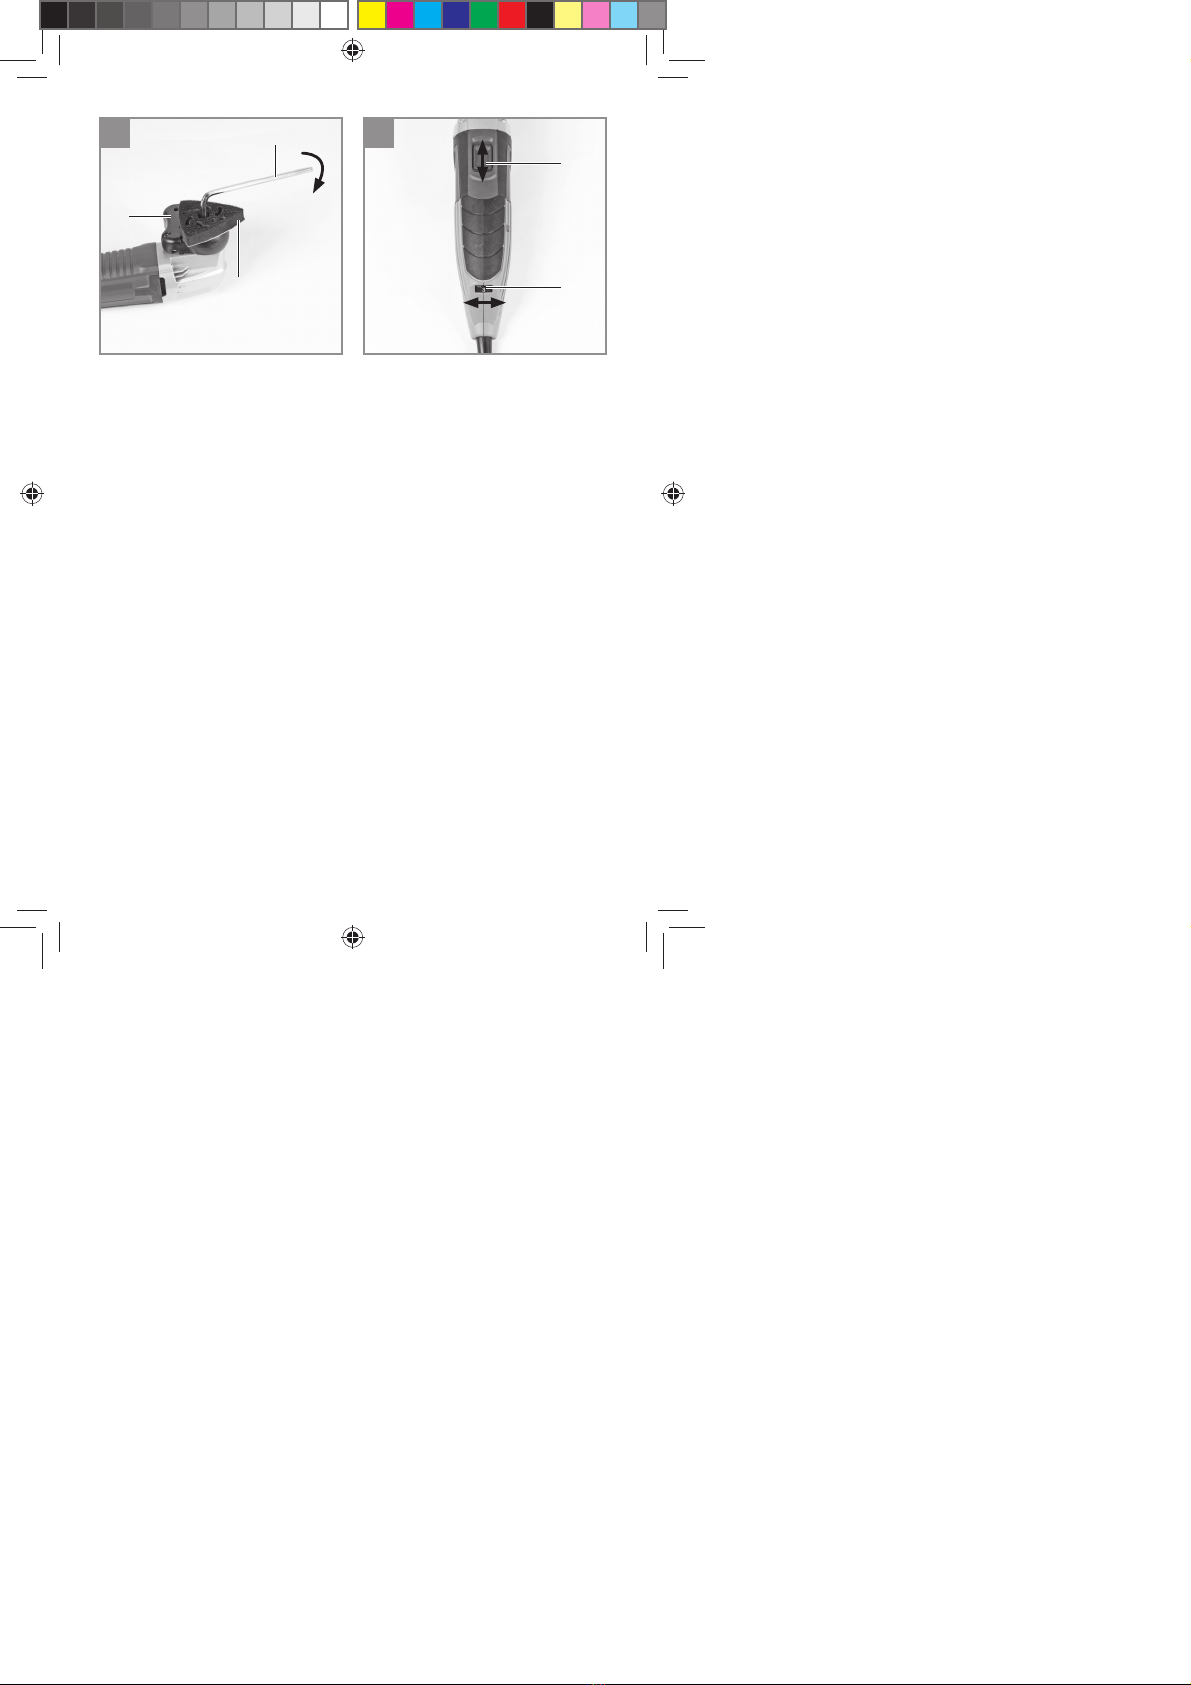
5.3 Fitting the dust extraction device for the
sanding/grinding plate (Fig. 3/4)
The dust extraction device prevents the accumu-
lation of dirt and high dust loads in the air, and it
makes it easier to dispose of the dust.
• Place the equipment in a stable position as
shown in 5.1.
• Mount the dust extraction device (6) on the
tool mounting (2) as shown in Fig. 3.
• Fasten the dust extraction device (6) with the
screws (a).
• Place the triangular sanding/grinding plate
(8) on the dust extraction device (6) and the
tool mounting (2) so that the pins of the tool
mounting (2) fit into the recesses of the trian-
gular sanding/grinding plate (8), then fasten
as shown in Fig. 4.
• Connect your tool to an extraction unit or va-
cuum cleaner. This will provide excellent ext-
raction of chips and dust from the workpiece.
The benefits are that you will protect both the
equipment and your own health.Your work area
will also be clean and safe.
6. Starting up
6.1 Switching on/off(Fig. 5)
Slide the switch (1) forwards to switch on the
equipment.
6.2 Practical tips
• Switch on the equipment.
• Work away from the body.
• Never move your hands into the direct vicinity
of the work area.
• Use only plug-in tools which are in good wor-
king order and undamaged.
6.2.1 Plug-in tools
Sawing: Sawing wood and plastic.
Notes on working practice: When sawing, watch
out for foreign bodies in the workpiece and remo-
ve these if necessary. Plunge cutting is allowed
only in soft materials such as wood or plaster-
board.
Sanding/grinding: Surface sanding/grinding at
edges, in corners or hard-to-reach areas. Depen-
ding on choice of sanding/grinding paper for the
sanding/grinding of wood, paint, lacquer, etc.
Notes on working practice: This equipment offers
particularly high performance for the sanding/
grinding of hard-to-reach corners and edges.To
sand/grind profiles and channels you can also
work with just the tip or the edge of the sanding/
grinding disk. Various sanding/grinding papers
are available, specially designed for the different
types of material you may be working on and the
amount you wish to remove from the surface.
The amount removed will depend largely on the
choice of sanding/grinding paper and pressure
applied to the sanding/grinding disk.
Scraping: Scraping offold paint or adhesives.
Notes on working practice: Move the plug-in tool
against the area you want to remove. Begin with
a at angle of incidence and little pressure.The
surface (e.g. wood, plaster) may be damaged if
too much pressure is used.
6.3 Speed control (Fig. 5)
You can select the speed by turning the speed
controller (4).
Plus direction: Higher speed
Minus direction: Lower speed
7. Replacing the power cable
If the power cable for this equipment is damaged,
it must be replaced by the manufacturer or its
after-sales service or qualified electrician to avoid
danger.
Anleitung_BT-MG_220_E_SPK1.indb 17 22.03.12 11:07

GB
- 9 -
8. Cleaning, maintenance and
ordering of spare parts
Always pull out the mains power plug before star-
ting any cleaning work.
8.1 Cleaning
• ehtdnastnevria,secivedytefasllapeeK
motor housing free of dirt and dust as far as
possible. Wipe the equipment with a clean
cloth or blow it with compressed air at low
pressure.
• ecivedehtnaelcuoytahtdnemmocereW
immediately each time you have finished
using it.
• tsiomahtiwylralugertnempiuqeehtnaelC
cloth and some soft soap. Do not use
cleaning agents or solvents; these could at-
tack the plastic parts of the equipment. Ensu-
ehT.ecivedehtotnipeesnacretawontahter
ingress of water into an electric tool increases
the risk of an electric shock.
8.2 Carbon brushes
In case of excessive sparking, have the carbon
brushes checked only by a qualified electrician.
Important! The carbon brushes should not be rep
laced by anyone but a qualified electrician.
8.3 Maintenance
There are no parts inside the equipment which
require additional maintenance.
8.4 Ordering replacement parts:
Please quote the following data when ordering
replacement parts:
• enihcamfoepyT
• enihcamehtforebmunelcitrA
• enihcamehtforebmunnoitacifitnedI
• deriuqertrapehtforebmuntraptnemecalpeR
For our latest prices and information please go to
9. Disposal and recycling
The unit is supplied in packaging to prevent its
being damaged in transit. This packaging is raw
material and can therefore be reused or can be
returned to the raw material system.
The unit and its accessories are made of various
types of material, such as metal and plastic. De-
fective components must be disposed of as spe-
cial waste. Ask your dealer or your local council.
10. Storage
Store the equipment and accessories out of
children’s reach in a dark and dry place at above
freezing temperature.The ideal storage tempe-
rature is between 5 and 30 °C. Store the electric
tool in its original packaging.
Anleitung_BT-MG_220_E_SPK1.indb 18
22.03.12 11:07
1300 922 271.

GB
Anleitung_BT-MG_220_E_SPK1.indb 20 22.03.12 11:07
The guarantee provided in this Guarantee Certificate is given by Einhell Australia Pty Limited
ACN 134 632 858 of 6/166 Wellington Street, Collingwood, Victoria (Telephone number 1300 922 271)
GUARANTEE
CERTIFICATE
EINHELL AUSTRALIA PTY LTD
6/166 Wellington Street
Collingwood VIC 3066
Australia
Phone: 1300 922 271
Dear
Customer,
All of our products undergo strict quality checks. In the unlikely event that your device develops a fault, please
contact our service department at the address shown on this guarantee certificate. Of course, if you would
prefer to call us then we are also happy to offer our assistance under the service number printed below.
Please note the following terms under which claims under the Einhell Express Guarantee can be made:
1. The benefits conferred by the Einhell Express Guarantee are in addition to all rights and remedies which
you may be entitled to under the Australian Consumer Law, and any other statutory rights you may have
under other applicable laws. This Einhell Express Guarantee does not exclude, restrict or modify any
We do not charge you for the Einhell Express Guarantee.
2. Our goods come with guarantees that cannot be excluded under the Australian Consumer Law. You are
entitled to a replacement or refund for a major failure and for compensation for any other reasonably
foreseeable loss or damage. You are also entitled to have the goods repaired or replaced if the goods
fail to be of acceptable quality and the failure does not amount to a major failure.
3. The Einhell Express Guarantee only covers problems caused by material or manufacturing defects, and
our liability under the Einhell Express Guarantee is limited, at our discretion, to the rectification of these
defects or replacement of the product. Please note that the product has not been designed for use in
commercial, trade or industrial applications. Consequently, the Einhell Express Guarantee will not apply
if the product is used in commercial, trade or industrial applications or for other equivalent activities.
4. The following are also excluded from the Einhell Express Guarantee: compensation for transport
damage, damage caused by failure to comply with the installation/assembly instructions or damage
caused by unprofessional installation, failure to comply with the operating instructions (e.g. connection to
the wrong mains voltage or current type), misuse or inappropriate use (such as overloading of the
product or use of non-approved tools or accessories), failure to comply with the maintenance and safety
regulations, ingress of foreign bodies into the product (e.g. sand, stones or dust), effects of force or
external influences (e.g. damage caused by the product being dropped) and normal wear resulting from
proper operation of the product. The Einhell Express Guarantee will also not apply if any attempt is made
5. The Einhell Express Guarantee is valid for a period of 2 years starting from the purchase date of the
product. Claims made under the Einhell Express Guarantee should be submitted before the end of this
guarantee period and within two weeks of the defect being noticed. No claims under the Einhell Expres
Guarantee will be accepted if submitted after the end of this guarantee period. The original guarantee
period remains applicable to the device even if repairs are carried out or parts are replaced. In such
cases, the work performed or parts fitted will not result in an extension of the guarantee period for the
Einhell Express Guarantee, and the Einhell Express Guarantee will not apply for the work performed or
6. To make a claim under the Einhell Express Guarantee, please send the relevant product postage-free
the address shown below and enclose either the original or a copy of your sales receipt or another date
proof of purchase. It would help us if you could describe the nature of the problem in as much detail as
possible. If the defect is covered by the Einhell Express Guarantee, your product will be repaired
immediately and returned to you, or we will send you a new device (at our election).
Any costs incurred by you in making a claim under this Einhell Express Guarantee, unless specified
otherwise in this guarantee certificate, must be borne by you.
Of course, we are also happy to offer a chargeable repair service for any defects which are not covered by the
scope of the Einhell Express Guarantee or for products which are no longer covered by the Einhell Express
Guarantee. To take advantage of this service, please send the product to our service address.
such rights or remedies.
to tamper with the product.
parts fitted. This also applies when an on-site service is used.
(Einhell Express Guarantee).

F
Anleitung_BT-MG_220_E_SPK1.indb 21 22.03.12 11:08

Anleitung_BT-MG_220_E_SPK1.indb 19
22.03.12 11:07
EH 04/2013(01)
This manual suits for next models
1
Table of contents
Other Bavaria Power Tools manuals


