Bayne Thinline BTL 208-12 Guide
OPERATION AND PARTS MANUAL
MODEL NUMBER :
PART NUMBER :
SERIAL NUMBER :
BAYNE MACHINE WORKS, INC. PHONE: 864.288.3877
910 FORK SHOALS ROAD TOLL FREE: 800.535.2671
GREENVILLE SC, 29605 FAX: 864.458.7519
WEBSITE:
www.baynethinline.com E-MAIL:
sales@baynethinline.com
LICENSED UNDER ONE OR MORE OF
THE FOLLOWING U.S. AND CANADIAN PATENTS:
5,503,512 4,773,812 1,327,765 5,447,405
1,335,648 5,308,211 5,333,984 5,826,485
BTL 208-12
1999-0212

Document Number: 1999-0212 Issue Date: 06/06/07 Revision No: 005 Page: 2 of 38
TABLE OF CONTENTS
Page
I. THINLINE ®Specifications 3
II. THINLINE ®Installation Instructions 4
III. THINLINE ®Operation Instructions 11
IV. THINLINE ®Diverter Valve Information 12
V. THINLINE ®Maintenance Instructions 14
VI. THINLINE ®Actuator Assembly Instructions 15
VII. Trouble-shooting Chart 24
VIII. Appendix A
1. Unit Assembly Drawings 28
2. Mounting Height Drawing 31
3. Hydraulic Schematic Drawings 32
4. Diverter Valve Drawings 34
5. Hand Valve Drawings 36
6. Lubrication Drawing 38

Document Number: 1999-0212 Issue Date: 06/06/07 Revision No: 005 Page: 3 of 38
SPECIFICATIONS ( WI-0087-B )
Bayne THINLINE ®Premium Lift Systems
A. Rotary Actuator - rack and pinion style design.
•Rack, pinion, and shaft bearings are constantly lubricated by the hydraulic oil for
extended life.
•Body and caps are made of high quality ductile iron.
•Pinion output shaft and racks are made of high tensile alloy steel.
•The rotary actuator provides smooth motion throughout the lift cycle, which results in
longer cart life with virtually no cart damage or abuse.
B. The BTL 208-12 lift unit measures as little as 5 3/4” thick from the back of the mainframe
to the front of the lift saddle in the down position. The unit also rotates underneath the
hopper to allow for easy dumping of large commercial containers without interference.
C. The BTL 208-12 faceplate is normally at 45 degrees in the dump position in order to
completely eject all materials into the hopper.
D. The BTL 208-12 lift unit operates at a cycle time of 8 to 10 seconds for safe, fast,
efficient service.
Note : Cycle time is controlled by flowrate, as flowrate increases, cycle time decreases. In
order to avoid injury and maintain manufacturer’s warranty never operate outside
the cycle time listed above
E. Recommended flow rate is 1 1/2 to 2 GPM.
F. Hydraulic pressure requirements are as follows:
•2000 to 2500 PSI normal working pressure
•3000 PSI maximum pressure
G. BTL 208-12 lift units can be a bolt on type installation for easy, quick maintenance and
less downtime.
H. All parts are manufactured and kept in stock at Bayne Machine Works, Inc. for fast
response to customer requests.
I. Two ( 2 ) year limited warranty from date of delivery on all units and models when
properly maintained and operated within the recommended cycle time.
All lift units and parts are inspected by our Quality Control Department before shipment to
insure that you always receive the highest quality available in the lift business.
For more information, please contact us at 1/800/535-2671 or by fax at 1/864/458-7519.

Document Number: 1999-0212 Issue Date: 06/06/07 Revision No: 005 Page: 4 of 38
INSTALLATION INSTRUCTIONS ( WI-0238-A)
Bayne THINLINE ®Premium Lift Systems
The following information is intended to be a GENERAL GUIDE to installing the Bayne
THINLINE®lifter on a typical refuse truck. Before starting the installation, read these
instructions completely. ALWAYS use the proper tools, lift devices, and personal protective
equipment to prevent injury while performing the installation.
NOTE:If a Bayne THINLINE®Tap-In Kit was also acquired for this installation, refer to
the installation instructions included in the Tap-In Kit manual for more detailed information.
I. Mounting lifter(s) on the truck :
1. The truck should be emptied and cleaned before any installation. The truck should
be parked on a level solid surface, a concrete floor if possible.
2. All lights, tags, steps, etc. that will interfere with the installation should be removed
and/or relocated.
3. Position the lifter(s) on the sill of the truck per figure I-1 and mounting height
drawing ( Appendix A ) and tack weld in place. If using a mounting plate kit for bolt
on applications, tack weld the mounting plate in place and attach the lifter to the
mounting plate using the 1/2” studs. ( tack weld only at this time so that adjustments
can be made if necessary. ).
Figure I-1

Document Number: 1999-0212 Issue Date: 06/06/07 Revision No: 005 Page: 5 of 38
II. Mounting hand valve(s) on the truck:
1. Choose and mark an acceptable location(s) on the side(s) of the truck to mount the
hand valve assembly(s) ( figure I-2 ).
2. Remove the mounting bracket(s) from the hand valve assembly(s) and weld to the
truck.
3. After the weld has cooled, paint the mounting bracket(s) to match the truck color.
4. After the paint has dried, reassemble the hand valve assembly(s) on the mounting
bracket(s).
Figure I-2
III. Mounting diverter valve on the truck :
1. Choose and mark an acceptable location to mount the diverter valve assembly. This
location should be near the truck’s main hydraulic pressure and tank lines on the
same area of the truck where the lifter is mounted.
2. Weld diverter valve mounting bracket to the truck.
3. After the weld has cooled, paint the mounting bracket to match the truck color.
4. After the paint has dried, bolt the diverter valve to the mounting bracket using the
1/4” bolts, washers, and elastic lock nuts.

Document Number: 1999-0212 Issue Date: 06/06/07 Revision No: 005 Page: 6 of 38
IV. Making Hydraulic Connections:
Before attempting any hydraulic connections, turn the truck’s engine off and
release all hydraulic pressure from the system. Refer to the hydraulic layouts
(figure I-3) and hydraulic schematics (Appendix A) while performing the
following steps. Always clean & lubricate fitting threads before installation.
Single Lifter Installation
Dual Lifter Installation
Figure I-3

Document Number: 1999-0212 Issue Date: 06/06/07 Revision No: 005 Page: 7 of 38
1. Cut or disconnect truck’s main hydraulic pressure line and install the diverter valve
in series using the “IN” and “OUT” ports.
2. Connect the “T” port on the diverter valve to the truck’s hydraulic tank line with an
appropriate size line to handle the full system flow.
3. Connect the “P1” port on the diverter valve to the “IN” port on the hand valve.
If installing dual lifters, connect the “P2” port on the diverter valve to the “IN” port
on the other hand valve.
4. Connect the “T1” port on the diverter valve to the “OUT” port on the hand valve.
If installing dual lifters, connect the “T2” port on the diverter valve to the “OUT”
port on the other hand valve.
5. Connect the “A” port on the hand valve(s) to the “UP” port of the rotary actuator(s).
6. Connect the “B” port of the hand valve(s) to the “DOWN” port of the rotary
actuator(s).
7. Disassemble each hose clamp assembly and position weld plates where needed and
weld in place.
8. After the weld has cooled, paint the weld plates to match the truck color.
9. After the paint has dried, reassemble the hose clamp assemblies around the hoses.
V. Adjusting relief valve settings:
The diverter valve ( 1 ) ( figure I-4 ) supplies the cart lifter hydraulic system
with approximately 2 GPM of oil flow. This diverter valve is equipped with a
full system relief valve ( 4 ) set at 2500 psi, to protect the truck’s hydraulic
system from any blockages that may occur down stream of the diverter valve.
The diverter valve also includes a lifter circuit relief valve ( 3 ) set at 2300 psi,
to prevent the diverter valve from shutting down if a blockage occurs in the lifter
circuit. There is also a relief valve ( 5 ) set at 1800 psi in the hand valve ( 2 ) to
protect the lifter from excessive pressure. These relief valves are preset from the
factory to operate properly on most trucks with a system pressure between 2300
and 2500 psi without any adjustment. However, if any adjustment is necessary,
follow these instructions.
WARNING :Bayne equipment is rated for a maximum pressure of 3000 psi.
Operation at pressures above 3000 psi may damage equipment and cause
personal injury. In order to avoid injury and maintain manufacturer’s warranty
never operate above 3000 psi.

Document Number: 1999-0212 Issue Date: 06/06/07 Revision No: 005 Page: 8 of 38
Figure I-4
1. Determine the truck’s system pressure setting.
2. Remove the cap nut(s) ( 8 ) ( figure I-4 ) from the hand valve relief valve(s) ( 5 ) and
turn the adjustment screw(s) clockwise until it bottoms out.
3. Loosen the lock nut ( 6 ) ( figure I-4 ) on the lifter circuit relief valve ( 3 ) and turn
the adjustment screw clockwise until it bottoms out.
4. Loosen the lock nut ( 7 ) ( figure I-4 ) on the full system relief valve ( 4 ) and turn
the adjustment screw counter-clockwise until it stops backing out.
5. Install a 3000 psi hydraulic pressure gauge with the necessary adapter in the “G”
port of the diverter valve.
6. Start the truck’s engine and engage the hydraulic system.
7. Operate the handle on the hand valve ( 2 ) ( figure I-4 ) back and forth a few times to
bleed all air from the lifter hydraulic system.
8. Setting the diverter valve full system relief valve:
a) Have an assistant hold the handle on the hand valve ( 2 ) ( figure I-4 ) in the
“retract” position. If installing dual lifters hold the handle down on only one
of the hand valves.
b) Turn the pressure relief adjustment screw on the full system relief valve ( 4 )
clockwise until the pressure reading on the gauge is either 100 psi above
truck system pressure, or if the pressure reaches a certain point and will not
go any higher, set the adjustment screw 1/2 turn past that point.
c) Release the handle on the hand valve.
Document Number: 1999-0212 Issue Date: 06/06/07 Revision No: 005 Page: 9 of 38
9. Turn the truck’s engine off and release all hydraulic pressure from the system.
10. Remove the hydraulic pressure gauge from the “G” port of the diverter valve and
reinstall the plug.
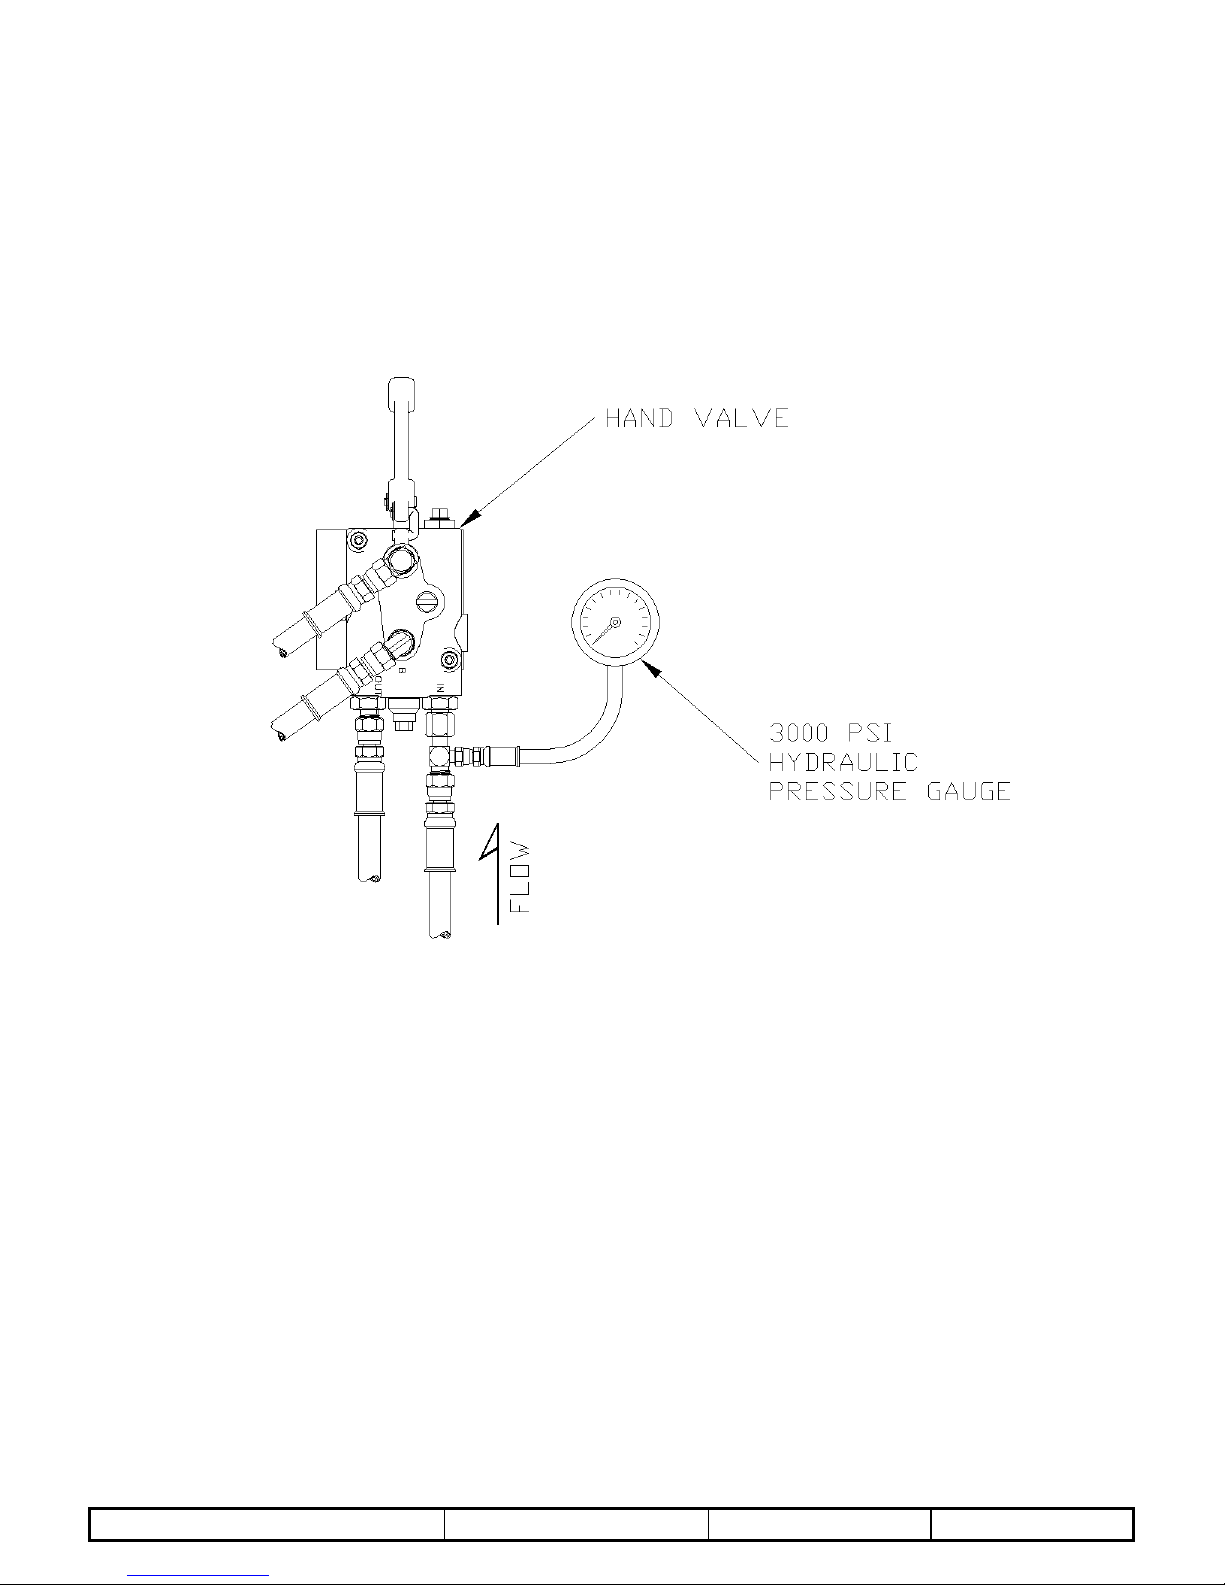
11. Install the 3000 psi hydraulic pressure gauge with the necessary adapter in the
hydraulic line connected to the “IN” port of the hand valve as shown in figure I-5. If
installing dual lifters, install the hydraulic gauge at either one of the hand valves.
Figure I-5
12. Start the truck’s engine and engage the hydraulic system.
13. Setting the diverter valve lifter circuit relief valve:
a) Have an assistant hold the handle on the hand valve ( 2 ) ( figure I-4 ) ( with
pressure gauge installed at the “IN” port ) in the “retract” position to show
pressure on the gauge.
b) Turn the pressure relief adjusting screw on the lifter circuit relief valve ( 3 )
counter-clockwise until the pressure reading on the gauge is either 100 psi
less than the truck system pressure or 2300 psi, which ever is the lowest.
c) Release the handle on the hand valve.

Document Number: 1999-0212 Issue Date: 06/06/07 Revision No: 005 Page: 10 of 38
14. Setting the hand valve relief valve(s):
a) Hold the handle on the hand valve ( 2 ) ( figure I-4 ) ( with pressure gauge
installed at the “IN” port ) in the “retract” position to show pressure on the
gauge.
b) Turn the pressure relief adjusting screw on the hand valve relief valve ( 5 )
counter-clockwise until the pressure reading on the gauge is either 200 psi
less than truck system pressure or 1800 psi, which ever is the lowest.
c) Release the handle on the hand valve.
d) Turn the truck’s engine off and release all hydraulic pressure from the
system.
e) Remove the hydraulic pressure gauge from the hydraulic line connected to
the “IN” port of the hand valve.
f) For dual lifters, install the hydraulic pressure gauge in the “IN” port of the
other hand valve as shown in figure I-5, start the truck’s engine, engage the
hydraulic system, and repeat step 14.
15. Reinstall the cap nut(s) ( 8 ) ( figure I-4 ) on the hand valve relief valve(s) ( 5 ) to
secure the correct pressure setting(s).
16. Tighten the lock nut ( 7 ) ( figure I-4 ) on the full system relief valve ( 4 ) to secure
the correct pressure setting.
17. Tighten the lock nut ( 6 ) ( figure I-4 ) on the lifter circuit relief valve ( 3 ) to secure
the correct pressure setting.
18. The hydraulic circuit pressures are now set for optimum performance.
VI. Final operation and mounting:
1. Start the truck’s engine and engage the hydraulic system.
2. Place a cart on each lifter and operate to make sure there are no clearance problems
and that the lifter engages the cart properly. Make any adjustments to the mounting
position of the lifter(s) to ensure correct operation.
3. After locating an acceptable mounting position, complete the welding of the lifter(s)
to the truck.

Document Number: 1999-0212 Issue Date: 06/06/07 Revision No: 005 Page: 11 of 38
OPERATION INSTRUCTIONS ( WI-0407-A )
Bayne THINLINE ®Premium Lift Systems
The Bayne THINLINE
®Premium Lift System is a high quality durable cart lifter built to meet
your industry’s requirements. To insure the safety of all operators of this equipment, please
read this manual carefully before operating the lifter. FAILURE TO COMPLY WITH
INSTRUCTIONS COULD RESULT IN PERSONAL INJURY AND/OR PROPERTY
DAMAGE.
The operating stages ( figure O-1 ) in the cycle of the cart lifter are as follows:
1) START - The cart to be dumped is placed at the lifter.
2) ACTUATOR DUMP - The rotary actuator cycles to dump the contents of
the cart into the box. During this cycle, the slider latch automatically
extends to “lock” the cart to the lifter.
3) ACTUATOR REVERSE - The rotary actuator reverses its cycle
returning the cart to the start position. The slider latch automatically
retracts to “unlock” the cart from the lifter.
figure O-1
Warning: Exceeding the 8 to 10 second cycle time on any lifter will void the
manufacturer’s warranty
The rotational motions of the cart lifter are controlled with the use of a hand valve. Moving
the handle on the hand valve in one direction will cause the lifter to perform the actuator
dump stage ( figure O-1 ). Moving the handle in the opposite direction will cause the lifter to
perform the actuator reverse stage.

Document Number: 1999-0212 Issue Date: 06/06/07 Revision No: 005 Page: 12 of 38
6091/6092-0700 DIVERTER VALVE
OPERATION AND INSTALLATION INFORMATION
( WI-0026 )
Bayne THINLINEPremium Lift Systems
The Bayne diverter valve establishes priority flow to the lifter circuit “P1” and “P2” ports and
bypasses oil to the “OUT” port, which typically supplies flow to the remainder of the truck’s
hydraulic circuit. This bypass occurs only after the lifter circuit is satisfied. The priority flow
is controlled by the flow regulator cartridge (FR1) (and FR2 in dual applications) in
combination with the differential pressure sensing valve (DPS). This allows the valve to
maintain constant flow regardless of changes in load pressure or volume flow rate. Since both
the lifter circuit and bypass flow can be utilized in the operation of the truck regardless of
which pressure is greater, a single pump can be used to supply two circuits or operations.
The lifter circuit flow is regulated and maintained by the flow regulator cartridge (FR1) (and
FR2 in dual applications). The differential pressure sensing valve (DPS), rated for 75 gpm of
flow and 3000 psi of pressure, is operated by an internal spring and dampening orifice (OR)
which establishes a pressure drop across the block sufficient to ensure the correct operation of
the flow regulator (FR1). For a dual diverter valve, a second flow regulator cartridge (FR2) is
installed in the “FR2” cavity and a shuttle valve (DSV) is installed in place of the SAE plug in
the “DSV” cavity. Once the pressure drop is established, a precision metered flow is provided
to the tipper circuit(s) with additional flow being bypassed to the “OUT” port.
The operation of the diverter valve does not require the use of a tank line to be run to the “T”
port. However, the efficiency of the block will be significantly increased if a tank line is
installed. The logic circuit of the block will manage the flow of oil returning from the tipper
circuit to ensure optimum performance. This is primarily controlled with the sequence valve
(PSV) which is factory set and should not be adjusted. All oil returning from the tipper circuit
will normally be regenerated into the outgoing flow to ensure that the downstream functions
are not slowed in any way. When the downstream backpressure rises to a predetermined
pressure, the block will redirect the flow to the “T” port to increase the overall efficiency of
the block and reduce the pressure drop through the block. If the “T” port is connected to a
tank line, the oil will be dumped through the block at a lower pressure. This allows
downstream functions to operate at the highest possible pressure when pressure is being
required. If the “T” port is blocked, the oil will be redirected back into the outgoing flow
through the check valve (CV).
A relief circuit for the tipper function is controlled by a relief valve (RV), which is preset to
2300 psi. This can be adjusted to limit pressure to the tipper(s). This relief valve is more
efficient than the relief in the hand valve and will operate with less noise. It is recommended
that it be adjusted to relieve before the hand valve relief. It may also be used to limit the
weight the lifter can dump. This may be beneficial in avoiding damage to cans resulting from
overloading. This should be the only adjustment that the block may require. Any other
adjustments should only be made after close consultation with Bayne’s Engineering
Department to ensure proper operation.

Document Number: 1999-0212 Issue Date: 06/06/07 Revision No: 005 Page: 13 of 38
POSSIBLE PROBLEMS
1. The most common cause of valve failure is dirty oil. If debris becomes lodged in the
cartridge valves they will malfunction. Recommended filtration level is between 15 and
25 microns. Many systems filter the oil on the return side. This does not guarantee clean
oil going into the system. It is important to ensure that the tank vent filtration element is
properly maintained as well. Very small contaminants may not cause the valve to stop
functioning, but can cause “stiction” in the cartridges between the body and the moving
spool. This can cause improper operation. A slow moving tipper is most likely the result
of contamination in the flow regulator cartridge. A pulsating noise may be the result of
contamination in the differential pressure sensing valve causing it to stick. If any valve
malfunctions, remove and thoroughly clean the valve, being extremely careful not to score
or abrade the “o” ring seals or moving parts of the valve. Be sure that the spool moves
freely in the valve body.
2. The flow regulator cartridges (FR1 and FR2) are designed to operate at a designated
pressure of 80 psi. This means that in order for the valve to function properly, a minimum
of 80 psi is required from the supply line through the “IN” port of the valve. This can
present a problem on trucks with a dry valve pump system. Normally in the dry (off)
mode of the pump, a flow of approximately 2 gpm at 20 psi is required to circulate
through the open center system of the truck. This is for pump lubrication in the off mode.
When the diverter valve is placed in the main pressure line of the truck, a blockage occurs
because of the differential pressure sensing valve needing 80 psi to initially open and
allow the flow regulators function. The path of the lubrication oil is therefore stopped
because the valve does not open. When the oil is blocked, the pump will rotate and
cavitate in the lubricating oil, causing heat to build up over an extended period of time,
possibly leading to premature pump failure. To prevent this problem from occurring, a
“bleed line” circuit needs be installed on the truck to allow passage of the lubricating oil
back to tank.
3. On front load residential truck applications, several considerations need to be noted. The
Bayne hand valve is an open center valve that allows for the lifter circuit to maintain flow
through the hand valve and back to the diverter valve when the lifter is not being operated.
If flow is not maintained through the hand valve, the oil will constantly be relieving over
the lifter circuit relief valve (RV) in the diverter valve, which can cause an increase in
operating temperature. Certain front load box designs allow for the hand valve to be
located on the arms of the truck which keeps the hand valve in the lifter circuit at all times
to maintain flow. Most problems occur with applications where the hand valve is located
on the box itself. In this situation, when the operator disconnects the hydraulic lines to the
box, a blocked condition occurs in the lifter circuit. To prevent this problem, the pump
must be turned off prior to disconnecting the box hydraulic lines. Once the lines have
been disconnected from the box, it is necessary to connect the two lines for the hand valve
to each other to functionally complete the lifter circuit. It is recommended that male and
female quick disconnects be used opposite each other on the truck to provide an
uninterrupted circuit. Once the lines have been connected and the circuit continued, the
pump could then be turned on to continue operations.

Document Number: 1999-0212 Issue Date: 06/06/07 Revision No: 005 Page: 14 of 38
MAINTENANCE INSTRUCTIONS ( WI-0140-A )
Bayne THINLINE ®Premium Lift Systems
NOTE:
THE MOST COMMON CAUSE OF HYDRAULIC COMPONENT FAILURE
IS CONTAMINATION OF THE HYDRAULIC FLUID ( WATER, CHIPS,
DIRT, ETC. ) THE Bayne THINLINE ®LIFT SYSTEM COMES CLEAN
FROM THE FACTORY. IF REMOVED, BE SURE THE HOSES,
CYLINDER AND FITTINGS ARE CLEAN BEFORE RE-INSTALLING
THEM ON THE UNIT.
Inspect your cart lifter on a weekly basis for loose bolts, fittings, oil leaks, etc. Tighten loose
hardware as necessary and replace necessary seals to repair oil leaks.
In order to maintain warranty and for preventive maintenance, grease all points weekly with a
good multi-purpose grease at points shown in the lubrication drawing ( APPENDIX A ).
Document Number: 1999-0212 Issue Date: 06/06/07 Revision No: 005 Page: 15 of 38
BAYNE
PREMIUM LIFT SYSTEMS
ASSEMBLY INSTRUCTIONS
1100 SERIES ROLLER BEARING ACTUATOR
PART NUMBER 1120-1044 ( WI-1133 )
LICENSED UNDER ONE OR MORE OF THE FOLLOWING U.S. PATENTS:
4,773,812 1,327,765 5,308,211 5,333,984
READ INSTRUCTIONS COMPLETELY BEFORE STARTING ASSEMBLY.
Before starting the assembly of the Rotary Actuator, refer to the exploded parts drawing and
parts list (fig. A-13 found at the end of these instructions) to familiarize yourself with the
individual components. Prepare a clean surface, in an area free of blowing dust and
contaminants in which to assemble the Rotary Actuator. Be sure that all parts are thoroughly
clean and dry before starting assembly.
NOTE:All torque values given apply to clean dry threads only. Follow these directions
closely when repairing the Rotary Actuator.
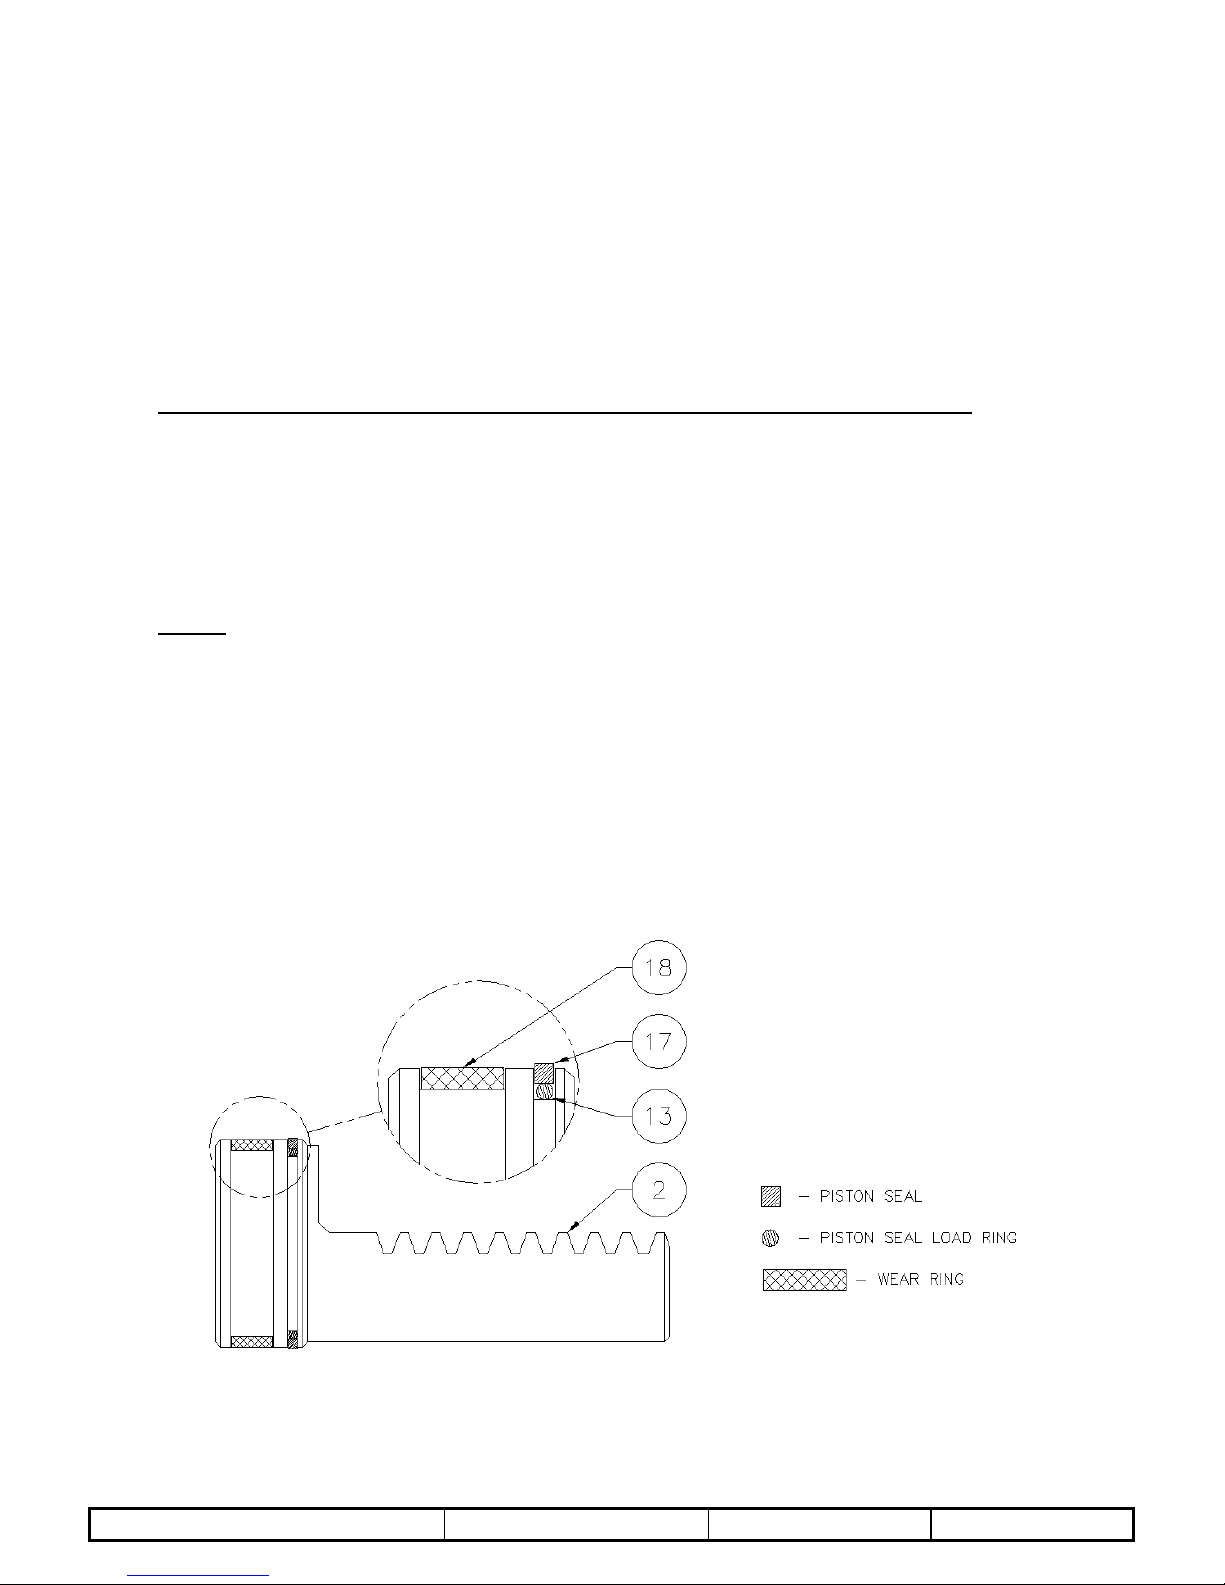
1. Install the piston seal load ring (13) (fig. A-1) in the small groove on the head of the
actuator rack (2). Place the “square” piston seal (17) over the load ring (13) in the same
small groove (a small “blunt” flathead screwdriver may be used, taking care not to scratch
or damage the seal). Install the wear ring (18) in the large groove on the head of the rack.
Using a ring compressor, firmly seat the rings on the rack before setting it aside, this will
help to reverse the effects of any stretching of the rings that occurred during installation.
Repeat this procedure for the other rack.
figure A-1

Document Number: 1999-0212 Issue Date: 06/06/07 Revision No: 005 Page: 16 of 38
2. Install the tube seal (12) (fig. A-2) and “square” tube seal backup (16) on each end of the
actuator tubes (3) (fig. A-13). Be sure that the “square” tube seal backup ring is toward
the inside of the tubes at both ends as shown. Press all rings firmly into the grooves.
Repeat this procedure for the other tube.
figure A-2
3. Thoroughly clean the pinion shaft (1) (fig. A-3) and inner races (10) with a mild solvent
and dry completely. Spray the inner race contact area (shown in figure A-3) at each end
of the pinion shaft and the inside diameter of the inner race thoroughly with LOCTITE
7649 N PRIMER. Apply LOCTITE RETAINING COMPOUND 609 around the pinion
shaft at contact area and the inside diameter of the inner races. Slide the inner races (10)
on the pinion shaft (radius end first as shown in figure A-3) until the races seat against the
gear teeth. After the races seat against the gear teeth, twist the races on the pinion 360º to
spread the retaining compound evenly. Wipe off any excess retaining compound.
figure A-3
Document Number: 1999-0212 Issue Date: 06/06/07 Revision No: 005 Page: 17 of 38
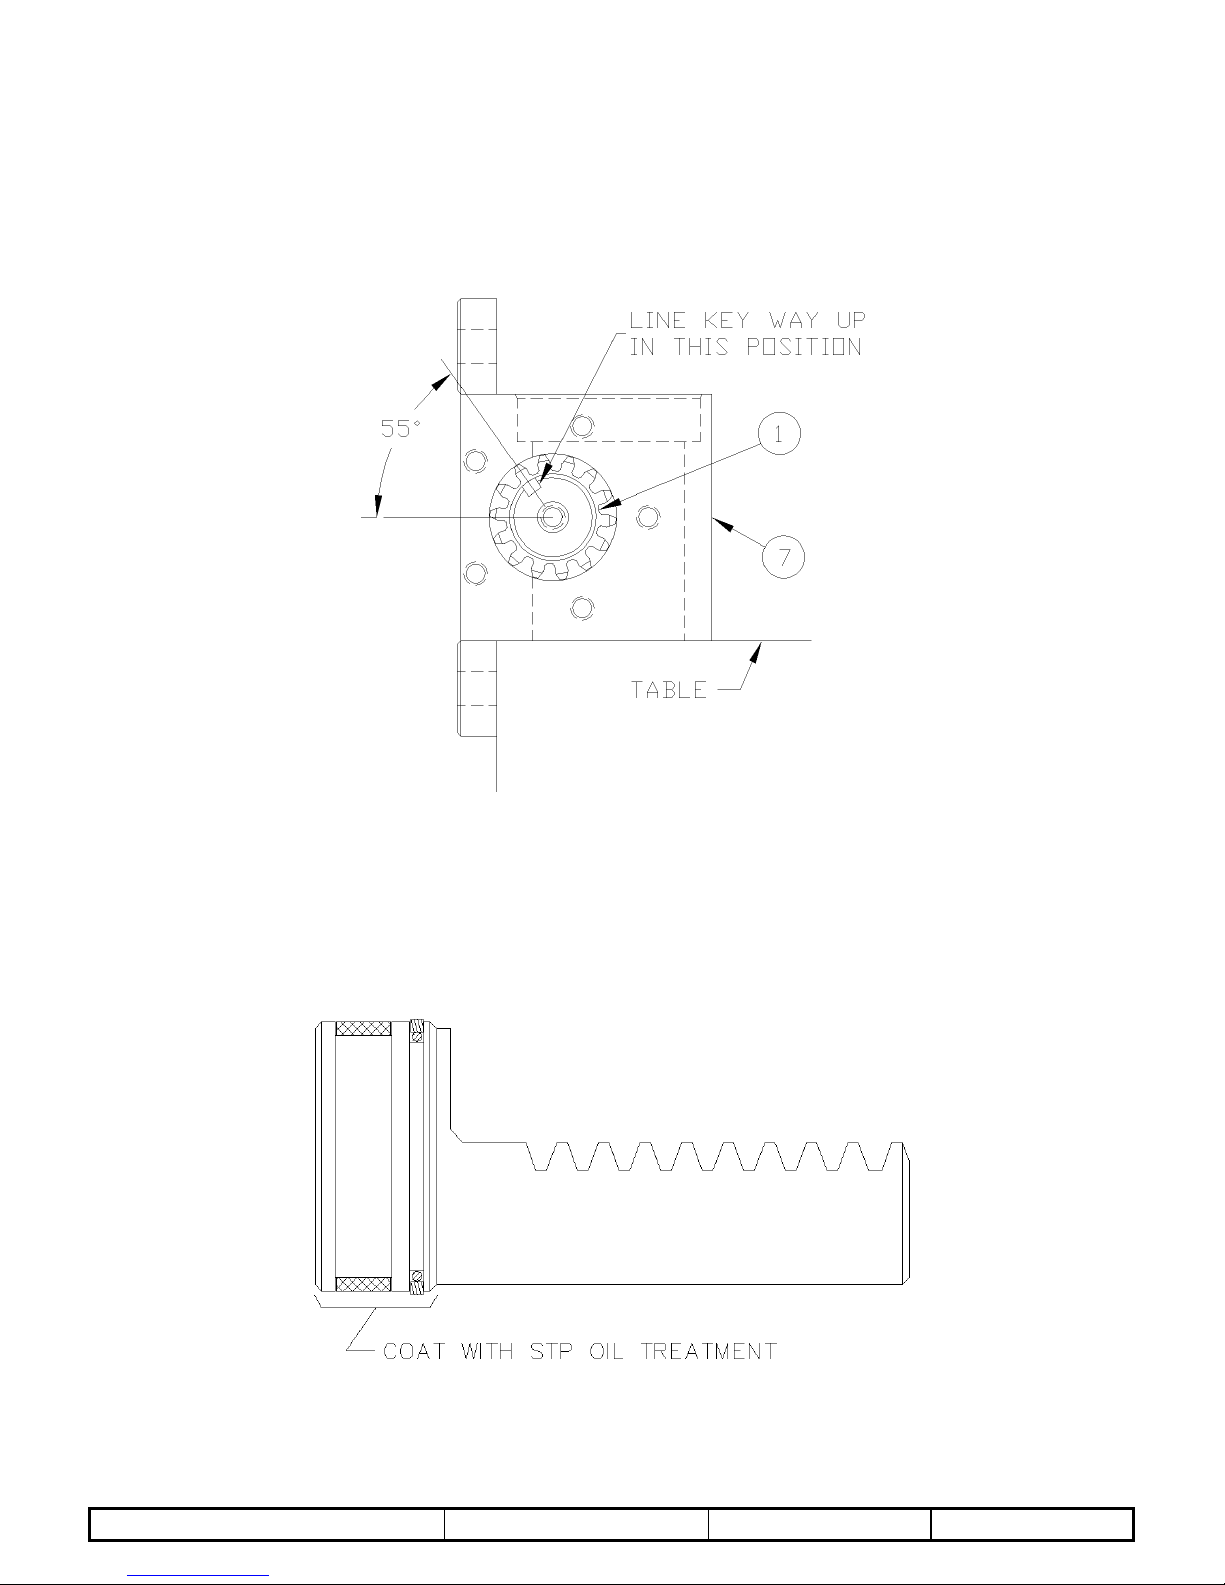
4. Place the actuator body (7) (fig. A-4) on the edge of the table, mounting flanges closest to
the assembler with the counter-bores facing up. Insert the pinion shaft (1) through the bore
on either side of the actuator body with the key ways facing back toward the mounting
flanges and up away from the table with the center line of the key ways pointing in the
position as shown in figure A-4. Center the pinion in the actuator body.
figure A-4
5. Coat the head portion of the racks (2) (fig. A-13) with STP Oil Treatment. Install the
racks, head portion up with the teeth facing the flanges of the actuator body, into the dual
set of bores in the body. Simultaneously slide the racks into the bores so that the racks
mesh with the pinion in the same position. Rotate the pinion shaft to engage the racks into
the pinion.
figure A-5

Document Number: 1999-0212 Issue Date: 06/06/07 Revision No: 005 Page: 18 of 38
6. Check the position of the racks in the pinion by making sure both racks seat against the
actuator body at the same time and also when the racks are seated against the body, the
key ways on the pinion shaft should be facing down toward the table and mounting
flanges on the actuator body as shown in figure A-6.
figure A-6
7. Coat one end of the actuator tubes (3) (fig. A-13) around the seal area with STP Oil
Treatment as shown in figure A-7. Using a rubber mallet, drive the coated end of the tube
onto the exposed rack until the tube end seats in the actuator body, making sure that the
seals remain in place as the tube enters the counter-bore. Repeat this procedure for the
other side.
figure A-7

Document Number: 1999-0212 Issue Date: 06/06/07 Revision No: 005 Page: 19 of 38
8. Install the six tie rod studs (6) (fig. A-13) by screwing the short threaded end into the
actuator body. Hand tighten only at this time (the torque needed will be applied later in
the procedure).
9. Place the tube cap (4) (fig. A-13) on the table. Coat the sides of the two bores in the tube
cap with STP Oil Treatment. Install the cap over the tubes and rod studs with the oil port
positioned to the left as shown in figure A-13. Using a rubber mallet, tap the tube cap
over the tubes until the tubes seat in the cap, making sure that the seals remain in place.
10. Place the tube mounting bracket (30) (fig. A-13) over the two end rod studs opposite the
oil port in the tube cap as shown in figure A-13.
11. Install the hex nuts (23) (fig. A-13) and lock washers (24) on the tie rod studs. Torque the
nuts to 50 ft-lb. in the sequence shown in figure A-8.
figure A-8
12. Place the rack cap (5) (fig. A-13) bore side up on the table and coat the edge of each bore
with STP Oil Treatment. Install the rack cap seals (14) (fig. A-9) in the rack cap.

Document Number: 1999-0212 Issue Date: 06/06/07 Revision No: 005 Page: 20 of 38
figure A-9
13. Reposition the actuator on the table mounting flanges down, and the lower tubes facing
away from the assembler. Rotate the pinion shaft to allow 1” of the rack to protrude from
the top of the actuator body. Install the rack cap with the oil port positioned to the left
hand side of the actuator opposite the bottom oil port located in the tube cap as shown in
figure A-13. Attach the rack cap to the actuator body using the socket head bolts (22) (fig.
A-13) and lock washers (26). Torque the bolts to 90 ft-lb. in the sequence shown in figure
A-10.
figure A-10
14. Reposition the actuator so that the pinion shaft can be rotated with no obstacles. Rotate
the pinion shaft to ensure that the racks move freely. Also make sure that the key ways
point perfectly straight “up” toward the rack cap and “down” toward the tube cap at each
end of the 180° stroke. If the assembly does not perform all of these functions correctly, it
must be disassembled, cleaned, and reassembled.
Table of contents
Other Bayne Lifting System manuals


Popular Lifting System manuals by other brands


Clarke
Clarke Strong Arm CML2 Operating & maintenance instructions

The Handy
The Handy 20707G INSTRUCTIONS, PARTS DRAWING, PART LIST

Rotary
Rotary SPOA3LX Operation & maintenance manual

The Handy
The Handy S.A.M. 1000 manual

Upright
Upright AB-46 Bi-Energy Operator's manual

Presto Lifts
Presto Lifts PL Series Installation, operation and service manual


