ergolet LunaIPx4 User manual

LunaIPx4
Ceiling hoist
User manual
Important information
Please read this user manual carefully
before using the product!
This user manual is intended as a guide
for caregivers and other users, as well as
technical personnel during servicing and
maintenance of the product.
Date: 04-11-2019
Version: 10
Scan the QR code for more information

2

3
CONTENTS
1PURPOSE, SAFETY AND USE ________________________________________________4
Purpose ____________________________________________________________4
Essential Performance ________________________________________________4
Safety instructions____________________________________________________4
Before use __________________________________________________________5
Terminology ________________________________________________________5
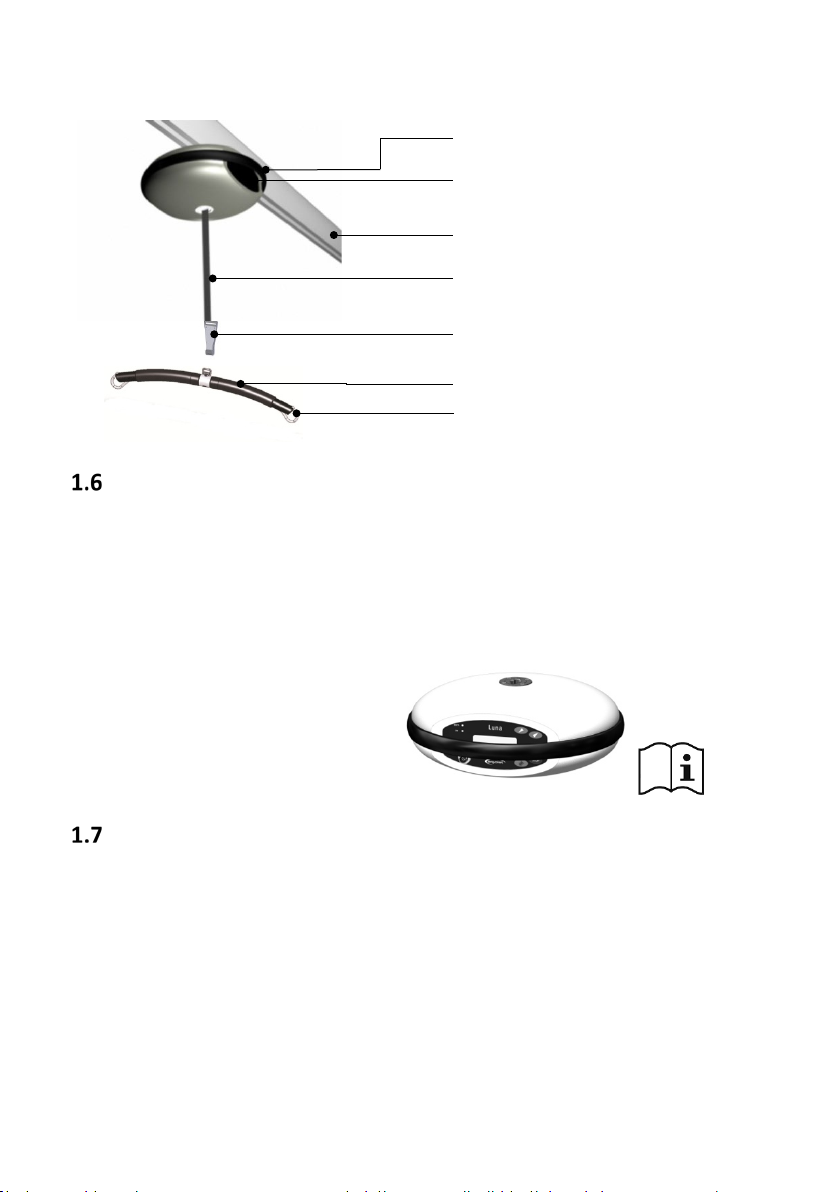
Unpacking __________________________________________________________6
Transport ___________________________________________________________6
2INSTALLATION AND OPERATION ____________________________________________7
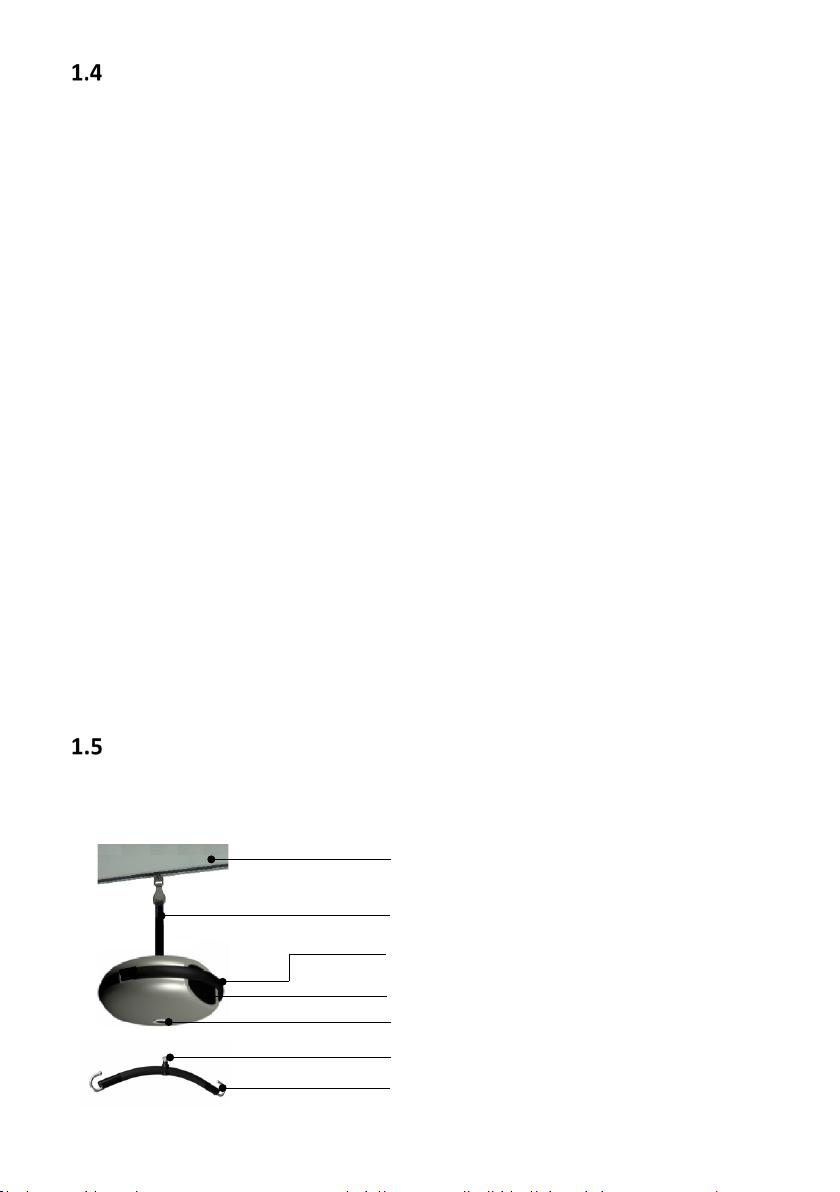
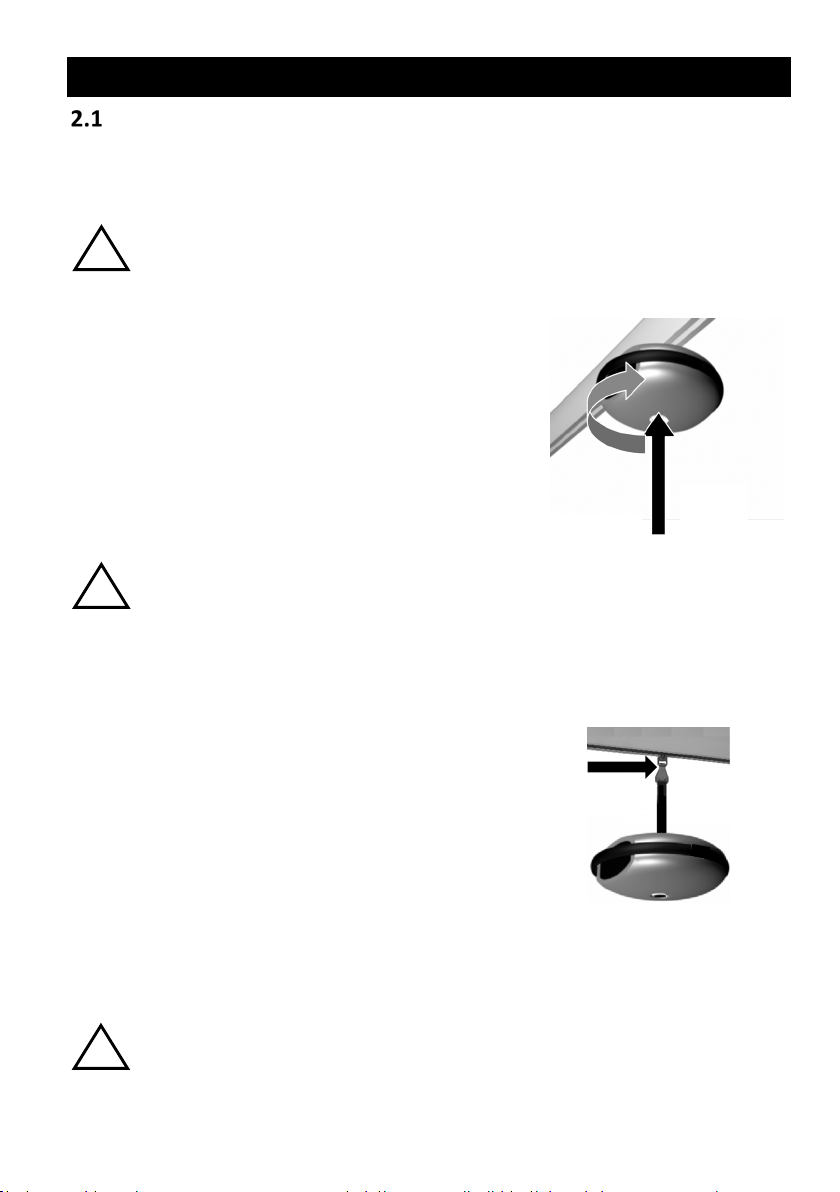
Mounting and detaching Luna __________________________________________7
Mounting and detaching of the spreader bar ______________________________8
Pictograms and functions _____________________________________________10
Operating__________________________________________________________11
Operating safety functions ____________________________________________11
Charging___________________________________________________________13
3USING LUNA ___________________________________________________________14
Using lifting slings ___________________________________________________14
Room to room transfer _______________________________________________15
Using Luna in a shower or bathing environment ___________________________17
4MAINTENANCE _________________________________________________________17
Cleaning ___________________________________________________________17
Storage ___________________________________________________________17
5CHECK, WARRANTY AND TROUBLESHOOTING________________________________18
Annual check and warranty ___________________________________________18
Troubleshooting ____________________________________________________18
6TECHNICAL DATA AND DIMENSIONS _______________________________________19
Technical specifications ______________________________________________19
Dimensions ________________________________________________________20
7ENVIRONMENT AND QUALITY _____________________________________________21
Disposal ___________________________________________________________21
Battery ____________________________________________________________21
Quality ____________________________________________________________21
Symbols and abbreviations ____________________________________________21
8ACCESSORIES___________________________________________________________22
9EMC data ______________________________________________________________23

4
1PURPOSE, SAFETY AND USE
Purpose
The Luna IPx4 Ceiling hoist/lift, referred to in this manual as Luna, is available in different
models. If not specified, this manual is valid for all models. The Luna also comes in a 2-channel
model, used for accessories such as Luna Mover. Use of the extra channel is described in the
accessory’s user guide.
The Luna is designed for making easy user/patient transfers from e.g. bed to wheelchair, to
toilet etc. in institutions such as nursing homes, hospitals, care centres and in homecare.
The Luna can be used as a ceiling mounted hoist/lift or as a mobile hoist/lift in fixed or
movable track systems.
The product is not bound to one person only but can easily be passed on to a new user after
thorough cleaning (see 4.1).
Essential Performance
Intended use: Lifting and lowering of patient.
The Luna can lower the weight using the emergency lowering button during susceptible to
continues phenomena of electrical interference.
Safety instructions
Important – Warning!
This user guide must be read thoroughly before Luna is taken into service.
•All parts must be mounted correctly and according to this user manual.
•There must be no indication of wear and tear on the Luna, track system or lifting sling.
•NEVER begin lifting if there is suspicion of any defect (abnormal sound, loose brackets
etc.) In such cases the Luna must be taken out of service immediately and you must
contact the dealer or Winncare Nordic.
•Depending on the model the lifting capacity is 200 kg or 275 kg (440 Ibs or 606 Ibs),
and this must never be exceeded. When using Luna along with other items such as
slings, spreader bars or transportable track systems it is always the item with the
LOWEST weight capacity that decides the maximum lifting capacity.
•Make sure that the Luna or the spreader bar cannot come into contact/hit the
user/patient while mounting the sling on the spreader bar.
•A caregiver must always be present when the Luna is used.
•Make sure that neither caregiver nor patient can be injured when carrying out lifts and
transfers. Always check surroundings and move obstacles out of the way.
•Never lift higher than necessary.
•According EMC. Electrical interference from portable RF communications equipment
including antennas, can affect medical electrical equipment and should not be used
within a distance of minimum 30 cm (12 Ines) from Luna IPx4.
!

5
Before use
The caregiver or user is responsible for making the following checks before use:
•Personnel must have received qualified instructions in how to use the Luna.
•The Luna is being used in track systems produced or approved by Winncare Nordic.
•Installation of track system for the Luna is carried out by qualified installers approved
by dealer or Winncare Nordic.
•Luna can only be fitted with spreader bars supplied by Winncare Nordic.
•Luna has been developed for use with ErgoSlings and other sling products approved by
Winncare Nordic. See brochure for ErgoSlings.
•The Luna is intended for use under normal temperatures (+2˚C/35.6˚F to +40˚C/104˚F)
and relative humidity (40 – 90%).
•If the Luna is used near shower system or bath, make sure that the Luna or hand
control is not submerged (see section 3.3).
•The Luna should never be used in an environment containing chlorine or in other
aggressive environments.
Safety checks
•Check lifting strap for wear and tear or damage. If there is any sign of a defects, the
Luna must be taken out of use immediately.
•Make sure the emergency stop has not been activated. If the red lamp is lit up, press
and hold the reset button for 5 seconds to release the emergency stop.
•Check the up/down function, if any abnormal sound is heard the Luna must not be
used before a service check has been performed by a qualified technician.
•Make sure that the strap can move freely into the Luna without twisting.
•Check lifting sling for any damage especially with regards to lifting straps. The sling
must not be used if damage or defects are detected.
•If in doubt on how to use the Luna, please contact the dealer or Winncare Nordic for
advice and guidance.
Terminology
Luna mounted in strap
Bayonet socket for spreader bar
Carry handle
Bayonet fixing point for Luna
Hook for sling lifting strap
Track system
Function buttons and handset connection
Strap

6
Luna mounted on the track
Unpacking
Check that all the parts are present and undamaged. Any suspicion of damage or shortage
should be reported immediately to the dealer or Winncare Nordic.
We recommend keeping and store original packaging for later transport to other sites or for
return shipment to Winncare Nordic in case of repair or annual check.
Contents of the box
:
•Luna cassette
•User manual
•Hand control (accessories)
•Spreader bar (accessories)
•Charger (accessories)
Transport
The Luna is most safely transported using the original packaging.
Symbols are printed on the packaging to ensure the best information for transport companies.
Strap
Hook for removable spreader bar
Track system
Function buttons and hand control
connection
Spreader bar
Hook for sling lifting strap
Carry handle

7
2INSTALLATION AND OPERATION
Mounting and detaching Luna
The Luna can be mounted in two different ways to meet specific needs. By choice from the
buyer the Luna is prepared, delivered and ready to be mounted in one of the following, A or B.
A) Luna mounted directly on the cart
The Luna is mounted directly on a cart in the track system.
(Fig. 2.1A).
1) Lift up the Luna and connect the bayonet on the cart
into the Luna socket (when connecting you will feel
easy resistance from spring).
2) Now turn the Luna clockwise 90˚ and await a little
click - this indicates correct mounting.
If the Luna is not mounted correctly an electronic safety device prevents to operate
Detaching the Luna from the cart
1) Push the Luna upwards toward the cart (feel easy resistance from the spring).
2) Turn the Luna 90˚ counter clockwise for detachment.
B) Luna mounted by the strap
Use the hook on the strap for mounting directly onto the cart
(Fig. 2.1B)
1) Lift up the Luna and attach the hook to the cart by
connecting the strap hook directly to the cart in the
track.
2) Await click for correct attachment. Safety spring-
plate on the hook must be locked to prevent the Luna
from detachment.
Always check that the hook is locked before using the Luna.
Be aware that the Luna weighs 6,7 kg (14.8 Ibs)
!
(1)
(2)
Fig. 2.1A
!
(1)
Fig. 2.1B
!

8
Detaching the Luna strap from cart
1) The hook can be released by using an extension arm
2) The extension arm is placed at the lower part of the hook.
3) Push up the extension arm to release the spring-plate on the hook and unhook the Luna
strap from the cart.
4) Lower the Luna into the cradle on the trolley and leave the strap slightly slackened.
1)
2)
3)
4)
Extension arm or Luna Trolley with extension arm can be purchased
from Winncare Nordic or dealer.
See order number in section 8, Accessories
Mounting and detaching of the spreader bar
Depending on how the Luna is mounted, the spreader bar can be attached as follows.
A) Luna mounted directly on the cart
Mounting the spreader bar (Fig. 2.2A)
1) Lift the spreader bar. Hold the strap and press
the safety spring-plate on the hook.
2) Attach the hook onto the attachment point on
the spreader bar and release the safety spring-
plate.
3) Ensure that the hook is safely locked onto the
spreader bar attachment point.
1)
2)
3)
Fig. 2.2A

9
Detaching the spreader bar
1) Press in the spring-plate on the hook.
2) Tilt the hook to detach the spreader bar.
B) Luna mounted in strap
Mounting the spreader bar directly into the Luna
1) Fit the spreader bar bayonet into the socket on the
Luna (when connecting you will feel a light resistance
from spring).
2) Now turn the Luna clockwise 90˚ and await a little click -
this indicates correct mounting (see fig. 2.2B).
If the spreader bar is not mounted correctly an electronic safety device
prevents operation of the Luna.
Detaching the spreader bar
1) Push the spreader bar upwards into the Luna (feel light resistance from the spring).
2) Turn the Luna 90˚ counter clockwise for detaching.
Fig.
2.2B
!

10
Pictograms and functions
(1) ON – If LED light is off, the Luna is in
“sleep” mode. The LED light will turn on when
the up (4) or down (3) button on the hand
control is pressed.
Side foil:
(2) BATT. – Indicates battery level (see 2.6).
(3) + (4) Up/Down –Press and hold the Luna
will move in the desired direction. Release the
button to stop the movement.
Note: Works only with hand control (5)
plugged in and LED light (1) must be on.
(5) Plug – Insert the hand control plug.
Hand control:
(6) Data display – Information about the Luna
model, serial number and symbols
information.
(7) Emergency Lowering – ONLY used in
situations where it is necessary to lower a
patient safely in case of a lift failure. This
button must be held constantly to lower the
unit. (See section 2.5)
(8) STOP – Press the emergency stop button
to stop the Luna immediately. This function
can be reset by pressing the reset button on
the hand control for 5 seconds.
9) Reset – Used to reset the Luna after the
use of the emergency stop - or lock function.
Reset by holding the reset button for 5
seconds, the Luna will then be reactivated.
Reset can also be used to lock all functions to
avoid unintended use by e.g. the patient.
When the reset button is held, the LED light
will show red and all functions will be locked.
(10) Option – This option is not available on a
standard hand control. The extra output can
be e.g. the Luna Mover or an electrical
spreader bar.
(1)
(2)
(3)
(4)
(5)
(6)
(7)
(8)
(9)
(7)
(8)
(10)
(4)
(3)
(2)
(1)

11
Operating
The Luna is ready for use, when the Luna cassette and the spreader bar are correctly mounted.
When the hand control is connected to the plug inlet on the front panel, the Luna may start up
in emergency stop mode. To release the emergency stop, press and hold the reset button for 5
seconds. Test the up and down functions before using the Luna.
The Luna will move faster when not loaded in order to reach the user quickly. When the user is
lifted, the speed will automatically reduce to increase the comfort and safety for the user.
Operating safety functions
Emergency stop
This function is only to be used in an emergency e.g. if the Luna does not react or does not
stop after releasing button on the hand control. The Emergency stop is placed on the hand
control and on the side foil on the Luna. If the emergency stop has been activated all functions
will stop immediately and the LED light will show red on the hand control.
The Emergency stop can be deactivated by pressing the “Reset” button on the handset for 5
seconds.
Emergency lowering button
Emergency lowering is only to be used in an emergency where it is necessary to safely lower a
patient. The emergency lowering button is placed on the hand control, illustrated as a
parachute and on the side foil with 3 arrows pointing down.
To activate the emergency lowering, press and hold the button on the hand control or on the
side foil for 5 seconds. The Luna will continue to beep while the button is held down. After 5
seconds the Luna will lower the patient. The button must be held down to continue lowering
of the patient.
Note: On some models, emergency lowering works even if the hand control
has a defect. Try using the button on the front panel instead. If neither
works, use the manual emergency lowering feature described in the next
section.
The Luna must be active before emergency lowering can be activated. Press
the up or down button first.
The lower endstop is not active when emergency lowering is used. Release
the emergency lowering button before the strap is at its full length.
!

12
Fig. 1
Fig. 2
Fig. 3
Manual emergency lowering:
The manual emergency is used to lower the client, when the powered emergency lowering
does not work or if the hand control is defective.
Follow the instructions on the charger or follow the description below:
Fig. 1) Remove the hand control.
Fig. 2)
Remove the plug on the side of the Luna.
Fig. 3)
Take the key, which is placed at the top of the
charger. Put the key into the Luna and turn the key
counter clockwise to lower the user.
Note:
Scan the QR-code and see the instructions on video.
If one of the emergencies stop functions has been activated due to an emergency, the Luna
must not be used again before a check has been made and any defect repaired.
If in doubt, contact your dealer or Winncare Nordic.

13
Charging
The Luna can be charged by placing the hand control in the charging station mounted on the
wall or in the charger unit on the Luna Trolley. The charger unit is connected to the mains.
There are approximately ~80 lifts/100 kg (220 Ibs) per. charging
Note: The Luna is fitted with batteries that require regular charging. Winncare Nordic
recommends that the Luna is charged every night or when the unit is not in use.
The Luna is fitted with a diode (marked BATT.) on the hand control and front panel which gives
the following information concerning battery condition during use:
Diode colour Description
Green
•
When charging starts the LED on the hand control and
front panel will flash.
oAfter 2 minutes the flashing stops, but the Luna
continues charging.
•To check the charging status, simply remove and reinsert
the hand control in the charger
oA constant light indicates that the Luna is fully
charged. The light turns off after 2 minutes.
Note: On some models the light may not turn off
Yellow
•The LED on the Luna cassette lights and indicates that the
batteries are approx. 50% discharged.
•
Recommend charging to avoid low battery.
Red
•The LED on the Luna cassette lights and indicates that the
batteries have reached a critical point.
•The LED starts flashing and an acoustic (” beep” signal) will
be heard.
•Luna must IMMEDIATELY be put on charge in this situation
and remain on charge for 5 hours.
Note: Luna cannot be overcharged.

14
3USING LUNA
Luna is ready for use if all the assembly instructions have been followed correctly.
Note: The two carry handles placed on the Luna, is only used for installation-/transportation.
Using lifting slings
Luna spreader bars are designed for use with Winncare Nordic lifting slings.
Winncare Nordic lifting slings have 2-6 lifting straps and are designed for lifting hooks with a
minimum diameter of 8 mm (0.31 In).
Use of non-approved slings will make Winncare Nordic’s responsibility for faults and accidents
null and void.
Winncare Nordic can assist in choosing slings and the correct use of slings.
Attaching slings to the Winncare Nordic spreader bar
Winncare Nordic accepts no responsibility if slings are placed incorrectly. The caregiver/helper
are responsible for ensuring that a sling is mounted correctly and fit for the situation.
1) The sling strap is placed over the hook in its open
position.
1)
2) The strap is pulled down to close the hook.
Note: The hook is designed so the weight of the
patient/user will help close the hook.
2)
To release the strap after lifting, simply pull the strap upwards to open the hook.
WARNING! Risk of finger entrapment - ensure that the patient fingers cannot get
trapped.
!

15
Room to room transfer
It is possible to move a patient from room to room in 2 different ways. To ensure that the
transfer is done correctly without any risk for the client, follow description A) Transfer with
two Luna’s or B) Transfer with one Luna.
A) Transfer with two Luna’s
Note: only possible when using a special spreader bar.
1) In this lifting situation, the two Lunas (a and b)
are placed as close together as possible.
2) The lifting strap from Luna (b) is extended and
attached to the extra suspension point on the
spreader bar.
3) Now both Lunas are connected to the
spreader bar. Check that the hook from the
receiving Luna (b) is fitted correctly. Lower the
strap on Luna (a) and raise the strap on Luna
(b) as seen on picture 3.
4) Lower the lifting strap on Luna (a) until the
strap is hanging loose. Now all weight is on
Luna (b)
5) On the spreader bar, un-hook the strap from
the Luna (a) by releasing the safety spring-
plate on the strap hook.
6) The transfer can now continue with the Luna (b).
1
2
3
4
5
b
a
b
a
b
a
b
a
b
a

16
B) Transfer with one Luna
Note: only possible when using a room to room Luna.
Note: It may be necessary to adjust the length of the strap (see below).
Adjusting the length of the strap
The length of the strap can be adjusted to fit the distance between the tracks in the two
rooms.
1) The screw (a) is released.
2) The strap is placed in the correct
position and the bolt (b) is placed in
the corresponding loop (c).
3) Ensure that the screw (a) and the
bolt (b) are tightened before the
Luna is mounted on the cart.
1) In this lifting situation Luna (a) is moved, as close as it is
possible to the carts.
2) Luna (a) with user is moved to the door and the transfer
strap (b) from the other room is fitted to the vacant ring
bracket on Luna (a).
3) Now both straps (a and b) are fitted to the Luna
cassette. Check the hook is fitted correctly.
4) The strap on Luna (a) is slowly released until the transfer
strap (b) carries weight of the user.
5) The strap on Luna (a) can now be removed and fitted on
the cart next to the transfer strap. The lifting strap is
best removed by bringing the bracket up, press the
spring and remove.
1
3
2
5
4
b
a
b
a
b
a
b
a
b
a
c
b
a
c
c

17
Using Luna in a shower or bathing environment
The LunaIPx4 and the hand control are water resistant and can tolerate being sprayed with
water. Winncare Nordic recommends that the Luna is used as shown in fig. 3.2A and 3.2C.
It may be an advantage to use Luna mounted directly on the track as fig. 3.2C.
Fig. 3.2A – Right
Fig. 3.2B – Wrong
Fig. 3.2C – Right
Note: IPx4 hand control cannot withstand being immersed in water. As an accessory, it is
possible to buy a waterproof IPx7 hand control, which withstands to be immersed in water.
4MAINTENANCE
Cleaning
The Luna may be cleaned using a slightly damp cloth with a small quantity of standard
household cleaning agents. Strong chemicals or abrasive agents must not be used.
Storage
The Luna must be stored in a dry environment with relative humidity under 70 %.
If the Luna is not to be used for a long period, it is recommended to press the emergency stop
button to save the battery.
Note: The Luna should be fully charged before storing. The batteries will slowly discharge, so
it is recommended that the Luna is recharged every 3 months to prevent the battery
from being destroyed.

18
5CHECK, WARRANTY AND TROUBLESHOOTING
Annual check and warranty
The Luna must always be repaired and maintained by qualified personnel, including the
replacements of print card, batteries, lifting straps and other components.
The manufacturer Winncare Nordic recommends that the Luna MUST be checked by a
qualified person at least once a year in accordance with Winncare Nordic service instructions.
An annual check is also recommended to the European Standard (EN/ISO 10535) for patient
hoists including ceiling hoist.
It is the legal owners’ duty to ensure that these checks are carried out on the product.
If it is necessary to replace any parts due to wear or damage, Winncare Nordic recommends
for safety reasons to use original spare parts.
Warranty
The LunaIPx4 has a 5-year warranty. See further warranty provisions on www.Winncare.com
Troubleshooting
Fault
Possible cause
Solution
Luna does not react
when the hand control
UP/DOWN are used.
(no” beep” sound from
the Luna unit).
Luna is not on or
emergency stop is
activated.
Turn on the Luna.
Deactivate emergency stop (see
section 2.5).
Defective hand control.
Check if up/down buttons on the
Luna unit. If it works, try another
hand control or get a new one
from the dealer or Winncare
Nordic
Batteries are not fully
charged or defective.
Charge batteries (see section 2.6)
If this does not help, the batteries
must be replaced.
Fault
Possible cause
Solution
Luna does not react
when UP/DOWN buttons
on the hand control are
used. (a” beep” sound is
heard).
Spreader bar not
mounted.
Mount the spreader bar (see
section 2.2).
Luna unit is not mounted
correctly on the track/
cart.
Read the mounting instructions
and follow section 2.1 for correct
mounting of the Luna in track
system.
Batteries are not fully
charged.
Charge batteries (see section
2.6).
The strap is rolled
incorrectly.
Request service technician from
dealer.

19
Fault:
Possible cause
Solution
The lift does not react
when the hand control
UP-button is used.
(a” beep” sound from the
Luna unit).
The lifting capacity has
been exceeded – User
too heavy or sling has
been caught on furniture
etc.
Charge batteries, if this does not
help the batteries must be
replaced.
Fault:
Possible cause
Solution
Does not charge.
Charger is not connected
to the main supply.
Connect charger to main supply.
(see section 2.6).
Charger defect.
Try another charger or get a new
one from the dealer or Winncare
Nordic.
Connection to the hand
control is defective.
Try another charger or get a new
one from the dealer or Winncare
Nordic.
6TECHNICAL DATA AND DIMENSIONS
Technical specifications
Max capacity:
Length of lifting strap:
Weight:
Measurements:
Battery operation:
Charging:
Covering:
Noise:
IP-class:
Output:
200 kg or 275 kg (440 Ibs or 606 Ibs), depending on model
2200 mm (86.6 In)
6.7 kg (14.7 Ibs) without spreader bar
320 x 130 mm (12.6 x 5.1 In)
36 V lead acid batteries
100 - 240 V, 0.5 amp.
High impact, moulded ABS
LwA during lifting/lowering without load is 49dB(A)
LwA during lifting/lowering with 175 kg (386 Ibs) load is 53dB(A)
Cassette: IPx4
Charger: IPx4
Hand control: IPx4 / IPx7 (Depending on model)
24 V (Only available in the 2-channel model)
EMC tested according to following standards:
LunaIPx4 200 kg (441 Ibs) 1 channel: IEC 60601-1-2:2014 (4th Ed)
Other models: IEC 60601-1-2:2007

20
Dimensions
Measurements ceiling mount:
A) Width of Luna cassette
320 mm
12.6 In
B) Spreader bar (see section 8,
Accessories, for other sizes)
580 mm
22.8 In
C) Height of Luna cassette
170 mm
6.7 In
D) Min. height from hook to track
430 mm
16.9 In
E) Lifting range from min. height
1950 mm
76.7 In
Measurements strap mounted:
A) Width of Luna cassette
320 mm
12.6 In
B) Spreader bar (see section 8,
Accessories for other sizes)
580 mm
22.8 In
C) Height of Luna cassette
155 mm
6.1 In
D) Min. height from hook to track
465 mm
18.3 In
E) Lifting range from min. height
1950 mm
76.7 In
Table of contents
Other ergolet Lifting System manuals
Popular Lifting System manuals by other brands

Atlas Equipment
Atlas Equipment OH-10X manual

Elebia
Elebia NEO100 user manual

TECALEMIT
TECALEMIT TEC 3000X Installation, operation and maintenance instructions

DL
DL JCPT-HD/DC Series Training manual

BorMann
BorMann BWR5119 Assembly and operation instructions

Paragon Pro
Paragon Pro PANELIFT 439 Operator's manual

EZ-ACCESS
EZ-ACCESS PASSPORT installation manual

Bishamon
Bishamon A031810 user guide

Rocks
Rocks OK-08.0021 user manual

nifty
nifty TM34M ECO Series Operating and safety instructions

Safety Clamps
Safety Clamps VL-BC Operation, maintenance, and repair manual

Ranger
Ranger RML-1500XL Installation and operation manual