Bayside BRISTOL User manual

Installation Instructions
1 | P a g e v 1 . 1 (02 / 2 0 1 9 )
BRISTOL FLUSH MOUNT WITH EMERGENCY LIGHTING
SKU# 189199
Rated Voltage 220-240V~ 50Hz
Thank you for purchasing this quality Bayside product. To ensure correct function and safety, please read and follow all
instructions carefully before assembly, installation and use of this luminaire. Please keep instructions for future reference.
Warranty
This luminaire is covered by a 2 year warranty. The warranty is from date of purchase, not the date of installation.
If the luminaire is not assembled and installed by a licensed electrician the warranty will be void.
Please retain proof of purchase and evidence of installation by a licensed electrician for any warranty enquiries.
Warranty will be void if there is any damage due to improper usage or modification to the luminaire.
The use of non-compatible dimmers may damage your luminaire and will void your warranty.
Failure to comply with the instructions in this manual may increase the risk of damage or injury and will void warranty.
Installation Requirements
Must be assembled and installed by a licensed electrician.
All wiring and installation of the luminaire must adhere to the latest local and national wiring rules.
eg. AS/NZS 3000 Electrical Installations.
This is a Class II luminaire and must be maintained during wiring and installation
This luminaire is rated IP54, this must be maintained during wiring and installation.
Select a suitable location for installation:
- This luminaire is protected against water penetration to IP54 standards, which is splashing in every direction.
- The mounting point must support 2 times the weight of the luminaire.
This luminaire is dimmable and has been tested at the date of publication with the dimmers listed in the specification
section. The use of a LED dimmer such as the Lucci LEDlux SKU# 290998 or SKU# 290997 dimmer is highly
recommended.
NOTE: For the best dimming range, use with the Lucci LEDlux SKU# 290998 dimmer and adjust the variable
resistor at minimum and maximum dimming positions on the dimmer during the installation.
NOTE: Dimming may cause buzzing sounds or a slight flicker. There may be slight delays with the LED light start
up or slight uneven light performance when more than one LED luminaire is linked together, switched ON or
dimmed. This is not a product fault and as such is not covered under warranty.
NOTE: Some dimmers have a minimum load of 20W. Ensure the dimmer position is on the maximum setting before
turning on the LED light and adjust the dimmer down to your desired light level.
CAUTION: risk of electric shock . The light source of this luminaire is not replaceable; when the light source
reaches its end of life the whole luminaire will require replacement.
Take care not to pull any electrical wires during unpacking as this may damage the connection.
Lay out all the components on a smooth surface and make sure there are no components missing before assembling.
If parts are missing, return the complete product to the place of purchase for inspection or replacement.
Check whether the luminaire has been damaged during transport. Do not operate/install any luminaire which appears
damaged in any way. Return the complete product to the place of purchase for inspection, repair or replacement.
Ensure power to the circuit you are working on has been switched OFF, before commencing any electrical work.

Installation Instructions
2 | P a g e v 1 . 1 (02 / 2 0 1 9 )
NOTE:
Working Temperature: 0℃~40℃
Emergency Classification: C0 D32 / C90 D32;
The luminaire is with over-charge and over-discharge protection.
The battery must be replaced when it no longer meets the rated duration of operation.
Please discard or terminate use if unusual smell, over-heating, changes to colour occurs, or there are damages
found on the battery pack.
Battery Information: Li-ion 6.4V 2S1P 9.6Wh 1.5Ah 18650MUB
Installation Directions
Remove all packaging material from the product and be careful not to throw away accessories that may be hidden within
the packaging material. If assembly is required, place the luminaire on a smooth non-scratch surface.
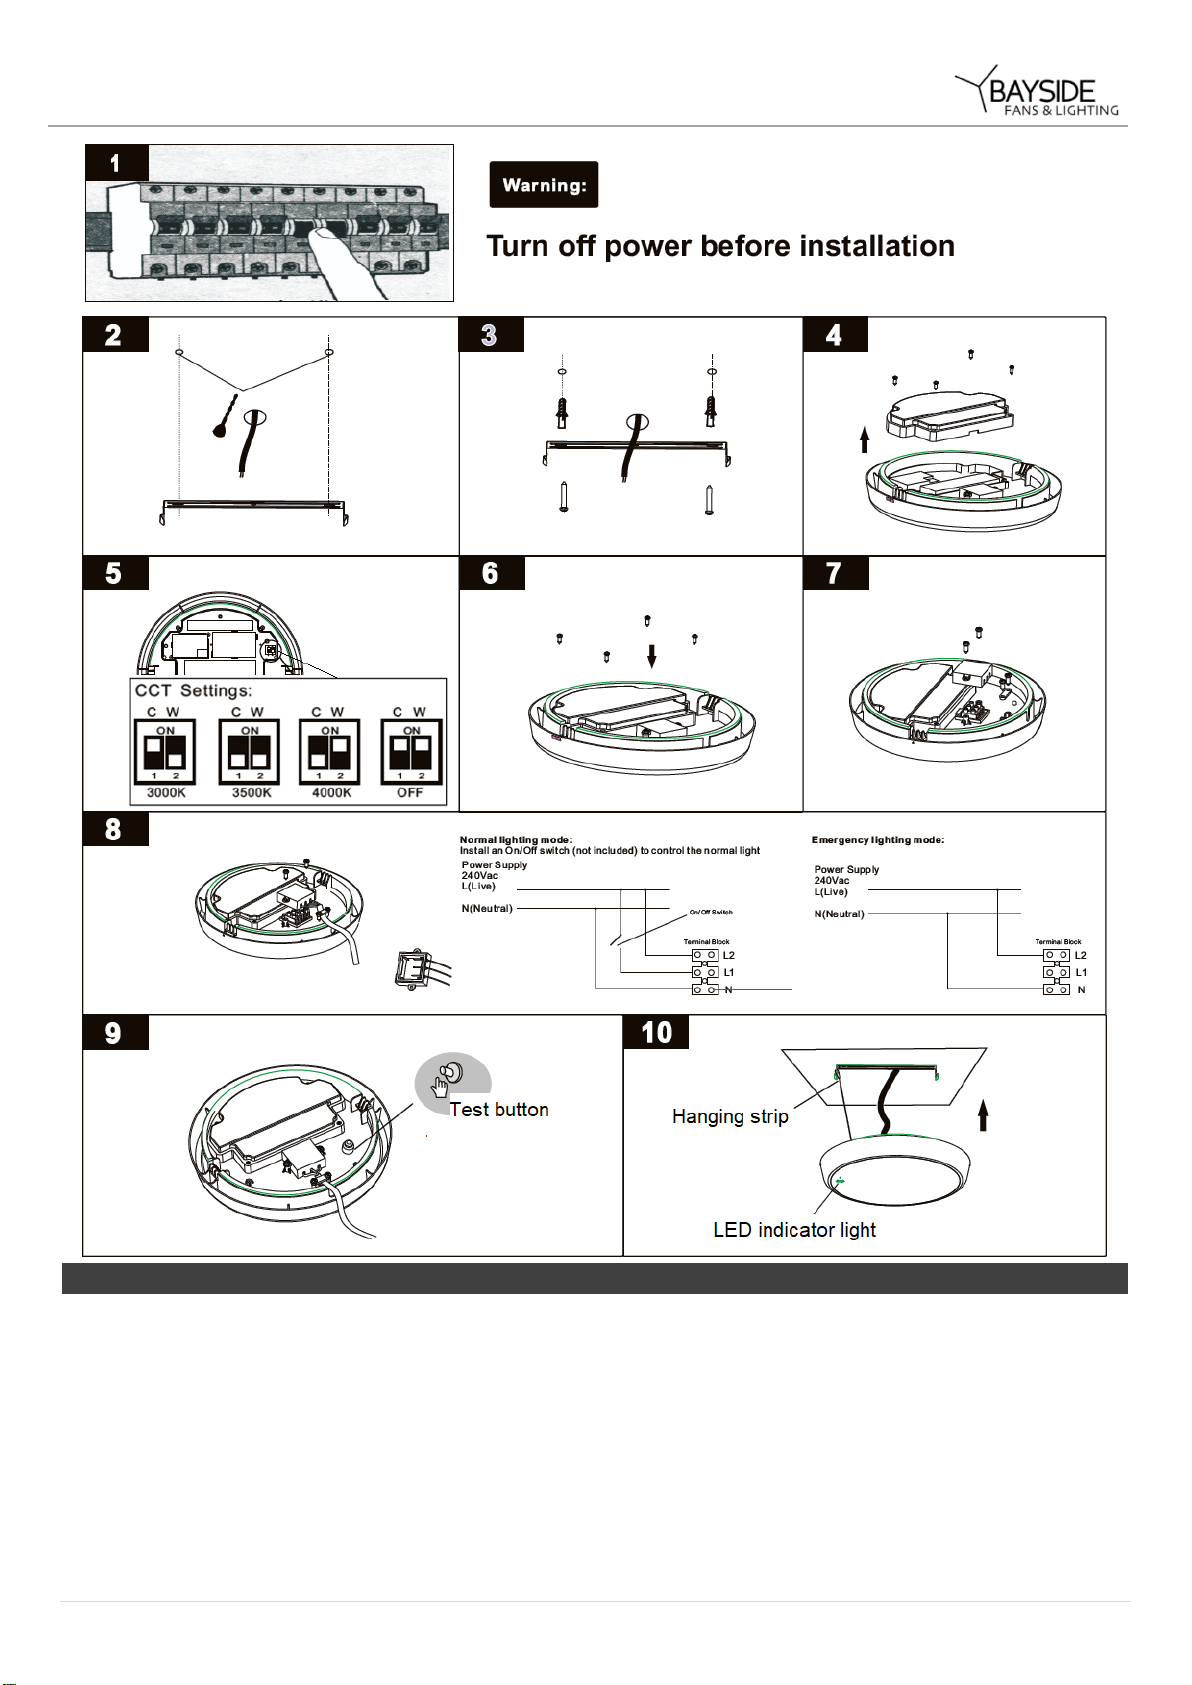
1. Remove the mounting bracket from the luminaire. Use the mounting bracket as a template to mark the screw
positions on the ceiling. Fig. 2
2. Install the mounting bracket onto the ceiling using appropriate size mounting screws and anchors. Ensure the
mounting screws and anchors are suitable for the mounting surface and the surrounding environment. Fig. 3
3. Remove the driver cover to access the DIP switch. Fig. 4
WARNING: To remove the driver cover and adjust the DIP switches, this MUST be performed by a licensed
electrician.
4. Select your preferred color temperature by setting the DIP switch. Fig. 5
NOTE: Factory pre-set is warm white 3000K.
5. Reinstall the driver cover and secure by tightening the screws. Fig.6
6. Remove the terminal block cover by loosening the screws. Fig.7
7. Insert the mains supply wire through the holes on the terminal bock cover. Connect the main supply wire to the
terminal block. Fig.8 Select the lighting mode required and follow the wiring method below:
Normal lighting mode:
Install an On/Off switch (not included) to control the
normal light.
Emergency lighting mode:
8. Ensure wires are secure and no bare wires are exposed. Reinstall the terminal block cover and secure by tightening
the screws Fig. 7.
9. Indicator light is on during battery charging period. Press the test button to switch to emergency lighting mode.
Indicator light will be off in emergency mode. Fig.9,
10. Attach the luminaire to mounting bracket using the hanging strip. Push and press the luminaire onto the mounting
bracket. Fig.10
11. After the installation, switch on the luminaire to test and enjoy your new lighting product.
Installation Instructions
3 | P a g e v 1 . 1 (02 / 2 0 1 9 )
Safety Tips
Always ensure the power is OFF and the luminaire has cooled down before performing any maintenance, cleaning
or making any adjustment to the luminaire.
To avoid injury or damage to the luminaire, ensure that power leads and screws are secure before connecting the
power.
Select a suitable location away from hazards.
The luminaire must not be used if the protective shield/shade has been damaged or cracked. The protective
shield/shade must be replaced before using the luminaire again.
To clean, wipe with a soft damp cloth. Do NOT soak or immerse the product in water or other liquids.
Ensure that the luminaire does not come in contact with corrosive chemicals/solvents or abrasive cleaners etc.

Installation Instructions
4 | P a g e v 1 . 1 (02 / 2 0 1 9 )
Specifications
SKU #
189199
Colour #
White
Rated Voltage
220-240V~ 50Hz
Rated Wattage
22W
LED
Nationstar LEDS, 3000K, 3500K,4000K, 1400 lumens
Weight
0.78kg
IP Rating
IP54
Dimensions
D:300mm H:60mm
Dimmer
Information
Highly Recommended
Dimmers
Lucci LEDlux SKU# 290998, SKU# 290997
Compatible Dimmers
LUMEX Load Smart LT1D450LS;
DIGINET LED Smart MEDM;
Clipsal 31E2RUDM, 32E450TM, 32E450UDM, 31E2PUDM and
32ELEDM;
HPM: Cat. 400T
Working
Temperature
0℃~40℃
Battery Spec
Model No.: Li-ion 6.4V 2S1P 9.6Wh 1.5Ah 18650MUB
Battery
Charging Time
12 Hours
Emergency
Classification
C0 D32 / C90 D32
Emergency
Light Output
200LM
Emergency
Power
2W
Emergency
Running Time
3 Hours
This manual suits for next models
1
Popular Light Fixture manuals by other brands

Maximex
Maximex 88441500-m Instructions for use

Acclaim Lighting
Acclaim Lighting Color Ray MR Operation instructions

Lightolier
Lightolier Soli ADA Series instruction sheet

FONESTAR
FONESTAR MOV-18L instruction manual

Cooper Lighting
Cooper Lighting Halo H1DRPSML specification

Chauvet
Chauvet LX 5 Quick reference guide


