manuals.online logo
Brands
  1. Home
  2. •
  3. Brands
  4. •
  5. Bazooka
  6. •
  7. Subwoofer
  8. •
  9. Bazooka Marine SCUBA8 User manual

Bazooka Marine SCUBA8 User manual

This manual suits for next models

5

Other Bazooka Subwoofer manuals

Bazooka EL104 User manual

Bazooka

Bazooka EL104 User manual

Bazooka BTA6100 User manual

Bazooka

Bazooka BTA6100 User manual

Bazooka FJ Cruiser TMS8A-HP-FJ User manual

Bazooka

Bazooka FJ Cruiser TMS8A-HP-FJ User manual

Bazooka CSW1014 User manual

Bazooka

Bazooka CSW1014 User manual

Bazooka PTS20-21050 User manual

Bazooka

Bazooka PTS20-21050 User manual

Bazooka Marine MBT8014 User manual

Bazooka

Bazooka Marine MBT8014 User manual

Bazooka EL604 User manual

Bazooka

Bazooka EL604 User manual

Bazooka PMW1024DVC User manual

Bazooka

Bazooka PMW1024DVC User manual

Bazooka Party Bar G2 User manual

Bazooka

Bazooka Party Bar G2 User manual

Bazooka CS8A5 User manual

Bazooka

Bazooka CS8A5 User manual

Bazooka CSW1004 User manual

Bazooka

Bazooka CSW1004 User manual

Bazooka ELW1014.2 User manual

Bazooka

Bazooka ELW1014.2 User manual

Bazooka Double Cab Subwoofer VSE-TUN-DC-04 User manual

Bazooka

Bazooka Double Cab Subwoofer VSE-TUN-DC-04 User manual

Bazooka ELW1014P User manual

Bazooka

Bazooka ELW1014P User manual

Bazooka BW1014 User manual

Bazooka

Bazooka BW1014 User manual

Bazooka TA850C User manual

Bazooka

Bazooka TA850C User manual

Bazooka EL1004 User manual

Bazooka

Bazooka EL1004 User manual

Bazooka BTA6100 User manual

Bazooka

Bazooka BTA6100 User manual

Bazooka EL10A User manual

Bazooka

Bazooka EL10A User manual

Bazooka SM10A User manual

Bazooka

Bazooka SM10A User manual

Bazooka MGW Subwoofer MGW1024PT User manual
Bazooka

Bazooka MGW Subwoofer MGW1024PT User manual

Bazooka NOS6 User manual

Bazooka

Bazooka NOS6 User manual

Bazooka RSW1024DVC User manual

Bazooka

Bazooka RSW1024DVC User manual

Bazooka BT6014 User manual

Bazooka

Bazooka BT6014 User manual

Popular Subwoofer manuals by other brands

Extron electronics SF 8CT SUB user guide

Extron electronics

Extron electronics SF 8CT SUB user guide

SVS PB-4000 quick start guide

SVS

SVS PB-4000 quick start guide

Pioneer S-DVR9SW Service manual

Pioneer

Pioneer S-DVR9SW Service manual

Yamaha YST-SW515 Service manual

Yamaha

Yamaha YST-SW515 Service manual

Velodyne SPL-800 ULTRA - REV B datasheet

Velodyne

Velodyne SPL-800 ULTRA - REV B datasheet

Teufel US 2110/1 SW operating instructions

Teufel

Teufel US 2110/1 SW operating instructions

Wet Sounds SS-65 user manual

Wet Sounds

Wet Sounds SS-65 user manual

Pyle PLQB10 Specifications

Pyle

Pyle PLQB10 Specifications

Sony XS-L1536 Product guide

Sony

Sony XS-L1536 Product guide

Sony XS-AW8 operating instructions

Sony

Sony XS-AW8 operating instructions

B&C Speakers 15 HPL 76W Specifications

B&C Speakers

B&C Speakers 15 HPL 76W Specifications

Velodyne DD-18+ Specifications

Velodyne

Velodyne DD-18+ Specifications

Sonance Cinema Series SUB 10-150 Specifications

Sonance

Sonance Cinema Series SUB 10-150 Specifications

Hifonics HW-12 Owners & installation manual

Hifonics

Hifonics HW-12 Owners & installation manual

Yamaha 64263 owner's manual

Yamaha

Yamaha 64263 owner's manual

Magnat Audio ADR 130 BP user manual

Magnat Audio

Magnat Audio ADR 130 BP user manual

Technics SB-AS500 Operaing instructions

Technics

Technics SB-AS500 Operaing instructions

Lyngdorf BW-2 owner's manual

Lyngdorf

Lyngdorf BW-2 owner's manual

manuals.online logo
manuals.online logoBrands
  • About & Mission
  • Contact us
  • Privacy Policy
  • Terms and Conditions

Copyright 2025 Manuals.Online. All Rights Reserved.

Models: NOS6, NOS8, NOS8A,
NOS8P, NOS8W, SCUBA8
Dear Friend,
Thank you for selecting Bazooka® Mobile Audio for your car stereo
system. This Bazooka subwoofer re resents our continued commitment
to efficiency and design. An innovative manufacturing rocess we
develo ed for the Bazooka rovides consumers with state-of-the-art
s eaker system design. At Bazooka Mobile Audio, we take ride
manufacturing the most revolutionary bass s eaker systems ever created,
featuring our atented Bass Tubes® enclosure design, and we ho e
you will take ride in owning them.
Several years ago, we realized that efficiency was the wave of the future
in autosound, so we made a commitment to design, manufacture, and
deliver the most efficient s eaker systems ossible.
Today we market our atented s eaker systems worldwide and the
high quality of the Bazooka brand is well res ected by consumers and
dealers of all nationalities.
When ro erly installed, Bazooka Mobile Audio systems will give you
years of clean uninterru ted sound re roduction. Therefore, I urge you
to take a few minutes of your time to review this instruction booklet.
It was designed to give you a better understanding of our roducts
and to ex lain how to a ly them ro erly.
Thank you again for choosing Bazooka. Our early commitment to quality
has made them the roduct of choice, and I am sure you will agree that
you have made the right one! Enjoy!
Sincerely,
JON C. JORDAN
President
BAZOOKA Mobile Audio
1
2
WARRANTY
All SAS® subwoofer roducts are covered under warranty for ONE full
year from the date of urchase. Terms and conditions of the warranty
are as stated on the warranty card included in the box with the roduct.
SAS recommends that you use only authorized BAZOOKA® dealers to
install this roduct. Im ro er or incorrectly erformed installation voids
this warranty.
BASS TUBES ENCLOSURE
BAZOOKA® subwoofer s eaker systems exclusively incor orate the
revolutionary Bass Tubes® atented subwoofer enclosure design available
only from SAS.®
PRACTICE SAFE LISTENING
Continuous ex osure to high volumes of sound may cause ermanent
hearing loss. High owered auto sound systems are ca able of roducing
sounds well over 130 dB. Even short eriods of lay at high volume
levels can im air your ability to hear necessary traffic sounds and may
constitute a hazard. Please use common sense and ractice SAFE
LISTENING !
If you have any questions contact
the SAS Technical Su ort De artment at:
Phone - 800 THE-TUBE  Fax - (225) 272-9844
Email - [email protected]  Website - www.bazooka.com
In Canada: (604) 988 2966
15049 Florida Blvd., Baton Rouge, LA. 70819
CONTENTS
Warranty pg 2
System Features pg 3
Spe ifi ations pg 3
Pre Installation pg 4, 5
Finishing The Look Part 1 pg 5
Finishing The Look Part 2 pg 6
Vehi le Pla ement pg 7
Mounting The Subwoofer pg 8
Wiring pg 9, 10
Woofer Size 6.5 (NOS6) 8 (NOS8, NOS8W, NOS8P)
Voice Coil Size 1 high ower. /high tem . 2 high wr. /high tem .
Magnet Size 20 oz. 36 oz.
Frequency res onse* 39-1500 hz. 39-1500 hz.
Efficiency* 100 dB* 102 dB*
Power Handling 6-100 watts/channel 6-300 watts/channel
Dimensions 18x6.75x8 27.5" x 8.5" x 10"
Weight 11 lbs. 23 lbs.
Im edance SVC 4 ohm SVC 4 ohm
SYSTEM FEATURES
 6 or 8 PURE-PISTON WOOFER
 150 WATT HIGH POWER AMP (NOS8A ONLY)
 TURBO COOLED VOICE COILS
 BASS REFLEX, DUCTED PORT ENCLOSURE
 CORNER LOADING
 COPLANAR OUTPUT
 HIGH OUTPUT EFFICIENCY
 MOISTURE RESISTANT ENCLOSURE AND WOOFER
 MAXIMIZED SPACE EFFICIENCY
 1 YEAR WARRANTY
 LARGE MAGNET FOR INCREASED POWER HANDLING
* The efficiency levels of all Bazooka subwoofer s eaker systems are measured in the
ty ical environment: In the low bass region with one watt of ower.
3
SPECIFICATIONS: PASSIVE UNITS
SPECIFICATIONS: NOS8A
Woofer Size 8
Voice Coil Size 1.5 high ower./high tem .
Magnet Size 28 oz.
Frequency res onse* 39-250 hz.
Efficiency** 102 dB*
Power Handling 150 watts
Dimensions 18.325" x 8.5" x 10"
Weight 20 lbs.
Im edance 4 ohms
INSTALLATION
Please take time to read through this manual and lan out your installation
before you begin!
Locate an area in the rear of the vehicle where you would like to lace the
Bazooka s eaker systems. The location you have selected must meet the following
requirements in order for the Bazooka to be ro erly installed in the vehicle:
1.) The woofer (grill end) should be facing into a corner. (See vehicle lacement
recommendations on age 5)
2.) Ideally, there should be 2 to 4 inches between the woofer and the corner it
is ointing into.
3.) The mounting area should be carefully checked to be sure that the mounting
screws will not damage the gas tank, electrical wiring, fuel lines, or the s are tire
during the mounting of the stra bases.
4.) Ensure that the mounting base brackets are 13 a art and square before
mounting. Incorrect lacement of the brackets will make final mounting difficult
or im ossible (See mounting on age 8).
5.) The bracket mounting bases should be screwed securely to a rigid surface
that is art of, or anchored to, the structure of the vehicle.
Be sure that your a lication meets all of these requirements before you continue
the installation rocedure!
4
5
FINISHING THE LOOK (Step 1)
In order to com lete the look of your subwoofer, you will need to install
the included wire loom over the wire and attach the nozzle to the to of
the tank.
To begin, the wiring needs to be routed THROUGH the nozzle. If necessary,
begin by feeding the wire through the nozzle as shown in the icture
below. Continue feeding wire through as you ush the nozzle into the to
of the tank until you hear a click. O the NOS8A, the amou t of
wiri g a d small area of the ozzle ca make this difficult. To make
this easier, Bazooka recomme ds twisti g the ozzle assembly
arou d to make the wiri g coil up i side the ozzle a d take up
less space. Be sure ot to rotate the ozzle so much that it pulls
the wires loose from their co ectio s. Usually, o e-a d-a-half
tur s is all that is ecessary.
On the NOS8A, you will also need to install the valve knob onto the gain
control at this oint.
Valve Gain Knob
Twist if Necessary
6
Next, install the wire loom by pushi g the loom onto the wire, as
shown in below. Starting from the free end and working your way u
to the nozzle. (Note: Pulli g the wire loom will result i bi di g,
maki g it more difficult to put the loom i place.) Remove the
locking nut from the nozzle by turning counter-clockwise ¼ turn. Once
the wire loom is assed along the length of the wire and through the
locking nut, fold the wire loom over itself at least 5/8 of an inch, so
the end of the loom is flush with the locking nut. Slide the remaining
wire and loom through the locking nut, and screw the locking nut into
lace by turning ¼ turn clockwise.
FINISHING THE LOOK (Step 2)
Braided wire loom
Locking
Nut
5/8
Fold over
HATCHBACK INSTALLATION
tube size is exaggerated for em hasis
TRUCK INSTALLATION
tube size is exaggerated for em hasis
SEDAN INSTALLATION
tube size is exaggerated for em hasis
VEHICLE PLACEMENT RECOMMENDATIONS
7
8
S ace floor mount brackets 13 a art
(inside edge to inside edge)
Floor Mount
Bracket
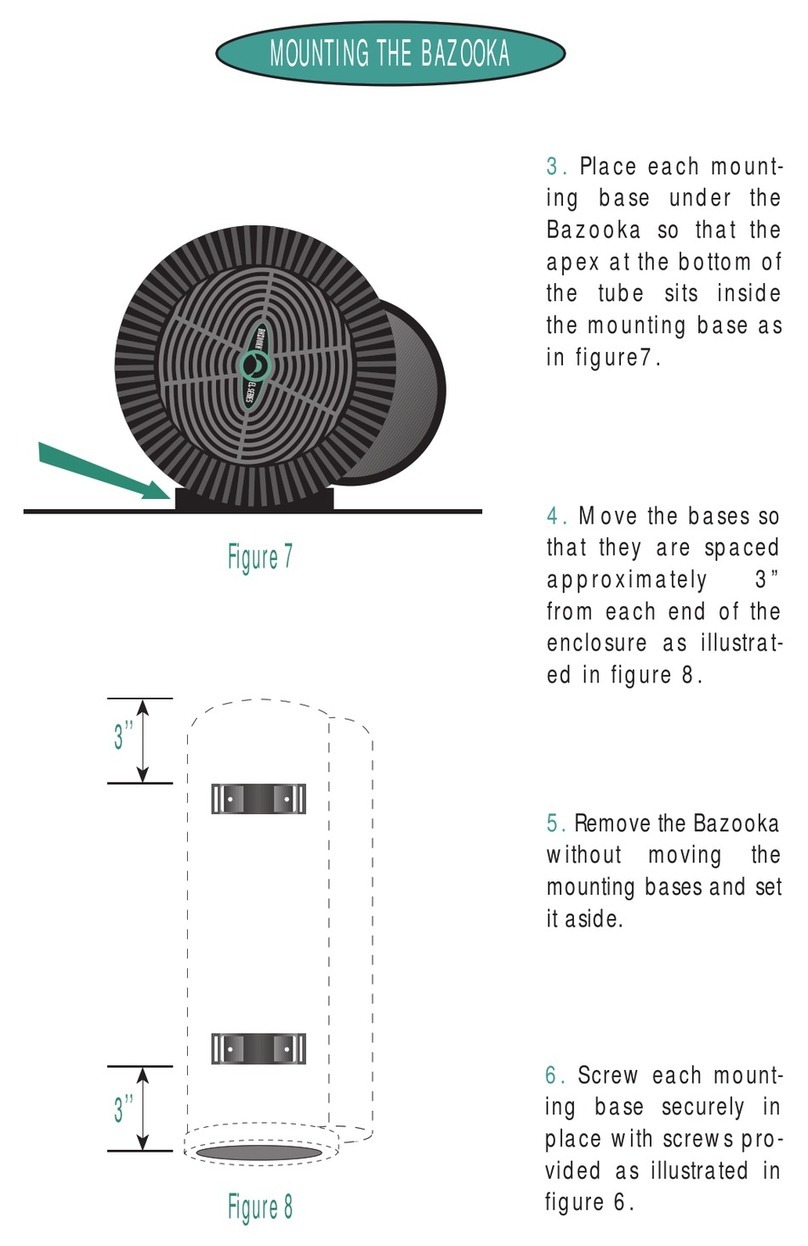
Mounting the NOS Tube:
Once you have found a suitable location, you need to mount the NOS
Tube. Mounting the unit ensures that it will give you years of trouble-
free erformance, and also guarantees that your unit is correctly
oriented for it to o erate ro erly. To begin, mount the bases arallel
on the floor of the vehicle with the bases EXACLTY 13 inches a art,
from inside edge to inside edge. Mounting these brackets incorrectly
will make the final mounting ste s difficult or im ossible. The tall
bracket should be mounted towards the front of the vehicle, to stand
the back of the unit u , mimicking an actual NOS installation. Once
the brackets are mounted firmly to the vehicle, lace the NOS Tube on
the brackets, and secure them with the enclosed mounting stra s. The
stra s sim ly screw into the brackets with the su lied hardware.
Red
Black
RCA
Gree /White
Ora ge
RCA
Brow /Grey
POWER WIRE (NOS8A only)
The ower wire must be fused and connected directly to the ositive
terminal of the battery to rovide a ower source with a low voltage
dro and low noise. Do not make the ower connection at the fuse
block or any oint other than the battery. Im ro er ower sources can
reduce out ut and cause distortion.
The fuse holder should be connected to the battery's ositive terminal.
The fuse is designed to revent fire or damage to your car, should the
battery wire short to ground. Wait to insert the fuse into its holder
until all wire connections have been made.
If it is necessary to lengthen the battery wire, add the required length
between the am lifier and the fuse holder, not the fuse holder and
the battery. If you need to extend the battery wire, use 12 gauge or
larger for NOS8A, it is best to use as short a wire as ossible. Be sure
you DO NOT run the ower wire next to the in ut cables of the am lifier,
this will induce noise. Avoid running the ower wire near the radio's
9
WIRING DIAGRAM (NOS8A Only)
RED 12 GAuge
BLACK 12 Gauge
Ora ge 16 Gauge
Gree /White RCA
Brow /Grey RCA
+ 12 Volt Battery
Chassis Grou d
Remote Tur -O
Right RCA I put
Left RCA I put