BBT PHD-71CC User manual

OWNER’S MANUAL
Assembly & Operating Instructions
MODEL NO. BBT-PHD-71CC
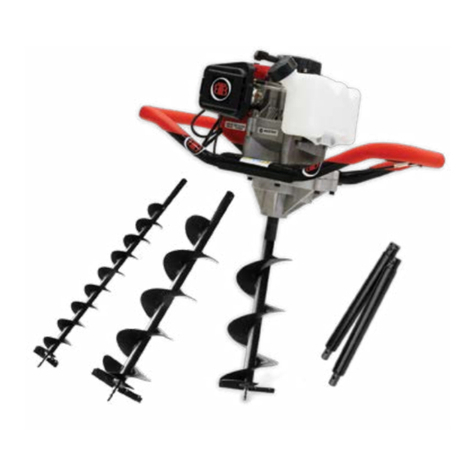
BBT 71CC Post Hole Digger
All manuals and user guides at all-guides.com
all-guides.com

2
WWW.BBTA.COM.AU BBT-PHD-71CC
To The Owner
Thank you for purchasing our Post Hole Digger. It was carefully engineered to provide excellent performance
when properly operated and maintained.
Please read this entire manual prior to operating the Post Hole Digger. It instructs you how to safely and easily
set up, operate and maintain your Post Hole Digger. Please be sure that you, and any other persons who will
operate the Post Hole Digger, carefully follow the recommended safety practices at all times. Failure to do so
could result in personal injury or property damage.
All information in this manual is relative to the most recent product information available at the time of printing.
Review this manual frequently to familiarise yourself with the machine, its features and operation. Please be
aware that this Owner’s Manual may cover a range of product specifications for various models. Characteristics
and features discussed and/or illustrated in this manual may not be applicable to all models. We reserve the right
to change product specifications, designs and equipment without notice and without incurring obligation.
All the power testing information used to establish the power rating of the engine equipped on this Post Hole
Digger can be found in the engine manufacturer’s manual or website. If you have any problems or questions
concerning the machine, please contact our Customer Support Department.
Throughout this manual, all references to right and left side of the Post Hole Digger are observed from the
operating position. The engine manufacturer is responsible for all engine-related issues with regards to
performance, power-rating, specifications, warranty and service.
Customer Support
Please do NOT return the Post Hole Digger without first contacting the Customer Support Department at
bbt@bbta.com.au.
If you have difficulty assembling this product or have any questions regarding the controls, operation, or
maintenance of this Post Hole Digger, please contact our Customer Support Department.
SAVE THESE INSTRUCTIONS
All manuals and user guides at all-guides.com

3
WWW.BBTA.COM.AUBBT-PHD-71CC
TABLE OF CONTENTS
Page(s)
To The Owner.......................................................................................................................2
Customer Support................................................................................................................2
TABLE OF CONTENTS .............................................................................................. 3
IMPORTANT SAFETY INFORMATION ...................................................................4-7
Additional Information and Potential Changes.................................................................4
Key to Symbols.....................................................................................................................5
Engine Safety Precautions...................................................................................................7
Burns and Fires.....................................................................................................................7
PARTS LOCATION..................................................................................................... 8
ASSEMBLING ........................................................................................................... 8
OPERATION.........................................................................................................9-11
Preparing Engine for Starting.............................................................................................9
Normal Operation..............................................................................................................10
Starting and Stopping Engine...........................................................................................10
SPECIFICATIONS..................................................................................................... 11
MAINTENANCE.................................................................................................12-13
Engine Maintenance.......................................................................................................... 12
Auger Maintenance........................................................................................................... 12
Transporting Your Earth Auger......................................................................................... 12
Long Term Storage............................................................................................................. 13
SERVICE, TROUBLESHOOTING AND REPAIR ........................................................ 14
Service.................................................................................................................................14
Troubleshooting.................................................................................................................14
WARRANTY & SERVICE ......................................................................................... 15
EXPLODED DIAGRAM & PARTS LIST.............................................................................16-17
YOU MAY ALSO LIKE ............................................................................................ 18
All manuals and user guides at all-guides.com

4
WWW.BBTA.COM.AU BBT-PHD-71CC
IMPORTANT SAFETY INFORMATION
Additional Information and Potential Changes
We reserve the right to discontinue, change, and improve our products at any time without notice or obligation
to the purchaser. The descriptions and sections contained in this manual were in effect at the time of printing.
Equipment described within this manual may be optional. Some illustrations may not be applicable to your
machine.
WARNING: Read and thoroughly understand all instructions in this manual and on the safety decals
before assembling or operating this Post Hole Digger. Failure to do so may cause serious injury or
death. Do not allow anyone to operate this Post Hole Digger who has not read this manual. As with
all power equipment, a Post Hole Digger can be dangerous if assembled or used improperly. Do
not operate this Post Hole Digger if you have any questions concerning its safe operation. To get
answers to any questions, call our Customer Support Department.
This SAFETY ALERT SYMBOL identifies important safety messages in this manual. Failure to follow
this important safety information may result in serious injury or death.
DANGER! This Post Hole Digger was built to be operated according to the safe operation practices in
this manual. As with any type of power equipment, carelessness or error on the part of the operator
can result in serious injury. This Post Hole Digger is capable of amputating hands and feet and throwing
debris. Failure to observe the following safety instructions could result in serious injury or death.
The following signals, words and meanings are intended to explain the levels of risk associated with this product.
DANGER indicates a hazardous situation which, if not avoided, will result in serious injury or
death.
WARNING indicates a hazardous situation which, if not avoided, could result in serious injury
or death.
CAUTION indicates a hazardous situation which, if not avoided, could result in minor or
moderate injury.
NOTE is important information about the proper use of your Post Hole Digger. Failure to
follow this instruction could result in damage to your Post Hole Digger or property.
All manuals and user guides at all-guides.com

5
WWW.BBTA.COM.AUBBT-PHD-71CC
IMPORTANT SAFETY INFORMATION
Key to Symbols
Symbol Description
READ THE OWNER’S MANUAL(S)
Read, understand and follow all instructions in the manual(s) before attempting to assemble
and operate.
FACE PROTECTION
Always wear safety goggles or safety glasses with side shields, or a face shield when
operating this product as well as ear protection.
WEAR GLOVES
Always wear non-slip, heavy-duty protective gloves when operating this product.
WEAR SAFETY FOOTWEAR
Always wear non-slip steel-toed safety footwear when operating this product.
BEWARE OF FLYING OBJECTS
Danger of eye injury. Wear safety glasses.
BYSTANDERS
Keep bystanders, helpers and children at least 15 metres away.
NO FIRE
No unprotected source of flame, no smoking.
BEWARE OF HAZARDOUS GASES
Never run an engine indoors or in a poorly ventilated area. Engine exhaust contains carbon
monoxide.
Protect the equipment from rain and damp.
Take care of mechanical hazards.
WARNING! Your Responsibility—Restrict the use of this power machine to persons who read, understand and follow
the warnings and instructions in this manual and on the machine.
SAVE THESE INSTRUCTIONS!
15M
All manuals and user guides at all-guides.com

6
WWW.BBTA.COM.AU BBT-PHD-71CC
PLEASE READ THIS SECTION CAREFULLY. Operate the auger according to the safety instructions and
recommendations outlined here and inserted throughout this manual. Anyone who uses this auger must
read the instructions and be familiar with the controls.
IMPORTANT SAFETY INFORMATION
This symbol points out important safety instructions which, if not followed, could
endanger your personal safety. Read and follow all instructions in this manual before
attempting to operate this equipment.
• Do not carry the auger powerhead between holes with the engine running.
• The auger should not rotate when the engine is idling.
• Always keep hands, feet, hair and loose clothing away from any moving parts on the engine and
auger.
• Do not allow children to operate this power auger. Do not allow adults to operate the auger
without proper instruction.
• Do not operate any power equipment under the influence of alcohol, drugs or medication.
• Ensure all screws, nuts and bolts are tight.
• Ensure engine is turned off, cooled and spark plug wire is removed from spark plug before any
repairs are attempted.
• Temperature of muffler and nearby areas may be hot. Avoid touching these areas.
• Never run engine indoors or in an enclosed area. Engine exhaust contains carbon monoxide, an
odourless and deadly gas.
• If the auger will not turn in the hole, turn engine off and allow to cool before attempting to
remove it manually.
• Do not let persons who do not fully understand the manual thoroughly to operate the auger.
• When operating the auger make sure to keep bystanders a minimum of 15 metres away.
WARNING
All manuals and user guides at all-guides.com
all-guides.com

7
WWW.BBTA.COM.AUBBT-PHD-71CC
IMPORTANT SAFETY INFORMATION
Engine Safety Precautions
Warning Carbon Monoxide Poisoning
All engines contain carbon monoxide in their exhaust.
Carbon monoxide is a deadly, colourless, tasteless, odourless
gas which may be present even if you do not smell or see
any engine exhaust. Levels of carbon monoxide, which
can be deadly, can be present for days in an enclosed area
that has poor ventilation. Any level of carbon monoxide, if
inhaled, can cause headaches, drowsiness, nausea, dizziness,
confusion and eventually death. If you experience any
of these symptoms, seek fresh air and medical attention
immediately.
Preventing Carbon Monoxide Poisoning
• Never run engine indoors.
• Carbon monoxide can reach dangerous levels very
quickly.
• Never run engine outdoors where exhaust fumes may
be pulled into a building.
• Never run engine outdoors in a poorly ventilated area
where the exhaust fumes may be trapped and not easily
taken away. (Examples include: in a large hole or areas
where hills surround your working area.)
• Never run engine in an enclosed or partially enclosed
area. (Examples include: buildings that are enclosed on
one or more sides, under tents, carports or basements.)
• Always run the engine with the exhaust and muffler
pointed in the direction away from the operator.
• Never point the exhaust muffler towards anyone.
People should always remain a safe distance away from
the operation of the engine and its attachments.
Petrol Fires and Handling Fuel Safely
Fuel and fuel vapours are highly flammable. Never use fuel
where a spark or flame may be present. Never use fuel where
a potential source of ignition could occur. (Examples include:
hot water systems, clothes dryer or electric motors, etc.)
Keep flames and sparks away from engine and fuel to
prevent fires. Fuel fires spread very quickly and are highly
explosive.
Prevention of Petrol Fires
• Never fill your fuel tank with fuel indoors. (Examples
include: garage, shed, house, porch, etc.)
• Always fill fuel tank outside in a well ventilated area.
• Never remove the fuel cap or add fuel with the engine
running. Stop engine and allow to cool before filling.
• Never drain fuel from engine in an enclosed area.
• Always wipe up excess (spilled) fuel from engine before
starting. Clean up spilled fuel immediately.
• Allow spilled fuel to dry, after wiping and before
starting.
• Allow fuel fumes/vapours to escape from the area
before starting engine.
• Test the fuel cap for proper installation before starting
and using engine.
• Always run the engine with fuel cap properly installed
on the engine.
• Replace fuel cap if it allows fuel to spill or leak.
• Never smoke while refilling engine fuel tank.
• Prevent fire and explosion caused by static electric
discharge. Use only non-metal, portable approved fuel
containers.
• Do not store engine with fuel in fuel tank indoors. Fuel
and fuel vapours are highly explosive.
• When storing, screw down fuel cap vent tightly.
• Never pour fuel from engine fuel tank.
• Never siphon fuel by mouth to drain fuel tank.
• Always have an adult fill the fuel tank.
• Never allow an adult or anyone under the influence of
drugs or alcohol to fill engine.
• Never allow children to fill the engine.
Burns and Fires
The muffler, muffler guard and other parts of the engine
become extremely hot during the operation of the engine.
These parts remain extremely hot even after the engine has
stopped.
Prevention of Burns and Fires
• Never remove the muffler guard from the engine.
• Never touch the muffler guard as it is extremely hot and
will cause severe burns.
• Never touch parts of the engine that become hot after
operation.
• Always keep materials and debris away from muffler
guard and other hot parts of the engine to avoid fires.
Hot gases are a normal by-product of a functioning
catalytic converter. Follow all safety instructions to
prevent burns and fires.
CAUTION
All manuals and user guides at all-guides.com

8
WWW.BBTA.COM.AU BBT-PHD-71CC
ASSEMBLING
PARTS LOCATION
Set the auger on the output shaft, then insert the pin shaft, then lock it with cotter pin.
1. Recoil starter
2. Muffler
3. Spark plug
4. Choke lever
5. Handle
6. Air filter
7. Transmission complete
8. Pin shaft
9. Auger
10. Fuel tank cap
11. Assembly Trigger
12. Cotter pin
All manuals and user guides at all-guides.com

9
WWW.BBTA.COM.AUBBT-PHD-71CC
OPERATION
Preparing Engine for Starting
Fuel and Oil
Quality
To operate the engine, we recommend using 2 stroke fuel
and oil mix to ensure that the engine operates correctly
throughout the life of the engine.
Use unleaded regular 95 or 98 grade petrol only.
Mixture
Run earth auger with a 25:1 ratio
FUEL 2 STROKE OIL RATIO
2.5 litres 100ml 25:1
5 litres 200ml 25:1
Mixing Fuel and Filling Fuel Tank
Mixing Fuel
1. Fuel must be mixed in a container outside in a well
ventilated area.
2. Fill certified fuel container 1/4 full of recommended fuel.
3. Add recommended amount of 2 stroke oil.
4. Screw container cap on straight and tight.
5. Shake the container to mix fuel and oil.
6. Unscrew fuel cap slowly to vent, add the remainder of
fuel requirements.
7. Wipe away any spilled fuel or oil and allow to evaporate
before moving or transporting.
1. Shut-off engine and allow engine to completely cool
before refilling the fuel tank.
2. Move to a well ventilated area, outdoors, away from
flames and sparks.
3. Clean debris from area around the fuel cap.
4. Loosen fuel cap slowly. Place the cap on a clean, dry
surface.
5. Carefully add fuel without spilling.
6. Do not fill fuel tank completely full, allow space for fuel
to expand.
7. Immediately replace fuel cap and tighten. Wipe off
spilled fuel and allow to dry before starting engine.
Do not alter/modify engine or auger.
Avoid injury! Never alter or modify the engine from the factory. Serious injury or death may occur if engine is modified
or altered.
Avoid injury! When working on, or replacing parts for the engine or auger you must always disconnect spark plug wire
from the spark plug and keep it away from the spark plug.
Avoid injury! Always wear hearing protection while operating engine.
Avoid injury! Please do not start your auger until you have read the previous section of this manual. If you have read
these and follow the steps below to start your auger.
Avoid injury! Never store engine with fuel in the tank indoors. Fuel and fuel vapours are highly flammable.
Avoid injury! Never mix fuel and oil directly in engine fuel tank. Use only non-metal, portable approved fuel containers.
Avoid injury! An adult must always handle and fill the engine with fuel.
Avoid injury! Always handle fuel in a well ventilated area, outdoors, away from flames or sparks.
Filling Fuel Tank
CAUTION
IMPORTANT: this engine uses a fuel/oil mixture. Do not run on straight fuel only, as this will cause engine damage.
All manuals and user guides at all-guides.com

10
WWW.BBTA.COM.AU BBT-PHD-71CC
Normal Operation
1. The clutch will transfer maximum power after about
two hours of normal operation. During this break-in
period clutch slippage may occur. The clutch should be
kept free of oil or other moisture for efficient operation.
2. Drill holes without placing excessive body weight on the
unit. The auger operates most efficiently with a shaving
action caused by the weight of the unit itself.
3. Never run engine indoors. Exhaust fumes are deadly.
4. Do not use an earth auger in ice.
5. To attach auger to powerhead, align hole at top of
auger shaft with the output shaft hole. Insert 3/8-16 x
1-1/2” bolt and secure bolt with provided 3/8” bi-way
lock nut using a wrench.
Using the Screw Type, Manual Venting Fuel Cap
1. Your auger is equipped with a screw type, manual
venting fuel cap.
2. Before starting the engine, turn the screw in the top
of the fuel cap all the way open (anti-clockwise) to its
venting position. To ensure that fuel will not spill during
use, check that the fuel cap is screwed on tightly and the
fuel cap screw is in the venting position.
3. After using the auger and before putting away or
transporting it in a vehicle, screw the fuel cap screw on
(clockwise) tightly. This will prevent fuel from leaking
during storage. The fuel cap will not leak fuel during
storage if the cap is tight and the screw at the top is
tight.
Starting and Stopping Engine
• Move engine to a well ventilated area, outdoors, to
prevent carbon monoxide poisoning.
• Move to an area away from flames or sparks, to avoid
ignition of vapours if present.
• Remove all debris from air cleaner holes and fuel cap to
ensure proper air flow.
Cold Engine Start
Starting engine for first time, or after engine has cooled off,
or after running out of fuel.
1. Open fuel cap vent screw all the way (anti-clockwise).
2. Move choke lever to RUN or OFF position.
3. Prime unit until primer hose is filled with fuel.
4. Move choke lever to CHOKE or ON position.
5. Push rocker switch to the ON position.
6. Squeeze throttle control wide open with right hand.
Grasp starter handle with left hand and pull out slowly,
until it pulls slightly harder. Without letting starter
handle retract, pull rope with a rapid full arm stroke.
Let it return to its original position very slowly until unit
fires or runs. Repeat this step every time the starter rope
is pulled.
7. After onngine starts running, move choke lever to HALF
CHOKE position until unit runs smoothly.
8. Move choke lever to RUN or OFF position and move
throttle to desired speed.
9. To stop engine, push rocker switch to OFF position.
OPERATION
NOTE: The ends of the bolt should be flush with the
auger collar. Bolt head and thread end should never go
beyond earth collar.
NOTE: Choke must be in the RUN or OFF position when
pushing or using the primer bulb.
NOTE: CHOKE position is defined by moving the choke
lever as far to the ON position as possible.
NOTE: If engine fails to start after 5-6 pulls, push
primer one time and pull starter rope again.
NOTE: HALF CHOKE is defined when the choke lever is
between CHOKE and RUN or ON and OFF.
NOTE: Run at full throttle when possible. Do not let
unit idle for extended periods of time.
NOTE: When using the primer bulb, allow the bulb
to return completely to its original position between
pushes.
NOTE: When storing, place unit in an upright position.
If storing for prolonged periods of time in warm
weather, vent fuel cap to prevent fuel from leaking
from carburettor.
Avoid injury! Always handle fuel in a well ventilated
area, outdoors, away from flames or sparks.
Avoid injury! Do not start engine if fuel is spilled. Wipe
off excess fuel and allow to dry. Remove engine from
area to avoid sparks.
CAUTION
All manuals and user guides at all-guides.com

11
WWW.BBTA.COM.AUBBT-PHD-71CC
Warm Engine Start
1. Open fuel cap vent screw all the way (anti-clockwise).
2. Move choke lever to CHOKE or ON position.
3. Continue with Step 5 of Cold Engine Starting.
Hot Engine Start
1. Open fuel cap vent screw all the way (anti-clockwise).
2. Continue with Step 5 of Cold Engine Starting.
3. If engine does not fire, refer to Step 2 of Warm Engine
Starting.
DO NOT attempt to start engine in the following
ways:
• DO NOT use starting fluid.
• DO NOT spray flammable liquids or vapours into air
filter, carburettor or spark plug chamber.
• DO NOT remove spark plug and pull on starter rope.
Flammable fuel can spray out & ignite from a spark from
spark plug.
OPERATION
Avoid injury! Always handle fuel in a well ventilated
area, outdoors, away from flames or sparks.
Avoid injury! Do not start engine if fuel is spilled. Wipe
off excess fuel and allow to dry. Remove engine from
area to avoid sparks.
Avoid injury! If auger is mounted to engine, all safety
guards must be securely on to avoid serious injury.
Avoid injury! Starter rope can cause an unanticipated
jerk towards engine. Please follow instructions to avoid
injury.
Avoid injury! Never leave engine running while
unattended. Turn off after every use.
Avoid injury! Never carry powerhead and auger
between holes while engine is running.
CAUTION
NOTE: CHOKE position is defined by moving the choke
lever as far to the ON position as possible.
Avoid injury! Make sure the unit is in a stable position
before pulling the starter handle.
Avoid injury! When the unit starts to fire or run, release
the throttle control momentarily with your right hand
and return your left hand to the handlebar position
to maintain control and stability of the unit with both
hands.
WARNING
SPECIFICATIONS
Model XYEA50
Engine Model XY1E50F-1
Engine Type Forced Air-cooled 2- Stroke
Displacement 71cc
Max. Output 2.0kW
Fuel Fuel And Oil Mixture(25:1)
Fuel Tank Capacity 0.8 L
Ignition System C.D.I.
Starting System Recoil
Gear Ratio 30:1
Max. Engine Speed 8500 r/min
Clutch Engine Speed 3700 r/min
Idle Engine Speed 2900 r/min
Auger Speed 0-280 r/min
Spark plug type /model L7RTC/TORCH
Specifications subject to change without prior notice.
All manuals and user guides at all-guides.com
all-guides.com

12
WWW.BBTA.COM.AU BBT-PHD-71CC
MAINTENANCE
Auger Maintenance
1. The gear case has grease installed at the factory. It is
recommended that once a year, the gear case be split
and the grease level checked. Add grease only if level of
grease is below top of the gears.
DO NOT OVERFILL.
2. Keep all screws, nuts, and bolts tight.
3. For cold weather operation, store the unit in a cool
environment. Transferring the unit from a warm
place to a cold place can cause a build up of harmful
condensation.
4. If blade performance decreases, turn unit off and
disconnect spark plug wire. Carefully inspect cutting
edge of the blade for any signs of wear. If blades
show any of these signs, they need to be sharpened or
replaced.
Engine Maintenance
Cooling Fins
Cooling fins, air inlets and linkages must be free from any
debris before each use.
Air Filter
Never run engine without air filter properly installed.
Added wear and engine failure may occur if air filter is not
installed. Service air filter every 3 months or after 20 hours of
operation. Clean filter daily in extremely dusty conditions.
Steps for Cleaning Air Filter
1. Wash in warm water with mild soap until dirt and debris
are removed. Press filter when washing, do not twist.
2. Rinse in warm water until soap and dirt are removed.
3. Dry filter by wrapping in a clean cloth and pressing filter
until it is dry.
4. Apply oil to the entire filter.
5. Remove excess oil.
6. Attach the filter and air cleaner cover to the engine.
Spark Plug
The recommended spark plug is a NGK BM6A which cross
references to a Champion CJ8.
1. Check spark plug after every 50 hours of operation.
2. Disconnect the spark plug cap, and clean any debris
from around the spark plug area.
3. Remove spark plug and replace if any of the following
occur; pitted electrodes, burned electrodes, cracked
porcelain, or deposits around electrodes.
4. After analysis, seat spark plug and tighten with spark
plug wrench.
• Reinstall original spark plug, tighten additional 1/2 turn.
• Installing new spark plug, adjust spark plug gap to .030”
and tighten additional 1/8 – 1/4 turn .
Transporting Your Earth Auger
1. Never transport engine inside an enclosed space or
vehicle. Fuel or fuel vapours may ignite causing serious
injury or death.
2. If fuel is present in the fuel tank, transport in an open
vehicle in an upright position.
3. If an enclosed vehicle must be used, remove fuel into an
approved fuel container. DO NOT siphon by mouth.
4. Run engine to use up the fuel in the carburettor and
fuel tank. Always run engine in a well ventilated area.
5. Wipe away any spilled fuel from engine and auger.
Allow to dry.
To prevent accidental starting:
Avoid injury! Temperature of muffler and nearby areas
may exceed 65°C, avoid these areas.
Avoid injury! Check auger often for loose nuts and
bolts. Keep these items tightened.
Avoid injury! Never store engine with fuel in the tank
inside a building. Potential sparks may ignite fuel or
fuel vapours.
Avoid injury! An adult must always do maintenance
and repair on engine and auger.
Avoid injury! Engine must be shut-off, cool, and spark
plug wire removed before any repair or maintenance
can be done.
CAUTION
NOTE: Loose spark plug may overheat and damage
engine. Over tightened spark plug may damage
threads in the cylinder head.
Carburettor: Never tamper with factory setting of the
carburettor.
All manuals and user guides at all-guides.com

13
WWW.BBTA.COM.AUBBT-PHD-71CC
Long Term Storage
If your auger will not be used for more than one month,
prepare it for long term storage.
Steps for Long Term Storage
1. Add fuel stabiliser according to manufacturer’s
instructions.
2. Run engine for 10-15 minutes to ensure that the stabiliser
reaches the carburettor.
3. Remove the remainder of the fuel from the fuel tank
into an approved fuel container.
4. Remove auger from powerhead and apply a thin layer
of grease to the output shaft.
5. Remove all debris from auger and powerhead (engine).
6. Store auger and powerhead (engine) in a vertical
position.
MAINTENANCE
Avoid injury! To avoid injury or death, never siphon
fuel by mouth.
Avoid injury! Never store auger with fuel in the fuel
tank inside an enclosed area or building.
To prevent accidental starting:
Avoid injury! Engine must be turned off and cooled,
spark plug wire must be removed from spark plug
before checking and adjusting engine or before any
repair or maintenance can be done.
Avoid injury! An adult must always do maintenance
and repair on engine and auger.
CAUTION
All manuals and user guides at all-guides.com

14
WWW.BBTA.COM.AU BBT-PHD-71CC
SERVICE, TROUBLESHOOTING AND REPAIR
Service
We build quality and durability into the design of our products; but no amount of careful design by us, and careful
maintenance by you, can guarantee a repair-free life for your auger. Most repairs will be minor and easily fixed by following
the suggestions in the troubleshooting guide in this section.
The guide will help you pinpoint the causes of common problems and identify remedies.
A parts catalogue is included in this section.
Troubleshooting
PROBLEM POSSIBLE CAUSE REMEDY / ACTION
Engine will not start 1. Power switch off 1. Flip switch to ON position
2. Spark plug wire disconnected 2. Connect spark plug wire to spark plug
3. Out of fuel 3. Refuel
4. Spark plug wet, faulty or improperly gapped 4. Clean, replace or gap spark plug
5. Throttle control not held wide open 5. Hold throttle control wide open when pulling
recoil handle
6. Fuel line hose not positioned in bottom of fuel tank 6. Push fuel line down into fuel in fuel tank
Engine runs rough,
floods during
operation
1. Dirty air filter 1. Clean or replace air filter
2. Choke partially engaged 2. Turn off choke
3. Carburettor out of adjustment 3. Call factory
Engine is hard to start 1. Stale fuel 1. Drain old fuel and replace with fresh. Use fuel
stabiliser at end of season
2. Spark plug wire loose 2. Make sure spark wire is securely attached to
spark plug
3. Dirty carburettor 3. Clean carburettor, use fuel stabiliser
4. Throttle control not held wide open 4. Prime unit 3 more times, then hold throttle
wide open when pulling recoil handle
Engine misses or lacks
power
1. Clogged fuel tank 1. Remove and clean
2. Clogged air filter 2. Clean or replace
3. Carburettor out of adjustment or bad 3. Call factory
4. Spark plug wet, faulty or improperly gapped 4. Clean, replace or gap spark plug
Engine runs, then
quits
1. Fuel cap not venting 1. Open manual venting fuel cap screw all the
way open (anti-clockwise)
2. Plugged fuel filter 2. Clean or replace
3. Carburettor out of adjustment or bad 3. Call factory
Engine revs too high 1. Carburettor out of adjustment 1. Call factory
Auger turns at idle 1. Idle speed too high 1. Adjust idle speed lower
2. Broken clutch spring 2. Replace spring
Auger turns, but has
no power
1. Choke on 1. Turn off choke after engine is running
2. Carburettor out of adjustment 2. Call factory
3. Broken transmission 3. Call factory
4. Worn clutch shoes 4. Replace clutch shoes and spring
5. Worn engine lower seat 5. Call factory
Auger jumps 1. Blade damaged 1. Replace with new blade
Auger cuts slowly 1. Dull blade 1. Buy new blade, or have blade sharpened at
factory
2. Damaged fishtail point 2. Replace fishtail point
All manuals and user guides at all-guides.com

15
WWW.BBTA.COM.AUBBT-PHD-71CC
WARRANTY & SERVICE
Warranties
Bigger Boyz Toyz offer a 1-year parts warranty on all products used for domestic use from the date of purchase.
For all commercial use, a 3-month parts warranty period applies, unless specified in the item listing. All conditions
below are based upon the product being faulty or not performing as described. In the instance where a return
is required, the purchaser is liable for any shipping cost. Warranties will only be determined by a Bigger Boyz
Toyz Technician upon inspection.
Warranties do not cover accidents, misuse, neglect, natural disaster or act of God or other external causes, or
damage caused by operating the equipment in a manner that is not described in the instructions.
Our products come with guarantees that cannot be excluded under the Australian Consumer Law. You are entitled
to a replacement or refund for a major failure and for compensation for any other reasonably foreseeable loss or
damage. You are also entitled to have the goods repaired or replaced if the goods fail to be of acceptable quality
and the failure does not amount to a major failure.
Spare Parts
Spare parts are available. Please see our website (www.bbta.com.au) or contact us at bbt@bbta.com.au for more
details.
All manuals and user guides at all-guides.com

16
WWW.BBTA.COM.AU BBT-PHD-71CC
EXPLODED DIAGRAM & PARTS LIST
All manuals and user guides at all-guides.com
all-guides.com

17
WWW.BBTA.COM.AUBBT-PHD-71CC
EXPLODED DIAGRAM & PARTS LIST
NO SKU DESCRIPTION QTY
1SP-PHD-71CC-001 GAS ENGINE, 71CC 1
2SP-PHD-71CC-002 HANDLEBAR ASSEMBLY 1
3SP-PHD-71CC-003 TRANSMISSION COMPLETE 1
4SP-PHD-71CC-004 TRIGGER ASSEMBLY 1
5SP-PHD-71CC-005 BOLT PPH 10-24×16 1
6SP-PHD-71CC-006 THROTTLE CABLE 1
7SP-PHD-71CC-007 BOLT HH 1/4"-20×19 4
8SP-PHD-71CC-008 GEAR CASE TOP 1
9SP-PHD-71CC-009 CLUTCH DRUM 1
10 SP-PHD-71CC-010 BALL BEARING DOUBLE LIP R12-2RS 3
11 S P-PH D -71C C- 011 GEAR 7T PINION THREADED 1
12 SP-PHD-71CC-012 SNAP RING Φ19 2
13 SP-PHD -71CC-013 DOWEL PIN STEEL 1
14 SP-PHD-71CC-014 GEAR 44T 1
15 SP-PHD-71CC-015 GASKET 1
NO SKU DESCRIPTION QTY
16 SP-PHD-71CC-016 BALL BEARING R10 2
17 S P- PHD -71C C- 017. 2 GEAR 48T 1
17 S P- PHD -71C C- 017. 3 GEAR 10T 1
18 SP-PHD-71CC-018 GEAR CASE BOTTOM 1
19 SP-PHD-71CC-019 SHAFT OUTPUT 7/8" 1
20 SP-PHD-71CC-020 BOLT HEX SKT HD 1/4"-20×38 2
21 SP-PHD-71CC-021 BOLT HEX SKT HD 1/4"-20×50 4
22 SP-PHD-71CC-022 EARTH AUGER 10" 1
23 SP-PHD-71CC-023 BOLT HEX SKT HD M8×50 1
24 SP-PHD-71CC-024 NUT HEX NYLOC M8 1
25 SP-PHD-71CC-025 BOLT HEX SKT BUTTON HD M6×18 4
26 SP-PHD-71CC-026 NUT HEX FLANGE LOCK M6 4
27 SP-PHD-71CC-027 EARTH BLADE 10" (SR) 2
28 SP-PHD-71CC-028 FISHTAIL POINT SHARPENED 1
SKU DESCRIPTION QTY
SP-PHD -71CC- 001.1 CRANKCASE AND CYLINDER BLOCK 1
SP-PHD-71CC-002.1 SPARK PLUG 1
SP-PHD -71CC- 003.1 VALVE, COMPRESSION RELEASE 1
SP-PHD -71CC- 004.1 HALFMOON KEY, FLYWHEEL 3×5.9×13 1
SP-PHD-71CC-005.1 F LY WH EE L, MAGNET O 1
SP-PHD -71CC- 006.1 NUT HEX FLANGE M8 1
SP-PHD-71CC-007.1 WASHER ¬8.4×16×1.5 2
SP-PHD -71CC- 008.1 CLUTCH ROTOR ASSEMBLY W/SPRING 1
SP-PHD -71CC- 009.1 WASHER, WAVE ¬10 2
SP-PHD-71CC-010.1 BOLT, SHOULDER 8×24 2
S P- PHD -71C C- 011.1 PIN, LOCATING ¬5×12.5 2
SP-PHD-71CC-012.1 MOUNT RING & SHROUD 1
SP-PHD -71CC- 013.1 BOLT W/WASHER HEX SKT HD M5×28 4
SP-PHD-71CC-014.1 IGNITION COIL 1
SP-PHD -71CC- 015.1 BOLT HEX SKT HD M4×20 2
SP-PHD -71CC- 016.1 WASHER, PLATE 4 2
S P- PHD -71C C- 017.1 WINDPIPE, INTAKE 1
SP-PHD -71CC- 018 .1 GASKET, INTAKE 1
SP-PHD -71CC- 019.1 BOLT W/WASHER HEX SKT HD M5×32 1
SP-PHD-71CC-020.1 BOLT W/WASHER HEX SKT HD M5×22 1
SP-PHD -71CC- 021.1 GASKET, CARBURETTOR 1
SP-PHD-71CC-022.1 CARBURETTOR ASSEMBLY 1
SP-PHD -71CC- 023.1 AIR FILTER ASSEMBLY 1
SP-PHD-71CC-024.1 BOLT W/ WASHER PPH M5×52 2
SP-PHD -71CC- 025.1 PLATE, REINFORCEMENT 1
SP-PHD -71CC- 026.1 FOAM, AIR FILTER 1
SP-PHD-71CC-027.1 COVER, AIR FILTER 1
SKU DESCRIPTION QTY
SP-PHD-71CC-028.1 GASKET, EXHAUST 1
SP-PHD -71CC- 029.1 WINDPIPE, EXHAUST 1
SP-PHD -71CC- 030.1 MUFFLER ASSEMBLY 1
SP-PHD -71CC- 031.1 BOLT W/WASHER PPH M5×12 2
SP-PHD -71CC- 031.1 WASHER, FL AT, 5 2
SP-PHD-71CC-033.1 BOLT HEX SKT HD M5×65 2
SP-PHD -71CC-34.1 COVER, MUFFLER 1
SP-PHD -71CC- 035.1 BOLT W/WASHER HEX SKT HD M5×12 1
SP-PHD -71CC- 036.1 RECOIL CLUTCH 1
S P- PHD -71C C- 037.1 PL ATE, RECOIL 1
SP-PHD -71CC- 038.1 RECOIL ASSEMBLY 1
SP-PHD -71CC- 039.1 BOLT W/WASHER HEX SKT HD M5×20 3
SP-PHD -71CC- 040.1 BOLT W/WASHER HEX SKT HD M5×25 1
SP-PHD -71CC- 041.1 SHROUD, ENGINE 1
SP-PHD-71CC-042.1 COVER, ENGINE SHROUD 1
SP-PHD -71CC- 043.1 BOLT W/WASHER PPH M5×16 1
SP-PHD -71CC- 044.1 BRACKET LOWER, GAS TANK 1
SP-PHD-71CC-045.1 BRACKET UPPER, GAS TANK 1
SP-PHD -71CC- 046.1 GAS TANK 1
S P- PHD -71C C- 0 47.1 FUEL LINE KIT ASSEMBLY 1
SP-PHD -71CC- 048.1 GAS CAP ASSEMBLY 1
SP-PHD -71CC- 049.1 CUSHION, RUBBER 2
SP-PHD-71CC-050.1 BOLT HEX FLANGE M5×18 4
SP-PHD-71CC-051.1 SHROUD, GAS TANK 1
SP-PHD-71CC-052.1 GASKET, MUFFLER 1
SP-PHD-71CC-053.1 SWITCH, ROCKER 1
All manuals and user guides at all-guides.com

Blowers
Lawn Mowers Chainsaw Sharpeners
YOU MAY ALSO LIKE
Chainsaws
COPYRIGHT © BIGGER BOYZ TOYZ AUSTRALIA PTY
Unit 2/3 Delta Place Albion Park Rail NSW 2527
BBT-PHD-71CC-MNL1802
All manuals and user guides at all-guides.com
This manual suits for next models
1
Table of contents
Other BBT Power Tools manuals

