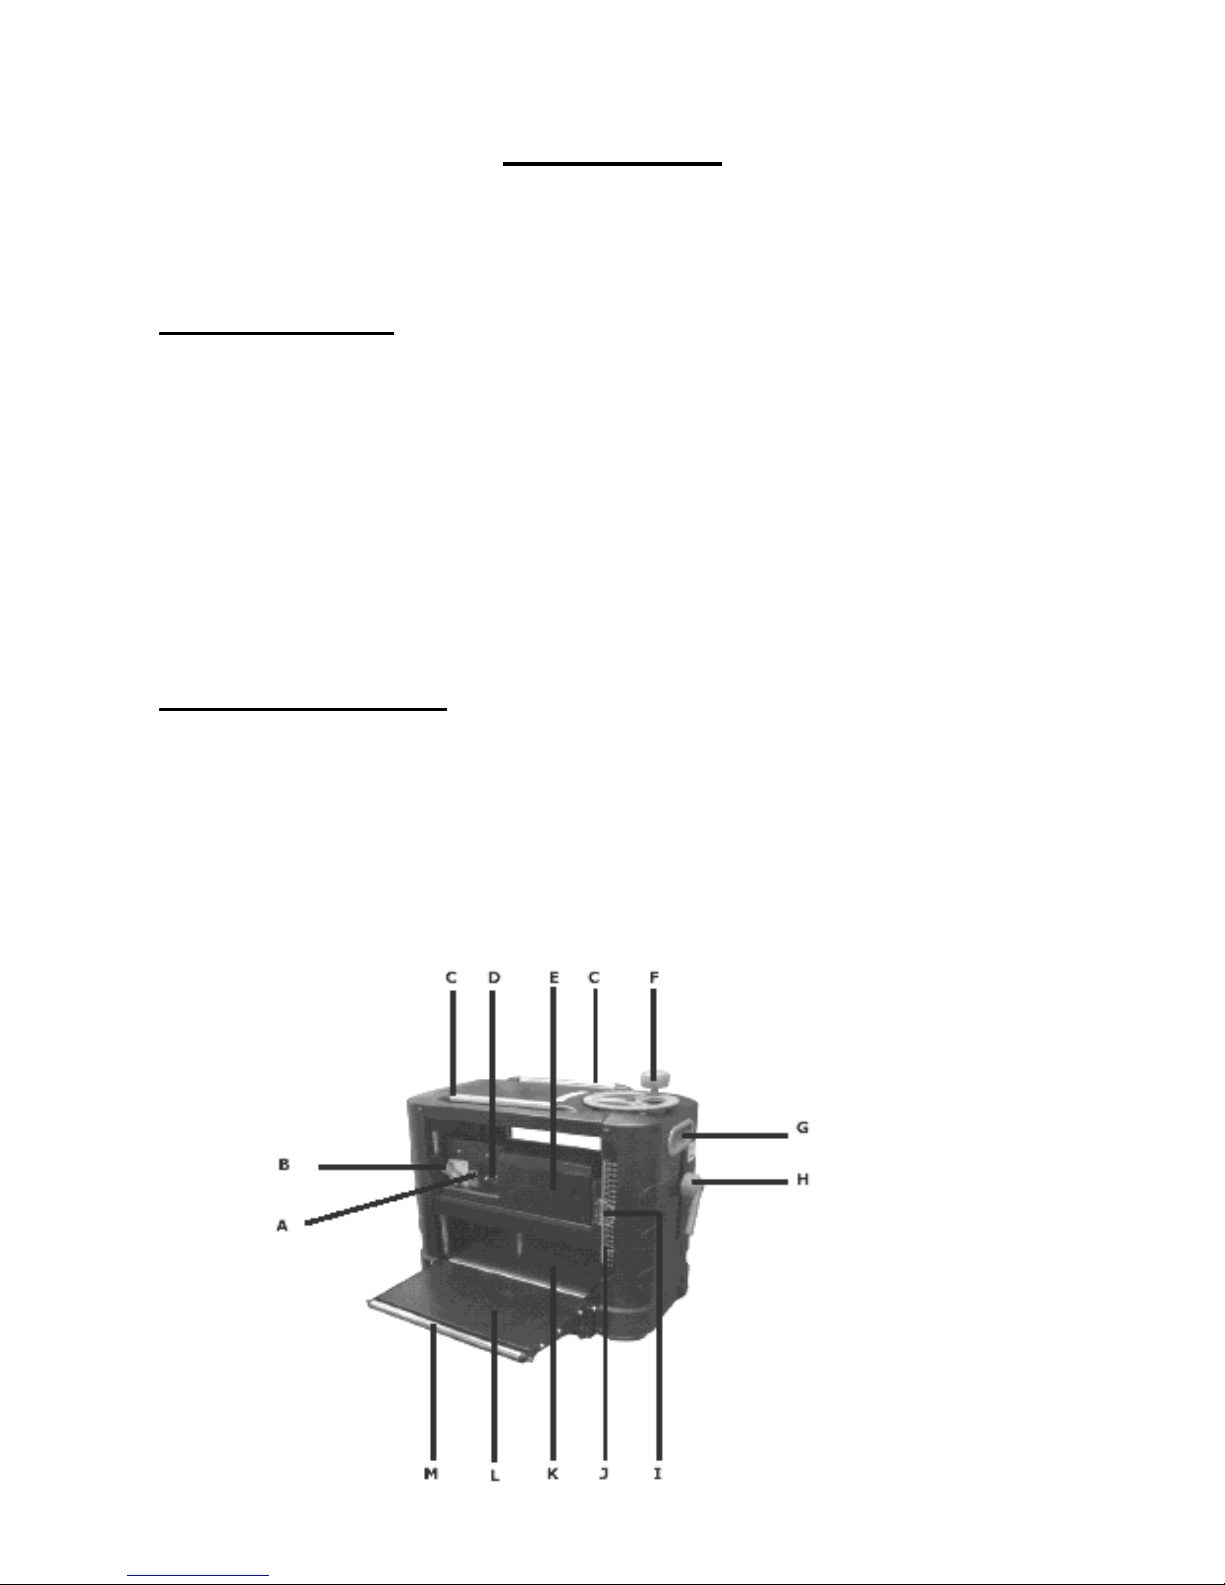
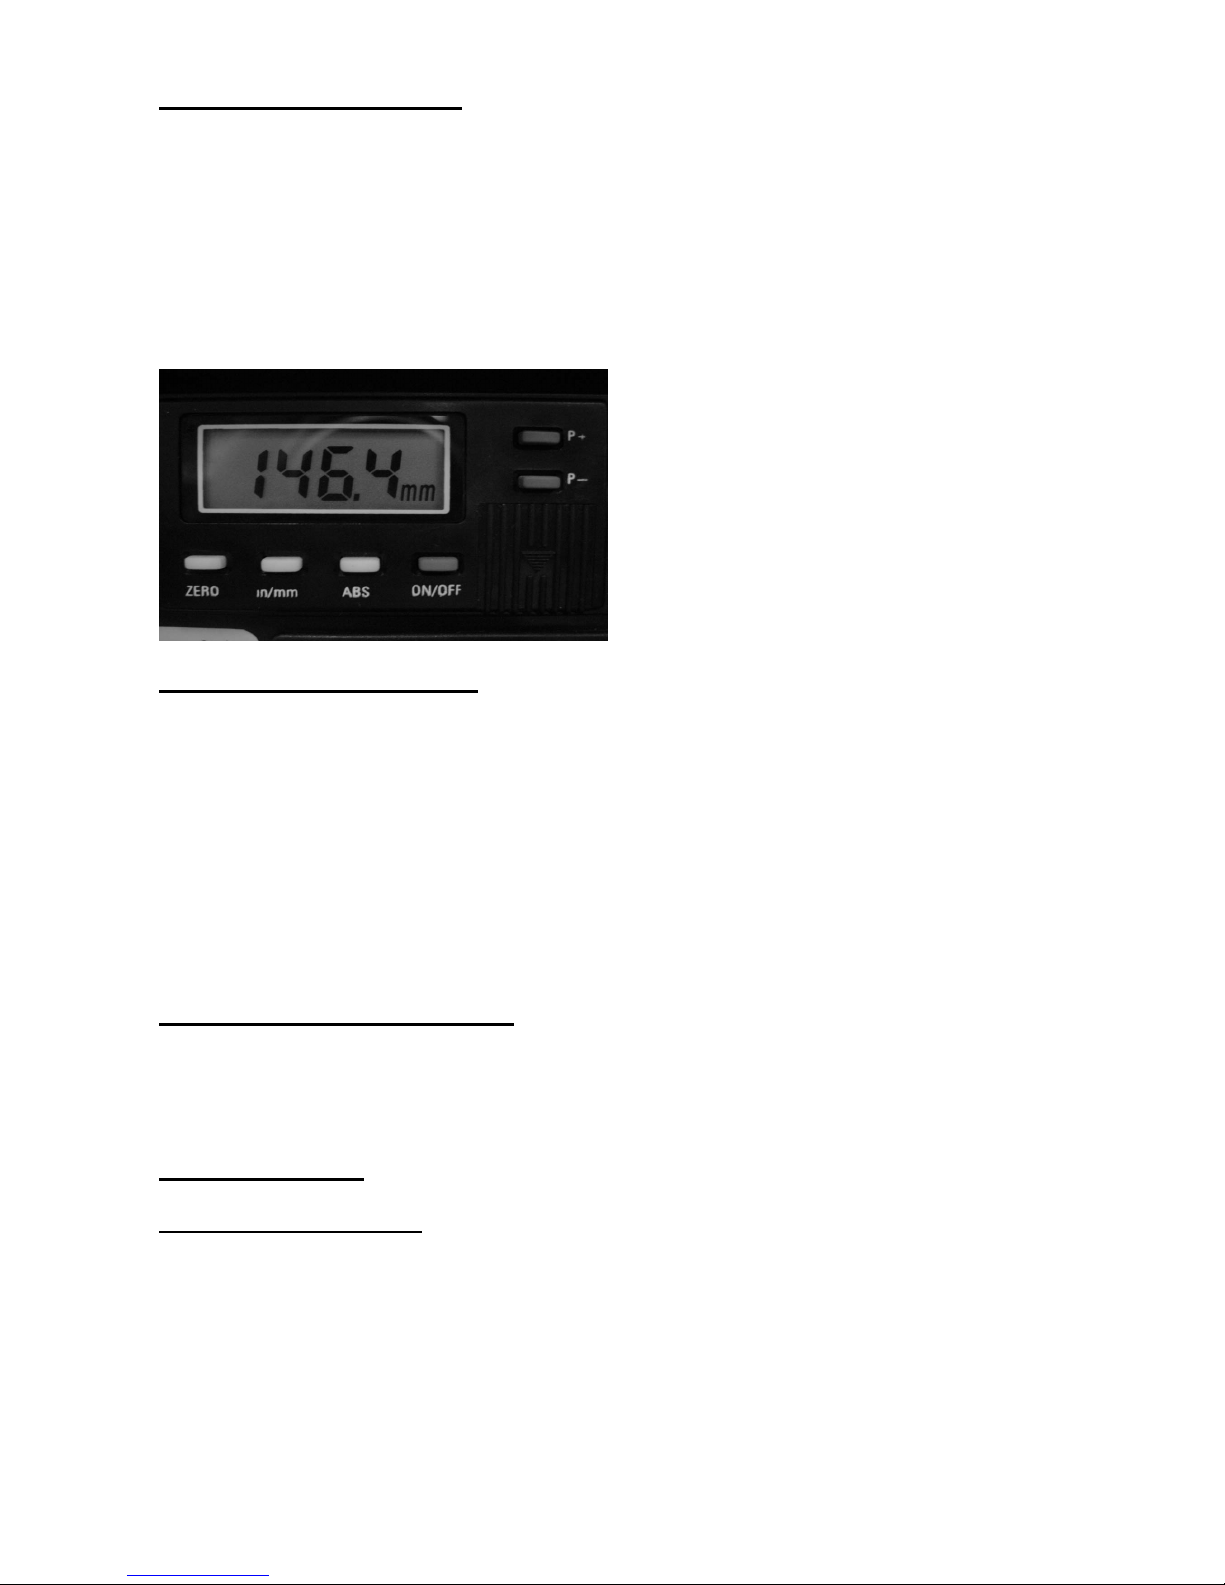
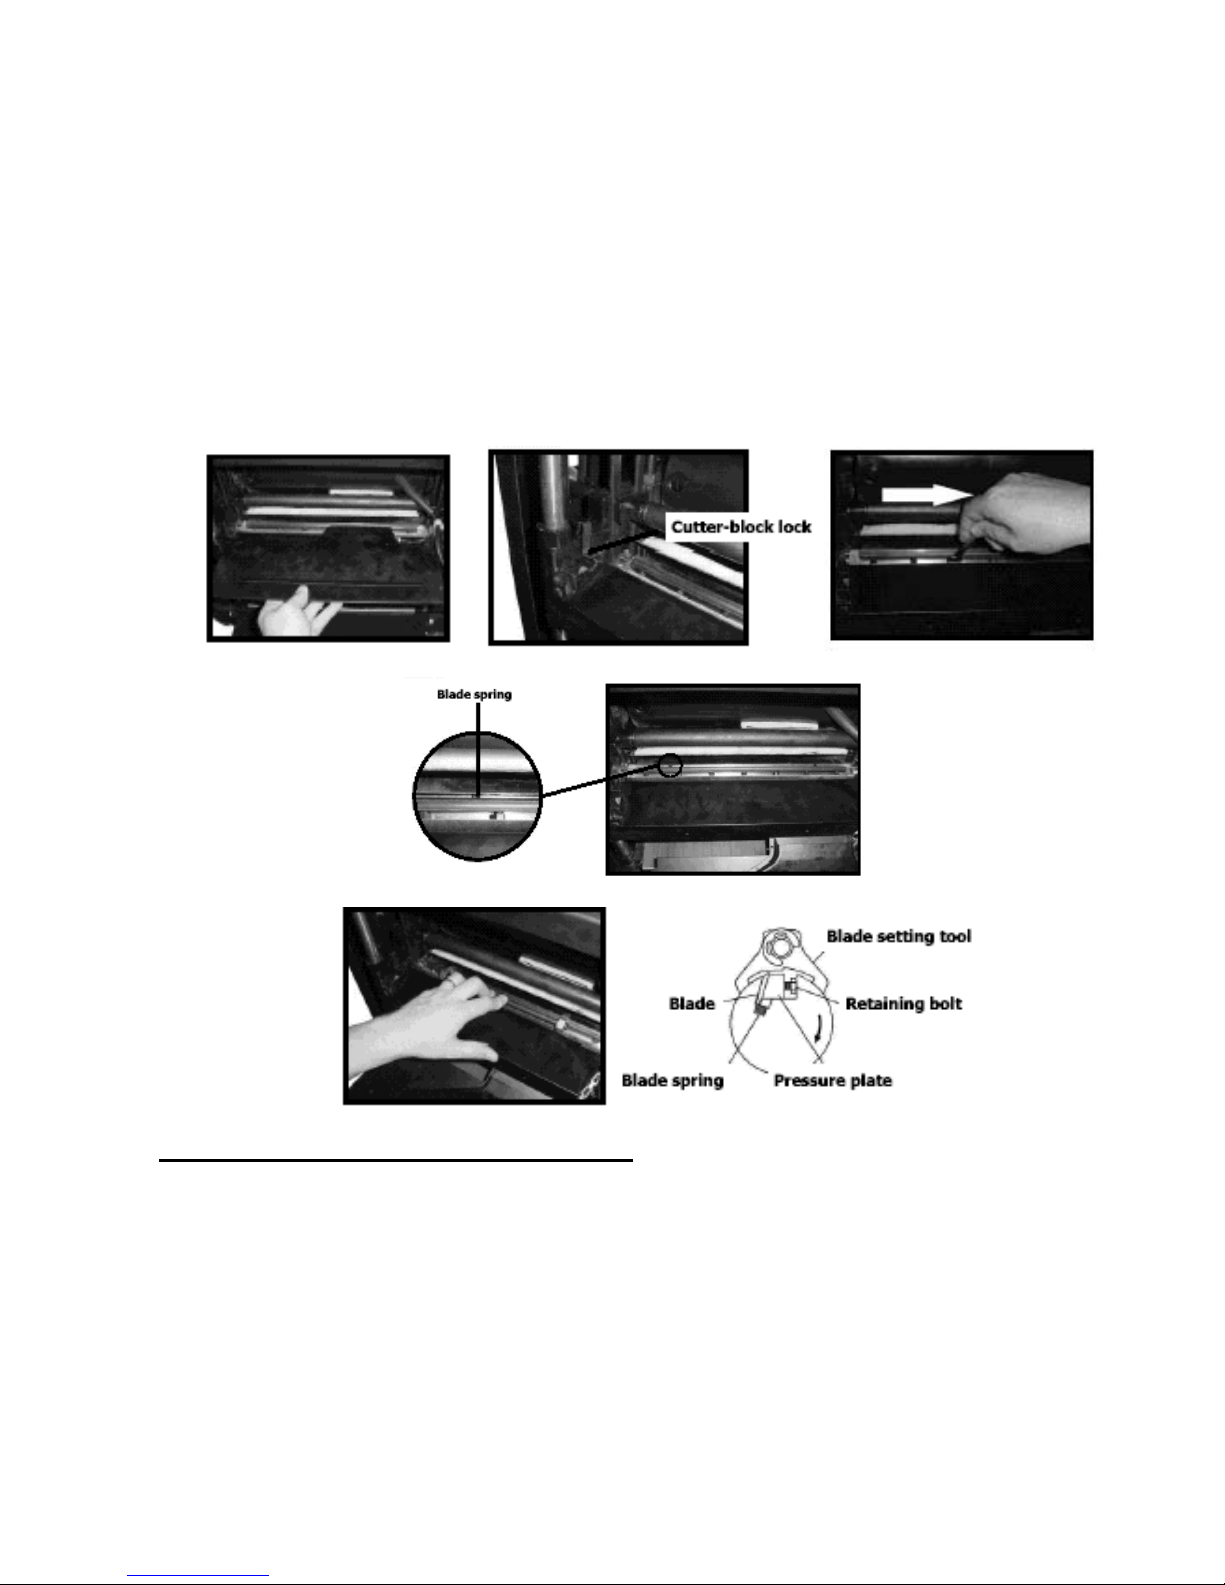
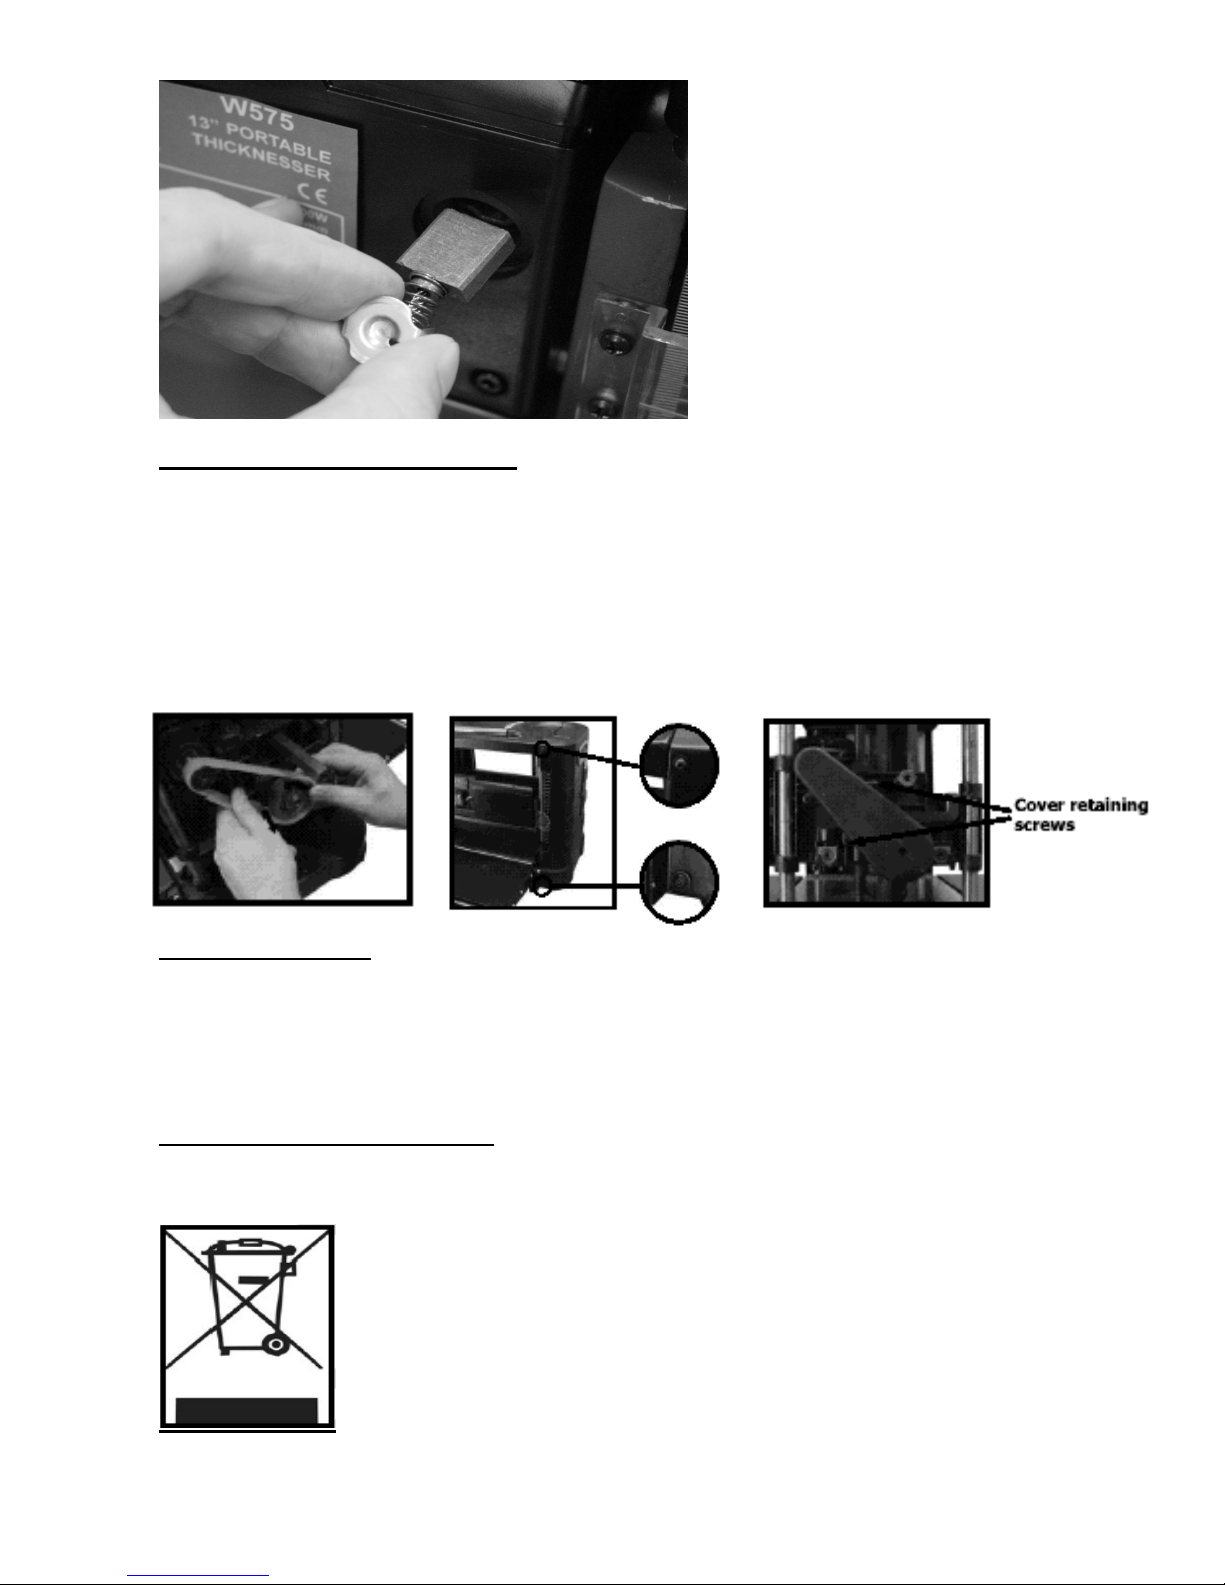
Charnwood W575 User manual

13” PORTABLE THICKNESSER
OPERATING INSTRUCTIONS
MODEL: W575
Charnwood, Cedar Court, Walker Road, Bardon,
Leicestershire, LE67 1TU
Tel. 01530 516 926 Fax. 01530 516 929

2
Introduction
To get the most out of your new portable thicknesser, please read through this manual and
safety instructions before use. Please also save the instructions in case you need to refer
to them at a later date.
Technical data
Voltage/frequency 230 V ~ 50 Hz
Power rating 1800 watts
No load speed 8000rpm
Maximum width 330 mm (13”)
Thicknessing capacity 4.2-150 mm
Planing depth 0-3 mm
Work table 360 × 195 mm
Feed-in speed 1 (slow) 4 m/min
Feed-in speed 2 (fast) 6 m/min
No. of blades 2
Extractor outlet 65mm / 100 mm dia.
Main components
A. On / Off Switch H. Height locking handle
B. Feed rate Control I. Scale indicator
C. Auxiliary Roller J. Scale
D. Motor Overload Switch K. Main bed
E. Motor L. In Feed bed
F. Height Adjust Wheel M. In feed roller
G. Carrying Handle

3
Accessories
A. Extraction port E. M6 x 30mm allen bolt
B. Height adjust wheel F. M6 x 20mm cross head screw , washer & spring washer
C. Height locking handle G. 3mm & 5mm allen key
D. Rubber foot H. Blade setting device
Special safety instructions
- For planing wood only.
- Never use the machine if the blade is not correctly locked in the blade housing.
- Never allow fingers or tools to get near the blade when machine is in use.
- Never try to plane across the grain.
Fitting the rubber feet (part#150)
- Place the machine on a level surface and carefully tip backwards to show the bottom of
the machine.
- Line up the rubber feet with the threaded section in each corner and push onto the
machine. Secure each foot in place using one of the M6 x 30mm allen bolts. Use the 5mm
allen key supplied to tighten (be careful not to overtighten as this may cause the casting to
crack).
- Carefully lift the thicknesser back upright and make sure it is level and stable.

4
Fitting the height adjust wheel (part#24)
- Remove the rubber bung from the centre of the wheel
- Place the wheel onto the shaft on top of the machine ensuring that the flat section on
the wheel lines up with the one on the shaft
- Using the M6 x 20mm crosshead screw, washer and spring washer secure the wheel
to the shaft.
- Refit the rubber bung
Fitting the height locking handle (part#17)
- Locate the allen bar (part#16) on the right hand side of the machine
- Fit the locking handle over the allen bar
- Secure in place using the remaining M6 x 30mm allen bolt and tighten using the 5mm
allen key
Fitting the extraction port (part#27)
- Remove the two allen bolts at the back of the machine
- Slide the extraction port into place, making sure to line up the allen bolt holes
- Refit the two allen bolts
- Fit the two M4 x 12mm cross head screws at the back of the extraction port to secure
in place
- Always ensure a suitable extractor is used when the extraction port is fitted to avoid
blockages, we recommend the Charnwood W690 or W790 1hp extractors.

5
Operating Instructions
Adjusting the depth of cut
- The height of the cutter on the scale is the size of the workpiece after it has passed
through the thicknesser. This height can also be viewed on the digital display
- Firstly ensure that the height locking handle (part#17) is unlocked
- Measure the size of your workpiece, then set the height to 1mm below the size of the
workpiece using the height adjustment wheel (part#24)
- Lock the cutter block in place using the height locking handle (part#17)
Turning the thicknesser on
- Connect the machine to a suitable power supply
- Press the switch on the front of the machine to the on position, the motor will start to
run
- You can set the feed speed by turning the speed adjustment knob ( part#51) on the
front of the panel. Slow speed is 4m/min, fast speed is 6 m/min. Only adjust this when
the cutter block is running at full speed.
- Feed your workpiece into the front of the thicknesser making sure it is placed flat on the
base of the machine. There are two spring loaded rubber coated feed rollers that will
feed the workpiece through the thicknesser automatically
- Once your workpiece has been fed through turn the machine off and measure the
height of the wood
- You can now repeat the above steps lowering the cutter height by up to 3mm at a time

6
Using the digital display
- Press the on/off button and the readout will appear in the digital display
- You can change the readout from metric to imperial by pressing the in/mm button
- By turning the height adjustment handle the readout will change to give the height of
the workpiece once it has passed through the thicknesser
- Alternatively you can press the ABS button, this will change the readout to zero. This
can be used once you have passed the workpiece through the thicknesser, you then
measure the size of the wood. If you now need to take 3mm off the workpiece you turn
the height adjustment wheel until the readout is –3mm. Feed the workpiece back
through and it will now be at the correct size
Setting the digital display
- The W575 thicknesser is fitted with a digital display to give an accurate height reading.
- Once you have passed your first workpiece through the thicknesser you should
measure the height and check that the digital readout is set correctly
- If it is not then you can recalibrate
- Press and hold the Zero button then press the P+ button. The word set will appear on
the display and start flashing
- To adjust the readout up or down press and hold the P+ or P- button. It will take a few
seconds for the readout to change.
- If you hold the button for several seconds the readout will gradually change quicker
- Once the readout is set correctly press the zero button and the ‘set’ will disappear
Thermal overload protection
- The motor is protected against overheating and burnout by a thermal overload switch
- If this happens then it is simply reset by pressing the thermal overload button on the
front of the control panel next to the on/off switch
Maintenance
Replacing the blades
- The blades on this thicknesser can be reground to give a longer life
- Loosen and remove the screws and bolts that hold the extraction port in place
- Slide the dustproof cover(part#29) forward so you can gain access to the cutter block
- Lower the cutter block using the height adjustment handle until you have easy access
to the cutter block
- Turn the cutter block until it is locked in the correct position to allow access to the
blades. Be careful as the blades are extremely sharp, we recommend you use safety
gloves

7
- There are 6 different lockable positions. Press the locking lever and turn the block until
it is in the correct position
- Loosen the seven blade screws (part#74)
- Remove the blade from the cutter block taking note of the direction the blade is facing
to ensure it is replaced the same way
- Place the new blade into the cutter block seating it on the two springs (part#75) and
making sure it is positioned centrally
- Sit the blade setting device onto the cutter block and press down so the blade is set to
the correct height
- Whilst holding down the blade setting device tighten up the seven blade screws
- Carry out the above steps for the second blade
- Once both blades are fitted slide the dustproof cover back over the cutter block and
refit the extraction port
Replacing the motors carbon brushes
- When the carbon brushes get below 4mm they will need to be replaced. Follow the
instructions below to check the brushes regularly and replace when necessary
- There are two brush covers (part#159) one is situated at the front of the machine and
the other is located from the rear with the cutter wound down to the bottom to give easy
access
- Using a flat screwdriver remove the brush cover, slide out the old brush and replace if
necessary
- Refit the brush cover

8
Replacing the drive belt (Part#95)
- Remove the height locking handle (part#17) and height adjustment wheel (part#2)
- Unscrew the four allen bolts that hold the right hand side panel in place
- Slide the panel upwards and remove
- Unscrew the two screws that hold the belt cover (part#96) in place and remove the
cover
- Rotate the cutter block pulley using the belt whilst slowly pulling the belt towards you.
The belt should gradually come off the pulley.
- Replace the new belt in the same way
General cleaning
- Remove dust and chips regularly from machine with a brush or compressed air. Check
that motor ventilation slots are not blocked.
- Lubricate all bearings and moving parts regularly with oil. Avoid getting oil on drive belt.
- Regularly remove sap and the like from the front and rear tables with household spirit or
petroleum.
Environmental information
You can help protect the environment! Follow local environmental regulations:
Dispose of unwanted electrical equipment at an approved refuse disposal centre.

9
Troubleshooting
Problem Possible cause Possible solution
Motor is slow or weak - voltage from source is - Request a voltage
low checkfromlocal
power company
- Windings are burned - Have the motor
out or open checked, repaired or
replaced
- NVR switch is defective - Have the NVR
checked, repaired or
replaced
- Circuit is overloaded - Do not use other
with appliances, lights appliances or
or other electrically electrically powered
powered equipment equipment on the same
circuit when using the
thicknesser
Motor regularly overheats - Voltage from source - Request a voltage check
Is low from the local power
company
- Dull blades - Replace the blades
- Sawdust inside machine - Clean out the
is blocking airflow thicknesser
- Feed rate too fast - Reduce the feedrate
- Too much material - Reduce the amount
being removed per pass of material being
removedperpass
Motor does not start -No power at mains - Check the mains
Supply supply
- Defective switch, motor - Have the machine
or mains lead inspected by a suitably
qualified person
- Overload has cut the - Leave the machine to
power to the motor cool for 10–15 minutes
Poor finish on work piece - Dull/ damaged blades - Resharpen or replace
Blade
- Blade blocked by - Clean the blades
Chipping’s or resin
- Too much material - Make more passes
being removed per pass with smaller cuts
- High moisture content - Dry out workpiece or
in work piece use a different piece
Un-parallel workpiece - Blades incorrectly set - Reset blades parallel
After cut

10
Charnwood W575 Parts List
Part no. Description Part no. Description
1. Flatwasher 47. Steel Ball
2. Pressure plate 48. Positioning spring
3. Lockingshaft 49. Hex bolt
4. Pin 50. Speed adjustment shaft
5. Screw 51. Speed adjustment knob
6. Bush 52. Hex bolt
7. Upper cover 53. Hex bolt
8. Locking bar 54. Spring washer
9. Roller 55. Flat washer
10. Key 56. Gear box cover
11. Bolt 57. Shaft circlip
12. Rotation label 58. Sprocket
13. Pin shaft 59. Hex bolt
14. Positioning shaft 60. Adjustable nut
15. Spring pin 61. Gear box support
16. Allen bar 62. Bearing
17. Height locking handle 63. Sleeve
18. Height adjust knob upper 64. Gearing
19. Screw 65. Gearing
20. Height adjust knob lower 66. Gear spindle
21. Rubber bung 67. Gear spindle
22. Cross head screw 68. Sprocket spindle
23. Spring washer 69. Sleeve
24. Height adjustment wheel 70. Sleeve
25. Cross head screw 71. gear
26. Flatwasher 72. Blade
27. Extraction port 73. Blade pressure plate
28. Foam guard 74. Blade screw
29. Dustproof cover 75. Spring
30. Screw 76.Cutter block
31. Gear 77.Pin
32. Gear 78.Drive wheel
33. Gear 79.Nut
34. Key 80.Circlip
35. Adjustable bar 81.Bearing
36 Bearing 82.Body
37 Washer 83.Cord clamp
38 Bearing 84.Spring washer
39. Gear box supporter 85.Dustproof plate
40. Gear bar 86.Nyloc nut
41. Flat washer 87.Adjustable nut
42. Cross head screw 88.Spring
43. Shaft circlip 89.Plate
44. Gear 90.Hex bolt
45. Speed adjustment bracket 91. Motor connection plate
46. Washer 92. Flat washer

11
93. Hex bolt 147. Hex bolt
94. Cross head screw 148. Flat washer
95. Drive belt 149. Transmission shaft
96. Belt cover 150. Rubber foot
97. Motor fixture bar 151. Oiled bearing
98. Indicator 152. Bag keep plate
99. Cross head screw 153. Bag
100. Bearing 154. Bearing
101. Circlip 155. Sel tapping screw
102. Positioning flange 156. Coil
103. Feed roller 157. Armature
104. Spring 158. Adjustable thread
105. Oil bearing 159. Carbon brush cap
106. Shaft circlip 160. Carbon brush
107. Sprocket 161. Carbon brush holder
108. Sprocket sleeve 162. Motor housing
109. Sprocket 163. Hex bolt
110. Bearing cover 164. Circlip
111. Hex bolt 165. Belt pulley
112. Nut 166. Cord
113. Washer 167. Self tapping screw
114. Hex bolt 168. Cord clamp
115. Extension table roller 169. Cord sleeve
116. Extension table 170. Control panel housing
117. Cross head screw 171. Cable protection ring
118. Connection plate 172. Self tapping screw
119. Nyloc nut 173. Cable protection ring
120. Screw 174. Motor cover
121. Worktable 175. Self tapping screw
122. Connection plate 176. Rear motor cover
123. Motor 177. Capacitor
124. Column sleeve 178. Switch
125. Stand plate 179. Self tapping screw
126. Column 180. Thermal overload protector
127. Adjustable thread 181. Nyloc nut
128. Pin 182. Plastic cover
129. Bevel gear 183. Anti reverse plate holder
130. Hex bolt 184. Anti reverse plate
131. Thread guard 185. Anti reverse plate base
132. Rail pressure bracket 186. Washer
133. Base
134. Allen bolt
135. Nut
136. Allen bolt
137. Band spring
138. Coil spring
139. Lower guard
140. Scale
141. Socket handle
142. Left housing
143. Cable clip
144. Cross head screw
145. Shaft circlip
146. Drive shaft cover

12
Charnwood W575 Exploded View Diagram
Table of contents
Other Charnwood Power Tools manuals