BCD microtechnique COVIDAIR S/T EASY User manual

COVIDAIR S/T Easy Quick Start Guide Page
1
Qu
ic
k
S
t
a
r
t
C
O
VI
D
A
IR
S/T
E
asy
E
n
g
li
sh
1 1 d
oc
x
/
B
C
D
/
30
04 2
0
20
COVIDAIR S/T EASY
Quick Start Guide
WARNING
The COVIDAIR device must always be used under the supervision of adoctor or amember of the
medical
profession trained in ventilation

COVIDAIR S/T Easy Quick Start Guide Page
2
Qu
ic
k
S
t
a
r
t
C
O
VI
D
A
IR
S/T
E
asy
E
n
g
li
sh
1 1 d
oc
x
/
B
C
D
/
30
04 2
0
20
Table of Content
1 Description
3
2 Easy using Covidair S/T
5
2 1 Switching ON the device
5
2 2 Switching OFF the device
5
2 3 Start and Stop ventilation
6
2 4 Locking and unlocking the touch screen 7
2 5 Navigation in menus and settings 8
2 5 1 Cockpit Page 9
2 5 2 Graphic Page
10
2 5 3 Ventilation Parameter Page
11
2 5 4 Alarms Page
13
2 5 5 Advanced Parameters Page
15
2 5 6 History Page
16
2 5 7 Display Brightness
17
2 5 8 WiFi Parameters
18

COVIDAIR S/T Easy Quick Start Guide Page
3
Qu
ic
k
S
t
a
r
t
C
O
VI
D
A
IR
S/T
E
asy
E
n
g
li
sh
1 1 d
oc
x
/
B
C
D
/
30
04 2
0
20

COVIDAIR S/T Easy Quick Start Guide Page
4
Qu
ic
k
S
t
a
r
t
C
O
VI
D
A
IR
S/T
E
asy
E
n
g
li
sh
1 1 d
oc
x
/
B
C
D
/
30
04 2
0
20
1 Descri tion
The following images describe the components of the COVIDAIR S/T device
1 Handle
2 Patient Inspiratory port
3 On / off button
4 Touchscreen
5 Humidification system (Option not deliverable)
6 Humidification output port
7 Humidification input port
8 SpO2 sensor connector
9 USB connectors (maintenance service only)
10 Ground connector
11 Power connector
12 Low flow oxygen inlet and inlet filter
13 Nameplate
1. Easy using Covidair S/T
Switching the device ON
The COVIDAIR device starts up as soon as the external power supply is connected The push button
flashes slowly (1 Hz) to signify that the device has started
If the device has been switched off displaying the graphical interface and the mains supply has
not been disconnected, press the push button to start it again
The device is ready to use when the touch screen displays the main screen The turbine blows at
idle (0 5l/s) to indicate that it is working properly
NOTE:
The display needs about 30 seconds to turn itself on
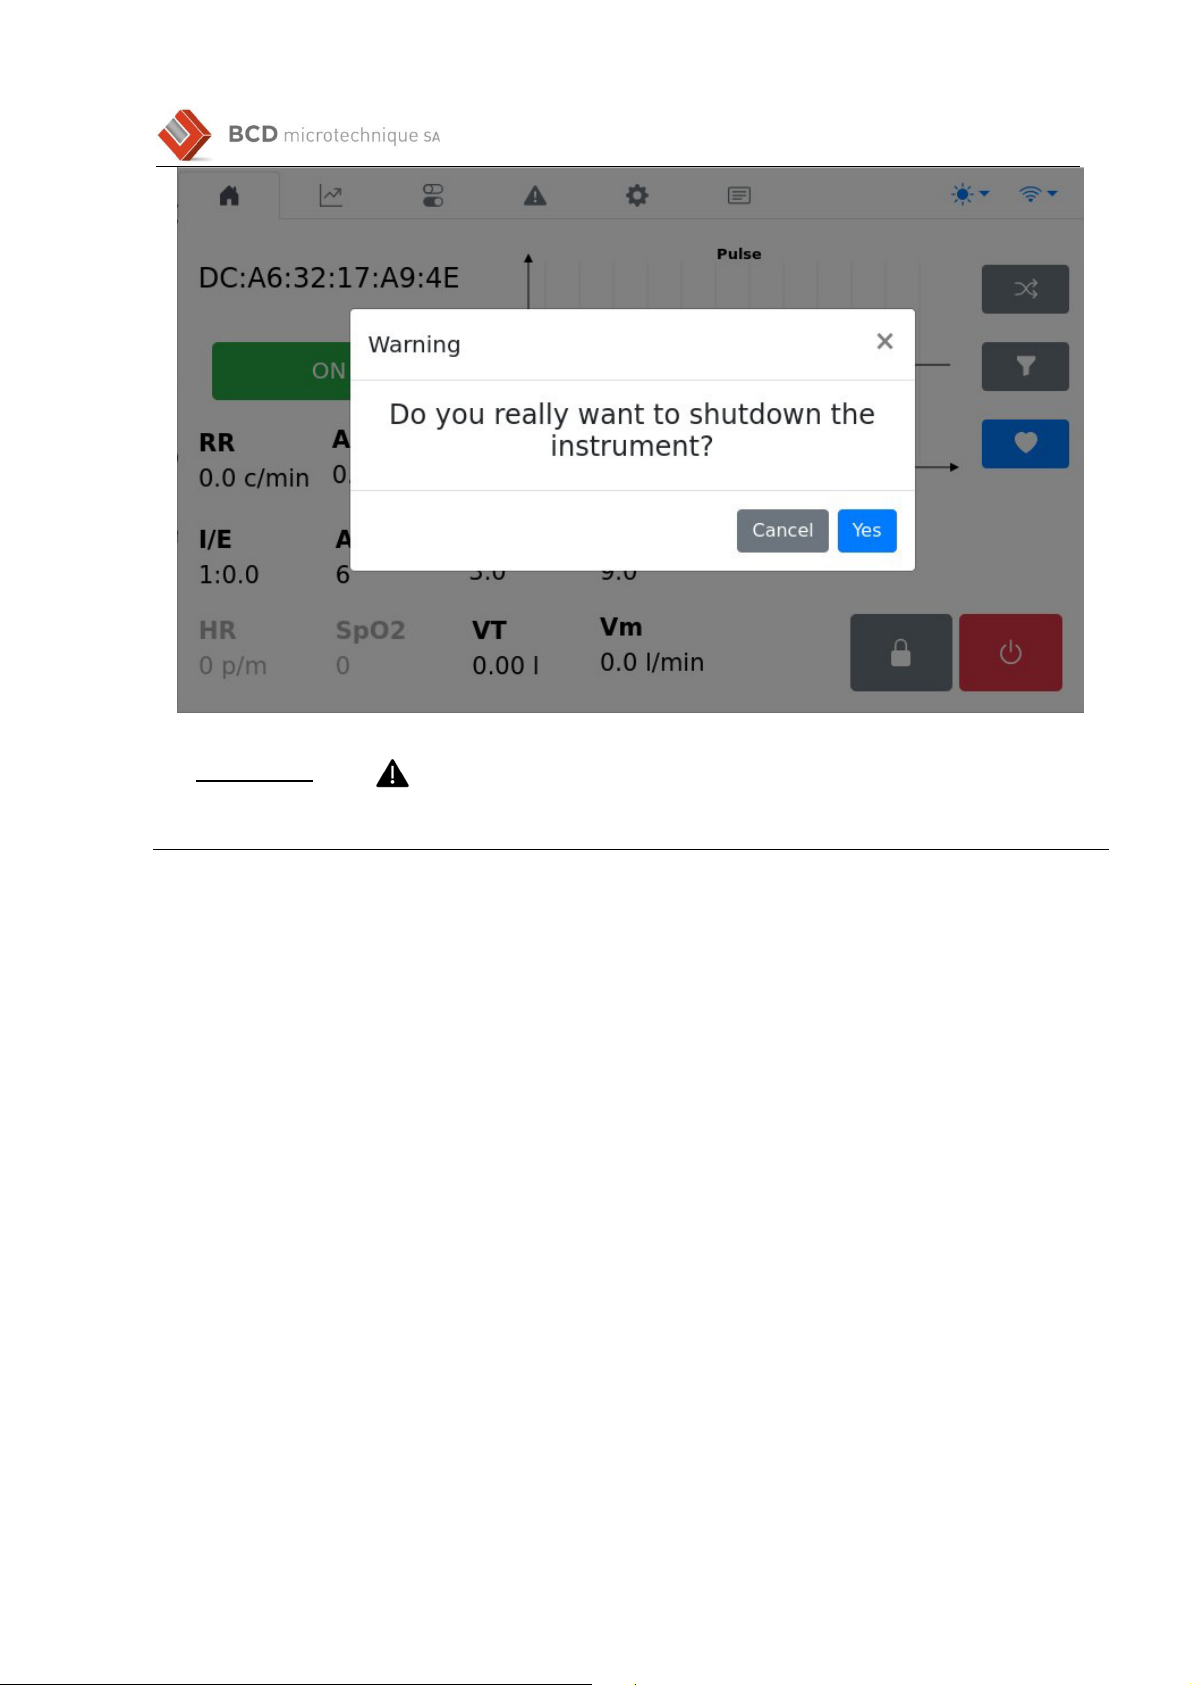
2.2. Switching the device OFF
To switch off the COVIDAIR device, press the button on the main screen A message will ask for
confirmation of the action The push button flashes quickly (5 Hz) to indicate that the device has
switched off
COVIDAIR S/T Easy Quick Start Guide Page
5
Qu
ic
k
S
t
a
r
t
C
O
VI
D
A
IR
S/T
E
asy
E
n
g
li
sh
1 1 d
oc
x
/
B
C
D
/
30
04 2
0
20
WARNING
• Always switch off the COVIDAIR device via the interface before disconnecting the external power
supply

COVIDAIR S/T Easy Quick Start Guide Page
6
Qu
ic
k
S
t
a
r
t
C
O
VI
D
A
IR
S/T
E
asy
E
n
g
li
sh
1 1 d
oc
x
/
B
C
D
/
30
04 2
0
20
2.3. Start and Sto ventilation
Start and stop via the Touchscreen:
Press the button to start ventilation
The ventilation starts with the parameters saved in the "Parameters" and "Alarms" tabs
The message "Ventilation activated" is displayed and the main button flashes each
time the patient breathes
Press the button to stop the ventilation, a message then asks for
confirmation of the stop and the message "Ventilation stopped" is displayed
Start via the main push button:
Press the main push button to start ventilation
The ventilation starts with the parameters saved in the "Parameters" and "Alarms" tabs
The message "Ventilation activated" is displayed and the main button flashes each time the
patient breathes
Press the main push button again to stop the ventilation, a message then asks for
confirmation of the stop The message "Ventilation stopped" is displayed
NOTE:
The ventilation start function using the main button works even if the device screen has not yet
started It is therefore possible to start ventilation quickly with the last parameters saved!
COVIDAIR S/T Easy Quick Start Guide Page
7
Qu
ic
k
S
t
a
r
t
C
O
VI
D
A
IR
S/T
E
asy
E
n
g
li
sh
1 1 d
oc
x
/
B
C
D
/
30
04 2
0
20
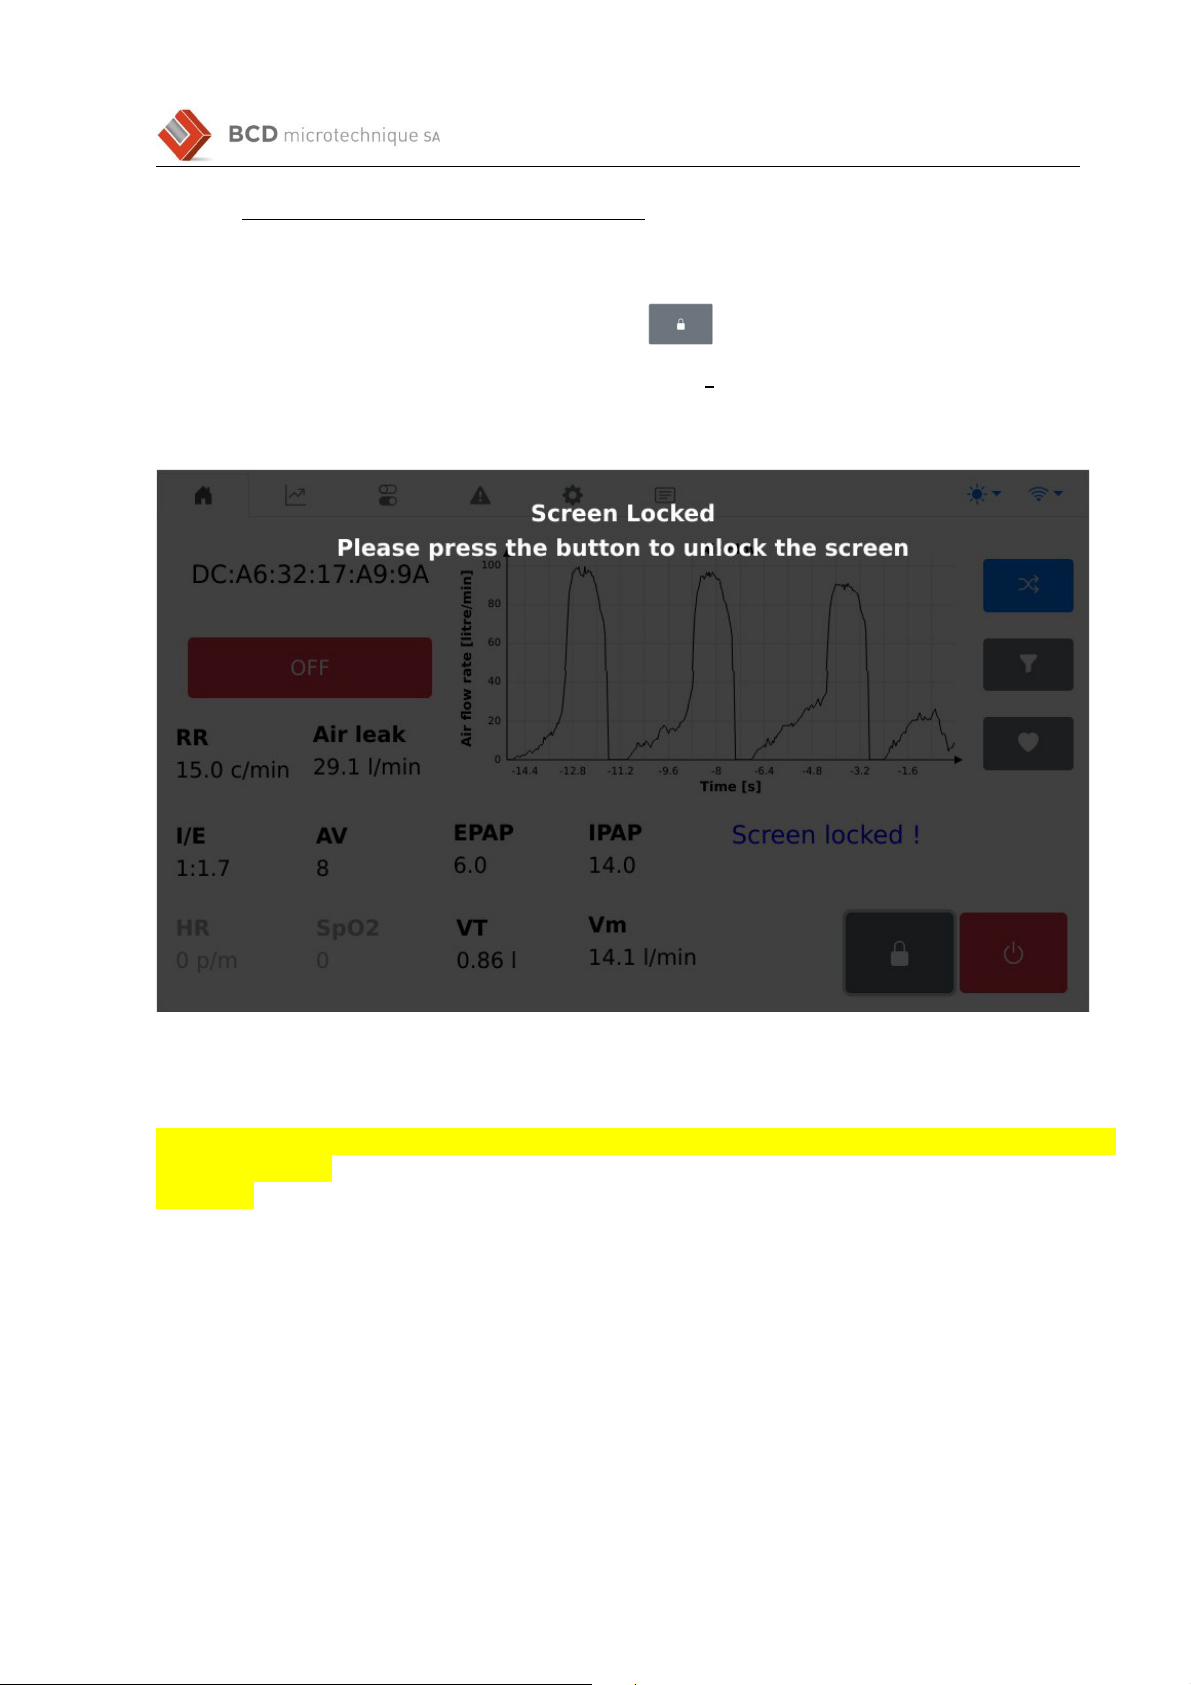
2.4. Locking and unlocking the touch screen
It is possible to lock the touch screen to avoid unwanted manipulation This function is only
available from the main screen
To lock the touch screen, press the padlock button on the
main screen Once the screen is locked, the following message is
displayed:
To unlock the screen, ress the main ush button.
NOTE:
Alarms have priority over screen locking If one of them sounds while the screen is locked, it will unlock and
show the alarm in a
visible way
COVIDAIR S/T Easy Quick Start Guide Page
8
Qu
ic
k
S
t
a
r
t
C
O
VI
D
A
IR
S/T
E
asy
E
n
g
li
sh
1 1 d
oc
x
/
B
C
D
/
30
04 2
0
20
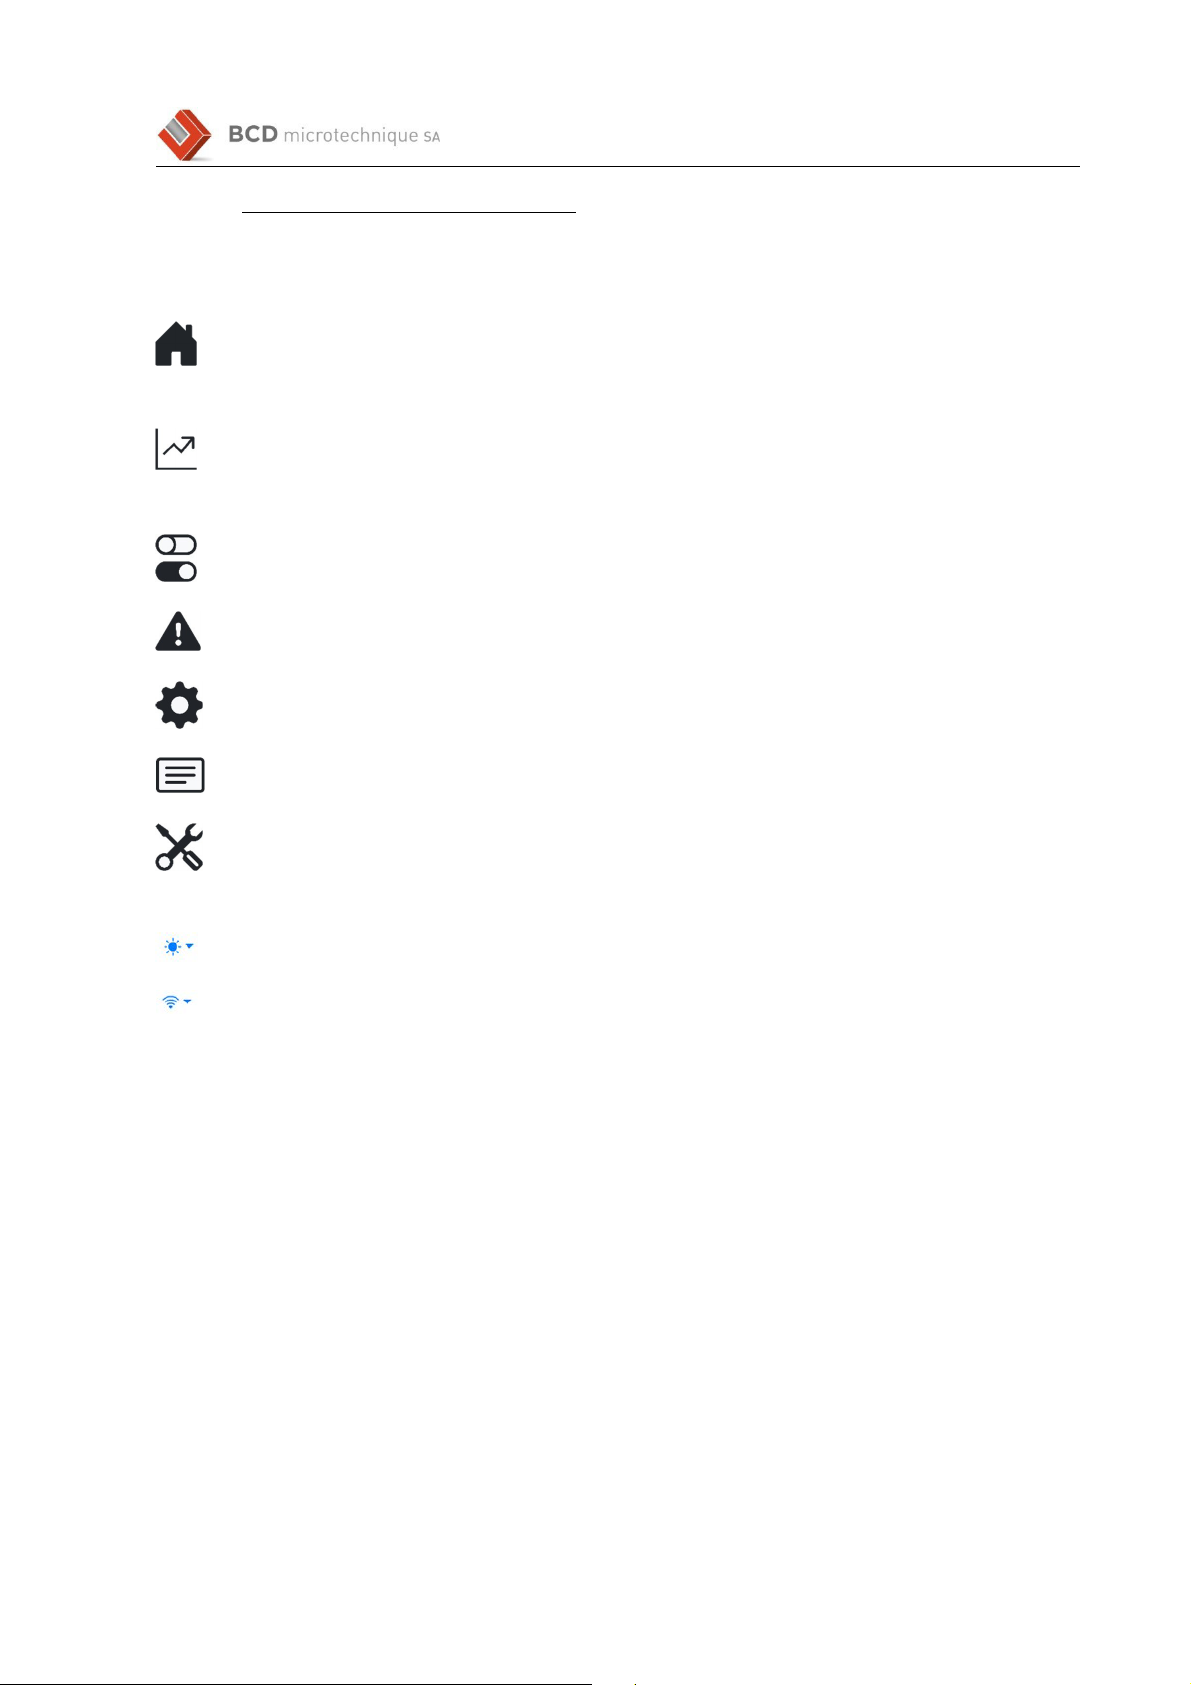
2.5. Navigation in menus and settings
Navigation in the page and settings is carried out using the tabs at the top of the display The tabs
are visible in each menu
: Main page
(Cockpit)
: Graphic Display
page
: Ventilation parameter page
: Alarms page
: Advance parameter page
: History page
: Maintenance (Trained user
only)
:"Brightness" setting
: Network Settings
COVIDAIR S/T Easy Quick Start Guide Page
9
Qu
ic
k
S
t
a
r
t
C
O
VI
D
A
IR
S/T
E
asy
E
n
g
li
sh
1 1 d
oc
x
/
B
C
D
/
30
04 2
0
20
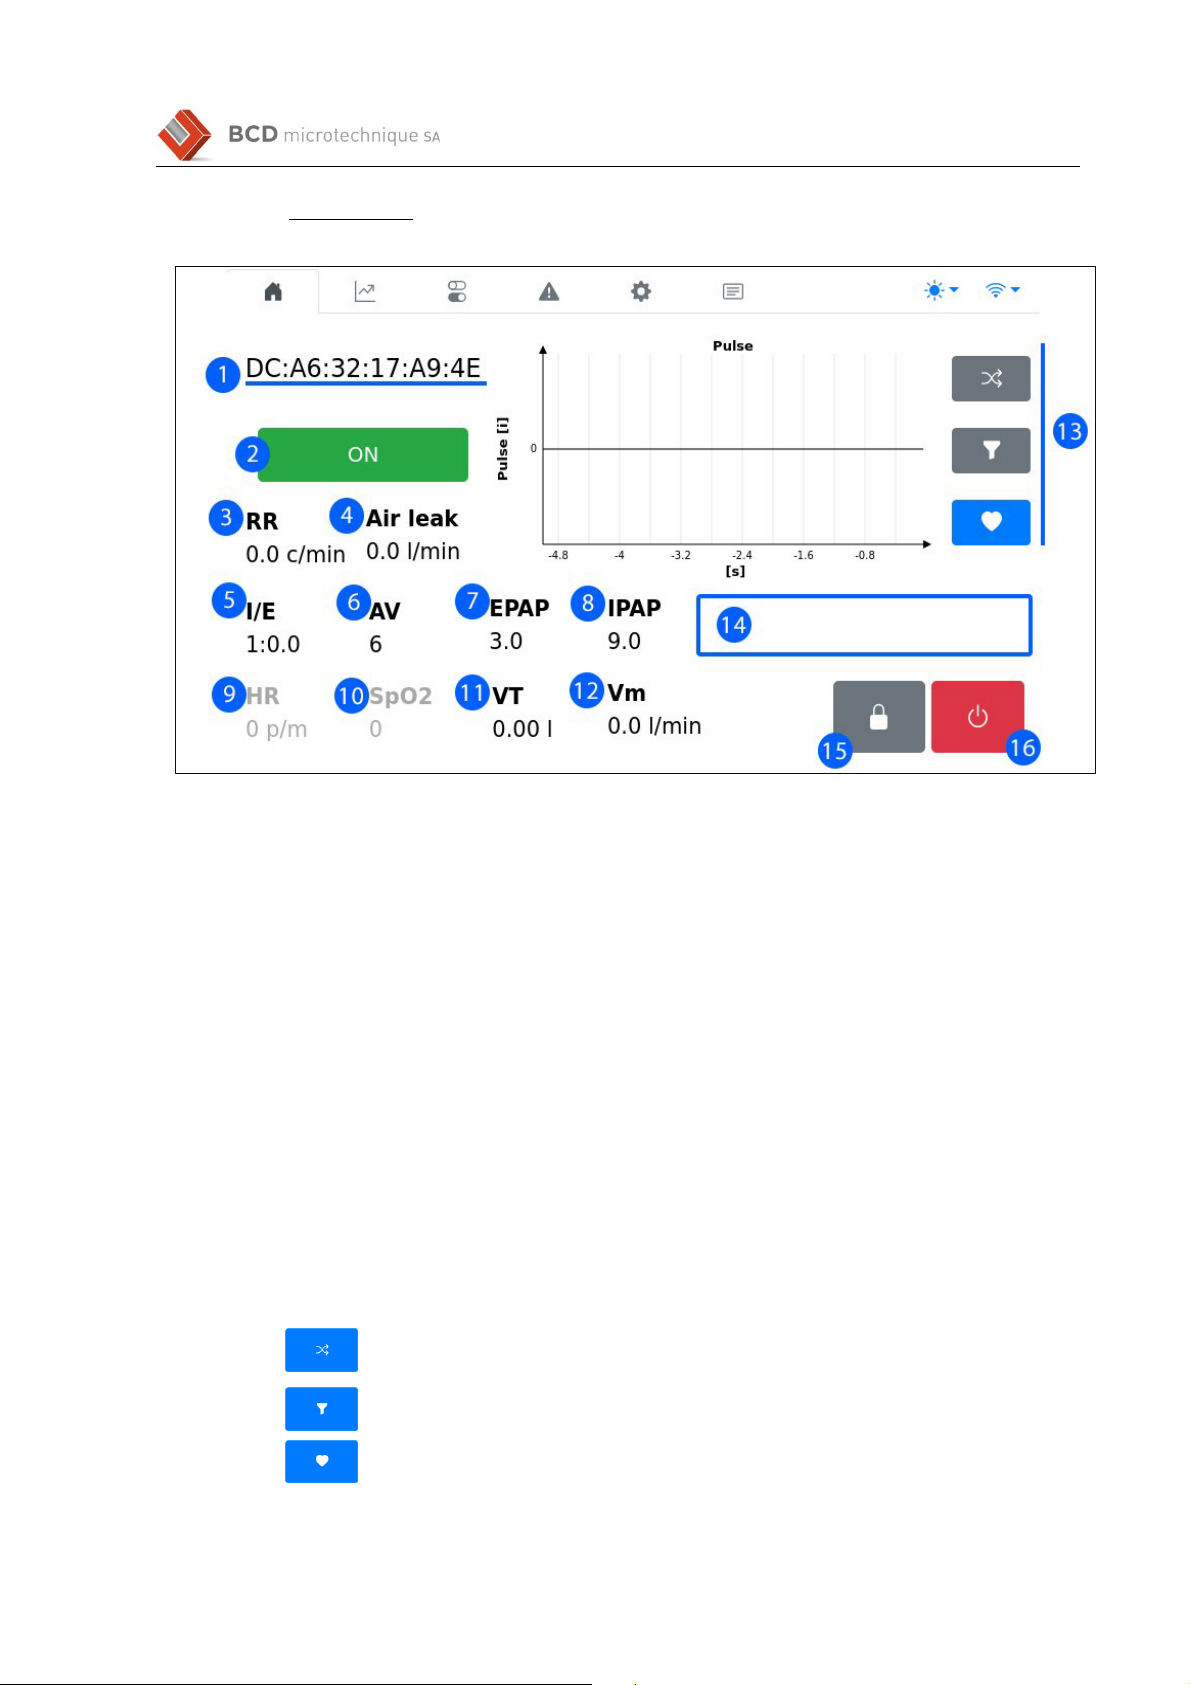
2.5.1. Cock it Page
1 Unique identification number of the COVIDAIR device
2 Ventilation start and stop button
3 RR: Respiratory Rate in cycles per minute
4 Leak: Estimated leak in liters per minute
5 I/E: Inspiratory /Expiratory time ratio
6 AV: Inspiration Assist (IPAP-EPAP)
7 EPAP or PEP: Expiratory Positive Airway Pressure in cmH2O
8 IPAP: Inspiratory Positive Airway Pressure in cmH2O
9 HR: Heart rate indicator in beats per minute (only if the pulse oximeter is used)
10 S O
2
: Oxygen saturation indicator in % (only if the pulse oximeter is used) Validity from 90
to 100%
11 VTt Expiratory tidal volume, with leakage correction
12 MV: Current Patient Volume in liters per minute
13 Graphic area with multiple displays:
The selection of the type of graph is done by a simple press of the buttons
listed below:
Display the flow curve (last 15 seconds)
Display the pressure curve (last 15 seconds)
Display the heart rate curve, if the pulse oximeter is used (last 5
seconds)

COVIDAIR S/T Easy Quick Start Guide Page
10
Qu
ic
k
S
t
a
r
t
C
O
VI
D
A
IR
S/T
E
asy
E
n
g
li
sh
1 1 d
oc
x
/
B
C
D
/
30
04 2
0
20
14 Display area for various devices messages
15 Screen lock button
16 Device shutdown button

Qu
ic
k
S
t
a
r
t
C
O
VI
D
A
IR
S/T
E
asy
E
n
g
li
sh
1 1 d
oc
x
/
B
C
D
/
30
04 2
0
20
COVIDAIR S/T Easy Quick Start Guide Page
10
10
2.5.2. Gra hic Page
1 Flow rate in liters per minute
2 Pressure (Paw) in cmH
2
O
3 Time scale It is also possible to zoom directly on the graphics with two fingers
Displays the 60 last seconds
Displays the last 30 seconds
Displays the last 10 seconds
4 RR: Respiratory Rate per minute
5 VTe: Expiratory tidal volume, with leakage correction
6 I/E: Inspiratory /Expiratory time ratio
Qu
ic
k
S
t
a
r
t
C
O
VI
D
A
IR
S/T
E
asy
E
n
g
li
sh
1 1 d
oc
x
/
B
C
D
/
30
04 2
0
20
COVIDAIR S/T Easy Quick Start Guide Page
11
11
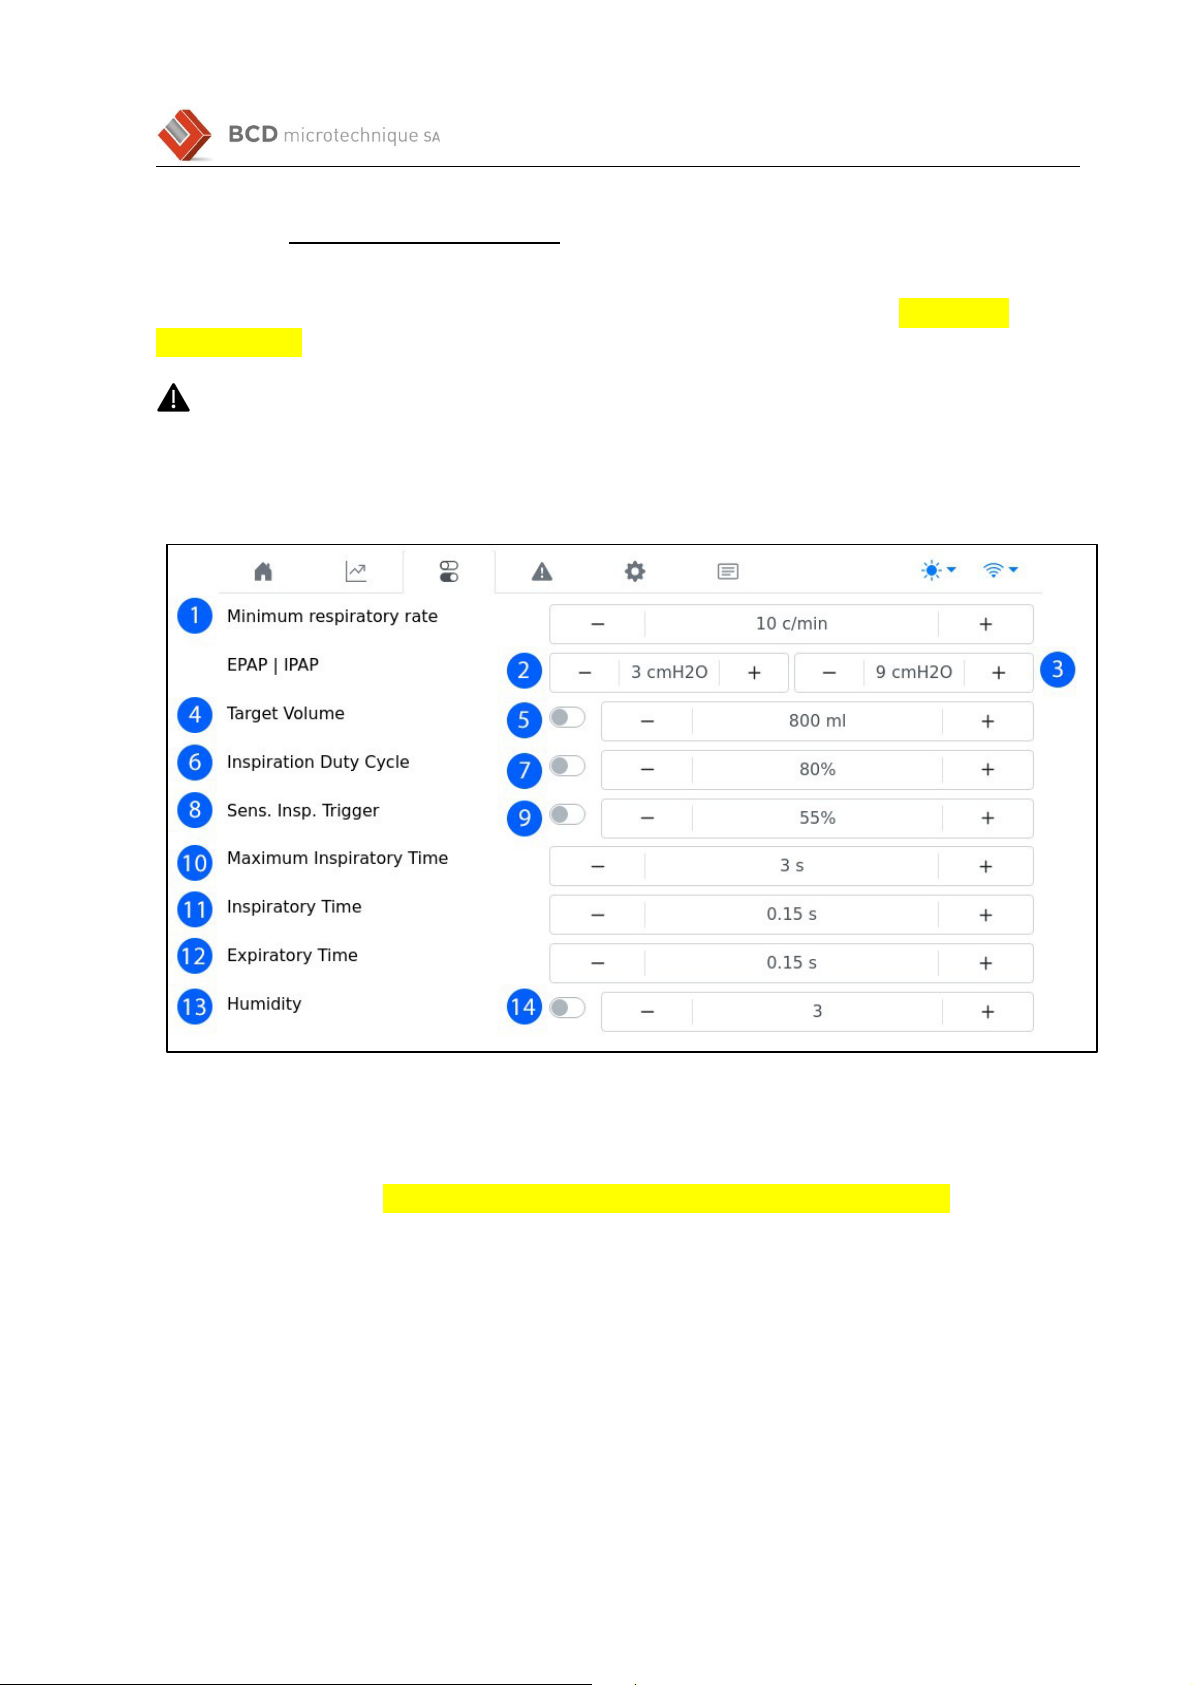
2.5.3. Ventilation Parameter Page
The parameters menu will determine the COVIDAIR ventilation parameters All parameters can
be changed during ventilation This menu is only accessible with a password The default
password 0000
WARNING
The
adjustment and modification of the parameters must be carried out under the supervision of
a doctor or a member of the medical profession trained in ventilation
1
Setting the minimum respiratory rate per minute imposed on the patient The value of
the respiratory rate is between 3 and 30 with steps of 1 breath per minute
2 Adjustment of the EPAP expiratory pressure in cmH
2
O The value of the expiratory
pressure is between 2 and 40 cmH
2
O it 1 cmH
2
O increments, but it cannot be greater than
the IPAP value If IPAP and EPAP are equal the device functions as CPAP
3 Adjustment of the IPAP inspiratory pressure in cmH
2
O
4 Tidal volume adjustment WARNING: This value did not take care of leaks It is not
recommended to use this value for ventilation system with leak
The tidal volume value is between 200 and 4000 milliliters with 50ml increments
5 Tidal volume activation slider (see its meaning and use at the end of the chapter)
6 Respiratory Rate adjustment in % The end of the inspiratory cycle is reached when the
flow rate drops to X % of the peak flow rate This value can be set between 15% and 99%
in 1% increments
7 Respiratory Rate cycling activation slider (see its meaning and use at the end of the
chapter)

Qu
ic
k
S
t
a
r
t
C
O
VI
D
A
IR
S/T
E
asy
E
n
g
li
sh
1 1 d
oc
x
/
B
C
D
/
30
04 2
0
20
COVIDAIR S/T Easy Quick Start Guide Page
12
12
8 Adjustment of the sensitivity of the inspiratory trigger in% The higher the %, the more
sensitive the trigger If the trigger is too sensitive (too high) there is a risk of self-trigger
9 Inspiratory trigger sensitivity activation slider (see its meaning and use at the end of the
chapter)
10 Setting the maximum inspiration time in seconds The value of the inspiration time is
between 0 1 and 3 by 0 1s increments

Qu
ic
k
S
t
a
r
t
C
O
VI
D
A
IR
S/T
E
asy
E
n
g
li
sh
1 1 d
oc
x
/
B
C
D
/
30
04 2
0
20
COVIDAIR S/T Easy Quick Start Guide Page
13
13
11 Setting the rise time in seconds The value of the rise time is between 0 1 and 1 in 0 05s
increments A short rise time (< 0 3 seconds) can lead to an overshoot)
12 Setting the drop time in seconds The value of the descent time is between 0 1 and 1 45
in 0 05s increments
13 Setting the humidity The humidity value is between 1 and 5 in 1 increment Do not use
this setting if the humidifier is not used
14 Humidity activation slider (see its meaning and use at the end of the chapter)
For each setting instruction, the "-" button allows you to decrease the value while the "+"
button allows you to increase the value by the indicated steps It is also possible to let your
finger pressed in order to reach the settings faster
The sliders in front of certain parameters allow you to activate or not the taking into
account of the adjusted parameter A simple press on the cursor changes its value
When the cursor is ON, the parameter is active
When the cursor is OFF, the parameter is not active
WARNING
If the parameter cursor is OFF, changing the parameter has no influence on the actual ventilation

Qu
ic
k
S
t
a
r
t
C
O
VI
D
A
IR
S/T
E
asy
E
n
g
li
sh
1 1 d
oc
x
/
B
C
D
/
30
04 2
0
20
COVIDAIR S/T Easy Quick Start Guide Page
14
14
2.5.4. Alarm Page
The “Alarms” page is used to activate or deactivate the alarms, as well as to set the alarm
limits This menu is only accessible with a password The default password is 0000
WARNING
The
adjustment and modification of alarm parameters must be carried out under the supervision
of a doctor or a member of the medical profession trained in ventilation
1
Activation slider for the "Total expired volume" (VTe) alarm (see its meaning and use at
the end of the chapter)
2 Setting the lower limit for the alarm "Total expired volume” (VTe) in milliliters
The value of the lower limit for "Total expired volume" is between 40 and 1300 by 5ml
increments
3 Setting the upper limit for the alarm "Total expired volume" (VTe) in milliliters
4 Activation slider for the "Volume per minute" (MV) alarm (see its meaning and use at
the end of the chapter)
5 Setting the low limit for the "Volume per minute" (MV) alarm in liters per minute
The value of the lower limit for the "Volume per minute" is between 0 2 and 25 by 0 1 l
increments
6 Setting the upper limit for the "Gaz volume per minute" (MV) alarm in liters
The upper limit value for "Volume per minute" is between 1 and 99 by 0 1 l/min
increments
7 Activation slider for the "Respiratory Rate" alarm (RR) (see its meaning and use at the
end of the chapter)

Qu
ic
k
S
t
a
r
t
C
O
VI
D
A
IR
S/T
E
asy
E
n
g
li
sh
1 1 d
oc
x
/
B
C
D
/
30
04 2
0
20
COVIDAIR S/T Easy Quick Start Guide Page
15
15
8 Setting the lower limit for the " Respiratory Rate " (RR) alarm in cycles per minute
The value of the lower limit for the " Respiratory Rate " (RR) is between 4 and 52 by 1
cycle/min increments
9 Setting the upper limit for the " Respiratory Rate " (RR) alarm in cycles per minute
The value of the upper limit for the " Respiratory Rate " (RR) is between 40 and 80 by 1
cycle/min increments
10 Activation slider for the "Pressure" alarm (Pressure Paw) (see its meaning and use at
the end of the chapter)
11 Adjustment of the low limit for the "Pressure" alarm (Pressure Paw) in cmH2O
Setting the low limit for the "Pressure" alarm (Pressure Paw) in cmH
2
O
The value of the low limit for the "Pressure" alarm (Pressure Paw) in cmH
2
O The value
of the low limit for the " Pressure " alarm is between 0 and 20 by 1 cmH
2
O increments
12 Adjustment of the upper limit for the "Pressure" alarm (Pressure Paw) in cmH
2
O
The value of the upper limit for the " Pressure alarm " is between 40 and 80 by 1
cmH
2
O increments
13 Activation slider for the "Apnea Time" alarm (Apnea) (see its meaning and use at the
end of the chapter)
14 Setting the time limit for the "Apnea time" (Apnea) alarm in seconds The countdown
begins after 3 missed respiratory cycles The limit value for " Apnea time" is between 10
and 60 by 5s increments
15 Activation slider for the "Allowable leak time" (Leak) alarm (see its meaning and use at
the end of the chapter)
16 Setting the time limit for the "Allowable leak time" (Leak) alarm in seconds The count
begins at the start of the leak The limit value for the "Allowable leakage time" is
between 5 and 60 by 5 s increments
17 Setting the low limit for the "Heart rate" (Fc) in beats per minute alarm, can only be
changed if the pulse oximeter is used
18 The value of the low limit for the "Heart rate" (Fc) is between 40 and 80 by 1 pulse per
minute increments
Setting of the upper limit for the "Heart rate" (Fc) in pulses per minute alarm, which can
only be modified if tthe pulse oximeter is used
The value of the upper limit for the "Heart rate" (Fc) is between 50 and 200 in 1 pulse per
minute increments
19 Activation slider for the "Oxygen saturation" (SpO2) alarm, which can only be modified if
the pulse oximeter is used (see its meaning and use at the end of the chapter)
20 Setting the time limit for the "Oxygen saturation" (SpO2) alarm in percent, only
modifiable if the pulse oximeter is used
The limit value for "Oxygen saturation" is between 80 and 99 in 1% increments
For each setting instruction, the "-" button allows you to decrease the value and the "+"
button allows you to increase the value by the indicated steps
For each setting instruction, the "-" button allows you to decrease the value while the
"+" key button allows you to increase the value by the indicated steps It is also possible
to let your finger pressed in order to reach the settings faster

Qu
ic
k
S
t
a
r
t
C
O
VI
D
A
IR
S/T
E
asy
E
n
g
li
sh
1 1 d
oc
x
/
B
C
D
/
30
04 2
0
20
COVIDAIR S/T Easy Quick Start Guide Page
16
16
When the cursor is ON, the parameter is active
When the cursor is OFF, the parameter is not active
NOTE:
• Alarms take precedence over the screen lock or any other displayed menus If one alarm
activates, it is displayed in priority
See also the "Alarms" cha ter earlier in this document for details on viewing and managing
current alarms.
Qu
ic
k
S
t
a
r
t
C
O
VI
D
A
IR
S/T
E
asy
E
n
g
li
sh
1 1 d
oc
x
/
B
C
D
/
30
04 2
0
20
COVIDAIR S/T Easy Quick Start Guide Page
17
17
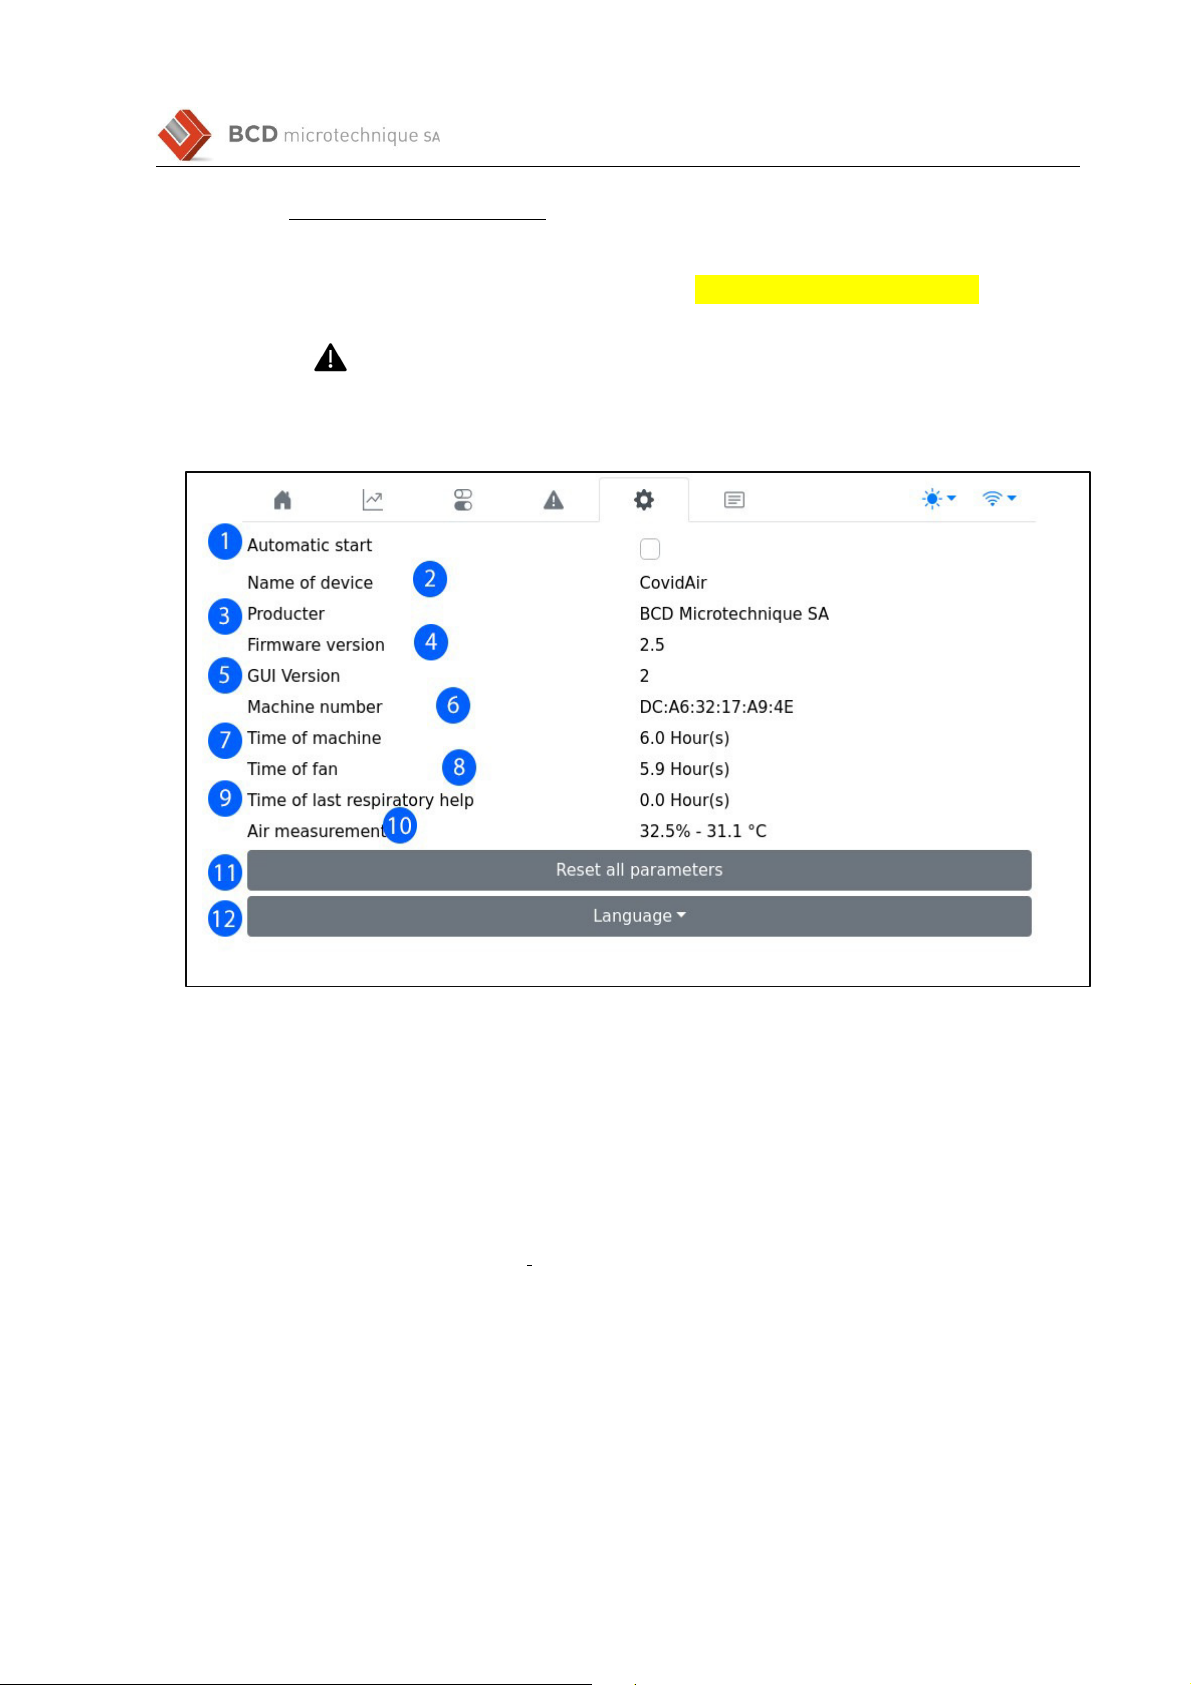
2.5.5. Advanced Parameter Page
The menu "Advanced settings" is accessible by password It contains technical information about
the device as well as general configuration parameters The default password is 0000
WARNING
Adjustment
and modification of the parameters in this menu must only be carried out under the
supervision of an authorized technician
1 Option to automatically start ventilation at power on
2 Name of the device
3 Manufacturer
4 Firmware revision
5 Graphic user interface revision
6 Device MAC address
7 Total operating time
8 Total turbine time
9 Last ventilation operating time or time since the last ventilation operating time
10 Air humidity and temperature indicator supplied by the device The humidity is in%
and the temperature is in °C
11 Button for resetting the operating and alarms parameters to the default values
(Confirmed action with a nodal
box)
12 Language selection

Qu
ic
k
S
t
a
r
t
C
O
VI
D
A
IR
S/T
E
asy
E
n
g
li
sh
1 1 d
oc
x
/
B
C
D
/
30
04 2
0
20
COVIDAIR S/T Easy Quick Start Guide Page
18
18
2.5.6. History Page
The ’History’ menu displays the history of events that occurred during each ventilation cycle
1
History of all events since the device was switched on
2 Clear history button
Qu
ic
k
S
t
a
r
t
C
O
VI
D
A
IR
S/T
E
asy
E
n
g
li
sh
1 1 d
oc
x
/
B
C
D
/
30
04 2
0
20
COVIDAIR S/T Easy Quick Start Guide Page
19
19
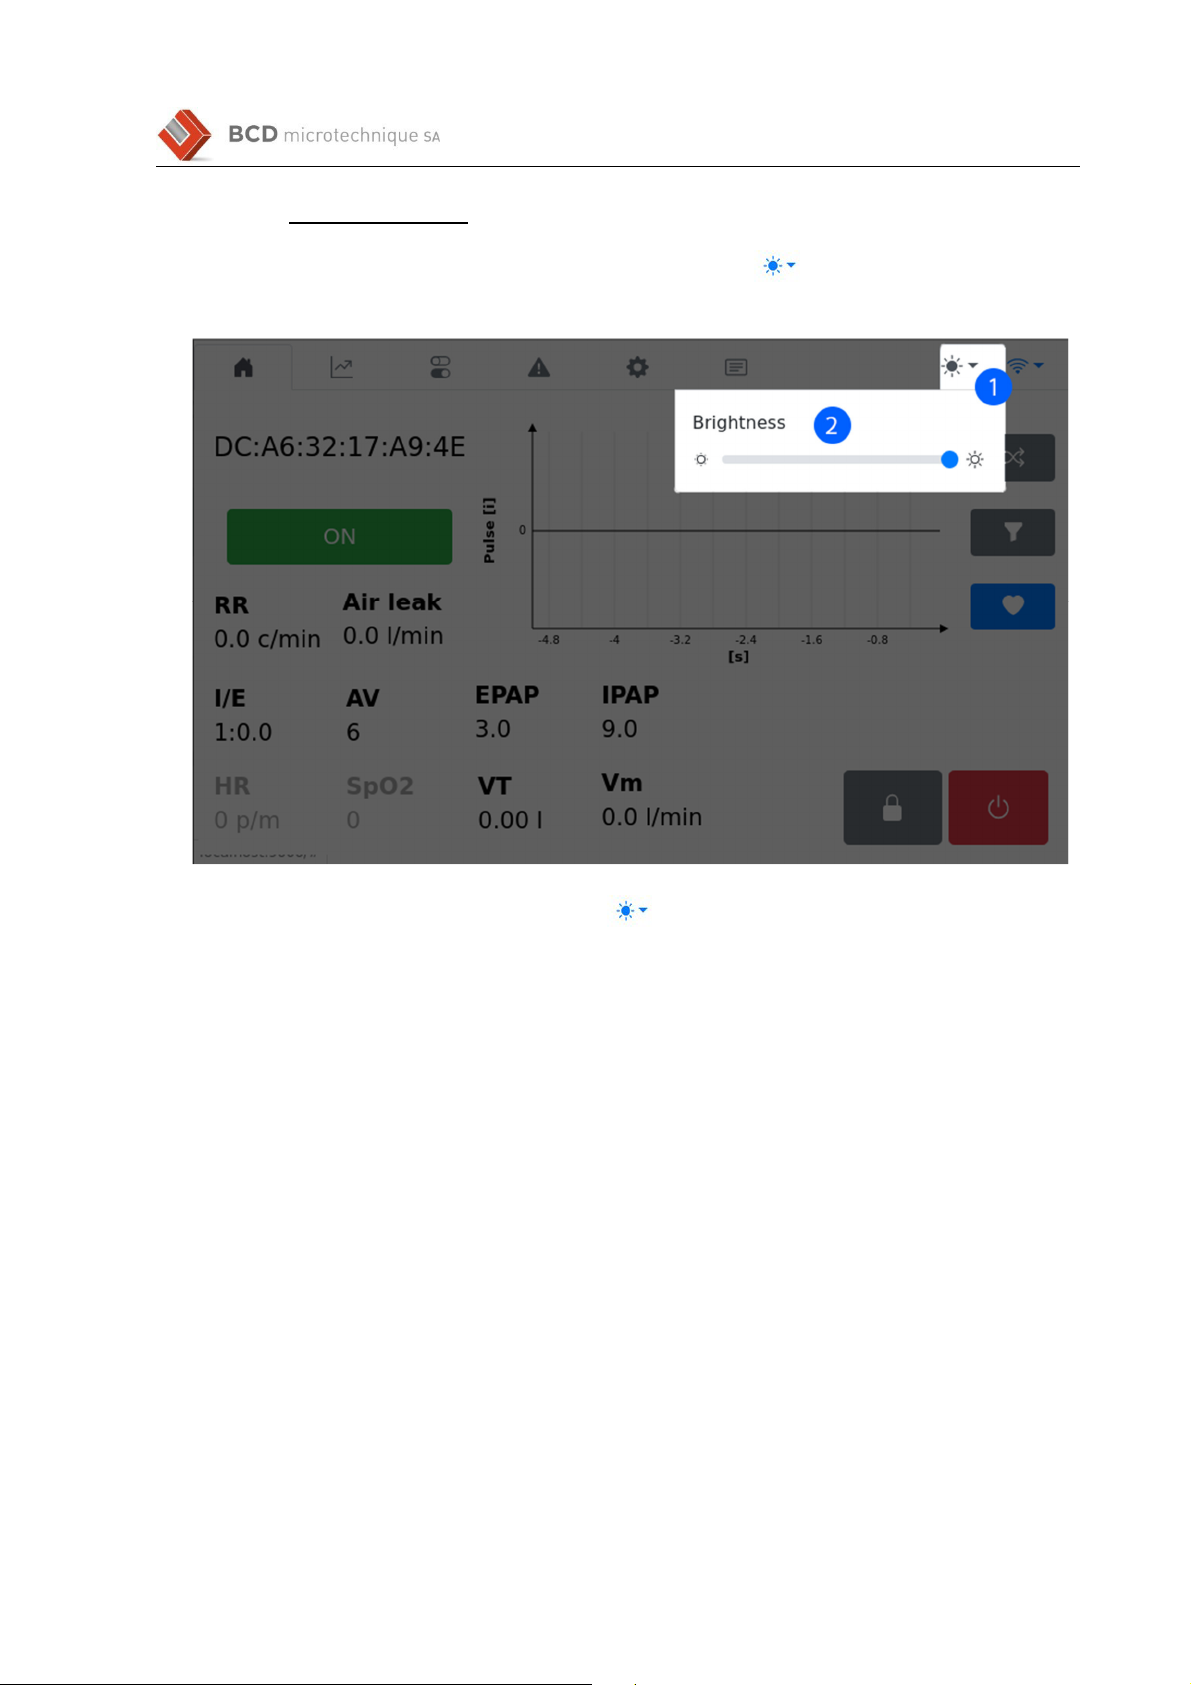
2.5.7. Dis lay Brightness
The display brightness is adjustable at all times via the button
1
The menu opens when the button is pressed
2 Slide from left to right in order to adjust the brightness for visual comfort
Table of contents


