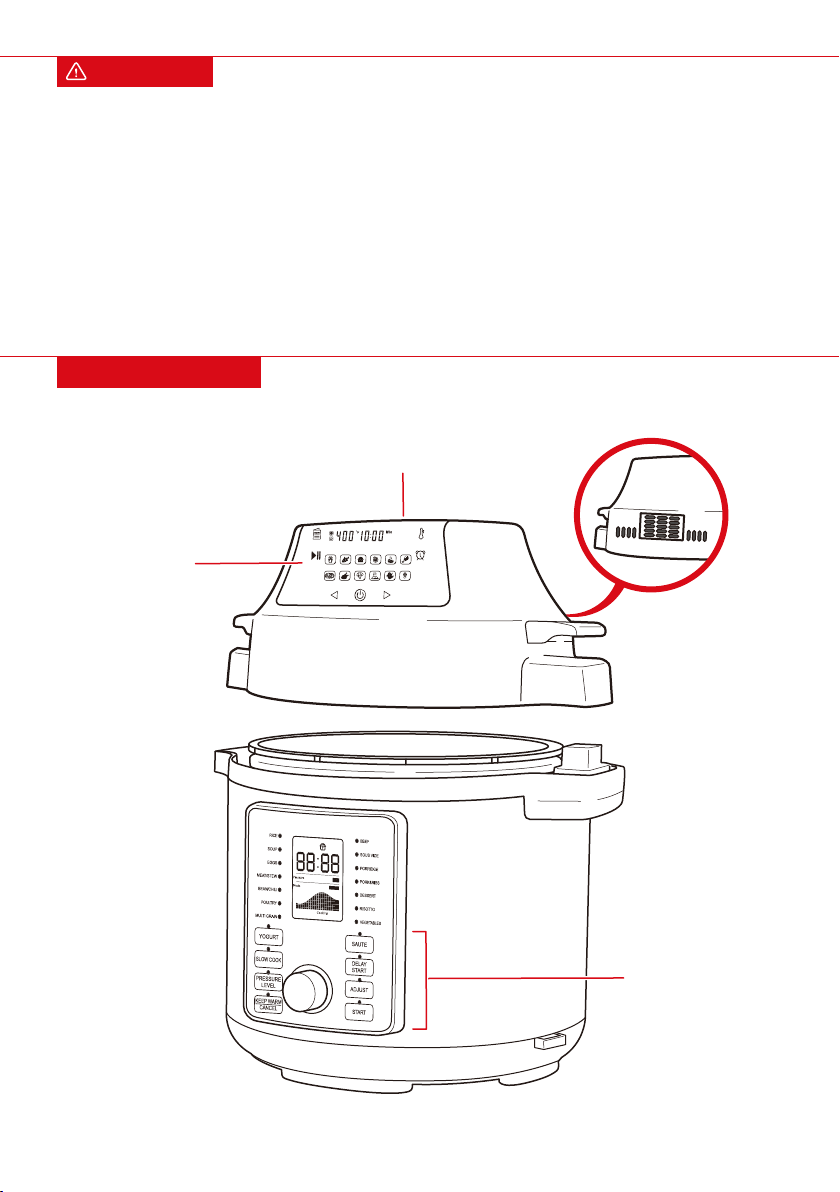
BCP SKY5434 User manual

SKY5434 + SKY5435
Ver. 1
INSTRUCTION
MANUAL
6.3-Quart 2-in-1 Multi-Cooker

BEFORE USE, preheat the
appliance without any food
for 10 minutes. Harmless
smoke and mild smell may
escape from the appliance.

bestchoiceproducts.com
Be extremely careful of hot steam
escaping the pressure limiting device.
Do not place hands, objects, or
obstructions above the pressure cooker.

NOTICE
•In order to avoid damage or injury, make sure to follow all safety instructions and warnings.
•Do not allow children to operate this appliance. Keep appliance out of reach of children.
•Place appliance on a stable and level surface.
•Appliance is intended for indoor, household use only.
•DO NOT operate this appliance if you have a pacemaker, hearing aids, or similar medical devices. Please
consult a professional licensed physician before operating this appliance.
•Switch o and unplug appliance if left unattended and before adding/removing accessories and cleaning.
•Ensure that your voltage is consistent with specifications.
•A short detachable power cord is provided to prevent tangling or tripping.
•Using an extension cord is not recommended as it may overheat and cause a risk of fire
•If an extension cord is used, make sure the electrical rating is compatible with the appliance, the plug is
grounded, and it is arranged so it cannot be tripped over unintentionally.
•This appliance is not intended for use by persons (including children) with reduced physical, sensory or
mental capabilities, or lack of experience and knowledge, unless they have been given supervision or
instruction concerning use of the appliance by a person responsible for their safety.
•If any parts are missing, broken, damaged, or worn, stop using this product until repairs are made
and/or factory replacement parts are installed.
•Do not use this item in a way inconsistent with the manufacturer’s instructions as this could void the
product warranty.
•Improper usage or handling may result in damage to property or person.
•Make sure appliance is placed in a well-ventilated area away from hot surfaces, combustible materials
(e.g. curtains and tablecloths), and wet environments.
•Do not place appliance on a stovetop surface.
•Do not run power cord over sharp edges/corners or a hot surface.
•Do not pull or carry appliance by the power cord.
•Do not position power cord near air vents while appliance is in operation.
•Do not touch or place yourself near the air outlet vent of this appliance when it is operating.
•Do not cover the air inlet or outlet when appliance is operating.
•Never cover the appliance with other items.
•Do not use the appliance if there is damage to the plug, main cord, or appliance.
•Do not expose plug or cord to high temperatures during operation.
•If cord becomes hot, stop operation of this appliance.
•Do not immerse this appliance in water, rinse under tap, spray with water, or keep in wet/humid areas
(this does not refer to the accessories).
•Do not spill water on the electrical components or connectors.
•Do not pull out the plug if hands are wet.
•Do not move or shake the appliance during operation.
•Do not touch the hot surfaces/interior while appliance is working.
•Do not touch accessories during or immediately after cooking. Always use oven mitts to move
potentially hot accessories.
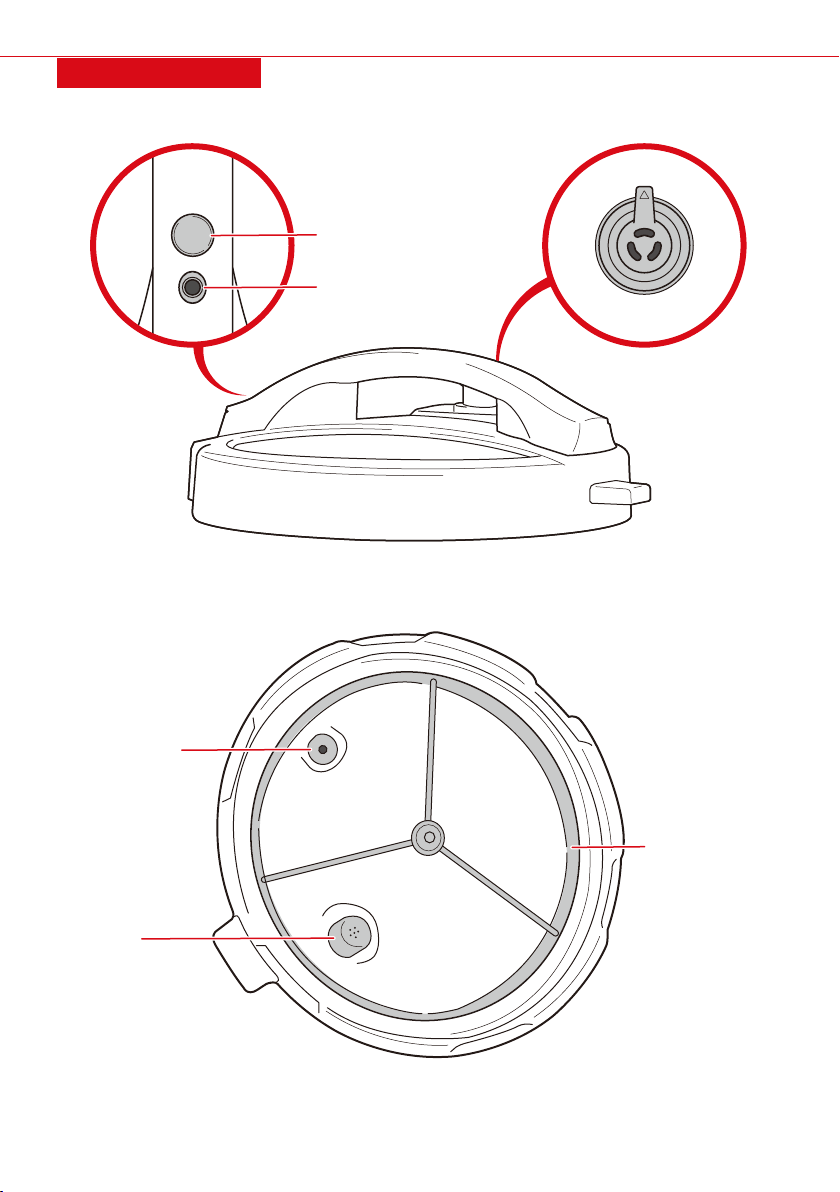
•Do not place metal or other conductive material into vents or you could risk electric shock.
•Do not use any accessory or fitting other than original accessories and fittings.
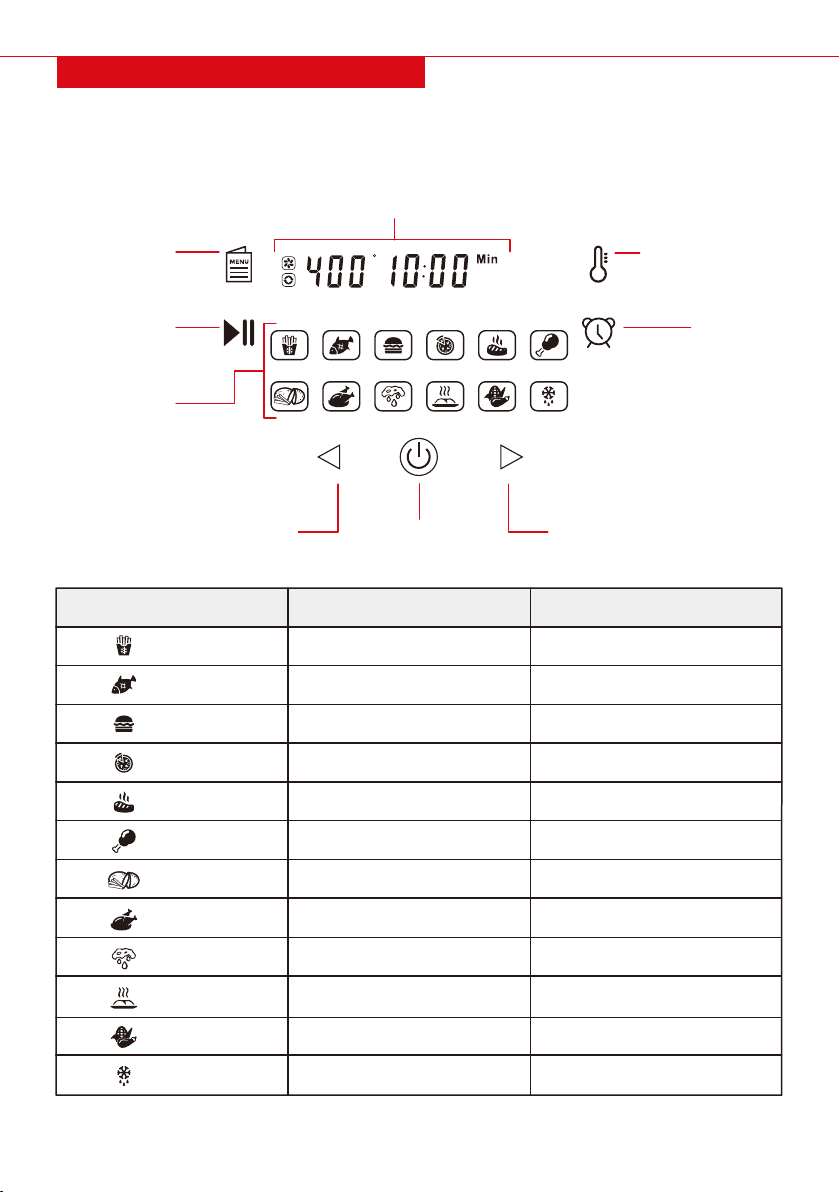
•Do not operate this appliance with an external timer or remote-control system.
•Do not place flammable items such as paper or plastic into the appliance.
WARNING
4|
Please retain these instructions for future reference.

•Do not operate unless plug is properly plugged into a wall outlet.
•Do not use this product if you notice any problems during operation.
•Do not share an outlet with other appliances or risk damaging the outlet or causing a fire.
•This appliance has a polarized plug (one blade wider than the other), so the plug must be oriented
correctly to fit into the plug.
•Be careful of hot steam and air escaping from the appliance during use and when removing food.
•Immediately unplug if you see smoke emitting from the appliance.
•After finishing operation of this appliance, make sure the appliance is turned o and unplugged.
•Let appliance cool for 30 minutes before disassembly or cleaning.
•Overheating protection: Appliance will not function if overheating protection is activated. Unplug and
wait for appliance to completely cool before restarting.
WARNING
MAIN DIAGRAM
AIR FRYER
CONTROL PANEL
•AIR FRYER LID
AIR INLET
AIR OUTLET
PRESSURE COOKER
CONTROL PANEL
|5

6 |
LID RELEASE
BUTTON
PRESSURE LIMITING DEVICE
FLOAT VALVE
VALVE SEAL
FLITER
RUBBER SEAL
RING
MAIN DIAGRAM
•PRESSURE COOKER LID (TOP VIEW)
•PRESSURE COOKER LID (BOTTOM VIEW)

MAIN DIAGRAM
RICE SPOON
BASKET6-LITER INNER POT
STEAM RACK
CONDENSATION CUP MEASURING CUP
PIZZA PAN
LID RACK
TONGS
|7

CONTROL PANEL - AIR FRYER
COOKING PRESET TEMPERATURE (°F) MINUTES
400- Frozen Fries
- Fish
- Hamburger
- Pizza
- Steak
- Drumsticks
- Fresh Fries
- Chicken
- Dehydrate
- Broil
320
370
370
350
400
320
360
15
15
13
15
25
22
30
40
160 2 hours
320 10
- Vegetables
- Defrost
360 15
120 5
8 |
• POWER: Press to turn on/o; defaults to 360°F and 15 minutes
•PRESET SELECTION: Press to cycle through cooking presets
•DIGITAL DISPLAY: Displays temperature and time
F
COOKING
PRESETS
DIGITAL DISPLAY
PRESET
SELECTION
START/
PAUSE
ADJUST
TIMER
ADJUST
TEMPERATURE
DECREASE TEMP./TIMER INCREASE TEMP./TIMERPOWER

SUGGESTED COOKING SETTINGS FOR FOOD
400
400
400
400
360
360
360
360
360
360
8-12
10-14
7-14
13-15
18-22
10-15
15-20
4-17.5
6-10
8-10
4-17.5
4-17.5
4-17.5
4-17.5
4-17.5
4-17.5
4-17.5
4-12
4-17.5
4-17.5
Use Oven-Ready
Use Oven-Ready
Use Oven-Ready
Use Oven-Ready
Use Oven-Ready
Steak
Pork Chops
Hamburger
Sausage Roll
Chicken Drumsticks
Chicken Breast
Spring Rolls
Frozen Chicken Nuggets
Frozen Fish Sticks
Frozen Mozzarella Sticks
4001516Frozen Onion Rings
MEAT AND POULTRY
SNACKS
320104-17.5Stued Vegetables
10-24
MIN-MAX
AMOUNT (OZ.)
TIME
(MIN.)
TEMPERATURE
(°F)
ADDITIONAL
INFORMATION
15-16 400
Add 1/2 tbsp. oil
Add 1/2 tbsp. oil
Add 1/2 tbsp. oil
400
400
360
360
400
15-20
10-16
10-24
15-18
15-18
10-24
10-24
10-24
8
16
Thin Frozen Fries
Thick Frozen Fries
Homemade Potato Cubes
Hash Browns
Potato Gratin
Homemade Fries
360
10-24
10-24Homemade Potato Wedges
POTATOES AND FRIES
FOOD ITEM
|9

32020-2510Cake
BAKING
36020-2212Quiche
40015-1810Muns
3202012Sweet Snacks
MIN-MAX
AMOUNT (OZ.)
TIME
(MIN.)
TEMPERATURE
(°F)
ADDITIONAL
INFORMATION
FOOD ITEM
SUGGESTED COOKING SETTINGS FOR FOOD
CONTROL PANEL - PRESSURE COOKER
• CONTROL KNOB: Turn to cycle through cooking presets or adjust cook time
- Press to adjust the time of a selected preset
•PRESSURE LEVEL: Toggle between high and low pressure
•DELAY START: Delay cooking at 30-minute increments; press to increase delay time
•ADJUST: Press to adjust for quantity of ingredients; toggle between Less, Normal, and More
NOTE: Cook time is correlated with quantity of ingredients
10 |
CONTROL
KNOB
COOKING
PRESETS

COOKING PRESET QUANTITY (ADJUST) COOK TIME (MIN.) MANUAL TIME SETTING
Less
Normal
More
Less
Normal
More
Less
Normal
More
Less
Normal
More
Less
Normal
More
Less
Normal
More
Less
Normal
More
Less
Normal
More
Less
Normal
More
Less
Normal
More
Less
Normal
More
Less
Normal
Rice
Soup
Eggs
Meat/Stew
Bean/Chili
Poultry
Multigrain
Beef
Sous Vide
Porridge
Pork & Ribs
Dessert
1 to 99 min.
1 to 99 min.
1 to 99 min.
1 to 99 min.
1 to 99 min.
1 to 99 min.
1 to 99 min.
1 to 99 min.
1 to 4 hours
1 to 99 min.
1 to 99 min.
1 to 99 min.
More
8
12
15
12
15
20
4
5
6
20
35
45
25
30
40
10
15
25
20
40
45
30
35
40
2 hours
12
15
20
13
18
25
25
40
50
CONTROL PANEL - PRESSURE COOKER
|11

12 |
COOKING PRESET QUANTITY (ADJUST) COOK TIME (MIN.) MANUAL TIME SETTING
Less
Normal
More
Less
Normal
More
Less
Normal
More
Less
Normal
More
N/A
N/A
N/A
20
35
45
10
15
20
24 hours
8 hours
Boil
30 min.
6 hours
9 hours 30 min.
30
Risotto
Vegetables
Yogurt
Slow cook
Sauté
1 to 99 min.
1 to 99 min.
6 to 24 hours
0.5 to 9.5 hours
N/A
CONTROL PANEL - PRESSURE COOKER
PREPARATION
1Place appliance on a stable and level surface and plug it into a wall outlet.
•Leave at least 5 inches of clearance around the appliance during operation.
•Make sure power cord has enough length to reach the socket comfortably.
NOTE: Clean accessories with hot water, dish soap, and a non-abrasive sponge before first use. Wipe inside
and outside of appliance with a clean, dry cloth. Make sure all stickers and packing labels are removed.

PREPARATION
2Air Fryer: Press the power button to turn the appliance on.
|13
3
F
Air Fryer: Set desired temperature and timer to 10 minutes. Press start to preheat appliance.
F

COOKING
1Place ingredients in the desired accessory, then place in the inner pot.
•Do not overload the accessory or pot.
Use oven mitts to insert the accessory/pot into the appliance.
14 |
2Select the appropriate lid to use appliance as an air fryer or pressure cooker.
•Place the air fryer lid and the air fryer controls
will illuminate.
•Place the pressure cooker lid and turn it
clockwise until it locks. The pressure cooker
controls will illuminate.

COOKING
|15
3Press the power button or turn the control knob to turn appliance on.
4Select a cooking preset and/or manually set cooking settings.

16 |
COOKING
5Press start button to begin cooking.
•If needed, pause cooking and add/remove ingredients.
6Air Fryer: Do the following to cook food evenly:
•Shake or flip food
- Use oven mitts to pull pot out of the appliance and shake/flip the food.
- Insert the pot back into the appliance to continue cooking.

|17
AIR FRYER USAGE TIPS
• Always use oven mitts to move potentially hot accessories.
• Do not overload accessories or appliance.
• Do not place food in appliance during preheating.
• Smaller ingredients require a slightly shorter cook time than larger ingredients.
• Shaking or flipping foods during cooking can help prevent uneven cooking.
• Set timer to half the cook time so the appliance will indicate when it is time to shake or flip food.
• Do not overcook or burn food.
• Do not eat burned food. Remove all burned food remnants.
• You can use a light amount of oil to add crispiness, but do not add an excessive amount.
• Pre-made dough requires a shorter cook time than homemade dough.
7Cooking is finished when the timer hits 0. The appliance will emit a sound and turn o or keep
food warm.
COOKING
8Use oven mitts to pull out the accessory/pot and remove food.
NOTE: Make sure to place accessory/pot on a stable surface away from any combustible items.
Always switch o and unplug the appliance when you are done cooking with it. Do not move or
store the appliance until it has completely cooled down.

CLEANING AND STORAGE
PRESSURE COOKER USAGE TIPS
• Appliance cooks under pressure; improper use may result in injury.
• Be extremely careful of hot steam escaping the pressure limiting device. Do not place hands, objects, or
obstructions above the pressure cooker.
• Make sure unit is properly closed before operating.
• Be aware that the pressure limiting device is loose when appliance is not cooking.
• Do not place pressure cooker in a heated oven.
• Make sure pressure limiting device is not clogged before use.
• Typically, do not fill inner pot more than 2/3 full.
• If ingredients expand during cooking (e.g. rice or dried vegetables), do not fill more than ½full.
• Do not cook ingredients that can foam, froth, or sputter during cooking as they may clog the pressure
limiting device.
- Examples include: Applesauce, cranberries, pearl barley, oatmeal, cereal, split pea, noodles, rhubarb,
spaghetti, etc.
• Do not use appliance to fry oil.
• Do not open pressure cooker until unit has cooled and internal pressure has been released.
- If lid is locked, the unit still has internal pressure. Do not force the lid open.
• Inner pot is non-stick; do not use sharp or metal utensils on the inner pot. Only use wood or
plastic utensils.
• Do not use the inner pot with other heat sources other than the pressure cooker.
• Do not place additional weight or put pressure on the pressure limiting device.
• Unplug and let appliance cool before changing parts, cleaning, or storage.
• Unplug and let appliance cool for 30 minutes before disassembly or cleaning.
• Clean appliance, removable parts, and accessories after every use.
• Wipe down the exterior and interior of appliance with a soft cloth and warm water.
• Clean accessories with warm water, mild detergent, and a non-abrasive sponge or cloth. If needed, soak
parts in hot water.
• Only accessories are dishwasher safe. Never submerge the appliance in water or any other liquid.
• Do not use strong, corrosive cleaners to clean this appliance.
• Do not clean appliance with metal utensils or abrasive cleaning materials.
• Once parts are completely dry, reassemble and store appliance in a cool, dry place.
TECHNICAL SPECIFICATIONS
Rated Voltage
Rated Frequency
Air Fryer Power
Pressure Cooker Power
120V
60Hz
1500 watts
1000 watts
18 |

TROUBLESHOOTING
PROBLEM REASON SOLUTION
Does not work
Fried ingredients are
not done
Ingredients are fried unevenly
Appliance is not plugged
in correctly Plug into grounded wall outlet
Set timer
Fully close lid
Ingredient batch too large and
ingredients lay on top of
each other
Make sure to use fresh
ingredients and prepare them
correctly for frying (add some
oil, etc.)
Use fresh ingredients or
oven-ready snacks
Remove some ingredients or
shake/flip food halfway
through cooking
Place smaller batches in
accessory/pot
Ingredients are not fresh or
prepared improperly
Certain ingredients are better
for air fryer
Lightly brush some oil
onto food
Need some oil
Pat ingredients dry
before cooking
Ingredients are wet
Too many ingredients
Some white smoke is normal,
wipe down food to remove
excess oil
Properly clean accessories
Food in air fryer is greasy
Accessories still contain grease
residue from previous use
Set temperature is too low,
cook time too short
Raise temperature, increase
cook time
Timer is not set
Lid not closed
Fried food not crispy
White smoke comes out
of appliance
Carefully reposition until it
is sealed
Pressure limiting device not
properly sealed
Steam escaping from
pressure limiting device
Cancel cooking, open lid, and
reposition rubber seal ring
Rubber seal ring not
installed correctly
Clean pressure limiting device
Pressure limiting device
obstructed
Steam escaping around lid
|19

All items can be returned for any reason within 60 days of the receipt and will receive a full refund as long
as the item is returned in its original product packaging and all accessories from its original shipment are
included. All returned items will receive a full refund back to the original payment method. All returned
items will not be charged a re-stocking fee.
All returned items require an RA (Return Authorization) number, which can only be provided by a Best
Choice Products Customer Service Representative when the return request is submitted. Items received
without an RA may not be accepted or may increase your return processing time. Once an item has been
received by Best Choice Products, refunds or replacements will be processed within 5 business days.
All returns must be shipped back to the Best Choice Products Return Center at the customer’s expense. If
the reason for return is a result of an error by Best Choice Products then Best Choice Products will provide
a pre-paid shipping label via email. Boxes for return shipping will not be provided by Best Choice Products,
and is the customer’s responsibility to either use the original shipping boxes or purchase new boxes.
Pictures may be required for some returns to ensure an item is not damaged prior to its return. Items
returned are not considered undamaged until they are received by Best Choice Products and verified as
such. All damages to items are the customer’s responsibility until the item has been received by and
acknowledge by Best Choice Products as undamaged.
PRODUCT WARRANTY INFORMATION
Manufacturer and seller expressly disclaim any and all liability for personal injury, property damage or
loss, whether direct, indirect, or incidental, resulting from the incorrect attachment, improper use,
inadequate maintenance, or neglect of this product.
HELP CENTER
Product Assembly
Product InquiryChat Support Returns & Refunds
Orders FAQ
WARNING
Question about your product? We're here to help. Visit us at:
help.bestchoiceproducts.com
CHAT
US!
This manual suits for next models
1
Table of contents
Other BCP Kitchen Appliance manuals
Popular Kitchen Appliance manuals by other brands

Skymsen
Skymsen ES-100 instruction manual

Tricity Bendix
Tricity Bendix SI4023 Operating and installation instructions

Arzum
Arzum Panimini AR 297 instruction manual

lamart
lamart Bamboo PRODUCT INFORMATION AND INSTRUCTIONS

DS Produkte
DS Produkte Z 02832 instruction manual

Royal Catering
Royal Catering RCHW-350-2 user manual