Beam 250 User manual
Beam 250
moving head light
User manual
(RDM, color display, touch operation)
Please read the instructions carefully before use

Catalogue
Chapter 1 Precautions and Installation ........................................................................................
1. Maintenance .....................................................................................................................
2. Statement ..........................................................................................................................
3. Product Precautions ........................................................................................................
4. Fixture installation ...........................................................................................................
Chapter 2 Panel Operation .............................................................................................................
1. Overview ............................................................................................................................
2. Menu operation ................................................................................................................
3. Function Menu Description ............................................................................................
1. Set address ................................................................................................................
2. Set working mode ....................................................................................................
3. Display setting ..........................................................................................................
Chapter 3 Channel Description ......................................................................................................
Chapter 4 Common Faults and Precautions ................................................................................
1. Common fault handling ..................................................................................................
2. Precautions for Use ..........................................................................................................
3. Precautions for using RDM ..............................................................................................

Chapter 1 Precautions and Installation
1. Maintenance
a) The fixture shall be kept dry to avoid working in a humid environment.
b) Intermittent use will effectively prolong the service life of the fixture.
c) In order to obtain good ventilation effect and lighting effect, pay attention to
cleaning the fan, fan mesh and lens frequently.
d) Do not wipe the lamp shell with alcohol or other organic solvents to avoid
damage.
2. Declaration
When the product is delivered from the factory, its performance is intact and its
packaging is complete. All users shall strictly abide by the warnings and
operating instructions stated above. Any damage caused by misuse is not
covered by the Company's warranty, and the failure and problem caused by
ignoring the operating manual is not within the scope of the dealer.
This manual is subject to technical changes without notice
3. Product Precautions
a) In order to ensure the service life of the product, this product should not be
placed in a damp or leaking place, nor should it work in an environment where
the temperature exceeds 60 degrees.
b) Do not place the product in a place that is easy to loosen or vibrate.
c) In order to avoid the danger of electric shock, this product should be repaired by
professionals.
d) when the bulb is used, the change of power supply voltage shall not exceed ±
10%. If the voltage is too high, the life of the bulb will be shortened. If the voltage
is too low, the light color of the bulb will be affected.
e) After the power is cut off, it takes 20 minutes for the lamps to be fully cooled
before being powered on again
f) To ensure the normal use of this product, please read this instruction carefully.
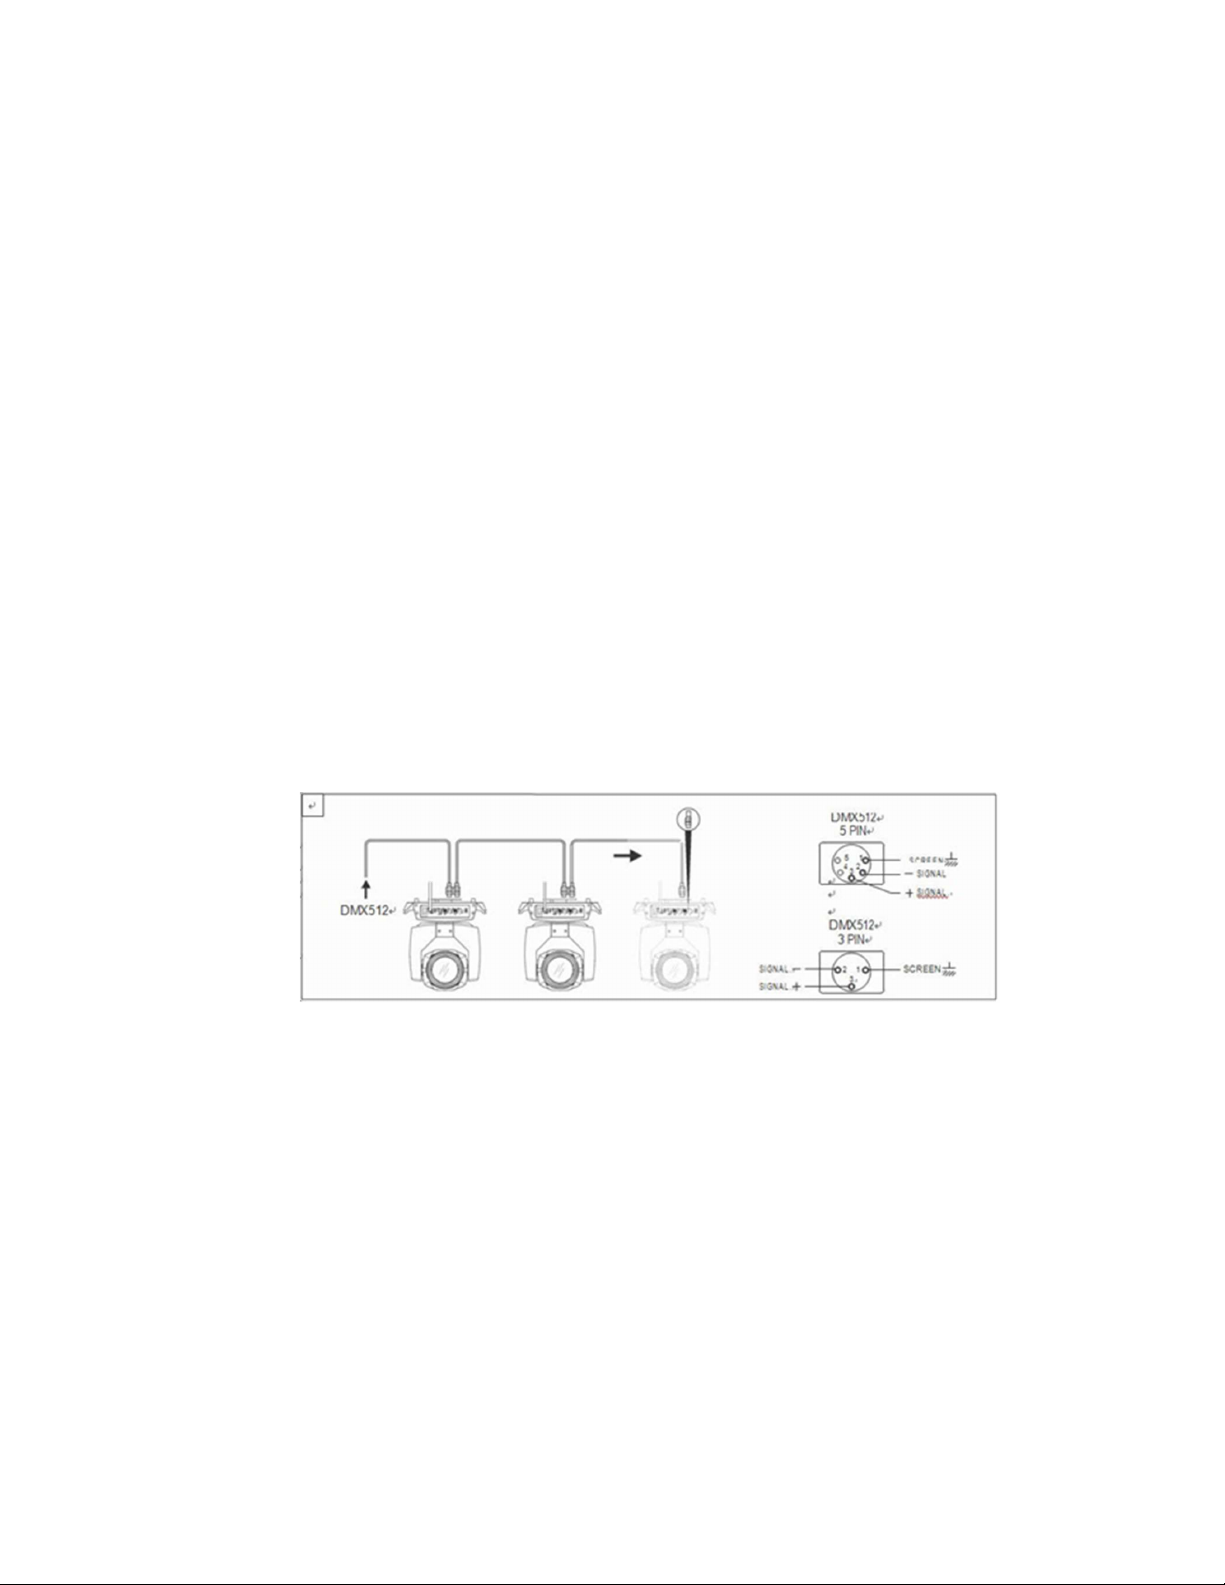
Signal line connection (DMX)
g) Use RS-485 cables that meet the specifications: shielded, 120ohm characteristic
impedance, 22-24 AWG, low capacitance. Do not use microphone cables or
cables with different specified characteristics. Terminal connection must use 3
or 5 pin XLR male/female connector. (1/4 W minimum).
Figure 1 DMX signal line connection diagram
4. Installation of fixture
Fixture can be placed horizontally, inclined or upside down. Pay attention to the
installation method when hanging diagonally or upside down.
As shown in Figure 2, before positioning the Fixture, the stability of the
installation site shall be ensured. During the reverse hanging installation, it is
necessary to ensure that the lamp does not fall off the support frame. It is

necessary to use a safety rope to pass through the support frame and the lamp
handle for auxiliary hanging to ensure safety and prevent the lamp from falling
and sliding.
During the installation and commissioning of fixtures, pedestrians are not
allowed to pass under them. Regularly check whether the safety ropes are worn
and whether the hook screws are loose.
Our company will not bear any responsibility for all consequences arising from
falling fixtures due to unstable hanging installation.
Figure 2 Schematic Diagram of Inverted Fixture
Chapter 2 Panel Operation
1. Overview
The schematic diagram of the fixture panel is shown in Figure 3. The title above shows the
lamp name, and the status bar below shows the signal, bulb status, and fault of the
current lamp ("ERR" is displayed when the fault information is not viewed, otherwise
"NOR" is displayed).
This fixture supports the DMX/RDM protocol. When the lamp is searched by the RDM host,
three letters "RDM" will appear on the panel, indicating that the lamp is normally
enumerated.
The display and operation are similar to "Android operating system". Click the
corresponding item with your fingertip or blunt object to operate
2. Menu operation
1. Select the menu item
The left area is the TFT display area and the touch area. Click the panel content with your
finger or blunt hardware to complete parameter settings or check the status.
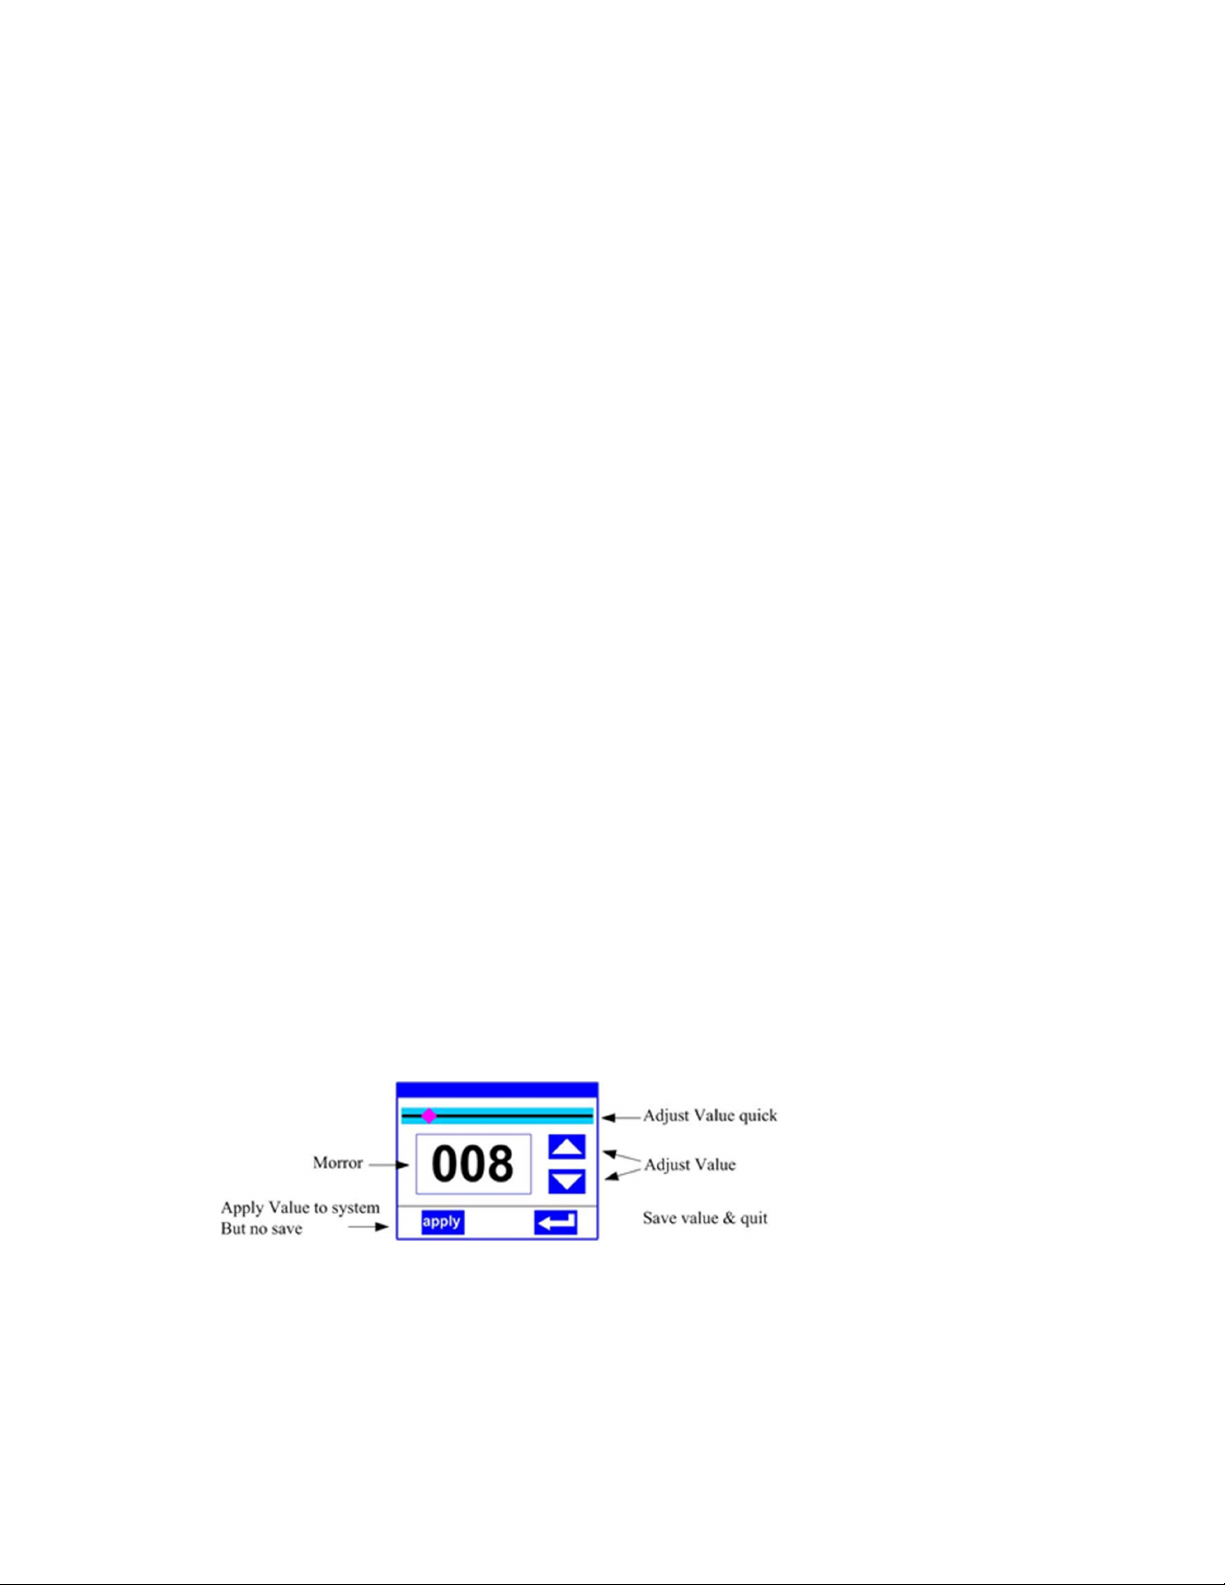
2. Parameter value input
Setting value: You can directly pull the slider to quickly set the required value, or click the
"Up" or "Down" button on the right to precisely set the required value or use auxiliary
input to set.

Application value: When the data is set by pressing the "Up" or "Down" button, and then
press the "Apply" button at the bottom left corner, the value will be sent to the lamp
immediately, but the value is not saved.
Save the value: at any time, click the "OK" button at the bottom right corner to save the
current value to the internal memory, and the saved value will be applied to the lamp
when it is turned on next time.
3. Function Menu Description
1. Set DMX address code
The menu setting of lamps optimizes the address setting, and several operations for
setting address codes are as follows:
Select "Previous" or "Next", the lamp will automatically calculate the address code of the
next or previous set according to the current address code and channel data, which can
be quickly set;
Click the address code value to enter the value editing window, where you can set any
valid address code. The fixture automatically obtains the current channel number of the
lamp, and automatically filters the address code (512 - current channel number) that
cannot be used.
The fixture supports RDM protocol, and the lamp address code can be set remotely
through RDM.
Two buttons are provided:
Channel mode: different channel modes can be selected circularly;
fixture reset: reset all motors.
2. Set fixture working mode
The fixture supports four operation modes (DMX mode, self-propelled mode, voice
control mode and scene mode)
3. Panel display setting
Fixture support Chinese English bilingual, upside down display
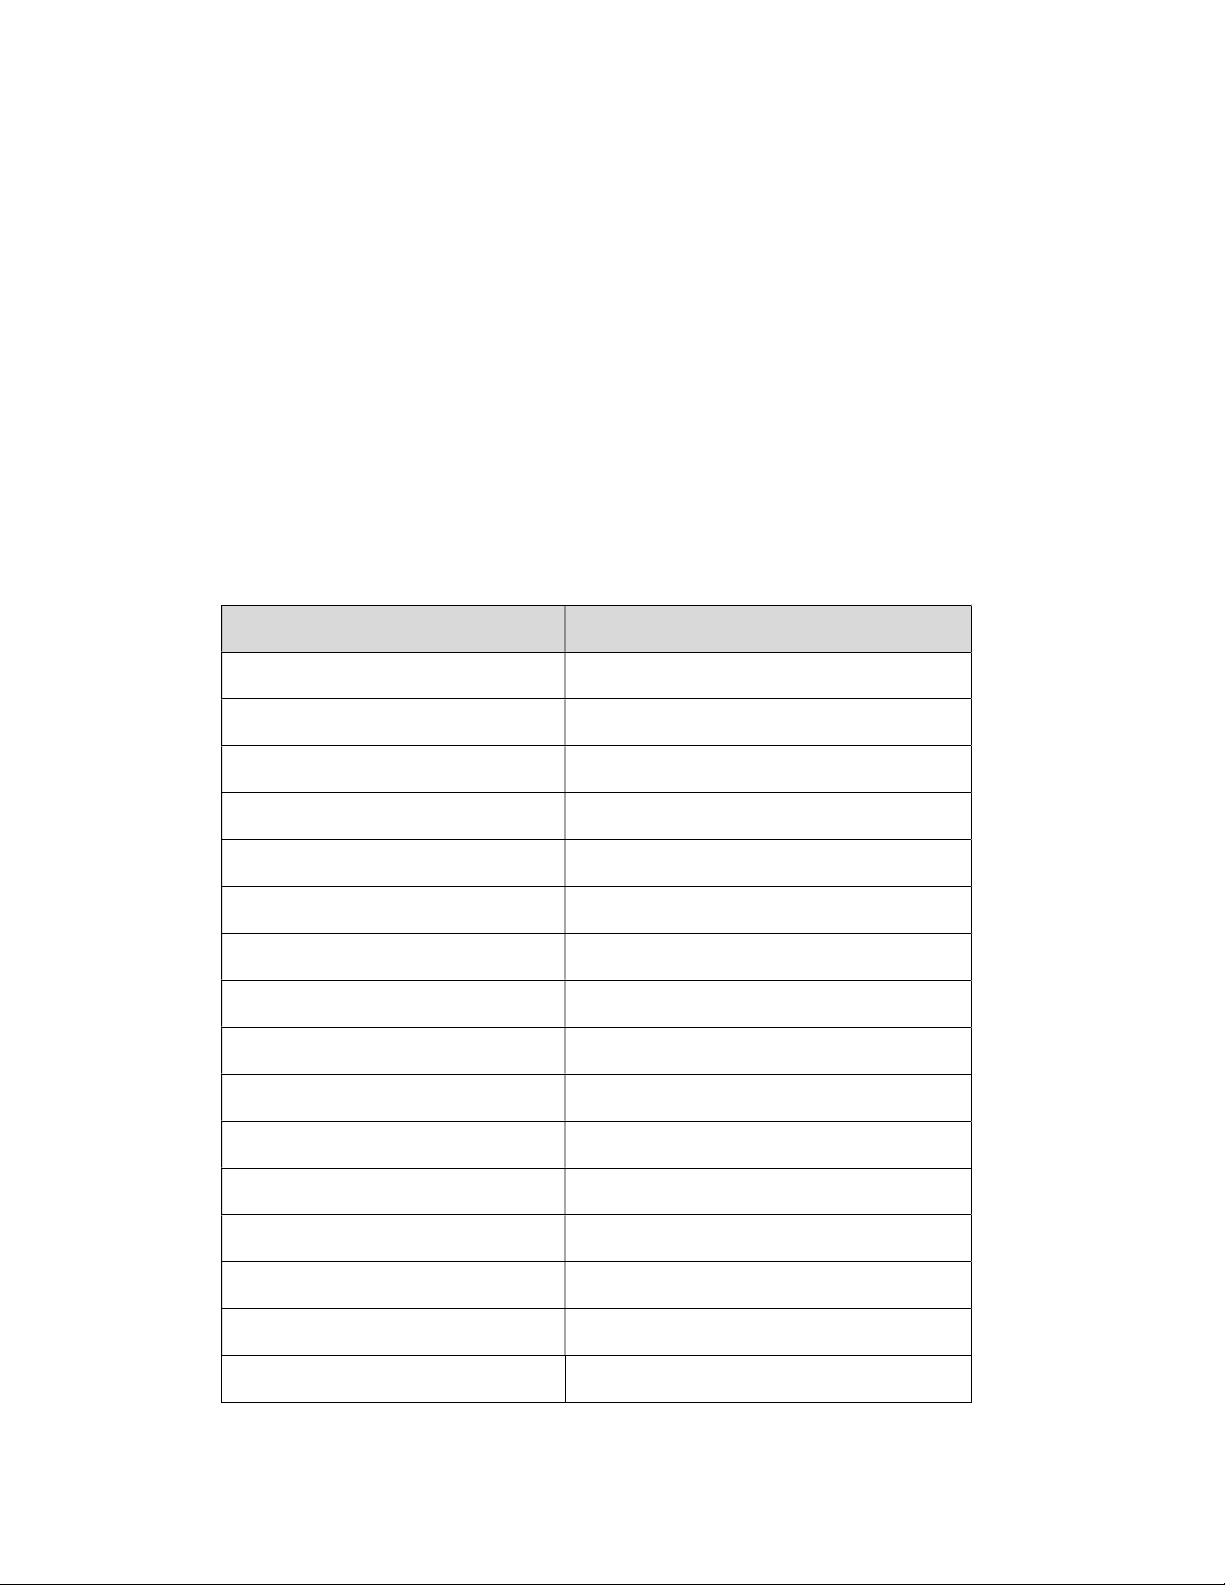
Chapter 3 Channel Description
CHANNEL Function
CH1 Pan
CH2 Tilt
CH3 Pan fine
CH4 Tilt fine
CH5 P/T speed
CH6 Frost
CH7 Strobe
CH8 Dimmer
CH9 Color
CH10 Gobo
CH11 Prism 1
CH12 Prism 2
CH13 Prism Rot
CH14 Rainbow
CH15 Focus
CH16 Lamp/Reset

Lamp/Reset(CH16): 100-105 (LAMP OFF)
200-205 (LAMP ON)
240-255 (RESET ALL)
Chapter 4 Common Faults and Precautions
1. Common fault handling
The fixture contains microcomputer circuit board, high-voltage power supply and
other professional components. For your safety and product life, no professionals
are not allowed to dismantle the fixture and related accessories without
authorization.
1. The bulb does not light up (except for LED light source)
Possible causes: The bulb is not completely cooled, or the bulb has reached its
service life. The treatment is as follows:
Due to abnormal operation, the bulb is not completely cooled, so the lamp body
should be allowed to cool for more than 10 minutes to fully restore its interior to
normal state, and then start the power supply again;
Check whether the bulb has reached its service life, and replace it with a new one;
Check whether the circuit between the bulb and the lamp lighter leaks, falls off or
has poor contact;
Replace with a new lamp lighter.
2. The beam appears dim

Possible causes: The bulb has been used for a long time or the light path is not
clean. The treatment is as follows:
Check whether the bulb has reached its service life, and replace it with a new one;
Check whether the optical components or bulbs are clean and whether there is
dust on the bulbs and other optical components. Clean and maintain the bulbs
and components in the lamps regularly.
3. Blurred pattern projection
Check whether the electronic focusing channel value is suitable for the current
projection distance.
4. The fixture works intermittently
Possible causes: the internal circuit enters the protection state, and the treatment
is as follows:
Check whether the fan operates normally or becomes dirty, causing the
temperature inside the lamp to rise;
Check whether the internal temperature control switch is closed;
Check whether the bulb has reached its service life and replace it with a new one.
5. The lamp does not accept the control of the console after normal reset
Possible causes: signal line fault or abnormal lamp parameter setting. The
handling is as follows:
Check the starting address code and the connection of the DMX signal line
(whether the signal line cable is in good condition and whether the connection of
the CORNON head is loose);
Table of contents


