BEANAIR EcoSensor Beandevice ONE-T User manual

QUICK START
Wireless IOT Temperature & humidity sensors
built-in datalogger
ONE-TH
Wireless IOT temperature sensor
built-in datalogger
ONE-T
Wireless IOT Sensor | IR(Infrared)
temperature sensor
built-in datalogger
ONE-Tir
2.4GHz
EcoSensor


1
TECHNICAL SUPPORT.........................................................................
VISUAL SYMBOLS DEFINITION..............................................................
ACRONYMS AND ABREVIATIONS...........................................................
Beandevice®2.4GHz ONE-T/ONE-TH/ONE-TIR.........................................
UNBOX YOUR BeanDevice®..........................................................
PRODUCT OVERVIEW....................................................................
NON-CONTACT BUTTONS AND LEDS DESCRIPTION............................
OPERATIONS ON NON-CONTACT BUTTONS AND NETWORK LEDS...............
WIRELESS IOT COORDINATOR ( BEANGATEWAY®)....................................
UNBOX YOUR BEANGATEWAY®OUTDOOR..........................................
UNBOX YOUR BEANGATEWAY®INDOOR............................................
INDOOR VERSION .......................................................................
OUTDOOR VERSION .....................................................................
START YOUR APPLICATION...................................................................
A QUICK SETTINGS OVERVIEW.............................................................
DATA ACQUISITION CONFIGURATION.................................................
USING THE DATALOGGER...............................................................
WHERE TO FIND MORE TECHNICAL INFORMATION?...................................
1.
2.
3.
4.
4.1
4.2
4.3
4.4
5.
5.1
5.2
5.3
5.4
6.
7.
7.1
7.2
8.
4
4
5
6
6
7
7
8
9
9
10
12
13
14
20
20
22
25
Contents
EcoSensor

2
Figure 01
Figure 02
Figure 03
Figure 04
Figure 05
Figure 06
Figure 07
Figure 08
Figure 09
Figure 10
Figure 11
Figure 12
Figure 13
Figure 14
Figure 15
Figure 16
Figure 17
Figure 18
Figure 19
Figure 20
Figure 21
Figure 22
Figure 23
Figure 24
Figure 25
Figure 26
Figure 27
List of Figures
:
:
:
:
:
:
:
:
:
:
:
:
:
:
:
:
:
:
:
:
:
:
:
6
7
9
10
10
11
11
15
15
16
16
18
18
19
19
19
20
20
21
21
22
22
22
23
23
23
24
BeanDevice®Box ........................................................................
BeanDevice®ONE-TH....................................................................
BeanGateway®Outdoor Box...........................................................
BeanGateway®accessories...........................................................
BeanGateway®Indoor Box..............................................................
BeanGateway®Indoor version........................................................
BeanGateway®Indoor Accessories.................................................
Static IP allocation on your PC.......................................................
Dynamic IP allocation on your PC......................................................
Turn on the BeanGatewa®..............................................................
Localization process....................................................................
Start the Server............................................................................
BeanGateway®Dashboard..............................................................
Powen on the BeanDevice®............................................................
Connect the BeanDevice®to the BeanGateway®...........................
Add to Firewall.............................................................................
Expert View.................................................................................
DAQ frame.................................................................................
DAQ Configuration........................................................................
Real-Time Graph..........................................................................
DataLogger Options.....................................................................
DataLogger Status.......................................................................
DataLogger Tab............................................................................
DataLogger status.......................................................................
DataLogger Manager....................................................................
DataLogger Management.............................................................
DataLogger memory configuration.................................................
EcoSensor

3
Disclaimer
The information contained in this document is the proprietary information of BeanAir®.
The contents are confidential and any disclosure to persons other than the ocers,
employees, agents or subcontractors of the owner or licensee of this document, without
the prior written consent of BeanAir®GmbH, is strictly prohibited.
BeanAir®makes every eort to ensure the quality of the information it makes available.
Notwithstanding the foregoing, BeanAir®does not make any warranty as to the information
contained herein, and does not accept any liability for any injury, loss or damage of any
kind incurred by use of or reliance upon the information.
BeanAir®disclaims any and all responsibility for the application of the devices characterized
in this document, and notes that the application of the device must comply with the
safety standards of the applicable country, and where applicable, with the relevant wiring
rules.
BeanAir®reserves the right to make modifications, additions and deletions to this document
due to typographical errors, inaccurate information, or improvements to programs and/
or equipment at any time and without notice.
Such changes will, nevertheless be incorporated into new editions of this document.
Copyright: Transmittal, reproduction, dissemination and/or editing of this document as
well as utilization of its contents and communication thereof to others without express
authorization are prohibited. Oenders will be held liable for payment of damages. All
rights are reserved.
Copyright © BeanAir GmBh 2021
EcoSensor
EcoSensor
4
1. TECHNICAL SUPPORT
For general contact, technical support, to report documentation errors and to order manuals,
contact BeanAir®Technical Support Center (BTSC) at:
For detailed information about where you can buy the BeanAir®equipment/software or for
recommendations on accessories and components visit:
www.beanair.com
To register for product news and announcements or for product questions contact BeanAir’s
Technical Support Center (BTSC).
Our aim is to make this user manual as helpful as possible. Please keep us informed of
your comments and suggestions for improvements. BeanAir®appreciates feedback from
the users.
DefinitionSymbols
Danger – This information MUST be followed if not you may damage the
equipment permanently or bodily injury may occur.
Tip or Information – Provides advice and suggestions that may be useful when
installing BeanAir Wireless IOT Sensors.
Caution or Warning – Alerts the user with important information about BeanAir®
wireless IOT Sensors. if this information is not followed, the equipment /software
may fail or malfunction
2. VISUAL SYMBOLS DEFINITION
EcoSensor

5
AES Advanced Encryption Standard
CCA Clear Channel Assessment
CSMA/CA Carrier Sense Multiple Access/Collision Avoidance
GTS Guaranteed Time-Slot
kSps Kilo samples per second
LDCDA Low duty cycle data acquisition
LLC Logical Link Control
LQI Link quality indicator
MAC Media Access Control
PER Packet error rate
POE Power Over Ethernet
RF Radio Frequency
SD Secure Digital
UPS Uninterruptible power supply
USB OTG USB On The Go
WDAQ Wireless DAQ
WSN Wireless Sensor Networks
3. ACRONYMS AND ABREVIATIONS
EcoSensor
EcoSensor

6
4. Beandevice® 2.4GHz ONE-T/ONE-TH/ONE-TIR
Open the BeanDevice®box
Figure 1 :BeanDevice®Box
4.1 UNBOX YOUR BeanDevice®
Use the magnet to:
- Power ON/Power OFF the BeanDevice®
- Pair the BeanDevice®to your BeanGateway®
Figure 2 :BeanDevice®ONE-TH
The BeanDevice®is provided with a waterproof antenna
2.2dBi and a magnet.
EcoSensor

7
4.2 PRODUCT OVERVIEW
EcoSensor®sensor series is suitable for Environmental Monitoring, Test & measurement
and structural health monitoring (SHM) :
BeanDevice®2.4GHz ONE-T
Ambient Temperature
EcoSensor
BeanDevice®2.4GHz ONE-T-ST
BeanDevice®2.4GHz ONE-T-ST-CL BeanDevice®2.4GHz ONE-T-STCORE
BeanDevice®2.4GHz ONE-T-HA BeanDevice®2.4GHz ONE-T-HAEY
EcoSensor
4.3 NON-CONTACT BUTTONS AND LEDS DESCRIPTION
EcoSensor
2.4GHz ONE-T
Temperature Sensor probe
Network Reset
non-contact push button
Waterproof Antenna
ON/OFF non-contact
push button
Eyelet for
wall mounting
BeanDevice®2.4GHz ONE-TH
Temperature. Humidity & Dew point
BeanDevice®2.4GHz ONE-TIR
IR Temperature
EcoSensor
8

9
4.4 OPERATIONS ON NON-CONTACT BUTTONS AND LEDS
Sensor Activity LED
Green LED ON :
Measurement is OK
Red LED ON :
Measurement is not OK
( sensor failure)
Network LEDOperating status
LED OFFThe BeanDevice® is power o
Green LED :
Wireless Network Activity
Red LED :
Wireless transmission failure
The BeanDevice® is power on
with wireless TX/RX activity
Green LED blinks twice The BeanDevice® is power on
Red LED ON during 2sThe BeanDevice® is power o
(was power on before)
Green LED blinksThe BeanDevice® is power on
& waits for a network activity
Red LED ON during 2s then
Green LED ON during 2s then
Green LED blinks
constantly until connection to
BeanGateway®
The BeanDevice® is power on
& a network Reset is performed
by holding the magnet on
Network Push Button during 2s
EcoSensor
10
Figure 3 :BeanGateway®Outdoor Box
5.1 UNBOX YOUR BEANGATEWAY®OUTDOOR
Open the BeanGateway®Outdoor box
The BeanGateway®is a wireless coordinator used to build and manage Beanair®Wireless IOT
Sensors. It supports the conversation of data exchanged, compression and IP connectivity
with the network thereby reducing the intelligence required in these platforms, maintenance
and therefore the associated cost.
The BeanGateway is available in two versions : Indoor (IP40) and Outdoor (IP67)
5. WIRELESS COORDINATOR ( BEANGATEWAY®)
EcoSensor

11
5.2 UNBOX YOUR BEANGATEWAY®INDOOR
Open the BeanGateway®box
Figure 05 :BeanGateway®accessories
The BeanGateway®Outdoor is provided with a wall plug-in
power supply, a power adapter for your country, a N-Type
antenna, a Wall mounting kit and an Ethernet cable.
Figure 05 :BeanGateway®Indoor Box
EcoSensor

12
The BeanGateway®Indoor is provided with a wall plug-in power supply, a power
adapter for your country, a RPSMA antenna and an Ethernet cable.
Figure 13 :BeanGateway®Indoor Accessories
Figure 12 :BeanGateway®Indoor version
EcoSensor
13
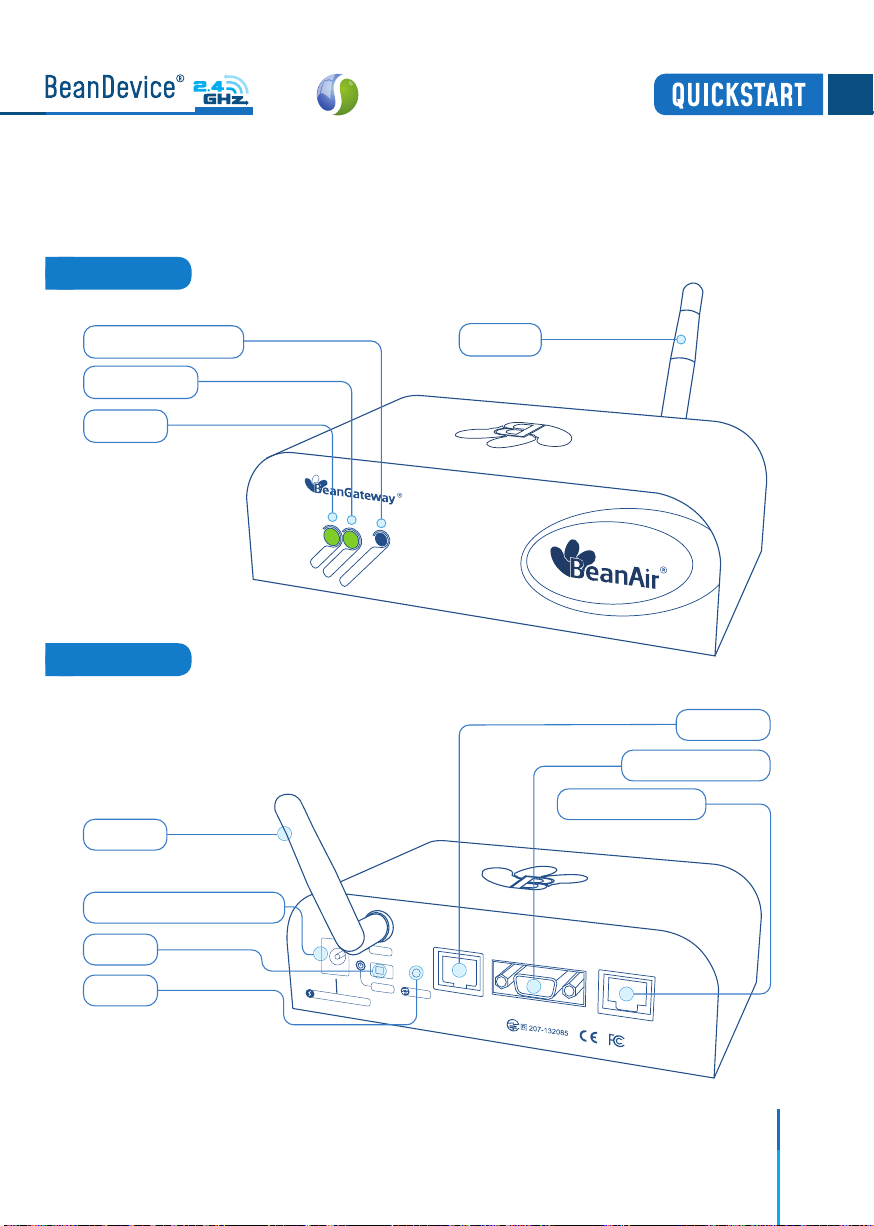
5.3 INDOOR VERSION
Front View
Rear View
EcoSensor
Wireless IOT Sensors Coordinator
Wireless Link
Wireless Link
Reset LAN Settings
Reset LAN Settings
Antenna
LAN Link
LAN Link
Power Supply 8-28 VDC
OFF/ON
Reboot
Antenna
Ethernet
RS232 / ModBus
RS485 / ModBus
Made in Germany
RoHS Lead free
ID : TYOJN5148MO
Power Supply 8-28 VDC
OFF/ON
Antenna
Ethernet
RS232 / ModBus
RS485 / ModBus
Reboot

14
Network push button
( Restores factory settings )
RJ45 connector integrated in a
cable gland (IP67 Waterproof)
M8-3Pins Power Supply Socket
(DC 8-28 Volts)
WSN Activity LED
LAN Activity LED
Antenna
ON/OFF Push Button
RS485/ModBus(Option)
5.4 OUTDOOR VERSION
EcoSensor

6. START YOUR APPLICATION
2.
1. Insert the BeanScape®2.4GHz DVD in your DVD drive then follow the installation
instructions.
Connect your Beangateway®directly to your PC or to your WIFI/LAN router by using
an Ethernet cable.
If you connect your BeanGateway®to your WIFI/LAN router, you can go for Static or
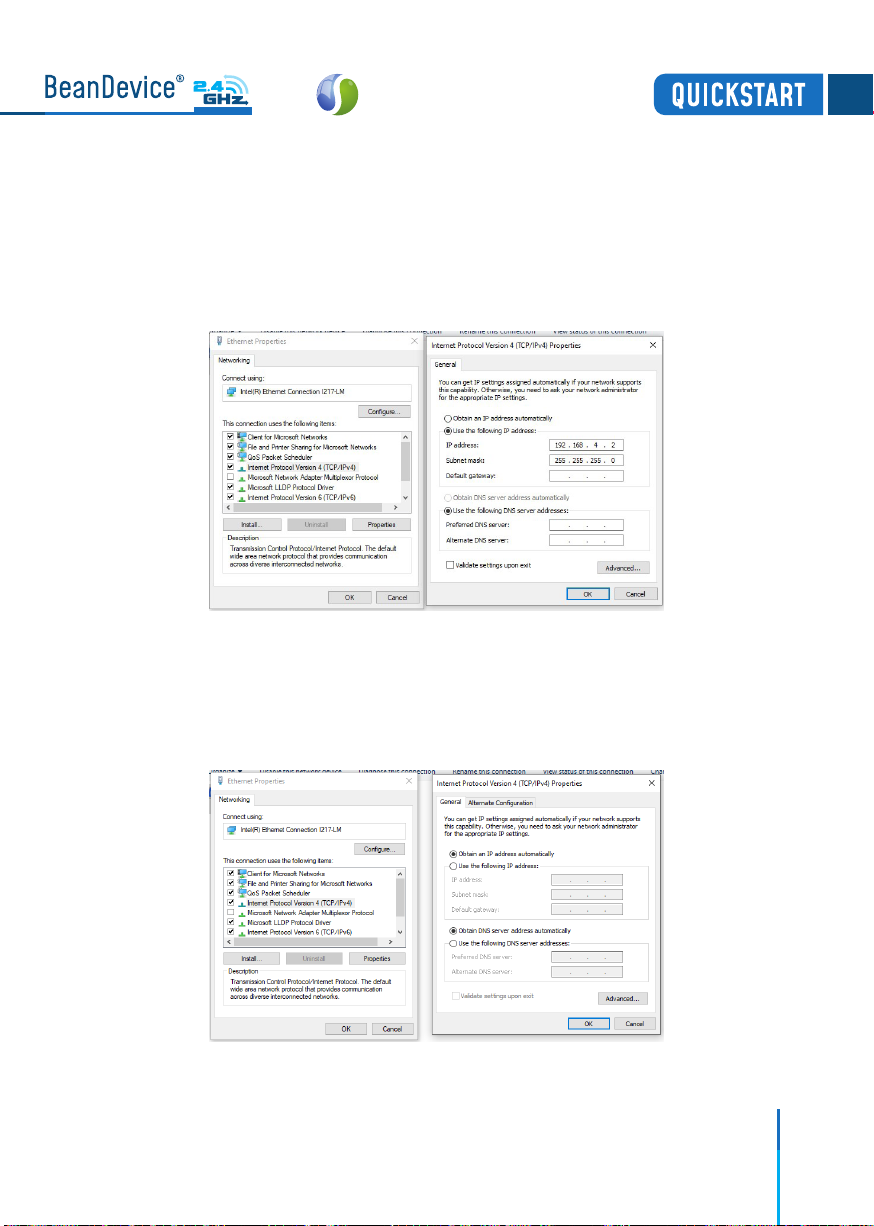
Dynamic IP. If your Beangateway®is directly connected to your PC, Static IP should be
selected as there is no DHCP server hosted on your PC.
15
EcoSensor
R
R
LAN RJ45
Wireless link
Wireless link
LAN or WIFI
Ethernet LAN
Third-party WLAN
Router
16
The BeanGateway®comes with the default IP address 192.168.4.123
Assign manually a static IP address to your PC with the same subnet as your BeanGateway®,
192.168.4.2
You can go for Dynamic IP address on both PC and BeanGateway®
Direct connection :
Via LAN Router connection :
Figure 8 :Static IP allocation on your PC
Figure 9 :Dynamic IP allocation on your PC
EcoSensor
17
4.
3.
5.
Make sure that your Beanscape®software is already
installed on your PC and running.
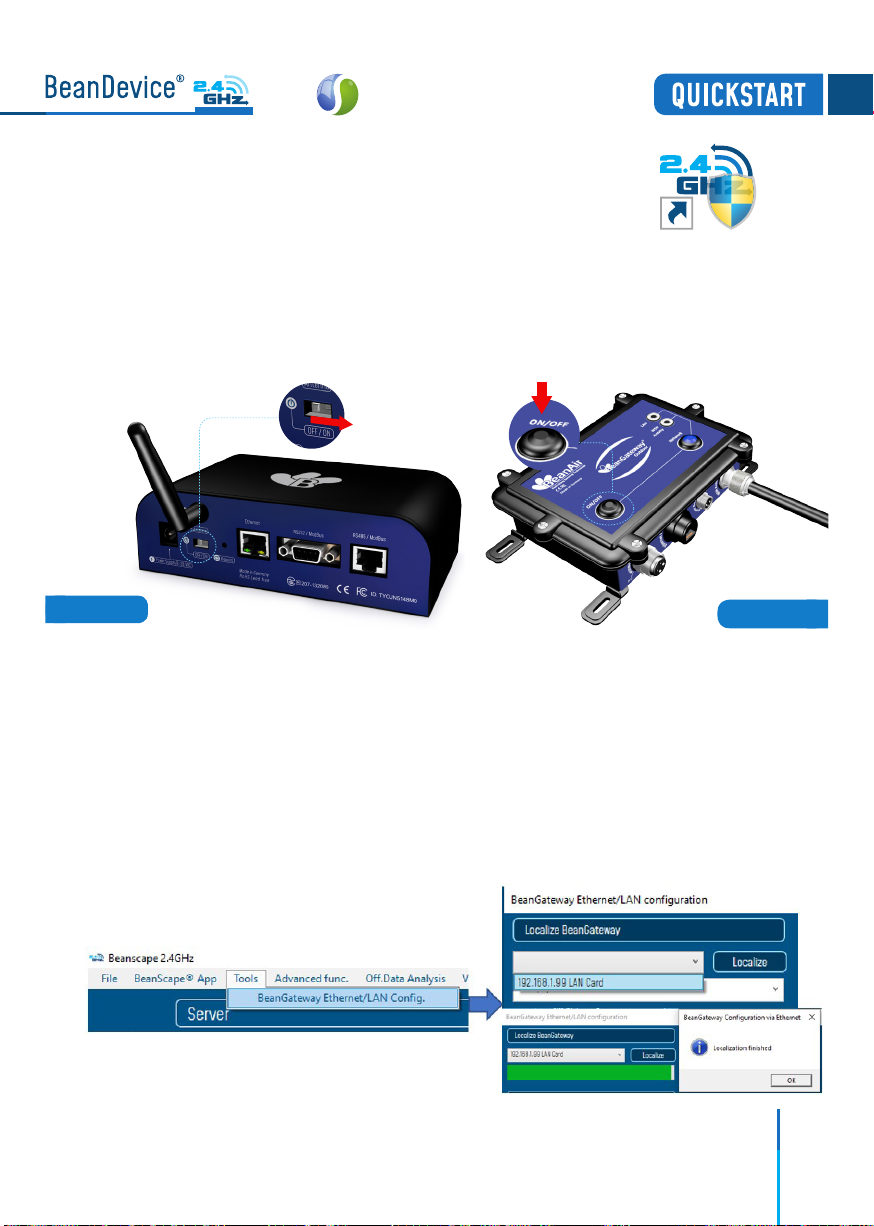
Turn on the BeanGateway®by pushing on the ON/OFF button if you are using the
outdoor version or slide the ON/OFF button to the right side if you are using the
indoor version.
Localize your BeanGateway®on your LAN
Go to Tools tab then select BeanGateway®Ethernet/LAN Config. and select your PC
IP address from the scroll down menu then click on localize, your BeanGateway®
MAC ID will appear on a scrolling list, select it then click on validate.
Figure 10 : Turn on the BeanGateway®
BeanScape 2.4GHz
outdoor Version
Figure 11 : Localization process
EcoSensor
Indoor Version
18
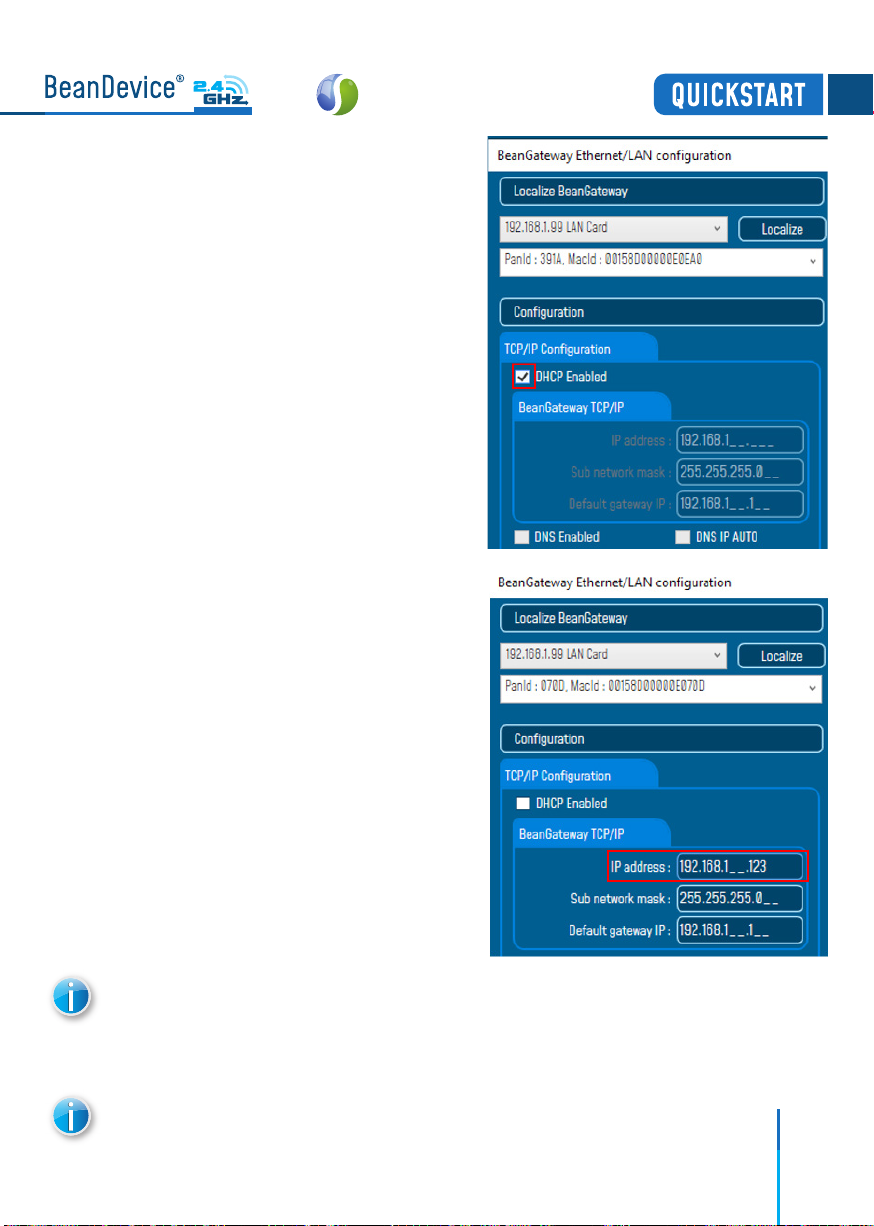
Via LAN Router connection :
Direct connection :
Make sure that DHCP check box is enabled
Allocate a static IP to your BeanGateway®
before to click on validate
If the BeanGateway®scroll down menu appears empty, push on the CNC/Network
push button for 10s until the network LED turns to red color. You will restore LAN
settings from the factory (static IP address: 192.168.1.123) then redo the localization
process.
Make sure you have no antivirus/firewall blocking the network activity between
the BeanGateway®and the BeanScape®software.
EcoSensor
This manual suits for next models
2
Table of contents
Other BEANAIR Accessories manuals


