BEANAIR BeanGateway User manual

2.4GHz
BeanGateway
With 3G / 4G / LTE / Connectivity
For 2.4GHz Sensors
QUICK START


1
1. TECHNICAL SUPPORT........................................................................................
2. VISUAL SYMBOLS DEFINITION...........................................................................
3. ACRONYMS AND ABREVIATIONS........................................................................
4. QUICK PRODUCT DESCRIPTION .........................................................................
4.1-UNBOX YOUR BEANGATEWAY® 2.4GHz 4G
4.2-ACCESSORIES DESCRIPTION
5. INSTALLATION ..................................................................................................
6.DEFAULT SETTINGS............................................................................................
7.HOW TO SETUP A REMOTE ACCESS IN 4 STEPS (EXAMPLE OF IP FORWARDING
METHOD) ..........................................................................................................
7.1-STEP 1: AT YOUR OFFICE, CONFIGURE YOUR FIREWALL FOR REMOTE ACCESS
7.2-STEP 2: AT YOUR OFFICE, CONFIGURE IP FORWARDING RULES
7.2.1-Example with ADSL MODEM (NAT ROUTER Conguration)
7.2.2-Example of 4G Router (SIM CARD Provider Olivia wireless)
7.2.2.1-System Architecture
7.3-STEP 3: AT YOUR OFFICE, CONFIGURE THE PORT NUMBER ON YOUR BEANSCAPE®
7.4-STEP 4 : BEANGATEWAY® CONFIGURATION ON THE MONITORING SITE
7.4.1-Sim card conguration
7.4.2-Make sure the DHCP is enabled on your LTE router
7.4.3-BeanGateway® 2.4GHz conguration with Public IP of your Ofce PC
8.WHERE TO FIND MORE TECHNICAL INFORMATION ..............................................
Contents
BeanGateway
3
3
4
4
4
5
6
10
13
14
14
14
17
17
24
24
24
26
27
31
V1.3 - 27/06/2022

2
List of Figures
BeanGateway
Disclaimer
The information contained in this document is the proprietary information of BeanAir®.
The contents are confidential and any disclosure to persons other than the ocers,
employees, agents or subcontractors of the owner or licensee of this document, without
the prior written consent of BeanAir®GmbH, is strictly prohibited.
BeanAir®makes every eort to ensure the quality of the information it makes available.
Notwithstanding the foregoing, BeanAir®does not make any warranty as to the information
contained herein, and does not accept any liability for any injury, loss or damage of any
kind incurred by use of or reliance upon the information.
BeanAir®disclaims any and all responsibility for the application of the devices characterized
in this document, and notes that the application of the device must comply with the
safety standards of the applicable country, and where applicable, with the relevant wiring
rules.
BeanAir®reserves the right to make modifications, additions and deletions to this document
due to typographical errors, inaccurate information, or improvements to programs and/
or equipment at any time and without notice.
Such changes will, nevertheless be incorporated into new editions of this document.
Copyright: Transmittal, reproduction, dissemination and/or editing of this document as
well as utilization of its contents and communication thereof to others without express
authorization are prohibited. Oenders will be held liable for payment of damages. All
rights are reserved.
Copyright © BeanAir GmBh 2022

3
BeanGateway
1. TECHNICAL SUPPORT
For general contact, technical support, to report documentation errors and to order manuals,
contact BeanAir®Technical Support Center (BTSC) at:
For detailed information about where you can buy the BeanAir®equipment/software or for
recommendations on accessories and components visit:
www.beanair.com
To register for product news and announcements or for product questions contact BeanAir’s
Technical Support Center (BTSC).
Our aim is to make this user manual as helpful as possible. Please keep us informed of
your comments and suggestions for improvements. BeanAir®appreciates feedback from
DefinitionSymbols
Danger – This information MUST be followed if not you may damage the
equipment permanently or bodily injury may occur.
Tip or Information – Provides advice and suggestions that may be useful when
installing BeanAir Wireless IOT Sensors.
Caution or Warning – Alerts the user with important information about BeanAir®
wireless IOT Sensors. if this information is not followed, the equipment /software
may fail or malfunction
2. VISUAL SYMBOLS DEFINITION

4
BeanGateway
AES Advanced Encryption Standard
CCA Clear Channel Assessment
CSMA/CA Carrier Sense Multiple Access/Collision Avoidance
GTS Guaranteed Time-Slot
kSps Kilo samples per second
LDCDA Low duty cycle data acquisition
LLC Logical Link Control
LQI Link quality indicator
MAC Media Access Control
PER Packet error rate
POE Power Over Ethernet
RF Radio Frequency
SD Secure Digital
UPS Uninterruptible power supply
USB OTG USB On The Go
WDAQ Wireless DAQ
WSN Wireless Sensor Networks
3. ACRONYMS AND ABREVIATIONS
4. QUICK PRODUCT DESCRIPTION
Open your BeanGateway® Box
The 2.4GHz 4G Gateway is available in two versions:
4.1 UNBOX YOUR BEANGATEWAY® 2.4GHZ 4G

5
BeanGateway
In addition to the BeanGateway® you will find inside the packet a list of accessories:
• 4G Antenna
• WiFi Antenna
• External cable for Wifi antenna
• External cable for 4G/LTE antenna
•Power supply plug (only available with the mains power version)
4.2 ACCESSORIES DESCRIPTION
• BGTW-4G-MPWR-OUT, Mains Power supply • BGTW-4G-SOLAR-OUT, Solar Power Supply
It is provided with a 4G antenna, WiFi antenna, external cables for both WiFi & 4G/LTE anten-
nas and a power supply plug (only available with the mains power version).

6
4.2 ACCESSORIES DESCRIPTION
BeanGateway
1 : Please follow the following wiring code instructions to correctly build your own AC Power
supply
• Mains Power supply (Ref: BGTW-4G-MPWR-OUT)
The previous hardware version comes with a Female Socket and a Male Plug
BEANGATEWAY 4G WIFI Antenna
Power Supply Plug
4G / LTE Antenna
®
For more info on the accessories and its specication please refer to the user manual
5. INSTALLATION
Ref: , Provider:932321100 Hirschmann Plug Ref: ,provider:934124100 Hirschmann
C-Line (Pin 2) AC- Neutral (Pin 1)
Ground (Pin 4)
Positioning Notch
Socket for Mains Power supply

7
BeanGateway
• Solar Power supply (Ref: BGTW-4G-SOLAR-OUT)
DC Power:
The solar power controller can work between 13VDC to 20VDC, user can use an AC/DC power
adapter in this voltage rating.
If the DC Voltage is less than 13VDC, the provided voltage will not be enough to power
the Solar Power Manager
2: Use the provided antennas cables and power supply cable to connect to the appropriate
connectors as shown below in the gure.
Socket for solar power supply
Ref: , Provider:932321100 Hirschmann Plug Ref: ,provider:934124100 Hirschmann
12VDC – Solar Panel (Pin 2)
Ground (Pin 4)
Positioning Notch
BeanGateway
BeanGateway
8
BeanGateway
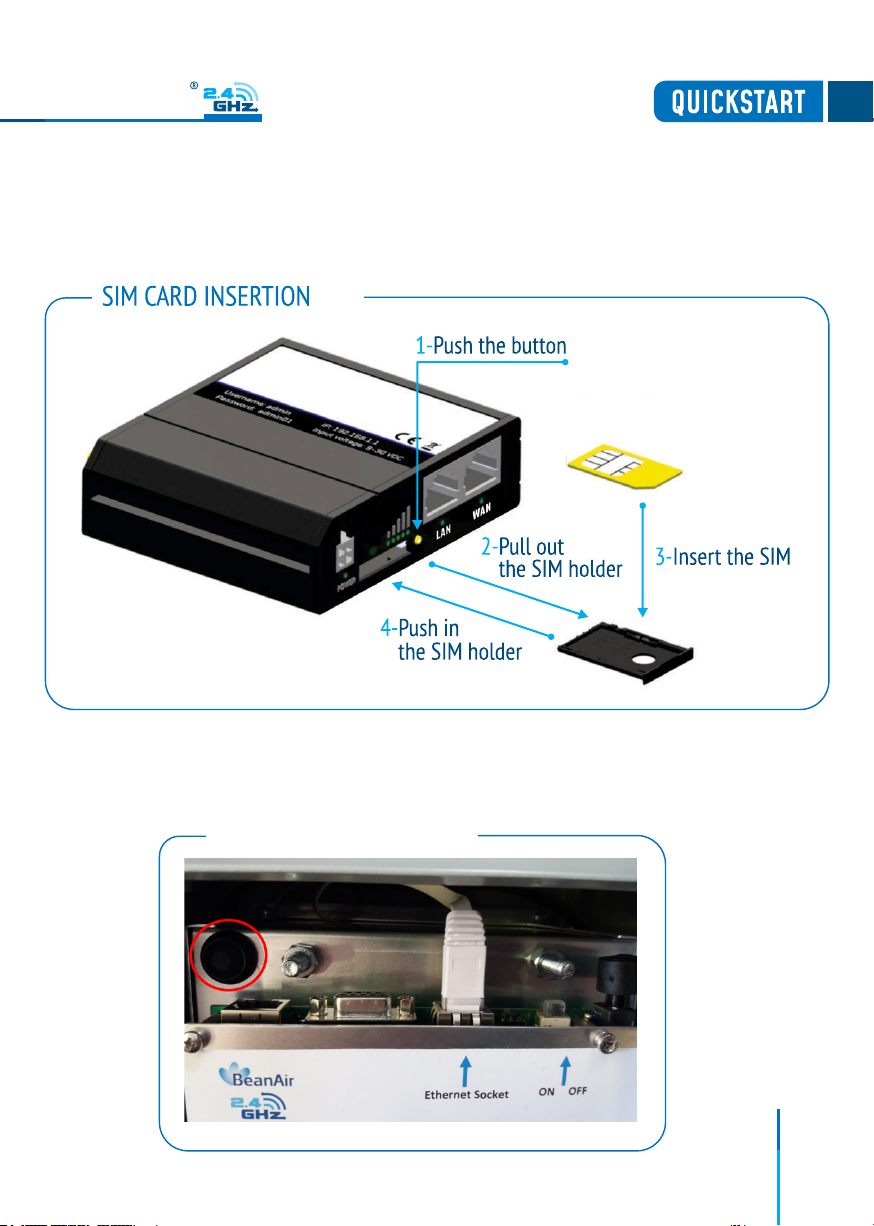
3. Open the box enclosure and use the Ethernet cable to connect your Laptop to the router in
order to congure the IoT Gateway and get it ready for remote monitoring, as well to insert
SIM card. Use a screwdriver to remove the black lid and properly insert the SIM card.
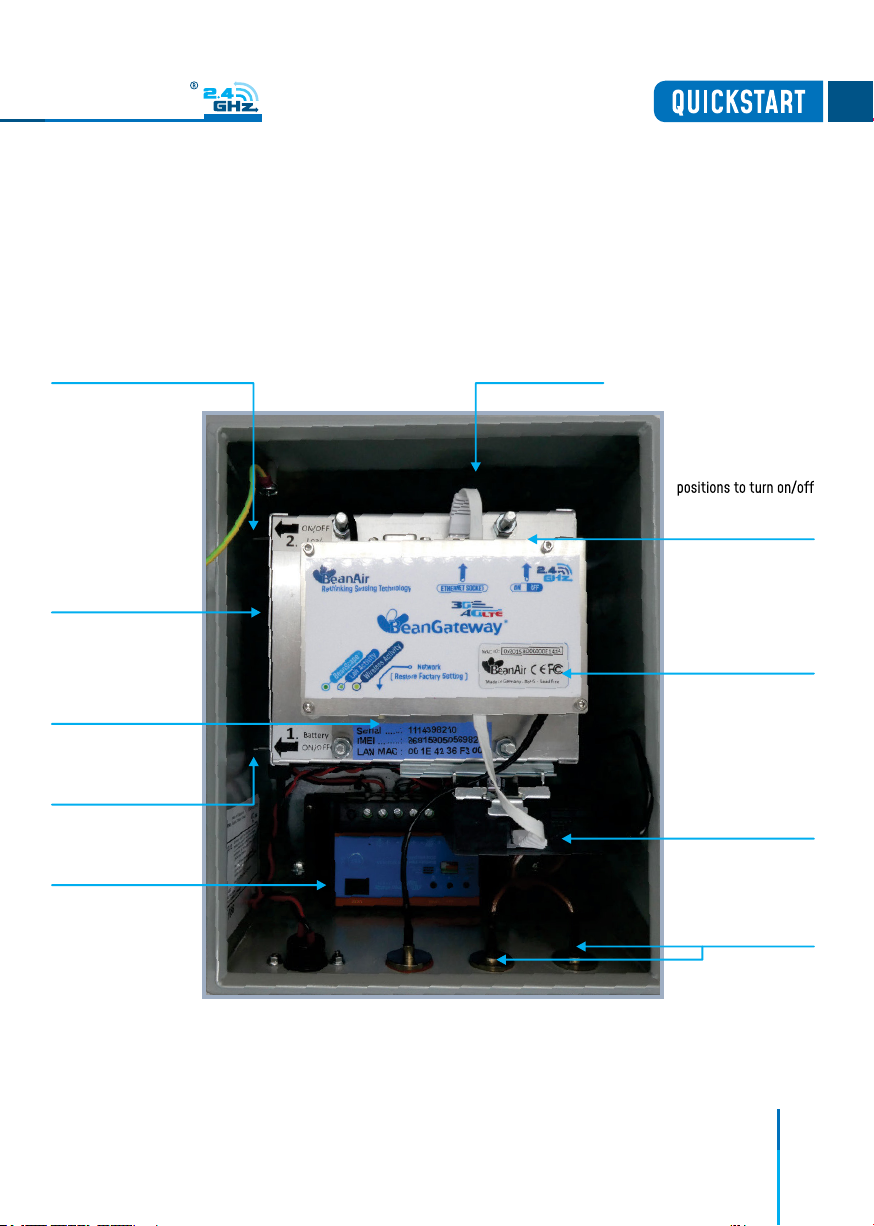
4. Don’t forget to turn On the switch mode box by pushing the ON/OFF push buton at the top
left corner, in order to charge the Lead-Acid Battery and get the gateway ready for congura-
tion.

9
BeanGateway
BGTW-4G-MPWR-OUT, Mains Power supply
BeanGateway
10
BeanGateway
Switch ON/OFF for Load
(BeanGateway® + 4G Router)
Backup Lead-Acid
Battery 14AH
Rj45 connector on the
BeanGateway board
To Reset LAN Settings
on your BeanGateway®
press and hold this
button for 10s
Switch ON/OFF
for Battery
Solar Power controller
Slide switch with ON/OFF
separately the
BeanGateway®
BeanGateway®
MAC address
Teltonika 4G router
connected to
the BeanGateway®
Router 4G antennas
BGTW-4G-SOLAR-OUT, Solar Power Sup-
11
BeanGateway
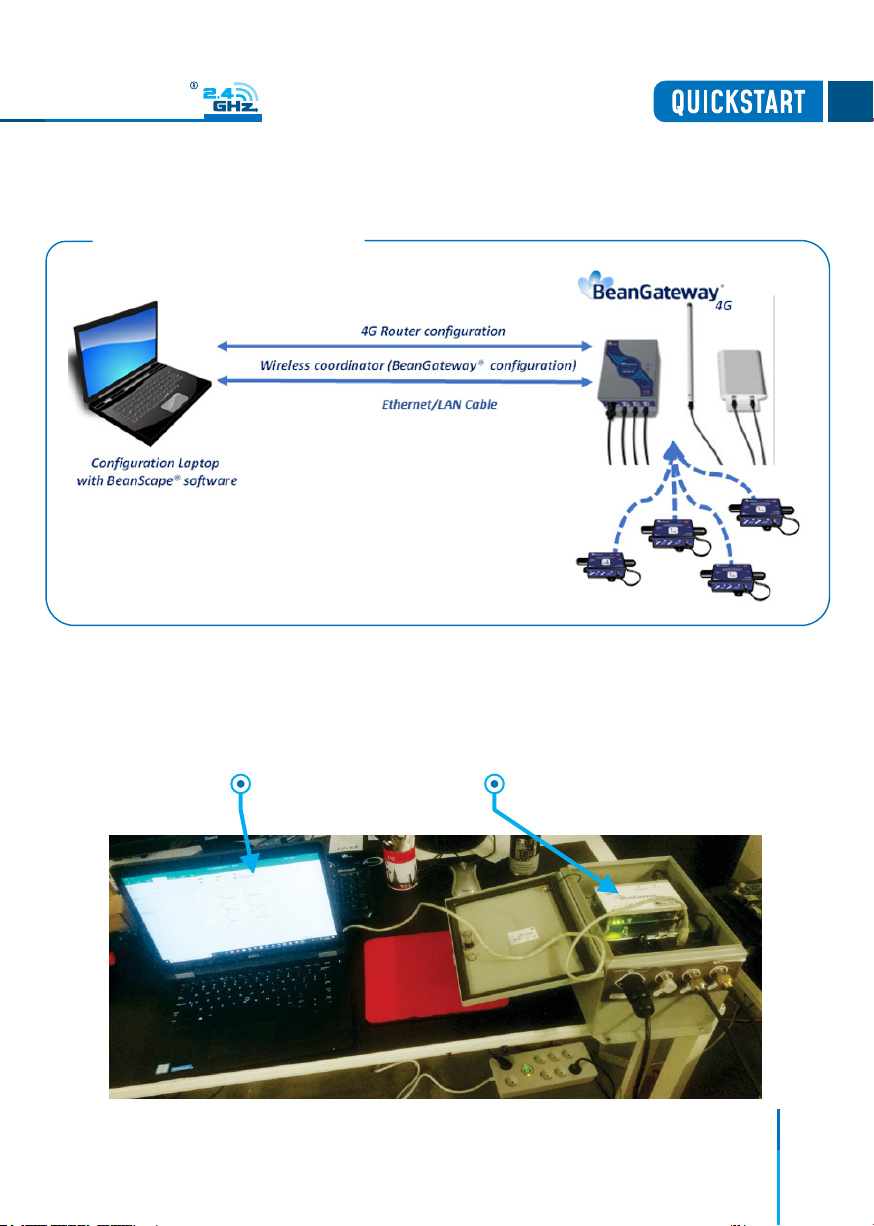
4. Use an ethernet cable to connect the router inside the IOT Gateway® to your laptop.
• Plug the power adapter to your 4G Router, then use an ethernet cable and plug it into the
LAN Ethernet port of your Conguration PC.
4G RouterConfiguration PC

12
BeanGateway
6. DEFAULT SETTINGS
The Default 4G Gateway® IP address is 192.168.1.1
1. Assign a static IP address to your PC within the same subnetwork as your BeanGateway®
• In the search bar tap change ethernet settings, then click on open
• Click on change Adapter settings

13
BeanGateway
• Right click on the Etherner device with is connected to your IOT Gateway, choose Propreties
• Double click on Internet Protocol Version4 (TCP/IPv4)

14
BeanGateway
• Enter the owing settings:
- Enter any ip in the form of 192.168.1.XXX where XXX is a number from 2 to 254 (except
243 which is the router IP address).
- Enter 255.255.255.0 for your subnet mask
- The default 4G gateway must come with the same IP address that your 4G Router
192.168.1.243
- Finally enter primary DNS server IP , the same than your 4G Router IP 192.168.1.243
- Click on OK validate your conguration
• Once your PC and IOT Gaetway® are connected to the same network, you can easily have
access to the router.

15
BeanGateway
7. HOW TO SETUP A REMOTE ACCESS IN 4 STEPS (EXAMPLE OF IP FORWARDING METHOD)
Before to start to congure your remote access, make sure your Ofce router/ASDL Box
should come with Fixed Public IP address to avoid losing the BeanGateway® whenever
it reboots for any reason.
How to get a xed public IP:
• If you are using an ADSL Router at your ofce: you can ask to your ADSL Router
provider to
allocate you a xed public IP
• You can purchase a Data SIM card with xed public IP from your ISP (Example: Olivia
Wireless)
• If you are using a standard SIM card, some PORTS can be blocked by the ISP.
It’s not mandatory to use a SIM card with xed public IP on the monitoring site.

16
BeanGateway
7.1 STEP 1: AT YOUR OFFICE, CONFIGURE YOUR FIREWALL FOR REMOTE ACCESS
You have to enable Routing and Remote Access option for both Private and Public networks,
communication through the rewall.
7.2 STEP 2: AT YOUR OFFICE, CONFIGURE IP FORWARDING RULES
7.2.1 Example with ADSL MODEM (NAT ROUTER Conguration)
1• From your Ofce PC, search for your Public IP address (ex: search for MyIP on Google).

17
BeanGateway
2• Setup a Port Forwarding conguration on your Router (each router brand has its own con-
guration interface).
Example 1: GlobalNet ADSL Router Webserver conguration (North Africa)
Make sure that no antivirus/rewall is blocking the network activity between the
BeanGateway® and the BeanScape® software.

18
18
BeanGateway
Example 2: Fritze Box (Germany)
Please be aware if the public IP Address
of your ADSL Box is not xed, you will
lose the connection between the Bean-
Gateway® and your Monitoring PC (at
the ofce), whenever the router reboots.
If you are not sure to have a xed public
IP, we suggest you use a 4G Router and a
SIM Card with a xed public IP.
Other manuals for BeanGateway
2
Table of contents
Other BEANAIR Gateway manuals


