Beauty UP ITT-9575 User manual

ITT-9575
Wireless Pad
User Manual
Please read over the user manual carefully before using. Keep the
manual for reference

2
Index
1 Safety Warning --------------------------------------------------
2 Accessories ------------------------------------------------------
3 Parts Description -------------------------------------------------
4 Installation -------------------------------------------------------
5 Specification and System Requirement -------------------------
6 Wireless Pad Setting ---------------------------------------------
7 ID Setting --------------------------------------------------------
8 Q&A --------------------------------------------------------------
9 Warranty Card ---------------------------------------------------
2
2
3
6
7
8
10
11
13

3
1 Safety Warning
Ś To use this product properly and safely, carefully read over the
Safety Warning
1. Use product near other electrical apparatuses.
2. Place product accessories in mouth.
3. Keep device in temperature above 40℃or below 5℃.
4. Use corrosive cleansing agents to clean.
5. Place product on tilt, unsafe or vibrating surface to avoid dropping
and causing damages.
6. Step or place heavy objects on top of the product.
7. Keep in humid location.
8. Place metallic materials on the product.
9. Bending or dropping the product and causing damages.
10.Place product in dusty locations and cause mal-function.
11.Fix or repair on one’s own. Disassembling the product may damage
the delicate parts within. Contact BEUP for repair.
12.Battery Leakage
-Rinse with water to clean battery leakage stained on hand or
clothing.
-Battery leakage may cause blindness if stained to the eye. Rinse
with lots of water and conduct inspection in the hospital
immediately.
Waiver
Ś Natural disasters, fire, or by users or third party’s purposefully or
unintentionally use.
Ś Improper usage that has not been written in the manual.
Ś Connecting to an inappropriate apparatus, or not using bundled
software.
4
2 Accessories
In the package you would find the following items. Contact your
vendor if there are any missing or damaged items.
-Wireless (Handwriting) Pad 1 pc
-Receiver 1 pc
-Installation CD 1 pc
-Electronic Pen 1 pc
-User Manual 1 pc
-Rechargeable NI-MH AAA battery 4 pcs
-Charger 1 pc
-USB extension for receiver 1 pc
-USB cord 1 pc(optional)
-Choosing (optional)
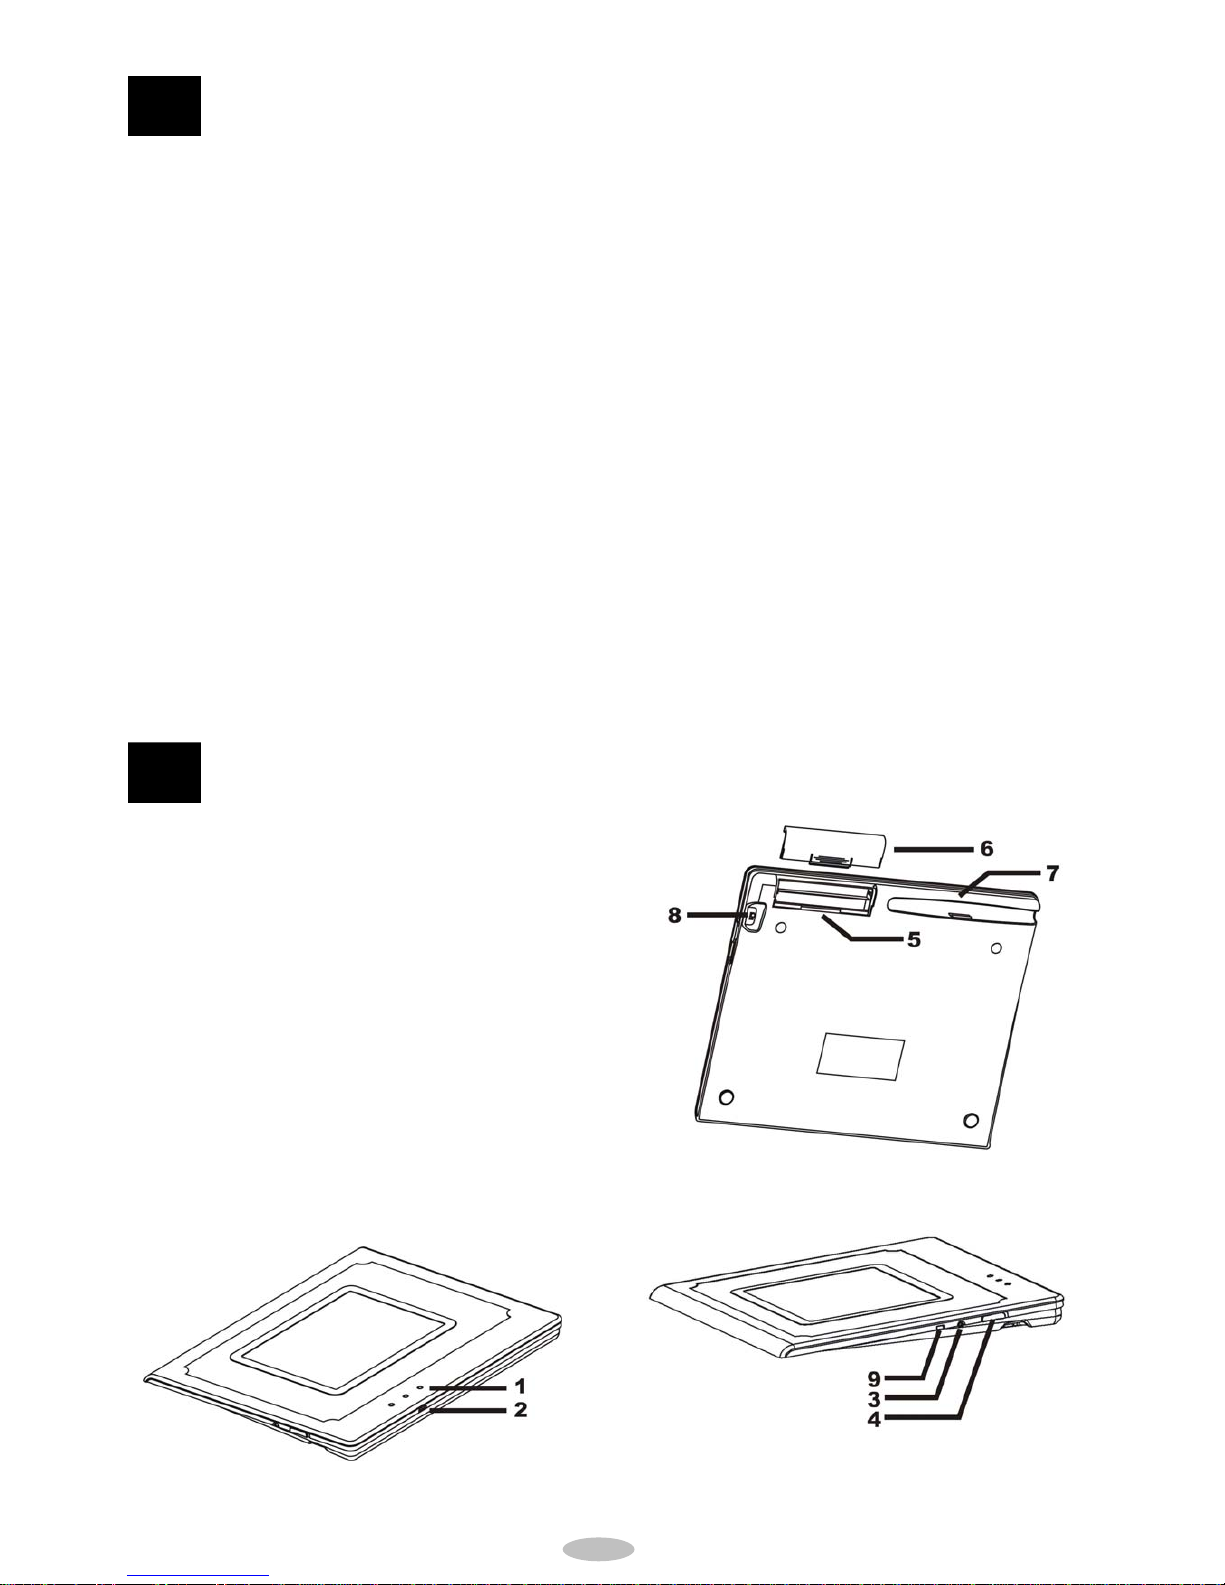
3 Parts Description
1ĈLight Signal
2ĈUSB cord (optional)
3ĈCharging Slot
4ĈPower Switch
5ĈBattery Slot
6ĈBattery Cover
7ĈPen Slot
8ĈID Setting Switch
9ĈChoosing Slot(optional)

5
3.1 Wireless Handwriting Pad
3.1.1 Light Signal
1. Wireless Pad
Green:Power on
Green light will be off if power is all consumed.
Yellow: Power Insufficiency
When yellow light is on, charge the battery
would be necessary.
Red : Charging
Red light will be on when the batteries are
charging. Red light will be off if charging is
completed.
2. Wireless Receiver
Green : Data Transmission.
Red : Power pm.
3.1.2 USB cord (optional)
3.1.3 Charging Slot
1. Alkali batteries : change to new batteries when the yellow
light is on.
2. Ni-MH batteries : charge the batteries when the yellow
light is on. Use the charger to plug into the charging slot
and the power socket to start charging. If the red light
turns off, charging is completed.
3.1.4 Power Switch
3.1.5 Battery Slot
Place batteries with correct polarity alignment.
3.1.6 Battery Cover
Open the battery cover to change the batteries.
3.1.7 Pen Slot
Place the electronic pen back to the pen slot after each use

6
to avoid loosing the pen.
3.1.8 ID Setting Switch
1. Setting Mode
Switch down to conduct setting of the wireless pad. After
setting, switch up to start Working Mode
2. Writing Mode
Switch up for Writing Mode. Wireless pad can only work
properly under this mode.
3.2 Switch [On] to start using the wireless pad. After using, remember
to switch [Off] to prolong the usage of the batteries. Green light will
not be visible if all power is consumed.
4 Installation
4.1 Wireless Pad
1. Connect Wireless Receiver to the computer.
2. Place four AAA batteries into the battery slot.
3. Green light will be on when switching on the
Wireless Pad.
4.2 Driver and Setting
1. Place the Driver CD in the CD-Rom.
2. If the CD doesn’t auto-run, find the CD-Rom
Drive in My Computer. Double click on “autorun” to start
installation.
3. Click “Driver” and follow the steps for installation.
4. Click “SuperHand” and follow the steps for installation.
5. Click “Exit” after installation and keep it at a safe place for
future use.
4.3 This icon will show on the bottom right hand corner of the computer
screen when Wireless Pad has been detected<Fig 4.1>.If not, a
forbidden sign on the icon will show<Fig 4.2>.
<Fig 4.1>
<Fig 4.2>

7
4.4 When a forbidden sign appears, check if the Wireless Pad had been
connected correctly or if the power is on or not.
5 Specification and System Requirement
5.1 Specification
Wireless Pad
Technology
Active Area Dimension
Resolution
Precision
Pressure Sensitivity
Pen Tiltness
Sensing Height
Light Signal
Power Consumption
Temperature Tolerance
Humidity Resistance
Battery
Product Dimension
Weight
Certification
Wireless Receiver
Data Transmission
Transmitting Distance
Data Transmitting Speed
Interface
Light Signal
Power Consumption
Temperature Tolerance
Humidity Resistance
Active Digitize
152.4×114.3 mm
4096 ppi
+/-0.01 inch
512
+/-45°
10mm
Low Battery / Charging / Power on
Writing Mode 68.4mA / Stand-by 54.5mA
-20Ƃ50℃
0Ƃ95%
AAA*4
295×255×25 mm
500g(including batteries)
FCC / CE / R&TTE / LVD / EMC / NCC
RF2.4GHz
10m
12Mbps
USB A
Power on / Data Transmission Power
39.7mA
-20Ƃ50℃
0Ƃ95%

8
Product Dimension
Weight
80×25×13 Ʈ
15g
5.2 System
Operating System!
Processor!
HDD Space!
Memory!
Interface
Windows 2000, XP, Vista
Pentium IV ͽ˯
80MB at least
256MB RAM and above
USB
6 Wireless Pad Setting
6.1 Driver
Click “Setting” <Fig 4.1> for the driver settingĄ
6.2 Pen Setting
6.2.1 Mode
1. Pen : Writable area is the same size as the screen and

9
supports pressure sensitivity
2. Mouse : Use pen like a mouse
6.2.2 Function
Customize your button function. Default setting for pen tip is
[left click] and this can not be altered.
6.2.3 Double Click Speed
Speed of left key double clicking.
6.2.4 Pressure Sensitivity
When pressure sensitivity is available in a software,
electronic pen can be used to write out different pen stroke
thickness depending on the pressure placed onto the pen tip.
6.2.5 Default
Switch all setting back to default.
6.3 Wireless Pad
6.3.1 Wireless Pad Active Area
1. Full Screen : Active Area can be set to full screen.
2. Customize : Set Active Area according to needs.

10
6.3.2 Default
Switch all setting back to default.
6.4 Hardware
Name of hardware connected to the computer.
7 ID Setting
7.1 Setting
Click [Wireless Setup] to access the set up window.
7.2 Wireless Setup
7.2.1 Setting
1. Receiver
a. Channel of Receiver : Click Read to show the current
channel.
b. Read the current channel.
c. Write in channel (1 to 16).

11
2. Wireless Pad
a. When writing in channel or ID, switch ID setting
switch to [1] to start setting.
[Warning] Remember to switch the ID setting switch
back to [2], so the Wireless Pad can be in
Writing Mode.
b. Channel : Channel of Wireless Pad.
Click [Read] to show the current channel.
c. ID : ID of Wireless Pad.
Click [Read] to show the current ID.
d. Read : Read the current Channel or ID.
e. Write : Customize Channel (1 to 16) and ID (1 to 128)
7.2.2 Inquire
Check Wireless Pad and Receiver’s current Channel and ID.
[Warning] Wireless Pad and Receiver must be set at
the same Channel for the Wireless Pad to
work properly.
8 Q & A Ⴗᙱଵྋ
Q1:
A:
What does it mean when the icon on the bottom
right hand corner of the computer screen is with
a forbidden sign?<Fig 6.1>
Check if the Receiver has been connected
properly to the USB port in the computer and if
the power light on the Receiver is on or not.
<ဦ6.1>

12
Q2:
A:
Receiver Power light signal is not on.
Check if the Receiver has been connected properly to the USB
port in the computer. If the power light signal on the Receiver is
still not on, change to another USB port.
Q3:
A:
Unable to read the Channel and ID of the Wireless Pad.
Check if the Setting Switch is in Position 1; Setting Mode.
Q4:
A:
Wireless Pad does not work.
Check if the Setting Switch is in Position 2; Writing Mode. Check
the Channel. Follow the instructions in 7.2 ID Setting to make
sure Wireless Pad and Receiver are in the same Channel. If
different, follow steps in 7.2 to re-set Channel.

14
9 Warranty Card
Model : ITT-9575 Wireless Pad
Purchase date :
Serial Number :
Vendor
Name : e-mail :
Address :
TelĈ Mobile :
During Warranty, repairing will be charged for the following
mal-function situations:
1) Product has not been used according to the instructions stated in
the manual or instructed by our service center
2) Changing or modifying the structure of the product
3) Natural disasters, fire, bugs, or thunder lightning and etc.
4) Products purchased from a non-authorized vendor or those who
could not offer warranty card
5) Not following Warnings in the manual to store the product to avoid
damagesw or mal-function
6) Shipping, re-locating or dropping
7) Other human-factor
Beauty
UP Co., Ltd.
No.85, Danuan Rd., Tucheng City,
Taipei County 23676, Taiwan TELĈ
886-2-22689925 FAXĈ886-2-22679395
http://www.beup.com.tw
Table of contents


