Endress+Hauser ria45 User manual

Products Solutions Services
Operating Instructions
RIA45
Process indicator
BA00272R/09/EN/07.22-00
71573625
2022-06-30
Valid from version
01.03.xx (device software)


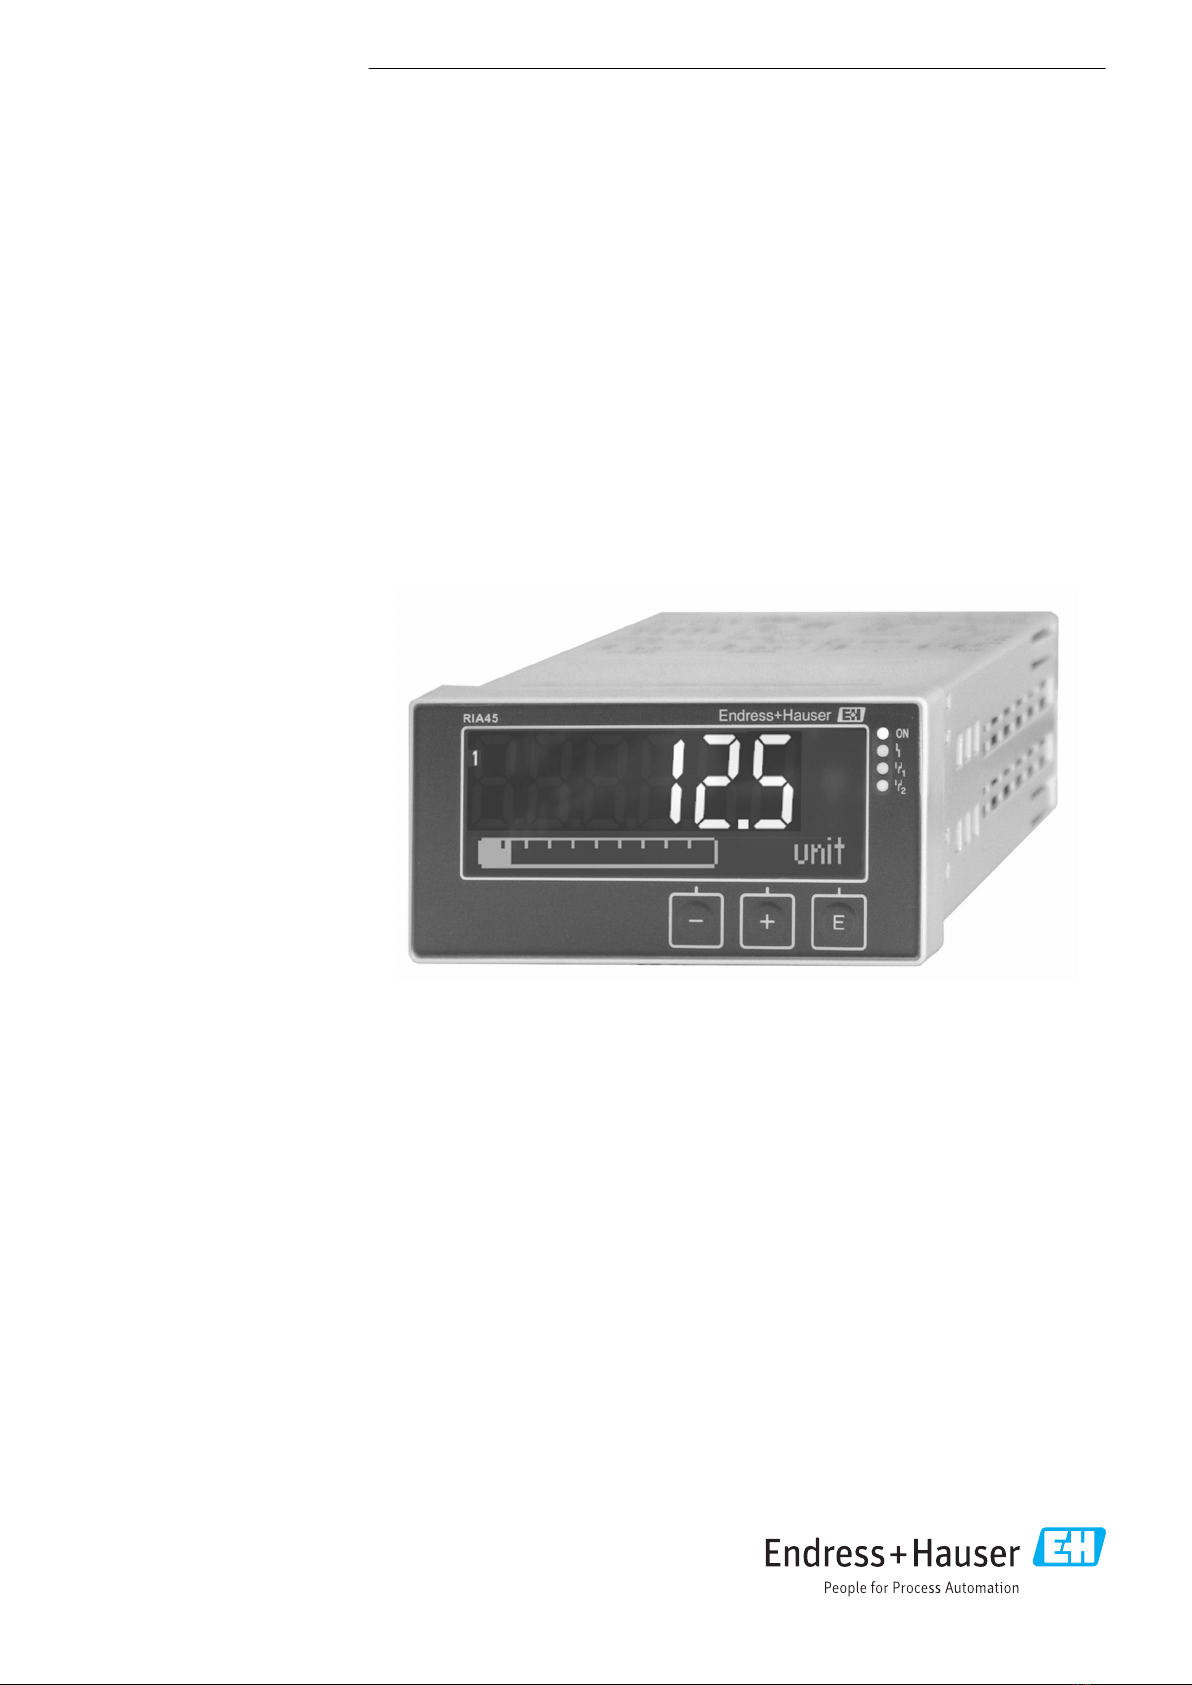
RIA45 Table of contents
Endress+Hauser 3
Table of contents
1 About this document ................ 4
1.1 Symbols .............................. 4
1.2 Documentation ........................ 5
2 Safety instructions .................. 7
2.1 Requirements for the personnel ............ 7
2.2 Intended use .......................... 7
2.3 Workplace safety ....................... 7
2.4 Operational safety ...................... 7
2.5 Product safety ......................... 8
3 Incoming acceptance and product
identification ....................... 9
3.1 Incoming acceptance .................... 9
3.2 Product identification .................... 9
3.3 Certificates and approvals ................ 9
3.4 Storage and transport .................. 10
4 Mounting ......................... 11
4.1 Installation requirements ................ 11
4.2 Dimensions .......................... 11
4.3 Mounting procedure ................... 11
4.4 Post-installation check .................. 12
5 Wiring ............................ 13
5.1 Electrical connection ................... 13
5.2 Post-connection check .................. 15
6 Operation ......................... 16
6.1 Operating elements .................... 16
6.2 Display and device status indicator / LED .... 18
6.3 Symbols ............................. 18
6.4 Quick guide to the operating matrix ........ 19
7 Commissioning .................... 23
7.1 Post-installation check and switching on the
device .............................. 23
7.2 General information about configuring the
device .............................. 23
7.3 Notes on setup access protection .......... 23
7.4 Device configuration ................... 24
7.5 In operation .......................... 36
8 Diagnostics and troubleshooting ... 40
8.1 General troubleshooting ................. 40
8.2 Overview of diagnostic information ........ 40
8.3 Diagnosis list ......................... 40
9 Maintenance ...................... 41
9.1 Cleaning ............................ 41
10 Repair ............................ 42
10.1 General notes ........................ 42
10.2 Spare parts .......................... 42
10.3 Return .............................. 43
10.4 Disposal ............................ 43
11 Accessories ....................... 44
11.1 Device-specific accessories ............... 44
11.2 Communication-specific accessories ........ 44
12 Technical data .................... 45
12.1 Input ............................... 45
12.2 Output ............................. 45
12.3 Power supply ......................... 47
12.4 Performance characteristics .............. 48
12.5 Installation .......................... 49
12.6 Environment ......................... 50
12.7 Mechanical construction ................ 51
12.8 Operability .......................... 52
12.9 Accessories .......................... 53
13 Appendix ......................... 54
13.1 Further explanations regarding the
differential pressure application in level
measurement ........................ 54
13.2 Display menu ......................... 56
13.3 Setup menu .......................... 57
13.4 Diagnostics menu ..................... 66
13.5 Expert menu ......................... 68
Index .................................. 75

About this document RIA45
4 Endress+Hauser
1 About this document
1.1 Symbols
1.1.1 Safety symbols
DANGER
This symbol alerts you to a dangerous situation. Failure to avoid this situation will result in
serious or fatal injury.
WARNING
This symbol alerts you to a dangerous situation. Failure to avoid this situation can result in
serious or fatal injury.
CAUTION
This symbol alerts you to a dangerous situation. Failure to avoid this situation can result in
minor or medium injury.
NOTICE
This symbol contains information on procedures and other facts which do not result in
personal injury.
1.1.2 Electrical symbols
Symbol Meaning
Direct current
Alternating current
Direct current and alternating current
Ground connection
A grounded terminal which, as far as the operator is concerned, is grounded via a
grounding system.
Potential equalization connection (PE: protective earth)
Ground terminals that must be connected to ground prior to establishing any other
connections.
The ground terminals are located on the interior and exterior of the device:
• Interior ground terminal: potential equalization is connected to the supply network.
• Exterior ground terminal: device is connected to the plant grounding system.
1.1.3 Symbols for certain types of information
Symbol Meaning
Permitted
Procedures, processes or actions that are permitted.
Preferred
Procedures, processes or actions that are preferred.
Forbidden
Procedures, processes or actions that are forbidden.
Tip
Indicates additional information.
Reference to documentation
A
Reference to page

RIA45 About this document
Endress+Hauser 5
Symbol Meaning
Reference to graphic
Notice or individual step to be observed
1.
,
2.
,
3.
… Series of steps
Result of a step
Help in the event of a problem
Visual inspection
1.1.4 Symbols in graphics
Symbol Meaning Symbol Meaning
1, 2, 3,... Item numbers
1.
,
2.
,
3.
… Series of steps
A, B, C, ... Views A-A, B-B, C-C, ... Sections
-
Hazardous area
.
Safe area (non-hazardous area)
1.2 Documentation
Document Purpose and content of the document
Technical Information (TI) Planning aid for your device
The document contains all the technical data on the device and provides
an overview of the accessories and other products that can be ordered for
the device.
Brief Operating Instructions (KA) Guide that takes you quickly to the 1st measured value
The Brief Operating Instructions contain all the essential information
from incoming acceptance to initial commissioning.
Operating Instructions (BA) Your reference document
The Operating Instructions contain all the information that is required in
various phases of the life cycle of the device: from product identification,
incoming acceptance and storage, to mounting, connection, operation
and commissioning through to troubleshooting, maintenance and
disposal.
Description of Device Parameters
(GP)
Reference for your parameters
The document provides a detailed explanation of each individual
parameter. The description is aimed at those who work with the device
over the entire life cycle and perform specific configurations.

About this document RIA45
6 Endress+Hauser
Document Purpose and content of the document
Safety Instructions (XA) Depending on the approval, Safety Instructions (XA) are supplied with the
device. The Safety Instructions are an integral part of the Operating
Instructions.
Information on the Safety Instructions (XA) that are relevant for
the device is provided on the nameplate.
Supplementary device-dependent
documentation (SD/FY)
Additional documents are supplied depending on the device version
ordered: Always comply strictly with the instructions in the
supplementary documentation. The supplementary documentation is an
integral part of the device documentation.
The document types listed are available:
• In the Download Area of the Endress+Hauser Internet site: www.endress.com →
Download
• Enter the serial number from the nameplate in the W@M Device Viewer
(www.endress.com/deviceviewer): all data relating to the device and an overview of
the Technical Documentation supplied with the device are displayed.
• Enter the serial number on the nameplate into the Endress+Hauser Operations app
or scan the 2-D matrix code (QR code) on the nameplate with the Endress+Hauser
Operations app: all data relating to the device and the Technical Documentation
pertaining to the device is displayed.

RIA45 Safety instructions
Endress+Hauser 7
2 Safety instructions
2.1 Requirements for the personnel
The personnel for installation, commissioning, diagnostics and maintenance must fulfill
the following requirements:
‣Trained, qualified specialists must have a relevant qualification for this specific function
and task.
‣Are authorized by the plant owner/operator.
‣Are familiar with federal/national regulations.
‣Before starting work, read and understand the instructions in the manual and
supplementary documentation as well as the certificates (depending on the
application).
‣Follow instructions and comply with basic conditions.
The operating personnel must fulfill the following requirements:
‣Are instructed and authorized according to the requirements of the task by the facility's
owner-operator.
‣Follow the instructions in this manual.
2.2 Intended use
The process indicator evaluates analog process variables and displays them on its
multicolored screen. Processes can be monitored and controlled with the device's outputs
and limit relays. The device is equipped with a wide array of software functions for this
purpose. Power can be supplied to 2-wire sensors with the integrated loop power supply.
• The device is an associated apparatus and may not be installed in the hazardous area.
• The manufacturer accepts no liability for damages resulting from incorrect use or use
other than that intended. It is not permitted to convert or modify the device in any way.
• The device is designed for installation in a panel and must only be operated in an
installed state.
2.3 Workplace safety
When working on and with the device:
‣Wear the required personal protective equipment as per national regulations.
2.4 Operational safety
Risk of injury!
‣Operate the device only if it is in proper technical condition, free from errors and faults.
‣The operator is responsible for the interference-free operation of the device.
Modifications to the device
Unauthorized modifications to the device are not permitted and can lead to unforeseeable
dangers!
‣If modifications are nevertheless required, consult with the manufacturer.
Repair
To ensure continued operational safety and reliability:
‣Carry out repairs on the device only if they are expressly permitted.
‣Observe federal/national regulations pertaining to the repair of an electrical device.
‣Use only original spare parts and accessories.

Safety instructions RIA45
8 Endress+Hauser
2.5 Product safety
This product is designed in accordance with good engineering practice to meet state-of-
the-art safety requirements and has been tested and left the factory in a condition in
which it is safe to operate.

RIA45 Incoming acceptance and product identification
Endress+Hauser 9
3 Incoming acceptance and product
identification
3.1 Incoming acceptance
Proceed as follows on receipt of the device:
1. Check whether the packaging is intact.
2. If damage is discovered:
Report all damage immediately to the manufacturer.
3. Do not install damaged material, as the manufacturer cannot otherwise guarantee
compliance with the safety requirements and cannot be held responsible for the
consequences that may result.
4. Compare the scope of delivery to the contents of the order.
5. Remove all the packaging material used for transportation.
3.2 Product identification
The following options are available for identification of the device:
• Nameplate specifications
• Extended order code with breakdown of the device features on the delivery note
• Enter the serial number from the nameplate in the W@M Device Viewer
(www.endress.com/deviceviewer): all data relating to the device and an overview of the
Technical Documentation supplied with the device are displayed.
• Enter the serial number on the nameplate into the Endress+Hauser Operations App or
scan the 2-D matrix code (QR code) on the nameplate with the Endress+Hauser
Operations App: all the information about the device and the technical documentation
pertaining to the device is displayed.
3.2.1 Nameplate
The right device?
Check the information on the nameplate of the device:
• Product name and manufacturer ID
• Order code, extended order code and serial number
• Power supply and power consumption
• Approvals
• Temperature range
• Firmware version and device revision
3.2.2 Name and address of manufacturer
Name of manufacturer: Endress+Hauser Wetzer GmbH + Co. KG
Address of manufacturer: Obere Wank 1, D-87484 Nesselwang
Model/type reference: RIA45
3.3 Certificates and approvals
For certificates and approvals valid for the device: see the data on the nameplate
Approval-related data and documents: www.endress.com/deviceviewer → (enter the
serial number)

Incoming acceptance and product identification RIA45
10 Endress+Hauser
3.3.1 Other standards and guidelines
• IEC 60529:
Degrees of protection provided by enclosures (IP code)
• IEC 61010-1:
Safety requirements for electrical equipment for measurement, control and laboratory
use
• EN 60079-11:
Explosive atmospheres - Part 11: Equipment protection by intrinsic safety "I" (optional)
3.4 Storage and transport
Please note the following:
The permitted storage temperature is –40 to 85 °C (–40 to 185 °F); it is possible to store
the device at borderline temperatures for a limited period (48 hours maximum).
Pack the device for storage and transportation in such a way that it is reliably
protected against impact and external influences. The original packaging offers the
best protection.
Avoid the following environmental influences during storage and transport:
• Direct sunlight
• Vibration
• Aggressive media

RIA45 Mounting
Endress+Hauser 11
4 Mounting
4.1 Installation requirements
NOTICE
High temperatures reduce the life-time of the display.
‣To avoid heat accumulation, ensure the device is sufficiently cooled.
‣Do not operate the device in the upper temperature range over a longer period of time.
The process indicator is designed for use in a panel.
The orientation is determined by the legibility of the display. The connections and outputs
are provided on the rear. The cables are connected via coded terminals.
Operating temperature range:
Non-Ex/Ex devices: –20 to 60 °C (–4 to 140 °F)
UL devices: –20 to 50 °C (–4 to 122 °F)
4.2 Dimensions
Observe the installation depth of approx. 150 mm (5.91 in) for the device incl. terminals
and fastening clips.
In the case of devices with an Ex approval, the Ex frame is required and an installation
depth of 175 mm (6.89 in) must be taken into consideration. For more dimensions please
refer to the "Technical data" section.
• Panel cutout: 92 mm (3.62 in) x 45 mm (1.77 in).
• Panel thickness: max. 26 mm (1 in).
• Max. viewing angle range: 45° to the left and right from the central display axis.
• If the devices are arranged horizontally beside one another in the X-direction, or
arranged vertically on top of one another in the Y-direction, the mechanical distance
(specified by the housing and front section) must be observed.
4.3 Mounting procedure
The necessary panel cutout is 92 mm (3.62 in) x 45 mm (1.77 in)
114
67
12
1.
34
2.
4
3
5
6
6
A0010404
1 Installation in a panel
1. Screw the threaded rods (item 1) into the positions provided on the mounting frame
(item 2). Four opposing screw positions (item 3/4) are available for this purpose.
2. Push the device through the panel cutout from the front.

Mounting RIA45
12 Endress+Hauser
3. To secure the casing in the panel, hold the device level and push the mounting frame
(item 2), with the threaded rods screwed in, over the casing until the frame locks into
position (1).
4. Then tighten the threaded rods to fix the device in place (2.).
5. For the Ex option, mount the spacer (item 6) for the terminals.
To remove the device, the mounting frame can be unlocked at the locking elements (item
5) and then removed.
4.4 Post-installation check
• Is the seal undamaged?
• Is the mounting frame securely fastened on the housing of the device?
• Are the threaded rods properly tightened?
• Is the device located in the center of the panel cutout?
• Is the spacer mounted (Ex option)?

RIA45 Wiring
Endress+Hauser 13
5 Wiring
LWARNING
Danger! Electric voltage!
‣The entire connection of the device must take place while the device is de-energized.
‣The protective ground connection must be established before all other connections. If
the protective ground is disconnected, this can be a source of danger.
‣Before commissioning the device, make sure that the supply voltage matches the
voltage specifications on the nameplate.
‣Provide suitable switch or circuit breaker in building installation. This switch must be
provided close to the device (within easy reach) and marked as a circuit breaker.
‣An overcurrent protection element (rated current ≤ 10 A) is required for the power
cable.
• Observe the terminal designation on the front of the device.
• The mixed connection of safety extra-low voltage and dangerous contact voltage to
the relay is permitted.
5.1 Electrical connection
A loop power supply (LPS) is provided for every input. The loop power supply is primarily
designed to supply power to 2-wire sensors and is galvanically isolated from the system
and the outputs.
RTD ILPS 2-W LPS 4-W
TC U<=1V U>1V
CH1 CH2
Typ J,K,T,N...
±100mV...±1V
4-W
3-W
2-W
0/4...20mA
0...10V
0/1...5V
±10V
±30V
4...20mA 0/4...20mA
Analog Out
4...20mA
x2 x4
x8x7x6x5 x4
x8
x2x1 x4
x8
x2x1
x8x7 x8x7 x8
x3 232221
25 26 27 28
24
131211
15 16 17 18
14
x4
x8
R12 R11 R13 R22 R21 R23
L|+ N|-
A0010228
2 Terminal assignment of device (channel 2 and relays optional). Note: Illustrated contact position of the
relays if the power supply fails.
We recommend you connect a suitable surge arrester upstream if high-energy
transients can be expected on long signal cables.

Wiring RIA45
14 Endress+Hauser
5.1.1 Overview of possible connections on the process indicator
Terminal assignment of analog inputs, channel 1 and 2 (optional)
CH2
232221
25 26 27 28
24
CH1
131211
15 16 17 18
14
A0010406
Loop power supply connection
2-wire
LPS 2-W
x4
x8
x2x1
A0010407
4-wire
LPS 4-W
x4
x8
x2x1
A0010408
Analog input connection
RTD/resistor, 2-wire
RTD
2-W
x2 x4
x8x7x6x5
A0010581
RTD/resistor, 3-wire
RTD
3-W
x2 x4
x8x7x6x5
A0010582
RTD/resistor, 4-wire
RTD
4-W
x2 x4
x8x7x6x5
A0010583
Thermocouple
TC
x8x7
A0010409
U ≤ 1 V
U<=1V
x8x7
A0010410
U > 1 V
U>1V
x8
x3
A0010411
Current
I
x8
x4
A0011934
Illustrated contact position of the relays if the power supply fails:
(Optional) relay connection
Relay 1
R12 R11R13
A0010412
Relay 2
R22 R21R23
A0010413

RIA45 Wiring
Endress+Hauser 15
Analog output connection
Analog output 1
O15 O16
A0010416
Analog output 2 (optional)
O25O26
A0010414
Digital output connection
Digital output / open collector
D11 D12
OC
A0010415
Power supply connection
24 to 230 V AC/DC (-20 % / +10 %) 50/60 Hz
L|+ N|- PE
A0010418
Interfaces
Interface for configuring with PC software
A0010417
5.2 Post-connection check
Device condition and specifications Notes
Are cables or the device damaged? Visual inspection
Electrical connection Notes
Does the supply voltage match the specifications on the nameplate? 24 to 230 V AC/DC (-20 % / +10
%) 50/60 Hz
Are all terminals firmly engaged in their correct slot? Is the coding on the
individual terminals correct?
-
Are the mounted cables strain-relieved? -
Are the power supply and signal cables correctly connected? See the wiring diagram on the
housing.

Operation RIA45
16 Endress+Hauser
6 Operation
Thanks to the device's simple operating concept, it is possible to commission the device for
many applications without a printed set of Operating Instructions.
The FieldCare operating software is a quick and convenient way of configuring the device.
It contains brief explanatory (help) texts that provide additional information on individual
parameters.
6.1 Operating elements
6.1.1 Local operation at the device
The device is operated by means of the three keys integrated in the front part of the device
• Open the Configuration menu
• Confirm an entry
• Select a parameter or submenu offered in the menu
Within the Configuration menu:
• Scroll step-by-step through the parameters/menu items/characters offered
• Change the value of the selected parameter (increase or decrease)
Outside the Configuration menu:
Display enabled and calculated channels, as well as min. and max. values for all the active
channels.
You can always exit menu items / submenus by selecting "x Back" at the end of the menu.
Leave the setup directly without saving the changes by pressing the ‘-’ and ‘+’ keys
simultaneously for longer (> 3 s).
6.1.2 Configuration via interface & PC configuration software
LCAUTION
Undefined states and switching of outputs and relays while configuring with the
configuration software
‣Do not configure the device when the process is running.
To configure the device using the FieldCare Device Setup software, connect the device to
your PC. You need a special interface adapter for this purpose, e.g. the Commubox
FXA291.
Installing the communication DTM in FieldCare
Before the indicator can be configured, FieldCare Device Setup must be installed on your
PC. The installation instructions can be found in the FieldCare instructions.
Then install the FieldCare device driver according to the following instructions:
1. First install the device driver "CDI DTMlibrary" in FieldCare. It can be found in
FieldCare under "Endress+Hauser Device DTMs → Service / Specific → CDI".
2. The DTM catalog in FieldCare must then be updated. Add the new installed DTMs to
the DTM catalog.

RIA45 Operation
Endress+Hauser 17
Installation of the Windows driver for TXU10/FXA291
Administrator rights are required to install the driver in Windows. Proceed as follows:
1. Connect the device to the PC using the TXU10/FXA291 interface adapter.
A new device is detected and the Windows installation wizard opens.
2. In the installation wizard, do not allow the device to automatically search for
software. For this, select "No, not this time" and click "Next".
3. In the next window, select "Install software from a list or specific location" and click
"Next".
4. In the next window, click "Browse" and select the directory where the driver for the
TXU10/FXA291 adapter is saved.
The driver is installed.
5. Click "Finish" to finish the installation.
6. Another device is detected and the Windows installation wizard starts again. Again,
choose "No, not this time" and click "Next".
7. In the next window, select "Install software from a list or specific location" and click
"Next".
8. In the next window, click "Browse" and select the directory where the driver for the
TXU10/FXA291 adapter is saved.
The driver is installed.
9. Click "Finish" to finish the installation.
This completes the driver installation for the interface adapter. The COM port that has
been assigned can be seen in the Windows device manager.
Establishing the connection
Proceed as follows to establish the connection with FieldCare:
1. Firstly, edit the connection macro. For this, start a new project and in the window
that is displayed, right-click the symbol for "Service (CDI) FXA291" and select "Edit".
2. In the next window, to the right of "Serial interface", select the COM port which was
assigned during the installation of the Windows driver for the TXU10/FXA291
adapter.
The macro is now configured. Select "Finish".
3. Start the "Service (CDI) FXA291" macro by double-clicking it and confirm the
subsequent query with "Yes".
A search for a connected device is performed and the suitable DTM is opened.
Online configuration is started.
Continue with device configuration in accordance with these Operating Instructions for the
device. The complete Setup menu, i.e. all of the parameters listed in these Operating
Instructions, can also be found in the FieldCareDevice Setup.
In general, it is possible to overwrite parameters with the FieldCare PC software and
the appropriate device DTM even if access protection is active.
If access protection by means of a code should be extended to the software, this
function should be activated in the extended device setup.
For this, select Menu → Setup / Expert → System → Overfill protect → German WHG
and confirm.

Operation RIA45
18 Endress+Hauser
6.2 Display and device status indicator / LED
The process indicator provides an illuminated LC display which is split into two sections.
The segment section displays the value of the channel and additional information and
alarms.
In the dot matrix section, additional channel information, such as the TAG, unit or bar
graph, is displayed in the display mode. Operating text in English is displayed here during
operation.
The parameters for configuring the display are described in detail in the "Configuring the
device" section.
1
2
4
5
6
7
8
9
3
A0010223
3 Display of the process indicator
1 Channel indicator: 1: analog input 1; 2: analog input 2; 1M: calculated value 1; 2M: calculated value 2
2 Dot matrix display for TAG, bar graph, unit
3 Limit value indicators in the bar graph
4 "Operation locked" indicator
5 Green LED; on - supply voltage applied
6 Red LED; on - error/alarm
7 Yellow LED; on - relay 1 energized
8 Yellow LED; on - relay 2 energized
9 Minimum/maximum value indicator
In the event of an error, the device switches automatically between displaying the error
and displaying the channel, → 37 and → 40.
6.3 Symbols
6.3.1 Display symbols
The device is locked / operator lock; the device setup is locked for changes to parameters; the
display can be changed.
1 Channel one (Analog in 1)
2 Channel two (Analog in 2)
1M First calculated value (Calc value 1)
2M Second calculated value (Calc value 2)
Max Maximum value/value of the maximum indicator of the channel displayed
Min Minimum value/value of the minimum indicator of the channel displayed
In the event of an error:
The display shows: , the measured value is not displayed

RIA45 Operation
Endress+Hauser 19
Underrange/overrange:
The error and the channel identifier (TAG) are specified in the dot matrix section.
6.3.2 Icons in the editing mode
The following characters are available for entering customized text:
‘0-9’, ‘a-z’, ‘A-Z’, ‘+’, ‘-’, ‘*’, ‘/’, ‘\’, ‘%’, ‘°’, ‘2’, ‘3’, ‘m’, ‘.’, ‘,’, ‘;’, ‘:’, ‘!’, ‘?’, ‘_’, ‘#’, ‘$’, ‘"’, ‘´’, ‘(’,
‘)’, ‘~’
For numerical entries, the numbers ‘0-9’ and the decimal point are available.
Furthermore, the following icons are used in the editing mode:
Symbol for setup
Symbol for expert setup
Symbol for diagnostics
Accept entry.
If this symbol is selected, the entry is applied at the position specified by the user, and you quit
editing mode.
Reject entry.
If this symbol is selected, the entry is rejected and you quit editing mode. The previously set text
remains.
Jump one position to the left.
If this symbol is selected, the cursor jumps one position to the left.
Delete backwards.
If this symbol is selected, the character to the left of the cursor position is deleted.
Delete all.
If this symbol is selected, the entire entry is deleted.
6.4 Quick guide to the operating matrix
The following tables list all the menus and the operating functions.
Display menu Description
AI1 Reset minmax* Reset the min/max values for Analog in 1
AI2 Reset minmax* Reset the min/max values for Analog in 2
CV1 Reset minmax* Reset the min/max values for Calc value 1
CV2 Reset minmax* Reset the min/max values for Calc value 2
Analog in 1 Display setting for analog input 1
Analog in 2 Display setting for analog input 2
Calc value 1 Display setting for calculated value 1
Calc value 2 Display setting for calculated value 2
Contrast Display contrast
Brightness Display brightness
Alternating time Switchover time between values chosen to be displayed
Back Return to the main menu
*) Is only displayed if "Allow reset" = "Yes" is set in the "Expert" menu for the corresponding channel.

Operation RIA45
20 Endress+Hauser
Setup menu Description
Application Application selection
1-channel 1-channel application
2-channel 2-channel application
Diff-pressure Differential pressure application
AI1 Lower range* Lower measuring range limit for Analog in 1
AI1 Upper range* Upper measuring range limit for Analog in 1
AI2 Lower range* Lower measuring range limit for Analog in 2
AI2 Upper range* Upper measuring range limit for Analog in 2
CV Factor* Factor for calculated value
CV Unit* Unit for calculated value
CV Bar 0%* Bar graph lower limit for calculated value
CV Bar 100%* Bar graph upper limit for calculated value
Linearization* Linearization for calculated value
No lin points Number of linearization points
X-value X-values for linearization points
Y-value Y-values for linearization points
Analog in 1 Analog input 1
Signal type Signal type
Signal range Signal range
Connection Connection type (only for Signal type = RTD)
Lower range Measuring range lower limit
Upper range Measuring range upper limit
Tag Designation of analog input
Unit Unit for analog input
Temperature unit Unit of temperature, only visible if "Signal type" = RTD or TC
Offset Offset for analog input
Ref junction Reference junction (only for Signal type = TC)
Reset min/max Reset min/max values for analog input
Analog in 2 Analog input 2
See Analog in 1
Calc value 1 Calculated value 1
Calculation Type of calculation
Tag Designation of calculated value
Unit Unit for calculated value
Bar 0% Bar graph lower limit for calculated value
Bar 100% Bar graph upper limit for calculated value
Factor Factor for calculated value
Offset Offset for calculated value
No lin points Number of points for linearization
X-value X-values for linearization points
Y-value Y-values for linearization points
Reset min/max Reset min/max values
*) Is only displayed if "Application" = "Diff pressure".
Other manuals for ria45
4
Table of contents
Other Endress+Hauser Touch Panel manuals
Popular Touch Panel manuals by other brands

i3-TECHNOLOGIES
i3-TECHNOLOGIES TOUCH PX Series manual

ComAp
ComAp InteliVision 13Touch Global Guide

Avalue Technology
Avalue Technology ARC-1533 Quick reference guide

Beckhoff
Beckhoff CP22 Series Installation and operating instructions

AXIOMTEK
AXIOMTEK MPC153-834 user manual

Garmin
Garmin GI 275 pilot's guide