Bebe Care Mira Lite User manual

MIRA LITE
STROLLER
MODEL # 011230
IMPORTANT: RETAIN FOR
FUTURE REFERENCE,
READ CAREFULLY

Fingers or parts of the body could be injured when the stroller is being folded or unfolded. Please use
caution when folding or unfolding the stroller.
Always check that safety locks are engaged before placing a child in the stroller.
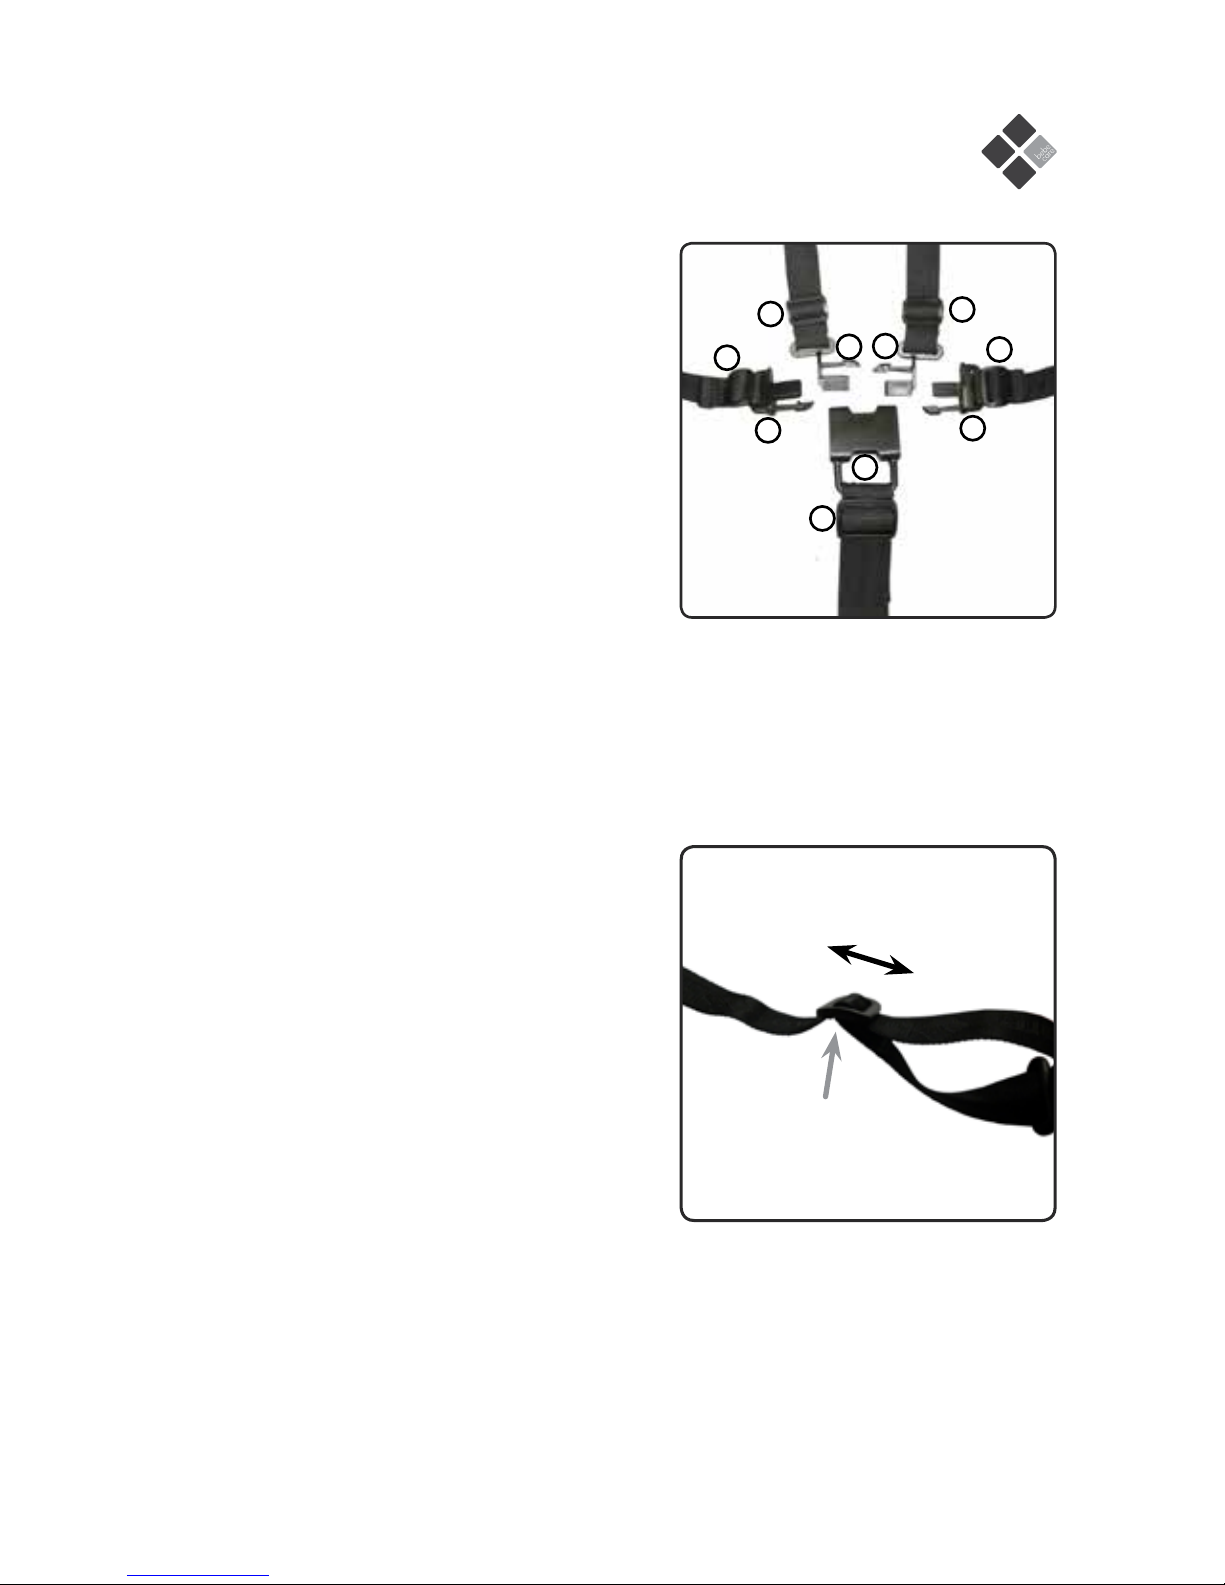
Ensure your child is secured with a correctly adjusted safety harness.
Do not allow children to stand on the seat.
Do not hang bags or goods from the handle as this could cause the stroller to tip over.
Do not place more than 5kgs in the basket or 1kg in the hood pocket (if supplied).
The weight of the child using the product should not exceed 20kgs.
The height of the child using the product should not exceed 96cm.
It is unsafe to use parts other than those approved by the manufacturer.
Never ride with more than one child in the stroller.
Regularly inspect all parts and locking devices, promptly replace worn out or broken parts.
Never leave a child in the pram/stroller when ascending or descending stairs or escalators or when
travelling on other forms of transport.
To prevent the risk of the stroller catching fire, do not park it near an open fire, heater or barbeque.
Do not make any changes or alterations to this product, unless through an approved service agent.
To avoid the risk of suffocation, keep all plastic packaging materials out of reach of children.
Never leave safety harness connected when not fitted to a child in the stroller as this may create loops
that could cause a strangulation hazard.
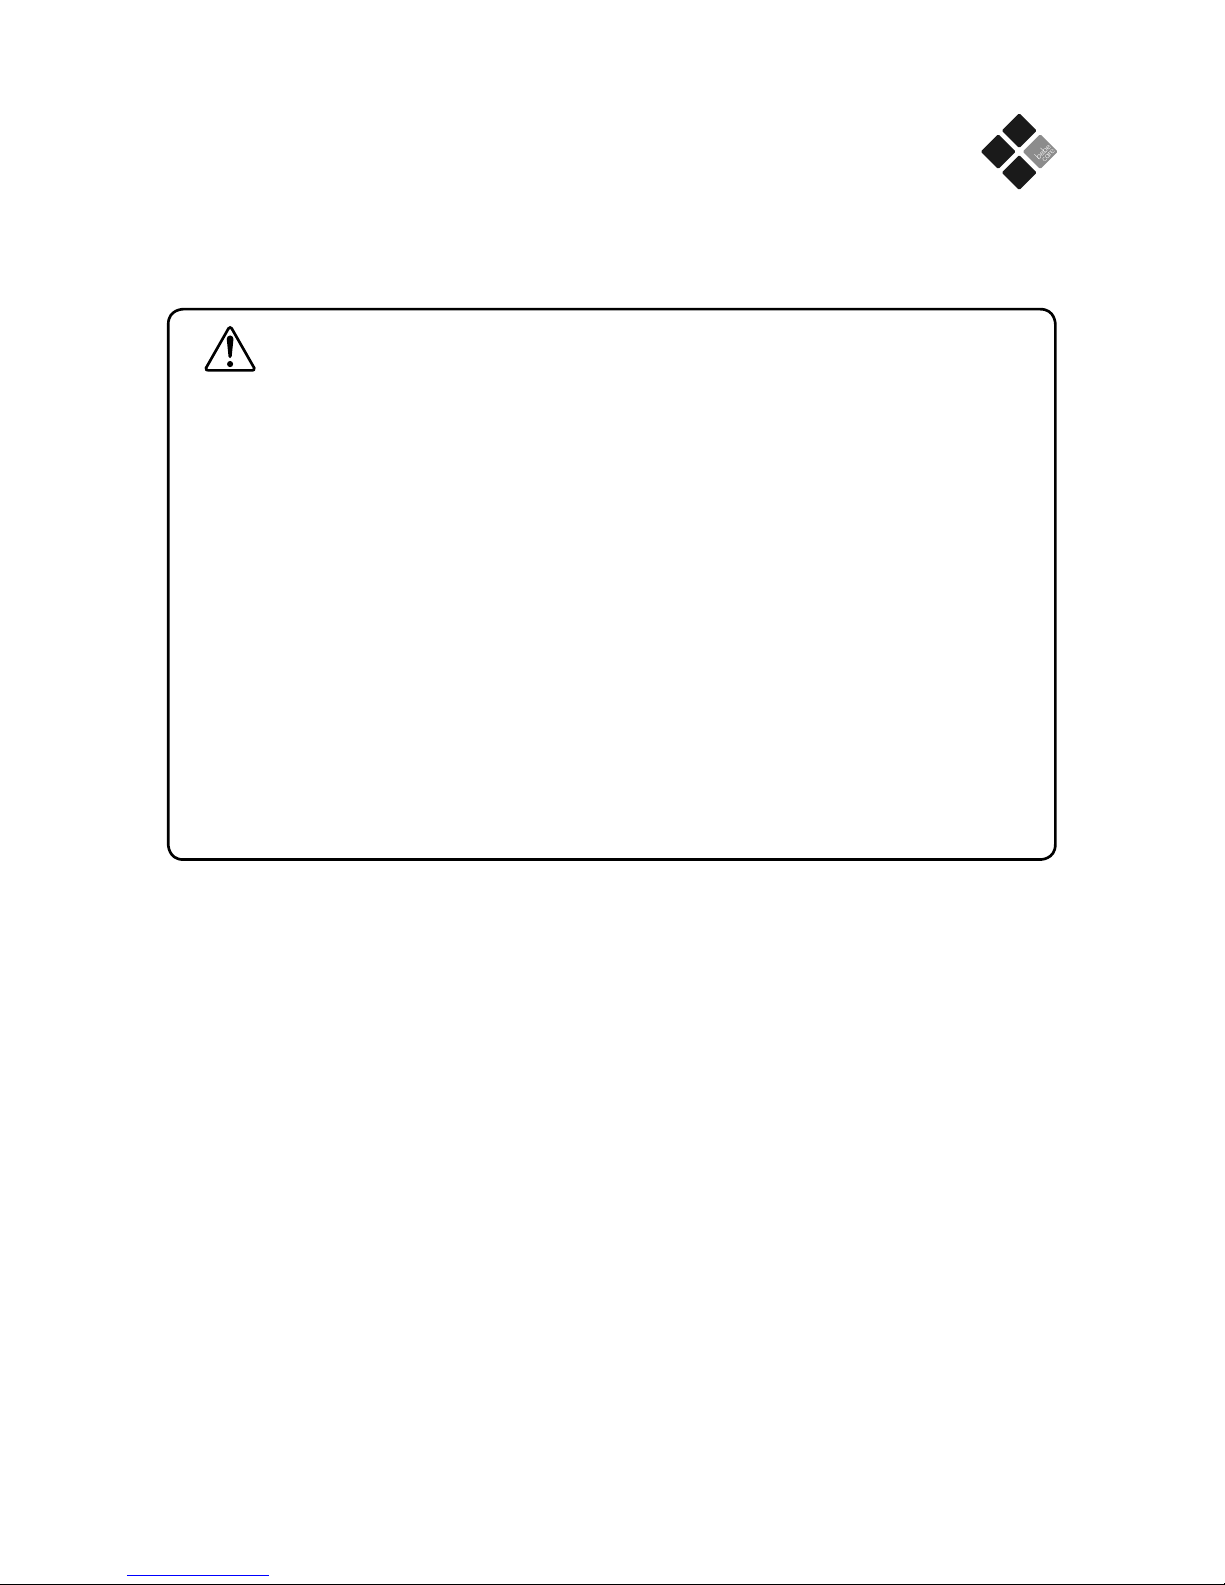
Ensure the storage latch is fully engaged when lifting or carrying the stroller
TO AVOID INJURY OR DEATH:
ALWAYS APPLY THE BRAKES WHENEVER THE STROLLER IS
STATIONARY.
DO NOT LEAVE CHILD UNATTENDED.
SECURE THE CHILD IN THE HARNESS AT ALL TIMES.
DO NOT CARRY EXTRA CHILDREN OR BAGS ON THIS STROLLER.
MAKE SURE CHILDREN ARE CLEAR OF ANY MOVING PARTS IF
YOU ADJUST THE STROLLER.
TO AVOID INJURY ENSURE THAT YOUR CHILD IS KEPT AWAY
WHEN FOLDING AND UNFOLDING THE STROLLER.
ENSURE THAT ALL LOCKING DEVICES ARE ENGAGED BEFORE USE
WARNING
Before assembling this stroller, read and understand the instructions. Incorrect assembly may make the stroller
unsafe. Do not use this stroller if any part is broken, torn or missing. Keep instructions in a safe place for future
reference.
SAFETY PRECAUTIONS

03
Due to variations in the style and design of our products, the photographs and illustrations
shown in this instruction manual are generic, therefore product fabrics, colour and design
may vary from images shown. CNP Brands reserves the right to alter product specifications
without notice as a result of our ongoing policy of product improvement.
Assembly contents list
Assembly / Operating instructions
Stroller accessories
How to care for your bebe care stroller
Contents
Congratulations on your purchase of the
bebe care Mira Lite Stroller.
This product has been designed and developed with
safety, comfort and functionality in mind. Please take
the time to read this manual carefully before using
this product and keep it in a safe place for future
reference.

04
x2
x1
x1
Lx1
Rx1
Check what you have received...
You have received 1 box. Please check the contents of the box against the list below. If anything is
missing, please contact Customer Service. In Australia, contact CNP Brands on 1300 667 137, in
New Zealand contact Wainhouse Distribution on 0800 567 5000.
Supplied loose in box:
Dual front swivel wheels
Canopy
Bumper bar
Car seat adapters
(Britax: Orion / Strider / Cruiser)
Stroller frame, with the following components
pre-assembled on frame:
Rear wheels
Basket
Assembly Contents

05
Unfolding the stroller
1. Hold down the stroller by the handles and release the storage
lock.
Front swivel wheels assembly
1. Push wheel firmly onto the mounting point on the front legs.
ensure arrow on swivel housing is pointing upwards. Push until
wheel clicks into position.
2. Pull back on wheel to ensure that it is secure.
3. Repeat for other front wheel.
2. Lift the handles and allow the front legs to drop towards the
floor. Do not try to open the stroller by forcing the handles apart.
Emsure the storage lock is released.
3. Push down on the lower locking bar until the frame is fully opened
and locked. (Check that both the upper and lower locking bars
are fully engaged).
Assembly Instructions

06
To use brakes
1. To lock brakes, push down on each
brake lever with foot.
2. To release brakes, lift each brake
lever up with foot.
CAUTION: Always apply both brakes
when parking stroller.
To adjust the seat extension
1. Lower the seat extension by pressing up the release latches
located underneath on both sides of the seat extension.
2. Push down and raise the seat extension by lifting it until the
release latches lock into place.
CAUTION: Do not adjust the extension while the child is in the stroller
Front swivel function
1. To lock swivel function on front
wheels, lift the locking clip up. The
swivel wheels can only be locked
when the wheels are in the trailing
position under the frame (wheels
under frame).
2. Push the locking clip down to allow
the wheels to swivel.
Lock Unlock
To attach canopy
1. Slide the canopy clips onto the
mounting brackets on the stroller
frame.
2. Attach the velcro loops around the
top of the frame as shown.
Assembly Instructions
Lock Unlock

07
To adjust canopy
To open the canopy, pull the canopy forwards and ensure the locking
hinge is locked into position by pushing it downwards. To close the
canopy, push the centre of the locking hinge upwards to unlock it, and
pull the canopy back.
To adjust sunvisor
To open the sunvisor, pull it downwards. To close the sunvisor, fold it
back up into the hood.
Adjusting the backrest
This stroller has an adjustable backrest. The upright position on the
backrest is not suitable for use with children less than six months old.
For use with a newborn (0-6mths), the seat should be fully reclined. The
backrest should only be adjusted to a more upright position as the child
grows older and is able to support their head without assistance.
1. To lower the backrest; pull backrest adjusting lever upwards and
lower to desired position. Release lever.
2. To raise the backrest; push the backrest upwards.
CAUTION: Do not adjust the backrest while child is in the stroller.
Assembly Instructions
Mesh canopy extension
Unzip the mesh section of canopy carefully. The canopy can then be
adjusted forward or backward to allow ventilation through the mesh
sections.

08
Restraints - Harness
1. To secure the child in the harness, place left hand
buckle prong (b) on top of (a).
2. Hold both left hand buckle prongs (a) and (b)
together and insert it into buckle housing (e) until
it snaps into position.
3. Repeat previous steps for right hand buckle
prongs (c) and (d).
4. Once all attached, carefully adjust the harness
straps by pulling each slider (f) until the desired
fit is achieved in the lap, shoulder and crotch
straps.
5. To release the buckles, squeeze the top and
bottom prongs (a) and (b), (c) and (d) together
until harness disengages.
CAUTION: Always adjust the harness when changing
the seating position of the child.
Adjuster
Slide up or down
To adjust harness straps
To adjust straps, hold the strap with one hand and
slide the adjuster up or down the strap. Sliding the
adjuster down will loosen the strap, while sliding the
adjuster up will tighten the strap.
(a), (b): Left hand buckle prongs
(c), (d): Right hand buckle prongs
(e): Buckle housing
(f): Strap adjustment sliders
Assembly Instructions
f
ff
f
fa
b
c
d
e

09
Tether strap
Ensure tether strap is used at all times. Make sure your hand is fed
through the loop as shown in the diagram.
Folding the stroller
1. Before folding the stroller, remove bootcover, close the hood,
place seat in full layback position and transfer handle to forward
facing mode.
2. Simultaneously squeeze both handle levers located in the middle
of the stroller handle and lift the red lever located on the left side
of the stroller handle.
3. Push down on handle to commence folding the unit. Once fold is
complete, push down on the handle to engage the folding locks.
Assembly Instructions
Attaching bumper bar
1. Align the bumper bar ends with the locking buttons on the sides
of armrest moulds of the stroller frame and push inwards until they
“click” and lock into position on each side.
2. To remove bumper bar; push both locking buttons in and pull
bumper bar out.

10
Assembly Instructions
Cleaning
To ensure the long-lasting use of your stroller, dry it with a soft absorbent cloth after use in rainy
weather. Use a damp cloth to clean the frame. Do not use abrasive cleaners. After using your
stroller on the beach, clean the frame and wheels thoroughly with water to remove the sand and
salt. Allow it to dry thoroughly. Removable and non-removable fabric covers and trims may be
cleaned using a damp cloth with soap or mild detergent. Allow it dry completely before folding
or storing it away. Do not dry clean, or use bleach on fabrics or trims. Do not machine wash,
tumble or spin dry, unless the care labelling on the product permits these methods.
Maintenance
Check stroller regularly to ensure that locking devices and components are secure and working
properly. Always check parts regularly for tightness of screws, nuts and other fasteners – tighten
or replace if required. To maintain the safety of your stroller, seek prompt repairs for bent, torn,
worn or broken parts. Use only those parts and accessories approved by CNP Brands. If the
wheels squeak, use silicone based spray or light oil ensuring it penetrates the wheel and axle
assembly. To prevent mould or mildew, do not fold or store the product if it is damp or wet. Allow
it to dry thoroughly. Always store the product in a well ventilated area and away from direct
sunlight.
If you have any difficulties in assembling the stroller, please contact our Service Department.
In Australia, contact CNP Brands on 1300 667 137, in New Zealand contact Wainhouse
Distribution on 0800 567 5000.

11
Warranty Terms and Conditions
1.1 Our goods come with guarantees that cannot be excluded under the Australian Consumer Law. You are entitled to a replacement
or refund for a major failure and compensation for any other reasonably foreseeable loss or damage. You are also entitled to
have the goods repaired or replaced if goods fail to be of acceptable quality and the failure does not amount to a major failure.
1.2 In addition to the guarantees that cannot be excluded under the Australian Consumer Law described in clause 1.1 and any other
guarantee or warranty implied by law, when you purchase one of our products, you will also have the peace of mind in knowing
that your product is covered by CNP Brands Standard Warranty. The Standard Warranty is provided by C.O. White Pty Ltd
trading as CNP Brands (ABN 97 004 169 233) (“CNP Brands”). The terms and conditions of the Standard Warranty are further
described below.
1.3 Subject to clause 1.1 and the terms below, CNP Brands warrants that this CNP Brand product, purchased by you in Australia or
New Zealand:
a) Is free from defects in workmanship and material, when the product is used for normal consumer use for a period of 2 years
from the date of purchase as evidenced by your proof of purchase (“Warranty Term”); and
b) Will, when the product is used for normal consumer use, comply with the manufacturer’s specifications during the Warranty
Term.
1.4 CNP Brands agrees to repair or replace at CNP Brands cost, the product, and any accessory supplied with the product, which is
proven upon inspection by CNP Brands or a CNP Brands Authorised Service Agent not to comply with either warranty contained
in clause 1.3. Any decision to repair or replace a product is to be made by CNP in its absolute discretion. The extent of any
repair will be to rectify any defect in workmanship and materials or to ensure that the product complies with the manufacturer’s
specifications.
1.5 To make a claim under this Standard Warranty you will need to:
a) Return the product within the Warranty Term to the place of purchase together with your proof of purchase, where the retailer
will provide you with assistance to make your claim; or
b) Contact CNP Brands Customer Care Centre on toll free 1300 667 137 during the Warranty Term to register your claim and
provide the details to enable CNP Brands to assess the claim.
1.6 You may also be required to make the product available to CNP Brands or a CNP Brands Authorised Service Agent. If you are
required to return the product to a CNP Brands Authorised Service Agent, CNP Brands will provide details of the centre closest to
you. Unless CNP Brands decides otherwise you are responsible for any costs associated with returning the product to CNP
Brands. The product will be at your risk whilst in transit to and from the CNP Brands or CNP Brands Authorised Service Agent,
unless transported by CNP Brands or its agents.
1.7 In order for your claim to be processed you will need to provide to CNP Brands with an original proof of purchase. For example
an original retailer purchase receipt, bill of sale, invoice, lay-by docket, credit card receipt or similar proof of purchase.
1.8 If CNP Brands decide to repair a product, this product may be replaced by refurbished products of the same type rather than
being repaired. Refurbished parts may be used to repair the product. Replacement of the product or a part does not extend or
restart the Warranty Term.
1.9 Exclusions
a) This Standard Warranty does not cover products purchased as an ex-display, without being checked by CNP Brands or CNP
Brands Authorised Service Agents.
b) This Standard Warranty does not cover faults or defects caused by:
i. Unsuitable, improper use or use not in accordance with the manufactures specifications;
ii. Incorrect installation or installation not in accordance with instructions provided;
iii. Normal wear and tear;
iv. Inadequate or complete lack of maintenance;
v. Chemical, electrochemical or electrical influences; or
vi. Harsh detergents or abrasive cleaners used on product finishes.
c) To the fullest extent permitted by law, CNP Brands excludes all liability for damage or injury to any person, damage to any
property, and any indirect consequential or other loss or damage.
For Customer Service in Australia, contact CNP Brands on 1300 667 137 or email [email protected]. In New Zealand
contact Wainhouse Distribution on 0800 567 5000.

12
Distributed in Australia by CNP Brands, 20 Calarco Drive, VIC, 3030
Customer Service 1300 667 137 www.cnpbrands.com.au
Distributed in New Zealand by Wainhouse Distribution, 2-6 Argyle St,
Morningside, PO Box 41-014, St Lukes, Auckland, New Zealand
This manual suits for next models
1
Table of contents
Other Bebe Care Stroller manuals