Becker BT-BKRMTCK Instruction Manual

Courtesy of: DiscountCarStereo.com
Serving the internet community since 1995
|
This radio is for illustration purposes only
BT-BKRMTCK
Quick start installation guide for Motorola and Parrot
Created June 19, 2015
Revised: June 10, 2020

Introduction:
The BT-BKRTMCK Bluetooth harness is designed exclusively for the installation of
Motorola and Parrot Bluetooth Car Kits to Becker Radios with “PHONE” menu
option. These radios are typically found in older European vehicle such as BMW,
Ferrari, Mercedes and Porsche including the popular Traffic Pro, CR-22, CDR-22,
CR-220, CDR-220, CR-210* and CDR-210*. The BT-BKRTMCK harness allows for
quick installation of: Motorola TK30, Parrot CK3200, CK3400, MK6000, MK6100,
MKi9100, MKi9200
Installation:
Although not critical, we recommend disconnecting the
car battery. Keep in mind that most Becker radios are
coded and will not operate without the code. Radio code
must be available for radio to operate upon reconnection.
Remove radio from dashboard to gain access to the connectors. This
process requires special removal tools (not included) (See Fig. 1).
Fig. 1
Radio removal Tools
1. To remove radio, slide tools into slots to detent position. Withdraw the
radio by pulling outwards. See Fig. 2
Fig. 2
2. With radio removed disconnect observe C1, C-2 and C-3 on radio (See
Fig. 3)
C-1 and C-2 and C-3 chambers may be empty. These
chambers are reserved for amplifier (C-1) and CD
Changer (C-2 & C-3).
Fig. 3
Radio connector

Motorola TK30
1. Connect BT-BKRTMCK 24-pin Molex plug (See Fig. 4) to Motorola TK30
24-pin Molex connector.
2. Proceed to “Bluetooth audio installation” below
Fig. 4
Parrot CK & MKi:
1. Connect BLU-BKRTMCK 24-pin Molex plug (See Fig. 4) to Parrot
MK6000, MK6100, MKi9000 & MKi9200 24-pin Molex connector.
2. Proceed to “Bluetooth audio installation” below
Bluetooth Audio installation:
Radios with existing CD Changer/iPod Adapter or Aux
1. Insert white wire to #13 slot of existing blue ISO plug (See Fig. 5)
2. Insert purple wire to # 14 slot of existing blue ISO plug (See Fig 5)
Fig. 5
Bluetooth Music Streaming
If Bluetooth kit supports music streaming, the following must be observed:
Radios with existing CD Changer/iPod Adapter or Aux:
Warning: If your kit supports music streaming, the CD Changer, iPod Adapter or
auxiliary input adapter must be disconnected.
1. Disconnect CD Changer, iPod adapter or aux ISO plugs from radio (usually
blue and green)
2. Connect blue ISO plug into the 8-pin connector (C-3) on the back of the radio.
(See Fig. 3)
Radios without CD Changer, Auxiliary/iPod adapters (empty slot):
1. Connect BLU-BKRTMCK blue ISO plug to radio 8-pin connector (C-3)
(See Fig. 3)

Power harness installation:
1. Disconnect factory 8-pin plug from radio “A” chamber (See. Fig. 3)
2. Connect installation harness male plug (See Fig. 6) to radio “A”
chamber vacated in step 1.
3. Connect factory 8-pin plug to mating connector on installation harness
(See Fig 6)
Fig. 6
Operation:
The most important steps in this process is enabling AUX function within the
Becker radio menu. The following steps are required to enable “AUX” otherwise
the adapter will not perform as intended.
Note: Becker CDR210, CR210, PCM1 radios do not have AUX function. Simply
enter CD Changer mode to operate Bluetooth mode
Enabling AUX function
Radios with TP button: (i.e. CDR-220)
1. Turn radio "ON"
2. Press and hold the "TP" button for about 8 seconds until Becker 1 is
displayed.
3. Turn the Tuning Knob until AUX OFF is displayed.
4. Press either button located directly under the Arrows on the display to
change the present setting from OFF to ON.
Turn radio OFF.
5. Turn Radio back “ON” Press “S” button to enter AUX Mode. This is the
mode to use whenever you want to listen to the device connected to
the adapter.

Radios with ☼button: (i.e. BE6104)
1. Turn Radio “ON”
2. Press and hold the ☼button for about 8 seconds.
3. Select AUX “ON/OFF”option.
4. Press either button located directly under the Arrows on the display to
change the setting to ON.
5. Turn radio OFF.
6. Turn Radio back ON press the “☼”button until “AUX”is displayed.
Other Radios with ☼button (i.e. BE4602)
1. Turn radio ON.
2. Press and hold the ☼button for 8 seconds, until Becker 1 is displayed.
3. Turn the Tuning Knob until AUX OFF is displayed.
4. Press either button located directly under the Arrows on the display to
change the present setting from OFF to ON
5. Turn Radio back “ON” Press “CD” button to enter AUX Mode
Radios with 3 Function buttons (i.e. BE4527)
1. Turn radio ON.
2. Press and hold Function button #2 (center) for more than 4 seconds.
3. The accompanying menu appears on the display.
4. Press the multifunction button located directly under “AUX” on the
display to change the present setting from OFF to ON.
5. The Setting is stored automatically.
Nav Traffic Radios
1. Press the "Radio" button to enter Radio mode.
2. Press the "Navi" and "F10" simultaneously
3. Press "Next" until the AUX input, Changer Res screen
4. Press AUX to enable/disable.
Becker 4775 (Land Rover) & Other Traffic Pro
1. With the Radio "ON" press and hold the Tone button until the sub-menu
comes up.
2. Press the soft-key labeled “Aux” until the screen displays “AUX Mode
on”.
3. Press the Tone button to exit the menu.
4. To enter "AUX" mode, press the "CD" button and select the "AUX" soft-
key.

Sound 5 (BE7077 Sprinter Van)
1. Turn radio ON.
2. Press the
dp
repeatedly until EXT menu appear.
3. Turn Rotary control knob clockwise and select EXT AUX.
4. Press the CD button repeatedly until “AUX” is displayed
Cascade Pro (i.e. BE7941)
To activate the External Device mode
1. Turn radio ON.
2. Press the information button
3. Turn the rotary control/push (OK) button counterclockwise until
System Settings appears at the top right of the display
4. Press the rotary control/push (OK) button
5. Turn the rotary control /push (OK) button to select External Device
6. Confirm selection by pressing the rotary control/push (OK) button
7. Select “AUX” from list and turn it “ON”.
8. Exit menu
9. To listen to the “AUX” device, press the MEDIA button
10. Turn the rotary control /push (OK) button to “AUX” and press the
rotary control/push (OK) button
Becker BE7801 Infotainment (Ferrari, Maserati)
1. Press the TP button for more than 2 seconds
2. Press multifunction button “AUX”
3. Select Ext audio source
4. press the right control knob to select “ON”
5. The setting is store automatically
Becker DTM /High speed (i.e. BE-7892, BE7910)
1. Press the Sound button for more than 2 seconds
2. Press multifunction button “AUX”
3. Select Aux Mode on
4. The setting is stored automatically
In CD Operation, the multifunction button AUX must be pressed to select
AUX operation

Frequent Asked questions:
1. Why purchase the BT-BKRTMCK?
The BT-BKRTMCK harness allows for quick installation of: Motorola
TK30, Parrot CK3200, CK3400, MK6000, MK6100, MKi9100, MKi9200
2. Why can’t I use the installation harness included with my Motorola
or Parrot Kit?
The installation harness included with the aforementioned kits can be
used in most application except in vehicles equipped with factory
amplifier. The BT-BKRTMCK can be used in vehicles with or without
amplifiers or to replace the original installation harness (if purchased
as a used item that did not include the harness)
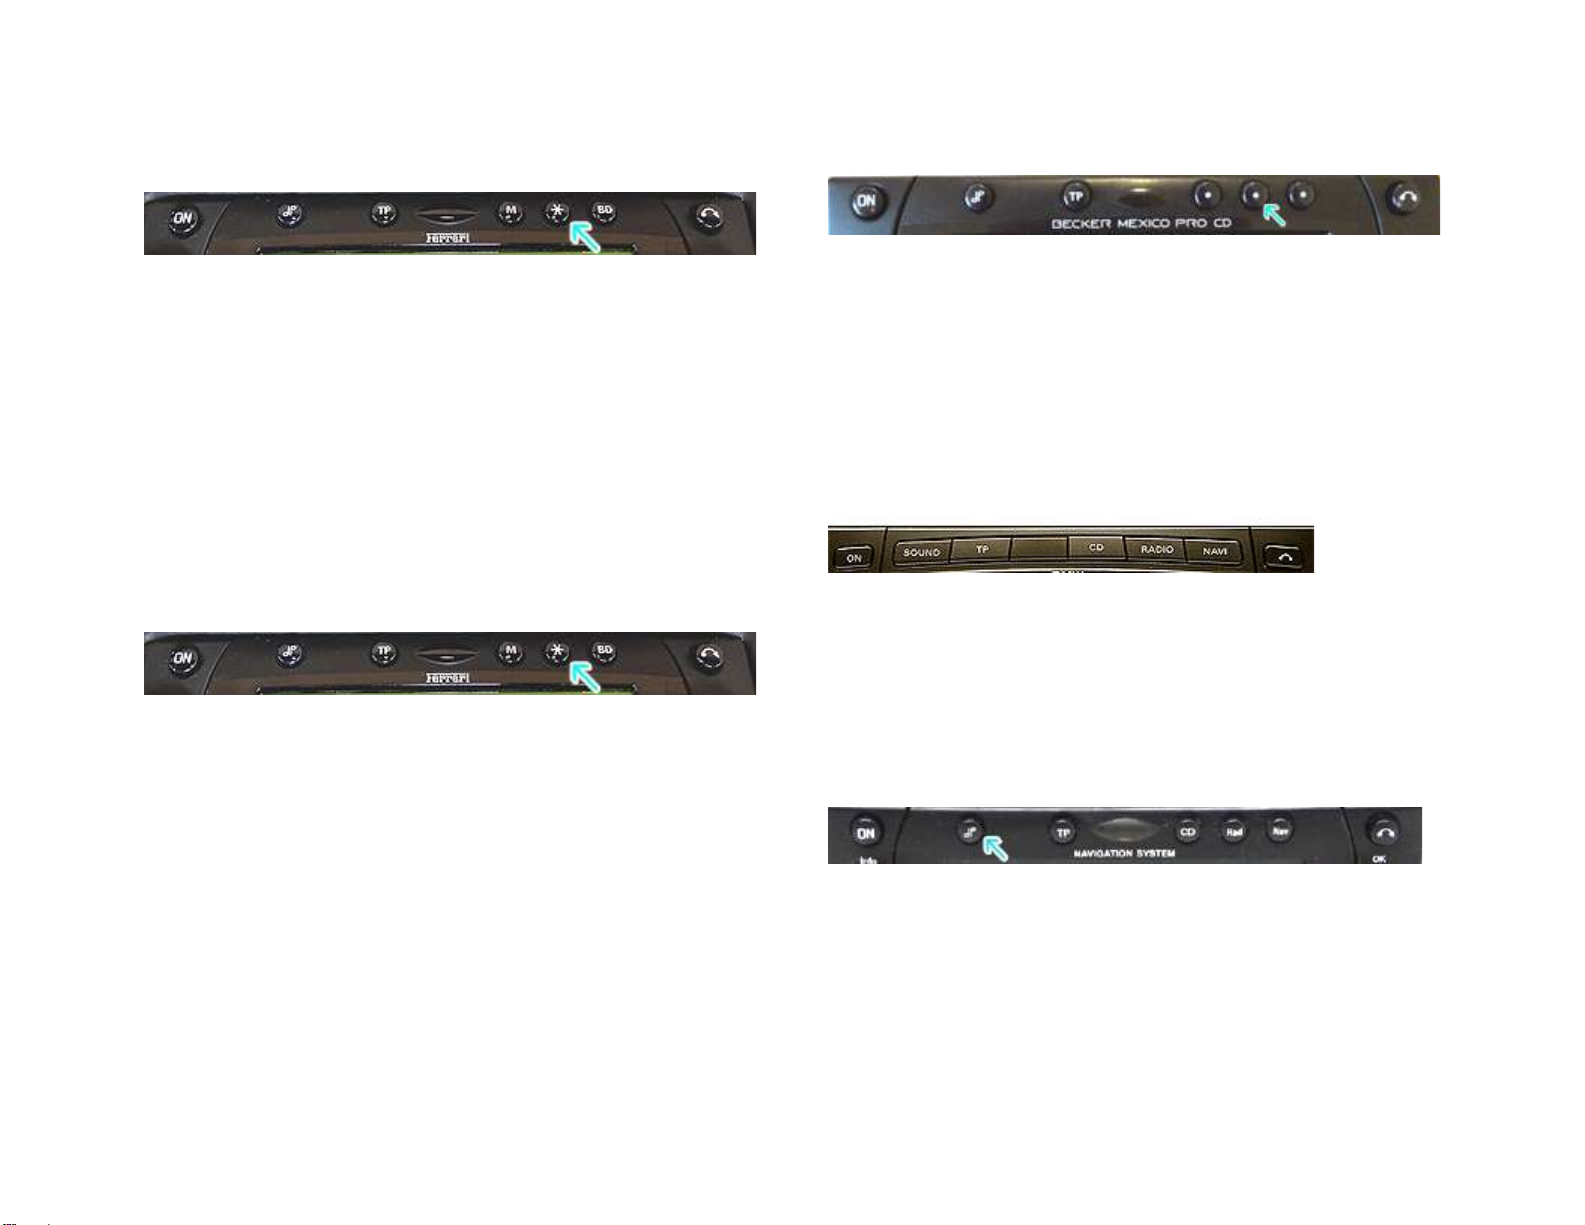
3. * Why can’t I use this harness to install my Hands Free with Audio
streaming Bluetooth kit to the CD-210 and CDR-210 radios?
The CR-210 and CDR-210 radios (Porsche), do not have “AUX IN” port
required for the music streaming feature to work. Use the installation
harness included with your kit for CD-210/CDR-210 radios or any
without aux input port.
4. My radio has an existing CD Changer, AUX Adapter/iPod Adapter.
Do I have to disconnect them in order to use the BT-BKRTMCK?
Short answer is NO!! Bluetooth hands free features works without
disconnecting these options, however music streaming from Motorola
TK30 or Parrot MKi9100 etc.) requires disconnecting the CD changer,
Auxiliary or iPod adapter.
Disclaimer
• This product has no affiliation with Porsche, Becker or Apple
• We’re not liable for misuse of this product.
Email support@discountcarstereo.com
© 1995-Jun-20 Discount Car Stereo, Inc. All rights reserved. Information in this document is
subject to change without notice. Other products and companies referred to herein are
trademarks or registered trademarks of their respective companies or mark holders.
Table of contents
Other Becker Automobile Accessories manuals
Popular Automobile Accessories manuals by other brands

Front Runner
Front Runner FAJK010 Read me first

Saris
Saris 4033 Assembly instructions

Curtis
Curtis 47587421001 Installation & owner's manual

Prorack
Prorack WHISPBAR S47 Fitting Instructions for Basic Carrier

Mercedes-Benz
Mercedes-Benz MCS Operator's manual

Thitronik
Thitronik WiPro III safe.lock installation manual