Bedrock SM50 User manual

Bedrock SM30/SM50/SM90
Operating manual
© 2019 Bedrock Audio BV Document version 2.4.0
IEC-60268-16 rev. 4 & rev. 5
IEC-61672 Class 2 / ANSI S1.4 Type 2
IEC-61260 Class 0
ISO-3382-2
ANSI S12.2 / ISO-1996

2 Bedrock SMxx operating manual © Bedrock Audio BV, 2019

2 Bedrock SMxx operating manual © Bedrock Audio BV, 2019
3
Contact information and support
The Bedrock SMxx devices (SM30, SM50, SM90) are designed and manufactured by Em-
bedded Acoustics B.V. in the Netherlands.
The manufacturer can be contacted at the following address:
Bedrock Audio BV
Ampèreweg 18
2627 BG DELFT
The Netherlands
www.bedrock-audio.com
Phone: +31 88 8770700
Fax: +31 88 8770799
Email: [email protected]
Updates of the system’s firmware and documentation are released online :
www.bedrock-audio.com/support
NOTE: All screenshots and product pictures shown in this manual correspond to the
SM50 with hardware platform 1.1B running firmware version 2.4. If you are using a differ-
ent device model or a different firmware version, the screenshots may not fully correspond
to what is being displayed on your device’s screen.
Where this manual refers generically to the Bedrock SMxx, the corresponding text ap-
plies to all device models starting with the letters “SM” (i.e. SM30, SM50 and SM90).
All functions and features of the SM30 are identical to the SM50, with the exception of
the STIPA modules (which are not featured on the SM30). The SM90 hardware differs
from the other two models: it complies with Type 1/ Class 1 requirements (compared to
Type 2 / Class 2 for the other models).
© Bedrock Audio BV, 2013-2019. All rights reserved.
Bedrock Audio and Embedded Acoustics are registered trademarks.
Document version 2.4.0 release date April 2019. Applies to models: SM30, SM50 and
SM90. Speech intelligibility related functions not supported on SM30

4 Bedrock SMxx operating manual © Bedrock Audio BV, 2019
Contents
Contact information and support 3
1. Introduction 6
2. SMxx versions and features 7
3. How to use this manual 8
New in firmware version 2.4 8
4. General use and safety precautions 9
4.1. Safety precautions when charging 9
4.2. Safety precautions related to connectors 10
5. Getting started 11
5.1. Preparing and booting the SMxx 11
5.2. The SMxx main menu 11
5.3. Customizing the main menu 13
5.4. Warning dialogs 13
5.5. Layout of the user interface 14
5.6. Some more tips and tricks 15
6. Speech intelligibility measurements 16
6.1 Quick STIPA (not featured on the Bedrock SM30) 16
6.2 STIPA pro (not featured on the Bedrock SM30) 20
6.3 Full STI (not featured on the Bedrock SM30) 24
6.4 Speech Level Meter (not featured on the Bedrock SM30) 27
7. Level and spectrum 28
7.1 SPL meter 28
7.2. LAEQ logging 31
7.3. Real-Time Analyzer (RTA) 35
7.4. Fast Fourier Transform analyzer 37
7.5. Statistical acoustics (percentiles) 39
7.6. RTA logging (button) 41
8. Room acoustics 42
8.1. Reverberation Time meter (RT60) 42
8.2. Noise curves 49
9. Electro-acoustics 52
9.1. Oscilloscope 52
9.2. AC Volt meter 53
9.3. Electric in RTA and FFT 54
9.4. Polarity 54
10. Other modules and control modes 56
10.1. Calibration 56
10.2. Settings 58
10.3. Status 62
10.4. USB audio device mode 63

4 Bedrock SMxx operating manual © Bedrock Audio BV, 2019
5
11. Accessing saved measurements from a PC 64
11.1. Connect USB cable 64
11.2. Copy your measurement data 64
11.3. Resetting measurement number series 65
11.4. About the file format 65
11.5. Downloading recorded audio 65
11.6. Further use of USB 65
12. Remote control from a PC 66
12.1. Remote duplication of the SMxx screen (Remote display) 66
12.2. The Bedrock remote control API 68
13. Power and charging 70
13.1. Charging instructions 70
13.2. Power saving recommendations 71
13.3. Use of power banks and external battery packs 71
14. Cleaning, maintenance and calibration 72
Battery disposal 72
15. Product warranty 73
16. Firmware updates 75
17. Buttons, icons and symbols 76
18. Technical specifications 80
Linear range (31 Hz - 4k - 8k - 12.5kHz) 81
19. Troubleshooting 82
LED states 83
Firmware update error codes 83
EC declaration of conformity 84
Annex A. Correction factors for SPL measurements (IEC-61672) 85
Annex B. Manufacturer’s instructions for periodic testing according to IEC-61672-3. 98
Annex C. Manufacturer’s instructions for periodic validation of STI test functions 100

6 Bedrock SMxx operating manual © Bedrock Audio BV, 2019
Class 2 / type 2
microphone
Power button
Charge status LED
USB charge & data
port
Touch screen
Tripod mount
Hook for
carrying cord
Serial number Model shown is
Bedrock SM50
1. Introduction
Congratulations on purchasing your Bedrock measuring instrument! The SMxx product
line comprises a series of flexible, all-round acoustic analyzers: the SM30, SM50 and SM90.
The features of each of these instruments are listed in section 2 of this manual.
Using the SMxx is quite easy, thanks to its touch-screen operation and intuitive menu
structure. Most users will get the hang of doing measurements with the SMxx without
spending too much time with this manual. Nonetheless, we strongly recommend that you
do read chapters 1-5 of this manual before using your SMxx for the first time, in order to
get acquainted with the various features of the device, as well as the procedures for charging
and maintenance. With a little care, you can expect years and years of reliable and trouble-
free operation from the SMxx.

6 Bedrock SMxx operating manual © Bedrock Audio BV, 2019
7
2. SMxx versions and features
The SM30, SM50 and SM90 share a common hardware platform, with some differences
between the different versions of the device:
• The SM30 and SM50 comply with class 2 / type 2 (Group X) of IEC-61672:2013 and
ANSI S1.4. The SM90 complies with class 1 / type 1.
• The SM50 and SM90 feature speech intelligibility measurement functions. The SM30
does not include any of the modules related to speech intelligibility.
The table below lists all of the functions and modules
Modules and features SM30 SM50 SM90
Speech intelligibility
STIPA measurements (IEC-60268-16) - • •
Full STI measurements (IEC-60268-16) - • •
Speech Level measurements (IEC-60268-16) - • •
Level & spectrum
SLM: Sound Level Meter (IEC-61672 / ANSI S1.4) class 2 class 2 class 1
LAEQ logging (long term monitoring) • • •
RTA: Realtime Analyzer, 1/1, 1/3, 1/6 and 1/12 oct. • • •
RTA logging: long term monitoring of RTA spectra • • •
FFT: Fast Fourier Transform spectral analyzer • • •
L% - statistical acoustics (percentile levels) such as L10 and L90 • • •
Room Acoustics
RT60: Reverberation Time measurements (ISO-3382-2), IR-based and interrupted noise • • •
Noise curves (NR, NC, etc - ISO-1996, ANSI S12.2) • • •
Electro-acoustics
Oscilloscope (time domain inspection of signals) • • •
AC Voltmeter (measure RMS, dBU, dBV) • • •
RTA (Real-Time analyzer) for electric input signals • • •
FFT (Fast Fourier Transform) for electric input signals • • •
Polarity - check polarity of loudspeakers • • •
Other options and features
Recording calibrated audio • • •
Remote operation as USB audio device • • •
Remote control via PC • • •
Availability of remote control API for third-party applications • • •
Download of measured data via USB • • •
User-configurable home menu • • •
Free firmware upgrades • • •

8 Bedrock SMxx operating manual © Bedrock Audio BV, 2019
3. How to use this manual
Depending on how you plan to use your Bedrock SMxx, not all information in this manual
may be equally interesting or relevant. If you are new to the Bedrock SMxx, we strongly
recommend that you read the following chapters:
• Chapter 4: General use and safety precautions
• Chapter 5: Getting started
• Chapters on the measurement modules that you plan to use first
• Chapter 13: Power and charging
• Chapter 14: Cleaning, maintenance and calibration
We recommend reading the chapters on the various measurement modules as you plan to
use them. As some of the modules implement complex measurement procedures, using
those modules may require you to spend some time with this manual, and possibly also
third-party source of information (such as online tutorials and course manuals).
The following sections should be read if you are experiencing issues with your device or if
you need to upgrade your firmware:
• Before getting support from your Bedrock audio vendor, please consult the
Troubleshooting section (chapter 19)
• Consult the section on Firmware updates (chapter 16) before trying to in-
stall new firmware on your device. Failure to follow firmware update in-
structions precisely may render your device permanently inoperable and
voids your warranty.
Towards the end of this manual, you will find detailed information in tables and appendi-
ces that may not be needed for everyday use of the device. In particular, these appendices
contain procedures for periodic testing, as needed by 3rd party labs for calibration and (re-)
certification of your instrument.
New in firmware version 2.4
If you have previously used the Bedrock SMxx but have recently upgrade to firmware 2.x.x
we recommend that you read the “Getting started” section to get acquainted with the new
structure of the Home menu (which is now user-configurable). New modules introduced
in FW2.x.x are: Speech Level Meter, Full STI, AC Volt meter, Noise Curves and RTA log-
ging. Functionality of RT60 has been enhanced, and a remote control API for 3rd party
apps is now available. Full STI and Speech Level Meter are not available to SM30 users.

8 Bedrock SMxx operating manual © Bedrock Audio BV, 2019
9
4. General use and safety precautions
Your Bedrock SMxx is a sophisticated electronic measuring instrument that should be used,
maintained and stored with care:
• We recommend that you always use a lanyard to secure your device against
dropping, by suspending it around your neck or wrist. If you use a tripod
to mount the device during measurements, we recommend that you use a
sturdy model with a sufficiently wide base.
• Do not expose the device itself, the measuring microphone or charger to
rain, moisture or liquids of any kind. Take special care to prevent liquids to
permeate into the device through the connectors or along the display bezel.
• Do not operate at ambient temperatures above 35oC/95F.
• Do not use close to flames or open fire.
• Do not use in environments where flammable or explosive materials may
also be used.
• Do not keep the device powered on while unattended for prolonged periods
of time.
• Use the charger only with the international adapter suitable for your region.
• Make sure that the device is switched off before transportation and storage.
• During transportation and storage, keep the device in a suitable casing or
container – preferably its original case. The device needs to be protected
from shocks and vibration (due to transportation or falling), excessive tem-
peratures, liquids and moisture, and any other external conditions that
could do damage to the device. Care should be taken that other objects can-
not come into direct contact with the display during transportation.
4.1. Safety precautions when charging
The Bedrock SMxx is a battery-powered rechargeable device, with an internal low self-
discharge NiMH battery pack. This battery pack is designed for many years of operation,
and therefore cannot be swapped out by the user. Recharging takes place through the mini
USB connector found on the left side of the device.
The device is charged through the USB connector using high currents of
up to 1500 mA. While being charged, it will heat up. DO NOT CHARGE
THE DEVICE WHILE IT IS INSIDE A CLOSED CONTAINER (BOX,
BRIEFCASE, ETC.). Please make sure that the device can shed excess heat
while charging.

10 Bedrock SMxx operating manual © Bedrock Audio BV, 2019
The supplied charger includes adapters for use worldwide, and operates on
a wide AC voltage range of 100 – 240V. Do not use the charger if the casing
appears cracked or broken, or if it has been exposed to fluids or moisture.
Contact with components inside the charger while this is plugged in may
result in serious injury or death.
4.2. Safety precautions related to connectors
The Bedrock SMxx features a USB connector and an XLR connector (to
which the microphone is attached). If you connect external devices to these
connectors, please ensure that these connections are protected against over-
voltage and power surges. The voltage supplied to the USB port may not
exceed 5.5V. As the USB power circuitry is connected to the battery pack,
excessive voltage applied to the USB port may cause the battery pack to
catch fire or explode.
The XLR connector supplies 48V phantom power to the microphone. This
phantom voltage can be switched on and off through the hardware settings
menu. IMPORTANT: connecting equipment not designed for 48V phan-
tom power to the XLR connector (with phantom power switched on) may
permanently damage the connected device and/or the SMxx. The manu-
facturer explicitly denounces responsibility for any damages to third-party
hardware resulting from exposure to the Bedrock SMxx’s phantom power.
The “AC Volt meter” function of the device is intended for measuring audio
output levels of amplifiers and other audio equipment. NEVER connect the
XLR input pins to AC voltages over 40V; do NOT try to measure the AC
mains with your SMxx.

10 Bedrock SMxx operating manual © Bedrock Audio BV, 2019
11
5. Getting started
You will most likely receive your Bedrock SMxx with sufficiently charged batteries to start
the device and get acquainted with its features. We do recommend that you fully charge the
device using the supplied charger before you start your first serious measurement session.
Leave the device on the charger until it finished its charge cycle. This may take up to 6
hours; many users opt for overnight charging.
All rechargeable batteries slowly lose charge during storage, the batteries in
the Bedrock SMxx are no exception. When you take out the device after it
has been on the shelf for more than a few weeks, always fully charge the
batteries first. The battery charge indicator may not be accurate after longer
periods of storage.
5.1. Preparing and booting the SMxx
Connect the microphone to the instrument using the XLR connector at the top of the de-
vice. Next, power on the device by pressing the red power button once.
Note: the power button is also used to power the device off. If you press the button while the
device is in operation, you will see a dialog window asking confirmation before powering
off. If the power button is kept pressed for 10 seconds in the “power on” state, the device
will be forced into the “off ” condition. This can be used to reset the device if it becomes
unresponsive (keep pressed to 10 seconds to switch off, then press again to restart).
5.2. The SMxx main menu
The Bedrock SMxx will boot into the main menu. You can launch its various measurement
modules from this menu.
When you first start the device, it may boot up showing a warning, remind-
ing you to recharge the battery after storage. This is normal; it just means
that the device has detected that it has been in storage for some time before
it was shipped to you.
The main menu is where all the available modules are shown, and where you can choose
which module to launch. New modules are regularly added through firmware updates
that are made available through the Bedrock website. If your device is running a different
firmware version than the version on which this manual is based (version 2.0), you may see
a different selection of modules appear in the menu than the ones found in this manual.
Small differences in appearance also exist between different SMxx models.

12 Bedrock SMxx operating manual © Bedrock Audio BV, 2019
Set menu favorites
: press to select favorite modules to appear on this page
STIPA pro
: app that gives you access to all STI measurement details
Quick STIPA
: simple app to quickly do STIPA measurements
Full STI
: measure STI based on the complete 14x7 MTF-matrix
Speech level
: measure speech level corrected for pauses (IEC-60268-16)
SPL meter
: Sound Pressure Level meter module
LAEQ logging
: long-term monitoring and logging of sound levels
RTA logging
: Long-term monitoring of spectra
FFT
: Fast Fourier Transform spectral analyzer
L%
: calculate statistical levels such as L10 and L95 (percentiles)
RTA
: Real-time analyzer
RT60
: Reverberation Time meter
Noise curves
: Measure curve-based spectral single-number ratings (NR, NC, etc).
Os-
cilloscope
: Inspect audio waveforms in real time
Polarity
: Check loudspeaker polarity
AC Volts
: Measure output levels of audio equipment in dBU, dBV and Vrms
el.in RTA, el.in FFT
: RTA and FFT for electric input signals via XLR
Calibration
: calibrate the SMxx and its microphone
Settings
: change the system’s hardware configuration
Status
: general information on the measurement system
USB audio
: use the SMxx as a calibrated audio device from Windows

12 Bedrock SMxx operating manual © Bedrock Audio BV, 2019
13
The menu consists of multiple screens, through which you can flip back and forth. A small
digital clock and the battery/power status are always shown on the bottom of the screen.
NOTE: the screenshots shown here apply to the SM50/SM90. The “speech intelligibility”
screen is not present on the SM30.
5.3. Customizing the main menu
Notice that it is possible to select your own “favorites” to appear on the first page of the
main menu. This is done for added convenien; if you place your most frequently used
modules here (up to five), you will not have to browse through the entire menu too often.
After you press “set menu favorites,” you can select any of the 5 positions on the screen to
place a module
Appearance of the main menu page after pressing “set menu favorites.”
After selecting a position (tap “choose module” in the location you wish to place a module),
you can browse through the available modules. To clear a position where your previously
placed a module, select the “choose module” placeholder from the list. You can place, re-
move and change modules in this menu screen as often as you like.
Apart from the modules listed here in the main menu, the SMxx has specific operating
modes triggered by the USB port: charging, data transfer and remote control. All modules
and USB operating modes will be explained in detail in separate sections of this manual.
5.4. Warning dialogs
Whenever you start the device, a self-diagnostic program is run. Among other things, this
program monitors the health of the battery pack. The statistics of the battery pack are
logged whenever the device is used; these logs are inspected whenever the device boots.
14 Bedrock SMxx operating manual © Bedrock Audio BV, 2019
If the self-diagnostic program detects any inconsistencies in the battery logs, it displays a
warning. These warnings are usually no reason for immediate concern. Mostly, they serve
to provide information to you as a user that helps you to prolong the lifespan of your bat-
tery pack and to optimize the accuracy of the battery charge indicator (always shown at the
bottom right of the screen).
Examples of warnings reported by the self-diagnostic program when the SMxx is booted.
Ignoring the battery warnings will most likely lead to inconsistencies in the battery charge
indicator (showing up either too full or too empty, or causing the indicator to make sudden
jumps). If this should happen, the best remedy is always to fully charge the device, then
fully discharge the device, and then fully charge it again. Note that the complete charge
cycle may take 5 hours or more. We recommend that you always leave the device connected
to the charger until the charge cycle finishes (perhaps overnight). The charge cycle is com-
pleted if the LED on the side of the device stops blinking green/amber.
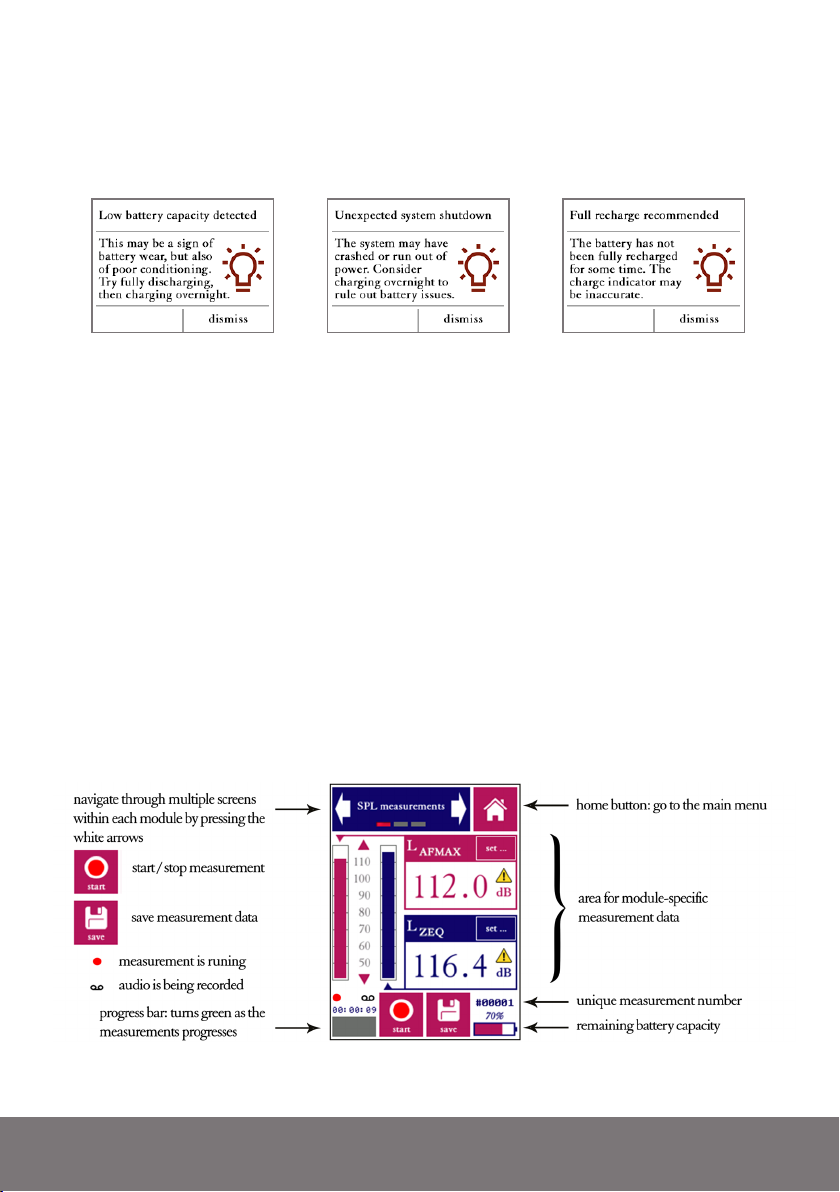
5.5. Layout of the user interface
The various measurement modules share a common user interface: most buttons and cap-
tions can be found in the same location throughout all modules. The graph below explains
the most common icons and buttons.

14 Bedrock SMxx operating manual © Bedrock Audio BV, 2019
15
5.6. Some more tips and tricks
Boot straight into your last-used module. The device boots up into the module from
which the device was last shut down. This is very convenient if you want to (temporarily)
turn the device off between measurements to conserve the batteries; you don’t have to go
through the menu each time. You can return main menu at any time by tapping the “home”
button, found at the top right of the screen in each module.
Add text annotations to your measurements. Measurements made by the SMxx are
uniquely identified by a serial number. However, as time passes by you may have a hard
time remembering which measurement #000422 was exactly. A short text such as “1st floor,
office 103” may jog the memory. It is now possible to add a short text note to every meas-
urement, by means of an on-screen keyboard. You will have to set “Text annotations ON”
in the settings module. Whenever you save a measurement, a keyboard will now pop up.
Record the audio of all of your measurements. Also from the settings menu, you can set
the device to record audio (in .wav format) for all of your measurements. These .wav files
are calibrated so that full scale corresponds to 150 dB SPL. You can play them back with
any audio player, although they may have to be amplified to be heard at a satisfactory level
(Windows is not set up to expect 32 bit audio files).
Back up your data via USB. All of your measurement data (and recorded audio) can be
copied to a PC using the supplied USB cable. The SMxx simply presents itself as a mass
storage device; see chapter 11 of this manual for the details. A word of warning: if your
computer is set up to display hidden files, be careful not to change, move or delete any files
from the SYSTEM folder.
Use a USB power bank for lengthy measuring sessions. Depending on the type and in-
tensity of use, most users get between 6 and 8 hours of use out of a single battery charge.
The battery is designed to last through the day during a typical measuring campaign. The
battery is drained most quickly during the actual measurements, when all pre-amplifiers
and the phantom power are fired up. When measuring continuously, expect the battery to
last 3 to 3.5 hours. If this is not enough, we recommend using a (generic) USB power bank,
connected via the USB port of the device. These devices are effective and inexpensive, and
will last you multiple days. To save power, set the display to a low brightness setting and
turn it off in between measurements.

16 Bedrock SMxx operating manual © Bedrock Audio BV, 2019
6. Speech intelligibility measurements
6.1 Quick STIPA (not featured on the Bedrock SM30)
The Quick STIPA module is intended to do simple and straightforward STI measure-
ments using the STIPA test signal. A comprehensive explanation of the STI method is
beyond the scope of this device manual; there are several online and offline resources that
provide guidance and information on doing STI measurements, such as our own white
paper on this topic.
In this section of the manual, we will briefly explain how to set up your equipment for
measuring the STI. The Quick STIPA module makes the process as simple as possible.
For any STI measurement, you need a source of the STIPA test signal as well as an STI
analyzer. In your case, the analyzer is your Bedrock SMxx. You can choose whatever type of
STIPA signal source that suits your application best (TalkBox, media player or otherwise).
The Embedded Acoustics reference STIPA test signal is included with the SMxx (on a
USB flash drive) and can also be downloaded from the Bedrock website, free of charge. We
supply IEC-60268-16 rev.4 and rev.5 test signals, fully compliany and compatible with all
STIPA meters that conform with the standard.
Measurement screen of the Quick STIPA module, in digit mode (left) and bar mode (right)
In order to carry out an STI measurement, complete the following steps:
• Power on your Bedrock SMxx and go to Quick STIPA
• Now start playback of the STIPA test signal through the channel or system
which you intend to test.

16 Bedrock SMxx operating manual © Bedrock Audio BV, 2019
17
• Note that the STI that you will now measure, will characterize all parts of
your transmission path, from playback device up to the microphone of your
Bedrock SMxx.
• Tap “Start”
• Wait for 18 seconds while the measurement takes place. Make sure that
signal playback is not interrupted, and that the acoustic environment is sta-
ble and free from impulsive sounds (such as door slams). Note: the STIPA
pro module uses a longer measurement time of 25s. A measuring time of 18s is
a reasonable minimum, within the range allowed by the standard, to arrive at
accurate results.
• You will see that the STI on your screen stabilizing towards its end value.
• Optionally, you can press “save” ( ) once the measurement is finished to
store the data, to be browsed or downloaded to PC later. A measurement
number is assigned to each saved measurement. This number is displayed
at the bottom right of the screen (preceded by a “#” character), above the
battery indicator.
The steps described above are essentially the entire procedure. If you are new to STIPA
measurements, please consult tutorials and standards to make informed decisions about the
STIPA signal playback level, measuring positions, number of repeated measurements, etc.
The Quick STIPA module also shows some additional measurement information:
• The A-weighted sound pressure level
• The qualification band (a letter between A and U) that is used in some
standards and defined in IEC 60268-16 rev. 4.
• A label (“bad”-”excellent”) that characterizes intelligibility based on the
STI
The arrows in the blue bar on the top of the display can be used to navigate through the
different screens for each module. The Quick STIPA module has three screens: “STI”,
“settings”, and “browse measurements”.
The “settings” screen gives some options to control the appearance of your measurement
results:
• Choose between presentation of the STI in large digits or as a bar plot
• Choose whether or not you want to see the qualification bands displayed
The “browse measurements” screen allows you to review earlier (saved) measurements
without having to download your data to a PC first.
• Use the blue buttons at the bottom of the screen to scroll back and forth
through your saved measurements.
• Note that the measurement number displayed above the battery indicator
corresponds to the measurement currently shown on the screen.
“

18 Bedrock SMxx operating manual © Bedrock Audio BV, 2019
“Settings” screen and “browse measurements” screen. The latter screen is nearly identical to the
STI measurement screen, but with previous/back buttons instead of start/stop and save buttons.
Reviewing larger numbers of STIPA measurements by using the “browse measurements”
screen will be inefficient; we recommend downloading the data to a PC for this. Please refer
to the section “accessing saved measurements through a PC.”
Please take note of the following features of the Quick STIPA module:
• On the bottom left of the screen, a red “recording dot” ( ) is displayed
whenever a measurement is running. Below this red dot, the progress of the
current measurement is indicated by a progress bar ( ).
• The “save” button is only operational when new (unsaved) measurement
data is available from a finished measurement. If this is not the case, the
save icon is colored gray ( ).
• The qualification band (a letter between A and U) is just a different way to
represent the STI number; it is fully redundant. We currently recommend
working only with the STI value itself, unless the use of qualification bands
is explicitly required.
• The Bedrock SMxx calculates a heuristic reliability metric for each STI
measurement. If the measurement is found to be unreliable (e.g. due to
disturbance by impulsive sounds), then a red cross is displayed across the
STI value. Crossed-out STI values are more often seen at the beginning of
measurements, when the calculation has not ran long enough to compute
a reliable STI. As soon as the cross disappears, the STI value can be trusted
to be within the usual STI measurement error of 0.03.

18 Bedrock SMxx operating manual © Bedrock Audio BV, 2019
19
A crossed-out STI value means that the measurement is not (yet) sufficiently reliable

20 Bedrock SMxx operating manual © Bedrock Audio BV, 2019
6.2 STIPA pro (not featured on the Bedrock SM30)
The STIPA pro module is also used to measure the Speech Transmission Index, but unlike
the quick STIPA module, it also comprises features that allow you to analyze and manipu-
late your measurement data in greater detail. It also uses a somewhat longer measurement
time (25s instead of 18s for Quick STIPA), for improved measurement accuracy.
“STI and spectrum” and “measurement details” screen in the STIPA pro module
The STIPA pro module has five screens:
STI and spectrum
: display measured STI, octave spectrum and dBA level
Measurement details:
display all measurement details including the MTF
Settings
: configure the STIPA pro module.
Additive noise:
enter and enable/disable a noise spectrum to add to data
Browse measurements:
review saved measurements
Measurements are usually started from the “STI and spectrum” or the “measurement de-
tails” screen. STI measurements are set up and started in the same way as when using the
Quick STIPA module (see above). However, in the STIPA pro module, more details about
the measurement are shown, and the user has more elaborate options to configure the
measurement. Measurements are started, stopped and saved in the same way as with the
Quick STIPA module (by using the buttons at the bottom of the screen).
The “STI and spectrum” screen shows not only the current STI value and the A-weighted
sound pressure level, but it also shows an octave band spectrum of the measured signal in
the 7 octave bands from 125 Hz to 8 kHz. The STI analysis is carried out in these octave
bands. The scale of the octave band spectrum plot can be modified by tapping on the trian-
gular arrows to the left of the plot.
Other manuals for SM50
1
This manual suits for next models
2
Table of contents
Other Bedrock Measuring Instrument manuals


