Bedrug BTTJ97F User manual
Congratulations on choosing the finest interior flooring kit available for your Jeep.
The Bedrug/Bedtred material is mold and mildew resistant, easily cleaned with water
& household cleaning chemicals and extremely resistant to most chemicals.
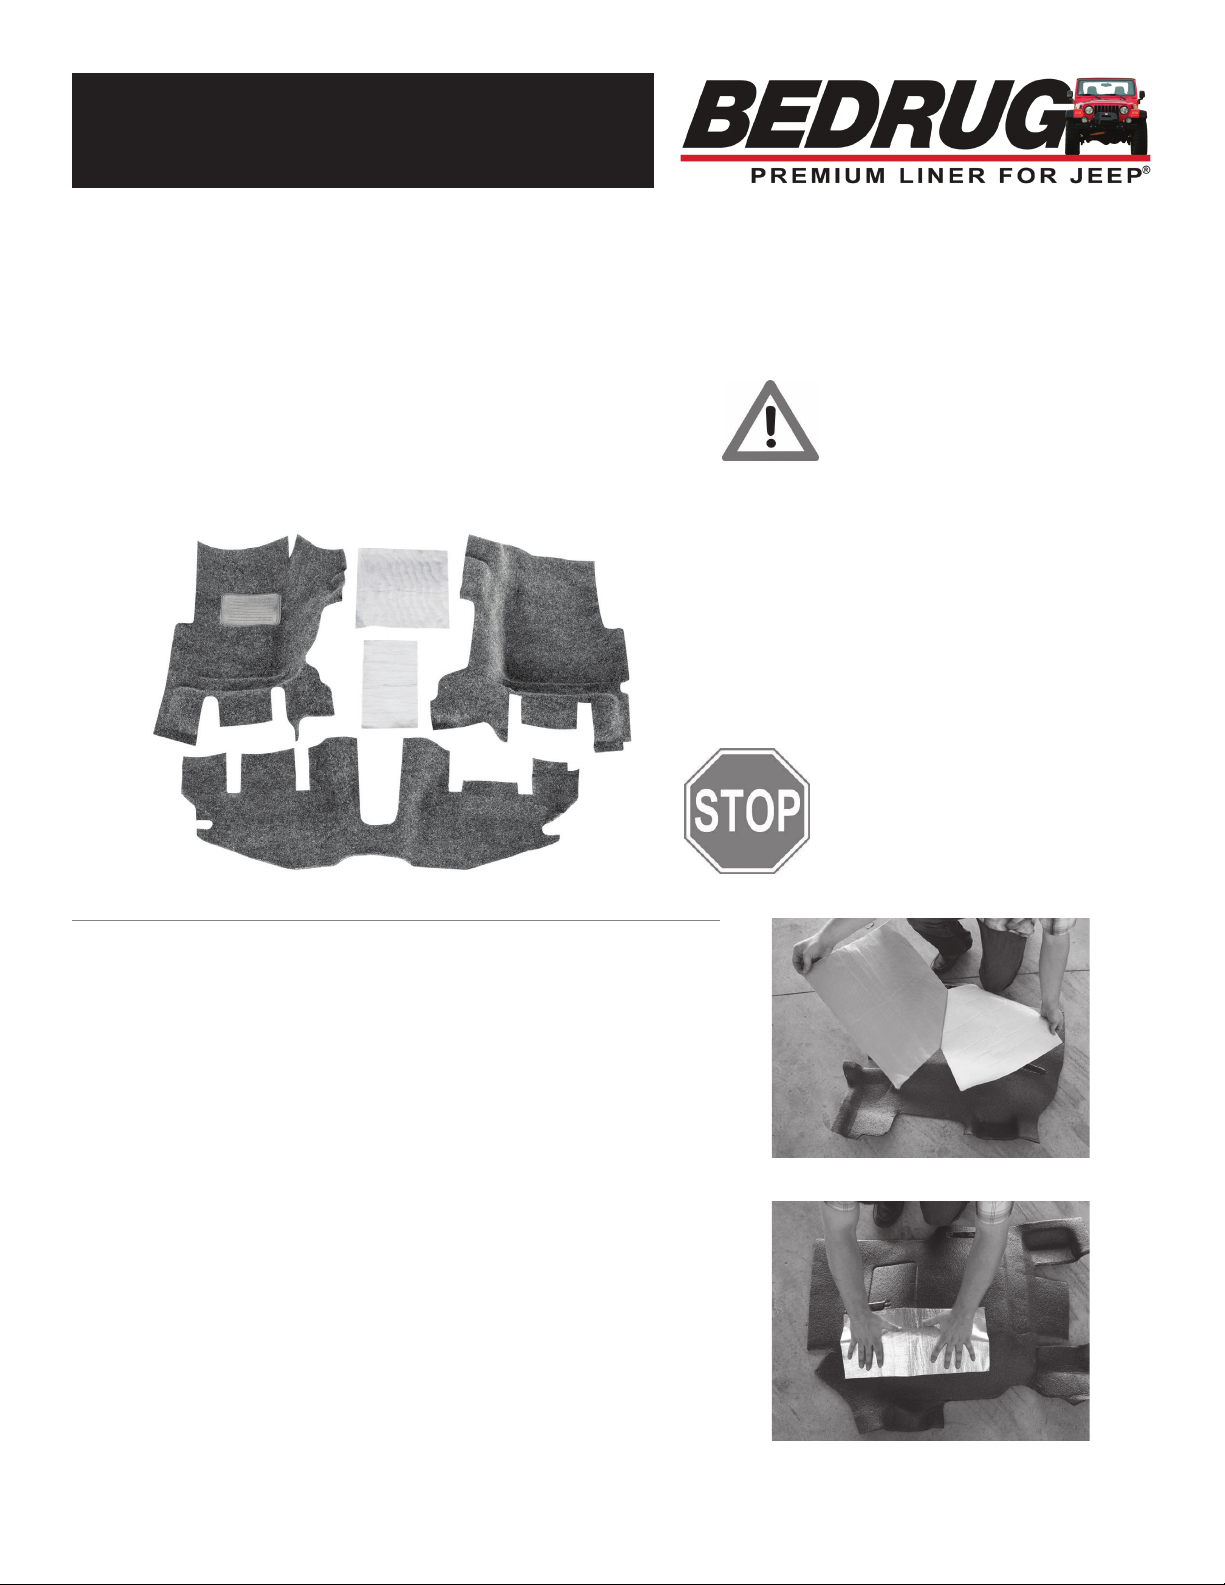
• Kit Contents: Driver side front floor, passenger side front floor,
rear passenger floor, heat shield material, hook fasteners,
and instruction sheet.
• Tools needed: Phillips screwdriver, utility knife, soap, water,
and rubbing alcohol.
Jeep Wrangler TJ
/
LJ Bedrug/BedTred
Interior Installation Instructions
PREPARATION
1. Read all instructions before beginning installation.
2. Remove old Jeep flooring material (if equipped).
3. Wash and dry the floor pan areas thoroughly.
4. Place the hook fasteners on each piece of loop sewn on the
back side of the BedRug. For BedTred installation, place the
hook fasteners to the loop surface on the underside of the
BedTred. Use drawing on Page 4 for proper location.
5. Pre-install provided heat shields on underside of the two
front pieces in areas (see Page 4), using the locator marks.
(Fig. 1 & Fig. 2) Note: Passenger side heat shield is
the larger of the two pieces.
IMPORTANT: Jeep floor should be at least 68°F (20°C) for maximum
adhesion. Clean all areas with rubbing alcohol before applying tape.
When removing backing, do not touch adhesive. If both front and rear
kits were purchased be sure to install the rear cargo area first.
FIGURE 1: PASSENGERS SIDE
FIGURE 2: DRIVERS SIDE
FRONT KIT: BRTJ97F and BTTJ97F
BEDRUG, INC. Q635 Old Hickory Blvd, Old Hickory, TN 37138-3162 Q800-462-8435 Qwww.bedrug.com
WARNING: The use of front floor
mats is not recommended with
BedRug or BedTred floor kits.
If floor mats are used, it is imperative to
re-use the removable retention hooks from
the factory carpet, installed to the manufacturers
specifications.Do not use floor mats or liners
with BedTred Kits, do not use floor mats or
liners with BedRug Kits without retention
hooks.**Please retain these instructions for
future reference in your vehicles glove box**
DON’T REMOVE YOUR SEATS!
Our kits and your factory carpet
are precut to make removing
your seats unnecessary.
TJ97FINST
Rev. 5 5/3/2019
Page 1 of 4
Jeep Wrangler TJ Bedrug/BedTred Interior Installation Instructions
INSTALLING FRONT FLOOR PIECES
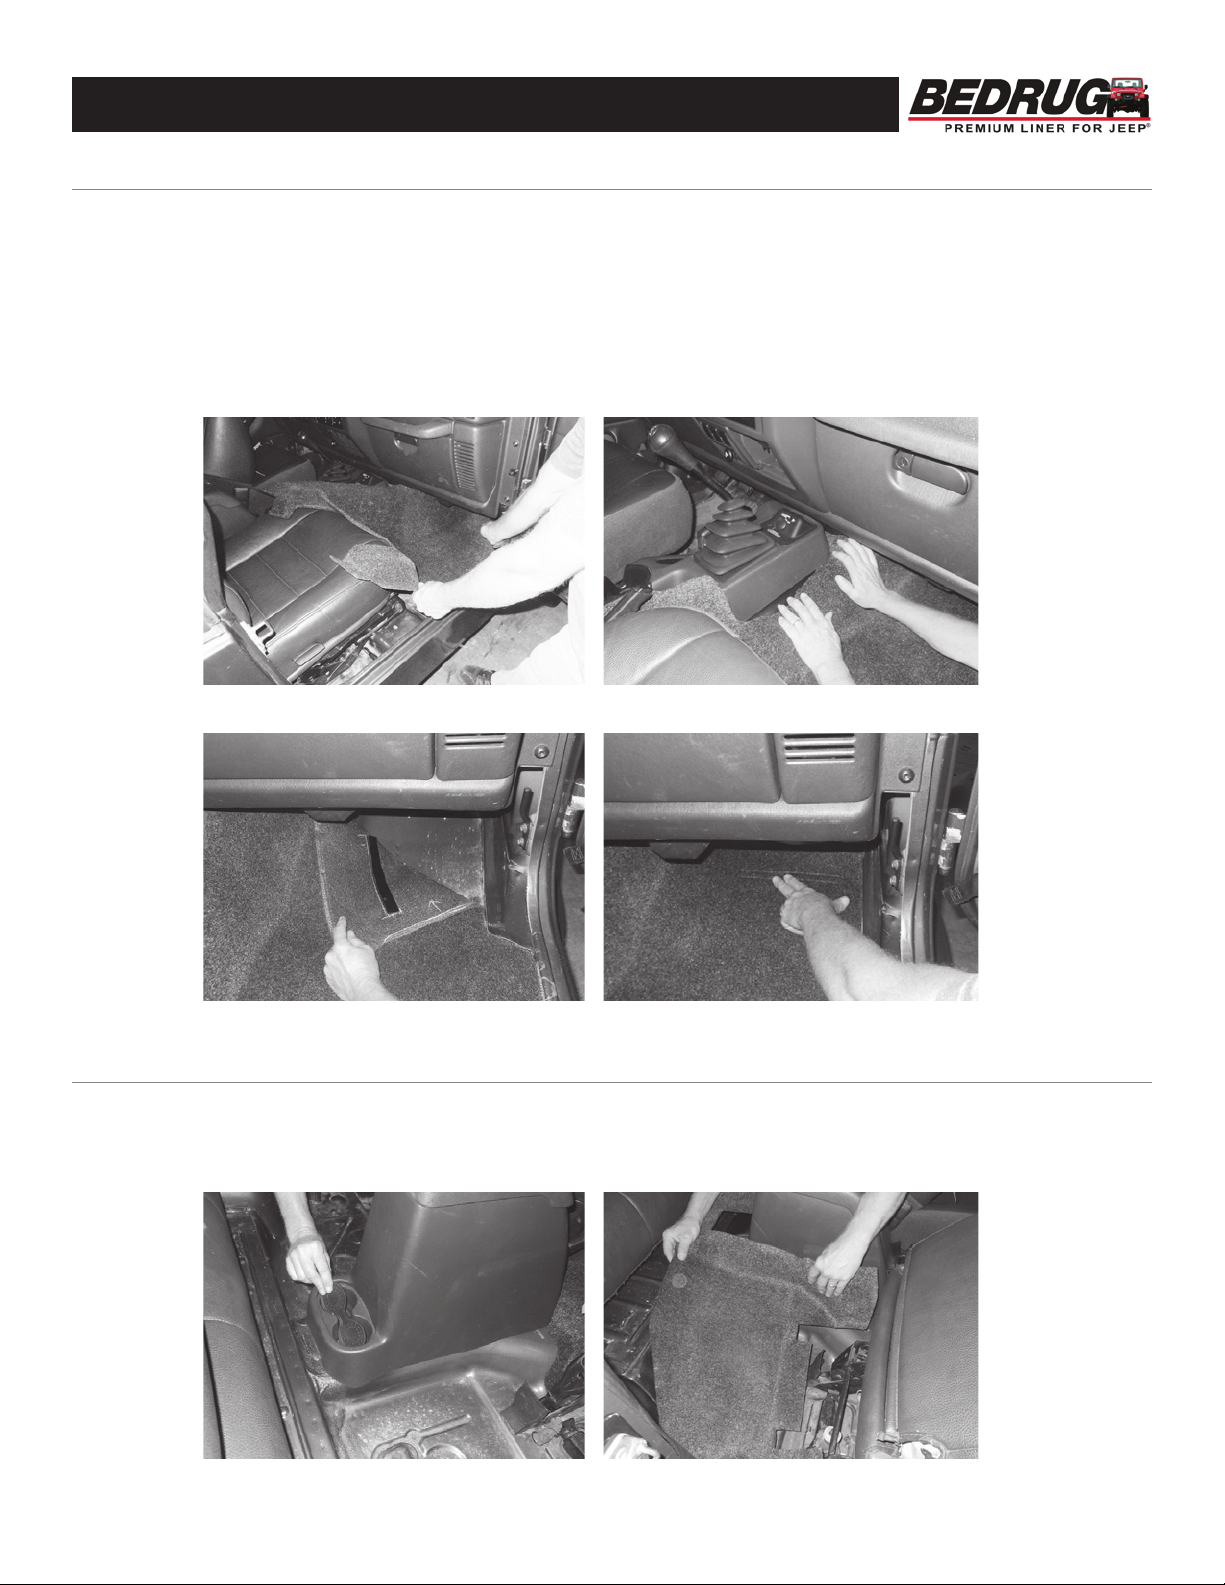
6. Adjust the front seats to the rear most position to allow maximum clearance for installation. Place front
floor pieces into place. (Fig. 5) Tuck under console and around seat brackets as shown. (Fig. 6)
(Tip: removing bolts from rear and/or front cup holders will allow console to lift up and position liner
underneath easily – Reference picture 9)
7. Once properly aligned, pull back part to access the two pieces of hook fastener (Fig. 7). Clean surface
with alcohol then remove the film backing and roll the part back into place. Firmly press the top surface
to ensure adhesive attachment. (Fig. 8) Repeat for other front floor piece.
FIGURE 5:
FIGURE 7:
FIGURE 6:
FIGURE 8:
FIGURE 9: FIGURE 10:
INSTALLING REAR FLOOR PIECE
8. Adjust the front seats to the fully forward and tilted up (passenger entry) position. Loosen the two screws
located in the bottom of the cup holders on the rear of the console if equipped. (Fig. 9) Next place the
rear floor piece into place. (Fig. 10)
BEDRUG, INC. Q635 Old Hickory Blvd, Old Hickory, TN 37138-3162 Q800-462-8435 Qwww.bedrug.com
TJ97FINST
Rev. 5 5/3/2019
Page 2 of 4
Jeep Wrangler TJ Bedrug/BedTred Interior Installation Instructions
FIGURE 11: FIGURE 12:
FIGURE 13: FIGURE 14:
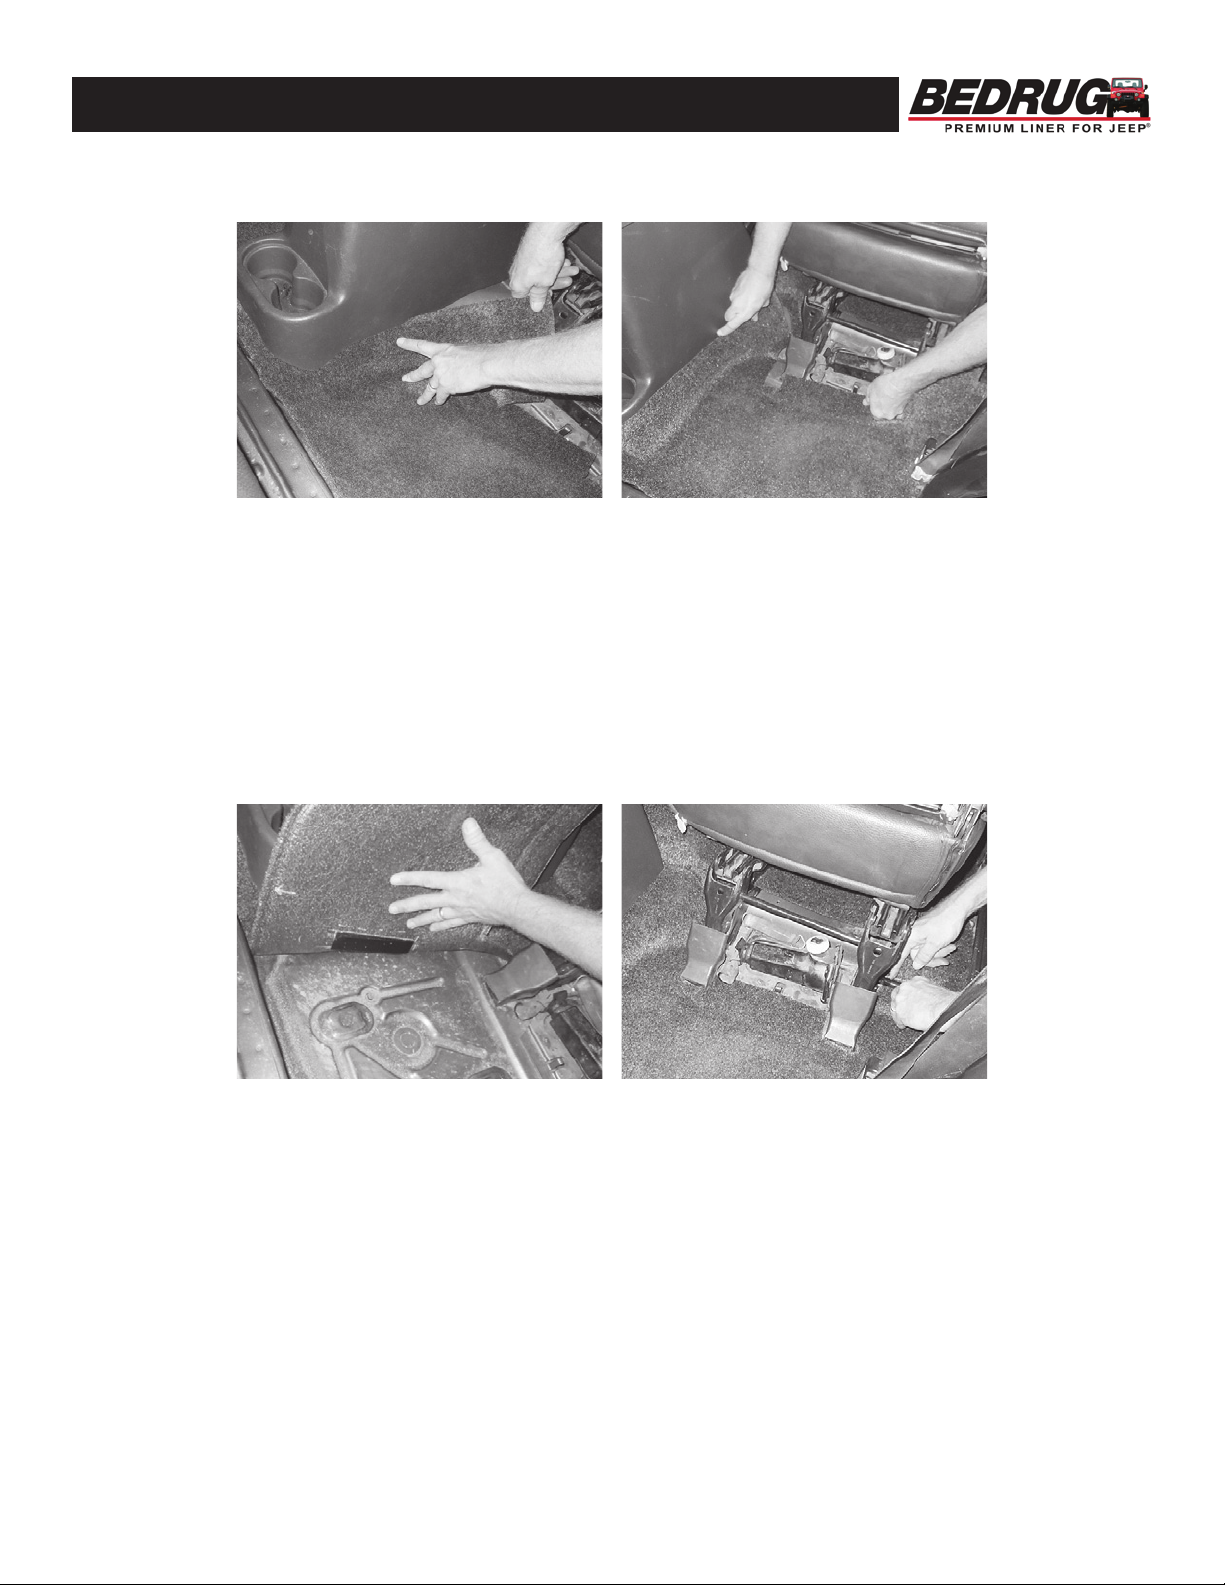
9. Tuck the part under the console and around the front seat brackets as shown. (Fig. 11 and Fig.12)
10. Next lift the floor piece from the outside of the vehicle toward the center to access the hook fastener.
(Fig. 13) Clean surface with alcohol then remove the film backing from both pieces and roll the floor
back into place. Firmly press the top surface to ensure adhesive attachment.
11. Now fit and tuck part around seat brackets, roll bar, and seat belt mounts. (Fig. 14)
Repeat for opposite side of vehicle.
12. Retighten the two console screws located in the bottom of the cup holder.
BEDRUG, INC. Q635 Old Hickory Blvd, Old Hickory, TN 37138-3162 Q800-462-8435 Qwww.bedrug.com
TJ97FINST
Rev. 5 5/3/2019
Page 3 of 4

WARNING
The use of front floor mats is not recommended with BedRug or BedTred floor kits. If floor mats are used, it is
imperative to re-use the removable retention hooks from the factory carpet, installed to the manufacturer’s specifications.
Do not use floor mats or liners with BedTred Kits. Do not use floor mats or liners with BedRug Kits without retention
hooks.
**Please retain these instructions for future reference in your vehicle’s glove box**
BEDRUG
®
BEDTRED
™
CLEANING INFORMATION
The mildew resistant BedRug/BedTred foam will not absorb liquids. The engineered composite surface resists stains and
deterioration from most acids, chemicals, gas and oils, etc. Therefore, by following the cleaning instructions below, your
BedRug/BedTred will remain serviceable for as long as you own your vehicle.
Cleaning your BedRug is easy:
1. A vacuum, broom, brush or compressed air can be used to remove dirt, grime, sand, mulch etc. Due to the
fact that water will not harm the product, pressure washing is also an effective way to clean a soiled
BedRug/BedTred.
2. Although most acids will not harm the BedRug/BedTred, baking soda should be applied immediately to
neutralize the acid to ensure the safety of the paint on the vehicle.
3. To clean tougher jobs such as gasoline, oil, chemicals, acid spills or leaks from your BedRug/BedTred use
detergent soap with degreaser and water, then rinse thoroughly. This detergent soap is used in most car wash
locations with pressure washing equipment. The polypropylene closed-cell foam will not absorb water and
the composite surface dries in minutes.
If you have additional questions, call BedRug Inc. customer service at 800-462-8435.
LIMITED WARRANTY
BedRug Inc. warrants BedRug and BedTred products for Jeep vehicles for three years from the original date of purchase.
Warranty is limited to the original purchaser and is not transferable. Product is warranted to be free from defects in
materials and workmanship. The warranty is void if the product has been damaged by accident, unreasonable use,
neglect, improper service/installation/removal, modifications, acts of God, normal wear and tear, or other causes not
arising out of defective materials or workmanship. Consequential and incidental damages are not covered under this
warranty. Warranty does not cover labor, the cost of shipping, or cost of returning the product for warranty service or
inspection. The terms of this warranty may vary from state to state. You may have rights under specific state laws that
differ from the terms of this warranty. Proof of purchase will be required for warranty service. Product should be cleaned
before return. A return authorization number must be obtained prior to returning any product. For warranty instructions,
returns, and packaging contact BedRug Inc. Customer Service at 800-462-8435.
PRODUCT REGISTRATION
Thank you for purchasing your BedRug product! We would appreciate it if you would take a few minutes to register your
purchase. Registration allows us to provide, with your permission, important updates, service information, helpful hints
or warranty service should you ever require technical support. BedRug offers the option of returning product registration
forms electronically, rather than having to fill them out by hand. You can be assured that BedRug does not share or sell
the information you provide. Save a copy of your sales receipt. Activate your warranty by registering your product online
at http://www.bedrug.com/customer-service/product-registration.html or by scanning the QR code. You will need the 6-
digit lot and date code found on the underside of the product, see label example below.
TJ97FINST
Rev. 5 5/3/2019
Page 4 of 4
This manual suits for next models
3
Other Bedrug Automobile Accessories manuals


