Beijing Huitianwei Technology HORI series User manual

HORI 3D printer
User guide

Safety Precautions...................................................................................................... 1
Section 1 Overview.................................................................................................. 2
1.1 Printer Introduction.......................................................................................... 2
1.2 Packing list....................................................................................................... 3
1.3 Product description......................................................................................... 3
Section 2 Installation Printer................................................................................... 5
Section 3 Understanding printer.............................................................................8
3.1 Buttons and parts Introduction...................................................................... 8
3.2 The main interface presentation................................................................. 10
Section 4 Print Operation Process...................................................................... 13
Section 5 Common Problem.................................................................................18
○ Tuning Platform.................................................................................................18
○ Why you will need to adjust the platform...................................................... 18
○ Effect of distance error of print....................................................................... 19
○ Transfer platform specific operation.............................................................. 19
○ Refueling operation.......................................................................................... 23
○ Demolition, armored head operation.............................................................27
○ Why dismantle head........................................................................................ 27
○ Some parts require disassembly....................................................................27
○ Demolition, armored head operation specific.............................................. 27
Section 6 Software................................................................................................. 29
6.1 Software Installation..................................................................................... 29
6.2 Software Introduction.................................................................................30
Security Statement.............................................................................................. 31

1
Safety Precautions
Before you install and use HORI 3D printer, be sure to read the following.
Please do not use any methods not described in the user's manual to use the
printer, Try to avoid personal injury and property damage.The printer is just
used for commercial purposes.
1. When moving the printer, pay attention to gently, avoid touching the inside
of the printer configuration, can carry two people, if necessary;
2. This printer is suitable for placement in a ventilated, cool, dry and less
dusty environment;
3. When you use the printer, pay attention to heat, avoid placing on a thick
rug or placed against the wall;
4. Do not put the printer near flammable materials or high heat;
5. Do not put the printer over a large vibration or other unstable
environments;
6. Do not pile heavy objects on the printer;
○ Use the power standardized
1. Please use the power adapter supplied with the printer;
2. Do not plug the power cord when your hands are wet;
3. When using your plug, make sure fully inserted into the socket;
4. Do not deliberately pull, twist printer lines, to avoid causing open or short
circuit;
○ Note that in the printing process
1. Do not use the printer without the supervision of person;
2. During and immediately after printing is finished, avoid touching the
printer's internal structure and print, to prevent burns;
3. If the printer while printing when smoke, abnormal noise, immediately turn
off the power switch, the printer stops working and contact our customer
service;
○ Often do product maintenance
1. Please do not use any methods not described in the user's manual to
remove or modify the printer,to avoid damage to the printer or other more
serious security incidents;
2. Periodically in case of power failure, the printer clean with a dry cloth to
wipe away dirt and bonding printed material. If you must use a damp cloth to
clean, do not use flammable solvents, flammable solvents avoid contact with
the printer's internal circuit causing a fire or electric shock;

Beijing Huitianwei Technology Co., Ltd.
2
Section 1 Overview
1.1 Printer Introductio
HORI 3D printer by The Beijing Huitianwei Technology Co., Ltd. launched fast
desktop 3D printer. It can work for you any sample model that you can come
up with in a short time, in a timely manner fresh your creative spark. In the
hands of the engineer, it can create a lot of prototypes mother, pregnant with
an eventual mass production of finished products; In the family, which can
simplify the manufacturing methods of personalized objects, releasing
individual user of creative thinking; Easy to use leaving the kids like to use it,
to create their own dream of love toys, exercise intelligence and creative
thinking in the entertainment. With the help of HORI 3D printer, you just need
to have some very simple software on your ideas can become a reality, it
changed in the past inventions privileged situation just a few people.
HORI 3D printer is mainly based on the principles of FDM (Fused Deposition
Modeling) technology. After printing material (PLA) sent through the catheter to
the intelligent control of the nozzle, heating, and final deposition modeling.
Molding materials having high strength and high stability, Can perform tapping,
drilling, color, etc, quickly generate and use. HORI 3D printer mechanical
structure is simple and reliable 3D printer, the movement member flexible.
Thank you for using HORI 3D printer, HORI 3D printer with large print volumes,
Ultra-fast print speed, Ultra-high print accuracy,The extruder is designed, in
the process of sustained and stable conveyance of the print material, make the
printing process more fluid.
The following documentation can help you understand the structure of HORI
3D printer for easy commissioning and maintenance。End of the manual
provides a number of solutions to common problems for your quick reference.
HORI 3D printer in use in the process, if you encounter any problems, please
contact us, we are happy to serve you.
We hope you have fun!

Beijing Huitianwei Technology Co., Ltd.
3
1.2 Packing list
Name
Number
Name
Number
3D printer
×1
PLA
×1
Power cable
×1
USB
×1
Wrench
×1
Take Modeling
Tools
×1
Phillips
screwdriver
×1
CD-ROM
×1
Instructions
×1
Certificate
×1
Warranty Card
×1
Warranty card
×1
1.3 Product description
Z300
1、Introduction
Thank you for purchasing HORI 3D printer. The 3D printer is easy to use,
available on-line printing and SD card offline prints two printing methods for
your convenience. It can be used for personal interests in research, teaching
teach, hand model design and other fields.
2、Trademark
English logo “HORI”,Beijing Huitianwei Technology
Co., Ltd. trademark registered in China.
3、Manufacturers
Beijing Huitianwei Technology Co., Ltd.
Bldg. 2-26C, Internation Pioneer Park, Xinxi Road 2#, Shangdi, Haidian Dist.,
Bejing, China
www.hori3d.com
010-82893385

Beijing Huitianwei Technology Co., Ltd.
4
4、Disclaimer
The 3D printer is a non-industrial equipment, for the mass consumer, the
company does not guarantee the effect of the final model, and can not be used
to measure validation.
5、Operating system
The 3D printer control software CURA, can support the following operating
systems
Windows xp full range
Windows 7 full range
Windows 8 full range
The description of "HORI H1" Case,Introduction HORI series 3D printer's
operating procedures, as well as operation and demonstration of the process
of using the common problem.HORI customers to buy other models can be
assured that the operation is much the same.

Beijing Huitianwei Technology Co., Ltd.
5
Section 2 Installation Printer
First step,open the box, remove the HORI series 3D printers, and cut off the
tie, remove the tape (Figure 2-1, Figure 2-2);
(Figure 2-1)
(Figure 2-2)
Beijing Huitianwei Technology Co., Ltd.
6
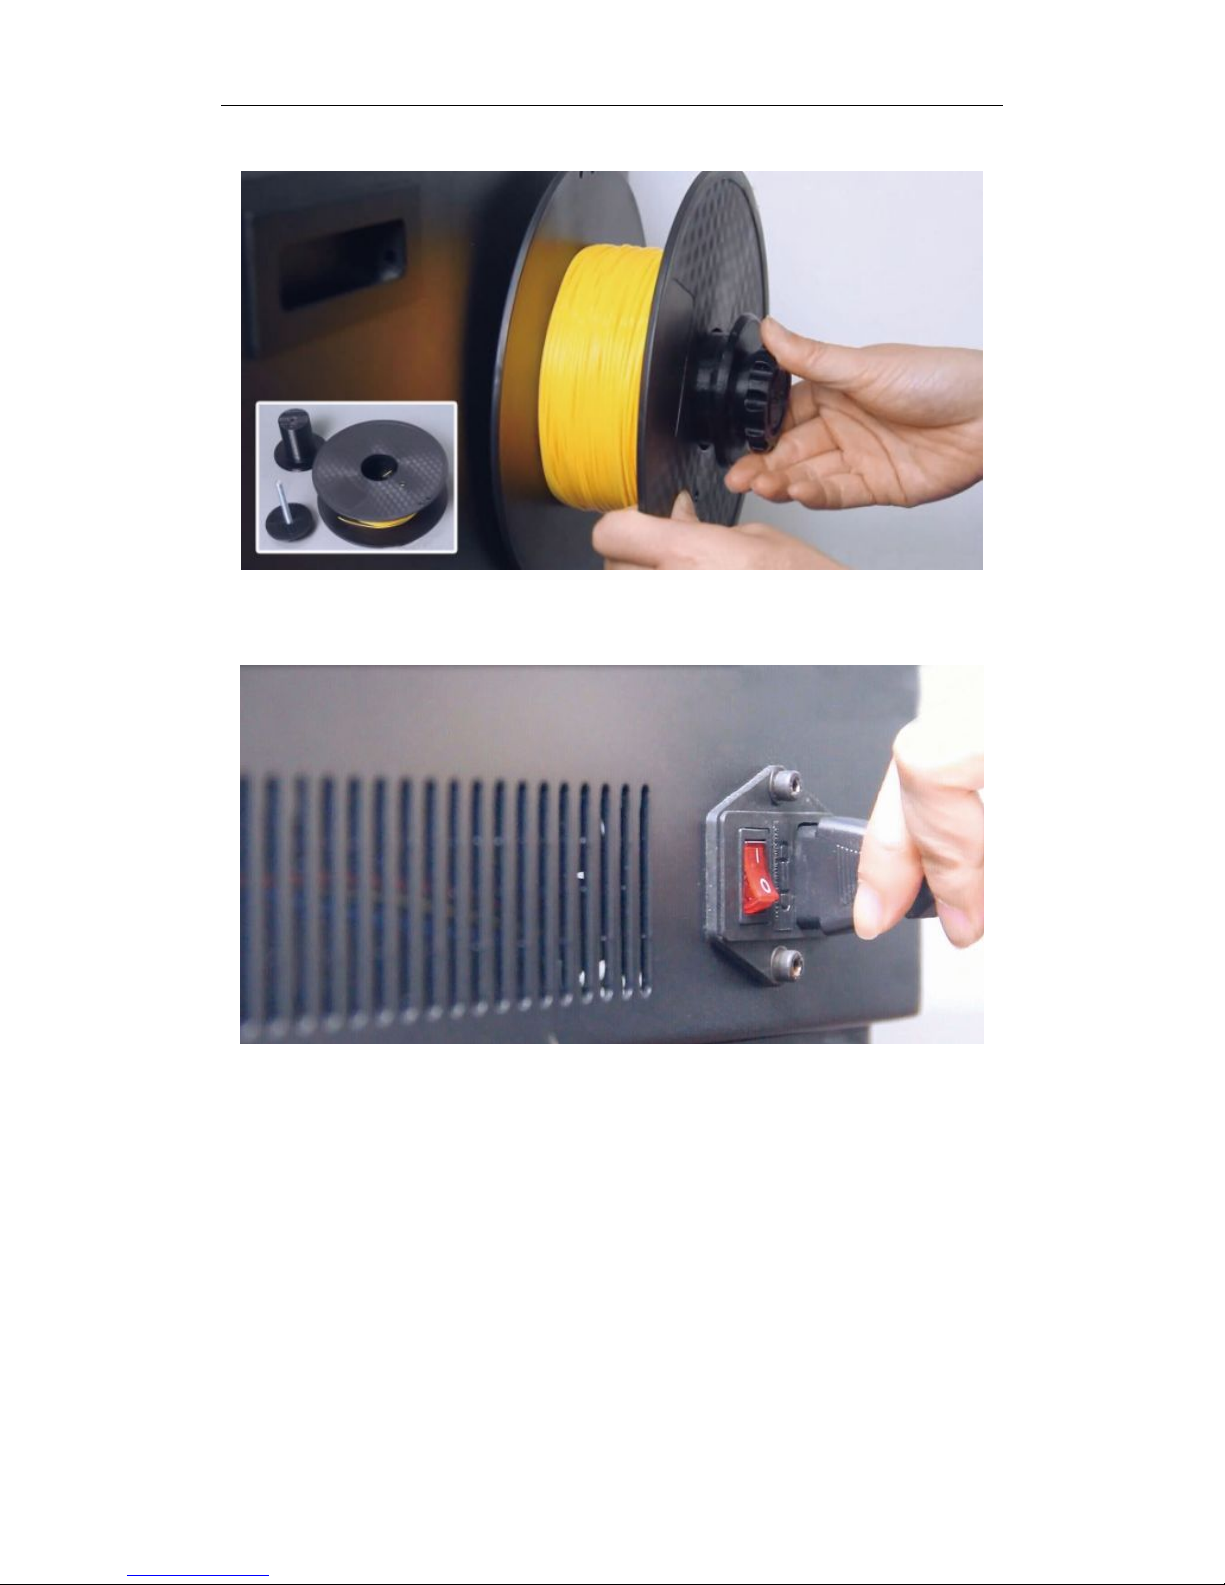
The second step, the feed shaft is mounted on the rear panel in the 3D printer
(Figure 2-3)
The third step, plug in the power , turn on the switch (Figure 2-4);
(Figure 2-4)

Beijing Huitianwei Technology Co., Ltd.
7
The fourth step, ①clicking move button, ②clicking the orange button on the
right (Figure 2-5);
(Figure 2-5)
The sixth step, the left of the printer to find the SD card slot, insert the SD card
(Figure 2-6);
(Figure 2-6)
The seventh, the printer is installed.
Beijing Huitianwei Technology Co., Ltd.
8
Section 3 Understanding printer
3.1 Buttons and parts Introduction
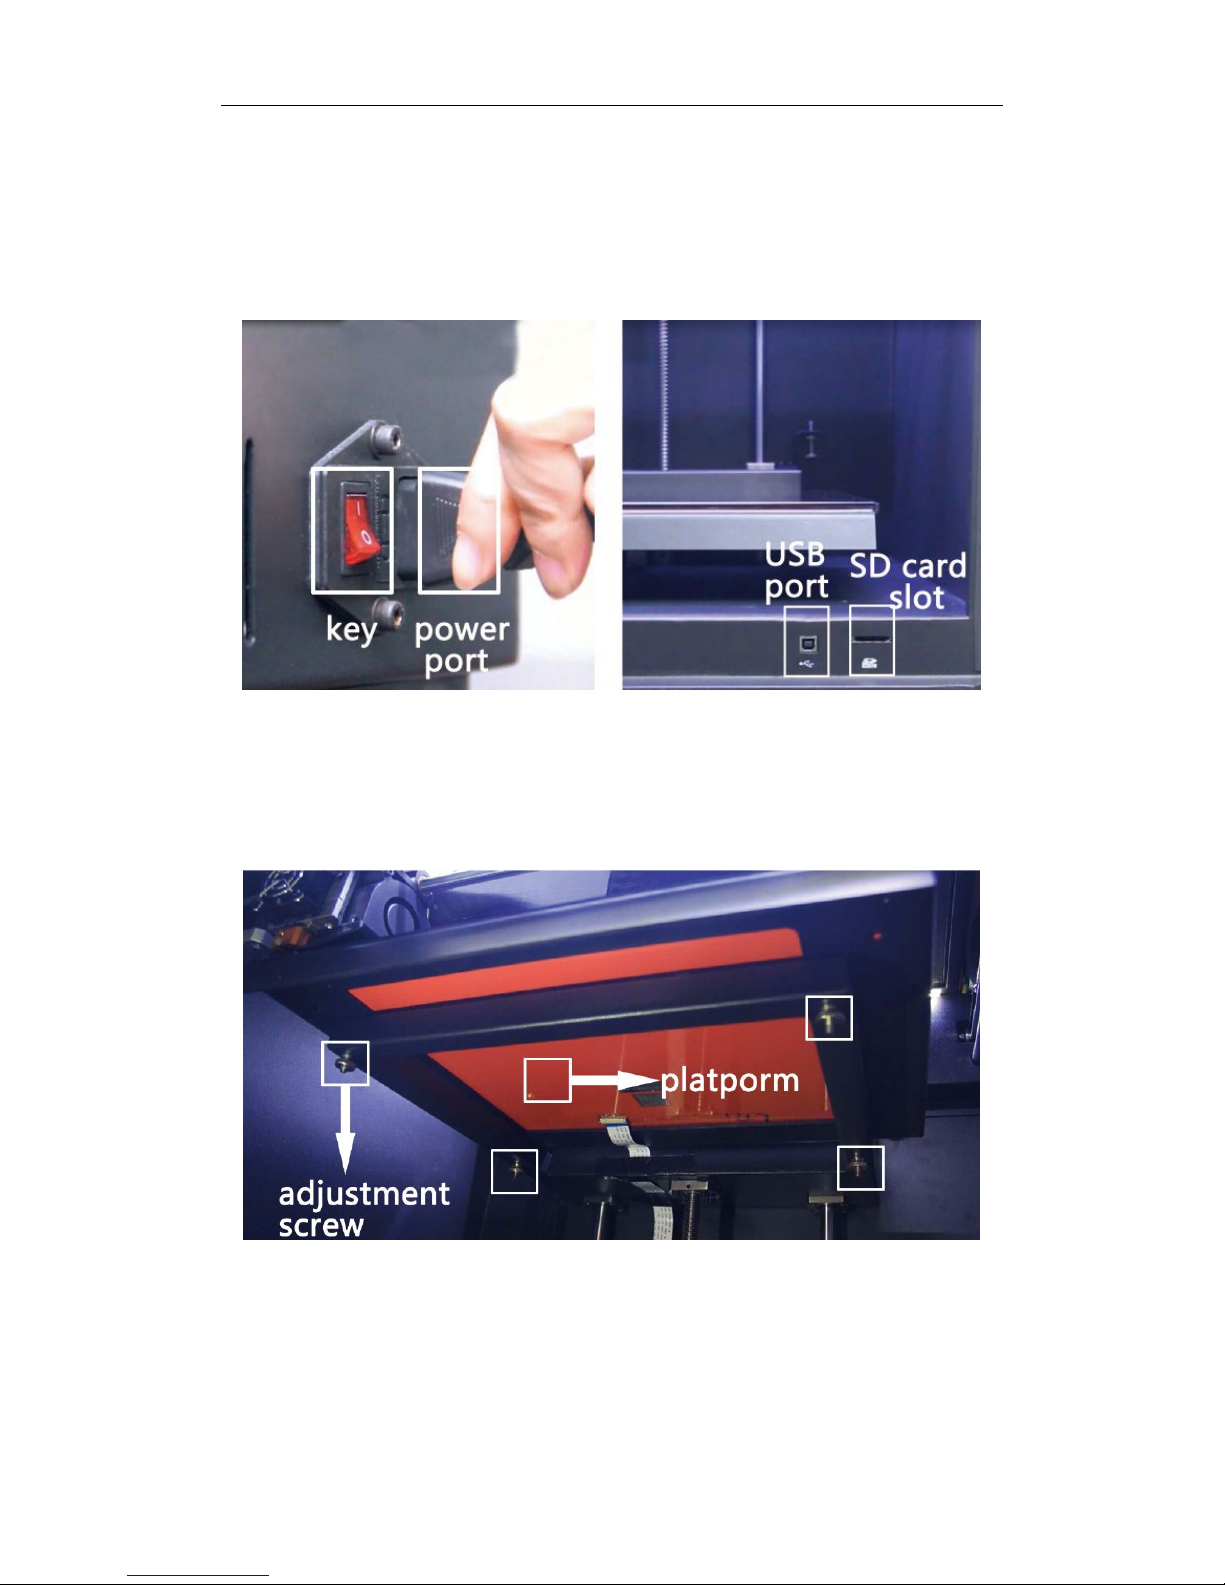
○ Printer side: key, SD card slot, USB port, power port (Figure 3-1);
(Figure 3-1)
○ Print platform: the platform, the platform-specific tape (surface blue), the
bracket and the adjustment screw (Figure 3-2);
(Figure 3-2)
Beijing Huitianwei Technology Co., Ltd.
9
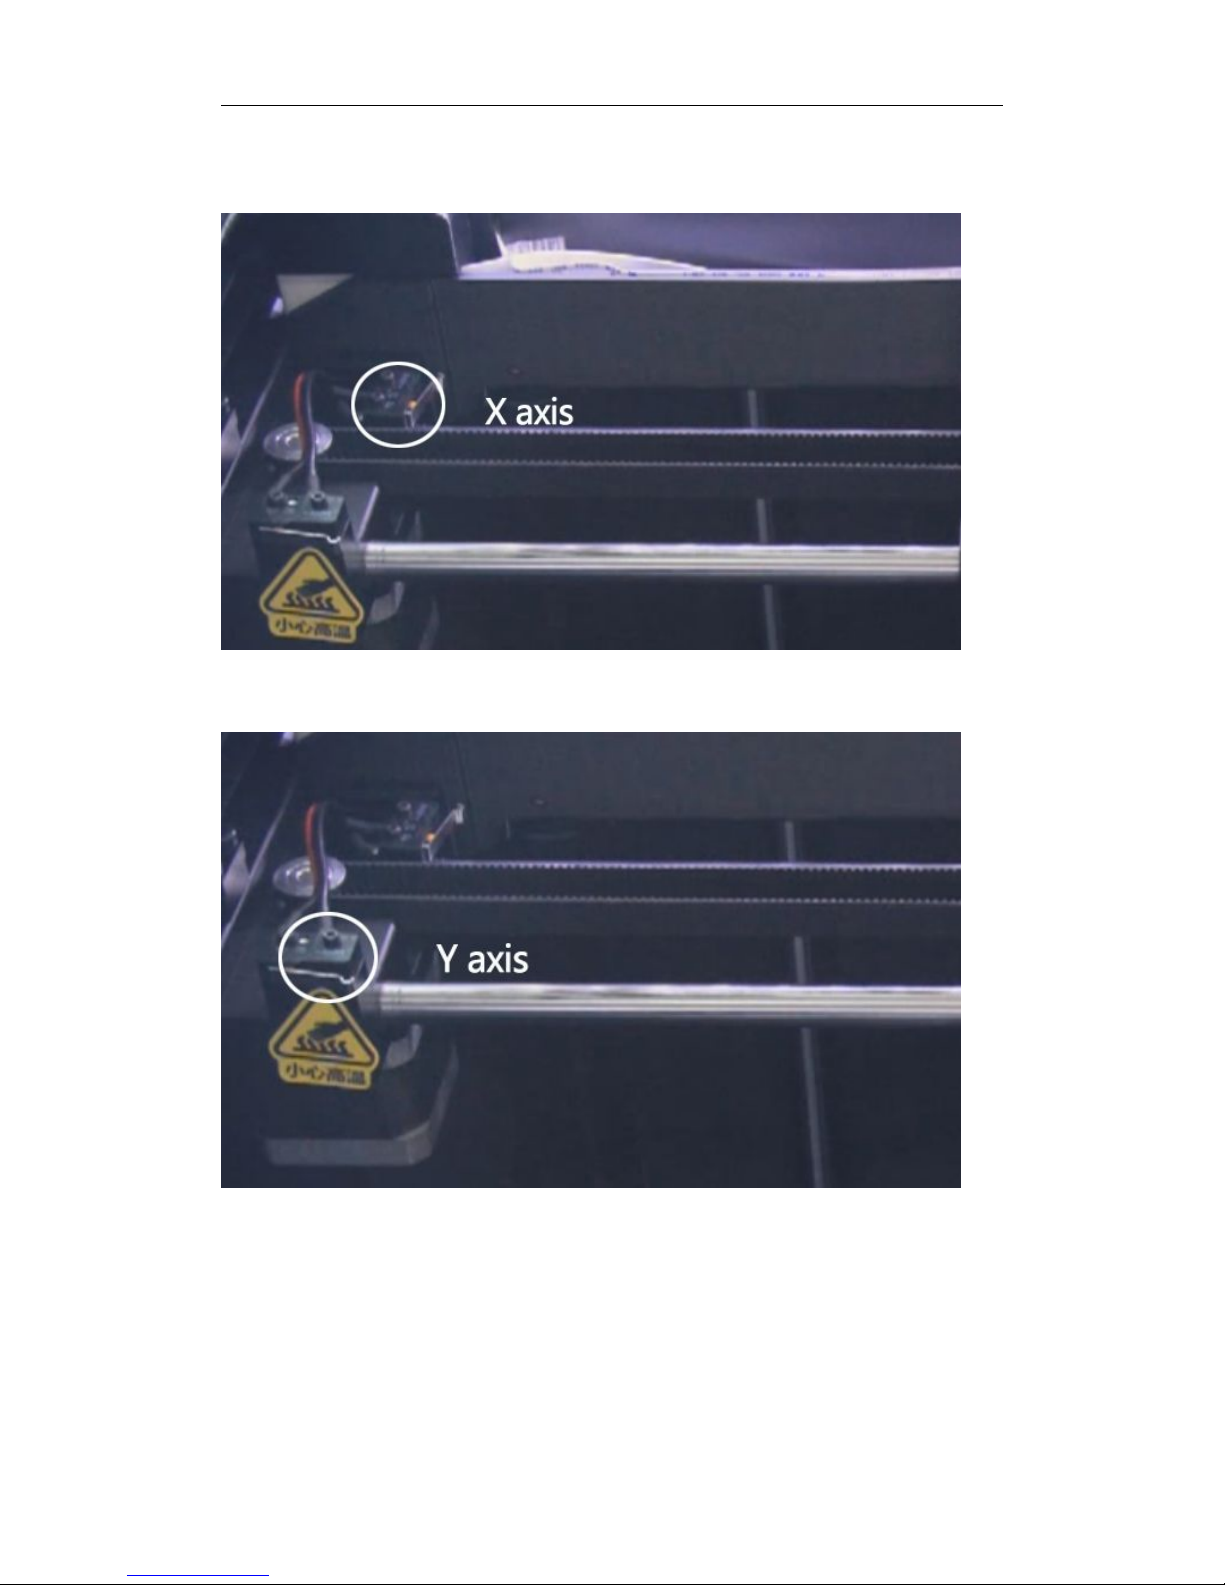
○ Limit switches: X axis ( Figure 3-3), Y-axis (Figure 3-4), Z-axis inside;
( Figure 3-3)
(Figure 3-4)
Beijing Huitianwei Technology Co., Ltd.
10
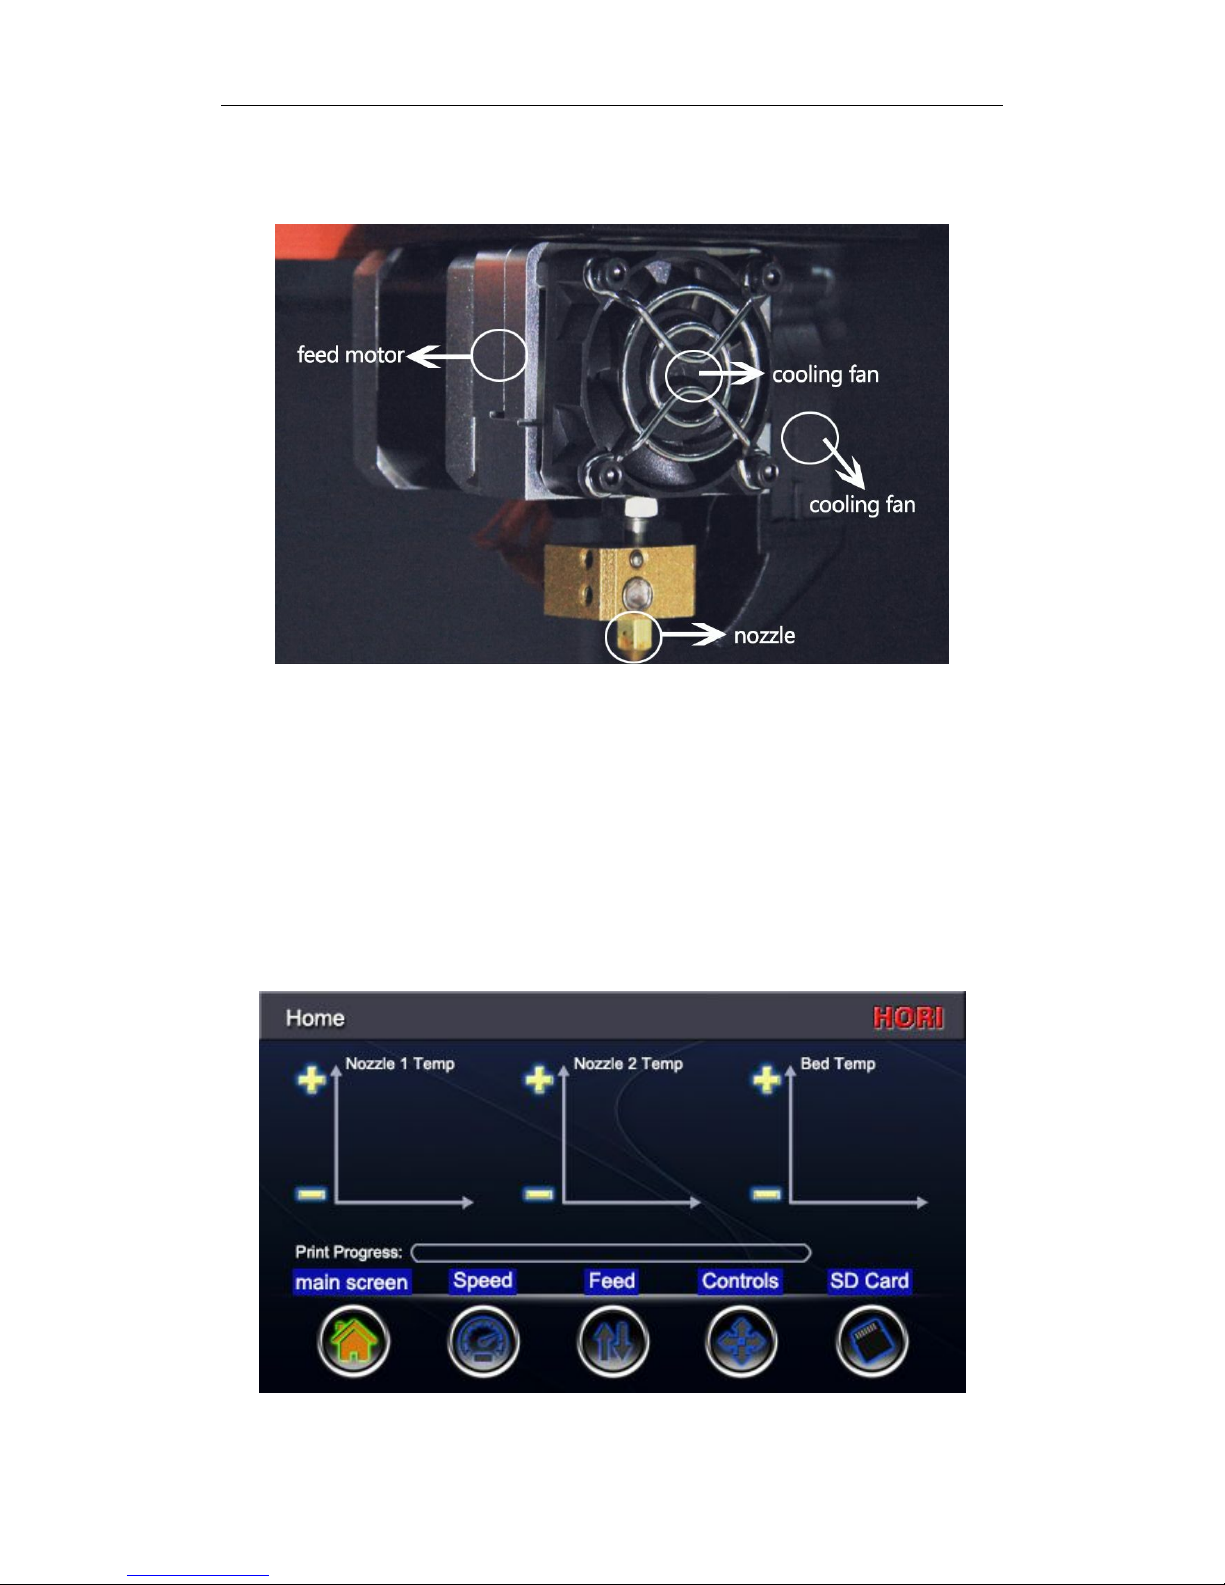
○ Print Head: feed motor, nozzle, cooling fan, cooling fan composition (Figure
3-5);
(Figure 3-5)
3.2 The main interface presentation
○ The main screen: The top three is a graph showing temperature monitoring,
reflect real-time temperature of the respective components, yellow line
real-time temperature, red line real-time temperature. click the plus or minus
sign to the left of coordinates, temperature corresponding components directly
change.(System Settings Click once plus or minus, increase or decrease the
temperature 5 °)。
Print progress bar: display SD card offline printing schedule, When the online
print progress displayed on the computer (Figure 3-6).
(Figure 3-6)
Beijing Huitianwei Technology Co., Ltd.
11
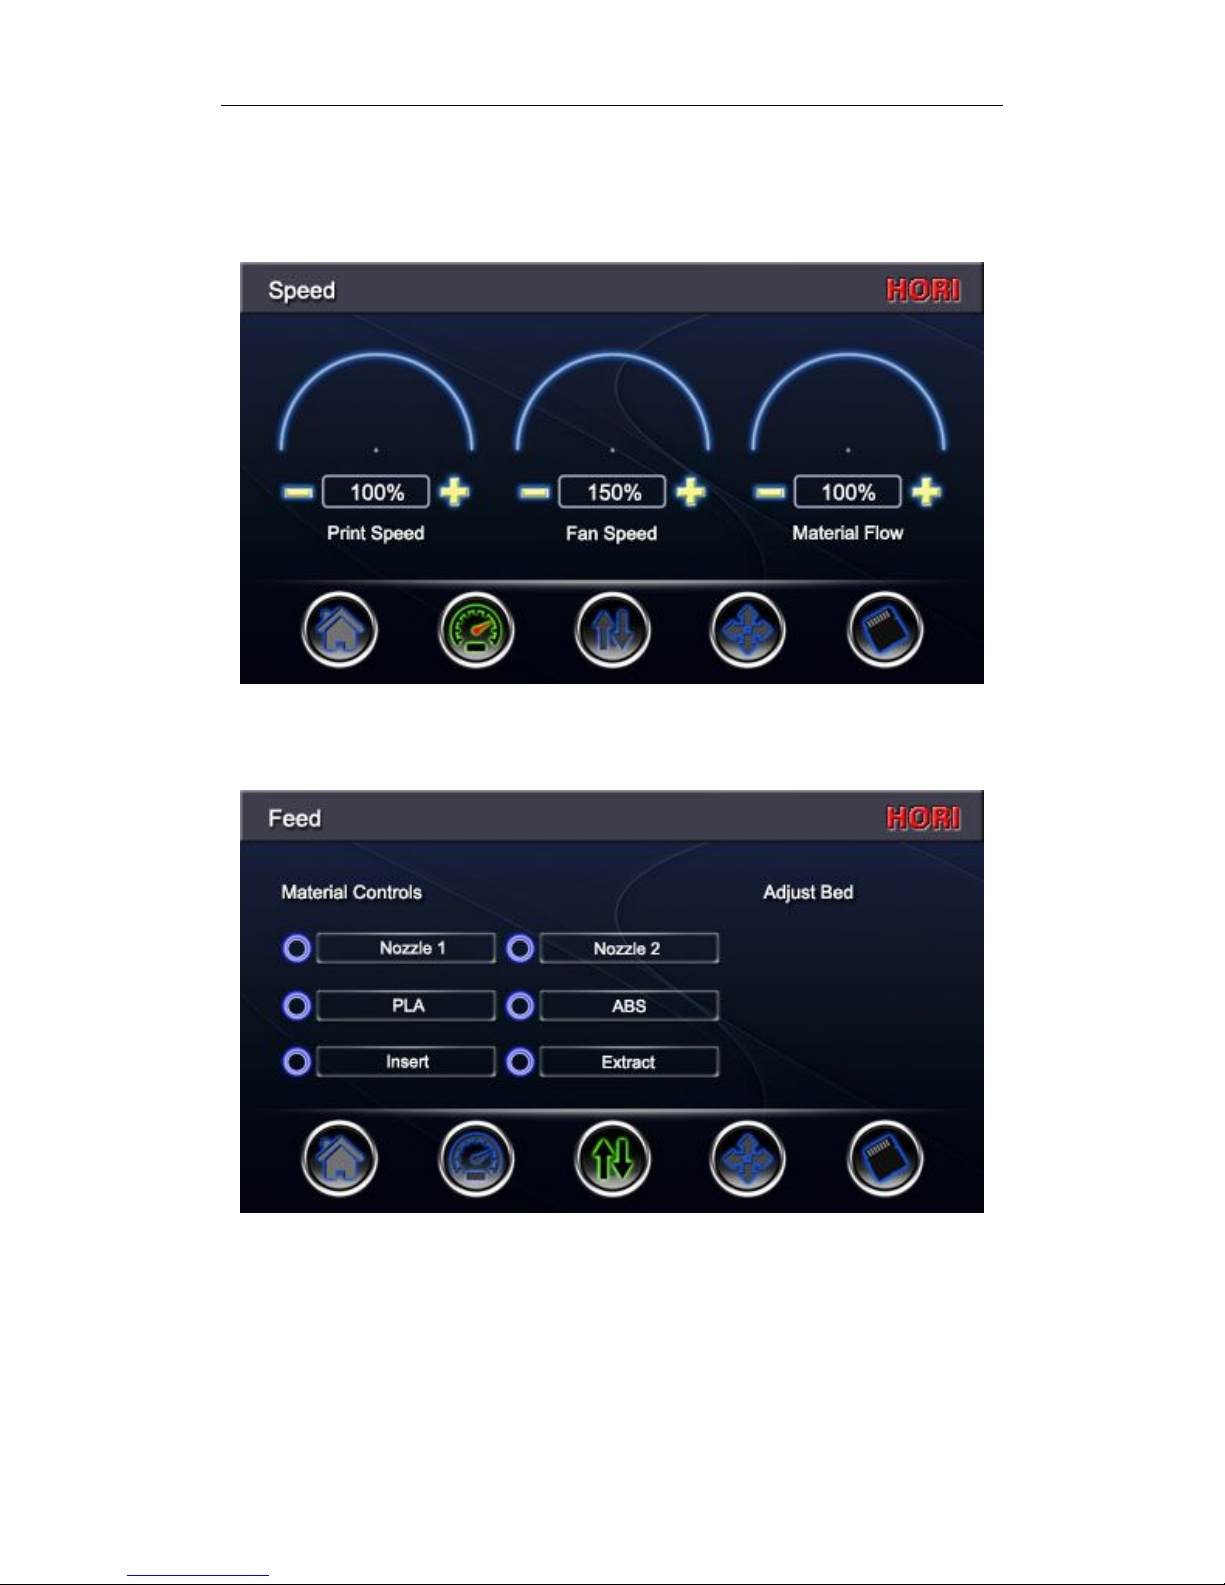
○ The Speed screen: The three tables used to monitor and control "print
speed", "fan speed", "Material Flow",percentage "Print Speed" and "Material
flow" here are relative values,parameter setting watch our video CURA
software (Figure 3-7)
(Figure 3-7)
○ The Feed screen: nozzle, material, material selection retreat (Figure 3-8).
(Figure 3-8)
○ Controls screen
Manual control displacement of printhead and platforms, and materials retreat
feed. (Figure 3-10);
(1)
Unlock Motor:
When checked, the print head can be directly pushed to the
desired position, on the contrary, when unchecked, can not freely move, this

Beijing Huitianwei Technology Co., Ltd.
12
time to the position of the print head can only move the screen by the arrow;
(2)Mobile Unit: Press once on the right arrow, member of the arrow axis
moving unit;
(3)Arrow:Arrow to the right, according logo below, control different parts of
the printer. XY axis control the print head is about to move back and forth, Z
axis control printing platform moves up and down;
(4)
Orange icon: X, Y axis center of the orange icon is X, Y-axis zero button, Z
axis center of the orange icon is X, Y, Z-axis zero button. This is the home key,
that Click on this button will homing triaxial, Back to the system settings
coordinate zero;
(5)E axis: Controls the printhead feed and return materials.
点击(Figure 3-9)
○ SD Card:
The middle section of the SD card ready model file,
click on one of
the files,there will be three symbols on the left, the first means "beginning" print,
the second means, "pause" printing, the third means, "Stop" Print (Figure
3-10).
(Figure 3-10
Beijing Huitianwei Technology Co., Ltd.
13
Section 4 Print Operation Process
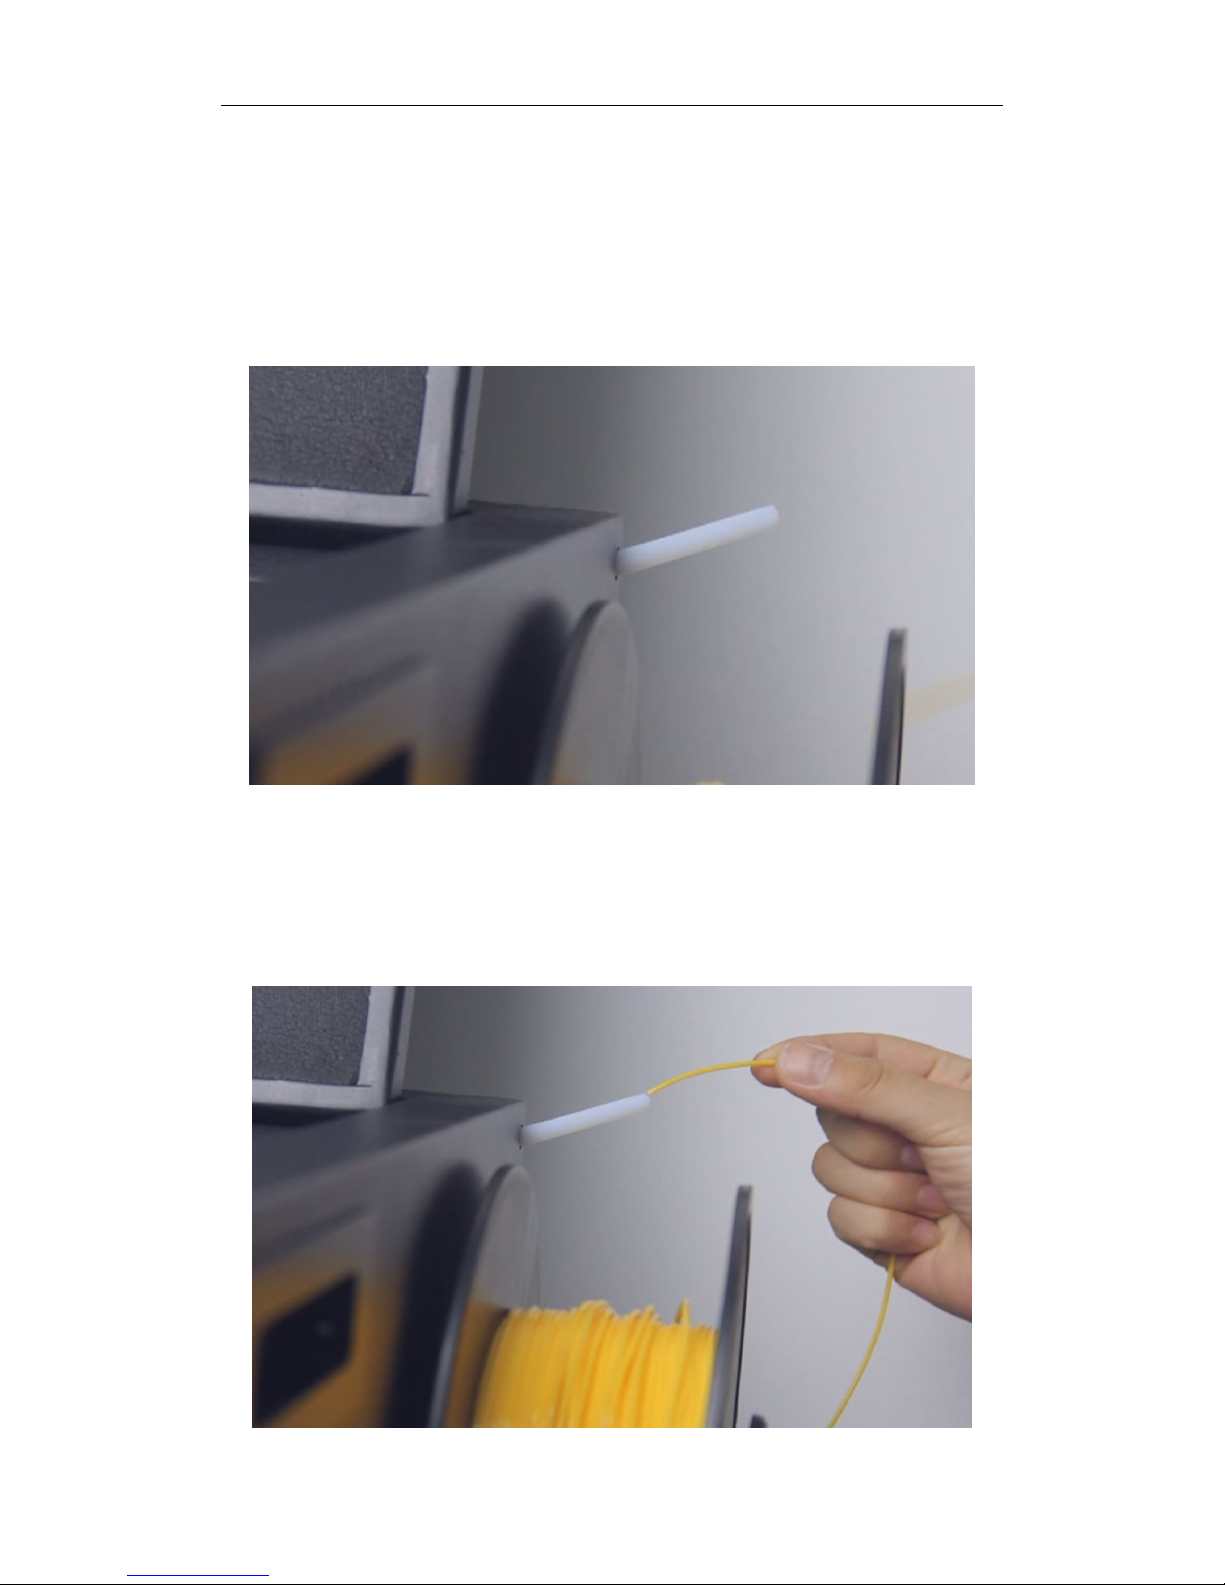
○ Feed: The material through the motor into the print head, so crowded feed
nozzle print, This process is referred to as the feed.
Feed specific operation:
The first step, press and hold down spout blue plastic sheet, forced to pull out
fixed tube white(Figure 4-1);
(Figure 4-1)
The second step, the tray is placed on the stand, the material through the
white fixed tube, then the material is inserted into the inlet, and feel the
material is gear bite (Figure 4-2 and 4-3);

Beijing Huitianwei Technology Co., Ltd.
14
(Figure 4-2)
(Figure 4-3)
The third step, click on the screen of the " Feed" button, click "One Click Feed"
button (Figure 4-4);
(Figure 4-4)
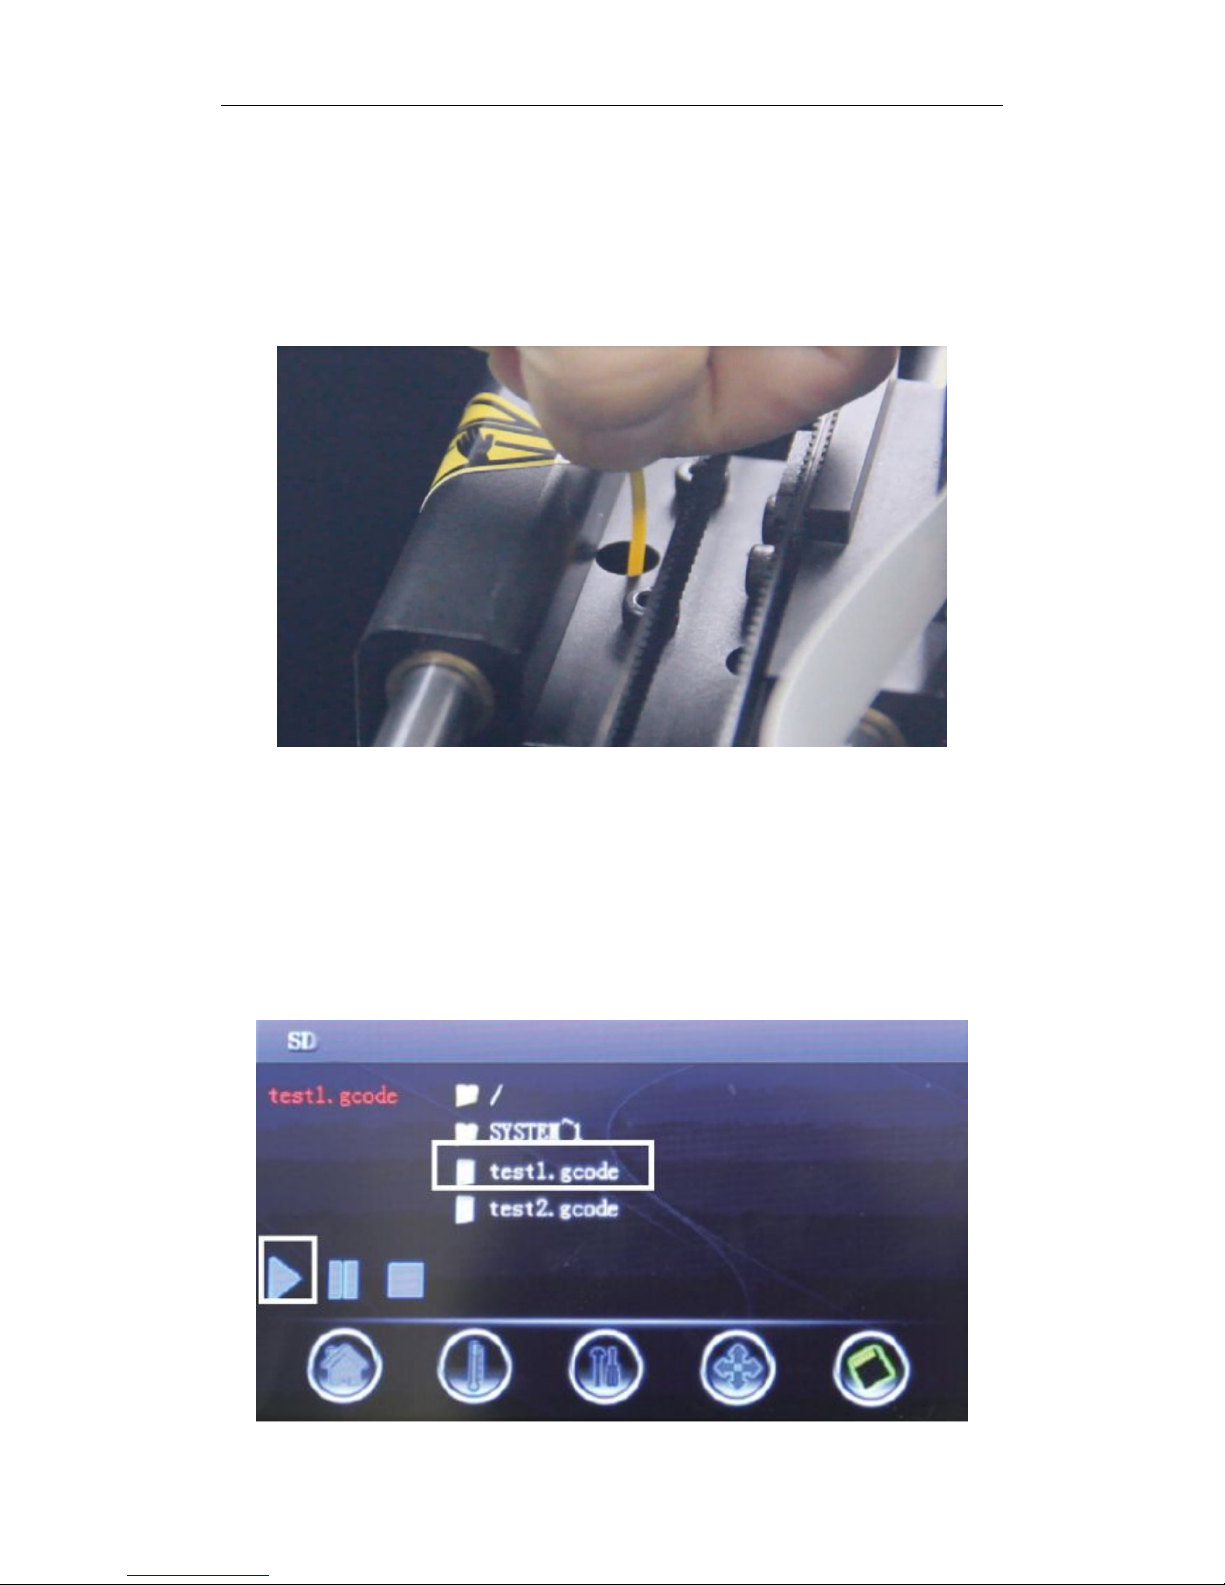
Beijing Huitianwei Technology Co., Ltd.
15
The fourth step, the printer automatically warming, after reaching the melting
temperature automatically feed, this process touch screen is locked,does not
respond to any operation. Beginning the discharge nozzle, the machine will
beep, this time represents the feed operation is completed, touch screen
automatically unlock. Finally, the white fixed tube inserted back in place, such
feed will be completed (Figure 4-4);
(Figure 4-5)
Before printing the other models, we first print two test files HORI division to
observe whether the printer each member to work properly.
The first step, on the touch screen to select "SD card" button, click
“test1.gcode”File, click "Start printing". Before printing, the print head has a
heating process, The main screen of the touch screen you can see the heating
curve(Figure 4-6);
SD card

Beijing Huitianwei Technology Co., Ltd.
16
(Figure 4-5)
The second step, when the print head starts to print, draw three circles of
different radii on the platform, click on "SD Card", click "stop printing" (Figure
4-7,4-8). draw a circle on the viewing platform is securely bonded to three,
material is uniformly perfect circle,if not, first operation back tone platform,
here then printing operation;
(Figure 4-7)
(Figure 4-8)
SD card

Beijing Huitianwei Technology Co., Ltd.
17
In the case of, cleanup material platform, click on "SD Card" button, click
“test2.gcode”file, click "Start printing". This waiting time can be small vase
printing is complete. If you print out a small vase structural symmetry, smooth
surface, you can print another model (Figure 4-9,4-10). Model before printing
operation, please watch this CURA software company released a video.
(Figure 4-9)
(Figure 4-10)
SD card
Beijing Huitianwei Technology Co., Ltd.
18
Section 5 Common Problem
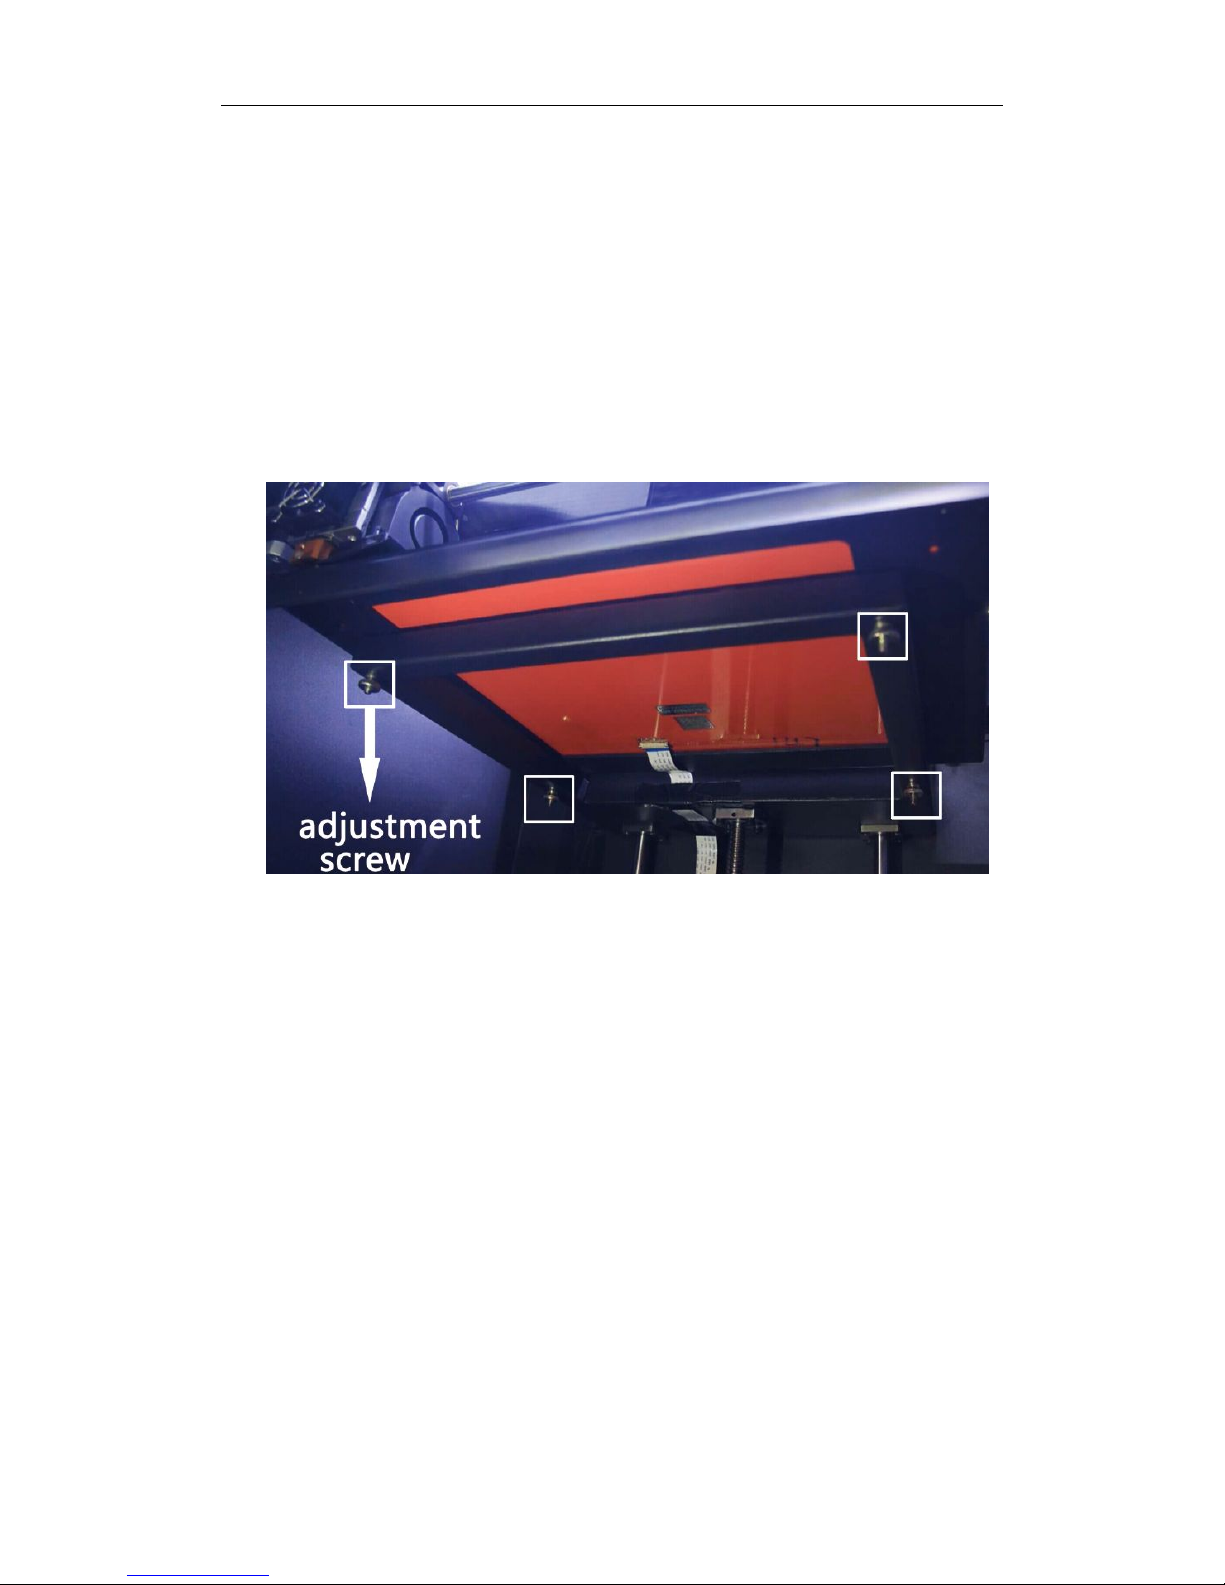
○Tuning Platform
Transfer platform to be operated knob: There are four fixed point below
the platform, the four is to control the platform level and adjust the balance
point, these four points at the bottom, it is what we need to "leveling knob"
(Outside leveling knob is hot melt adhesive stick (Figure 5-1),this is to
prevent the transport process because knob and affect highly Platform.
Platform at the factory has been adjusted to the best state, under normal
circumstances do not need regulation.
(Figure 5-1)
○Why you will need to adjust the platform
Z-axis coordinate print head is not going to change, coordinate platform has an
upper and lower limit, when you reach the platform uppermost limit, if the
distance from the nozzle of inappropriate words, we have to fine-tune the
height of the platform to control the distance between the platform and the
nozzle.
○ What is the correct distance from the nozzle and platforms
Between the platform and the nozzle is placed a piece of A4 paper, turn the
nozzle is moved to the top of the platform four fulcrum, parallel drag out the
paper, if you feel resistance, but it will not tear the paper, this distance is
correct. Remember that you must be a distance of four fulcrum are correct, in
order to ensure the proper platform from the nozzle.
This manual suits for next models
2
Table of contents


