BEIN IRHD-1000S/XX User manual

The default password is 0000.
Le mot de passe par défaut est 0000.
IRHD-1000S/XX


GB1
Notice
Thank you for purchasing a HUMAX product. Please read this user’s manual
carefully to be able to safely install, use and maintain the product at maximum
performance. Keep this user’s manual next to your product for future reference.
The information in this user’s manual is subject to change without notice.
Copyright (Copyright © 2014 HUMAX Corporation)
Not to be copied, used or translated in part or whole without HUMAX’s prior
consent in writing except approval of ownership of copyright and copyright
law.
Meaning of Symbols
To reduce the risk of electric shock, do not remove cover (or back).
No user serviceable parts inside. Refer servicing to qualified service
personnel.
This symbol indicates dangerous voltage inside the product that
presents a risk of electric shock or personal injury.
This symbol indicates important instructions accompanying the
product.
Warnings, Cautions and Notes
Throughout the whole manual, pay special attention to the following marks
that indicate hazardous situations.
Warning
Indicates a hazardous situation which could result in serious injury
Caution
Indicates a situation which could damage the equipment or other apparatus
Note
Indicates additional information to make the user aware of possible problems
and information of any importance to help understand, use and maintain the
installation.
Warranty
The warranty does not cover parts which may become defective due to misuse
of the information contained in this manual.
‘WEEE’ Instructions
This product should not be disposed with other household wastes at the end
of its working life. Please separate this from other types of wastes and recycle
it responsibly to promote the sustainable reuse of material resources. This will
prevent possible harm to the environment or human health from uncontrolled
waste disposal.
Domestic users:
Please contact either the retailer where you purchased this product or their
local government office for details of where and how they can take this item
for environmentally safe recycling.
Business users:
Contact your supplier and check the terms and conditions of the purchase
contract. This product should not be mixed with other commercial wastes for
disposal.
Trademarks
• Irdeto is a trademark of Irdeto Access B.V.
• Manufactured under license from Dolby Laboratories.
Dolby and the double-D symbol are trademarks of Dolby Laboratories.
• the HDMI Logo, and High-Definition Multimedia
interface are trademarks and registered trademarks of
HDMI Licensing LLC.
Note: The model name is located on the bottom of this product.
Notice

GB2
For Your Safety
For Your Safety
Safety Instructions
1. POWER SUPPLY
• Operate this product only from the type of power
supply shown on the marking label. If you do not
know the type of power supplied to your home,
contact your local power company.
• Disconnect the power supply before you start
any maintenance or installation procedures.
2. OVERLOADING
• Make sure that the wall outlet, extension cord
and adapter have a sucient power rating for the
appliance. If not, this can cause an electric re
shock.
3. LIQUID
• Do not expose this product to liquids. Do not put
objects lled with liquid on the product.
4. CLEANING
• Disconnect the product from the wall outlet
before you clean it.
• Use a moist cloth to clean the product. Do not
use solvents. Wipe the surface gently with a soft
cloth as it may get scratched.
5. VENTILATION
• Make sure that the slots on top of the product are
not blocked. It is necessary to have a sucient
airow into the unit.
• Do not put electronic equipment on the product.
• Do not put objects on the product. This will block
the ventilation or cause damage to the surface.
6. ATTACHMENTS
• Do not use any unsupported attachments as
these may be hazardous or cause damage to the
product.
7. LIGHTNING, STORM OR NOT IN USE
• Unplug the product from the wall outlet and
disconnect the antenna during a thunderstorm
or when left unattended and unused for long
periods of time. This will prevent damage to the
unit due to lightning and power-surges.
8. EXTRANEOUS OBJECTS
• Do not insert anything through the openings
in the unit, where they can touch dangerous
voltage points or damage parts.
9. REPLACEMENT OF PARTS
• When replacement of parts is required, be sure
the service technician uses replacement parts
specied by the manufacturer or those that
have the same characteristics as the original
part. Unauthorised substitution may result in
additional damage to the unit.
10. CONNECTION TO THE SATELLITE DISH LNB/CABLE
TV SIGNAL/AERIAL
• Disconnect the power supply before you connect
or disconnect the cable from the satellite dish/
cable TV signal/aerial. If not, this can cause
damage to the LNB/cable TV line/aerial.
11. CONNECTION TO THE TV
• Disconnect the power supply before you
connect or disconnect the cable from the TV.
If not, this can cause damage to the TV.
12. EARTHING (satellite only)
• Earth the LNB cable to the system earth for
the satellite dish.
13. LOCATION
• Place the product indoors to avoid exposure
to lightning, rain or sun. Do not place it near a
radiator or heat register.
• Keep at least 10 cm clearance from any other
appliances susceptible to electromagnetic
inuences such as a TV or a VCR.
• If you place the product on a rack or a
bookcase, make sure that there is adequate
ventilation and that you have followed the
manufacturer’s instructions for mounting.
• Do not place the product on an unstable
surface where it can fall. A falling product can
• Do not modify or process the power cord or plug
arbitrarily.
• Do not bend or twist the power cord.
• Make sure to disconnect the power cord while
you hold the plug.
• Keep heating appliances as far as possible from
the power cord to prevent the cover vinyl from
melting.
• The mains plug, as a disconnection device, shall
remain readily accessible by the user.
2. To avoid electrical shock
• Do not open the main body.
• Do not insert metal or inammable objects inside
the product.
• Do not touch the power plug with wet hands.
• Disconnect the power cord in case of lightning.
• Unplug the power cable before you install the
antenna cable.
3. To avoid damage of product
• Do not use the product when it is out of order. If
you continue to use the product when defective,
this may cause serious damage. Make sure
to contact the customer service centre if the
product is out of order.
• Do not insert metal or alien substance into the
slots for the modules or Smartcards. It may cause
damage to the product and reduce its life span.

GB3
AccessoriesContents
Note: This accessories may vary according to
area.
Contents & Accessories
Notice ................................................................................1
For Your Safety ................................................................2
Contents & Accessories..................................................3
Contents
Accessories
Quick Start Guide ...........................................................4
Front & Rear
Remote Control
Connections
Wizard
Managing Channels ......................................................9
Programme Information (i-Plate)
Channel List
Edit Channels
TV Guide............................................................................13
Preferences .......................................................................15
Installation.......................................................................16
Search Channels [Fixed Antenna]
Search Channels [SCD Antenna]
Search Channels [Motor Antenna]
Software Update (OTA)
Factory Default
System...............................................................................20
Appendix...........................................................................21
Specification
Trouble Shooting
HUMAX Customer Support
Error Messages
Glossary
Open Source Software Notice
Warranty Certificate
User’s Manual
SUB OK
User’s Manual
SUB OK
User’s Manual
SUB OK
User’s Manual
SUB OK
Remote Control
/ Batteries
User’s Manual
HDMI Cable
Smartcard
AC Adaptor
or
or
GB4
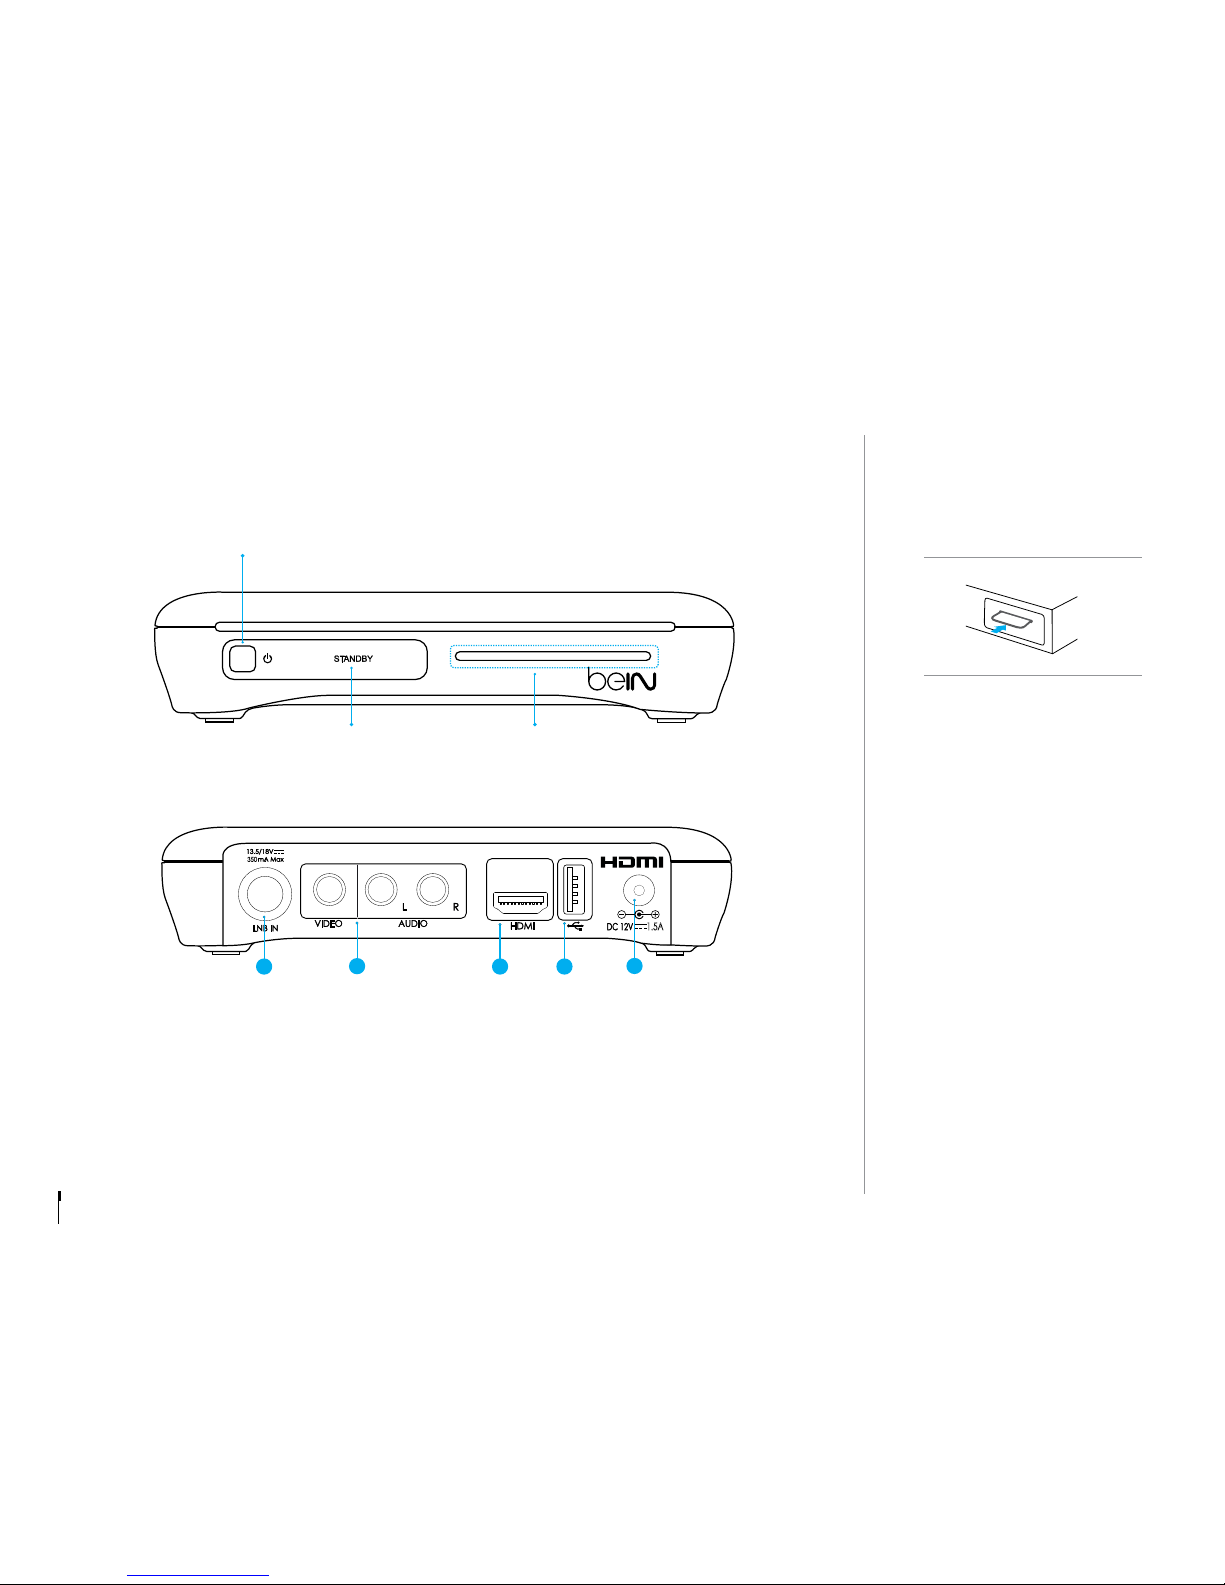
Front & Rear
Note: The image may differ from the actual product.
1LNB 1 IN: Connect a satellite antenna cable.
2VIDEO/AUDIO: Use an RCA cable to connect to the TV.
3HDMI: Use an HDMI cable to connect to the TV.
4USB Port: Connect a USB storage device.
5AC Adaptor: Use the AC adaptor to connect to the power supply.
Inserting the Smartcard
1. Hold the Smartcard horizontally
with the electronic chip facing
downwards.
2. Insert the Smartcard into the slot.
Quick Start Guide
1.5A
350
123 4 5
STANDBY
Switches between operation and standby modes
Smartcard Slot
STANDBY LED
Red light is emitted when the
product is in standby mode.
GB5
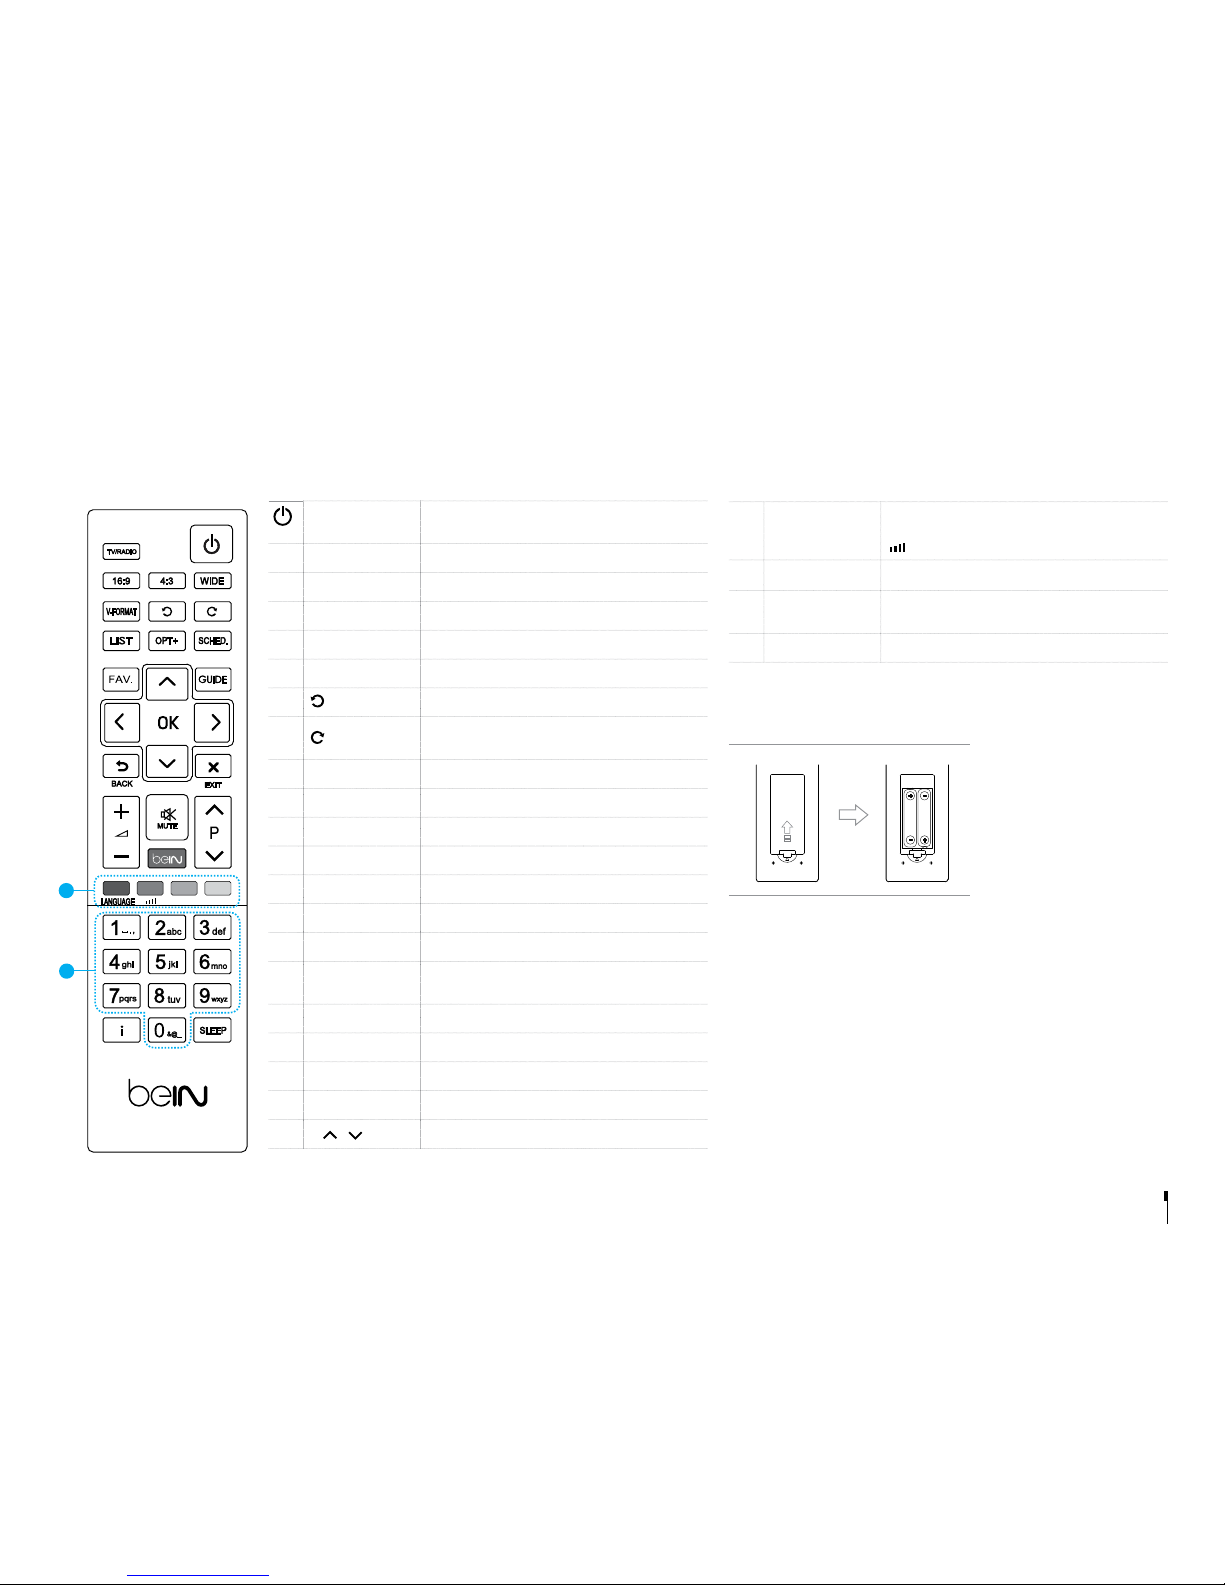
STANDBY Switches between operation and standby
modes
TV/RADIO Switches between TV and radio modes
16:9 Sets the screen ratio to 16:9
4:3 Sets the screen ratio to 4:3
WIDE Sets the display format
V-FORMAT
Sets the resolution of video
Jumps back 24 hours in the programme guide
Jumps ahead 24 hours in the programme
guide
LIST Displays the channel list
OPT+ Displays the channel attributes
SCHED. Displays the schedule list
FAV. Displays the favorite channel list
GUIDE Displays the programme guide
ARROW Buttons Moves the cursor up, down, left or right
OK Selects a menu or confirms
BACK
Returns to the previous channel or the previous
screen
EXIT Exits all On-Screen Display (OSD) screens
◢
-/+ Changes the audio volume
MUTE Mutes audio
beIN Displays the main menu
P /
Changes the channel or page
1COLOUR
Buttons
For interactive applications
LANG: Changes the subtitle/audio language
: Displays the system information
2NUMERIC (0-9)
iDisplays the channel and programme
infomration
SLEEP Sets the sleep time
Inserting Batteries
Insert the batteries matching the plus(+) and minus(-) at each end.
Important notice
The batteries of your remote control are 2 x AAA type, 1.5V DC. Do
not mix different types of batteries or new and old batteries. Do not
use rechargeable batteries. In order to avoid any risk of explosion,
observe polarities indicated inside the battery compartment. Replace
only with the type of batteries specified above. Do not subject to
excess heat such as SUN and Fire, do not recharge them. If you are
not using the remote control for a long period of time, remove the
batteries. Please respect the environment and prevalling regulations!
Batteries must be collected separately from other refuse! Before you
dispose of batteries, ask your dealer whether they are subject to
special recycling and if he will accept them for disposal.
Remote Control
Quick Start Guide
2
SUB OK SUB OK
Battery
Battery
YELLOW BLUE GREEN RED
REC
2
1
2
1
GB6
Inserting Batteries
Insert the batteries matching the plus(+) and minus(-) at each end.
Important notice
The batteries of your remote control are 2 x AAA type, 1.5V DC. Do
not mix different types of batteries or new and old batteries. Do not
use rechargeable batteries. In order to avoid any risk of explosion,
observe polarities indicated inside the battery compartment. Replace
only with the type of batteries specified above. Do not subject to
excess heat such as SUN and Fire, do not recharge them. If you are
not using the remote control for a long period of time, remove the
batteries. Please respect the environment and prevalling regulations!
Batteries must be collected separately from other refuse! Before you
dispose of batteries, ask your dealer whether they are subject to
special recycling and if he will accept them for disposal.
Remote Control
Quick Start Guide
2
SUB OK SUB OK
Battery
Battery
SUB OK
1
2 2
STANDBY Switches between operation and
standby modes
iDisplays the channel and programme
infomration
TV/RADIO Switches between TV and radio
modes
1NUMERIC (0-9)
FAV. Displays the favorite channel list
GUIDE Displays the programme guide
V +/- Changes the audio volume
P + /-
Changes the channel or page
MUTE Mutes audio
Displays the main menu
BACK
Returns to the previous channel or the
previous screen
EXIT Exits all On-Screen Display (OSD)
screens
ARROW Buttons Moves the cursor up, down, left or
right
OK Selects a menu or confirms
2COLOUR
Buttons
For interactive applications
SUB: Changes the subtitle language
: Displays the system information
SUB OK
1
2 2
SUB OK
1
2 2
SUB OK
1
2 2
GB7
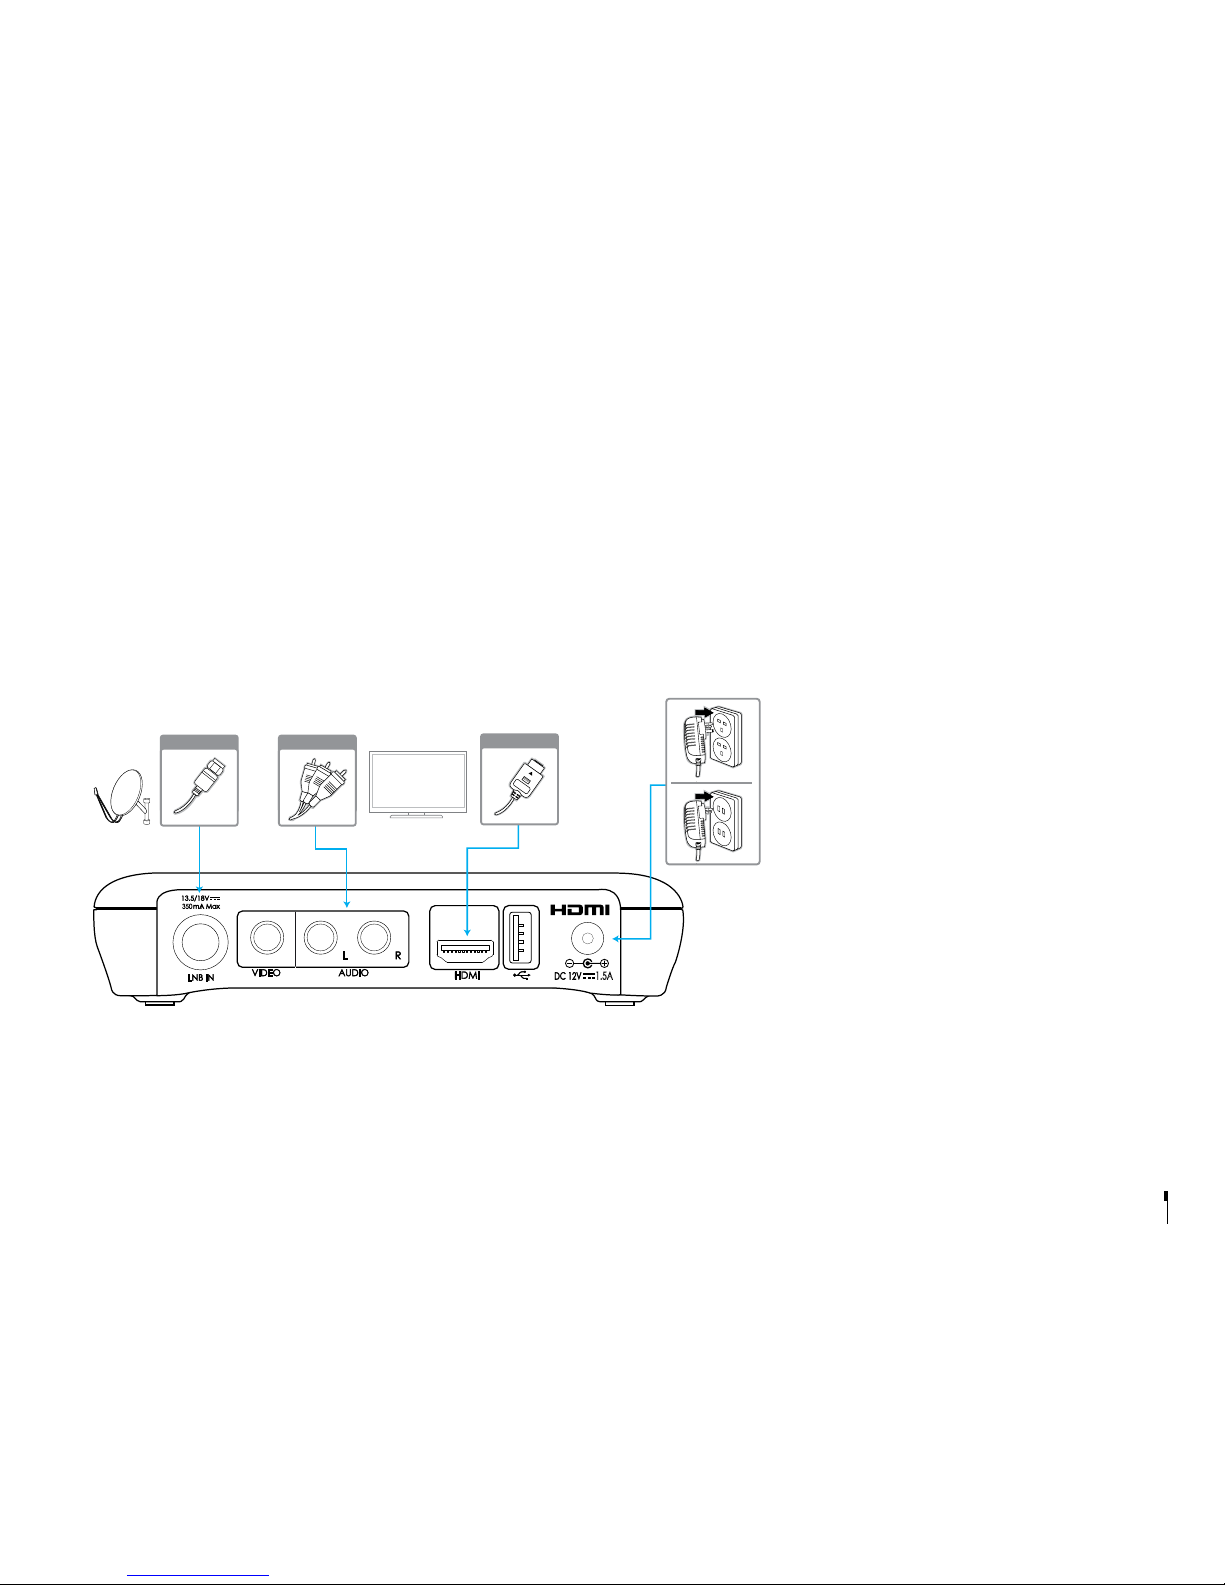
Connections
This section describes how to connect your product to match your particular devices and to gain optimum
signal quality.
Warning: Connect all devices before you plug any power cords into the wall outlet. Always turn off the product,
TV and other devices before you connect or disconnect any cables.
Note: If you encounter any problems setting up your product, please contact your local retailer or HUMAX
Customer Service.
Connecting the Antenna
Connect the aerial to the LNB IN.
Connecting the TV
2-1 Using an HDMI cable
For the best picture quality, use an HDMI cable to
connect to the TV.
2-2 Using an RCA cable
For good picture quality, use an RCA cable to
connect to the TV.
Powering On
1. Connect the power cord of the product to a
wall outlet.
2. Power on by pressing the STANDBY button on
the remote control or the STANDBY button at
the front panel.
Quick Start Guide
1.5A
350
TV
Antenna HDMI
12-1
RCA Cable
2-2

GB8
Wizard
The installation wizard operates automatically when you power on the product
for the first time or do factory default in menu.
Quick Start Guide
1. Language
Select the appropriate language from
the list.
2. Display
Set the video output to your TV.
3. Time Zone
Select your country to determine the
time zone.
4. Search Channels
• beIN Sports: Search the beIN sports
channels only.
• Automatic Search: Search all
channels of ES’HAIL(25.5E),
NILESAT(7.0W), ARBSAT(BADR 26.0E)
and HOTBIRD(13.0E) automatically.
• Skip: If you have SCD or motor
antenna, skip the search process
and go to installation in Settings.
5. Automatic Search
Channel search will begin
automatically.
Save the found channels when the
search is complete.
6. Result
The result of the installation wizard
will show. Select Finish to exit the
wizard.

GB9
Managing Channels
Programme Information (i-Plate)
The i-plate is an information banner that is displayed for a few seconds
whenever you change channels. Press the i button while you watch a
programme to display the i-plate. Press the EXIT button to hide it.
Viewing detailed programme information
Press the ibutton again while the i-plate is displayed.
Viewing Programme information of other channels
Press the p/qbutton while the i-plate is displayed. Press the
OK button to change to the selected channel.
Icons
Locked Programme
Scrambled Programme
Parental level
HD Pregramme
Resolution
Subtitle
Teletext
Screen ratio
Dolby Digital audio
Dolby Digital Plus audio
YELLOW BLUE GREEN RED
REC
YELLOW BLUE GREEN RED
REC
AD
AD
AD
AD
AD
AD
AD
AD
AD
Playing time
Channel number and name
Programme name
Icons
Current time
and date
Group name
23:15 TUE 03.13.2012

GB10
Channel List
You can access the channel list in several ways.
• Press the LIST button.
• Press the beIN button and select Channel List.
Changing Channels
Select the channel you want to watch and press the OK button. The channel
will change.
Changing Group
Press the button to display the list of the selected channel
group. (BEIN, TV, HDTV, A-Z, Radio, Favourite 1~5, Recent)
Sorting Channels
Press the RED button to sort the channels in numerical or
alphabetical order.
Filtering Channels
Press the GREEN button to filter the channels according to
channel type in TV or Radio list. (Satellite, Pay Channel, All)
Note:
• : Locked channel, : Scrambled channel (CAS icons)
• Press the ibutton to view the detailed channel information.
• Press the LIST or EXIT button to exit.
• Press the TV/RADIO button to switch between TV and Radio groups.
Editing Channels in Channel List
Select a channel you want to edit and press the YELLOW button.
Favourite
Setting Favourite Channels
Select a favourite group you want to move the channel to and
press the OK button.
To remove a channel from a favourite group, select the group
and press the OK button again.
Lock Locking Channels
Select On or Off.
Delete Deleting Channels
Press the OK button.
Rename Renaming Channels
Press the OK button and enter the name in the keyboard.
Note:
• The default password is 0000. If you have forgotten your password, please
contact your local distributor.
• To edit multiple channels, go to beIN > Settings > Edit Channels.
Managing Channels
AD
AD
YELLOW BLUE GREEN RED
REC
RED
GREEN
Sort Filter Edit
BEIN TV HDTV A-Z Radio Favourite1

GB11
Managing Channels
Deleting Channels
Select the channels using the p/qand OK button and press
the RED button.
Moving Channels
Select the channels using thep/qand OK button and press
the GREEN button. Move the selected channels to the location
you want using the p/qand OK button.
Changing Group
To list the channels of other groups, press the YELLOW button
and select a group you want.
Changing Background
You can change the channel displayed in the background
while editing. Select the channel you want to watch and press
the BLUE button.
Locking / Unlocking Channels
Renaming Channels
Selecting / Releasing All Channels
Edit Channels
Editing Channel List
> Settings > Edit Channels > Edit Channel List
Edit Channel List will help you delete, move, lock or rename multiple channels.
Note:
• : Locked channel, : Scrambled channel (CAS icons)
• Press the TV/RADIO button to switch between TV and Radio groups.
• Press the beIN or EXIT button to exit. Press the BACK button to return to the
previous screen.
AD
AD
AD
RED
GREEN
YELLOW
BLUE
YELLOW BLUE GREEN RED
REC
Group name Marked/Total channels
Function buttons
: Coloured or ibutton
Settings Edit Channels Edit Channel List
TV
Delete Move Group Preview Function

GB12
Editing Favourite List
> Settings > Edit Channels > Edit Favourite List
Edit Favourite List will help you add or remove channels from the favourite
groups.
Note:
• : Locked channel, : Scrambled channel (CAS icons)
• Press the TV/RADIO button to switch between TV and Radio groups.
• Press the beIN or EXIT button to exit. Press the BACK button to return to the
previous screen.
Adding Favourite Channels
Select the channels to add using the p/qand OK button in
the left column and then press the RED button. The added
channels will be listed in the right column.
Removing Favourite Channels
Select the channels to remove from the right column using the
p/qand OK button and then press the RED button.
Changing Group
To list the channels of other groups in the left column, press
the GREEN button and select a group you want. (TV, Radio,
HDTV)
Moving Favourite Channels
Select the channels using the p/qand OK button in the right
column and then press the GREEN button.
Changing Favourite Group
To list the channels of other favourite groups, press the
YELLOW button and select a group you want.
Changing Background
You can change the channel displayed in the background
while editing. Select the channel you want to watch and the
press the BLUE button. The background channel will change.
Renaming Favourite Group
Selecting / Releasing All Channels
Import Channels from USB
You can bring channel database from your hard disk drive.
Export Channels to USB
You can store channel database in your hard disk drive.
Managing Channels
AD
AD
RED
GREEN
YELLOW
BLUE
YELLOW BLUE GREEN RED
REC
AD
Group name
Marked/Total channels Favourite group name
Function buttons:
Coloured or ibutton
Settings Edit Channels Edit Favourite List
TV Favourite 1
Add Group Favourite Preview Function
GB13
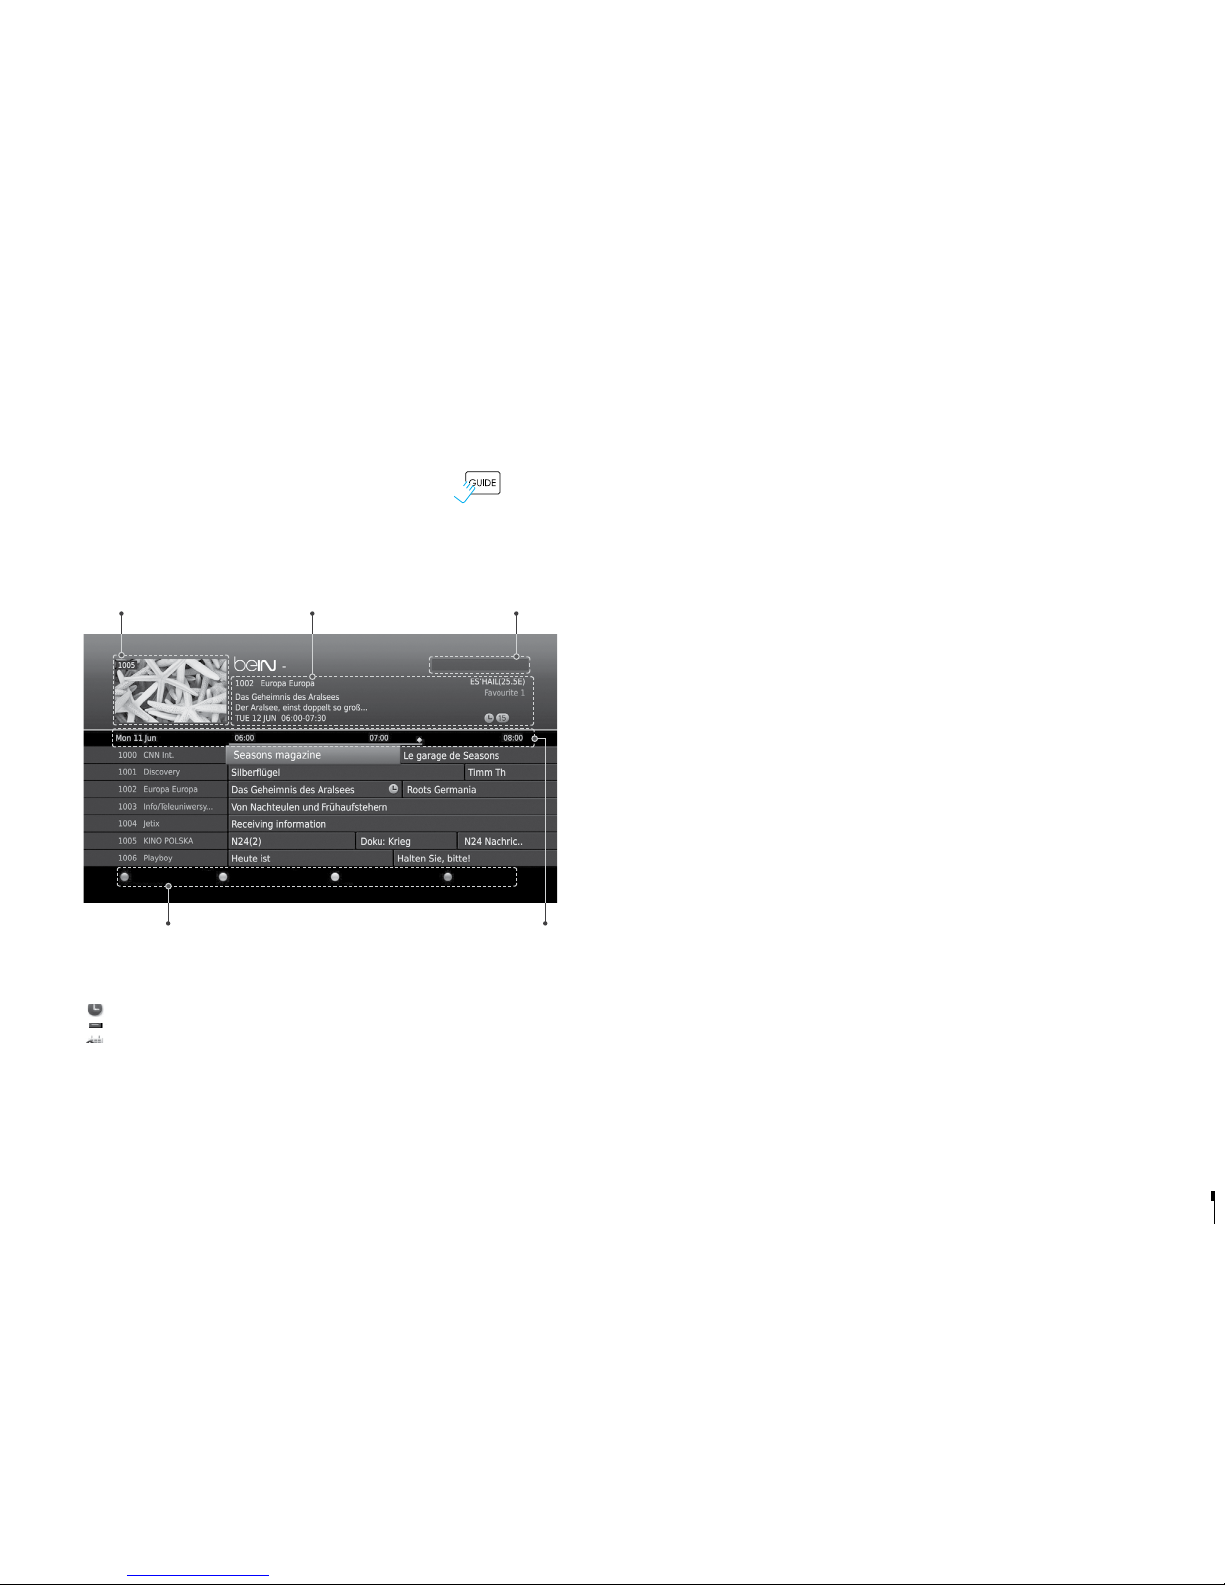
TV Guide
TV Guide
You can access the TV guide in several ways.
• Press the GUIDE button.
• Press the beIN button and select TV Guide.
Note:
• Press the ibutton to view the detailed programme information.
• : Scheduled programme
: Present time
Watching Programmes
1. Select a programme and press the OK button. The programme will display
in the preview.
2. Press the OK button again to exit the TV guide and watch the programme.
Setting Reminders
1. Select a future programme and press the OK button.
2. Select Reminder and press the OK button.
3. Press the OK button again to cancel the reservation.
The reserved programmes will be added automatically to Schedule.
Note:
• If the programme conflicts with another programme, adjust the reservation
appropriately.
Changing Group
To list the channels of other groups, press the BLUE button and select a group you
want.
AD
AD
YELLOW BLUE GREEN RED
REC
AD
Preview
Current time
and date
Information of the selected programme
Current number & name, programme name,
simple information, favourite group and icons
Function buttons: Coloured button Time bar
Guide Find Schedule Group
TV Guide 07:18 TUE 12 MAR 2012

GB14
TV Guide
Finding Programmes
Find will help you find the programmes more specifically according to the
keyword or genre.
By Keyword
1. Press the GREEN button.
2. Select Keyword and press the button.
3. Select a keyword and press the OK button.
Note: To enter a new keyword, select New Keyword.
By Genre
1. Press the GREEN button.
2. Select Genre and press the button.
3. Select a genre and press the OK button.
4. Select the specific genre and press the OK button.
Note:
• Press the ibutton to view the detailed programme information.
• Press the OK button to watch a found programme.
• You can set reminders for future programmes.
Scheduling Reminders
Schedule shows you the list of reminders and helps you manage them.
1. Press the YELLOW button.
2. You can add, edit or delete your reminders.
• To add, select New Reminder and press the OK button.
• To edit, select a reservation and press the OK button.
• To delete, select a reservation and press the BLUE button.
3. Reservation will pop up. You can change the options you want using the
p/q//, NUMERIC(0~9) and OK buttons.
4. Select OK to save and exit.
Note:
• Press the ibutton to view the detailed programme information.
• You can easily set reminders in TV Guide, Find or i-plate navigation mode.
Find
Schedule
TV
ES’HAIL(25.5E)
TV
ES’HAIL(25.5E)
TUE JUN
TUE JUN
New Keyword
TUE JUN
TUE JUN
New Reminder
TUE
TUE
WED
THU
FRI
SAT
1
2
3
4
5
6
Guide
Guide
Find
Find
Schedule
Schedule
Group
Group
GB15
Parental Control
• Maturity Rating: You can block the programme if the
programme is above the age limit.
• Change STB Password: Enter a new password.
Note:
• The default password is 0000. If you have forgotten your
password, please contact your local distributor.
• Enter the password to view the blocked programmes.
Language Setting
You can set the system language, audio language or
subtitle language.
Setting Power On/Off Timer
You can set the time the receiver powers on or powers off.
Note: You can set the GMT Oset and daylight saving time.
Video Setting
• Screen Ratio: You can select the screen ratio of your
TV.
• Resolution: You can set the resolution of the screen.
• Display Format: You can select the display format
according to the screen ratio of your TV.
• Letterbox & Pillarbox Colour: You can select the
colour of the margin space in Letterbox or Pillarbox
mode.
Audio Setting
• Digital Audio Output: You can select the digital audio
signal output.
• Lip-Sync: You can adjust the sound difference
between audio and video.
Screen Display
• Info Display Time: You can set the duration the i-plate
is displayed whenever you change the channel.
• Transparency: You can set the transparency of the
On-Screen Display.
• Subtitle Font: You can set the subtitle font.
Preferences
Channel List
TV Guide
Settings
Preferences
Edit Channels
Installation
System
Parental Control
Language
Time
Video
Audio
Screen Display
Preferences
AD
GB16
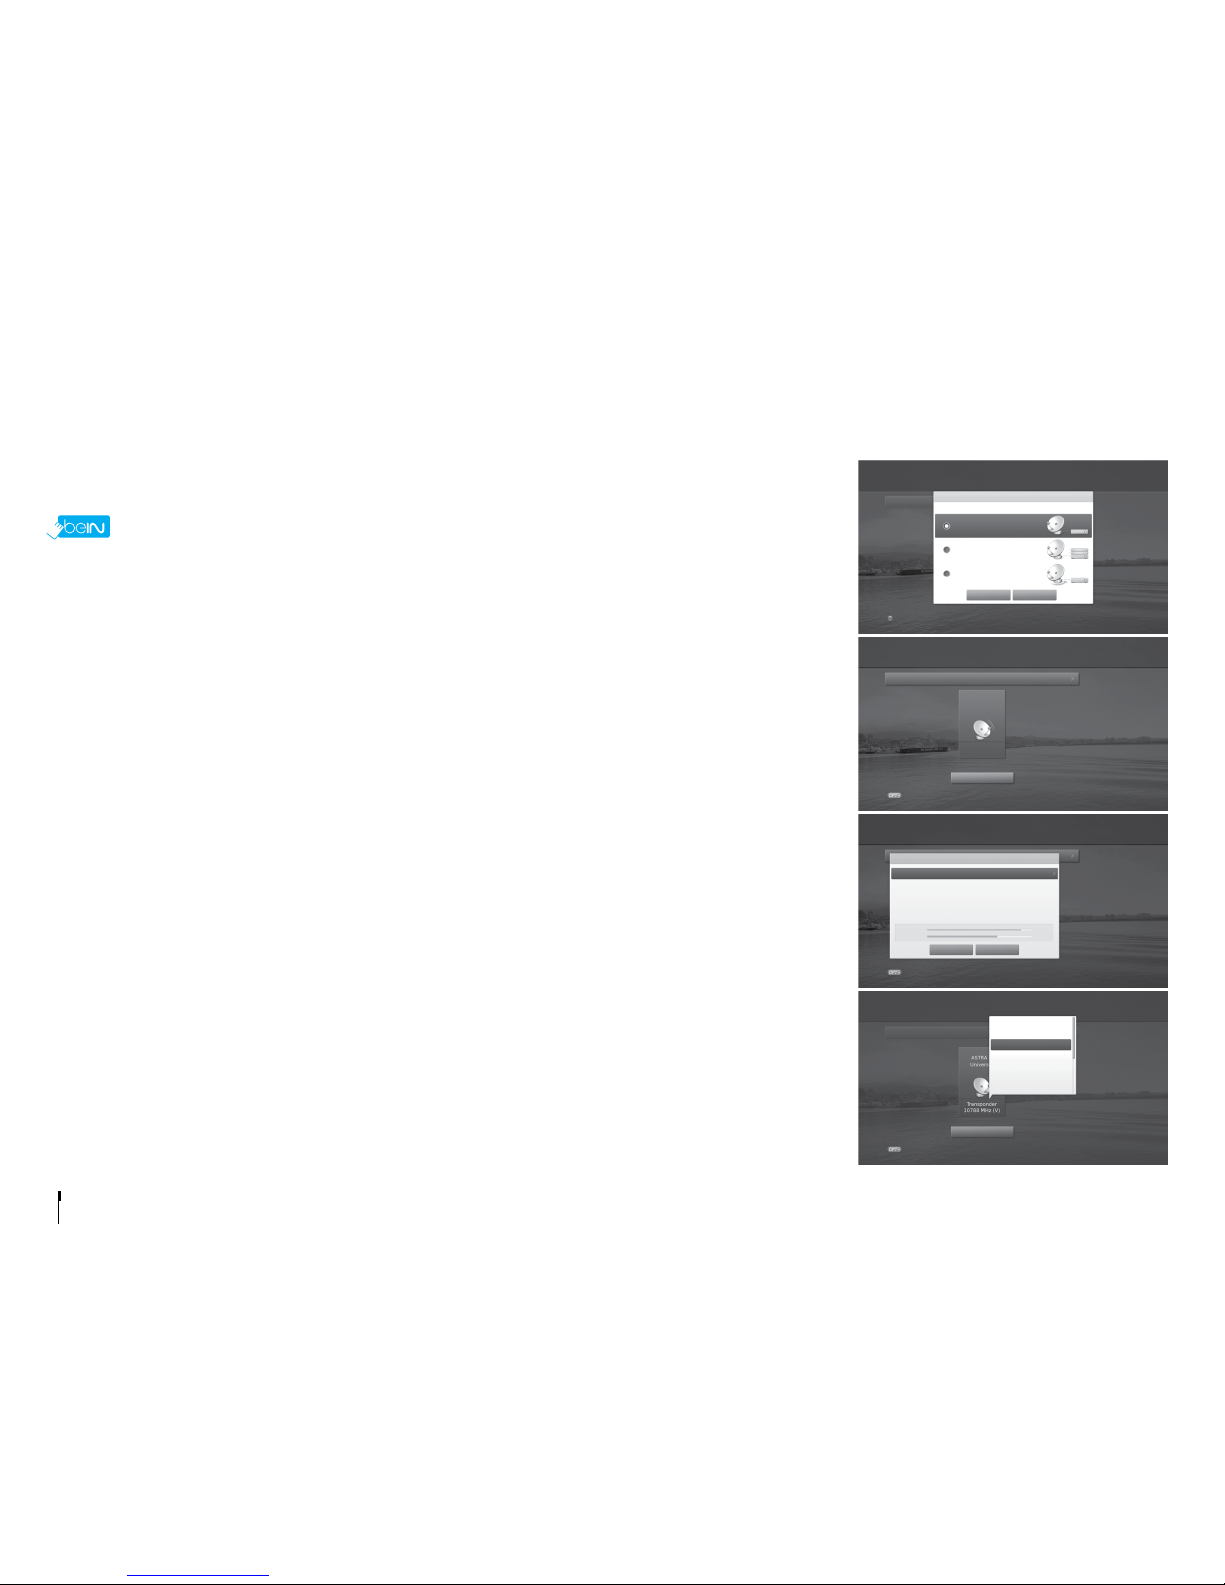
Installation
Installation allows you to configure your antenna and search the TV and radio channels.
> Settings > Installation
1 Press the RED button and select Fixed Antenna.
Select OK to save and exit.
2 Select Search Channels and press the OK button.
Select Switch Type and select LNB Onlyor DiSEqC.
3 Select a satellite figure and press the OK button.
• Satellite: Select the satellite.
• LNB Frequency: Select the LNB frequency.
• 22kHz Tone: Select the DiSEqC switch.
• DiSEqC: Select the DiSEqC switch.
• Test Transponder: Check the signal status of each transponder and select the one with the best quality.
Select OK.
Note: When Switch Type is set to DiSEqC , both 22kHz Tone and DiSEqC are activated.
4Select Transponder under the activated satellite figure and press the OK button.
Select a value in the transponder list.
5Select Search and press the OK button. The found channels will be listed.
6When the search is completed, select Save and press the OK button.
Note:
• Select User Dene to enter the options directly.
• All channels will be deleted if you change the antenna type.
• The default password is 0000. If you have forgotten your password, please contact your local distributor.
Search Channels [Fixed Antenna]
AD
1
2
3
4
Antenna Type
OK
OK
Search
Search
Cancel
Cancel
Fixed Antenna
SCD Antenna
Motor Antenna
Select your antenna type.
Antenna Type
Search Option
Search Option
Search Option
Strength
Quality
88%
67%
Transponder
10788 MHz (V)
ASTRA 1
Universal
Switch Type
Switch Type
Satellite
LNB Frequency
Test Transponder
Satellite Setting
All
None
User Dene
10755, V, 22000, 5/6
10818, V, 22000, 5/6
10832, H, 22000, 5/6
10847, V, 22000, 5/6
ASTRA 1 (19.2E)
Universal
10744, H, 22000, Auto
LNB Only
Settings Installation (Fixed Antenna)
Settings Installation (Fixed Antenna) Search Channels
Settings Installation (Fixed Antenna) Search Channels
Settings Installation (Fixed Antenna) Search Channels
GB17
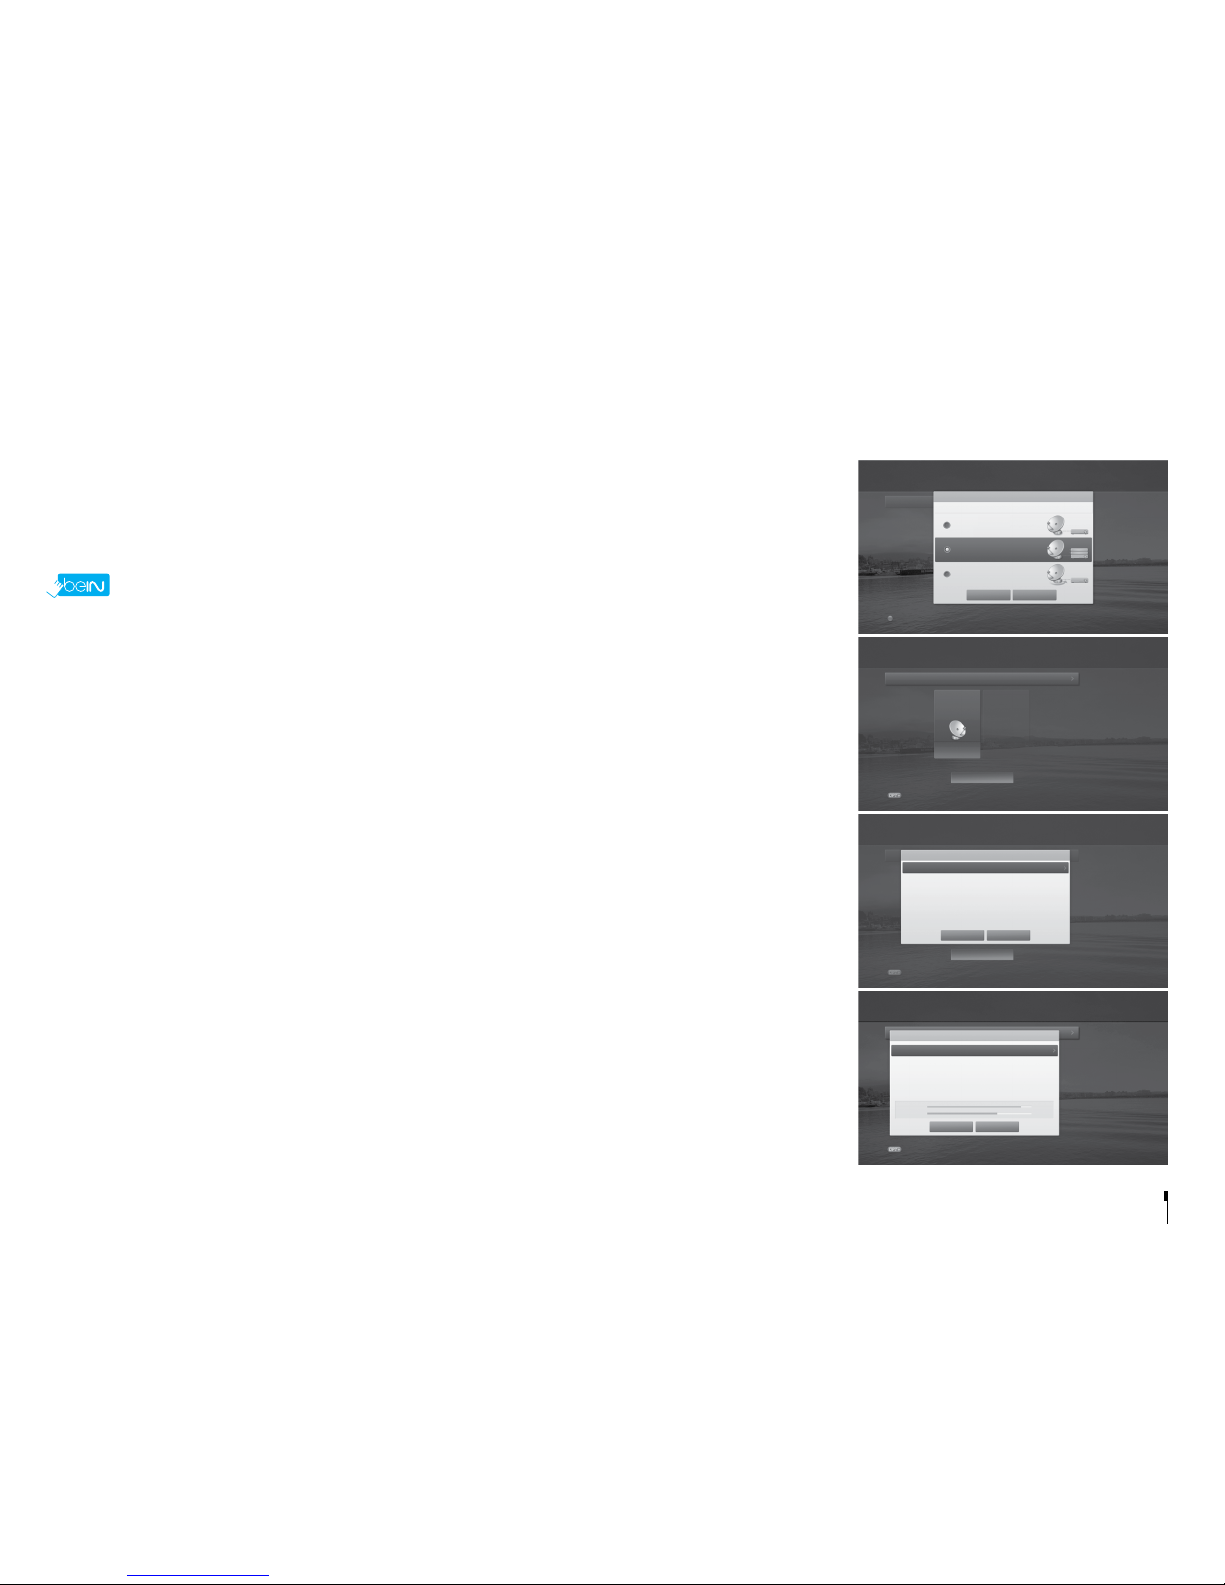
Installation
Single Cable Distribution enables the delivery of broadcast programming over a single cable to multiple users
eliminating the numerous cables required to support other electronics devices.
If you are using more than one satellite receiver, set one receiver at a time and turn off the others while setting.
Refer to the satellite antenna manual for details.
> Settings > Installation
1Press the RED button and select SCD Antenna. Select OK to save and exit.
2Select Search Channels and press the OK button.
3Select SCD Setting and press the OK button to set the channel(band) and frequency for this receiver.
• Tuner1: Select from Channel 1~8.
• Frequency: The frequency is set based on the channel of tuner1.
Select OK.
4Select a satellite figure and press the OK button.
• Satellite: Select the satellite.
• LNB Frequency: Select the LNB frequency.
• Test Transponder: Check the signal status of each transponder and select the one with the best quality.
Select OK.
5Select Transponder under the activated satellite figure and press the OK button.
Select a value in the transponder list.
6Repeat the two steps above to set more satellites.
7Select Search and press the OK button. The found channels will be listed.
8When the search is completed, select Save and press the OK button.
Note:
• Select User Dene to enter the options directly.
• Select Stop and press the OK button to stop the channel search.
• All channels will be deleted if you change the antenna type.
• The default password is 0000. If you have forgotten your password, please contact your local distributor.
Search Channels [SCD Antenna]
AD
Satellite
LNB Frequency
Test Transponder
Astra 1 (19.2E)
Universal
12722, H, 22000, 2/3
1
2
3
4
Antenna Type
OK Cancel
Fixed Antenna
SCD Antenna
Motor Antenna
Select your antenna type.
Antenna Type
Settings Installation (SCD Antenna)
OK
Search
Search
SCD Setting
Cancel
Search Option
Search Option
Transponder
-
Position 1
Satellite
-
SCD Setting
Tuner 1
Frequency
Tuner 2
Frequency
Channel 1
1210
Channel 2
1400
Channel 1/Channel 2
Settings Installation (SCD Antenna) Search Channels
Settings Installation (SCD Antenna) Search Channels
Settings Installation (SCD Antenna) Search Channels
Satellite Setting
OK Cancel
Search Option
Strength
Quality
75%
80%

GB18
Installation
You can set the position of the satellites when you use a motor antenna for efficient channel search.
> Settings > Installation
1Press the RED button and select Motor Antenna. Select OK to save and exit.
2Select Search Channels and press the OK button.
3Select Motor Setting and press the OK button to set the motor type and location.
• Motor Type:
DiSEqC1.2: General motor antenna using DiSEqC 1.2.
USALS: Motor antenna using USALS.
• My Longitude: Enter the longitude and direction.
• My Latitude: Enter the latitude and direction.
• LNB Frequency: Enter the LNB frequency.
Select OK.
Note: When Motor Type is set to DiSEqC 1.2, both My Longitude and My Latitude are inactivated.
4Select Edit Satellite Data and press the OK button to select the satellites that the motor antenna is pointing to.
Select satellites using the p/qand OK button.
When selecting User Define, enter the Longitude and Direction.
Press the BACK button to save and return.
5Select Position Setting and press the OK button to set the antenna position for the selected satellites.
• Satellite: Select the satellite.
• Transponder: Select the transponder.
• Motor Driving: Continuous – Step - Time
• Driving Size: When motor driving is set to Step or Time, select one from1~127.
• Go to Stored Position: Make the antenna turn toward the position of the selected satellite.
Fine-tune the position using the /button until the signal strength and quality reach the maximum level.
• Store Current Position: Save the adjusted position.
• Recalculate: Recalculates the positions of all satellites based on the position of current satellite.
Press the BACK button to save and return.
Note: When Motor Type is set to USALS, Motor Driving, Store Current Position and Recalculate are inactivated.
Search Channels [Motor Antenna]
AD
1
2
3
4
Motor Setting
Antenna Type
OK Cancel
Fixed Antenna
SCD Antenna
Motor Antenna
Select your antenna type.
Antenna Type
Settings Installation (Motor Antenna)
Select Satellites for Motor Antenna
Search
Search Option
Transponder
-
Satellite
Motor Setting
Edit Satellite Data
Position Setting
Limit Setting
USALS
Settings Installation (Motor Antenna) Search Channels
OK
Search
Cancel
Search Option
Motor Type
My Longitude
Direction
My Latitude
Direction
LNB Frequency
USALS
23.0E
East
36.5N
North
Universal
Settings Installation (Motor Antenna) Search Channels
.. Installation (Motor Antenna) Search Channels Edit Satellite Data
Table of contents
Other BEIN Receiver manuals

Popular Receiver manuals by other brands


Enersound
Enersound R-120 user manual

Extron electronics
Extron electronics MTP T SV A user guide

Integra
Integra DTR-5.5 instruction manual

uAvionix
uAvionix pingStation 2 User and installation guide

FrSky
FrSky Delta 8 manual

Silent Call Communications
Silent Call Communications Medallion Series quick start guide


