Beko WCY 81233 MLCM User manual

WCY 81233 MLCM
Washing Machine
User’s Manual

2/ 20 EN
Washing Machine / User’s Manual
1 Important instructions for safety and
environment
This section contains safety instructions that will help protect
from risk of personal injury or property damage. Failure to
follow these instructions shall void any warranty.
1.1 General safety
• Thisproductcanbeusedbychildrenatandabove8
yearsoldandbypersonswhosephysical,sensoryor
mentalcapabilitieswerenotfullydevelopedorwho
lack experience and knowledge provided that they are
supervised or trained on the safe usage of the product
andtherisksitbringsout.Childrenmustnotplaywith
theproduct.Cleaningandmaintenanceworksshouldnot
beperformedbychildrenunlesstheyaresupervisedby
someone.
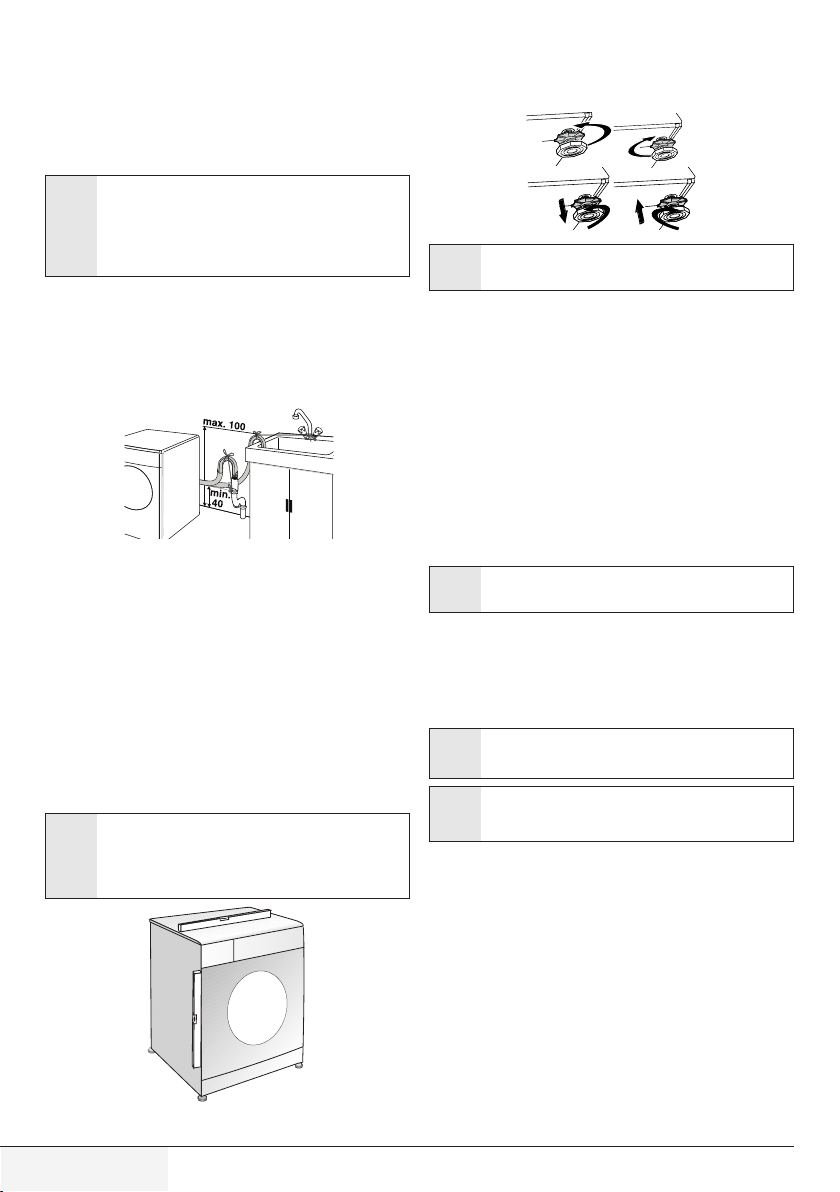
• Neverplacetheproductonacarpet-coveredfloor.
Otherwise,lackofairflowbeneaththemachinewillcause
electricalpartstooverheat.Thiswillcauseproblemswith
your product.
• Iftheproducthasafailure,itshouldnotbeoperated
unlessitisrepairedbytheAuthorizedServiceAgent.
There is the risk of electric shock!
• Thisproductisdesignedtoresumeoperatingintheevent
ofpoweringonafterapowerinterruption.Ifyouwishto
canceltheprogramme,see"Cancellingtheprogramme"
section.
• Connecttheproducttoagroundedoutletprotected
bya16Afuse.Donotneglecttohavethegrounding
installationmadebyaqualifiedelectrician.Ourcompany
shallnotbeliableforanydamagesthatwillarisewhen
the product is used without grounding in accordance with
the local regulations.
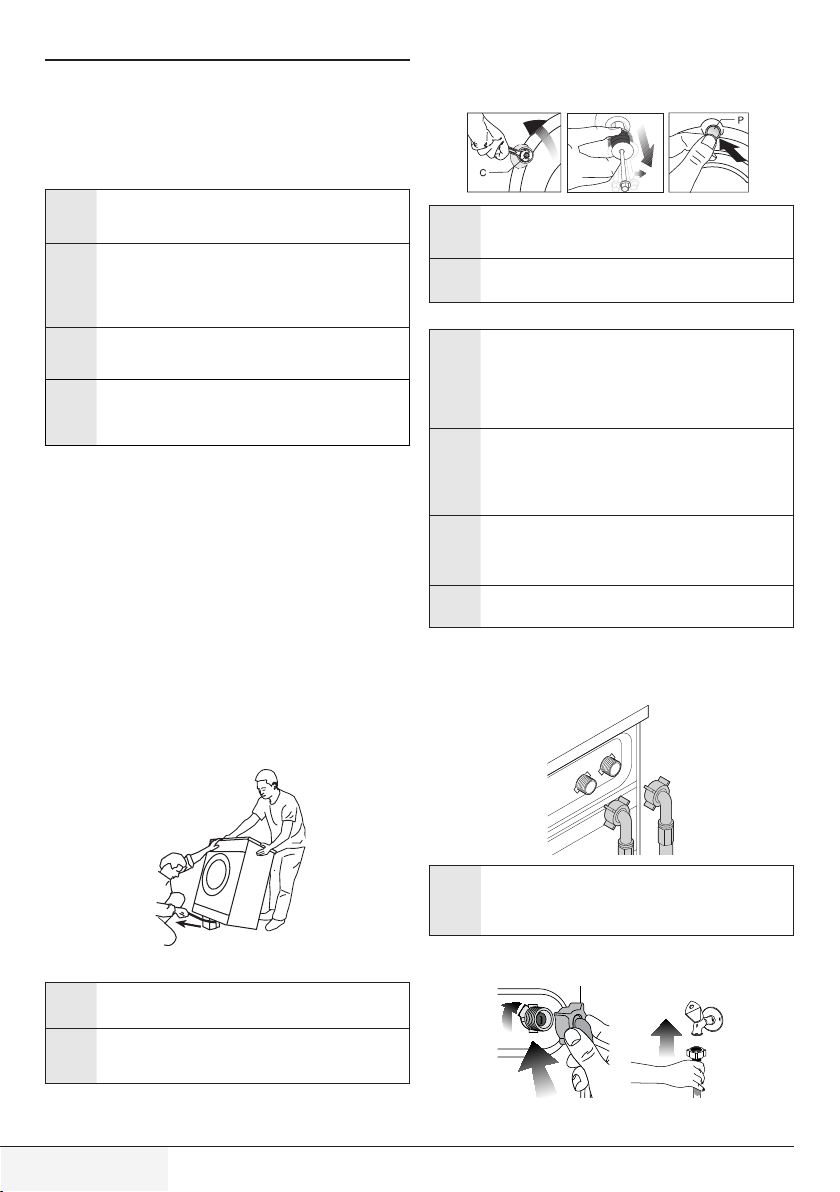
• Thewatersupplyanddraininghosesmustbesecurely
fastenedandremainundamaged.Otherwise,thereisthe
risk of water leakage.
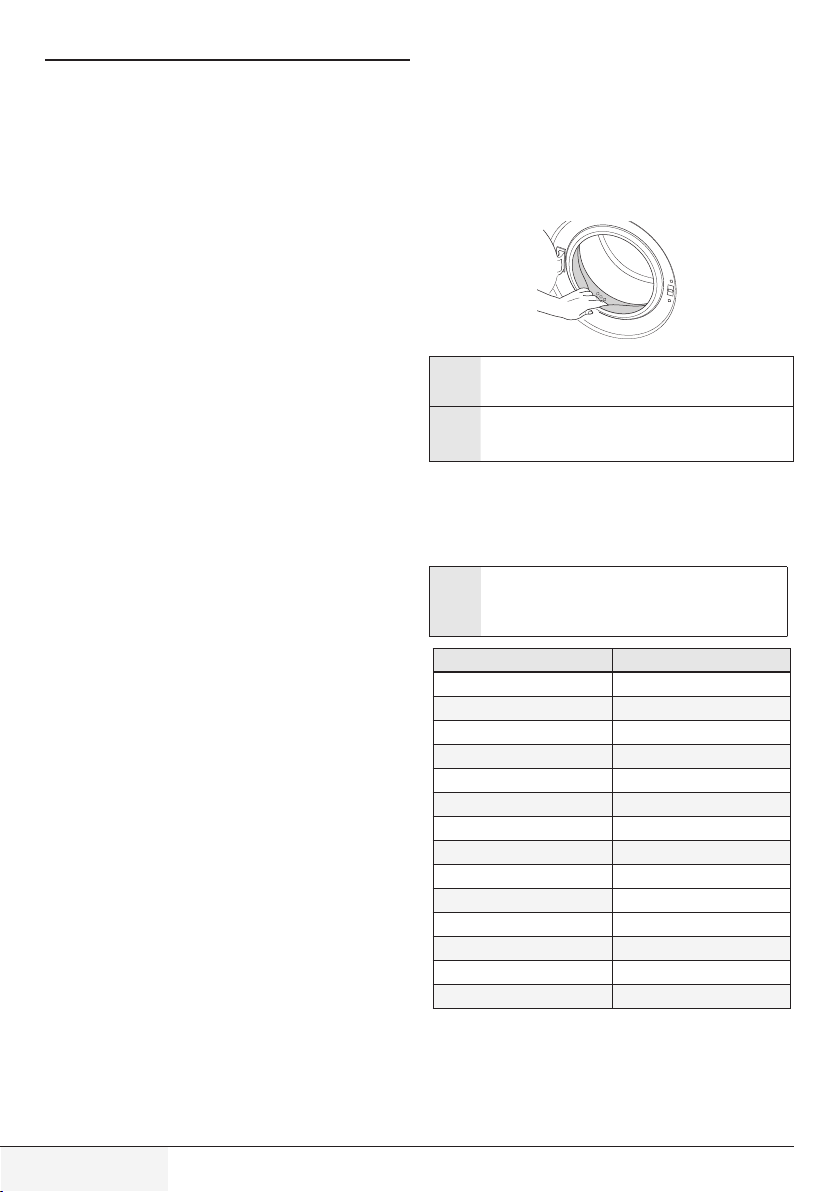
• Neveropentheloadingdoororremovethefilterwhile
thereisstillwaterinthedrum.Otherwise,riskofflooding
and injury from hot water will occur.
• Donotforceopenthelockedloadingdoor.Theloading
doorwillbereadytoopenjustafewminutesafterthe
washingcyclecomestoanend.Incaseofforcingthe
loadingdoortoopen,thedoorandthelockmechanism
may get damaged.
• Unplugtheproductwhennotinuse.
• Neverwashtheproductbyspreadingorpouringwater
onto it! There is the risk of electric shock!
• Nevertouchtheplugwithwethands!Neverunplugby
pullingonthecable,alwayspulloutbygrabbingtheplug.
• Usedetergents,softenersandsupplementssuitablefor
automatic washing machines only.
• Followtheinstructionsonthetextiletagsandonthe
detergent package.
• Theproductmustbeunpluggedduringinstallation,
maintenance,cleaningandrepairingprocedures.
• Alwayshavetheinstallationandrepairingprocedures
carriedoutbytheAuthorized Service Agent.
Manufacturershallnotbeheldliablefordamagesthat
mayarisefromprocedurescarriedoutbyunauthorized
persons.
• Ifthepowercableisdamaged,itmustbereplacedbythe
manufacturer,aftersalesserviceorasimilarlyqualified
person(preferablyanelectrician)orsomeonedesignated
bytheimporterinordertoavoidpossiblerisks.
1.2 Intended use
• Thisproducthasbeendesignedfordomesticuse.Itisnot
suitableforcommercialuseanditmustnotbeusedout
of its intended use.
• Theproductmustonlybeusedforwashingandrinsingof
laundry that are marked accordingly.
• Themanufacturerwaivesanyresponsibilityarisenfrom
incorrect usage or transportation.
1.3 Children's safety
• Packagingmaterialsaredangeroustochildren.Keep
packaging materials in a safe place away from reach of
the children.
• Electricalproductsaredangerousforthechildren.Keep
children away from the product when it is in use. Do not
letthemtotamperwiththeproduct.Usechildlockto
prevent children from intervening with the product.
• Donotforgettoclosetheloadingdoorwhenleavingthe
room where the product is located.
• Storealldetergentsandadditivesinasafeplaceaway
fromthereachofthechildrenbyclosingthecoverofthe
detergent container or sealing the detergent package.
1.4 Package information
• Packagingmaterialsoftheproductaremanufactured
fromrecyclablematerialsinaccordancewithour
National Environment Regulations. Do not dispose of the
packaging materials together with the domestic or other
wastes. Take them to the packaging material collection
pointsdesignatedbythelocalauthorities.
1.5 Disposing of the waste product
• Thisproducthasbeenmanufacturedwithhighquality
partsandmaterialswhichcanbereusedandaresuitable
forrecycling.Therefore,donotdisposetheproductwith
normal domestic waste at the end of its service life. Take
it to a collection point for the recycling of electrical and
electronicequipment.Pleaseconsultyourlocalauthorities
to learn the nearest collection point. Help protect the
environmentandnaturalresourcesbyrecyclingused
products.Forchildren'ssafety,cutthepowercableand
breakthelockingmechanismoftheloadingdoorsothat
itwillbenon-functionalbeforedisposingoftheproduct.
1.6 Compliance with WEEE Directive
This appliance’s packaging material is
recyclable.Helprecycleitandprotectthe
environmentbydroppingitoffinthemunicipal
receptacles provided for this purpose. Your
appliance also contains a great amount of
recyclablematerial.Itismarkedwiththislabel
to indicate the used appliances that should not
bemixedwithotherwaste.Thisway,theappliancerecycling
organisedbyyourmanufacturerwillbedoneunderthebest
possibleconditions,incompliancewithEuropeanDirective
2002/96/EConWasteElectricalandElectronicEquipment.
Contactyourtownhalloryourretailerfortheusedappliance
collectionpointsclosesttoyourhome.Wethankyoudoing
your part to protect the environment.

3/ 20 EN
Washing Machine / User’s Manual
2 Installation
RefertothenearestAuthorisedServiceAgentforinstallation
oftheproduct.Tomaketheproductreadyforuse,review
the information in the user manual and make sure that the
electricity,tapwatersupplyandwaterdrainagesystemsare
appropriatebeforecallingtheAuthorizedServiceAgent.If
theyarenot,callaqualifiedtechnicianandplumbertohave
any necessary arrangements carried out.
CPreparationofthelocationandelectrical,tapwaterand
waste water installations at the place of installation is
undercustomer'sresponsibility.
Bwarning: Installationandelectricalconnectionsof
theproductmustbecarriedoutbytheAuthorized
ServiceAgent.Manufacturershallnotbeheldliablefor
damagesthatmayarisefromprocedurescarriedoutby
unauthorizedpersons.
Awarning: Priortoinstallation,visuallycheckiftheproduct
hasanydefectsonit.Ifso,donothaveitinstalled.
Damaged products cause risks for your safety.
CMake sure that the water inlet and discharge hoses
aswellasthepowercablearenotfolded,pinchedor
crushed while pushing the product into its place after
installation or cleaning procedures.
2.1 Appropriate installation location
• Placethemachineonarigidfloor.Donotplaceitona
long pile rug or similar surfaces.
• Totalweightofthewashingmachineandthedryer-with
full load- when they are placed on top of each other
reachestoapprox.180kilograms.Placetheproduct
on a solid and flat floor that has sufficient load carrying
capacity!
• Donotplacetheproductonthepowercable.
• Donotinstalltheproductatplaceswheretemperature
mayfallbelow0ºC.
• Placetheproductatleast1cmawayfromtheedgesof
other furniture.
2.2 Removing packaging reinforcement
Tiltthemachinebackwardstoremovethepackaging
reinforcement.Removethepackagingreinforcementby
pullingtheribbon.
2.3 Removing the transportation locks
Awarning: Donotremovethetransportationlocksbefore
taking out the packaging reinforcement.
Awarning: Removethetransportationsafetyboltsbefore
operatingthewashingmachine!Otherwise,theproduct
willbedamaged.
1.Loosenalltheboltswithasuitablespanneruntilthey
rotate freely (C).
2.Removetransportationsafetyboltsbyturningthem
gently.
3.AttachtheplasticcoverssuppliedintheUserManualbag
into the holes on the rear panel. (P)
CKeepthetransportationsafetyboltsinasafeplaceto
reusewhenthewashingmachineneedstobemoved
again in the future.
CNever move the product without the transportation safety
boltsproperlyfixedinplace!
2.4 Connecting water supply
CThewatersupplypressurerequiredtoruntheproductis
between1to10bars(0.1–1MPa).Itisnecessaryto
have10–80litersofwaterflowingfromthefullyopen
tap in one minute to have your machine run smoothly.
Attachapressurereducingvalveifwaterpressureis
higher.
CIfyouaregoingtousethedoublewater-inletproduct
as a single (cold)water-inletunit,youmustinstallthe
suppliedstoppertothehotwatervalvebeforeoperating
theproduct.(Appliesfortheproductssuppliedwitha
blindstoppergroup.)
Awarning: Modelswithasinglewaterinletshouldnotbe
connectedtothehotwatertap.Insuchacasethelaundry
will get damaged or the product will switch to protection
mode and will not operate.
Awarning: Do not use old or used water inlet hoses on the
newproduct.Itmaycausestainsonyourlaundry.
1.Connectthespecialhosessuppliedwiththeproductto
the water inlets on the product. Red hose (left) (max. 90
ºC)isforhotwaterinlet,bluehose(right)(max.25ºC)is
for cold water inlet.
Awarning: Ensure that the cold and hot water connections
are made correctly when installing the product.
Otherwise,yourlaundrywillcomeouthotattheendof
the washing process and wear out.
2.Tightenallhosenutsbyhand.Neveruseatoolwhen
tightening the nuts.
3. Open the taps completely after making the hose
connection to check for water leaks at the connection

4/ 20 EN
Washing Machine / User’s Manual
points.Ifanyleaksoccur,turnoffthetapandremovethe
nut. Retighten the nut carefully after checking the seal. To
preventwaterleakagesanddamagescausedbythem,
keep the taps closed when the machine is not in use.
2.5 Connecting to the drain
• Theendofthedrainhosemustbedirectlyconnectedto
thewastewaterdrainortothewashbasin.
Awarning: Yourhousewillbefloodedifthehosecomes
outofitshousingduringwaterdischarge.Moreover,there
is risk of scalding due to high washing temperatures!
To prevent such situations and to ensure smooth water
intakeanddischargeofthemachine,fixtheendofthe
discharge hose tightly so that it cannot come out.
• Thehoseshouldbeattachedtoaheightofatleast40
cm,and100cmatmost.
• Incasethehoseiselevatedafterlayingitonthefloor
levelorclosetotheground(lessthan40cmabovethe
ground),waterdischargebecomesmoredifficultandthe
laundrymaycomeoutexcessivelywet.Therefore,follow
theheightsdescribedinthefigure.
• Topreventflowingofdirtywaterbackintothemachine
andtoallowforeasydischarge,donotimmersethehose
end into the dirty water or do not drive it in the drain more
than15cm.Ifitistoolong,cutitshort.
• Theendofthehoseshouldnotbebent,itshouldnotbe
steppedonandthehosemustnotbepinchedbetween
the drain and the machine.
• Ifthelengthofthehoseistooshort,useitbyadding
an original extension hose. Length of the hose may
notbelongerthan3.2m.Toavoidwaterleakfailures,
theconnectionbetweentheextensionhoseandthe
drainhoseoftheproductmustbefittedwellwithan
appropriate clamp as not to come off and leak.
2.6 Adjusting the feet
Awarning: Inordertoensurethattheproductoperates
moresilentlyandvibration-free,itmuststandleveland
balancedonitsfeet.Balancethemachinebyadjusting
thefeet.Otherwise,theproductmaymovefromitsplace
andcausecrushingandvibrationproblems.
1.Loosenthelocknutsonthefeetbyhand.
2.Adjustthefeetuntiltheproductstandsleveland
balanced.
3.Tightenalllocknutsagainbyhand.
Awarning: Do not use any tools to loosen the lock nuts.
Otherwise,theywillgetdamaged.
2.7 Electrical connection
Connecttheproducttoagroundedoutletprotectedbya16
Afuse.Ourcompanyshallnotbeliableforanydamages
that will arise when the product is used without grounding in
accordance with the local regulations.
• Connectionmustcomplywithnationalregulations.
• Powercableplugmustbewithineasyreachafter
installation.
• Ifthecurrentvalueofthefuseorbreakerinthehouseis
lessthan16Amps,haveaqualifiedelectricianinstalla
16Ampfuse.
• Thevoltagespecifiedinthe"Technicalspecifications"
sectionmustbeequaltoyourmainsvoltage.
• Donotmakeconnectionsviaextensioncablesormulti-
plugs.
Bwarning: Damagedpowercablesmustbereplacedby
theAuthorizedServiceAgents.
Transportation of the product
1.Unplugtheproductbeforetransportingit.
2. Remove water drain and water supply connections.
3. Drain all water that has remained in the product.
4.Installtransportationsafetyboltsinthereverseorderof
removal procedure;
CNever move the product without the transportation safety
boltsproperlyfixedinplace!
Awarning:Packagingmaterialsaredangeroustochildren.
Keeppackagingmaterialsinasafeplaceawayfrom
reach of the children.

5/ 20 EN
Washing Machine / User’s Manual
3 Preparation
3.1 Sorting the laundry
• Sortlaundryaccordingtotypeoffabric,colour,and
degreeofsoilingandallowablewatertemperature.
• Alwaysobeytheinstructionsgivenonthegarmenttags.
3.2 Preparing laundry for washing
• Laundryitemswithmetalattachmentssuchas,
underwiredbras,beltbucklesormetalbuttonswill
damage the machine. Remove the metal pieces or wash
theclothesbyputtingtheminalaundrybagorpillow
case.
•Takeoutallsubstancesinthepocketssuchascoins,
pensandpaperclips,andturnpocketsinsideoutand
brush.Suchobjectsmaydamagetheproductorcause
noiseproblem.
• Putsmallsizeclothessuchasinfant'ssocksandnylon
stockingsinalaundrybagorpillowcase.
• Placecurtainsinwithoutcompressingthem.Remove
curtain attachment items.
• Fastenzippers,sewloosebuttonsandmendripsand
tears.
• Wash“machinewashable”or“handwashable”labeled
products only with an appropriate programme.
• Donotwashcoloursandwhitestogether.New,dark
colouredcottonsreleasealotofdye.Washthem
separately.
• Toughstainsmustbetreatedproperlybeforewashing.If
unsure,checkwithadrycleaner.
• Useonlydyes/colourchangersandlimescaleremovers
suitableformachinewash.Alwaysfollowtheinstructions
on the package.
• Washtrousersanddelicatelaundryturnedinsideout.
• KeeplaundryitemsmadeofAngorawoolinthefreezer
forafewhoursbeforewashing.Thiswillreducepilling.
• Laundrythataresubjectedtomaterialssuchasflour,
limedust,milkpowder,etc.intenselymustbeshakenoff
beforeplacingintothemachine.Suchdustsandpowders
onthelaundrymaybuildupontheinnerpartsofthe
machine in time and can cause damage.
3.3 Things to be done for energy saving
Following information will help you use the product in an
ecological and energy-efficient manner.
• Operatetheproductinthehighestcapacityallowedby
theprogrammeyouhaveselected,butdonotoverload;
see,"Programmeandconsumptiontable".
• Alwaysfollowtheinstructionsonthedetergent
packaging.
• Washslightlysoiledlaundryatlowtemperatures.
• Usefasterprogrammesforsmallquantitiesoflightly
soiled laundry.
• Donotuseprewashandhightemperaturesforlaundry
that is not heavily soiled or stained.
• Ifyouplantodryyourlaundryinadryer,selectthe
highest spin speed recommended during washing
process.
• Donotusedetergentinexcessoftheamount
recommended on the detergent package.
3.4 Initial use
Beforestartingtousetheproduct,makesurethatall
preparations are made in accordance with the instructions in
sections“Importantsafetyinstructions”and“Installation”.
Topreparetheproductforwashinglaundry,performfirst
operationinDrumCleaningprogramme.Ifyourproduct
isnotequippedwithDrumCleaningprogramme,perform
theInitialUseprocedureinaccordancewiththemethods
describedunder“5.2Cleaningtheloadingdoorandthe
drum”sectionoftheusermanual.
CUseananti-limescalesuitableforthewashingmachines.
CSome water might have remained in the product due to
thequalitycontrolprocessesintheproduction.Itisnot
harmful for the product.
3.5 Correct load capacity
Themaximumloadcapacitydependsonthetypeoflaundry,
the degree of soiling and the washing programme desired.
The machine automatically adjusts the amount of water
according to the weight of the loaded laundry.
Awarning: Followtheinformationinthe“Programme
andconsumptiontable”.Whenoverloaded,machine's
washingperformancewilldrop.Moreover,noiseand
vibrationproblemsmayoccur.
Laundry type Weight (g)
Bathrobe 1200
Napkin 100
Duvet cover 700
Bed Sheet 500
Pillowcase 200
Tablecloth 250
Towel 200
Hand towel 100
Evening gown 200
Underclothing 100
Men’s overalls 600
Men’s shirt 200
Men’s pajamas 500
Blouses 100
3.6 Loading the laundry
1. Open the loading door.
2.Placelaundryitemslooselyintothemachine.
3.Pushtheloadingdoortocloseuntilyouhearalocking
sound. Ensure that no items are caught in the door.

6/ 20 EN
Washing Machine / User’s Manual
CThe loading door is locked while a programme is running.
Thedoorcanonlybeopenedawhileaftertheprogramme
comes to an end.
Awarning: Incaseofmisplacingthelaundry,noiseand
vibrationproblemsmayoccurinthemachine.
3.7 Using detergent and softener
CWhenusingdetergent,softener,starch,fabricdye,bleach
or limescale remover read the manufacturer's instructions
on the package carefully and follow the suggested dosage
values.Usemeasuringcupifavailable.
Detergent Drawer
The detergent drawer is composed of three compartments:
–(1)forprewash
–(2)formainwash
–(3)forsoftener
–(*)inaddition,thereissiphonpieceinthesoftener
compartment.
1
23
Detergent, softener and other cleaning agents
• Adddetergentandsoftenerbeforestartingthewashing
programme.
• Neverleavethedetergentdraweropenwhilethewashing
programme is running!
• Whenusingaprogrammewithoutprewash,donot
put any detergent into the prewash compartment
(compartmentnr."1").
• Inaprogrammewithprewash,donotputliquiddetergent
intotheprewashcompartment(compartmentnr."1").
• Donotselectaprogrammewithprewashifyouareusing
adetergentbagordispensingball.Placethedetergent
bagorthedispensingballdirectlyamongthelaundryin
the machine.
• Ifyouareusingliquiddetergent,donotforgettoplace
theliquiddetergentcupintothemainwashcompartment
(compartmentnr."2").
Choosing the detergent type
Thetypeofdetergenttobeuseddependsonthetypeand
colourofthefabric.
• Usedifferentdetergentsforcolouredandwhitelaundry.
• Washyourdelicateclothesonlywithspecialdetergents
(liquiddetergent,woolshampoo,etc.)usedsolelyfor
delicate clothes.
• Whenwashingdarkcolouredclothesandquilts,itis
recommendedtouseliquiddetergent.
• Washwoolenswithspecialdetergentmadespecifically
for woolens.
Awarning: Useonlydetergentsmanufacturedspecifically
for washing machines.
Awarning: Do not use soap powder.
Adjusting detergent amount
Theamountofwashingdetergenttobeuseddepends
ontheamountoflaundry,thedegreeofsoilingandwater
hardness.
• Donotuseamountsexceedingthedosagequantities
recommended on the detergent package to avoid
problemsofexcessivefoam,poorrinsing,financial
savingsandfinally,environmentalprotection.
• Uselesserdetergentforsmallamountsorlightlysoiled
clothes.
Using softeners
Pourthesoftenerintothesoftenercompartmentofthe
detergent drawer.
•Donotexceedthe(>max<)levelmarkinginthesoftener
compartment.
•Ifthesoftenerhaslostitsfluidity,diluteitwithwater
beforeputtingitinthedetergentdrawer.
Using liquid detergents
If the product contains a liquid detergent cup:
• Makesurethatyouhaveplacedtheliquiddetergentcup
incompartmentnr."2".
•Iftheliquiddetergenthaslostitsfluidity,diluteitwith
waterbeforeputtinginthedetergentcup.
If the product does not contain a liquid detergent
cup:
• Donotuseliquiddetergentfortheprewashina
programme with prewash.
• Liquiddetergentstainsyourclotheswhenusedwith
DelayedStartfunction.IfyouaregoingtousetheDelayed
Startfunction,donotuseliquiddetergent.
Using gel and tablet detergent
Applythefollowinginstructionswhenusingtablet,geland
similar detergents.
• Ifthegeldetergentthicknessisfluidalandyourmachine
doesnotcontainaspecialliquiddetergentcup,putthe
gel detergent into the main wash detergent compartment
duringfirstwaterintake.Ifyourmachinecontainsaliquid
detergentcup,fillthedetergentintothiscupbefore
starting the programme.
• Ifthegeldetergentthicknessisnotfluidalorintheshape
ofcapsuleliquidtablet,putitdirectlyintothedrumbefore
washing.
• Puttabletdetergentsintothemainwashcompartment
(compartmentnr."2")ordirectlyintothedrumbefore
washing.
CTabletdetergentsmayleaveresiduesinthedetergent
compartment.Ifyouencountersuchacase,placethe
tabletdetergentbetweenthelaundry,closetothelower
part of the drum in future washings.
CUsethetabletorgeldetergentwithoutselectingthe
prewash function.

7/ 20 EN
Washing Machine / User’s Manual
Using starch
• Addliquidstarch,powderstarchorthefabricdyeintothe
softener compartment.
• Donotusesoftenerandstarchtogetherinawashing
cycle.
• Wipetheinsideofthemachinewithadampandclean
cloth after using starch.
Using bleaches
• Selectaprogrammewithprewashandaddthebleaching
agentatthebeginningoftheprewash.Donotput
detergentintheprewashcompartment.Asanalternative
application,selectaprogrammewithextrarinseandadd
thebleachingagentwhilethemachineistakingwater
from the detergent compartment during first rinsing step.
• Donotusebleachingagentanddetergentbymixing
them.
• Usejustalittleamount(approx.50ml)ofbleachingagent
and rinse the clothes very well as it causes skin irritation.
Donotpourthebleachingagentontotheclothesanddo
not use it for coloured clothes.
• Whenusingoxygenbasedbleaches,selectaprogramme
that washes at a lower temperature.
• Oxygenbasedbleachescanbeusedtogetherwith
detergents;however,ifitsthicknessisnotthesame
withthedetergent,putthedetergentfirstintothe
compartmentnr."2"inthedetergentdrawerandwait
until the detergent flows while the machine is taking
inwater.Addthebleachingagentfromthesame
compartment while the machine is still taking in water.
Using limescale remover
•Whenrequired,uselimescaleremoversmanufactured
specifically for washing machines only.
3.8 Tips for efficient washing
Clothes
Light colours and whites Colours Dark colours Delicates/
Woolens/Silks
(Recommended temperature
rangebasedonsoilinglevel:
40-90ºC)
(Recommended temperature
rangebasedonsoilinglevel:
cold-40ºC)
(Recommended
temperature range
basedonsoilinglevel:
cold-40ºC)
(Recommended
temperature range
basedonsoilinglevel:
cold-30ºC)
Soiling Level
Heavily Soiled
(difficult stains such
asgrass,coffee,
fruitsandblood.)
Itmaybenecessarytopre-
treat the stains or perform
prewash.Powderandliquid
detergents recommended
forwhitescanbeusedat
dosages recommended for
heavilysoiledclothes.Itis
recommended to use powder
detergents to clean clay and
soil stains and the stains that
aresensitivetobleaches.
Powderandliquid
detergents recommended
forcolourscanbeusedat
dosages recommended for
heavilysoiledclothes.Itis
recommended to use powder
detergents to clean clay and
soil stains and the stains that
aresensitivetobleaches.Use
detergentswithoutbleach.
Liquiddetergents
suitableforcolours
and dark colours can
beusedatdosages
recommended for
heavily soiled clothes.
Preferliquid
detergents produced
for delicate clothes.
Woolenandsilk
clothesmustbe
washed with special
woolen detergents.
Normally Soiled
(Forexample,stains
causedbybodyon
collars and cuffs)
Powderandliquiddetergents
recommended for whites
canbeusedatdosages
recommended for normally
soiled clothes.
Powderandliquiddetergents
recommended for colours
canbeusedatdosages
recommended for normally
soiledclothes.Usedetergents
withoutbleach.
Liquiddetergents
suitableforcolours
and dark colours can
beusedatdosages
recommended for
normally soiled clothes.
Preferliquid
detergents produced
for delicate clothes.
Woolenandsilk
clothesmustbe
washed with special
woolen detergents.
Lightly Soiled
(Novisiblestains
exist.)
Powderandliquiddetergents
recommended for whites
canbeusedatdosages
recommended for lightly soiled
clothes.
Powderandliquiddetergents
recommended for colours
canbeusedatdosages
recommended for lightly
soiledclothes.Usedetergents
withoutbleach.
Liquiddetergents
suitableforcolours
and dark colours can
beusedatdosages
recommended for lightly
soiled clothes.
Preferliquid
detergents produced
for delicate clothes.
Woolenandsilk
clothesmustbe
washed with special
woolen detergents.

8 / 20 EN Washing Machine / User’s Manual
4 Operating the product
4.1 Control panel
1 - Programme Selection knob (Uppermost position
On/Off)
2 - Display
8 - Temperature Adjustment button
4 - Programme Follow-up indicator
6 - Auxiliary Function buttons
7 - Spin Speed Adjustment button
3 - Delayed Start button (in some models)
5 - Start / Pause button
1
8 7
2 3
4
5
6

9 / 20 EN Washing Machine / User’s Manual
4.2 Preparing the machine
Make sure that the hoses are connected tightly. Plug in your
machine.Turn the tap on completely. Place the laundry in the
machine. Add detergent and fabric softener.
4.3 Programme selection
Select the programme suitable for the type, quantity
and soiling degree of the laundry in accordance with the
"Programme and consumption table" and the temperature
table below.
90˚C Heavily soiled white cottons and linens. (coffee table
covers, tableclothes, towels, bed sheets, etc.)
60˚C
Normally soiled, coloured, fade proof linens, cottons
or synthetic clothes (shirt, nightgown, pajamas, etc.)
and lightly soiled white linens (underwear, etc.)
40˚C-
30˚C- Cold
Blended laundry including delicate textile (veil
curtains, etc.), synthetics and woolens.
Select the desired programme with the Programme
Selection button.
Programmes are limited with the highest spin speed
appropriate for that particular type of fabric.
When selecting a programme, always consider the
type
of fabric, colour, degree of soiling and permissible
water
temperature.
Always select the lowest required temperature. Higher
temperature means higher power consumption.
For further programme details, see "Programme and
consumption table"
4.4 Main programmes
Depending on the type of fabric, use the following main
programmes.
• Cotton
Use this programme for your cotton laundry (such as
bed
sheets, duvet and pillowcase sets, towels, bathrobes,
underwear, etc.). Your laundry will be washed with vigorous
washing action for a longer washing cycle.
• Synthetics
Use this programme to wash your synthetic clothes (shirts,
blouses, synthetic/cotton blends, etc.). It washes with
a
gentle action and has a shorter washing cycle compared to
the Cottons programme.
For curtains and tulle, use the Synthetic 40˚C programme
with prewash and anti-creasing functions selected. As
their
meshed texture causes excessive foaming, wash the
veils/
tulle by putting little amount of detergent into the main
wash compartment. Do not put detergent in the prewash
compartment.
• Woollen
Use this programme to wash your woolen clothes. Select
the appropriate temperature complying with the tags of your
clothes. Use appropriate detergents for woolens.
4.5 Additional programmes
For special cases, additional programmes are available in
the machine.
Additional programmes may differ according to the
model of the machine.
• Cotton Eco
You may wash your normally soiled durable cotton and
linen laundry in this programme with the highest energy
and water saving compared to all other wash programmes
suitable for cottons. Actual water temperature may differ
from the declared cycle temperature. Programme duration
may automatically be shortened during later stages of the
programme if you wash less amount (e.g. ½ capacity or
less) of laundry. In this case energy and water consumption
will be further decreased giving you the opportunity for a
more economical wash. This feature is available for certain
models having remaining time display.
• Delicate
Use this programme to wash your delicate clothes. It washes
with a gentle action without any interim spin compared to
the Synthetics programme.
• Hand Wash 20°C
Use this programme to wash your woolen/delicate clothes
that bear “not machine- washable” tags and for which hand
wash is recommended. It washes laundry with a very gentle
washing action to not to damage clothes.
• Daily Xpress
Use this programme to quickly wash your little amount of
lightly soiled cotton clothes.
• Xpress Super Short
Use this programme to wash your little amount of lightly
soiled cotton clothes in a short time.
• Dark Care
Use this programme to wash your dark coloured laundry, or
the coloured laundry that you do not want them get faded.
Washing is performed with less mechanical movements at
low temperature. It is recommended to use liquid detergent
or wool shampoo for dark coloured laundry.
• Mix 40
Use this programme to wash your cotton and synthetic
clothes together without sorting them.
• Shirts
Use this programme to wash the shirts made of cotton,
synthetic and synthetic blended fabrics together.
• Babyprotect+
Babyprotect+ 60°C programme is tested and approved
by “The British Allergy Foundation” (Allergy UK) in
United Kingdom.
Use this programme for your laundry for which you require
an anti-allergic and hygienic washing at high temperature
with intensive and long washing cycles.

10 / 20 EN
Washing Machine / User’s Manual
4.6 Special programmes
Forspecificapplications,selectanyofthefollowing
programmes.
• Rinse
Usethisprogrammewhenyouwanttorinseorstarch
separately.
• Spin+Drain
Usethisprogrammetoapplyanadditionalspincyclefor
your laundry or to drain the water in the machine.
Beforeselectingthisprogramme,selectthedesiredspin
speedandpressStart/Pausebutton.First,themachinewill
drainthewaterinsideofit.Then,itwillspinthelaundrywith
the set spin speed and drain the water coming out of them.
Ifyouwishtodrainonlythewaterwithoutspinningyour
laundry,selectthePump+Spinprogrammeandthenselect
theNoSpinfunctionwiththehelpofSpinSpeedAdjustment
button.PressStart/Pausebutton.
CUsealowerspinspeedfordelicatelaundries.
4.7 Temperature selection
Wheneveranewprogrammeisselected,therecommended
temperature for the selected programme appears on the
temperature indicator.
Todecreasethetemperature,presstheTemperature
Adjustmentbutton.Temperaturewilldecreasegradually.
CIftheprogrammehasnotreachedtheheatingstep,
you can change the temperature without switching the
machinetoPausemode.
4.8 Spin speed selection
Wheneveranewprogrammeisselected,therecommended
spin speed of the selected programme is displayed on the
spin speed indicator.
Todecreasethespinspeed,presstheSpinSpeed
Adjustmentbutton.Spinspeeddecreasesgradually.Then,
dependingonthemodeloftheproduct,"RinseHold"and
"NoSpin"optionsappearonthedisplay.See"Auxiliary
functionselection"sectionforexplanationsoftheseoptions.
CIftheprogrammehasnotreachedthespinningstep,you
can change the speed without switching the machine to
Pausemode.

11 / 20 EN Washing Machine / User’s Manual
4.9 Programme and consumption table
•Selectable
* Automatically selected, no canceling.
** Energy Label programme (EN 60456 Ed.3)
** “Cotton Economic 40°C and Cotton Economic 60°C are the standard programmes.” These programmes are referred to as ‘standard 40°C
cotton programme’ and ‘standard 60°C cotton programme’
*** If maximum spin speed of the machine is lower then this value, you can only select up to the maximum spin speed.
The auxiliary functions in the table may vary according to the model of your machine.
Water and power consumption may vary subject to the changes in water pressure, water hardness and temperature, ambient
temperature, type and amount of laundry, selection of auxiliary functions and spin speed, and changes in electric voltage.
You can see the washing time of the programme you have selected on the display of the machine. It is normal that small
differences may occur between the time shown on the display and the real washing time.
Max. Load(kg)
Prodramme Duration(~min.)
Water Consumption(I)
Energy Consumption(kWh)
Max. Speed***
Prewash
Quick Wash
Rinse Plus
Anti-Creasing
Selectable
temperatu
re range
℃
Cotton 90 8 155 80 2.30 1600 ••••Cold- 90
Cotton 60 8 126 80 1.65 1600 ••••Cold- 90
Cotton 40 8 106 80 0.82 1600 ••••Cold - 90
Cotton Eco 60** 8 194 53 1.07 1600 40-60
Cotton Eco 60** 4 173 48 0.70 1600 40-60
Cotton Eco 40** 4 173 48 0.68 1600 40-60
Xpress Super Short 30 2 14 50 0.11 1400 •Cold - 30
Daily Xpress 90 8 88 57 2.10 1400 •Cold- 90
Daily Xpress 60 8 58 72 1.10 1400 •Cold - 90
Daily Xpress 30 8 28 70 0.26 1400 •Cold - 90
shirts 60 3.5 104 60 1.00 600 •••*Cold - 60
Mix40 40 3.5 115 55 0.60 800 ••••Cold- 40
Hand Wash 20°C 20 1 43 34 0.20 600 20
Woollen 40 1.5 60 47 0.34 600 •Cold - 40
BabyProtect+ 90 8 169 100 2.50 1600 •*30-90
Delicates 30 2 59 43 0.23 600 • • Cold - 40
Sports 40 4 101 67 0.58 800 ••••Cold- 40
Synthetics 60 3 116 55 1.00 800 ••••Cold - 60
Synthetics 40 3 106 55 0.55 800 ••••Cold- 60
Darkwash 40 3.5 105 66 0.55 800 *Cold - 40
Program
Auxiliary functions
EN

12 / 20 EN Washing Machine / User’s Manual
4.10 Auxiliary function selection
Use the following auxiliary functions according to your
daily needs. Select the desired auxiliary functions before
starting the programme. Furthermore, you may also
select
or cancel auxiliary functions that are suitable to the running
programme without pressing the Start / Pause button when
the machine is operating. For this, the machine must be in
a step before the auxiliary function you are going to
select
or cancel.
If the auxiliary function cannot be selected or canceled, light
of the relevant auxiliary function will blink 3 times to
warn
the user.
Some functions cannot be selected together. If
a
second
auxiliary function conflicting with the first one is selected
before starting the machine, the function selected
first will be canceled and the second auxiliary function
selection will remain active. For example, if you
want to
select Quick Wash after you have selected the
Prewash,
Prewash will be canceled and Quick Wash will
remain
active.
An auxiliary function that is not compatible with
the
programme cannot be selected. (See “Programme and
consumption table”)
Auxiliary Function buttons may vary according to
the
model of the machine.
• Pre-wash
A Prewash is only worthwhile for heavily soiled laundry. Not
using the Prewash will save energy, water, detergent and
time.
Prewash without detergent is recommended for tulle
and curtains.
• Quick Wash
This function can be used in Cottons and Synthetics
programmes. It decreases the washing times and also the
number of rinsing steps for lightly soiled laundry.
When you select this function, load your machine with
half of the maximum laundry specified in the programme
table.
• Extra Rinse
This function enables the machine to make another rinsing
in addition to the one already made after the main wash.
Thus, the risk for sensitive skins (babies, allergic skins, etc.)
to be effected by the minimal detergent remnants on the
laundry can be reduced.
• Pet hair removal
• Rinse Hold
If you are not going to unload your clothes immediately after
the programme completes, you may use rinse hold function
to keep your laundry in the final rinsing water in order to
prevent them from getting wrinkled when there is no water
in the machine. Press Start / Pause button after this process
if you want to drain the water without spinning your laundry.
Programme will resume and complete after draining the water.
If you want to spin the laundry held in water, adjust the Spin
Speed and press Start / Pause button.
The programme resumes. Water is drained, laundry is spun
and the programme is completed.
Delayed Start
Do not use liquid detergents when you set Delayed Start!
There is the risk of staining of the clothes.
Additional laundry may be loaded during the delayed
start period.
Changing the Delayed Start period
Press Delayed Start button. Every time the button is pressed,
the period will change in 3-hour increments and the light of
the selected delayed start time will turn on.
Canceling the Delayed Start function
If you want to cancel the delayed start countdown and start
the programme immediately:
Set the Delayed Start period to zero (all delayed start period
lights will turn off) or turn the Programme Selection knob
to any programme. Thus, Delayed Start function will be
canceled. The End/Cancel light flashes continuously. Then,
select the programme you want to run again. Press Start /
Pause button to start the programme.
4.11 Starting the programme
Press Start / Pause button to start the programme.
Programme follow-up light showing the startup of the
programme will turn on.
If no programme is started or no key is pressed within
1 minute during programme selection process, the
machine will switch to Pause mode and the illumination
level of the temperature, speed and loading door
indicator lights will decrease. Other indicator lights and
indicators will turn off. Once the Programme Selection
knob is rotated or any button is pressed, indicator lights
and indicators will turn on again.
4.12 Child Lock
Use child lock function to prevent children from tampering
with the machine. Thus you can avoid any changes in a
running programme.
This function helps to remove pet hair that remain on your garments
more effectively.When you select this function, Prewash and Extra
Rinse steps are added to the normal programme. Thus, washing is
performed with more water (30%) and the pet hair is removed more
effectively.
Never wash your pets in the washing machine.
With the Delayed Start function the startup of the programme
may be delayed up to 19 hours. Delayed start time can be
increased by increments of 1 hour.
Open the loading door, place the laundry and put detergent,
etc.Select the washing programme,temperature, spin speed
and, if required, the auxiliary functions. Set the desired time
by pressing the Delayed Start button. Press Start / Pause button.
The delayed start time you have set is displayed. Delayed start
countdown starts. “_”symbol next to the delayed start time
moves up and down on the display.
At the end of the countdown, duration of the selected
programme will be displayed. “_” symbol will disappear and
the selected programme will start.

13 / 20 EN
Washing Machine / User’s Manual
CIftheProgrammeSelectionknobisturnedwhenthe
ChildLockisactive,“Con”appearsonthedisplay.
TheChildLockdoesnotallowanychangeinthe
programmesandtheselectedtemperature,speedand
auxiliary functions.
CEven if another programme is selected with the
ProgrammeSelectionknobwhiletheChildLockis
active,previouslyselectedprogrammewillcontinue
running.
CWhentheChildLockisactiveandthemachineis
running,youcanswitchthemachinetoPausemode
withoutdeactivatingtheChildLockbyturningthe
ProgrammeSelectionknobtoOn/Offposition.When
youturntheProgrammeSelectionknobafterwards,the
programme will resu
To activate the Child Lock:
Pressandhold1stand2ndAuxiliaryFunctionbuttonsfor
3seconds.Thelightsonthe1stand2ndAuxiliaryFunction
buttonswillflashwhileyoukeepthebuttonspressedfor3
seconds.
To deactivate the Child Lock:
Pressandhold1stand2ndauxiliaryfunctionbuttonsfor3
seconds while any programme is running. The lights on the
1stand2ndAuxiliaryFunctionbuttonswillflashwhileyou
keepthebuttonspressedfor3seconds.
CInadditiontothemethodabove,todeactivatetheChild
Lock,switchtheProgrammeSelectionknobtoOn/
Offpositionwhennoprogrammeisrunning,andselect
another programme.
CWhenthepowerisrestoredafterapowerfailureorafter
yourmachineisunpluggedandpluggedinagain,the
ChildLockwillnotbedeactivatedwhenthemachine
resumes operating.
4.13 Progress of programme
Progressofarunningprogrammecanbefollowedfromthe
ProgrammeFollow-upindicator.Atthebeginningofevery
programmestep,therelevantindicatorlightwillturnonand
light of the completed step will turn off.
Youcanchangetheauxiliaryfunctions,speedand
temperature settings without stopping the programme flow
whiletheprogrammeisrunning.Todothis,thechange
youaregoingtomakemustbeinastepaftertherunning
programmestep.Ifthechangeisnotcompatible,relevant
lights will flash for 3 times.
CIfthemachinedoesnotpasstothespinningstep,
RinseHoldfunctionmightbeactiveortheautomatic
unbalancedloaddetectionsystemmightbeactivated
duetotheunbalanceddistributionofthelaundryinthe
machine.
4.14 Loading door lock
There is a locking system on the loading door of the
machine that prevents opening of the door in cases when
thewaterlevelisunsuitable.
Loading door light will start flashing when the machine
isswitchedtoPausemode.Machinechecksthelevelof
thewaterinside.Ifthelevelissuitable,LoadingDoorlight
illuminates steadily within 1-2 minutes and the loading door
canbeopened.
Ifthelevelisunsuitable,LoadingDoorlightturnsoffandthe
loadingdoorcannotbeopened.Ifyouareobligedtoopen
theLoadingDoorwhiletheLoadingDoorlightisoff,you
havetocancelthecurrentprogramme;see"Cancelingthe
programme".
Changing the selections after
programme has started
Switching the machine to pause mode
PresstheStart/Pausebuttontoswitchthemachineto
pause mode while a programme is running. The light of
the step which the machine is in starts flashing in the
ProgrammeFollow-upindicatortoshowthatthemachine
hasbeenswitchedtothepausemode.
Also,whentheloadingdoorisreadytobeopened,Loading
Door light will also illuminate continuously in addition to the
programme step light.
Changing the speed and temperature settings for
auxiliary functions
Dependingonthesteptheprogrammehasreached,you
maycanceloractivatetheauxiliaryfunctions;see,"Auxiliary
functionselection".
You may also change the speed and temperature settings;
see,"Spinspeedselection"and"Temperatureselection".
CIfnochangeisallowed,therelevantlightwillflashfor
3 times.
4.15 Adding or taking out laundry
PresstheStart/Pausebuttontoswitchthemachineto
pause mode. The programme follow-up light of the relevant
step during which the machine was switched into the pause
modewillflash.WaituntiltheLoadingDoorcanbeopened.
Open the Loading Door and add or take out the laundry.
ClosetheLoadingDoor.Makechangesinauxiliaryfunctions,
temperatureandspeedsettingsifnecessary.PressStart/
Pausebuttontostartthemachine.
4.16 Canceling the programme
Tocanceltheprogramme,turntheProgrammeSelection
knobtoselectanotherprogramme.Previousprogramme
willbecanceled.End/Cancellightwillflashcontinuouslyto
notifythattheprogrammehasbeencanceled.
Your machine will end the programme when you turn the
ProgrammeSelectionknob;however,itdoesnotdrainthe
waterinside.Whenyouselectandstartanewprogramme,
the newly selected programme will start depending on the
stepthepreviousprogrammewascanceledin.Forexample,
it may take in additional water or continue to wash with the
water inside.
CDepending on the step where the programme was
canceledin,youmayhavetoputdetergentandsoftener
again for the programme you have selected anew.

14 / 20 EN
Washing Machine / User’s Manual
CRepeatDrumCleaningprocessinevery2months.
CUseananti-limescalesuitableforthewashingmachines.
Aftereverywashingmakesurethatnoforeignsubstanceis
left in the drum.
Iftheholesonthebellowshowninthefigureisblocked,
open the holes using a toothpick.
CForeignmetalsubstanceswillcauseruststainsinthe
drum.Cleanthestainsonthedrumsurfacebyusing
cleaning agents for stainless steel. Never use steel wool
or wire wool.
Awarning: Neverusespongeorscrubmaterials.These
will damage the painted and plastic surfaces.
5.3 Cleaning the body and control panel
Wipethebodyofthemachinewithsoapywaterornon-
corrosivemildgeldetergentsasnecessary,anddrywitha
soft cloth.
Useonlyasoftanddampclothtocleanthecontrolpanel.
5.4 Cleaning the water intake filters
There is a filter at the end of each water intake valve at the
rear of the machine and also at the end of each water intake
hose where they are connected to the tap. These filters
preventforeignsubstancesanddirtinthewatertoenterthe
washingmachine.Filtersshouldbecleanedastheydoget
dirty.
1.Closethetaps.
2. Remove the nuts of the water intake hoses to access
thefiltersonthewaterintakevalves.Cleanthemwithan
appropriatebrush.Ifthefiltersaretoodirty,takethemout
bymeansofpliersandcleanthem.
3. Take out the filters on the flat ends of the water intake
hoses together with the gaskets and clean thoroughly
under running water.
4. Replace the gaskets and filters carefully in their places
andtightenthehosenutsbyhand.
5 Maintenance and cleaning
Servicelifeoftheproductextendsandfrequentlyfaced
problemsdecreaseifcleanedatregularintervals.
5.1 Cleaning the detergent drawer
Cleanthedetergentdraweratregularintervals(every
4-5washingcycles)asshownbelowinordertoprevent
accumulation of powder detergent in time.
1.Pressthedottedpointonthesiphoninthesoftener
compartment and pull towards you until the compartment
is removed from the machine.
CIfmorethannormalamountofwaterandsoftener
mixturestartstogatherinthesoftenercompartment,the
siphonmustbecleaned.
2.Washthedetergentdrawerandthesiphonwithplentyof
lukewarmwaterinawashbasin.Wearprotectivegloves
oruseanappropriatebrushtoavoidtouchingofthe
residues in the drawer with your skin when cleaning.
3.Insertthedrawerbackintoitsplaceaftercleaningand
make sure that it is seated well.
Ifyourdetergentdraweristheoneindicatedinthefollowing
figure:
CLift the rear part of the siphon to remove it as illustrated.
Afterperformingtheabovementionedcleaning
procedures,replacethesiphonbacktoitsseatingand
push its front section downwards to make sure that the
lockingtabengages.
5.2 Cleaning the loading door and the drum
Residuesofsoftener,detergentanddirtmayaccumulate
in your machine in time and may cause unpleasant odours
andwashingcomplaints.Toavoidthis,usetheDrum
Cleaningprogramme.Ifyourmachineisnotfeaturedwith
Drum Cleaningprogramme,useCottons-90programme
and select Additional Water or Extra Rinse auxiliary
functions as well. Run the programme without any laundry in
the machine. Beforestartingtheprogramme,putmax.100
g of powder anti-limescale into the main wash detergent
compartment(compartmentnr.2).Iftheanti-limescaleisin
tabletform,putonlyonetabletintocompartmentnr.2.Dry
theinsideofthebellowwithacleanpieceofclothafterthe
programme has come to an end.

15 / 20 EN Washing Machine / User’s Manual
5.5 Draining remaining water and
cleaning the pump filter
The filter system in your machine prevents solid items
such as buttons, coins and fabric fibers clogging the pump
impeller during discharge of washing water. Thus, the water
will be discharged without any problem and the service life
of the pump will extend.
If the machine fails to drain water, the pump filter is clogged.
Filter must be cleaned whenever it is clogged or in every 3
months. Water must be drained off first to clean the pump
filter.
In addition, prior to transporting the machine (e.g., when
moving to another house) and in case of freezing of the
water, water may have to be drained completely.
WARNİNG :Foreign substances left in the pump filter may
damage your machine or may cause noise problem.
In order to clean the dirty filter and discharge the water:
1. Unplug the machine to cut off the supply power.
WARNİNG :Temperature of the water inside the machine
may rise up to 90 ºC.To avoid burning risk, filter must be
cleaned after the water in the machine cools down.
2. Open the filter cover.
.
3. Follow the below procedures in order to drain
water.
a. In order to collect the water to flow out of the
filter, place a large vessel in front of the filter.
b. Turn and loosen the pump filter until water starts
to flow (counterclockwise). Fill the flowing water
into the container you have placed in front of
the filter. Always keep a piece of cloth handy to
absorb any spilled water.
c When the water inside the machine is finished,
take out the filter completely by turning it.
4 Clean any residues inside the filter as well as
fibers, if any, around the pump impeller region.
5. Replace the filter.
6. If the filter cap is composed of two pieces, close
the filter cap by pressing on the tab. If it is one
piece, seat the tabs in the lower part into their
places first, and then press the upper part to
close.

16 / 20 EN Washing Machine / User’s Manual
WCY 81233 MLCM
8
84
60
56.5
70
zH05/~V022
10
2000
1200
1.00
0.25
9211
•/ -
6 Technical specifications
Technical specifications may be changed without prior notice to improve the quality of the product.
Figures in this manual are schematic and may not match the product exactly.
Values stated on the product labels or in the documentation accompanying it are obtained in laboratory conditions in accordance
with the relevant standards. Depending on operational and environmental conditions of the product, these values may vary.
Models (EN)
Maximum dry laundry capacity (kg)
Height (cm)
Width (cm)
Depth (cm)
Net weight (±4 kg.)
Electrical input (V/Hz)
Total current (A)
Total power (W)
Spin speed (rpm max.)
Stand-by mode power (W)
Off-mode power (W)
Main model code
telniretaWelbuoD/telniretaWelgniS
•Available

17 / 20 EN
Washing Machine / User’s Manual
7 Troubleshooting
Programme cannot be started or selected.
•Washingmachinehasswitchedtoselfprotectionmodeduetoasupplyproblem(linevoltage,waterpressure,etc.).>>>To cancel the
programme, turn the Programme Selection knob to select another programme. Previous programme will be cancelled. (See “Canceling
the programme”)
Water in the machine.
•Somewatermighthaveremainedintheproductduetothequalitycontrolprocessesintheproduction.>>>This is not a failure; water is
not harmful to the machine.
Machine vibrates or makes noise.
•Machinemightbestandingunbalanced.>>>Adjust the feet to level the machine.
•Ahardsubstancemighthaveenteredintothepumpfilter.>>>Clean the pump filter.
•Transportationsafetyboltsarenotremoved.>>>Remove the transportation safety bolts.
•Laundryquantityinthemachinemightbetoolittle.>>>Add more laundry to the machine.
•Machinemightbeoverloadedwithlaundry.>>>Take out some of the laundry from the machine or distribute the load by hand to
balance it homogenously in the machine.
•Machinemightbeleaningonarigiditem.>>>Make sure that the machine is not leaning on anything.
Machine stopped shortly after the programme started.
•Machinemighthavestoppedtemporarilyduetolowvoltage.>>>It will resume running when the voltage restores to the normal level.
Programme time does not countdown. (On models with display)
•Timermaystopduringwaterintake.>>>Timer indicator will not countdown until the machine takes in adequate amount of water. The
machine will wait until there is sufficient amount of water to avoid poor washing results due to lack of water. Timer indicator will resume
countdown after this.
•Timermaystopduringheatingstep.>>>Timer indicator will not countdown until the machine reaches the selected temperature.
•Timermaystopduringspinningstep.>>>Automatic unbalanced load detection system might be activated due to the unbalanced
distribution of the laundry in the drum.
•Machinedoesnotswitchtospinningstepwhenthelaundryisnotevenlydistributedinthedrumtopreventanydamagetothemachineand
toitssurroundingenvironment.Laundryshouldberearrangedandre-spun.
Foam is overflowing from the detergent drawer.
•Toomuchdetergentisused.>>>Mix 1 tablespoonful softener and ½ l water and pour into the main wash compartment of the
detergent drawer.
•Putdetergentintothemachinesuitablefortheprogrammesandmaximumloadsindicatedinthe“Programmeandconsumptiontable”.
Whenyouuseadditionalchemicals(stainremovers,bleachsandetc),reducetheamountofdetergent.
Laundry remains wet at the end of the programme
•Excessivefoammighthaveoccurredandautomaticfoamabsorptionsystemmighthavebeenactivatedduetotoomuchdetergentusage.
>>>Use recommended amount of detergent.
•Machinedoesnotswitchtospinningstepwhenthelaundryisnotevenlydistributedinthedrumtopreventanydamagetothemachineand
toitssurroundingenvironment.Laundryshouldberearrangedandre-spun.
Awarning: Ifyoucannoteliminatetheproblemalthoughyoufollowtheinstructionsinthissection,consultyourdealerorthe
AuthorizedServiceAgent.Nevertrytorepairanonfunctionalproductyourself.

18 / 20 EN Washing Machine / User’s Manual
PRODUCT FICHE
Complying Commission Delegated Regulation (EU) No 1061/201
Supplier name or trademark Beko
Model name WCY 81233 MLCM
Rated capacity (kg) 8
Energy efficiency class (1) A+++
Annual Energy Consumption (kWh) (2) 192
)hWk(daollluftaemmargorpnottocC°06dradnatsehtfonoitpmusnocygrenE 1.07
0.695)hWk(daollaitraptaemmargorpnottocC°06dradnatsehtfonoitpmusnocygrenE
0.68)hWk(daollaitraptaemmargorpnottocC°04dradnatsehtfonoitpmus
nocygrenE
Power consumption in ‘off-mode’ (W) 0.250
Power consumption in ‘left-on mode’ (W) 1.000
Annual Water Consumption (l) (3) 11000
Spin-drying efficiency class (4) B
Maximum spin speed (rpm) 1200
Remaining moisture Content (%) 62
Standard cotton programme(5) Cotton Eco 60°C and 40°C
Programme time of the standard 60°C cotton programme at full load (min) 194
173
173
Programme time of the standard 60°C cotton programme at partial load (min)
Programme time of the standard 40°C cotton programme at partial load (min)
Duration of the left-on mode (min) N/A
Airborne acoustical noise emissions washing/spinning (dB) 57/74
Built-in No
(1) Scale from A+++ (Highest Efficiency) to D (Lowest Efficiency)
(2) Energy Consumption based on 220 standard washing cycles for cotton programmes at 60°C and 40°C at full and partial load, and
the consumption of the low-power modes. Actual energy consumption will depend on how the appliance is used.
(3) Water consumption based on 220 standard washing cycles for cotton programmes at 60°C and 40°C at full and partial load. Actual
water consumption will depend on how the appliance is used.
(4)Scale from A (Highest Efficiency) to G (Lowest Efficiency)
(5) “Standard 60°C cotton programme” and the “standard 40°C cotton programme” are the standard washing programmes to which
the information in the label and the fiche relates and these programmes are suitable to clean normally soiled cotton laundry andthat
they are the most efficient programmes in terms of combined energy and water consumption.

19 / 20 EN
Washing Machine / User’s Manual

20 / 20 EN
Washing Machine / User’s Manual
Table of contents
Other Beko Washer manuals

Beko
Beko WTV 7731 XW0 User manual

Beko
Beko WTV 7518 XS User manual

Beko
Beko WMB 91442 HLC User manual

Beko
Beko WMB 71343S User manual

Beko
Beko WRE7512PAR User manual

Beko
Beko WTE 7512 XW0 User manual

Beko
Beko WRE 6531 B0 User manual

Beko
Beko WMY 814831 User manual

Beko
Beko EV 5801+ User manual

Beko
Beko WMY 81233 LB3 User manual

Beko
Beko WMA10 User manual

Beko
Beko WMB 51431 User manual

Beko
Beko WJ837543W User manual

Beko
Beko WRA 9714 XW DR User manual

Beko
Beko WUE 8633 XST User manual

Beko
Beko WTE 6512 B0 User manual

Beko
Beko WMB 71642 PTLA User manual

Beko
Beko B5WT594189W2 User manual

Beko
Beko B3W5942IW User manual

Beko
Beko WUX81232WI/IT User manual