BELINEA 10 60 65 User manual

[USER MANUAL]
10 60 55
[
[

Bedienungsanleitung - 1
DEUTSCH
DEUTSCH 2 ~ 10
ENGLISH 11 ~ 18
FRANÇAIS 19 ~ 26
Belinea 10 60 55
DEUTSCH ENGLISH FRANÇAIS
Bedienungsanleitung - 3
DEUTSCH
EINLEITUNG
Dieses Handbuch wird Sie mit der Installation und der
Bedienung des Belinea Monitors vertraut machen.
Sehen Sie diese Anleitung auch dann kurz durch, wenn
Ihnen die Bedienung eines Monitors bereits vertraut
ist.
Wir haben alle Sorgfalt walten lassen, um in diesem
Handbuch korrekte und akkurate Informationen zu
geben. Für möglicherweise vorhandene Fehler kann
jedoch keine Haftung übernommen werden. Weiter-
hinübernehmenwirkeineGarantiedafür, daß die Hard-
ware den von Ihnen gewünschten Zweck erfüllt. Für
Hinweise auf vorhandene Fehler, Ihre Verbesserungs-
vorschläge und Kritik sind wir stets dankbar.
© Copyright 2001
MAXDATASysteme GmbH
45768 Marl, Deutschland
www.maxdata.com
Alle Rechte vorbehalten. Kein Teil dieses Handbuchs darf in
irgendeiner Form (Druck, Fotokopie, Mikrofilm oder andere
Verfahren) ohne vorherige schriftliche Genehmigung des Her-
stellers reproduziert oder unter Verwendung elektronischer
Systeme verarbeitet, vervielfältigt oder verbreitet werden.
Änderungen, die dem technischen Fortschritt dienen, blei-
ben vorbehalten. Belinea ist ein international eingetragenes
Warenzeichen. Andere Markennamen können eingetragene
Warenzeichen sein und müssen als solche behandelt wer-
den.
Umweltschutz ist auch unsere Aufgabe: Dieses Handbuch wurde von der ersten bis zur
letzten Seite auf einem Papier gedruckt, bei dessen Herstellung keinerlei Chlor mehr ver-
wendet wird.
INHALTSVERZEICHNIS
Verwendung von Symbolen
In diesem Handbuch wurden folgende Symbole ver-
wandt, um auf eine mögliche Personengefährdung,
Sachschäden bzw. nützliche Informationen hinzuwei-
sen:
GEFAHR! Bezeichnet eine mögliche Gefähr-
dung des Anwenders. Bei Nichtbeachtung
können Tod oder schwerste Verletzung die
Folge sein.
ACHTUNG! Weist auf mögliche Sachschäden
hin. Bei Nichtbeachtung können Geräte ernst-
haft beschädigt werden.
WICHTIG! Bezeichnet Anwendungstips und
andere besonders nützliche Informationen.
Willkommen bei Belinea ........................................... 2
Einleitung................................................................... 3
Eigenschaften im Überblick ...................................... 4
Wichtige Hinweise..................................................... 4
Auspacken................................................................. 5
Anschliessen ............................................................. 5
Einschalten................................................................ 5
Konfigurieren............................................................. 6
Grundlegende Einstellungen .................................... 6
Bildeinstellung über das OSD-Menü ........................ 6
Funktionen des OSD-Menüs ..................................... 7
Wartung und Pflege................................................... 8
Standard- und benutzerdefinierte Grafikmodi .......... 8
Problemlösungen ...................................................... 9
Stromsparfunktionen ............................................... 10
Technische Daten.................................................... 10
Stiftbelegung des Signalsteckers............................ 10

4 - Belinea 10 60 55
DEUTSCH
EIGENSCHAFTEN IM ÜBERBLICK
Dieser Monitor eignet sich zum Anschluß an IBM-kompatible Systeme mit 15poligem VGA-Anschluß. Nachfol-
gend finden Sie einen Überblick über die vielfältigen Funktionen und Leistungsmerkmale des Gerätes.
Multiscan
30 – 96 kHz,
50 – 160 Hz
Lochmaske
0,24 mm
Auflösung
1600 ×1200
Digital Front Control
OSD-Menü
MPR II, TCO 99
WICHTIGE HINWEISE
Sicherheitshinweise zum Betrieb
Das Netzkabel darf nicht beschädigt werden.
Stellen Sie keine Gegenstände auf das Netzka-
bel, und sorgen Sie dafür, daß keine Knoten am
Kabel auftreten. Um das Kabel zu lösen, ziehen
Sie stets am Stecker und nie am Kabel selbst.
Ein beschädigtes Netzkabel kann zu Brand oder
Stromschlägen führen.
•Stellen Sie nichts auf dem Monitor ab, insbe-
sondere keine Gefäße mit Flüssigkeiten. Wenn
Flüssigkeit in den Monitor eindringt, besteht die
Gefahr eines Stromschlages oder Kurzschlus-
ses.
•Achten Sie darauf, daß die Lüftungsschlitze
nicht verdeckt werden. Die Luftzirkulation im
Monitor ist erforderlich, um eine Überhitzung zu
vermeiden. Wird sie beeinträchtigt, können
Brand oder ein Ausfall des Monitors die Folge
sein.
•Verwenden Sie zum Reinigen des Monitors kei-
ne Lösungsmittel, da andernfalls die Gehäuse-
oberfläche beschädigt werden kann. Weitere
Hinweise zur Pflege des Geräts finden Sie im
Abschnitt „Wartung und Pflege”.
Öffnen Sie den Monitor niemals eigenständig.
Andernfalls besteht die Gefahr eines Strom-
schlags oder anderer Personenschäden. Der
Monitor darf nur von Fachpersonal geöffnet und
gewartet werden.
Hinweise zum Aufstellungsort
•Der Aufstellungsort darf weder extrem heiß oder
kalt, noch feucht oder staubig sein. Hitze und
Kälte können die Funktionsfähigkeit des Moni-
tors beeinträchtigen. Feuchtigkeit und Staub
können zu einem Ausfall des Monitors führen.
•Stellen Sie den Monitor nicht in unmittelbarer
Nähe von Wärmequellen wie Heizkörpern oder
Radiatoren auf. Das Gerät darf zudem keinen
mechanischen Vibrationen oder Stößen ausge-
setzt sein.
•Stellen Sie den Monitor so auf, daß kein direk-
tes Licht oder Sonneneinstrahlung auf die Bild-
schirmoberfläche fällt. Andernfalls können Spie-
gelungen entstehen, so daß die Bildbrillanz
beeinträchtigt wird.
•Geräte, die Magnetfelder erzeugen, z.B. Laser-
drucker, Lautsprecherboxen u.a., sollten nicht
in unmittelbarer Nähe des Monitors aufgestellt
werden. Andernfalls kann die Bildqualität be-
einträchtigt werden.
Hinweise zum Netzanschluß
Verwenden Sie ausschließlich das für Ihr Land
geeignete Netzkabel.
•Warten Sie nach dem Ausschalten des Moni-
tors mindestens 30 Sekunden, bevor Sie das
Netzkabel ziehen. Diese Zeit ist erforderlich,
damit sich die statische Elektrizität der Bild-
schirmoberfläche entladen kann.
Die Netzsteckdose sollte sich in direkter Nähe
befinden und leicht zugänglich sein. Der Moni-
tor kann nur durch Ziehen des Netzsteckers aus
der Steckdose ganz vom Netz getrennt werden.
Der Monitor tastet automatisch alle Horizontalfrequenzen im Bereich zwischen 30
und 96 kHz sowie alle Vertikalfrequenzen im Bereich zwischen 50 und 160 Hz ab.
Der Super-VGA-Monitor ist mit einer eigensicheren, hochauflösenden Bildröhre mit
0,24-mm-Lochmaske ausgerüstet.
Der Monitor erreicht eine maximale Auflösung von 1600 ×1200 Punkten.
Digital Front Control mit 24 Speicherplätzen (14 voreingestellte und 10 anwender-
spezifische) ermöglichen die leichte Einstellung für die verschiedenen Grafik- und
Farbstandards.
Dieser 19-Zoll-Monitor ist mit einem OSD-Bildschirmmenü ausgestattet und bietet
hiermit extrem professionelle Einstellmöglichkeiten.
Der Monitor unterschreitet die Strahlengrenzwerte nach MPR II und TCO 99.

Bedienungsanleitung - 5
DEUTSCH
ANSCHLIESSEN
Abbildung 2. Monitor an den PC anschließen
➧➧
➧➧
➧Schließen Sie den Monitor an den PC an..............
1. Stellen Sie sicher, daß Ihr PC und der Monitor vom
Netz getrennt sind.
2. Schließen Sie das 15polige Signalkabel des Moni-
tors an den PC an (siehe Abbildung 2).
➧➧
➧➧
➧Schließen Sie die Stromversorgung an ................
1. Schließen Sie das separate Netzkabel an den Mo-
nitor und eine Schuko-Steckdose an (siehe Abbil-
dung 3).
Abbildung 3. Stromversorung anschließen
1. Schalten Sie zuerst den PC und anschließend den
Belinea-Monitor ein. Die Betriebsanzeige (siehe R
in Abbildung 4) leuchtet grün auf.
2. Stellen Sie das Bild gemäß Ihren Anforderungen
ein (siehe die nachstehenden Abschnitte „Bildein-
stellung über das OSD-Menü” und „Funktionen des
OSD-Menüs”).
Signalkabel
(fest angeschlossen)
Netzkabel
Abbildung 1. Monitor mit Dreh-/Schwenkfuß
Heben Sie den Monitor vorsichtig aus der Verpackung,
und überprüfen Sie das Zubehör auf Vollständigkeit
(siehe Abbildung 1).
Montieren Sie den Dreh-/Schwenkfuß des Monitors
(siehe nächsten Absatz).
Bewahren Sie den Originalkarton und das Verpak-
kungsmaterial für den Fall auf, daß Sie den Monitor
einschicken oder anderweitig transportieren müssen.
➧➧
➧➧
➧Monitorfuß anbringen ..............................................
1. Legen Sie den Monitor mit der Kopfseite nach un-
ten auf eine gut gepolsterte Unterlage (Kissen, Dek-
ke o.ä.).
2. Richten Sie die Arretierhaken des Monitorfusses
an den Öffnungen auf der Unterseite des Monitor-
gehäuses aus, und schieben Sie den Monitorfuß
nach vorne, bis er mit einem Klicken einrastet.
AUSPACKEN
EINSCHALTEN
3. Wird auf dem Monitor kein Bild angezeigt, lesen
Sie die Informationen im Abschnitt „Problemlösun-
gen”.
Signalkabel
➧➧
➧➧
➧Monitorfuß abnehmen..............................................
1. Ziehen Sie die Arretierlasche an der hinteren Seite
desMonitorfußes,undschiebenSiegleichzeitigden
Fuß nach hinten (in Richtung der Monitorrücksei-
te). Danach läßt sich der Fuß leicht vom Monitor
lösen.

6 - Belinea 10 60 55
DEUTSCH
GRUNDLEGENDE EINSTELLUNGEN
➧➧
➧➧
➧Monitor unter Windows 95/98/ME und 2000
konfigurieren:
Um den Monitor unter Windows 95/98 und 2000 in
Betrieb zu nehmen, wird dringend empfohlen, die
Belinea-Einstellungsdatei zu installieren. Sie können
diese über Ihren Belinea-Händler beziehen oder von
der Belinea-Website www.belinea.de laden. Wählen
Sie hier die Rubrik Support, Downloads dann Treiber/
Treiberinstallation, und laden Sie die Datei
BELINEA.EXE herunter, indem Sie auf Download klik-
ken.
Kopieren Sie die Datei in ein eigenes Verzeichnis (z.B.
C:\BELINEA), und doppelklicken Sie dann darauf, um
sie zu dekomprimieren.
KONFIGURIEREN
Nach der Dekomprimierung finden Sie im gewählten
Verzeichnis die Datei BELINEA.TXT mit den
Installationsanweisungen für die Belinea-Einstellungs-
datei.
➧Monitor unter Windows NT 4.0 konfigurieren:
Unter Windows NT 4.0 benötigen Sie keine separate
Einstellungsdatei. Wählen Sie die Bildwiederhol-
frequenz und Anzahl der Farben direkt unter den Me-
nüpunkten „Einstellungen”, „Systemsteuerung”, „An-
zeige”, „Einstellungen” aus.
➧Kontrast und Helligkeit direkt einstellen..................................................................................................................
Abbildung 4. Bedienelemente des Monitors
Das OSD-Menü ist ein Fenster am Bildschirm, mit dem
Sie die Einstellungen für die Bilddarstellung auswäh-
len können.
➧➧
➧➧
➧So rufen Sie das OSD-Hauptmenü auf...................
1. Drücken Sie die Taste MENU/EXIT (Tin Abb. 4).
Das OSD-Menü erscheint am Bildschirm.
2. Wählen Sie mit dem Einstellrad (Sin Abb. 4) des
OSD-Reglers das gewünschte Funktionssymbol
(siehe nächsten Abschnitt „Funktionen des OSD-
Menüs„).
3. Drücken Sie die Taste ENTER (Uin Abb. 4), um
die Funktion zu aktivieren.
4. Stellen Sie mit dem Einstellrad den gewünschten
Wert ein.
5. Drücken Sie nochmals die Taste ENTER, um den
Wert abzuspeichern. Wiederholen Sie ggf. die
Schritte 2-4, um weitere Einstellungen vorzuneh-
men.
6. Das OSD-Menü verschwindet von selbst, nachdem
ca. 10 Sekunden lang keine Bedienung erfolgt ist.
Dabei werden die aktuellen Einstellungen gespei-
chert. Sie können es aber auch manuell ausblen-
den, indem Sie die Taste MENU/EXIT drücken.
BILDEINSTELLUNG ÜBER DAS OSD-MENÜ
Sie können den Kontrast und die Helligkeit direkt ein-
stellen, indem Sie das Einstellrad (Sin Abb. 4) dre-
hen, während das OSD-Menü nicht angezeigt wird.
Wenn Sie es im Uhrzeigersinn bewegen, erscheint das
Einstellmenü für den Kontrast; durch Bewegen gegen
den Uhrzeigersinn erscheint das Menü für die Hellig-
keitseinstellung. Drehen Sie dann das Rad wiederum
im Uhrzeigersinn, um den Kontrast bzw. die Helligkeit
zu erhöhen bzw. gegen den Uhrzeigersinn, um sie zu
reduzieren.

Bedienungsanleitung - 7
DEUTSCH
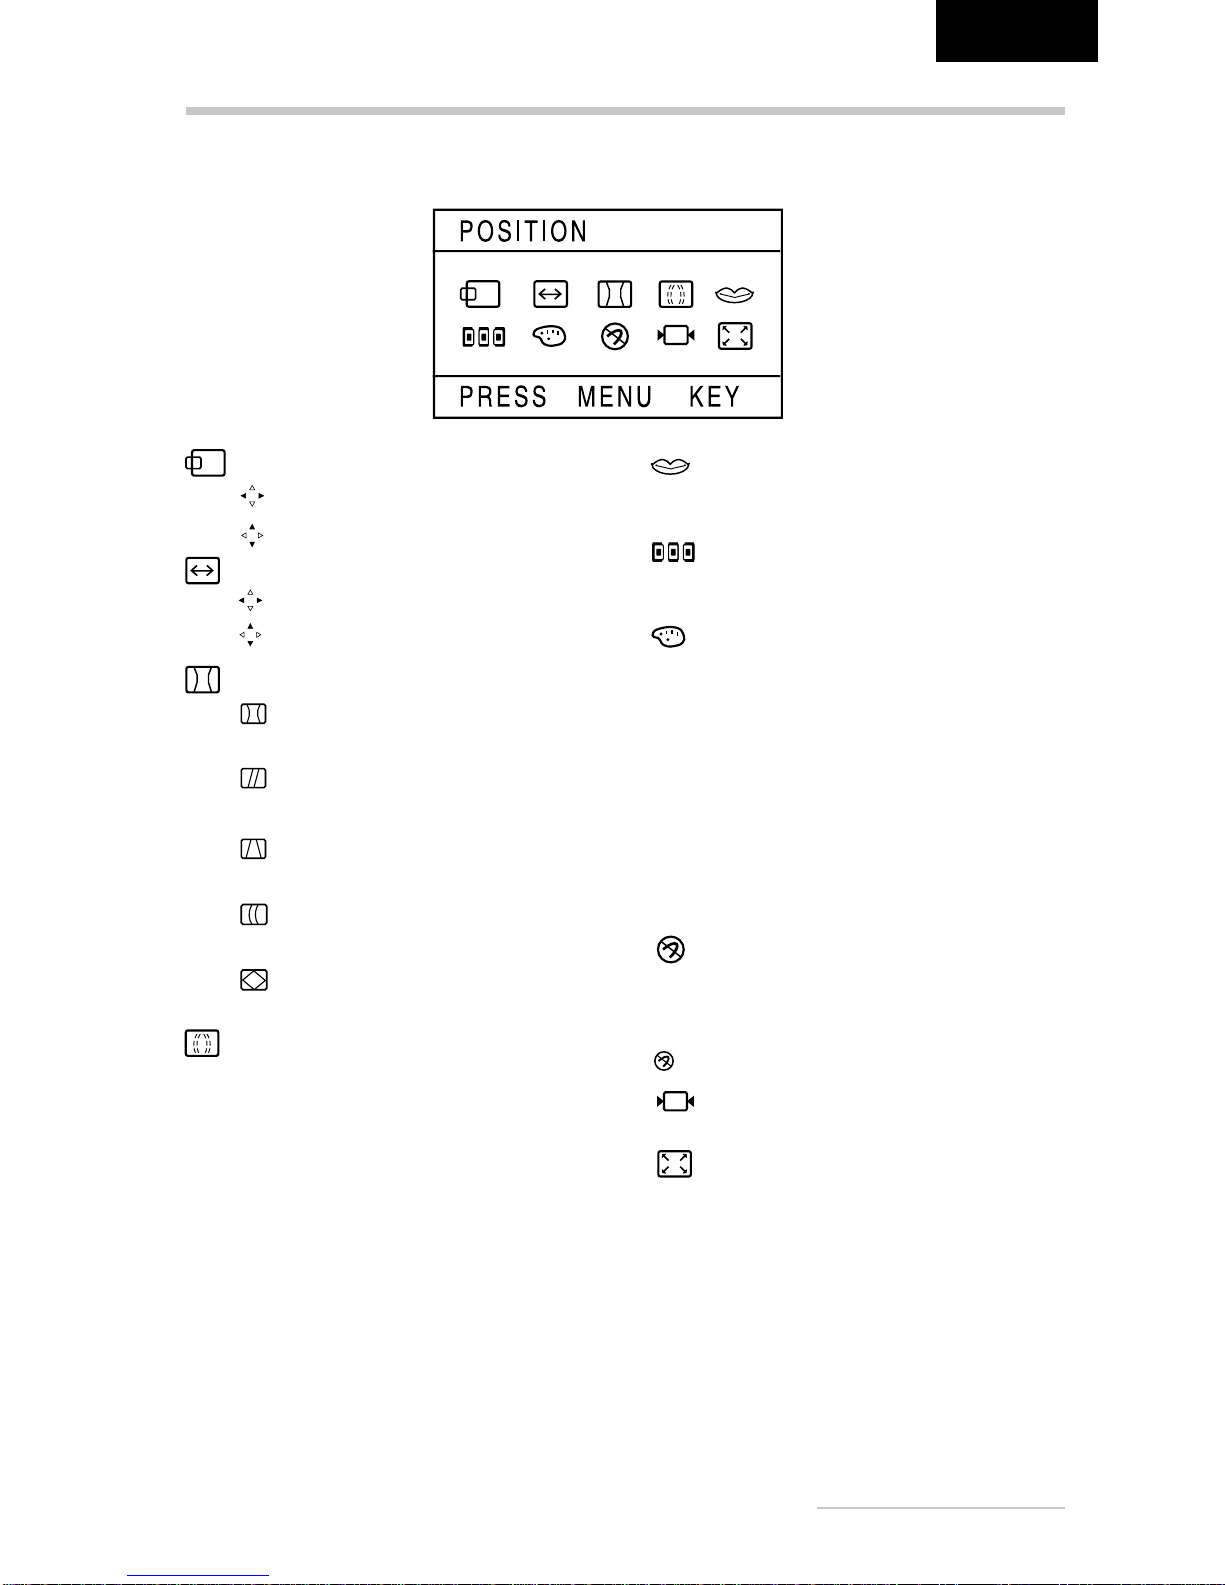
FUNKTIONEN DES OSD-MENÜS
POSITION
Regelt die horizontale Position des
Bildes.
Regelt die vertikale Position des Bildes.
SIZERegelt die horizontale Größe des Bildes.
Regelt die vertikale Größe des Bildes.
GEOMETRY
PINCUSHION
Regelt die Geradlinigkeit der vertikalen Bild-
kanten.
PARALLELOGRAM
Korrigiert die vertikalen Bildkanten, wenn sie
nach links oder rechts geneigt sind
TRAPEZOID
Stellt die vertikalen Bildkanten so ein, daß sie
parallel erscheinen.
PINBALANCE
Korrigiert die vertikalen Bildkanten, wenn sie
nach links oder rechts gebogen sind.
ROTATION
Korrigiert eine Schräglage (Drehung) des Bil-
des.
MOIRÉCONTROL
Korrigiert unerwünschte Bildmuster. Moiré ist eine
Interferrenz, bei der wellenlinige Muster erscheinen
(besonders bei abwechselnden Schwarz- und Weiß
Bildpunktmustern). Normalerweise kann diese
Interferrenz beseitigt, in Ausnahmefällen jedoch nur
korrigiert werden.
H.MOIRÉADJUST
Korrigiert horizontale Moiré-Muster.
V.MOIRÉADJUST
Korrigiert vertikale Moiré-Muster.
LANGUAGE
WähltdieSprachedesOSD-Menüs:Englisch,Deutsch,
Französisch, Spanisch, Italienisch.
OSD POSITION
Regelt die horizontale und vertikale Lage des OSD-
Menüs.
COLOR-TEMP
In diesen Menüs können Sie mit dem Einstellrad eine
voreingestellte Farbtemperatur (9300 K bzw. 6500 K)
auswählen und mit der OSD-Taste ENTER überneh-
men. Falls Sie die Farbwerte einzeln einstellen möch-
ten, wählen Sie das Symbol USER aus und bestätigen
mit der OSD-Taste ENTER. Anschließend können Sie
mit dem Einstellrad zwischen den Einstellmöglich-
keiten für R-BIAS und B-BIAS (roter bzw. blauer Hin-
tergrund) oder R-GAIN und B-GAIN (roter bzw. blauer
Bildinhalt) wechseln. Um eine Einstellung zu ändern,
drücken Sie die OSD-Taste ENTER, und stellen Sie
mit dem Einstellrad den gewünschten Wert ein. Bestä-
tigen Sie die Einstellung dann durch erneutes Drük-
ken der OSD-Taste ENTER.
Wenn Sie keine weiteren Werte einstellen wollen, wäh-
len Sie die OSD-Taste EXIT, um ins OSD-Hauptmenü
zurückzugelangen.
DEGAUSS
Korrigiert Farbfehler des Monitorbildes. Die Farbfehler
können durch Interferenzen mit dem Erdmagnetfeld
auftreten, z.B. wenn Sie den Monitor drehen oder trans-
portieren. Diese Funktion wird direkt nach Anwählen
des Funktionssymbols und Drücken der OSD-Taste
ENTER ausgelöst.
RECALL
Stellt die werkseitigen Bildeinstellungen wieder her.
ZOOM
Ändert gleichzeitig vertikale und horizontale Bildgröße.
8 - Belinea 10 60 55
DEUTSCH
•Lösen Sie zuerst das Netzkabel von der Stromver-
sorgung, indem Sie den Stecker aus der Steckdo-
se ziehen.
•Wenn der Monitor stark verschmutzt ist, reinigen
Sie ihn mit einem angefeuchteten Tuch. Verwen-
den Sie nur warmes Wasser, und reiben Sie den
Monitor danach trocken. Durch Lösungsmittel bzw.
scharfe Reinigungsmittel kann die Gehäuseober-
fläche beschädigt werden. Reinigen Sie die Bild-
röhre nur mit einem weichen Tuch, da ansonsten
die Bildröhrenbeschichtung Schaden nehmen
kann.
•Reinigen Sie den Monitor bei leichten Verschmut-
zung nur mit einem trockenen, weichen und anti-
statischen Tuch.
•Die Kathodenstrahlröhre verfügt über eine spezi-
elle Beschichtung, mit der die Monitorstrahlung ver-
ringertwird.DieseBeschichtungistgegenüberKrat-
zern empfindlicher als einfachere Monitore ohne
diese Funktion. Berühren Sie den Bildschirm nie-
mals mit einem Stift. Achten Sie darauf, daß keine
Uhren, Ringe, Knöpfe u.ä. mit dem Bildschirm in
Berührung kommen (eine häufige Ursache für Krat-
zer sind Krawattennadeln, die beim Umstellen des
Monitors den Bildschirm berühren).
STANDARD- UND BENUTZERDEFINIERTE GRAFIKMODI
In der nachfolgenden Tabelle finden Sie die werksei-
tig vordefinierten Grafikmodi mit den dazugehörigen
Auflösungen und Frequenzen. Für jeden dieser Modi
sind alle Bildeinstellungen (Breite, Höhe, Position etc.)
bereits optimal konfiguriert.
Sie können bis zu 10 weitere Einstellungen abspei-
chern. Verwenden Sie eine andere Auflösung oder
eine angegebene Auflösung mit anderen Frequenzen,
so justieren Sie einfach das Bild bis es optimal darge-
stellt wird (siehe Abschnitt „Bildeinstellung über das
OSD-Menü”). Wenn Sie später nach einem Modus-
wechsel diese Auflösung wieder einschalten (z.B.
durch Aufrufen des entsprechenden Programms), wer-
den die von Ihnen gespeicherten Werte für Bildgröße,
-position etc. automatisch übernommen (d.h. der Mo-
nitor „erinnert” sich an Ihre Einstellungen).
WARTUNG UND PFLEGE
Standard Auflösung H-Freq. (kHz) V-Freq. (Hz) Pixeltakt (MHz)
Industry 640 x 480 31,469 59,942 25,175
VESA 640 x 480 37,500 75,000 31,500
VESA 720 x 400 31,467 70,082 28,320
VESA 800 x 600 46,875 75,000 49,500
VESA 800 x 600 53,674 85,061 56,250
VESA 1024 x 768 60,023 75,029 78,750
VESA 1024 x 768 68,667 84,997 94,500
VESA 1024 x 768 80,741 99,803 109,000
VESA 1280 x 1024 79,976 75,025 135,000
VESA 1280 x 1024 91,146 85,024 157,500
VESA 1600 x 1200 93,750 75,000 202,500
MAC 640 x 480 35,000 66,667 30,240
MAC 832x 624 49,726 74,551 57,284
MAC 1152 x 870 68,681 75,062 100,000

Bedienungsanleitung - 9
DEUTSCH
PROBLEMLÖSUNGEN
Kein Bild
Netzanzeige leuchtet nicht
- Prüfen Sie, ob das Netzkabel richtig angeschlossen ist (siehe Abschnitt „Anschließen”).
- Stellen Sie sicher, daß der Monitor mit dem Netzschalter eingeschaltet wurde (siehe Abschnitt „Einschalten”).
Netzanzeige leuchtet orange oder blinkt
- Befindet sich der Monitor in einem Stromsparmodus (siehe Abschnitt „Stromsparfunktionen”)?
- Ist das Signalkabel am Monitor und an der VGA-Buchse des PC angeschlossen?
- Ist der PC eingeschaltet (siehe Dokumentation zu Ihrem PC)?
Netzanzeige leuchtet grün
- Evtl. ist ein Bildschirmschoner auf Ihrem PC installiert und wurde nach einer bestimmten Zeit der Inaktivität
eingeschaltet. Drücken Sie eine Taste auf der Tastatur, oder bewegen Sie die Maus.
RGB-Farbfeld
- Überprüfen Sie, ob das Signalkabel an die VGA-Buchse des PC angeschlossen ist (s. Abschnitt „Anschliessen”).
- Ist der PC eingeschaltet (siehe Abschnitt „Einschalten”)?
Fehler der Bilddarstellung
Bild ist nach links/rechts oder oben/unten verschoben
- Wenn das Bild zwar normal, aber nicht zentriert erscheint, können Sie dies mit den OSD-Funktionen justie-
ren. Weitere Informationen hierzu finden Sie im Abschnitt „Funktionen des OSD-Menüs” unter den Funktio-
nen „Position” und „Size”.
- Wenn das Bild links oder rechts über den Bildrand hinausläuft, flimmert und zudem ein Doppelbild erscheint,
ist wahrscheinlich eine zu hohe Bildwiederholfrequenz an der Grafikkarte eingestellt. Wählen Sie umgehend
eine niedrigere Frequenz aus, da der Bildschirm andernfalls beschädigt werden kann. Weitere Informatio-
nen hierzu finden Sie in der Dokumentation zu Ihrem PC, zur Grafikkarte bzw. zum Betriebssystem.
Bild flimmert oder zittert
- Wenn das Bild links oder rechts über den Bildrand hinausläuft, flimmert und zudem ein Doppelbild zu sehen
ist, ist wahrscheinlich eine zu hohe Bildwiederholfrequenz an der Grafikkarte eingestellt. Wählen Sie umge-
hend eine niedrigere Frequenz aus. Weitere Informationen hierzu finden Sie in der Dokumentation zu Ihrem
PC, zur Grafikkarte bzw. zum Betriebssystem.
- Wenn das Bild normal dargestellt wird aber unruhig erscheint, kann dies an einer zu geringen Bildwiederhol-
frequenz liegen. Wählen Sie eine höhere Bildfrequenz. Weitere Informationen hierzu finden Sie in der
Dokumentation zu Ihrem PC, zur Grafikkarte bzw. zum Betriebssystem.
- Möglicherweise ist nicht die richtige Einstellungsdatei für den Monitor ausgewählt. Informationen zum Ein-
richten des Monitors unter Windows 95/98/ME/2000/NT finden Sie im Anschnitt „Konfigurieren”.
Bild ist verschwommen oder unscharf
- Überprüfen Sie die Helligkeits- und Kontrasteinstellung (siehe Abschnitt „Grundlegende Einstellungen”).
- Bei hohen Auflösungen und Bildwiederholfrequenzen erscheint die Bilddarstellung etwas unschärfer. Wäh-
len Sie ggf. eine geringere Frequenz aus.
Farbdarstellung ungenügend
- Wenn einzelne Bildbereiche Farbverfälschungen aufweisen, sollte der Monitor entmagnetisiert werden (sie-
he Funktion „Degauss” im Abschnitt „Funktionen des OSD-Menüs”).
- Wenn die Farben etwas anders aussehen, als sie eigentlich sollten (z.B. Weiß nicht richtig weiß ist), sollten
Sie die Farbtemperatur nachregeln (siehe Funktion „Color-Temp” im Abschnitt „Funktionen des OSD-Me-
nüs”).
- Geräte, die Magnetfelder erzeugen, z.B. Laserdrucker, Lautsprecherboxen u.a., sollten nicht in unmittelbarer
Nähe des Monitors aufgestellt werden. Andernfalls kann die Bildqualität beeinträchtigt werden.
Bildränder verzerrt
- Wenn die Bildränder leicht verzerrt, gebogen oder geneigt erscheinen oder das gesamte Bild nicht waage-
recht liegt, können Sie dies über die Funktion des OSD-Menü nachregeln (siehe Funktionen „Pincushion”,
„Parallelogram”, „Trapezoid”, „Pinbalance”, sowie „Rotation” im Abschnitt „Funktionen des OSD-Menüs”).
10 - Belinea 10 60 55
DEUTSCH
TECHNISCHE DATEN
Bildröhre 19 Zoll Bilddiagonale (45,5 cm sichtbar),
0,24 mm Lochmaske, antistatische und Antireflexbeschichtung
strahlungsarm nach MPR II und TCO 99,
Phosphortyp P22
Eingangssignal Video: analog 0,7 Vpp / 75 Ohm positiv
Synchronisation: separat, TTL-Pegel
Horizontale Synchronisierung: positiv/negativ
Vertikale Synchronisierung: positiv/negativ
Bildschirmfarben Analog-Eingang, unbegrenztes Farbspektrum
Synchronisierung 30 – 96 kHz horizontal
50 – 160 Hz vertikal
Bandbreite 200 MHz
Auflösung max. 1600 ×1200 Punkte
Fehlkonvergenz Zentrum: maximal 0,20 mm; Hauptbereich: maximal 0,30 mm;
Rand: maximal 0,40 mm
Netzanschluß 200 - 240 V~, 50 - 60 Hz
Leistungsaufnahme max. 120 W (Standby: < 15 W, Off-Status: < 3 W)
Stromsparfunktionen nach EPA und VESA-DPMS, Energy Label
Abmessungen Breite 470 mm, Höhe 466 mm, Tiefe 466,5 mm
Gewicht 23,3 kg (nur Monitor)
Umgebungsbedingungen Temperatur: 0 - 35 °C
Rel. Luftfeuchtigkeit: 10 bis 90 % (nicht kondensierend)
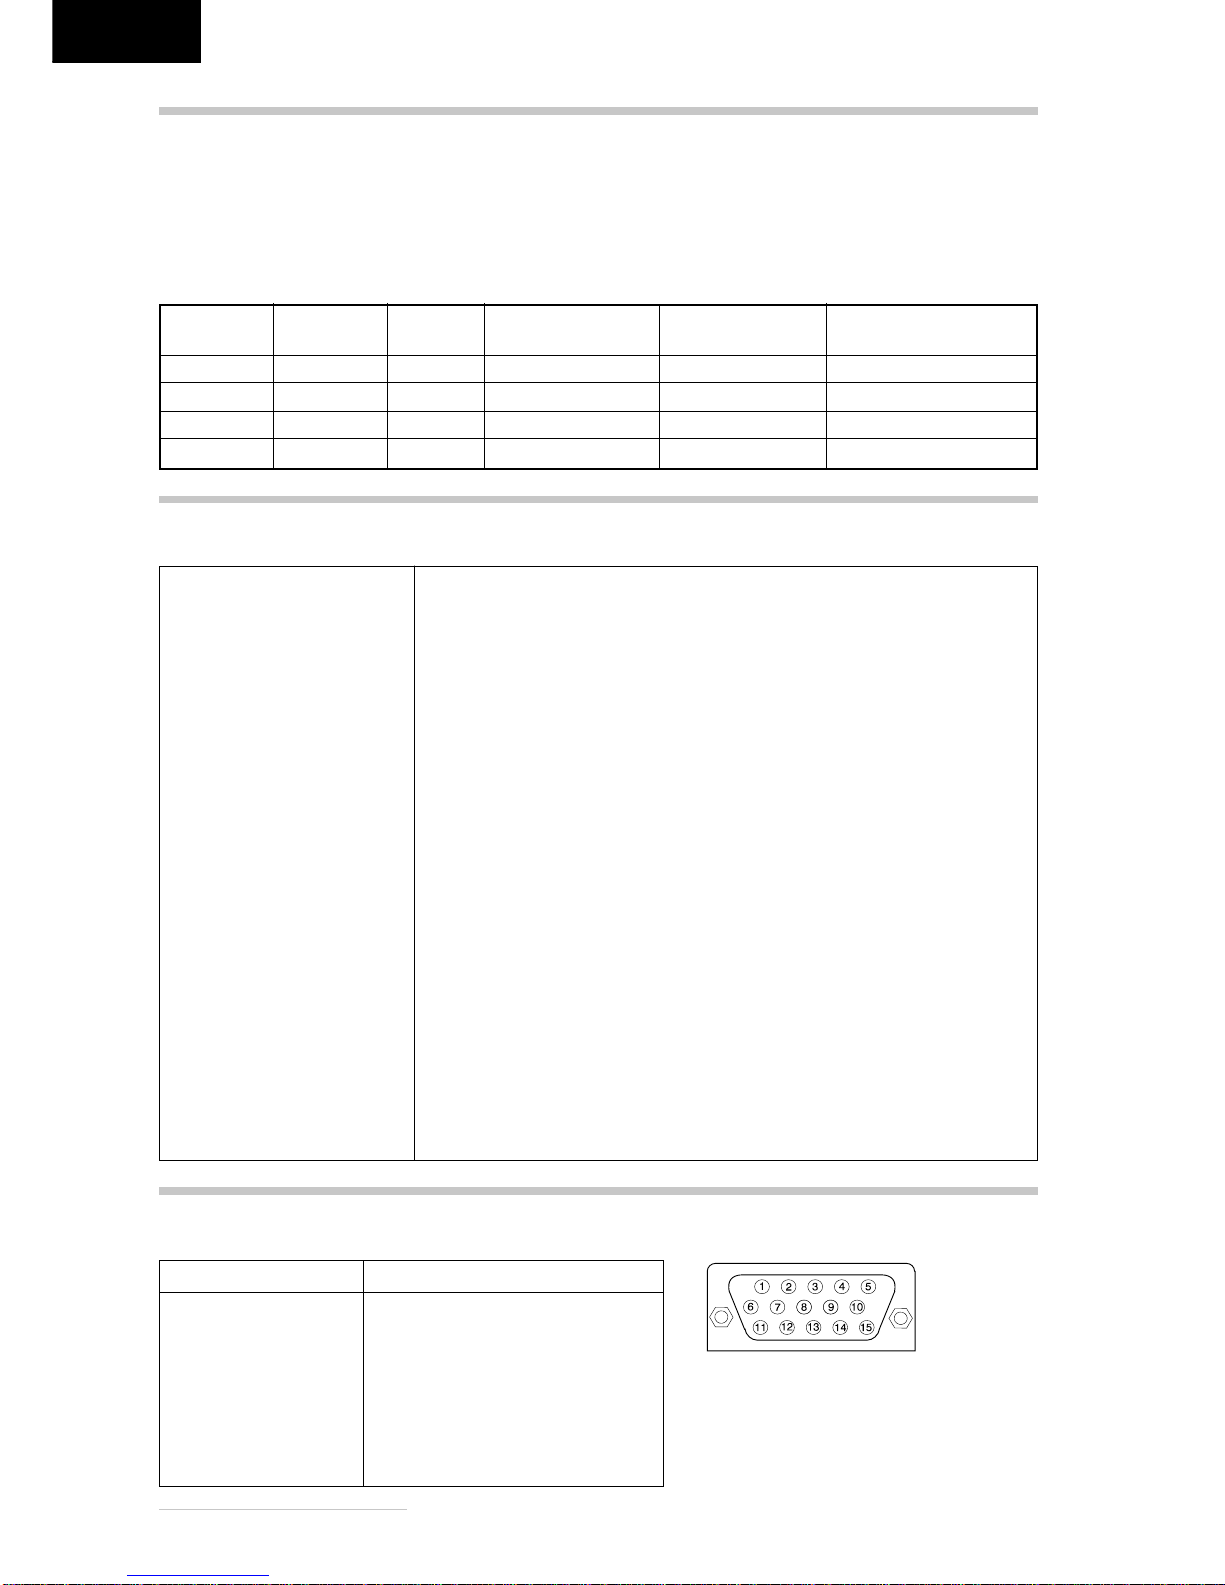
STIFTBELEGUNG DES SIGNALSTECKERS
Stift Belegung
1 Rot
2 Grün
3 Blau
4 Masse
5 Masse
6 Masse Rot
7 Masse Grün
8 Masse Blau
15poligerMini-D-SUB-Stecker
STROMSPARFUNKTIONEN
Der Monitor ist mit Stromsparfunktionen nach dem
EPA- und VESA-DPMS-Standard ausgestattet. In Leer-
laufzeiten wird er in drei Stufen (Standby, Suspend
und Off-Status) »abgeschaltet«. Wenn der Monitor sich
in einem Energiesparmodus befindet, blinkt die Be-
triebsanzeige (siehe Rin Abb. 4) orange. Die meisten
Grafikkarten und PC unterstützen Monitore mit Strom-
sparfunktionen. Sollten Sie einen älteren PC oder eine
ältere Grafikkarte ohne Stromsparunterstützung besit-
zen, wenden Sie sich an Ihren Händler.
Modus H-Sync V-Sync Farbe der Stromaufnahme Wiedereinschalt-
Betriebsanzeige max. zeit
Normal normal normal grün < 120 Watt -
Standby fehlt normal orange < 15 Watt < 3 Sek.
Suspend normal fehlt orange < 15 Watt < 3 Sek.
Off-Status fehlt fehlt orange (blinkend) < 3 Watt < 20 Sek.
Stift Belegung
9 kein Stift
10 Masse
11 Masse
12 SDA
13 Hor. Synch.
14 Vert. Synch.
15 SCL

Operating Instructions -11
ENGLISH
INTRODUCTION
This manual will familiarize you with the installation and
use of your Belinea Monitor. Please take the time to
look through these instructions even if you are familiar
with monitors.
We has taken all possible care to ensure that this
manual contains correct, accurate information.
However, the manufacturer cannot assume liability for
anypossibleerrors.Inaddition, the manufacturer cannot
guarantee that the hardware will meet the purpose you
require. We would appreciate reports of any errors,
suggestions or criticism.
© Copyright 2001
MAXDATA Systeme GmbH
45768 Marl, Germany
www.maxdata.com
All rights reserved. No part of this manual may be reproduced,
processed or distributed in any form (print, photocopy,
microfilm or any other process) or processed by an electronic
system without prior written permission from the manufacturer.
We reserve the right to make changes according to technical
progress. Belinea is an internationally registered trademark.
Other brand names may be registered trademarks and must
be treated as such.
We are all responsible for the environment: this manual was printed from front to back on
paper that was produced without chlorine.
TABLE OF CONTENTS
Guide to symbols
The symbols below are used in this manual to indicate
where there is risk of injury or damaging devices or to
indicate especially useful information:
DANGER! Indicates risk of injury. When not
following instructions, severe injury or death
may result.
ATTENTION! Indicates possible damage to
devices. When not following instructions,
devices may be heavily damaged.
IMPORTANT! Indicates hints on operation and
other useful information.
Important Safety Instructions
SomeBelineamonitormodelscomewith2 power cords.
Please ensure you use the UK plug (3 pin) in the UK and
nottheEuropeanplug(2pin).
Do not place the monitor in very hot or cold, nor damp or
dustysurroundings.Donotputvasesetc.onthemonitor,
watermaycauseshortcircuits. Do not block orcoverthe
ventilating openings. All products that produce magnetic
fields, i.e. laser printers, loud-speakers etc., must not be
placed close to the monitor. Do not install this monitor in
areas where too much light or sunshine might directly hit
thescreen, otherwisethebrightnessofthe picturewillbe
poorduetoreflections.Referallservicingandmaintenance
toauthorised servicepersonnelonly!
CAUTION
Do not remove the cover!
Serious electrical shock hazards exist inside this
monitor.
NOTE
Removal of cover invalidates your warranty.
Introduction .............................................................. 11
Features................................................................... 12
Important information ............................................... 12
Unpacking ................................................................ 13
Connecting............................................................... 13
Startup ..................................................................... 13
Configuration............................................................ 14
Basic Setup.............................................................. 14
Image Settings Using the OSD Menu...................... 14
OSD Menu Functions............................................... 15
Caring for Your Monitor............................................ 16
Preset and user defined graphic modes.................. 16
Troubleshooting ....................................................... 17
Energy Saving Functions......................................... 18
Technical Specifications .......................................... 18
Pin Assignment ........................................................ 18

12 - Belinea 10 60 55
ENGLISH
FEATURES
This monitor is suitable for connection to IBM-compatible systems equipped with a 15-pin VGAconnector. An overview
of the numerous functions and features is provided below.
Multiscan
30 - 96 kHz
50 - 160 Hz
Dot Pitch
0.24 mm
Resolution
1600 ×1200
Digital Front
Control
On Screen
Display
MPR II,TCO 99
IMPORTANT INFORMATION
Safety instructions for operation
The power cord must not be damaged. Do not
place any objects on the power cord and make
sure it does not have any knots. To unplug the
cord,alwayspullontheplug and not on the cable
itself.
•Never put anything on top of the monitor,
especially not any container with liquid. If liquid
enters the monitor it may cause electric shock
or short circuit.
•Avoid covering the ventilation slots. Air
circulation is necessary to prevent the monitor
fromoverheating.Iftheair circulation is restricted
it could cause fire or damage the monitor.
•Do not use any solvents to clean the monitor, as
the housing could be damaged. For more
information about cleaning the monitor, please
see “Caring for your Monitor”.
Never open the monitor housing yourself. There
is a danger of electric shock and other hazards.
The monitor may only be opened and serviced
by qualified professionals.
Note on monitor placement
•The setup location must not be extremely hot,
cold, humid or dusty. Heat and cold can impair
thefunctionalityofthemonitor.Humidity and dust
can cause the monitor to fail.
•Don’t place the monitor near heaters such as
radiators or the like. Don’t expose the monitor to
mechanical vibrations or jarring.
•Position the monitor so that no direct light or sun
strikes the screen, which could cause reflections
that reduce the quality of the image.
•Equipment that generates magnetic fields, i.e.
laserprinters,speakers,etc.,mustnotbeplaced
close to the monitor. They can distort the image.
Notes on power connection
Only use the power cord designated for use in
your country.
•After turning off the monitor wait for 30 seconds
before disconnecting the power cord. This time
is needed for the static electricity on the screen
to dissipate.
The wall outlet should be within easy reach.
Pulling the power plug is the only way to
disconnect the monitor from the power source.
The monitor automatically scans all horizontal frequencies between 30 and 96 kHz as well
as all vertical frequencies between 50 and 160 Hz.
This Super VGA monitor is equipped with a high resolution CRT with a dot pitch of .24 mm.
The monitor attains maximal resolution of 1600 ×1200 pixels.
Digital Front Control with 24 memory settings (14 factory-preset and 10 user-defined modes)
makes the setting of various graphic and color modes easy.
This19inchmonitoris equipped with an OSD(OnScreenDisplay)menuto make professional
adjustments easy.
This monitor exceeds the MPR II emission requirements and TCO 99.

Operating Instructions -13
ENGLISH
CONNECTING
Figure 2. Connecting the monitor to the PC
➧➧
➧➧
➧To connect the monitor to your PC ......................
1. Make sure that the PC and monitor are unplugged.
2. Connect the 15-pin signal cable to the monitor and
the PC (see figure 2).
➧➧
➧➧
➧To connect the monitor to the power source ......
1. Connect the separate power cable to the monitor
and a grounded outlet (see figure 3).
1. First, turn on your PC, and then turn on your Belinea
monitor. The status indicator (see in figure 4)
should light up green.
2. Adjust the image to meet your requirements (see
thefollowingsections”Imagesettings using the OSD
menu” and ”OSD Menu Functions”).
Figure 1. Monitor with Tilt/Swivel Base
Carefully lift the monitor out of the packaging and make
sure that all components are included (see Figure 1).
Assemble the tilt/swivel base to the monitor (see the
next section).
Save the original box and packing material in case you
have to ship or transport the monitor.
➧➧
➧➧
➧Assembling the tilt/swivel base .............................
1. Place the monitor screen down on a soft surface
(pillow, blanket or similar object).
2. Align the latches of the tilt/swivel base with the
openings on the bottom of the monitor and push the
base forward until it locks into place.
UNPACKING
STARTUP
3. If there is no image displayed on the monitor,
consult the section “Troubleshooting”.
Signal cable
Power Cord
Signal Cable
(buit-in)
Figure 3. Connecting the monitor to the power source
➧➧
➧➧
➧Disassembling the tilt/swivel base ........................
1. Pull the locking tab at the back of the base while
pushing the base backward (toward the monitor’s
back). Now the base should come off easily.
14 - Belinea 10 60 55
ENGLISH
Figure 4. Monitor features
BASIC SETUP
The OSD menu appears in a window on your screen. It
allows you to select the image settings you want to
change.
➧➧
➧➧
➧How to open the OSD menu ...................................
1. Press the MENU/EXIT button (in figure 4) to
display the OSD menu on the screen.
2. Select the desired function icon using the OSD dial
(in figure 4,see the following section “OSD Menu
Icons“).
3. Press the ENTER button (in figure 4) to activate
the function.
4. Enter the desired value by turning the OSD dial.
5. To store the setting, press theENTER button again.
Repeat steps 2-4 to make further adjustments as
needed.
6. The OSD menu will automatically disappear if no
changes are made for more than 10 seconds. The
current settings will be saved. You can also close it
manually by pressing the MENU/EXIT button.
You can adjust the contrast and brightness directly by
turningtheOSDdial(infigure4)while the OSD menu
is not active. Turning the dial clockwise displays the
OSD contrast menu, while turning it counter-clockwise
displays the OSD brightness menu. Then turn the dial
clockwiseto increase, orcounter-clockwiseto decrease
the contrast/brightness.
IMAGE SETTINGS USING THE OSD MENU
➧➧
➧➧
➧Monitor setup under Windows 95/98/ME and
2000:
For Windows 95/98 and 2000 users: Installation of the
Belinea driver software is highly recommended. This
canbeobtainedfrom your Belinea dealerordownloaded
from Belinea’s internet homepage atwww.belinea.de.
Choose Support, Downloads, then Driver Files, and
download BELINEA.EXE by clicking on Driver
Download....
Copy the file to a folder on your hard disk (e.g.
C:\BELINEA), and double-click it to start
decompression.
CONFIGURATION
After decompression you will find the file BELINEA.TXT
in your folder, providing further information on how to
install the Belinea driver software.
➧➧
➧➧
➧Monitor setup under Windows NT 4.0:
Under Windows NT 4.0 no separate setup file is
required. Select the vertical frequency and the number
of colors directly from within the “Settings”à“Control
Panel”à“Display”à“Settings” menu.
➧➧
➧➧
➧Shortcut for adjusting contrast and brightess .......................................................................................................
Operating Instructions -15
ENGLISH
OSD MENU FUNCTIONS
POSITION
Controls the horizontal position.
Controls the vertical position.
SIZEControls the horizontal image size.
Controls the vertical image size.
GEOMETRY
PINCUSHION
Corrects pincushion distortion.
PARALLELOGRAM
Corrects parallel slanted edges.
TRAPEZOID
Corrects inward/outward slanted edges.
PINBALANCE
Corrects parallel distortion of edges.
ROTATION
Corrects tilted image.
MOIRÉCONTROL
Correctsmoirépatterns.Moirépatternsareinterference
patterns that appear as wave lattices (especially prone
to appear in black-white alternating dot patterns).
Usually, this interference can be removed; however, it
can sometimes only be reduced.
H. MOIRÉ ADJUST
To correct horizontal moire patterns.
V. MOIRÉ ADJUST
To correct vertical moire patterns.
LANGUAGE
SelectionoftheOSDmenulanguage:English,German,
French, Spanish, Italian.
OSD POSITION
Adjusts the vertical and horizontal position of the OSD
menu.
COLOR-TEMP
Using these menus and the dial, you can select one of
the preset color temperatures (9300K or 6500K).
Confirm your choice by pressing the ENTER button. If
you want to change the color temperatures individually,
select the USER icon and confirm by pressing the
ENTER OSD button. Now you can use the OSD dial to
toggle between the settings R-BIAS and B-BIAS (red
orbluebackground)orR-GAINandB-GAIN(redorblue
image).
Once you have completed the desired manual
adjustments,selecttheEXITbuttontoreturntotheOSD
main menu.
DEGAUSS
Corrects image color distortions. The color distortion
may be due to interference from the earth’s magnetic
field, e.g. when the monitor is rotated or moved. This
function is triggered by selecting the function symbol
and pressing the OSD button ENTER.
RECALL
Recalls factory settings of the image parameters.
ZOOM
Simultaneously changes vertical and horizontal image
size.

16 - Belinea 10 60 55
ENGLISH
•First, unplug the power cord from the wall socket or
power supply.
•If the monitor is extremely dirty, clean it with a moist
cloth.Useonly warm waterandthenwipe the monitor
dry. Solvents or harsh cleaners can damage the
housing. Clean the picture tube only with a soft cloth,
otherwise you may damage the picture tube coating.
•If the monitor is only slightly dirty, clean it using a
soft, dry and antistatic cloth.
•The monitor’s cathode ray tube is covered with a
special coating for reduced emissions. This coating
is more susceptible to scratches and marking than
lower performance displays lacking this feature. Do
not touch the screen with pens and pencils. Do not
allow watches, rings, buttons and other clothing
accessories to brush against the screen (a common
cause of scratches are tie pins when moving the
display).
PRESET AND USER DEFINED GRAPHIC MODES
The following table lists the factory preset graphic
modes and their resolutions and frequencies. For all
these graphic modes all image adjustments (width,
height, position, etc.) are already optimally configured.
You can save up to 10 additional settings. If you use a
different resolution or one of the given resolutions with
other frequencies, you can adjust the image until it is
perfectly displayed (see section “Image settings using
the OSD menu“). If you switch back to this resolution
after changing modes (i.e. by running the same
software),thevaluesyousavedforimagesize,position,
etc., will automatically be recalled (that is, the monitor
“remembers“ your settings).
CARING FOR YOUR MONITOR
Standard Resolution H-Freq. (kHz) V-Freq. (Hz) Pixel clock (MHz)
Industry 640 x 480 31.469 59.942 25.175
VESA 640 x 480 37.500 75.000 31.500
VESA 720 x 400 31.467 70.082 28.320
VESA 800 x 600 46.875 75.000 49.500
VESA 800 x 600 53.674 85.061 56.250
VESA 1024 x 768 60.023 75.029 78.750
VESA 1024 x 768 68.667 84.997 94.500
VESA 1024 x 768 80.741 99.803 109.000
VESA 1280 x 1024 79.976 75.025 135.000
VESA 1280 x 1024 91.146 85.024 157.500
VESA 1600 x 1200 93.750 75.000 202.500
MAC 640 x 480 35.000 66.667 30.240
MAC 832x 624 49.726 74.551 57.284
MAC 1152 x 870 68.681 75.062 100.000

Operating Instructions -17
ENGLISH
TROUBLESHOOTING
Blank Screen
Power indicator is off
- Check if the power cable is connected properly (see section “Connecting”).
- Make sure that the monitor was turned on using the power switch (see section “Startup”).
Power indicator lights orange or is flashing
- Perhaps a power saving mode is active (see section “Energy Saving Functions”)?
- Is the signal cable connected to the monitor and the PC’s VGA connector?
- Is the PC turned on (see your PC’s documentation)?
Power indicator lights green
- A screen saver may have activated automatically after a certain period of inactivity. Press any key on your
keyboard or move the mouse.
RGB bars
- Make sure the signal cable is connected to the PC’s VGA connector (see section “Connecting”).
- Is the PC turned on (see section “Startup”)?
Display Problems
Image is displaced to the left/right or to the top/bottom
- Iftheimageisdisplayednormallybutnotcenteredcorrectly,youcanadjustitspositionusingtheOSDfunctions.
For more information on this topic consult the functions “Position” and “Size” in the “OSD Menu Functions”
section.
- If the image flickers, is blurred and moves off the screen towards the right or left, the vertical frequency
selected at the graphics card is probably too high. Immediately lower the frequency to prevent the monitor
from becoming damaged. For more detailed information consult the user’s guide of your PC, graphics card or
operating system.
Image flickers or is shaky
- If the image flickers, is blurred and moves off the screen towards the right or left, the vertical frequency
selected at the graphics card is probably too high. Immediately lower the frequency to prevent the monitor
from becoming damaged. For more detailed information consult the user’s guide of your PC, graphics card or
operating system.
- If the image is displayed normally but appears slightly shaky, the vertical frequency might be too low. Select a
higher frequency. For more information on this topic consult the user’s guide of your PC, graphics card or
operating system.
- Perhaps setup file chosen for the monitor is incorrect. For information on monitor setup under Windows 95/98/
ME/2000/NT consult the “Configuration” section.
Image is blurred
- Check brightness and contrast settings (see section “Basic Setup”).
- If the vertical frequency is too high, the image might be slightly blurred. In this case lower the frequency.
Color problems
- If the colors are distorted in some areas, you should demagnetize your monitor (see “Degauss” function in
section “OSD Menu Functions”).
- If the colors are off (e.g. white is not really displayed as white etc), you should adjust the color temperature
(see “Color-Temp” function in section “OSD Menu Functions”).
- Devices generating magnetic fields, such as laser printers and loudspeakers, shouldn’t be placed near the
monitor since they might affect image quality.
Image edges distorted
- If the image is slightly distorted, bent or tilted at the edges or the entire image is not aligned horizontally, you
can correct this using the OSD menu functions (see “Pincushion”, “Parallelogram”, “Trapezoid”, “Pinbalance”
and “Rotation” functions in section “OSD Menu Functions”).
18 - Belinea 10 60 55
ENGLISH
TECHNICAL SPECIFICATIONS
Picture tube 19 inches diagonal size (45.5 cm visible),
0.24 mm dot pitch,
low emissions according to MPR II and TCO 99,
phosphorus type P22
Input signal analog 0.7 Vpp / 75 Ohm, positive
Synchronization: separate, TTL level
Horizontal synchronization: positive/negative
Vertical synchronization: positive/negative
Display colors Analog input, unlimited colors
Synchronization 30 - 96 kHz horizontal
50 - 160 Hz vertical
Pixel clock 200 MHz
Resolution max. 1600 ×1200 pixels
Misconvergence center: max. 0.20mm; main area: max. 0.30mm; edge: max. 0.40mm
Power supply 200 - 240 VAC, 50/60 Hz
Power consumption max. 120 W (Standby: < 15 W, Off-Status: < 3 W); Power saving functions EPA and
VESA-DPMS certified, Energy Label
Dimensions 470 mm (width) x 466 mm (height) x 466.5 mm (depth); (monitor only)
Weight 23.3 kg (monitor only)
Operating environment Temperature: 0 to 35 °C
Rel. humidity 10 to 90 % (without condensation)
PIN ASSIGNMENT
Pin Assignment
1 Red
2 Green
3 Blue
4 Ground
5 Ground
6 Red return
7 Green return
8 Blue return
ENERGY SAVING FUNCTIONS
This monitor is equipped with power management
features according to the EPA and VESA DPMS
standards. When not in use, the power consumption is
reduced in three steps (Standby, Suspend and Off-
Status). While the monitor is in power saving mode, the
status LED (see in figure 4) is flashing orange. Most
graphic cards and PCs support monitors with power
management features. If you have an older PC or
graphic card that does not support power management
features, please contact your dealer.
Mode H-Sync V-Sync Color of Power Recovery
status indicator consumption (max.) time
Normal active active green < 120 watts -
Standby off active orange < 15 watts < 3 sec.
Suspend active off orange < 15 watts < 3 sec.
Off-Status off off orange (flashing) < 3 watts < 20 sec.
Pin Assignment
9 —
10 Ground
11 Ground
12 SDA
13 Hor. synch.
14 Vert. synch.
15 SCL
15-pin Mini-D-Sub connector

Mode d'emploi -19
FRANÇAIS
INTRODUCTION
Ce manuel est destiné à vous familiariser avec
l’installation et l’utilisation de votre moniteur Belinea.
Veuillez prendre le temps de lire ces instructions, même
si vous êtes familier de l’usage des moniteurs en
informatique.
Le constructeur a fait tout son possible pour que ce
manuel ne contienne que des informations précises et
correctes, mais il ne saurait être tenu responsable des
possibles erreurs. En outre, le constructeur ne peut
garantir que ce matériel est adapté à l’usage que vous
souhaitez en faire. Nous vous remercions par avance
pour toute remarque d’erreur, suggestion ou critique.
© Copyright 2001
MAXDATA Systeme GmbH
45768 Marl, Allemagne
www.maxdata.com
Tous droits réservés. Aucune partie de ce manuel ne peut
être reproduite, adaptée ou distribuée sous quelque forme
que ce soit (imprimerie, photocopie, microfilm ou tout autre
procédé) ou traités sous forme électronique sans l’autorisation
écrite préalable du fabricant.
Nous nous réservons le droit d’apporter des modifications
motivées par le progrès technique. Belinea est une marque
internationalement déposée. Les autres marques et noms de
produits mentionnés dans ce document peuvent être des
marques commerciales ou des marques déposées et sont à
considérer comme telles.
Nous somme tous responsables de l’environnement: ce manuel a été entièrement imprimé
sur du papier exempt de chlore.
TABLE DES MATIÈRES
Guide des symboles
Les symboles illustrés ci-dessous sont utilisés dans ce
manuel pour indiquer un risque de se blesser ou
d’endommager les périphériques, ou encore pour
signaler une information particulièrement utile:
DANGER! Indique un risque de blessure. Si
vous ne respectez pas les instructions, vous
risquez un accident grave ou potentiellement
mortel.
ATTENTION!Indiqueunrisqued’endommager
les périphériques. Si vous ne respectez pas
les instructions, les périphériques peuvent être
endommagés.
IMPORTANT! Indique un conseil d’utilisation
ou autre information utile.
Introduction .............................................................. 19
Caractéristiques ....................................................... 20
Informations Importantes ......................................... 20
Déballage................................................................. 21
Raccordement.......................................................... 21
Mise en route ........................................................... 21
Configuration............................................................ 22
Configuration de Base ............................................. 22
Réglage de l’image dans le menu OSD .................. 22
Fonctions du menu OSD ......................................... 23
Entretien de votre moniteur ..................................... 24
Modes graphiques présélectionnés et définis par
l’utilisateur ................................................................ 24
Résolution des problèmes ....................................... 25
Fonctions de gestion de l’énergie............................ 26
Specifications techniques ........................................ 26
Brochage.................................................................. 26

20 - Belinea 10 60 55
FRANÇAIS
CARACTÉRISTIQUES
Ce moniteur est destiné à être connecté à un ordinateur compatible IBM, équipé d’un connecteur VGA à 15 broches.
Vous trouverez ci-dessous une vue d’ensemble de ses nombreuses fonctions et caractéristiques.
Multi-fréquences
30 – 96 kHz
50 – 160 Hz
Pas de masque
0,24 mm
Résolution
1600 x 1200
Contrôles
numériques en
façade
Affichage des menus
à l’écran
MPR II, TCO 99
INFORMATIONS IMPORTANTES
Précautions d’emploi
Le câble d’alimentation secteur ne doit pas être
endommagé. Ne placez aucun objet sur ce
câble, et évitez qu’il ne s’emmêle. Pour
débrancher ce cordon, tirez toujours sur la prise,
etnonsurlecâblelui-même.Uncâbleélectrique
endommagé pourrait provoquer un incendie ou
une électrocution.
•Ne posez jamais rien sur le moniteur, et surtout
pas un récipient contenant un liquide. Si celui-ci
était renversé dans le moniteur, il pourrait
provoquer une électrocution ou un court-circuit.
•Évitezderecouvrirlesorifices de ventilation. Une
circulation d’air constante est nécessaire pour
empêcher le moniteur de trop chauffer. Si l’air
ne peut plus circuler, le moniteur peut être
gravement endommagé.
•N’utilisez pas de solvants pour nettoyer le
moniteur, cela pourrait endommager le boîtier.
Pour plus d’informations sur le nettoyage du
moniteur, consultez le paragraphe «Entretien de
votre moniteur».
N’ouvrez jamais vous-même le moniteur, vous
pourriez être électrocuté. Ce moniteur ne doit
être ouvert et réparé que par des professionnels
qualifiés.
Note sur la mise en place du moniteur
•L’emplacement choisi pour l’installation ne doit
être ni trop chaud, ni trop froid, ni humide ou
poussiéreux. La chaleur et le froid peuvent
altérerlesfonctionnalitésdumoniteur.L’humidité
et la poussière peuvent le mettre hors service.
•Ne placez pas le moniteur à proximité d’une
source de chauffage, par exemple un radiateur.
N’exposez pas le moniteur à des vibrations
mécaniques ou à des secousses.
•Positionnez le moniteur de façon à protéger
l’écran de la lumière directe ou du soleil: la
lumière directe peut provoquer des réflexions
nuisibles à la qualité de l’image.
•Il ne faut pas placer le moniteur à proximité d’un
équipementgénérantdeschampsmagnétiques,
tel qu’imprimante, haut-parleur, etc., faute de
quoi l’image pourrait présenter des distorsions.
Notes sur le raccordement à l’alimentation
électrique
N’utilisez que le type de cordon secteur destiné
à être utilisé dans votre pays.
•Après avoir éteint le moniteur, attendez une
trentaine de secondes avant de débrancher le
cordon secteur. Ce délai est nécessaire pour
permettre à l’électricité statique de se dissiper.
Laprised’alimentationmuraledoitêtreaisément
accessible. La seule façon de débrancher le
moniteur de la source d’alimentation électrique
consiste à débrancher le cordon secteur.
Ce moniteur se synchronise automatiquement sur toutes les fréquences horizontales
comprises entre 30 et 96 kHz, ainsi que sur toutes les fréquences verticales comprises
entre 50 et 160 Hz.
Ce moniteur Super VGA est doté d’un tube cathodique à haute résolution, au pas de
masque de 0,24 mm.
La résolution maximale du moniteur est de 1600 x 1200 pixels.
Le moniteur est équipé d’un panneau de contrôle en face avant, avec 24 modes
mémorisés (14 mémoires préréglées en usine et 10 modes programmables par
l’utilisateur), ainsi que des contrôles numériques vous permettant d’ajuster facilement
les divers paramètres d’affichage et de colorimétrie.
Ce moniteur de 19" est équipé d’un menu OSD(On Screen Display, ou affichage à
l’écran) qui permet d’effectuer facilement des ajustements professionnels.
Ce moniteur émet un rayonnement inférieur à la norme MPR II et TCO 99.
Table of contents
Languages:
Other BELINEA Monitor manuals

BELINEA
BELINEA 2080 S2 User manual

BELINEA
BELINEA 1945 G1 User manual

BELINEA
BELINEA 101903 User manual

BELINEA
BELINEA 101750 User manual

BELINEA
BELINEA 10 80 80 User manual

BELINEA
BELINEA 101715 User manual

BELINEA
BELINEA 10 20 05 User manual

BELINEA
BELINEA 101711 User manual

BELINEA
BELINEA 10 17 15 User manual

BELINEA
BELINEA 2025 S1 User manual

BELINEA
BELINEA 101720 User manual

BELINEA
BELINEA 10 60 75 User manual

BELINEA
BELINEA 101830 User manual

BELINEA
BELINEA 1975 S1 User manual

BELINEA
BELINEA 10 30 50 User manual

BELINEA
BELINEA 102035W User manual

BELINEA
BELINEA 101536 User manual

BELINEA
BELINEA 10 19 20 User manual

BELINEA
BELINEA 10 User manual

BELINEA
BELINEA 101730 User manual


