Belkin GoStudio F8Z295 User manual

GoStudio™
User Manual
Guide d’utilisation
Manual del usuario
PM01133tt F8Z295

GoStudio
TABLE OF CONTENTS
Table of Contents SECTIONS 1 2 3 4 5 6
3 TROUBLESHOOTING ................................20
4 SPECIFICATIONS ...................................22
5 LEARNING MORE ...................................24
6 INFORMATION......................................25
Notes 28
1 INTRODUCTION .....................................1
Welcome 1
Key Features 1
2 OVERVIEW ..........................................2
GoStudio Basics 2
Recording with GoStudio 2
What’s in the Box? 3
iPod Compatibility 3
Your First GoStudio Recording 4
GoStudio Tour 6
GoStudio Inputs and Outputs 7
GoStudio Controls 10
More on Recording 15
File Size and Audio Resolution 16
Recording with Microphones 17
Listening to a Recording 17
Copying a Recording to Your Computer 18
Tripod Mount 19

1
GoStudio
Table of Contents SECTIONS 12 3 4 5 6
INTRODUCTION
Welcome
Thank you for purchasing a GoStudio mobile handheld recorder for iPod.
We designed GoStudio for a wide range of users, from podcasters to students, teachers, and journalists.
The GoStudio is compact, portable, and sturdy enough to stand up to the rigors of a mobile digital lifestyle. Its shape gives you
easy access to the controls and makes it easy to get the best recordings possible in almost any situation. The iPod docking cradle
secures your iPod in a position that allows convenient and comfortable access to the screen and click wheel.
Your GoStudio will help you make the most of the high-quality recording capabilities of your iPod. You can use the built-in
microphones or connect other audio sources using the GoStudio’s array of audio input jacks. The GoStudio’s front panel gives you
all the control you need to make great recordings, while the audio-level-indicator LEDs give you real-time feedback. Plug in your
headphones to listen in while your iPod records your audio source, then listen to your recording when you’re done. If you don’t have
headphones handy, you can play back your iPod recordings through the GoStudio’s speaker.
We are pleased that you chose to purchase a GoStudio, and we have designed it to give you many years of high-quality recording.
Key Features
• RecorddirectlytoyouriPodin16-bit,44kHzdigitalaudioquality
• Built-instereomicrophones
• InstantlyplaybackyourrecordingsdirectlyfromyouriPodthrough
headphones or through the built-in speaker, with a discreet monitor
volume control
• TwocomboinputswithXLRand¼”jacksforconnectingdynamic
microphones(XLRor¼”)orline-levelsources(¼”)
• 3.5mm(1/8”)stereoinputformicrophonesorline-levelsources
• Gainswitchesforamplifyingaudiosignals,withamasterlevelcontrol
for fine-tuning the audio volume
• Optionalrecordingfeatures:monoswitchformixingaudiotomono;
limiterforkeepingaudiolevelswithintheiPodrecordinglimits;anda
low cut filter for removing unwanted low-frequency sounds

2
GoStudio
Table of Contents SECTIONS 1 23 4 5 6
OVERVIEW
Once you’ve prepared the audio source, you’ll adjust the gain and
master level controls for your recording. These controls set the volume,
or“level,”oftheaudiothatyouriPodwillrecord.Settingtheaudio
level is one of the most important aspects of making great recordings.
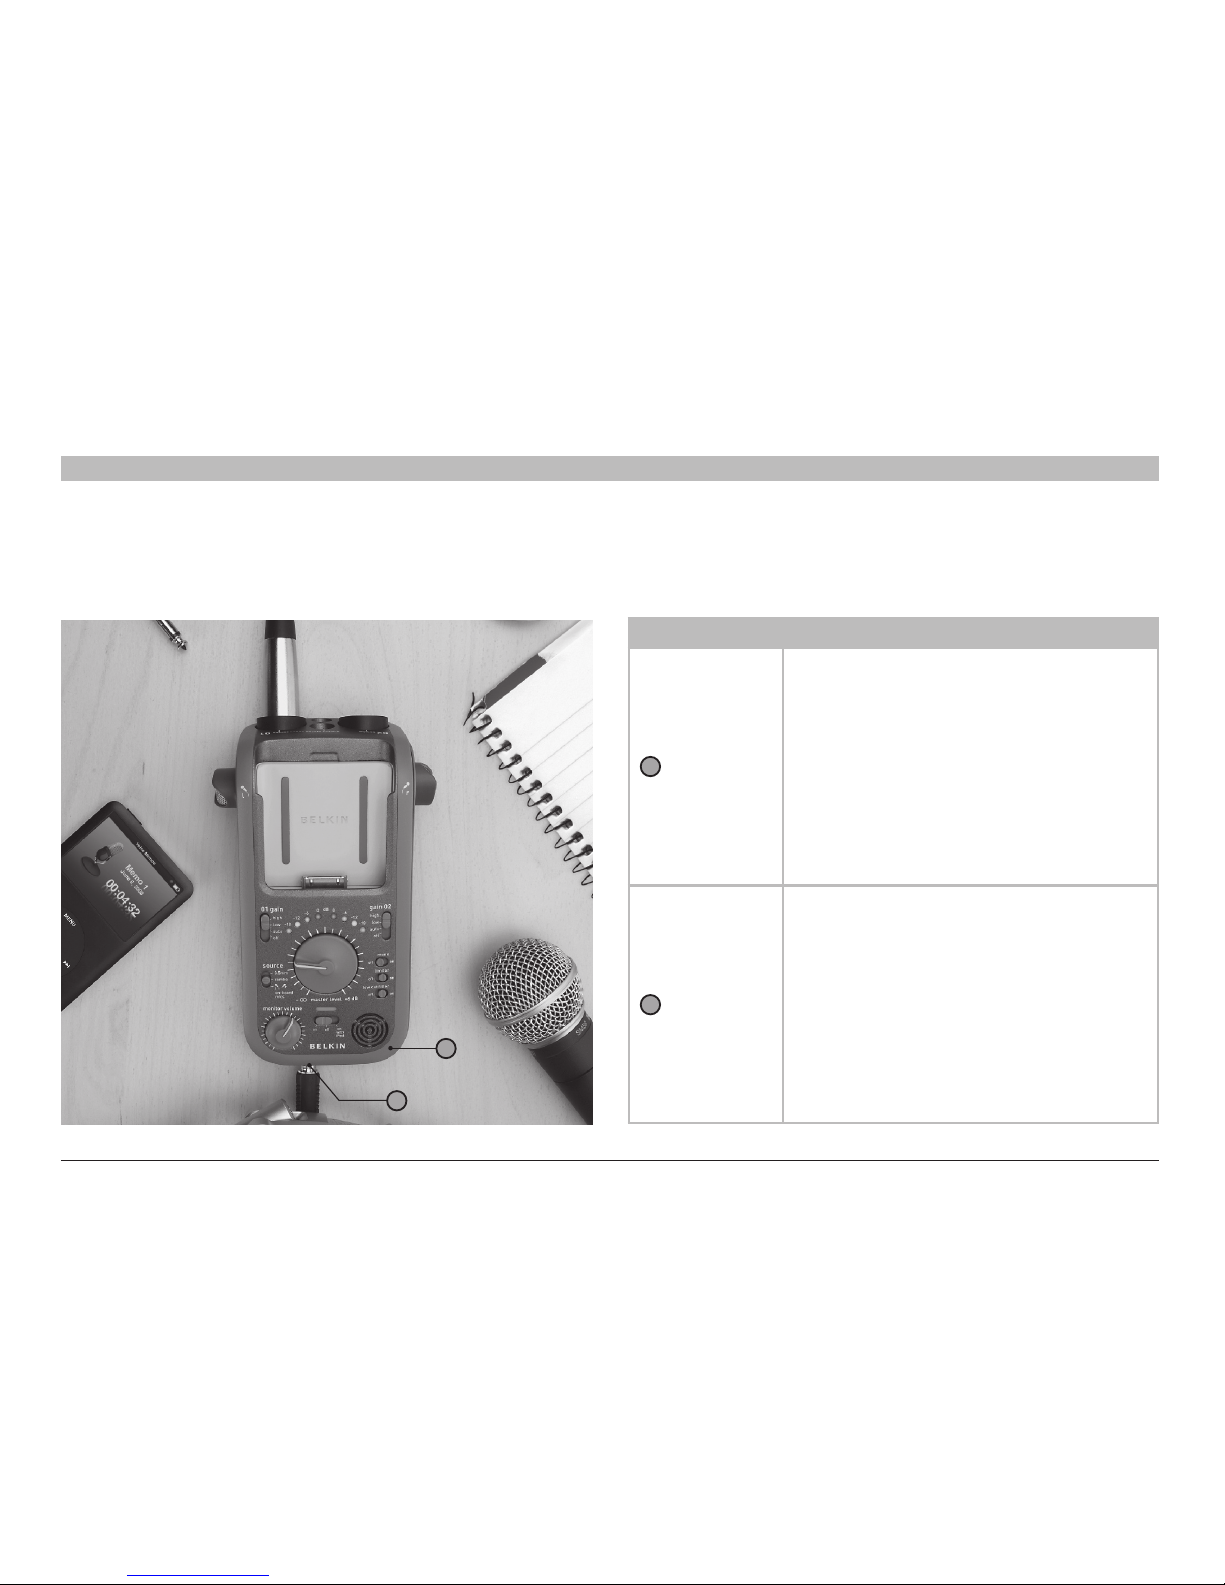
To help you set the audio level, the GoStudio lets you to listen to, or
“monitor,”theaudioinrealtimethroughtheGoStudio’sheadphonejack.
Additionally, an array of LEDs on the GoStudio shows you how loud the
audio is.
Once the recording level is set, you might want to activate some of the
GoStudio’s other recording options. The mono switch lets you mix down
your audio source to mono. The limiter switch lets you activate an audio
limiter function, which makes sure the audio signal that the iPod will
record does not exceed the optimal maximum level. The low cut filter
switch lets you activate a filter that removes low-frequency content from
your recording, such as sounds caused by vibrations or air conditioners.
Now you’re ready to record! Navigate to your iPod recording menu and
start a new recording. When you’re done recording, play it back through
your headphones or through the GoStudio’s built-in speaker. Then,
you can import the audio file of your recording from your iPod to your
computer where you can store it, edit it, distribute it, remix it, or just
about anything you can imagine.
GoStudio Basics
Your GoStudio captures and processes audio, which is then recorded
in high quality by your iPod. The GoStudio provides you with the audio
input options, audio controls, and real-time feedback needed to make
great recordings in almost any situation without any hassle.
Your iPod saves recordings as uncompressed files. There are a number
of ways that you can access the files containing your recordings later.
These are described on page 17.
Recording with GoStudio
To make a recording with your GoStudio, you will usually follow a few
simple steps. We’ll walk through your first recording (skip ahead to
“YourFirstGoStudioRecording”onpage14ifyoujustcan’twaitto
getstarted),buthere’sanoverviewoftherecordingprocesstogetyou
warmed up.
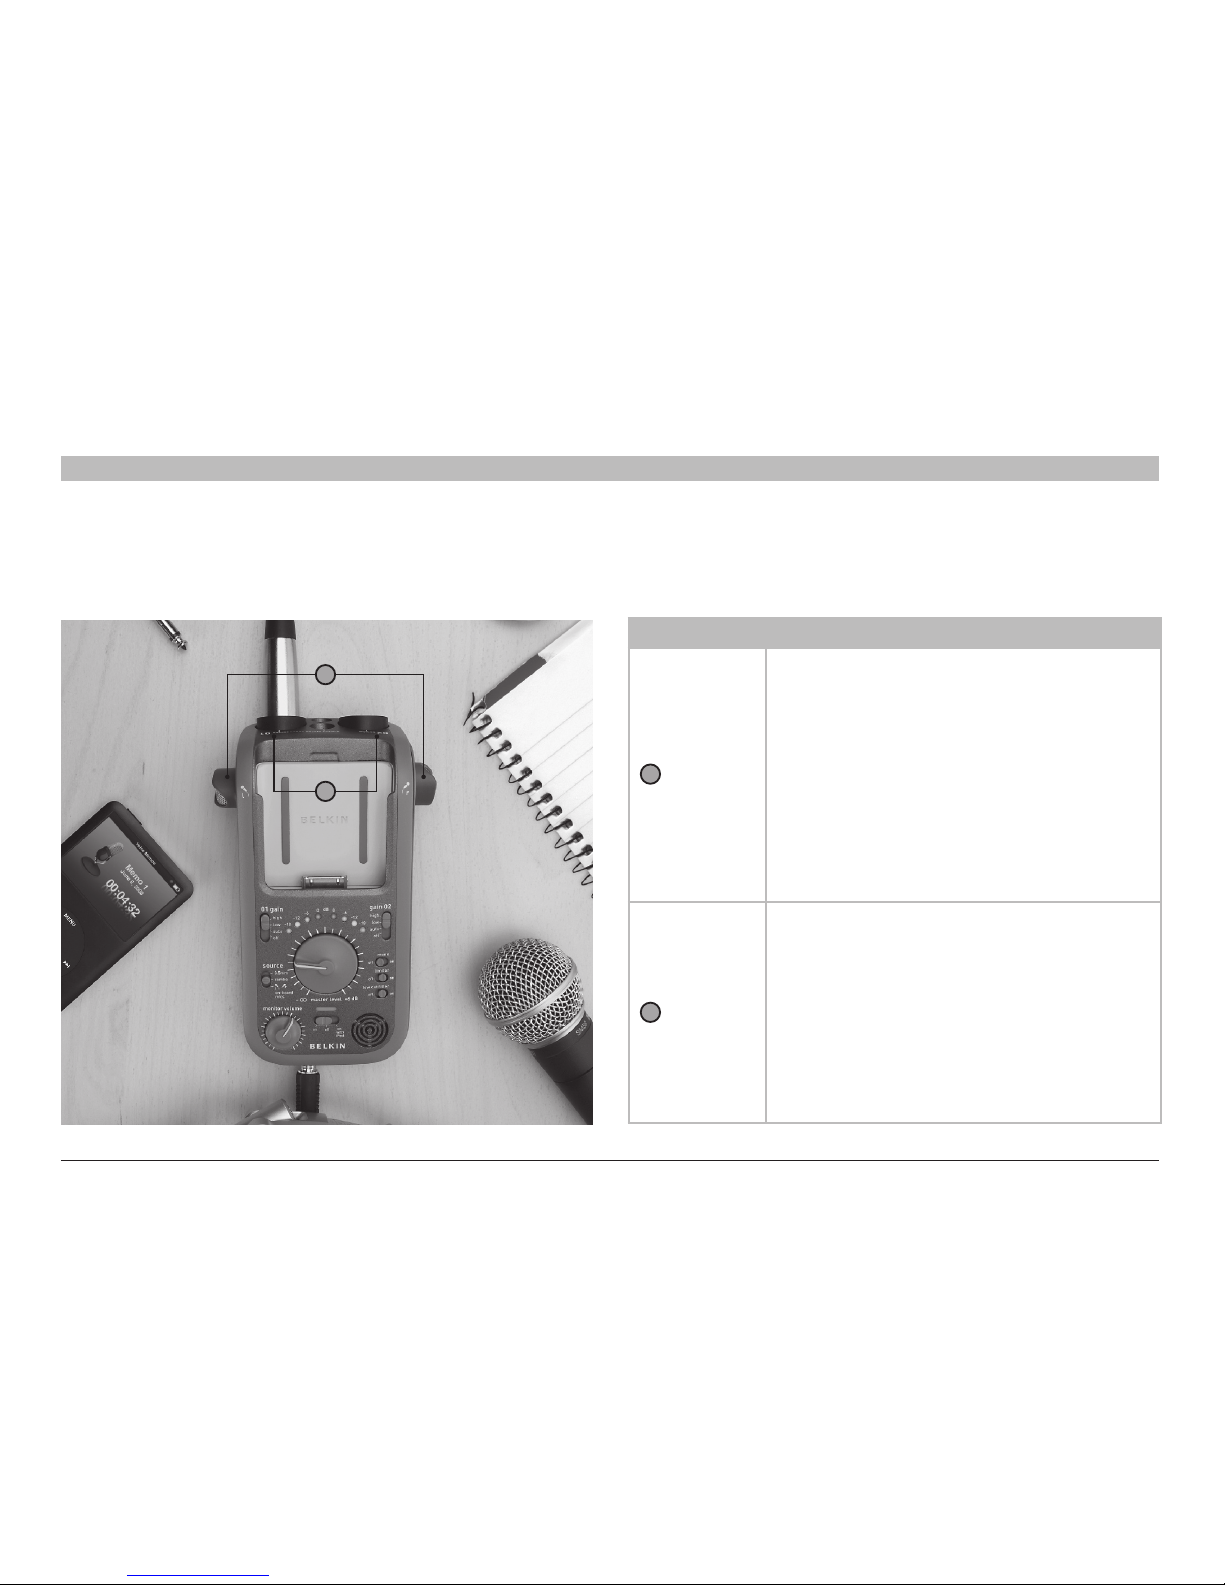
First, you’ll set up the audio source for your recording. If you want to
use the GoStudio’s built-in stereo microphones, then you’re ready to go.
If you want to connect another audio source to the GoStudio, such as
a microphone or an instrument, you’ll need a cable to connect it to the
GoStudio. Then, make sure the GoStudio’s Source switch is set for the
audio source you want to record.

3
GoStudio
Table of Contents SECTIONS 1 23 4 5 6
OVERVIEW
What’s in the Box?
ThefollowingitemsshouldbeinyourGoStudiobox:
• GoStudio
• AdapterinsertsfordifferentiPodtypes
• Warrantycard
• QuickStartGuide
• TwoAAAbatteries
iPod Compatibility
iPod nano
2nd generation (aluminum)
2e génération (aluminium)
2da generación (aluminio)
2GB 4GB 8GB
iPod
5th generation (video)
5e génération (vidéo)
5ta generación (video)
30GB 60GB 80GB
iPod nano
3rd generation (video)
3e génération (vidéo)
3ra generación (video)
4GB 8GB
iPod nano
3rd generation (video)
3e génération (vidéo)
3ra generación (video)
4GB 8GB
iPod classic
80GB 160GB
iPod classic
80GB 160GB
Note:GoStudiowillworkwith2ndgenerationiPodnano(aluminum),but
the GoStudio does not include an adapter for this type of iPod.

4
GoStudio
Table of Contents SECTIONS 1 23 4 5 6
OVERVIEW
Your First GoStudio Recording
It only takes a few minutes to set up your GoStudio and start recording.
Let’s walk through your first recording so you can get familiar with the GoStudio’s controls. All you need is your GoStudio, your iPod, and the
two AAA batteries that came with the GoStudio. For more details about how these controls work, see the “GoStudio Controls” section on
page 10.
To make your first GoStudio recording:
1 Make sure the GoStudio’s power switch is in the off position. The power switch is located toward the bottom of the control panel.
2 Remove the battery door on the rear of the GoStudio and install two AAA batteries.
3 Switch the GoStudio power switch to the on position. Check that the GoStudio’s status indicator, located directly above the power switch, is green.
4 In the next few steps, we’ll set the audio controls to record using the GoStudio’s built-in microphones.
5 Set the GoStudio’s Source switch, located on the left side of the control panel, to the lowest position. This tells the GoStudio that you want to
record using the on-board mics.
6 Set the 01 gain switch, located on the upper-left side of the control panel, to the auto position. This configures the GoStudio to provide
amplification that adapts to the audio that’s being recorded. In this case, the auto setting will work well for recording using the on-board
microphones in many situations. Don’t worry about the gain 02 switch, as this control does not apply when using the on-board microphones.
7 Set the master level control knob so that it points to the 0marking,whichisbetweenthe2:00and3:00positionoftheknob’srotation.Settingthis
knob to the 0point tells the GoStudio not to apply any extra attenuation or amplification to the audio signal.
8 Set the optional mono, limiter, and low cut filter control switches to the off position. These controls are located on the right side of the control
panel.

5
GoStudio
Table of Contents SECTIONS 1 23 4 5 6
OVERVIEW
9 Let’s do a quick level check. Gently tap on one of the GoStudio’s microphones. You should see some of the GoStudio’s recording level LEDs,
located above the master level control knob, light up when you tap the microphone. This lets you know that the audio signal is ready to be
recorded.
10 Find the right adapter for your iPod type and install the adapter in the GoStudio cradle. Some iPod models don’t require an adapter.
11 Slide your iPod into the cradle and gently push down on your iPod so that it connects to the GoStudio.
12 Some iPod models will automatically transition to the iPod Voice Memo interface. If your iPod does not automatically transition to the Voice Memo
interface, then you’ll have to navigate to it using the iPod click wheel. From your iPod main menu, select the Voice Memos option.
13 Using the iPod interface and controls, start recording. Note that the GoStudio’s status indicator changes to red when your iPod is recording.
14 Now make some noise into the GoStudio’s microphones. Tap the microphones, speak into the microphones, or find someone else to speak into the
microphones.
15 Once you’re done, use your iPod controls to end the recording.
16 Now your iPod should show a list of recordings, which are shown as a time stamp of when the recording was made. In this case, the recording
youjustmademightbetheonlyrecordinginthelist.Scrolltothenewrecordingandpresstheplay/pausebuttononyouriPodclickwheel.You
should be able to hear your recording through the GoStudio’s speaker, which is located on the lower-right side of the control panel. If you can’t hear
anything, turn up the monitor level control knob, which is located on the lower-left side of the control panel.
17 That’s it! You’ve made your first recording. Now that you understand the GoStudio’s basic controls, you’ll be able to set up and record much more
quickly in the future.
18 Go to www.belkin.com/registration to register your GoStudio.

6
GoStudio
Table of Contents SECTIONS 1 23 4 5 6
OVERVIEW
GoStudio Tour
Take a few minutes to learn how to use the inputs and controls on your GoStudio.

7
GoStudio
Table of Contents SECTIONS 1 23 4 5 6
OVERVIEW
Input/Output Description
On-Board
Microphones
Your GoStudio comes with a set of on-board stereo microphones (or
“mics”)thatcanbeusedtocaptureaudio.Soundsthatarepickedupby
the mic on the left are mixed to the left stereo channel. Sounds picked up
by the mic on the right are mixed to the right stereo channel.
The microphones are unidirectional, which means that each mic tends to
focus on audio from sources that the mic is pointing toward. Notice that the
microphones tend to point away from the GoStudio body at approximately
45 degrees. This allows the microphones to capture stereo recordings
accurately.
If you want to enhance the directionality of the microphones, you can
rotate each mic to point toward a sound source that you want to capture.
For example, when recording an interview, you can rotate one microphone
toward the interviewee and the other microphone toward yourself.
The on-board mics are quite sensitive. Depending on the loudness
of the sounds you want to record, as well as the settings of your
GoStudio controls, you may need to make sure the microphones
aren’t too close to the subject you’re recording.
Combo Jacks
Inputs labeled combo 01 and combo 02arecombination(or“combo”)
jacksthatletyouconnecteitheranXLRtypeconnectorora¼”connector.
These connectors are typically used to connect dynamic microphones
totheGoStudio,althoughthe¼”inputjackswillacceptline-levelsignals
as well.
Each input jack accepts a mono input signal, which can be balanced or
unbalanced.
The combo 01 input is routed to the left channel of the stereo mix and
the combo 02 input is routed to the right channel. If you would prefer
not to have the inputs panned all the way to the right or left channel,
or if you’re recording using only one of the two combo jacks, then
switch the GoStudio’s mono control to the on position to create a
mono mix.
GoStudio Inputs and Outputs
You can use the inputs and outputs to connect microphones and headphones to your GoStudio.
A
B
A
B

8
GoStudio
Table of Contents SECTIONS 1 23 4 5 6
OVERVIEW
Input/Output Description
3.5mm Stereo Jack
The 3.5mm jack that sits between the combo jacks can be used to
connect microphones or line-level audio sources.
TheGoStudioprovides“plug-inpower”forsmallelectretcondenser
microphones(ECMs),suchaslapelmicsanddesktop-computermics.
Some examples of line-level audio sources are MP3 players, guitar-
amp simulators, microphone preamplifiers, and laptop computers.
HeadphoneOutput
The headphone connection can be used to connect headphones
that have a 3.5mm jack, such as your iPod earbuds. The audio heard
through the headphone output will either be the audio signal that the
GoStudio is capturing or the audio from your iPod when playing back
an audio file.
You can also use the headphone output as a line output to connect the
GoStudio to another audio device with a line-level input. In this case,
you may need to turn up the monitor volume control (see the GoStudio
Controlstablebelow).
Note that the GoStudio’s speaker is disabled when headphones are
connected(seebelow).
C
C
D
D

9
GoStudio
Table of Contents SECTIONS 1 23 4 5 6
OVERVIEW
Input/Output Description
Speaker
The speaker will activate when playing back audio from your iPod, but
only if headphones are not connected to the GoStudio.
Note that heavy speaker use, especially at high volumes, may drain the
GoStudio’s batteries more quickly.
AC Power Supply
(Notincluded)
Optional power supply available to power GoStudio from any compliant
US 110-style grounded outlet. To purchase, please visit www.belkin.
com and search for part number F8Z295-PWR.
An AC power supply must be connected to the GoStudio in order to
provide power to your iPod for charging.
The power supply must meet the electrical requirements listed
in the “Specifications” section of this manual. Attaching a
non-compliant power supply may damage the GoStudio and/
or your iPod!
E
F
F
E

10
GoStudio
Table of Contents SECTIONS 1 23 4 5 6
OVERVIEW
Input/Output Description
Power Switch
The power switch controls whether or not the GoStudio operates.
on: GoStudio is operational.
off: GoStudio is off. Turn off the GoStudio when not in use to conserve
its batteries.
on with iPod: This setting is a little more interesting. When the power
switch is in this position, the GoStudio will operate whenever it detects
that an iPod is docked (as long as the iPod is not in deep sleep or
hibernatemode—consultyouriPodmanual).Thismeansthatyoucan
control the GoStudio’s power state by docking and undocking your
iPod to your GoStudio instead of toggling the power switch every time
you need to make a quick recording.
Note that the GoStudio always provides power to your iPod for
charging when an AC adapter is connected to the GoStudio, even
when the power switch is in the off position.
Source Select
This switch determines which audio input is captured by the GoStudio.
This switch should be set to the input that is in use. The selected
source is the only source that will be captured by the GoStudio. The
other input sources will be muted.
GoStudio Controls
You can use your GoStudio’s controls to fine-tune and monitor your recordings.
A
A
B
B

11
GoStudio
Table of Contents SECTIONS 1 23 4 5 6
OVERVIEW
Input/Output Description
Gain Control
Switches
The gain control determines how much amplification is applied to the
audio signal in the first stage of the GoStudio’s audio processor.
Thisstageissometimescalled“pre-gain.”Pre-gainisusedwhenthe
incoming audio signal is at a very low level and the signal must be
amplified for the best results. Pre-gain is most often needed when
using microphones, since microphones usually output very low-
levelsignals.Butbecareful;applyingtoomuchpre-gaincancause
distortion!
Thegaincontrolswitchsettingsprovidepre-gainasdescribedbelow:
off: No pre-gain is applied. Use this setting for line-level sources.
auto: This setting applies pre-gain that adjusts to the input audio
signal. The pre-gain is automatically reduced when the input signal
gets louder. This setting can be used with microphone or line-level
inputs.
low: A low amount of pre-gain is applied. This setting tends to work
best when using microphones in loud situations. This setting can also
be used for non-microphone sources that are a little too quiet.
high: A high amount of pre-gain is applied. This setting should be used
when recording very quiet or distant subjects using microphones.
It’s important to note that the gain control switch labeled gain 02 is
only used when recording from the combo jack inputs. This allows
you to dial in the appropriate level of pre-gain for each source. In
this case, the gain 01 switch controls the pre-gain of the combo 01
input, while the gain 02 switch controls the pre-gain of the combo
02 input. When recording from the 3.5mm input or the on-board
microphones, the gain 01 switch controls the pre-gain of both the
left and right stereo channels.
C
C

12
GoStudio
Table of Contents SECTIONS 1 23 4 5 6
OVERVIEW
Input/Output Description
Master Level
The master level control provides finer control of the audio signal
volume before it’s recorded by the iPod. The master level control can
reduce or amplify the audio signal after pre-gain is applied (see “Gain
ControlSwitches”above).Youcanalsousethiscontroltomakevolume
adjustments while recording, or perform fade-in and fade-out effects.
Note that there is a0toward the right side of the master level control.
When the master level knob points to the 0, then the signal is not being
attenuatedoramplified.Youcanthinkofthisasthe“neutral”position
that you can use when setting up a recording.
When the master level knob is turned completely counterclockwise, the
audio is muted. Turning the master level knob completely clockwise
results in +6 dB of amplification.
Limiter
The limiter feature can be used to make sure the audio signal that is
sent to the iPod is always within the signal range that the iPod can
accurately capture. If the signal that’s sent to the iPod is too loud, the
recording may be distorted (note that applying too much pre-gain can
alsoleadtodistortion—seethe“GainControlSwitches”description
above).
When the limiter is activated, the limiter looks at the audio signal and
automatically reduces the audio signal level if it gets too loud.
Generally you’ll barely notice a change in the audio, but that’s how it’s
meant to work. The limiter keeps very loud signals in check without
impacting other signals that aren’t too loud.
D
D
E
E

13
GoStudio
Table of Contents SECTIONS 1 23 4 5 6
OVERVIEW
Input/Output Description
Low Cut Filter
The low cut filter basically filters out very low-frequency signals
(below120Hz).Thisfeatureisusefulifyoufindthatcertainsounds
are degrading your recordings, such as air-conditioning systems,
vibrations, nearby delivery trucks, or a number of other things.
Mono Switch
The mono switch mixes the incoming stereo signal down to a mono
mix.
This is useful when you are using the combo jacks to record audio from
two different sources, but you don’t want the two sources to appear
only on the left and right stereo channels individually (see the “Combo
Jacks”descriptioninthe“GoStudioInputsandOutputs”tableabove).
This is also useful when recording from only one combo jack source,
and you don’t want the audio to only appear in the left or right channel.
Monitor Volume The monitor volume control sets the volume of the playback from the
GoStudio through the headphone output jack or the built-in speaker.
F
H
G
H
F
G

14
GoStudio
Table of Contents SECTIONS 1 23 4 5 6
OVERVIEW
Input/Output Description
Recording Level
LEDs
The recording-level LED indicators show how loud the audio signal is.
When recording or preparing to record, the recording-level LEDs will
light up when the audio level reaches a certain threshold. When playing
back audio from your iPod, the recording-level LEDs will respond to the
level of the audio being played.
The recording LED lights can tell you if the volume is too low or too
high. If none of the recording-level LEDs light up while you’re recording,
your audio signal volume might be too low. If all of the recording-level
LEDs are lit up constantly, your volume might be too high. You can
adjustthevolumeusingthegaincontrolswitchesand/orthemaster
level control knob.
The four LEDs to the left represent the left channel of the stereo mix,
and the four LEDs to the right represent the right channel.
The red LEDs in the center, marked with a 0, will light up when the
audio signal is right at the maximum audio level that the iPod can
accurately record. If either of these LEDs is frequently lighting up, you
might want to turn down the master level.
Status Indicator
The status-indicator LED shows you the state of the GoStudio.
Green: GoStudio is operational, but not performing a recording.
Red: GoStudio is operational and a recording is in progress.
Blinking: The status indicator starts to blink when the GoStudio
senses that the batteries are getting low. When the status indicator
starts to blink, you can expect to have 30–60 minutes of recording time
remaining before the batteries die. The status indicator blinks more
quickly as the batteries get lower and lower.
If the status indicator does not turn on when the GoStudio power
switch is set to on (or on with iPodwithfunctioningiPodattached),
this usually means that the batteries are too low for the GoStudio to
operate, and the batteries should be changed or charged.
I
I
J
J

15
GoStudio
Table of Contents SECTIONS 1 23 4 5 6
OVERVIEW
More on Recording
As you begin to explore recording with your GoStudio, experiment with
the gain controls for the different types of microphones you use and
in the different environments as well. These settings will most likely
need adjustment depending on what and whom you are recording.
Additionally, examining how the limiter and low cut filter can enhance
your recordings by helping you manage the levels of your recordings
as well as the amount of lower frequencies that are captured will also
impact your ability to develop higher-quality recordings in different
environments and will require less editing.

16
GoStudio
Table of Contents SECTIONS 1 23 4 5 6
OVERVIEW
File Size and Audio Resolution
Using your iPod, you can choose the quality setting of your
recordings.
Your iPod Voice Memos screen allows you to set the recording quality
to high quality or low quality. Choosing the right quality setting will help
you make the most of your recordings.
High Quality
The iPod high-quality setting lets you make recordings at a sampling
rateof44.1kHzwith16-bitstereosamples.Basically,thisisthesame
quality as standard uncompressed audio CDs. Use high quality when
you need the best audio fidelity or you want to capture audio in stereo.
Recording in high quality results in relatively large files that must be
stored by your iPod. Make sure you have enough room on your iPod to
record your content. To estimate how much storage space you’ll need,
remember that one minute of audio requires about 10MB of storage
space.
Keep in mind that recording in high quality may drain the batteries of
certain iPod models more quickly than low-quality recording, especially
when using a 5th generation iPod with video or an iPod classic. Note
that you don’t need to worry about this when the GoStudio is powered
with a compatible AC power supply, since the GoStudio will keep your
iPod battery charged.
Low Quality
The iPod low-quality setting records audio with lower fidelity, which
is suitable for most voice recordings. In this setting, audio files are
recordedatasamplingrateof22.05kHzwith16-bitmonosamples.
Record in low-quality mode when audio fidelity is less important than
theotherconsiderations:filesizeandiPodbatteryconservation.
Recording in low quality results in files that are much smaller than
when recording in high quality. Because of this, you can fit much more
audio content on your iPod by recording in low quality. For example, in
high-quality mode, 10MB of storage space can hold approximately one
minute of audio. But in low-quality mode, 10MB of space holds almost
four minutes of audio.
When recording to a 5th generation iPod with video or an iPod classic,
recording in low quality tends to drain the iPod battery more slowly than
high quality. When using batteries to power the GoStudio, instead of an
AC power supply, this might be an important consideration.
Note that when you choose to record in low quality, the GoStudio will
mix the audio sources to a mono mix. If you’re listening to your audio
inputs through the GoStudio using headphones, you’ll hear the same
mono mix that the iPod is recording.

17
GoStudio
Table of Contents SECTIONS 1 23 4 5 6
OVERVIEW
Listening to a Recording
Your recordings are saved as voice memos on your iPod. Each recording
is an uncompressed WAV file, and the file name is the recording’s date
and time.
To listen to a recording:
• NavigatetoyouriPodVoiceMemosinterface.Thisstepisdifferent
fordifferentiPodmodels:
• iPodclassicand3rdgenerationiPodnano:TheVoiceMemos
entry appears in your iPod top-level menu.
• 5thgenerationiPodwithvideo:ReturntoyouriPodtop-level
menu,thenselect“Extras>VoiceMemos”.
• Selecttherecordingandpress“Play”.
RecordingsthathavebeenimportedintoiTunes(seetherightcolumn)
can be found in the Voice Memos playlist on your iPod. Select “Music >
Playlists>VoiceMemos”.
Recording with Microphones
Read on to learn how to select and place a mic when recording.
Using the right kind of microphone is imperative with the GoStudio.
Because it is a portable device that allows for recording in any
environment, you must use a microphone that is designed for these
conditions and not for indoor studio recordings (e.g., a dynamic
microphone).
Dynamic Microphones
Dynamic(or“moving-coil”)microphonesareusuallylessexpensiveand
less sensitive than condenser microphones. Because they don’t have
amplifiers, dynamic mics don’t need phantom power. Phantom power
should not harm a dynamic mic, but you should turn off phantom power
before connecting a dynamic mic.
For more information about dynamic microphones, you can find many
sources on the Web.

18
GoStudio
Table of Contents SECTIONS 1 23 4 5 6
OVERVIEW
Note about long recordings:
When making a recording that is more than two hours long, your iPod
may split your recording into multiple voice-memo files, each with a
maximum length of two hours.
Copying a Recording to Your Computer
IfyouriPodissettoautomaticallyupdate(or“sync”)songsand
playlists, your recordings will be copied to your computer when you
connect your iPod. If iTunes is not set to sync songs and playlists
with your iPod, iTunes will ask you if you’d like to copy your new voice
memos when you connect your iPod to your computer.
Keep in mind that your recent recordings will be moved from your Voice
Memos menu on your iPod to the Voice Memos playlist once you’ve
imported them into iTunes. To open the Voice Memos playlist, select
“Music>Playlists>VoiceMemos”.
If you prefer the drag-and-drop approach, which may be more useful
if you plan to work with your recordings using other audio software,
youmustfirstchooseto“Manuallymanagemusicandvideos”foryour
iPodwithiniTunes.Thiswillalsoautomatically“Enablediskuse”for
youriPod,whichiswhatyouwant.Then,select“No”wheniTunesasks
if you’d like it to import your recent voice memos each time you dock
your iPod. Instead, you can manage your recordings through Windows
Explorer(PC)orFinder(Mac).YourrecordingsareregularWAVfiles,so
you can treat them as you would any other WAV file.
On a Windows PC, your iPod will appear in the list of drives when you
click“MyComputer”onyourdesktop.OnaMac,youriPodshould
appear in the Finder or on your desktop. Your recordings will be in the
“Recordings”folder.Eachrecording’sfilenameincludesthedateand
time of the recording.
Table of contents
Languages:
Other Belkin Recording Equipment manuals
Popular Recording Equipment manuals by other brands

TC Electronic
TC Electronic DBMAX - V 2 user manual

Tektronix
Tektronix DD 501 instruction manual

unisyn
unisyn OpenElect OVI-VC instructions

Roland
Roland Compu Rhythm CR-68 owner's manual

TeraBee
TeraBee TeraRanger Evo Swipe Plus user manual

Lattice Semiconductor
Lattice Semiconductor ECP5 Versa Technical notes