Belkin F8Z109 User manual

BELKIN
User Manual
Guide d'Utilisation
Manual del Usuario
TUNESTUDIO™

TABLE OF CONTENTS
WELCOME
Key Features
TUNESTUDIO
BASICS
What
You
Can
Do
with Your TuneStudio
What
You
Can
Connect
to
Your TuneStudio
WHAT'S IN
THE
BOX?
Cables You
May
Need
iPod,
WINDOWS,
AND
Mac
COMPATIBILITY
iPod
Windows
Macintosh
SETTING
UP
YOUR
TUNESTUDIO
To
set
up
your
TuneStudio
TUNESTUDIO
TOUR
TuneStudio
Inputs
and
Outputs
SETTING
THE
RECORDING
LEVEL
RECORDING
WITH
MICROPHONES
Types
of
Microphones
Recording
with
Multiple
Microphones
RECORDING
A
PODCAST
Tips
for
Record
ing aPod
cast
RECORDING
LIVE
MUSIC
Tips
for
Recording
Acoustic
Instruments
Tips
for
Recording
Electrical Instruments
RECORDING
A
CHOIR
Tips
for
Record
ing aChoir
RECORDING
TO
OR
FROM
A
COMPUTER
Tips
for
Recording
to
or
From a
Computer
EQUALIZING
(EQ)
TIPS
MIXINGTIPS
LISTENING
TO
A
RECORDING
Copying
a
Recording
to
Your
Computer
1
1
2
2
2
3
3
4
4
4
4
5
5
6
7
10
11
11
11
12
13
14
15
15
16
16
17
18
19
20
21
21

PROTECTING YOUR HEARING
TROUBLESHOOTING
If the Recording Menu button doesn't work
If your TuneStudio won't turn on
If
you
don't hear anything
in
the studio monitors or headphones
Ifthe microphone volume is too low
If
an
instrument's volume
is
too low
Ifthe sound is distorted
If
you
hear a"hum" sound
in
the recording
If your recordings are only
in
the left channel
Ifyour computer doesn't see your TuneStudio
TUNESTUDIO SPECIFICATIONS
LEARNING
MORE
GLOSSARY
Balance
Boost
Clipping
Cut
dB (decibel)
Distortion
Feedback
Gain
Monitor
Pan
("panorama")
RCA
("Radio Corporation of America")
TRS
("Tip-Ring-Sleeve")
USB ("Universal Serial Bus")
XLR
INFORMATION
NOTES
TABLE OF CONTENTS
22
23
23
23
23
23
23
24
24
24
24
25
27
28
28
28
28
28
28
28
28
28
28
28
28
28
28
28
29
32

WELCOME
Thank you
for
purchasing aTuneStudio iPod recording studio.
We designed TuneStudio for awide range of users, from novice podcasters to experienced musicians.
It's
compact,
portable, and sturdy enough to stand
up
to life
in
arehearsal room. Its
shape
gives you easy
access
to the
controls
and simplifies cable management. The iPod docking cradle keeps your iPod secured
in
aposition
that
allows convenient and
comfortable
access to the screen and click wheel.
Your TuneStudio will help you make the most
of
the high-quality recording capabilities
of
the iPod.
You
can
connect
up to four instruments or audio sources. Each audio input channel includes equalization
(EO),
pan,
and level controls. Input channels 1and 2can also provide again control and optional phantom power
for microphones.
We are pleased that you chose to purchase aTuneStudio, and we have designed it to give you many years of
high-quality
recording and mixing.
Have fun!
Key
Features
•Record
directly
to your iPod
in
16-bit, 44kHz digital audio quality
•Record to and from your PC or Mac
computer
using USB
1.1
or
higher
•Instantly play
back
your recordings directly from your iPod
•Charge
your
iPod while recording
•4-channel mixing console
•
3-band
EO,
pan/balance
and level controls to perfectly mix and enhance each channel
• 2
microphone
inputs with optional phantom
power
and up to 60 dB of gain
•
High-quality
stereo
compressor
with gain control to keep the audio levels within the recording limits
of
the iPod and avoid clipping
()

TUNESTUDIO BASICS
Your TuneStudio combines multiple audio sources ("channels") into one stereo signal.
You
can use the following
controls to enhance each channel's sound before it is mixed with the other channels:
•
Level
control to set the volume
•
Pan
(or "balance" for stereo channels) control to move the sound to the left or right
•
Low,
mid, and high
EQs
("equalizers") to fine-tune the sound
Your TuneStudio also includes acompressor that can be used to enhance your recordings and keep the volume
levels within the recording limits of the iPod.
What
You
Can Do with Your TuneStudio
•Record to
or
from
an
iPod
•Record to
or
from acomputer
•Record from up to 5audio sources
•Listen to your mix while recording, with studio monitors or headphones
•
Play
back your recordings from your iPod immediately after recording
What
You
Can
Connect
to Your TuneStudio
You
can connect almost any instrument, microphone, or other audio device to your TuneStudio.
Your TuneStudio has inputs for four different types of cables:
XLR,
1/4" TRS,
RCA,
and USB. With the right
cables or audio connector adapters, you should be able to connect almost any audio source, including:
•
CD
players
•Computers
•Drum machines
•Guitars and bass guitars
•Microphones
•Synthesizers and keyboards

WHAT'S IN THE BOX
The following items should
be
in
your TuneStudio box:
•TuneStudio
•CD with recording software
•1/8" (3.5mm) to 1/4" (6.35mm) headphone cable adapter
•
AC
power supply and power cable
•Adapter inserts for iPod
•Warranty card
•This user guide
Cables You May Need
You will need the following cables to connect microphones ("mics"), instruments, and other devices to
your TuneStudio:
Device Cable Type Example
Electronic audio sources
(such as CD players)
Instruments
RCA stereo
TRS 1/4"
)
Computers
Microphones and
high-end professional
audio equipment
USB
XLR

iPod, WINDOWS, AND
Mac
COMPATIBILITY
iPod
iPod classic
80GB 160GB
iPod
nanD
3rd generation (video)
4GB 8GB
iPod
5th generation (video)
30GB 60GB 80GB
iPod
nanD
2nd generation (aluminum)
2GB 4GB 8GB
Windows
Pentium®
II
350MHz (Pentium
III
500MHz or faster recommended)
64MB
RAM
(128MB recommended)
Windows®
XP
or
Windows
Vista™
CD drive
USB
1.1
or USB 2.0 port (USB 2.0 recommended)
Macintosh
83,
G4,
iMac, iBook, or PowerBook with native USB support
64MB
RAM
(128MB recommended)
CD drive
Mac
OS
Xversion 10.2.8 "Jaguar" or later

SETTING UP YOUR TUNESTUDIO
It only takes afew minutes to set up your TuneStudio and start recording.
To
set up your TuneStudio:
1Verify all devices are turned
off
and all level controls are set to
-00
(completely to the left).
2Connect the input sources.
3Insert your iPod into your TuneStudio's iPod dock.
4Connect the
PC,
studio monitors, and/or headphones.
5Plug TuneStudio and other devices into AC power.
6Turn everything on
in
the following order:
•Input sources
•TuneStudio (turning on your TuneStudio will turn on your iPod)
•Studio monitors, headphones,
and/or
computer
7When turning off, always turn
off
devices
in
the following order:
•Studio monitors, headphones, and/or computer
•TuneStudio
•Input sources
8Go to www.belkin.com/registration to register your TuneStudio.

®
1/4"
TRS
Take
afew minutes to learn how to use the inputs and controls on your TuneStudio.
o
0)
®
RCA MONITOR USB
INPUTS OUT AUDIO
TUNESTUDIO TOUR
f1\
XLR
MIC
----
\V
INPUTS
(j) GAIN
----
HIGH
----
MED
----
LOW----
®
PAN
----
PEAK
@INDICATORS
----
@LEVEL----
@BALANCE
LHEADPHONES
®
HEADPHONES
PLAYBACK
@
iPod
PLAYBACK @
LEFT &RIGHT Q
RECORDING LEOs ®
USB LEVEL INPUT @
COMPRESSOR @
AUDIO MIX
IN
RATIO
@
MASTER LEVEL @
MONITOR
~
PLAYBACK LEVEL
@!
RECORDING @
MENU BUTTON
17
•

TUNESTUDIO TOUR
You can use the inputs and outputs to
connect
instruments, mics, computers, speakers, and headphones
to your TuneStudio.
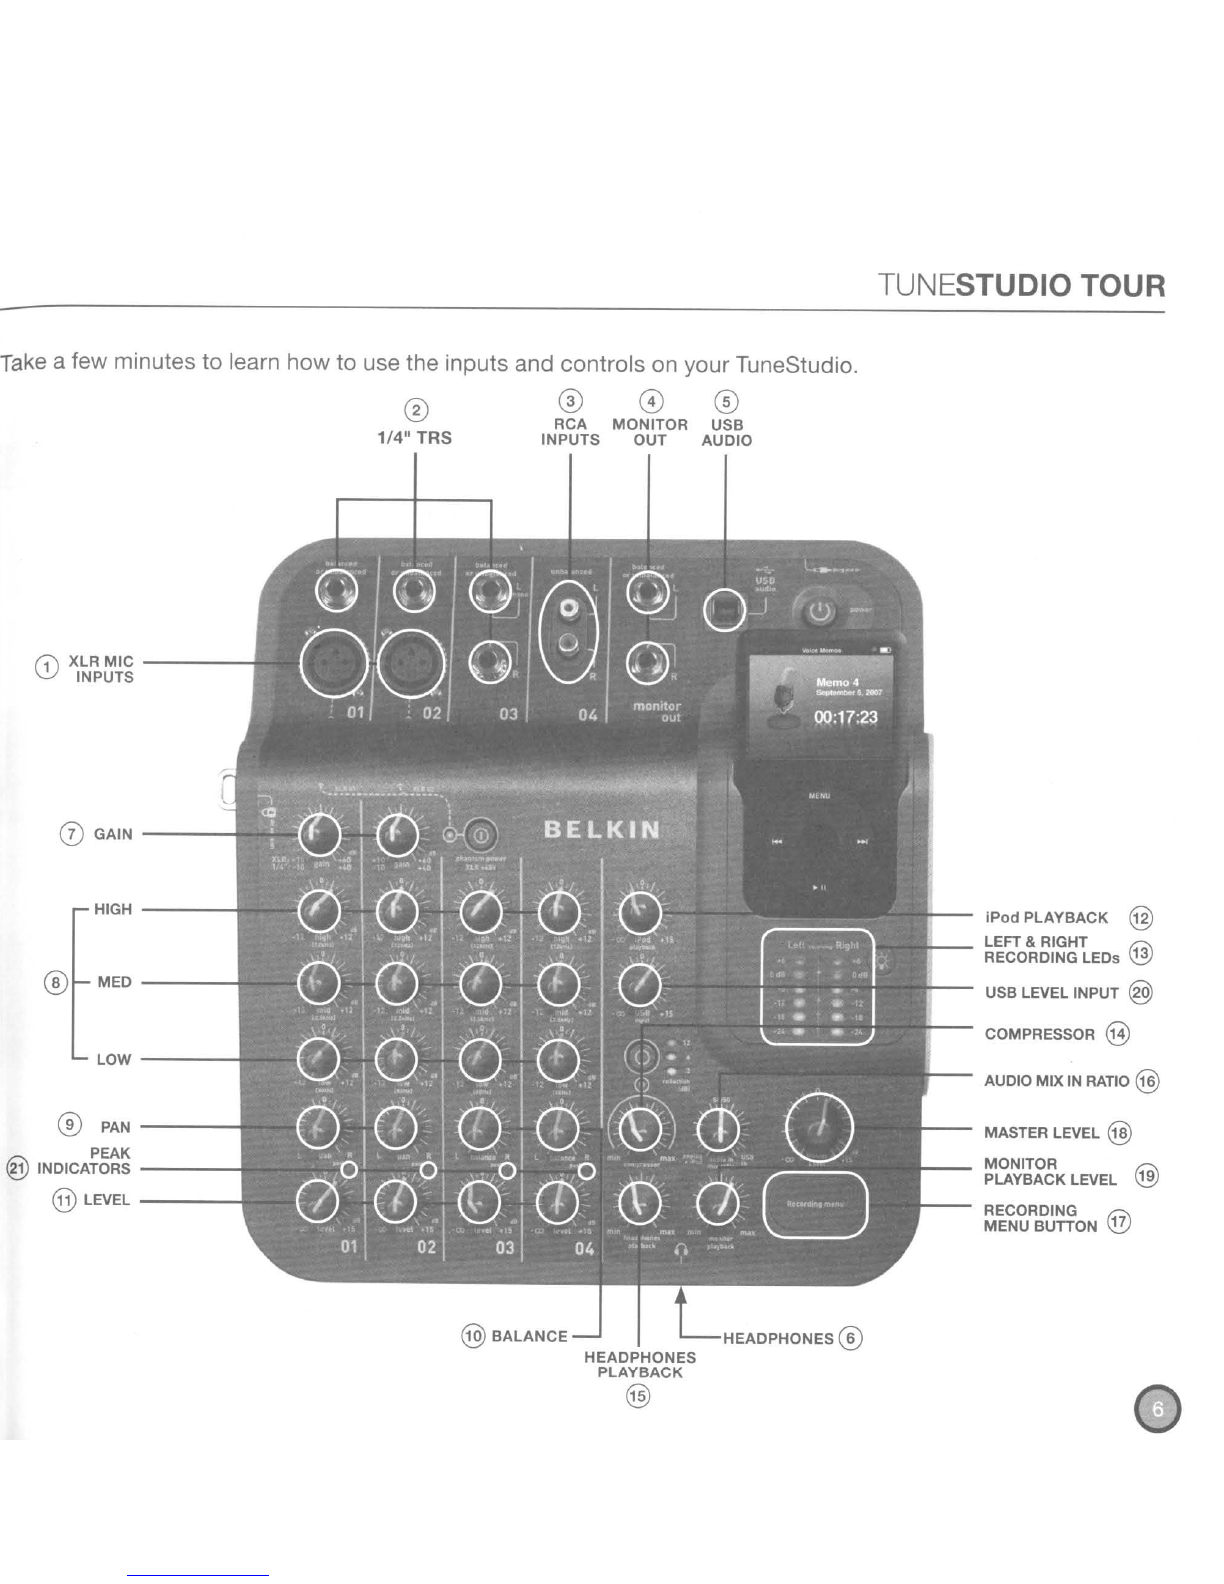
Input/Output Description
CD
XLR Mic Inputs
®1/4" TRS Inputs
oRCA Inputs
o
Monitor
Out
@USBAUdiO
®Headphones
Inputs 1and 2provide XLR cable microphone inputs with optional
phantom power for condenser mics. Acondenser mic usually requires
phantom power unless it has its own power source, such
as
abattery.
Dynamic and ribbon mics
don't
usually require phantom power.
Note: The phantom power button turns on phantom power for inputs
1and
2.
Always connect your microphones before turning on phantom
power. Microphones are very sensitive, and asudden power surge can
damage amicrophone. It's also a
good
idea to set the level control
to
-00
before you turn on phantom power.
Inputs
1-3
provide 1/4" TRS inputs
for
connecting guitars, bass
guitars, synthesizers, drum machines, and other instruments.
Channel 3provides
two
TRS inputs. If you're connecting amono
input
to
Channel
3,
connect it to the
"Left/Mono"
input.
Input 4's RCA inputs can be used to connect electronic equipment
such
as
aCD player or another iPod.
The monitor out connection can be used to
connect
studio monitor
speakers. Studio monitors should have built-in amplifiers or be
connected to an amplifier.
You can control the studio monitors' volume with
the
monitor
playback control.
The USB connection can be used to connect your TuneStudio to
acomputer.
You can control the computer's volume with the USB input control.
The headphones connection can be used
to
connect
headphones.
You can use the 1/8" (3.5mm)
to
1/4" (7mm) headphone adapter
to
connect
different types
of
headphones.
You can control the headphone's volume with the headphones
playback control.

TUNESTUDIO TOUR
You
can use your TuneStudio's controls to fine-tune and monitor your recordings.
Control Description
(j)Gain
(inputs
1
and
2)
®High, Mid,
Low
EQs
(inputs
1-4)
@Pan
(inputs
1and 2)
@salance
(inputs 3and
4)
@Level
(inputs
1-4)
@iPod Playback
@USB
Input
Level
The gain control determines how much of the source signal is sent to
the rest
of
the mix. If the gain is too high, the sound will be distorted. If
the gain is too low, background hiss may be more noticeable.
You
can add up to 60
dB
of gain to the
XLR
inputs and 40
dB
of
gain
to the 1/4" TRS inputs.
The high, mid, and low equalizers ("EOs") can be used to increase
("boost")
or
decrease ("cut") the volume by up to
12
dB. The
EO
settings can have adramatic effect, so use them carefully.
High
EQ
(12kHz)
The high
EO
can be increased to add crispness to cymbals, vocals,
and string instruments or decreased to reduce microphone hiss.
Mid
EQ
(2.5kHz)
The mid
EO
can be increased to make guitars, bass guitars, and
pianos stronger
or
decreased to soften vocals.
Low
EQ
(80Hz)
The low
EO
can be increased to add warmth to vocals or horns
or
extra punch to
synthesizers, guitars, and drums. Decreasing the low
EO
can reduce
hum and add clarity to bass instruments.
See "Equalizing
(EO)
Tips" on page
19
for more information.
The pan control can be used to move amono input
to
the left
or
right
in
the stereo spectrum.
The balance control can be used to control which part of astereo
input signal (left or right)
is
louder than the other.
If
amono source is
connected to input
3,
then the balance control works like the pan control.
The level control specifies how much
of
the source signal is sent to
the mix.
In
the leftmost position, the volume is muted.
In
the rightmost
position, the volume is increased by
15
dB.
The iPod playback control sets the volume when listening to your iPod.
In
the leftmost position, the volume is muted.
In
the rightmost position,
the volume is increased by
15
dB.
The USB level control specifies how much of the signal is sent
to
the
mix.
In
the leftmost position, the signal
is
not sent
to
the mix. In the
rightmost position, the signal is increased by
15
dB.

TUNESTUDIO TOUR
Control
Description
@
Compressor
@.H
..
~~~qOes
~1~yba~lt_
@
Audio
In
Mix
Ratio
@
Monito"PlaYba~k
Level
@
Master
Level
@.Recording
Men.uButto"
@
Left
and
Right
Recording
LEOs
@Peak'ndicators
The compressor can be used to enhance your recordings and keep
the volume levels within the recording limits of the iPod. With the
compressor, you can make softer sounds louder without making
louder
sounds too loud.
It
is especially useful when recording vocals and
instruments together.
The three LEDs to the right of the compressor button indicate how
many decibels (dBs) of compression are being applied.
The
h~adphones'Playback
control
can be used
to,s~tthe
volume
for
theheadphon~s,..
......
.'.
.
.-
.
'.
•
..
.
./>.
".
.
.•
···No~e;Tne.nea~PtJones
input is
on
the side
of
yourTuneStudi(>,under
the,
heaqp~onesJ)layback
controL
The audio in mix ratio specifies how signals from input sources
1-4
and the USB input are mixed together. For example, turning the control
to the left will increase the volume
of
input
1-4
sources and decrease
the volume
of
the USB source. Turning the control completely to
the
left
or
right will mute the other source.
.Themonitorplayl5ackcontrol Ccurbeused
to
seUne
volume
of
the
studio
monitor
speakers. .
The master level control sets the recording volume level to the iPod.
In
the leftmost position, the volume is muted.
In
the rightmost position,
the volume is increased by
15
dB.
The Recording Menu
button
can be used to open the Recording menu
on
the
iPod5th
generation (video) only.
Note
thatth;s
buttondoes not
work with the iPodnano 3rd'generation (video)
01"
iPod classic.
The recording
LED
lights tell you if the volume is too low or too high.
You can adjust the volume using each input's level control or the full
mix using the master level control.
Each input channel.
has
apeak indicator near its level control. The
peak indicator lights up when the audio signal'level
is
too high and
may be causing distortion. If apeak indicator lights up, you should
adjust your settings until the peak indicator stays off. These
are
the
most likely solutions:
•For inputs 1and
2,
try
turning down the gain control or moving your
microphone further away from
the
source.
•If youhave any of the
EO
controls turned up high, turn them
down alittle.
•
Turn
down the volume
of
the audio source.

SETTING THE RECORDING LEVEL
Setting the recording level will help you create clear, distortion-free recordings.
You
should set the recording level for each channel that you're using.
To
set the recording level:
1
If
you're using input 1or
2,
set the "Gain" control completely to the left.
2Set the "Low", "Mid", and "High"
EO
controls to
O.
3Set the "Pan" control to
O.
4Set the "Level" control to
-00.
5Connect the microphone or instrument cable to the channel's input.
6Set the "iPod Playback" control to
O.
7Set the "Master Level" control to
O.
8Play the instrument or electronic device at anormal level and slowly increase the channel's gain until
the left and right recording level
LEOs
are
continuously red
(0
dB).
9Slowly reduce the channel's gain until the red 0dB
LEOs
no longer light
up
when you play the
instrument or device.
10 Adjust the low, mid, and/or high
EOs,
then check the red 0dB
LEOs
to verify they don't light up.
11
If any of the red recording level
LEOs
lights up while you're recording, your recording could be distorted.
Keep
an
eye
on
the
LEOs
and adjust your levels
as
necessary.
12 If it's difficult to control the level of your audio source, especially if you're working with microphones or
multiple audio sources, experiment with the compressor to keep the levels
in
check. The compressor
looks for sudden increases
in
volume and reduces the audio levels very qUickly to keep the signals
from exceeding the recording level limits.
•

RECORDING WITH MICROPHONES
Read on to learn how to select and place amic when recording.
Using awell-placed microphone will drastically improve your sound quality.
You
should experiment with
microphone placement to find the best location.
Types of Microphones
There are
two
types of microphones: condenser and dynamic.
Condenser Microphones
Condenser (or "capacitor") microphones are usually used for live recordings. Unless they have their own
power supply, such as abattery, condenser mics use the phantom power from your TuneStudio to power their
amplifiers and impedance converters. There are many types of condenser mics, including headworn, lavalier,
probe, shotgun, and side-address.
Condenser mics are very sensitive, so they work well with distant or soft sources. They are often used
to
record
acoustic instruments and vocals.
Dynamic Microphones
Dynamic (or "moving-coil") microphones are usually less expensive and less sensitive than condenser
microphones. Because they
don't
have amplifiers, dynamic mics
don't
need phantom power. Phantom
power
should not harm adynamic mic, but you should turn off phantom power before connecting adynamic mic.
Older dynamic mics have low sensitivities and require ahigh gain setting. Ribbon mics
(a
type of dynamic
microphone) normally have very low sensitivity and usually require avery high gain setting. They are often
used to record guitars and drums.
Recording with Multiple Microphones
Your TuneStudio can record up to four sources at atime, and input channels 1and 2can provide phantom
power for
two
mics. If you are recording with multiple mics, you should follow the
3:1
rule.
3:1
Microphone Placement Rule
When you record with multiple mics, sounds arrive at each mic at different times. Sounds farther from
the
mic
will have aslight delay. When you combine the close and distant sounds, some frequencies will cancel each
other out. The result is a"hollow" or filtered sound.
To
avoid this problem, the distance between your mics should be three times the distance between the mics and
their source. For example, if your mics are one foot from the source, they should be placed at least three feet apart.

RECORDING APODCAST
The diagram below shows atypical 2-mic setup for recording apodcast.
You
can connect
an
iPod or a
computer to include background music.

RECORDING APODCAST
Tips for Recording aPodcast
You
will become much more comfortable and adept at recording podcasts after you have done it afew times.
Here are some tips to help you get started:
•Test the recording level before recording. The left and right recording level
LEOs
should not
b!3
constantly
red
(0
dB). If the 0
dB
LED
is constantly lit, the "peaks" of the recording may be clipped and the sound quality
will usually be poor.
•Use awell-placed, high-quality mic. Lavalier mics often work well for podcasts because they're small and
can be clipped to your clothing.
•If you are not using alavalier mic, be careful not to move too close to or far away from the mic.
•Position your mic about six inches from your mouth (or at
an
angle) so that it doesn't capture your breathing.
Remember, you can connect headphones to your TuneStudio to test different mic positions and distances.
•Speak
in
your normal voice at aconversational level. Don't be
too
self-conscious about your
voice-most
people
don't
like the sound
of
their voice when they first hear it
in
arecording. Just be sure to speak clearly.
•If you are recording
an
interview with one mic, try using a"figure eight" type mic and have your interviewee
sit directly across from you. Afigure eight mic
is
two sided, so it can capture sounds directly
in
front and
directly behind.
•Use the level controls to fade-in the beginning of your podcast and fade-out the end.
•Include background music during the podcast, with several seconds
of
music at the beginning and end
of your podcast. Make sure you have permission to use the music.

RECORDING LIVE MUSIC
The diagram below shows atypical setup for recording live music.
You
can connect different instruments as
needed. For example, you can connect adrum machine instead of asecond mic.
"'~c
9
10
r-------
(~
n
~
c6I
\e
...
·
•.
·.·.[I~
..
'.·.·.'·.)
~JI\l~

RECORDING LIVE MUSIC
Tips for Recording Acoustic Instruments
Acoustic instruments can be difficult to record. Here are afew tips to improve your acoustic guitar recordings:
•Record
in
ahighly acoustic room, such as aroom with awooden or tile floor.
•Use acondenser microphone ("mic"). It can capture softer instruments better than adynamic mic.
•Try positioning the mic about
24
inches from the instrument.
•Use multiple mics, and experiment with different angles and placements. For example, position two
mics
at gO-degree angles and use the pan controls to move one mic to the left side
of
the mix and the other
mic
to the right. This approach can create avery engaging stereo effect.
•For acoustic guitars,
try
placing one mic
1-6
inches from the sound hole.
You
will probably need to reduce
the low
EQ
control with this approach.
Tips for Recording Electrical Instruments
•Guitar -For alive sound,
try
recording with two mics. Point one mic directly into the guitar's monitor
speaker and the other mic about five or six feet from the speaker.
•Bass Guitar -If possible, connect the bass guitar to adirect injection ("01") box and connect the
01
box
to your TuneStudio. A
01
box will eliminate hum
in
your recordings.
•Keyboards -Record directly to your TuneStudio for clarity and with amic (set to lower volume) for a
live sound.

RECORDING ACHOIR
The diagram below shows atypical setup for recording achoir.
You
can connect
an
iPod or CD player to include
background music.
Tips for Recording aChoir
•Use acondenser mic for recording vocalists. They usually work better than dynamic mics for vocals.
•Use multiple mics. If possible, place them above the choir and aimed down.
•
Try
positioning two mics
in
the middle and aim them toward the vocalists
in
the back corners.
Place the mics least three times the distance from each other
as
from the vocalists.
•Try using
an
omnidirectional mic. It will capture both the choir and the sound resonating
in
the room.

RECORDING TO OR FROM ACOMPUTER
The diagram below shows atypical setup for recording to acomputer.
This manual suits for next models
1
Table of contents
Other Belkin Recording Equipment manuals