Bella WHOLE FRUIT JUICER User manual

WHOLE FRUIT
JUICER
Instruction Manual

TABLE OF CONTENTS
Introduction ............................................................................................................................. 3
Product Safety..................................................................................................................... 3-4
Electrical Satefy .................................................................................................................. 4-5
Features ..................................................................................................................................6
Before First Use....................................................................................................................... 7
Assembly Instructions.........................................................................................................7-8
Preparing Fruits and Vegetables for your Whole Fruit Juicer ........................................8-9
How to Use the Whole Fruit Juicer....................................................................................... 9
Disassembly Instructions..................................................................................................... 10
Care & Cleaning Instructions............................................................................................... 10
Storage................................................................................................................................... 11
Troubleshooting .................................................................................................................... 11
Servicing ................................................................................................................................ 12
Guarantee .............................................................................................................................. 12
Recipes.............................................................................................................................. 13-15
Due to our policy of continuous improvement, the actual
product may differ slightly from the one illustrated in this booklet.

3
INTRODUCTION
Thank you for purchasing this product.
You may already be familiar with using a similar product, but do please take the time
to read these instructions – they have been written to ensure you get the very best
from your purchases.
Safety is Important
To ensure your safety and the safety of others, please ensure you read the
Product Safety and Electrical Safety Information before you operate this product.
Please pay particular attention to any warnings and cautions contained in
these instructions.
Keep these instructions in a safe place for future reference.
PRODUCT SAFETY
When using electrical appliances, basic safety precautions should always be followed
including the following:
1. Read all instructions.
2. To protect against risk of electrical shock do not put cord, or appliance in water
or any other liquid.
3. Always operate on a at and stable surface.
4. This appliance can be used by children aged from 8 years and above and persons
with reduced physical, sensory or mental capabilities or lack of experience and
knowledge if they have been given supervision or instruction concerning use of
the appliance in a safe way and understand the hazards involved. Children shall
not play with the appliance. Cleaning and user maintenance shall not be made by
children unless older than 8 and supervised.
5. Unplug from the mains socket when not in use, before putting on or taking off
parts, and before cleaning.
6. Do not touch moving parts.
7. Do not operate any appliance with a damaged power cord or plug or after
the appliance malfunctions, or is dropped or damaged in any manner.
8. The use of attachments not recommended by the manufacturer may cause re,
electric shock, or injury.
9. Do not use outdoors.
10. Do not let the power cord hang over the edge of the table or worktop.
11. Do not let the power cord touch any hot surfaces.
12. Always make sure the Whole Fruit Juicer cover is clamped securely in place before
the appliance is turned ON. Do not unfasten the locking clamp while the Juicer
is in operation.
13. Turn the HIGH/OFF/LOW dial to OFF and unplug from mains socket after
each use of your Juicer. Make sure the motor has completely stopped
before disassembling.
14. Do not put your ngers or other objects into the Juicer opening while it is in
operation. If food becomes lodged in the feed tube, use the food pusher or
another piece of fruit or vegetable to push it down. When this method is not
possible, turn the HIGH/OFF/LOW dial to OFF, unplug the Juicer from the
mains socket, and disassemble the Juicer to remove remaining food.
15. Do not use this appliance for other than its intended use.

4
16. All users of this appliance must read and understand this instruction manual
before operating or cleaning this appliance.
17. The cord to this appliance should be plugged into a 220-240V AC electrical
outlet only.
18. Do not leave this appliance unattended during use.
19. If this appliance begins to malfunction during use, immediately turn the HIGH/OFF/
LOW dial to OFF and unplug the cord. Do not use or attempt to repair
the malfunctioning appliance.
20. If this appliance falls or accidentally becomes immersed in water, unplug it
immediately. Do not reach into the water! Do not use this appliance after it has
fallen into or becomes immersed in water.
21. To reduce the risk of injury to persons or property, never use this appliance in
an unstable position.
SAVE THESE INSTRUCTIONS
FOR HOUSEHOLD USE ONLY
ELECTRICAL SAFETY
WARNING!
Read these instructions thoroughly before using this appliance or connecting it to
the mains supply.
If the electrical circuit is overloaded with other appliances, your appliance may
not operate properly. It should be operated on a separate electrical circuit from
other appliances.
A 13 amp BS1362 ASTA approved fuse must be tted.
This appliance must be earthed.
There are no user-serviceable parts inside this appliance.
Always refer servicing to qualied service personnel.
The mains lead of this product is not replaceable by the user.
If the mains lead is damaged, the entire appliance should be returned to the Customer
Service Department.
Do not allow this product to be exposed to rain or moisture during use or storage.
Before switching on, make sure that the voltage of your electricity supply is the same
as that indicated on the appliance rating plate. Connecting it to any other power source
may cause damage.
This product may be tted with a non-rewireable plug. If it is necessary to change
the fuse in the plug, the fuse cover must be retted. If the fuse cover becomes lost or
damaged, the plug must not be used until a suitable replacement is obtained. If the
plug has to be changed because it is not suitable for your socket, or due to damage,
it should be cut off and a replacement tted, following the wiring instructions shown.
The old plug must be disposed of safely because inserting it into a 13 amp socket could
cause an electrical hazard.

5
ELECTRICAL SAFETY
The wires in the power cable of this product are coloured in accordance with
the following code:
Blue = Neutral, Brown = Live, Green/Yellow = Earth
If the markings on the terminals of your plug do not correspond to the colours of
the wires in the power cable, proceed as follows:
• The wire which is coloured Blue must be connected to the terminal which is marked N
or coloured Black.
• The wire which is coloured Brown must be connected to the terminal which is marked
Lor coloured Red.
• The wire which is coloured Green/Yellow must be connected to the terminal which
is marked with the earth symbol ( ) or coloured Green.

6
FEATURES
GETTING TO KNOW YOUR WHOLE FRUIT JUICER
Product may vary slightly from illustrations.
Food Pusher
Feed Tube Clear Cover
Pulp Spout
Cover
Clamp Locking Slots
Stainless Steel Filter
and Blade unit
Pulp Spout
Juice
Collection Jug
Juice Bowl
Juice Bowl Lip
Juice Spout
Froth
Separator
Motor Base
Motor Hub
Pulp Basket
Locking Clamp
Rubber Feet
HIGH/OFF/LOW Dial

7
BEFORE FIRST USE
The Whole Fruit Juicer comes almost completely assembled in the box.
1. Your Whole Fruit Juicer may be shipped with a protective cardboard insert
between the clear cover and the blade basket. Remove this and any other
protective packaging before using your Juicer.
2. Following the Disassembly Instructions, remove the food pusher from the feed
tube, then the cover, juice bowl with stainless steel blade unit.
3. Wash all removable parts (food pusher, clear cover, juice bowl, blade unit,
pulp basket, and juice collection jug with lid) in warm water with a mild detergent.
Rinse well and air-dry. This will eliminate any traces of dust or residue from
manufacturing or shipping.
CAUTION: Use care when handling the blade unit. Hold the lter by the plastic rim only.
DO NOT TOUCH the cutter blades. The cutter blades are very sharp!
CAUTION: Never rinse or immerse the Motor Base in water or any other liquid.
ASSEMBLY INSTRUCTIONS
WARNING: ALWAYS MAKE SURE THE WHOLE FRUIT JUICER IS UNPLUGGED BEFORE
STARTING ASSEMBLY.
IMPORTANT: The Juicer is equipped with a safety system that prevents the Juicer from
being turned ON unless the unit is completely and properly assembled.
1. Rotate the locking clamp so that it sits at the front of the base. (See Figure 1.)
2. Place the juice bowl on top of the motor base so that the juice spout ts into
the cut out at the front of the base. (See Figure 2.)
CAUTION: Use care when handling the stainless steel blade unit. Hold the lters
rim only. DO NOT TOUCH the cutter blades. The cutter blades are very sharp!
3. Set the stainless steel lter onto the motor hub in the centre of the juice bowl.
(See Figure 2.) Press down on the outer rim of the stainless steel lter until it
drops into place and is securely seated. Gently rotate the lter to ensure that it
turns freely. If initially it fails to seat, this should slip it into place. Double check
by pressing down on the rim and spinning it again.
4. Align the cover so that the pulp spout cover ts over the back of the base. Fit the
tab of the cover into the slot on the top of the juice bowl. (See Figure 3.)
5. Turn the food pusher so that the groove in the side lines up with the tab in the
feed tube. Insert the food pusher into the feed tube. (See Figure 4.) Store the food
pusher in the feed tube of the lid until the produce is ready to juice.
Juice
Collection Jug
Froth
Separator
Pulp Basket
Cover
Tab
Figure 1 Figure 2 Figure 3

8
6. Push the locking clamp up and over the lid. Hold the clamp rmly and push
until the two black clamp locks rest in the 2 locking slots on the top of the lid.
Make sure the lid is clamped securely into place. (See Figure 5.)
7. Add the pulp basket. (See Figure 6.) Tilt the pulp basket slightly so that the lip of
the juice bowl ts snugly over the inside of the pulp basket. Push the bottom of
the pulp basket so that it rests securely on its platform.
IMPORTANT: To avoid spillage, make sure the pulp basket sits ush up against
the base.
NOTE: To save cleaning time, line the pulp basket with biodegradable composting
bag, this can then be added directly onto the compost.
8. Add the froth separator lid onto the collection jug so that the lid’s cut out ts over
the jug’s pouring spout. Tilt the jug slightly so that the appliances juice spout ts
into the top of the jug’s lid. (See Figure 6.) This will prevent juice spillage.
PREPARING FRUITS AND VEGETABLES FOR YOUR
WHOLE FRUIT JUICER
• Clean all produce thoroughly, using a natural bristle brush.
• Remove and discard the outer leaves of non-organic produce and peel any waxed
fruit or vegetable.
• Trim away any discolored or bruised sections.
• The skin may be left on all produce (including pineapple and melons) except
oranges, grapefruit, and tangerines. The oil found in these skins tastes bitter and
is difcult to digest.
• Remove melon seeds when possible, as they may escape through the top of the
feed tube while juicing. The stones of fruits such as cherries, pears, and peaches
should also be removed.
• Cut produce into pieces small enough to t into the feed tube. Use the food pusher
to gently direct produce through the tube. NEVER PUSH PRODUCE INTO THE FEED
TUBE WITH YOUR FINGERS.
• It may be necessary to cut hard produce (carrots, beets, pineapple, etc.) into
smaller pieces to facilitate juicing.
• Leafy greens, parsley, wheat grass, and sprouts should be bunched up into a small,
tight ball and pushed through with either a carrot or the food pusher.
• Bananas are not suitable for juicing; a clear juice cannot be obtained from them
and residue left in the machine can clog the micro-mesh screen.
• For best results when juicing apricots, plums, pears, peaches, and tomatoes,
produce should be rm.
Platform
Lid Locking
Slots
Figure 5 Figure 6Figure 4
Groove
Tab
Black
Clamp
Locks

9
• When juicing apples, add a small amount of fresh lemon or lime to help slow
down the browning process.
• Fruits that contain starch, such as bananas, papayas, avocados, gs and mangoes
are not suitable for the Whole Fruit Juicer. Use a food processor, blender or hand
blender to process these fruits.
• The Juicer is not suitable for processing very hard and/or brous/starchy fruits
or vegetables such as sugar cane.
HOW TO USE THE BELLA WHOLE FRUIT JUICER
Dual Speed Control
Your Whole Fruit Juicer offers 2 speed options that ensure optimal rpm to provide
maximum juice extraction.
HIGH: Turn the HIGH/OFF/LOW dial to HIGH.
Use for harder produce, such as carrots, beets, and pineapple (with rind).
Also recommended for leafy or stringy produce such as celery and greens.
OFF: Turn the HIGH/OFF/LOW dial to OFF to stop operation.
LOW: Turn the HIGH/OFF/LOW dial to LOW.
Use for softer produce such as citrus, apples, grapes (with stems), melons,
peaches (remove the stone), and tomatoes. LOW is recommended for ripe produce
that has become soft.
IMPORTANT: The Juicer is equipped with a safety system that prevents the appliance
from being turned ON unless the unit is completely and properly assembled.
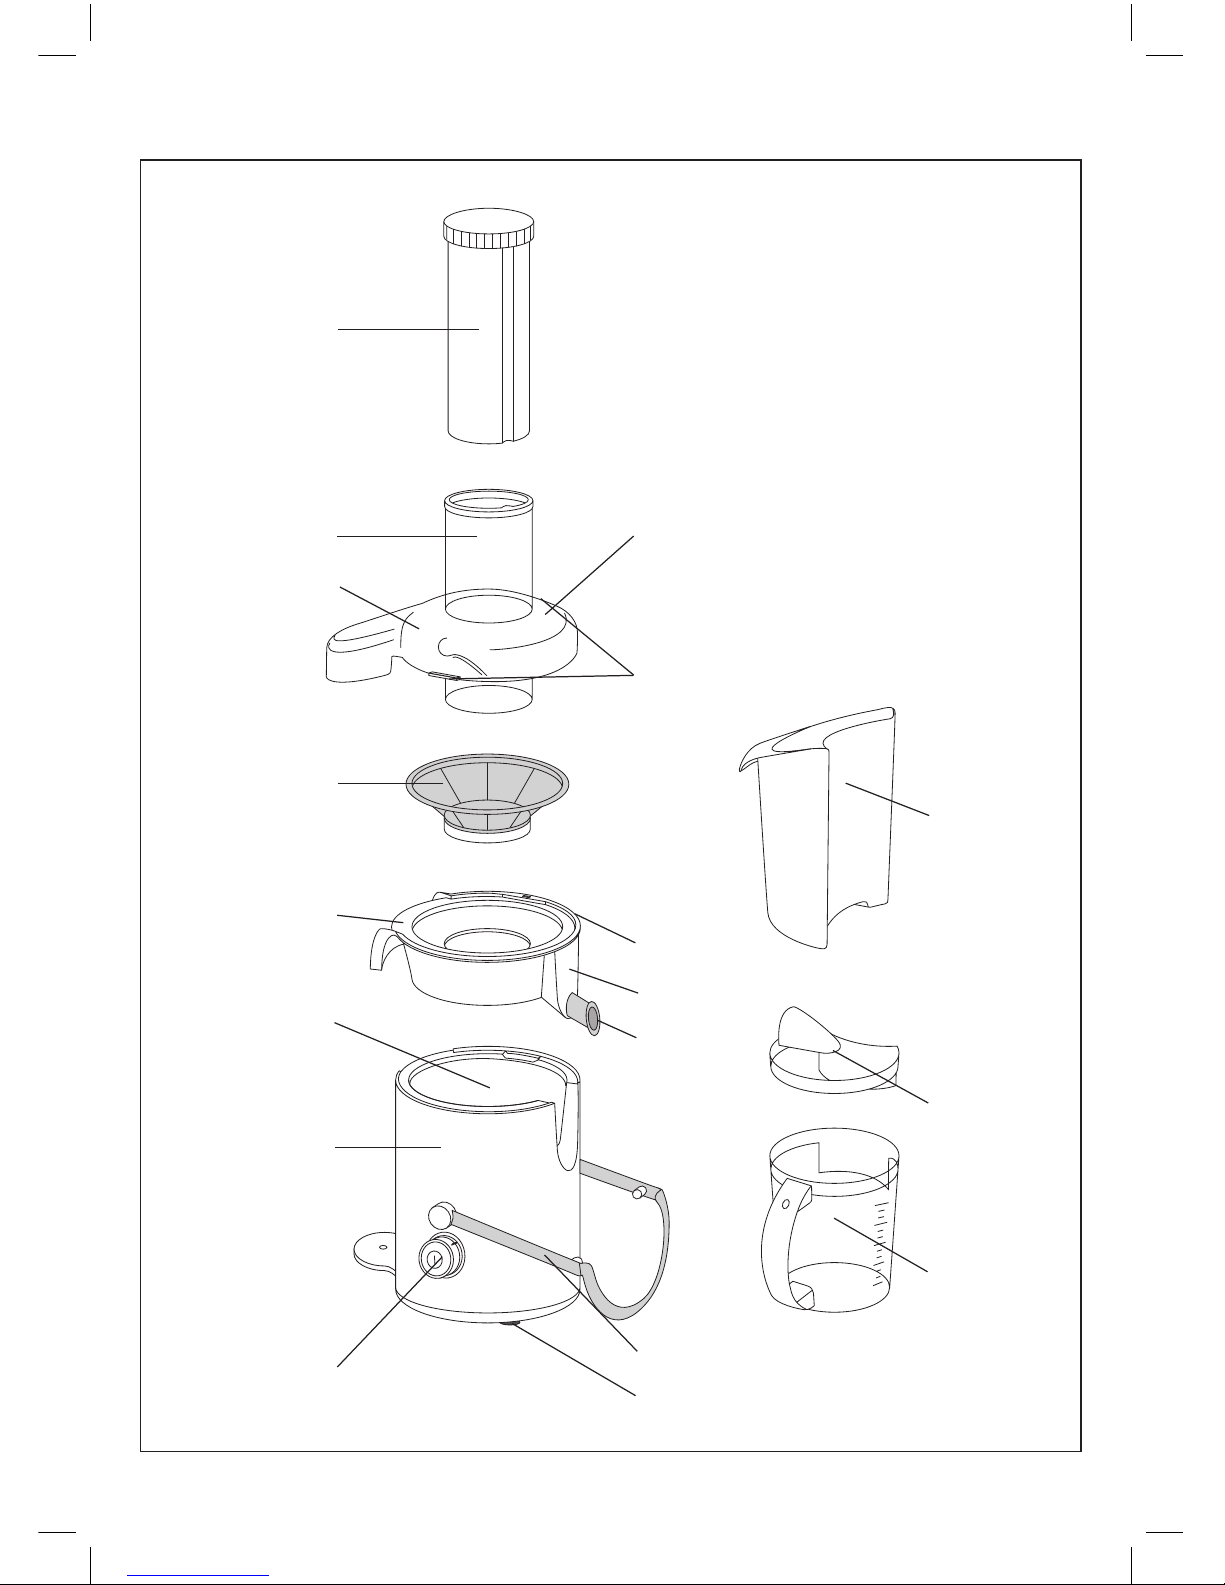
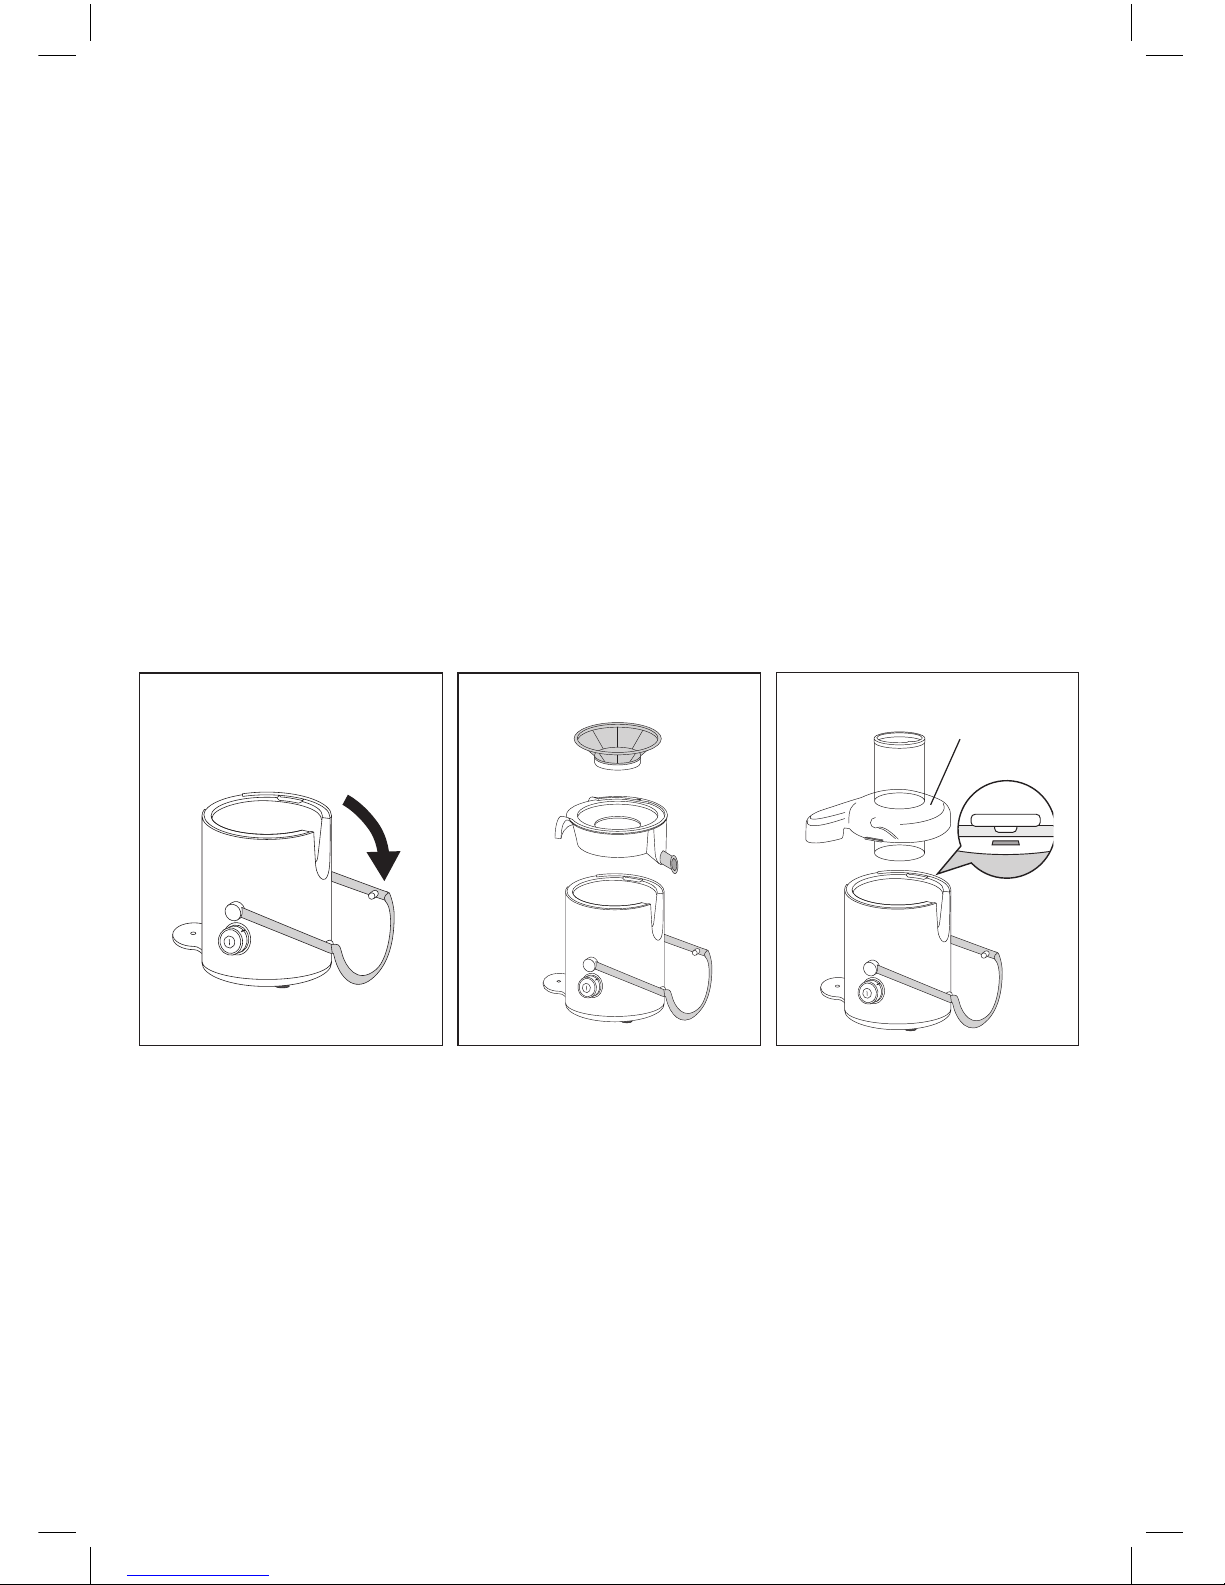
1. Assemble the Whole Fruit Juicer following the Assembly Instructions described
in this manual.
2. Have all fruits and vegetables prepared for juicing.
3. Plug the unit into a 220-240V electrical outlet.
4. Remove the food pusher from the feed tube.
5. Place produce into the feed tube. Use the food pusher to gently direct the produce
through the feed tube and lter and blade unit.
6. Turn the HIGH/OFF/LOW dial to HIGH to juice harder produce.
7. Turn the HIGH/OFF/LOW dial to LOW to juice softer produce.
NOTE: When juicing a combination of hard and soft produce, such as beets, carrots
and apples, you will want to use HIGH for beets and carrots and LOW for the
apples. You do not have to turn the machine OFF to change speeds. Simply turn
the dial to change to the appropriate speed for each type of produce being juiced.
Tip: To ensure the maximum efciency, alternate types of produce.
8. Do not operate the Whole Fruit Juicer for longer than 40 seconds at a time
when juicing heavy loads; if necessary, allow the Juicer to cool down for
2 minutes afterwards.
9. When juicing is completed, turn the HIGH/OFF/LOW dial to OFF.
10. Slide the jug out from the juice spout. Serve juice immediately for the freshest
avor and highest nutritional value.
11. Remove the pulp basket and save or discard pulp.
NOTE: The pulp from your Juicer can be used in many different applications such as
breads, mufns, cakes, soup stocks and garden compost material.
12. Unplug the Juicer from the power socket after use.
13. Follow Disassembly Instructions described in this manual; all removable parts
should be rinsed and cleaned after each use. Clean the Juicer following the
procedures described in the Care & Cleaning Instructions.

10
DISASSEMBLY INSTRUCTIONS
WARNING: ALWAYS MAKE SURE THE WHOLE FRUIT JUICER IS UNPLUGGED BEFORE
STARTING DISASSEMBLY.
1. Remove the pulp basket and the juice collection jug.
2. Lift the locking clamp up and off the 2 clamp locking slots on the cover.
Rest the locking clamp at the front of the unit.
3. Lift the Juicer’s cover up and off the Juicer.
4. Grasping the pulp spout in one hand and the back of the juice bowl in the other,
loosen and lift the juice bowl and lter and blade unit off as one piece.
These 2 parts will then easily separate for easy cleaning.
CAUTION: Use care when handling the lter and blade unit. Hold by the rim only.
DO NOT TOUCH the cutter blades on the bottom of the lter. The cutter blades are
very sharp!
5. Please follow the procedures outlined in the Care & Cleaning Instructions for
specic cleaning instructions.
CARE & CLEANING INSTRUCTIONS
1. Unplug from the power socket. Please follow the procedures outlined in the
Disassembly Instructions to remove parts before cleaning.
2. Clean unit and parts after each use.
3. Do not immerse the motor base in water or spray it with water. Clean only by
wiping with a damp sponge, cloth, or paper towel. Use a mild detergent, do not
use any harsh or abrasive cleaners as they will scratch and damage the cosmetic
nish of the unit.
4. If any juice has spilled under the Juicer, clean legs and area with a damp cloth,
then dry. Use a damp toothbrush or cloth to clean juice from inside the motor hub
on top of the motor base.
5. All parts (except the motor base) are washable in warm, soapy water or in the
dishwasher.
6. When cleaning the lter unit, make sure the tiny holes in the lter are not clogged.
This can be accomplished by holding the lter unit under running water.
Use a dishwashing brush in a circular motion to clean the lter from both inside
and outside of the lter unit.
CAUTION: Use care when handling the lter and blade unit. Hold the lter’s rim
only. DO NOT TOUCH the cutter blades on the bottom of the lter. The cutter
blades are very sharp!
7. The Juicer’s clear cover, juice bowl, lter, pulp basket, jug and lid may be washed
in the top rack of a dishwasher. However, washing with warm (not hot) tap water
on a daily basis should be sufcient.
8. Due to the powerful staining properties of the carotenoids that are found in many
vegetables, especially carrots, we suggest soaking stained parts overnight in any of
these 3 cleaning solutions:
• 1 part warm water to 1 part cider vinegar
• 1/2 small box baking soda in enough warm water to cover parts.
• Warm water with 10% lemon juice solution.
CAUTION: Never use ammonia or abrasives.
• Lightly clean with a sponge or damp cloth and mild liquid detergent
after soaking.
WARNING: NEVER SUBMERGE THE MOTOR BASE IN WATER OR ANY
OTHER LIQUID!

11
STORAGE
1. Unplug unit, assemble clean, dry parts before storing.
2. Store the Whole Fruit Juicer in its box in a clean, dry place. Never store it while it
is hot or still plugged in.
3. Store the food pusher in the feed tube of the lid.
4. Never wrap the power cord tightly around the appliance. Do not put any stress
on the power cord where it enters the motor base, as it could cause the cord
to fray and break.
TROUBLESHOOTING
Symptom Possible Correction
The Whole Fruit Juicer will
not turn ON.
The Whole Fruit Juicer is equipped with a safety system
that prevents the appliance from being turned ON unless
the unit is completely and properly assembled.
Turn the HIGH/OFF/LOW dial to OFF. Check to make sure the
stainless steel lter is properly seated.
Make sure the 2 black clamp locks rest in the 2 locking
slots on the top of the lid. (See Figure 6.)The lid must
be clamped securely into place or the Whole Fruit Juicer
will not turn ON.
The stainless steel basket may be clogged with pulp.
Clean the blade basket
Excessive noise or vibrations
occur after the Juicer is
turned ON.
Check to make sure the blade basket is properly seated.
Pulp may have built up on the lter unit. Clean the lter unit.
Try alternating different types of produce while juicing.
NOTE: Because of the Juicer’s powerful motor, a small
amount of noise and/or vibration is normal when the
appliance is turned ON and as it comes to a complete stop.
All juicers will sound slightly different.
Excessive noise or
vibrations, unpleasant odor,
appliance is hot to the touch,
or the Juicer smokes after it
is turned ON.
Unplug the unit immediately.
Take the Juicer to a qualied appliance repair technician
for servicing.
The blade basket is blocked.
Food is jammed in the base
of the feed tube.
The Whole Fruit Juicer has
stopped during juicing.
Turn the HIGH/OFF/LOW dial to OFF and unplug the Whole
Fruit Juicer from the mains supply.
Remove cover and clear feed tube.
Chop fruits and vegetables into smaller pieces to
facilitate juicing.

12
SERVICING
If you drop or damage your Bella Whole Fruit Juicer it should not be used
until it as been examined by an authorised service centre or qualied
appliance technician.
Always refer servicing to qualied service personnel.
GUARANTEE
This product is guaranteed for twelve months from the date of original purchase.
Any defect that arises due to faulty materials or workmanship will either be replaced
or refunded where possible during this period by the dealer from whom you purchased
the unit.
The following conditions apply:
• The guarantee does not cover accidental damage, misuse, cabinet parts,
knobs or consumable items.
• The product must be correctly installed and operated in accordance
with the instructions contained in this manual.
• It must be used only for domestic purposes.
• The guarantee will be rendered invalid if the product is re-sold or has been
damaged by inexpert repair.
• Specications are subject to change without notice.
• The manufacturer disclaims any liability for the incidental or consequential damages.
• The guarantee is in addition to, and does not diminish your statutory or legal rights.
• Valid in the UK only.
Customer Helpline: 0845 467 6743
DISPOSAL INFORMATION
Waste electrical products should not be disposed of with household waste.
Please recycle where facilities exist. Check with your local authority
for recycling advice.
For technical queries, please contact: MPL Home Ltd, 1 Old Parkbury Lane,
Colney Street, St Albans, Hertfordshire, AL2 2EB.

13
Recipes
Grapefruit, Orange and Pineapple Breakfast Boost
This is jam packed full of Vitamin C, this essential Vitamin is a powerful antioxidant and helps protect
cells and their DNA from damage. It is also essential for wound healing and even helps ght off the
common cold, so get juicing!!
Makes 1 large glass
• 1/2 Ruby Grapefruit, peeled and
roughly chopped
• 1 Large Orange, peeled
• 1/4 pineapple, tough skin removed
and chopped
• Ice cubes (optional)
1. Place all of the ingredient down the feeding chute alternating the fruit pieces.
2. Pour the juice over ice if required and drink immediately.
Apple, Spinach, Lemon and Ginger
This is a great way to introduce vegetables into juice, spinach is quite a strong juice so by mixing it
with apples it adds a lovely sweetness, the lemon adds a tang and the ginger adds a spicy kick.
Makes 1 large glass
• 3 Apples
• Large handful of spinach
• 1/2 lemon, peeled
• 1” piece of root ginger
• Ice cubes (optional)
1. Place 1 apple into the feeding tube followed by the spinach, lemon, ginger and another apple
push the ingredients down with the food pusher and add the remaining apple. This will ensure
maximum juice comes from the spinach.
2. Pour the juice over ice cubes and drink immediately.
Apple, Celery, Mint and Lime
Celery is great for juicing as it contains lots of juice; however it can be very strong if drunk on its
own and is always better if you add other ingredients. By combining it with apples you give the juice
sweetness and the mint and lime add extra avour.
Makes 1 glass
• 2 Apples
• 2 sticks of celery
• Small handful of mint leaves
• 1/2 lime, peeled
• Ice cubes (optional)
Add half the ingredients into the feeding chute packing the mint in the middle of the produce use
the food pusher to push down, add any remaining ingredients and juice. Pour the juice over ice
and drink immediately.
Orange, Carrot and Ginger pick me up
This is an amazingly refreshing juice, the ginger adds a lovely kick to this juice, ginger is one of
nature’s super roots, and is such an amazing ingredient to add to your juice. The Orange and Carrots
are full of vitamins; have this mid-morning or after work for a natural pick me up.
Makes 1 large glass
• 2 Oranges, peeled
• 2 large carrots
• 1” piece of root ginger
• Ice cubes (optional)
1. Place the oranges, carrots and ginger down the feeding chute and juice.
2. Pour the juice over ice and serve immediately.

14
Berry Blast
This is wonderful in the summer if you have a glut of summer berries, works extremely well with
a top up of sparkling water.
Makes 1 large glass or up to 4 people with a top-up of sparkling water
• Handful of strawberries
• Handful of raspberries
• 2 carrots
• 1 apple
• 1/2 lime, peeled
• Sparkling wine and ice cubes (optional)
Alternate the ingredients into the Juicer and push down using the food pusher and serve with
ice cubes or sparkling water.
Green, Green and more Green Juice!
This is full of antioxidants and iron; you may think that this is not one for you but try it you will be
surprised how delicious it is.
Makes 1 large glass
• 4 stalks of calvro nero cabbage or 100g kale
• Large handful of baby spinach
• 2 apples
• 1/4 lemon, peeled
1. Add ingredients into the feeding tube, using the food pusher to push down the cabbage and
spinach, add remaining ingredients and juice.
2. Drink immediately for maximum freshness.
ALCOHOLIC COCKTAILS
Moscow Mule
A delicious mix of ery ginger, lime and added sweetness from apple, with an extra kick from a shot
of vodka, what’s not to like?!!
Serves 2
• 1 apple preferably Braeburn,
• 1 cm piece of fresh ginger
• 1/2 lime, peeled, plus extra to garnish
• 2 shots of vodka (50ml)
• Lemonade
• Ice cubes
1. Chop the apple, ginger and lime and add to the Juicer and juice.
2. Add the vodka to the juice, and stir.
3. Add some ice cubes to 2 tall glasses and pour the juice over the ice, top with lemonade and
garnish with slices of lime.
Bloody Mary
This is a great way to use up a glut of tomatoes in the summer. Don’t forget to use the pulp in
a soup or stew!
• 4 tomatoes,
• 2 sticks of celery
• 1/2 lemon, peeled
• 50ml vodka
• 5 dashes of Worcestershire sauce
• Tabasco to taste
• Freshly ground black pepper
• Ice cubes to serve
1. Add the tomatoes, 1 stick of celery and the lemon to the Juicer and collect the juice in the juice
collector. Add the vodka, Worcestershire sauce and a few drops of tabasco sauce and stir well.
2. Pour into a large serving glass over ice, and add a grind of pepper serve with the remaining
celery stick.

15
What to do with the Pulp?
It seems a shame to simply discard the pulp after juicing, as it contains all the brous material and
still contains some nutrients. Add it to bread, cakes, mufns, soups or stews. Sneak it into pasta
sauces for children who are fussy eaters; they will never know it’s there!
Carrot Cake Pancakes
These are great for a breakfast treat; you would never know they had carrot in them.
Makes 15 pancakes
• 160g plain our
• 100g sugar
• 2 tsp baking powder
• 1 tsp ground cinnamon
• 1/2 tsp mixed spice
• 1/4 tsp salt
• 125g carrot pulp
• 180ml buttermilk
• 1 tsp vanilla extract
• 2 large eggs, beaten
• Butter for frying
• Greek Yogurt or syrup to serve
1. In a mixing bowl add the our, sugar, baking powder, cinnamon, mixed spice and salt and stir well
to combine and break up any small clumps of sugar. Add the carrot pulp and stir well to combine.
2. Mix the buttermilk, vanilla and eggs together and add to the dry ingredients stir thoroughly
to mix.
3. Heat a large frying pan over a moderate heat and add a small amount of butter until it sizzles,
add a tablespoon of batter for each pancake. Turn the pancakes over when small air bubbles
appear on the surface. Cook until they are golden brown and springy on both sides, serve with
Greek yogurt and syrup.
Spaghetti Bolognaise
Serves 4
• 1 tbsp. oil
• 500g lean beef mince
• 2 rashers of smoked bacon, chopped
• 1 onion, chopped
• 2 cloves of garlic, crushed
• 250g vegetable pulp (tomato, celery, carrot,
courgette)
• 2 tbsp. tomato puree
• 1 tsp. oregano
• Small glass of red wine
• 1 tin chopped tomatoes
• 150ml beef stock
• Salt and freshly ground black pepper
• Serve with spaghetti and parmesan cheese
1. Heat the oil over a high heat in a large frying pan and add the bacon and cook until it goes a little
crispy. Add the beef mince and season the meat with salt and pepper, and cook until brown.
Remove the minced beef from the pan and set aside for a minute.
2. Reduce the heat slightly and add the onion and garlic to the pan and gently fry until the onion
has softened slightly. Add the vegetable pulp, tomato puree, oregano and red wine and cook
for 2 minutes. Add the mince back to the pan along with the chopped tomatoes and beef stock
and mix well, reduce the heat down and simmer for 45 minutes or until the meat is tender and
the liquid has reduced. Taste and adjust the seasoning if required.
3. Serve with hot spaghetti and shavings of parmesan cheese.

MPL Home Ltd, AL2 2EB
f
acebook.com/bellalif
euk
twitter.com/bellalifeuk
bellaappliances.co.uk
SZ311564
Table of contents
Other Bella Juicer manuals