Bend-Pak WSA-100 User manual

Copyright © 2021 BendPak Inc. All rights reserved.
WSA-100 Utility Station
Quick Start Guide
P/N 5900095 — Rev. B — Sept. 2021
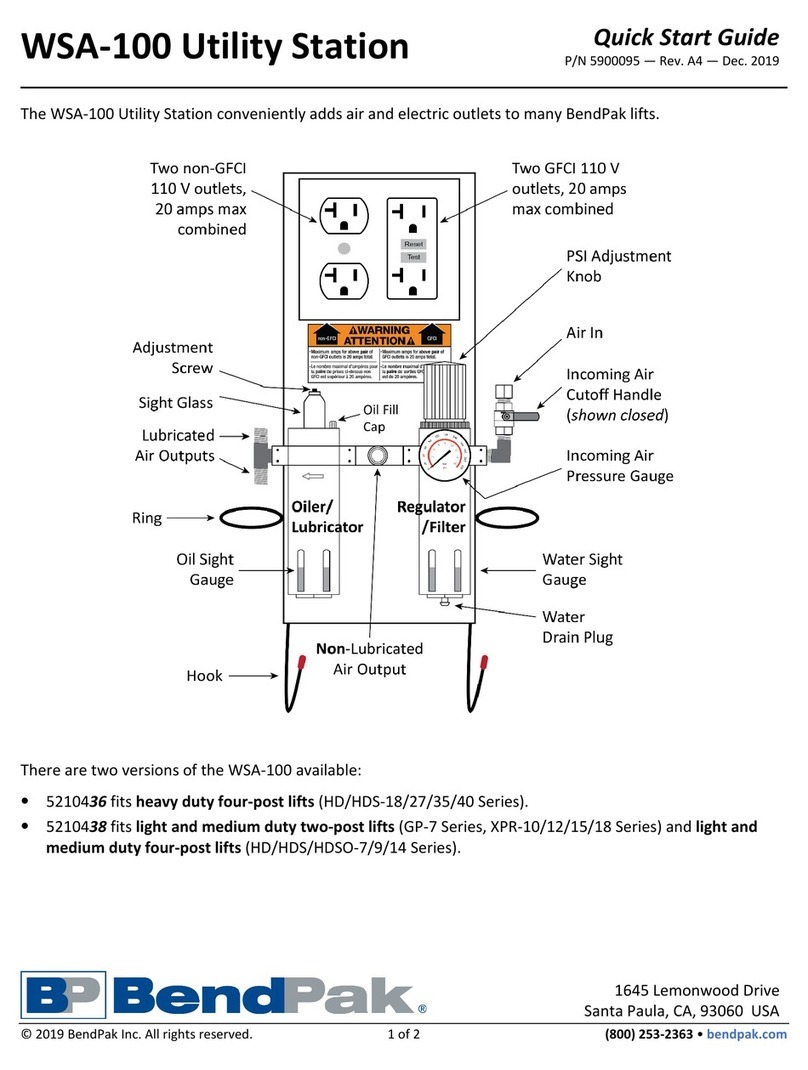
The WSA-100 Utility Station (SKU 5210438) conveniently adds air and electric outlets to many BendPak lifts.
This WSA-100 Utility Station can be used with the following BendPak Lifts:
Four Post Lifts:
•HD Series (HD-7/9/14)
•HDS Series (HDS-14/18/27/35/40)
•HDSO-14 Series
•D4-12 Model
Two-Post Lifts:
•GP-7 Series
•10AP Series
•XPR Series (XPR-9/10/12/15/18)
•D2 Series (D2-8/10/12/15)
The following drawing shows the main components of the WSA-100 Utility Station.
⚠WARNING California Proposition 65: This product can expose you to chemicals including styrene and vinyl
chloride, which are on the list of over 900 chemicals identified by the State of California to cause
cancer, birth defects, or other reproductive harm. Always use this product in accordance with
BendPak’s instructions. For more information, visit www.p65warnings.ca.gov.
1645 Lemonwood Drive
Santa Paula, CA, 93060 USA

WSA-100 Utility Station QSG 2of 4P/N 5900095 – Rev. B – September 2021
The main components of the WSA-100 are:
•Four 110 VAC outlets. Two have GFCI, two do not. Maximum current 20 Amps. Have a licensed,
certified
electrician connect outlets to 1 phase, 60 Hz, 110 VAC using suitable conduit (not supplied). Duplex receptacle
must be connected through the GFCI with the input line to the box connected to a circuit breaker or time delay fuse
rated at 20 amps. Both receptacles
must
be grounded to the box. Note that the maximum amperage for one outlet
in use is 20 amps total;
when using all four outlets, the combined total cannot exceed 20 amps
.
⚠DANGER All wiring
must
be performed by a licensed, certified Electrician in accordance with local and national
electrical codes.
•Two rings and two hooks. For holding tools and hoses, for example. The large hooks ensure that the electrical
cords can be stowed away neatly and out of the way.
•Air source. Brings pressurized air to your lift. There are three parts to the air source:
–Incoming air. Connect an incoming air supply to the Air In connector. You need to supply an appropriate
1/4" NPT fitting for the Air In connector.
–Regulator / Filter
.
Removes contaminants from incoming air. Includes a gauge that shows the pressure of
the incoming air. Non-lubricated air can be used to put air into tires or for instrument calibration. To adjust air
pressure, lift the PSI Adjustment Knob to unlock and turn clockwise to increase pressure and
turn
counterclockwise to decrease pressure
. Push Knob back down to lock in new pressure setting.
–Oiler / Lubricator. Puts pneumatic oil, for tool lubrication, into the incoming air. Pressurized air, saturated
with oil, provides lubrication to pneumatic tools, which reduces friction and helps them last longer. Only use
lubricated air with pneumatic products that require it.
To drain water from the Regulator/Filter Reservoir:
1.
Check the Water Sight Gauge to see how much water
is currently in the Reservoir.
⚠
CAUTION If the Reservoir is one quarter (~25%) or
more filled with water, you need to drain it.
2.
Disconnect the air source at the Air In connector.
3.
Press upwards on the Water Drain Plug at the bottom
of the Reservoir. The water drains out.
4.
Release the Water Drain Plug and re-connect the air
source.
To add pneumatic oil to the Oiler/Lubricator:
1.
Check the Oil Sight Gauge to see how much
pneumatic oil is currently in the reservoir.
⚠
CAUTION If the reservoir is less than one half (~50%)
filled with pneumatic oil, you need to add
oil to it.
2.
Disconnect the air source at the Air In connector.
3.
Turn the oil reservoir Oil Fill Cap counter-clockwise with
a slot screwdriver and pull it off.
4.
Add SAE 10W Air Tool Oil or generic pneumatic oil to
the reservoir.
5.
Put the oil reservoir back in place, turning it clockwise
until tight, then re-connect the air source.

WSA-100 Utility Station QSG 3of 4P/N 5900095 – Rev. B – September 2021
To check the oil feed rate on the Oiler/Lubricator:
1.
Use a device that uses lubricated air.
2.
Watch the Sight Glass to see how much pneumatic oil
comes out. Your goal is 1 or 2 drops per minute.
The rate may vary slightly based on the tool
manufacturer’s recommendations.
3.
If you are not getting 1 or 2 drops, turn the Adjustment
Screw counterclockwise (using a small slot-head
screwdriver) to increase the rate or clockwise to
decrease the rate. Use the device again to check the
rate.
4.
When you are getting 1 or 2 drops, stop.
To attach the WSA-100 to a Lift Post:
•Two-Post Lifts. Use one of the bare sides of the Power Post. The equipment must be positioned a
minimum
18 in. / 457 mm from the ground. Use the WSA-100 as a guide to mark the four (4) hole locations on the Lift Post,
set the Mounting Bracket aside, then drill 11/32” diameter holes. Secure the WSA-100 and Mounting Bracket in
place with the included hardware.
⚠WARNING For Two-Post Lifts, it is crucial that the WSA-100 Utility Station is centered on the Lift Post when
drilling the hole locations.
The hole locations are critical to avoid interference with the
internal Post components
.
The following illustration shows how to connect the WSA-100 to a BendPak Two-Post Lift.
•Four-Post Lifts. For light and medium duty Four-Post Lifts (HD-7/9/14), use the unused mounting bracket on the
Powerside Post. For heavy duty Four-Post Lifts (HD, HDS, HDSO 18/27/35/40), use the bare side of the Power
Post opposite of where the Power Unit is mounted. Use the WSA-100 as a guide to mark the four (4) hole locations
on the Lift Post, set the Mounting Bracket aside, then drill 11/32” diameter holes. Secure the WSA-100 and
Mounting Bracket in place with the included hardware. See illustrations on the following page.
⚠WARNING For Heavy Duty Four-Post Lifts, it is crucial that the WSA-100 Utility Station is centered on the Lift
Post when drilling the hole locations.
The hole locations are critical to avoid interference
with the internal Post components
.
This manual suits for next models
1
Table of contents
Other Bend-Pak Desktop manuals
Popular Desktop manuals by other brands

Dell
Dell Latitude 7000 Series Quick start guides

ViewSonic
ViewSonic VOT132 - 2 GB RAM Specifications

MagCore
MagCore Plus II Operation manual

Avery Dennison
Avery Dennison Monarch Mobile Work Station 9878 Operating & maintenance instructions

HP
HP Presario SR1200 - Desktop PC Technical specifications

MSI
MSI PRO DP21 11MA-217US user guide