Rise RS-4702 User manual

17” All-In-One LCD PC
RS-4702 / RS-4702L AIO LCD PC
User’s Guide
Version: A1.0
Users guide Ver. A1.0
Nov, 2012

RS-4702 / RS-4702L User’s Guide
2
Notice
Copyright
The copyright of this user’s guide belongs to any authorized company
and is protected by copyright law. This means partial or full duplication
of this document (electronically, mechanically or otherwise) is prohibited
without the permission of the authorized company.
The contents may be modified without notice for the improvement of
design, function, and reliability.
We do not guarantee the prevention of data loss. Please be cautious
not to lose important data and keep back-ups at all times.
Even though we did our best in drawing up this user’s guide, there
may be omissions and errors we failed to notice. Manufacturers and
suppliers cannot be held liable for problems stemming from those
errors and omissions.
Registered Trademark
Microsoft Windows 7 is a registered trademark of Microsoft.
Intel ATOM are registered trademarks of Intel.
Company names and product names mentioned in this document are
used to help your understanding and are registered trademarks.
The permissible level (Class B) of electromagnetic waves
The product was tested for electromagnetic waves and was rated as
class B, certified for sale and use worldwide.

Notice
3
Caution
For safe and proper installation and use of this product, please read
this guide carefully.
Even though this product is equipped with a safety device to prevent
users from getting injured, please follow the instructions carefully.
Caution during installation
zInstall on an even and stable place to prevent product damage
and injury.
zInstall in a place with good ventilation to reduce humidity and to
prevent overheating.
zKeep objects with magnetic properties away from this product.
zCheck the operational voltage before plugging the power cord
into the outlet.
zUse the power cord that is included with the product and do not
place heavy things on it.
zTo prevent electric shock and fire, do not use an outlet that is
damaged or that is not standard.
zIf you plug the power cord into an extension cord, be sure that
the total voltage of all the devices connected to the cord does
not exceed the number specified on it.
Caution during use
zIf peripheral equipment is connected to this product, turn on the
power source of the peripheral equipment first when you starting
up. On the contrary, when shutting down, turn off the power
source of this product first to prevent damage to the product.
zPlease make sure that no liquid enters into the product. This can
cause damage to the product, fire, or electric shock.

RS-4702 / RS-4702L User’s Guide
4
zUnplug the power cord before cleaning this product. Please
wipe with tissues or fabrics that are sprayed with a PC cleaner
and do not directly spray the product.
zWhen this product will be idle for an extended period of time,
unplug the power cord to prevent damage stemming from power
surges.
zWhen unplugging the power cord, pull by the plug, not the wire.
zDo not place this product in a place where the temperature is
over 60oC (140oF) and ventilation is poor. This may damage the
product.
zThe optimum temperature for the operation of this product is
40oC, so keep electric heaters away from this product.
zTake precautions to avoid losing data stored on the hard disc of
this PC and back-up important data at all times in case of an
unforeseen accident.
zDo not attempt to disassemble this product. When this PC
needs repairs or updates, request warranty service and have a
service person do the work.
zShould the following situations occur, contact one of our quality
assurance divisions.
9When liquid gets into the product or when it is exposed to
humidity for an extended time
9When this PC does not operate well even though you are
following the instructions
9When this product has fallen and broken or become cracked
during delivery.

Table of Contents
5
Table of Contents
Notice ............................................................................................... 2
Copyright.....................................................................................................................................................2
Registered Trademark ................................................................................................................................2
The permissible level (Class B) of electromagnetic waves ........................................................................2
Caution........................................................................................................................................................3
Caution during installation .....................................................................................................................3
Caution during use.................................................................................................................................3
Table of Contents ..............................................................................5
Chapter 1 Introducing the AIO LCD PC............................................6
Product features..........................................................................................................................................6
Unpacking ...................................................................................................................................................7
Optional devices..........................................................................................................................................7
Other peripherals ........................................................................................................................................8
Preparing you AIO LCD PC ........................................................................................................................9
Connect the AC Power Adapter.............................................................................................................9
Turn ON the AIO LCD PC....................................................................................................................10
Chapter 2. Knowing the Parts ........................................................... 11
Front sides : ..............................................................................................................................................11
Right Sides :..............................................................................................................................................13
Left Sides : ................................................................................................................................................14
Rear Sides : ..............................................................................................................................................15
Chapter 3. Starting the computer for the first time............................ 16
For Windows 7 ..........................................................................................................................................16
Step 0: Windows 7 and basic driver pre-setup .................................................................................16
Step 1: To set up the computer.........................................................................................................17
Step 2: The installation of drivers for other peripherals ....................................................................19
Step 3: The installation of software for other peripherals..................................................................19
Step 4: Completion of setup..............................................................................................................19
Chapter 4. System Upgrades ............................................................. 20
System upgrades ......................................................................................................................................20
Hardware upgrades .............................................................................................................................20
Software upgrades...............................................................................................................................20
Chapter 5. Reinstalling the OS ......................................................... 21
How to reinstalling Windows 7 ..................................................................................................................21
Appendix 1. Troubleshooting ........................................................... 23
Appendix 2. Product specifications................................................... 26
Appendix 3. Product warranty .......................................................... 29
Appendix 4. Jumper Setting.............................................................. 31

RS-4702 / RS-4702L User’s Guide
6
Chapter 1 Introducing the AIO LCD PC
Product features
AIO LCD PC is the all-in-one PC that combines a 17” TFT-LCD
monitor and a desktop computer, offering an ultra light weight of 8.6Kg
and a modern design that suits any working conditions.
AIO LCD PC is so user-friendly that anyone can use it without difficulty
because it has all major components in its all-in-one main body.
Even though the AIO LCD PC is very compact, its functionality is
limitless. It supports out-dated and conventional peripheral devices,
adapting to users’ working environments. It also supports the latest
peripheral devices with its four built-in USB ports (compatible with
USB v2.0).
The PC enables wireless networking without additional equipment
using its built-in network adaptor.
The PC’s 17” TFT-LCD display, directly driven by digital signals, offers
a clearer image than that of separate TFT-LCD monitor of the same
class, which is driven by analog signals. Furthermore, it allows for
the use of extended screens and has multi monitor functionality
because it is equipped with an extension port for connecting to TVs or
other external monitors.
This PC is designed to run best using Windows 7, Microsoft’s latest
operating system. When used with the Windows 7 operating system,
you can get a more stable and diverse computing environment.
The adoption of a 1 7 ” TFT-LCD monitor minimizes harmful
electromagnetic waves and power consumption. Its design is
engineered for the human body to minimize eyestrain.

Chapter 1 : Introducing the AIO LCD PC
7
Unpacking
This product is packaged with cardboard paper for safe delivery.
If there is a defect or missing part, contact the agency where you
purchased the product.
The box should contain the following items.
917” AIO LCD PC main body
960W AC/DC power adapter
9AC power cord
9Users Guide (This document)
9Master CD (with the driver file for backup)
Optional devices
9Wireless LAN Mini PCI-E card & Antenna
(built in the main body)
9Microsoft Windows 7 installation CD
A touch screen is optional and you can order it before the product is
shipped. To enable touch screen, you need to have the following
device; Please carefully the touch screen if you assembly system
by yourself.
917” Touch Screen
[For reference]
This PC has a Mini PCI-E slot in its main body allowing for expandability
with peripheral devices that have a Mini PCI-E card. Our company will
launch new models can support wireless LAN.

RS-4702 / RS-4702L User’s Guide
8
Other peripherals
This PC supports the following peripheral devices
9USB Keyboard and Mouse
9USB Printer
9Serial communication port
9USB devices (compatible with USB 2.0)
9External speakers/headphones
9External microphones
9External audio devices
9External monitors
[For reference]
zWhat is USB?
USB is a high-speed serial bus standard for the connection of peripheral
devices that reduces the use of valuable system resources. Devices
that support USB are USB mice, USB keyboards, USB PC cameras,
USB HDD, and USB memory sticks.
Chapter 1 : Introducing the AIO LCD PC
9
Preparing you AIO LCD PC
These are only quick instructions for using you AIO LCD PC.
Read the later pages for detailed information on using your AIO LCD PC
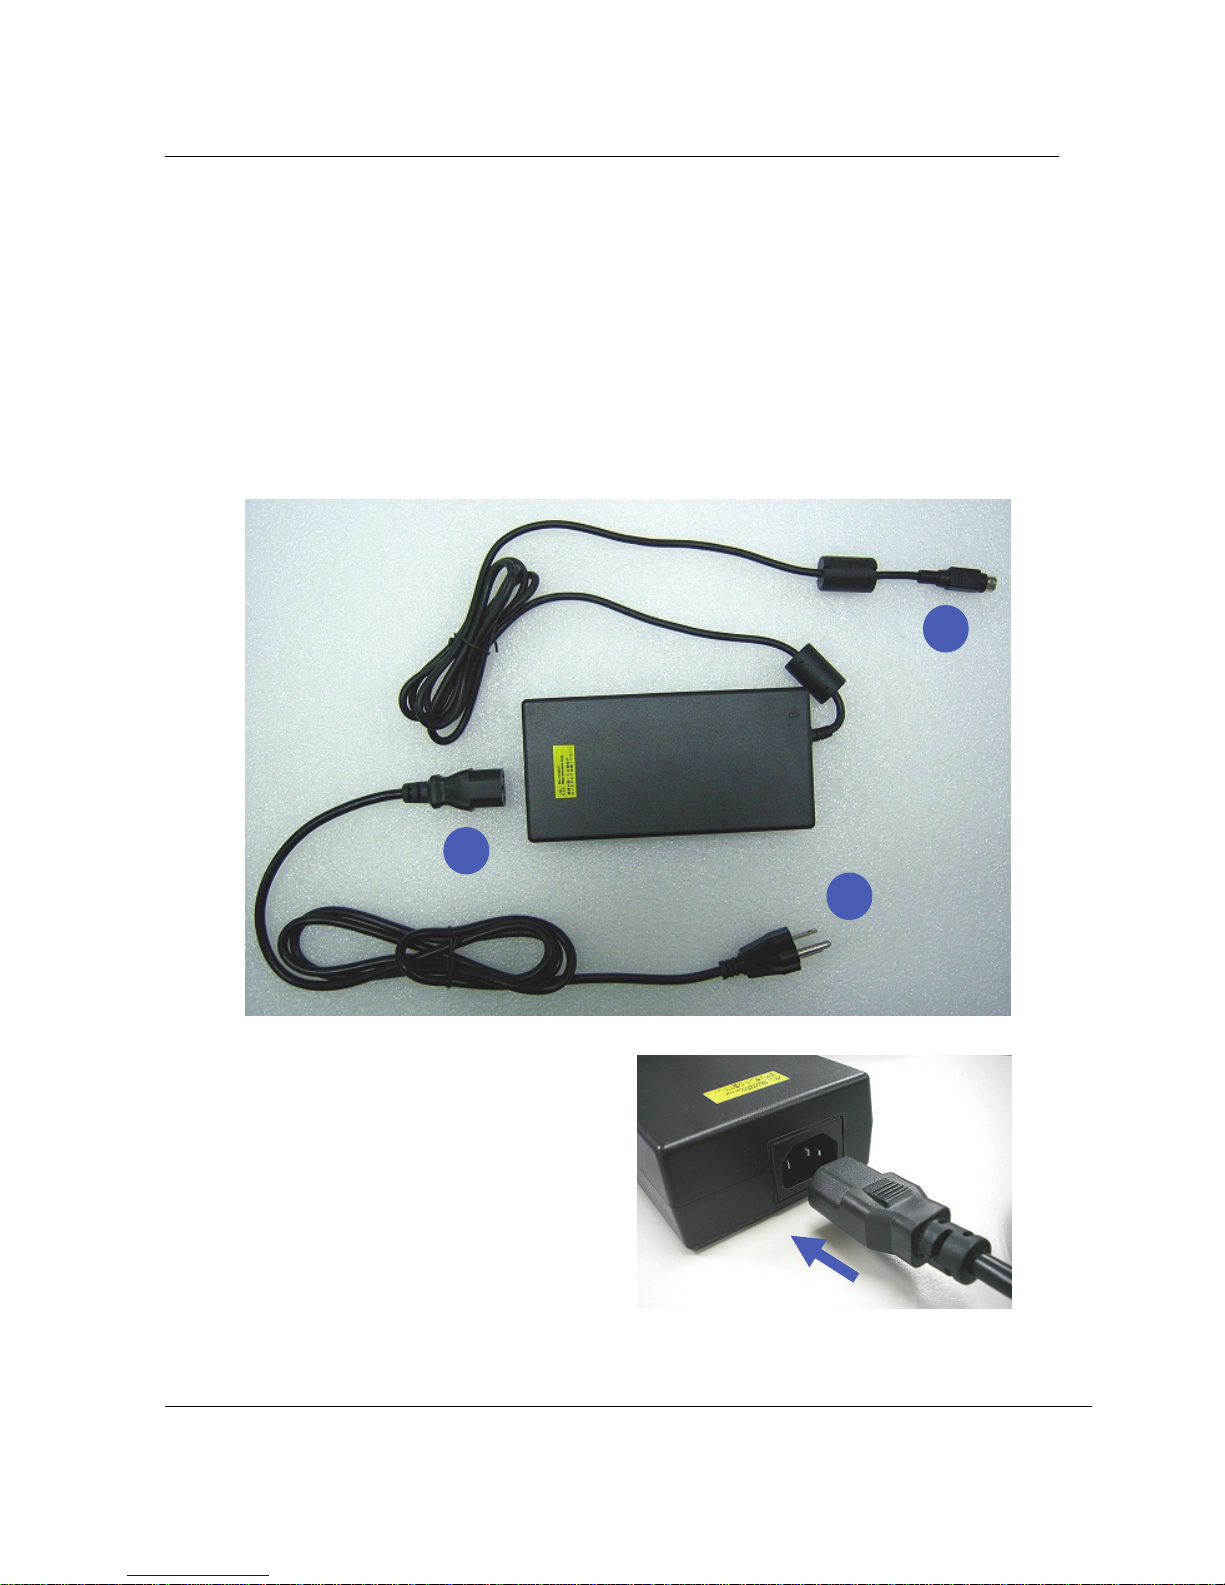
Connect the AC Power Adapter
1. Insert power cord into power adapter
1
3
2

RS-4702 / RS-4702L User’s Guide
10
2. Insert power adapter cable into
“Power Adapter Input” of
rear I/O panel
3. Insert power cord into AC power
socket
Turn ON the AIO LCD PC
1. Before turn on the LED
is Red color.
2. Press the power button
and release.
( In Windows 7, this button can also be used
to safely turn OFF the LCD PC. )
3. LED become Green color.
LED
Power Button
Chapter 2. Knowing the Parts
11
Chapter 2. Knowing the Parts
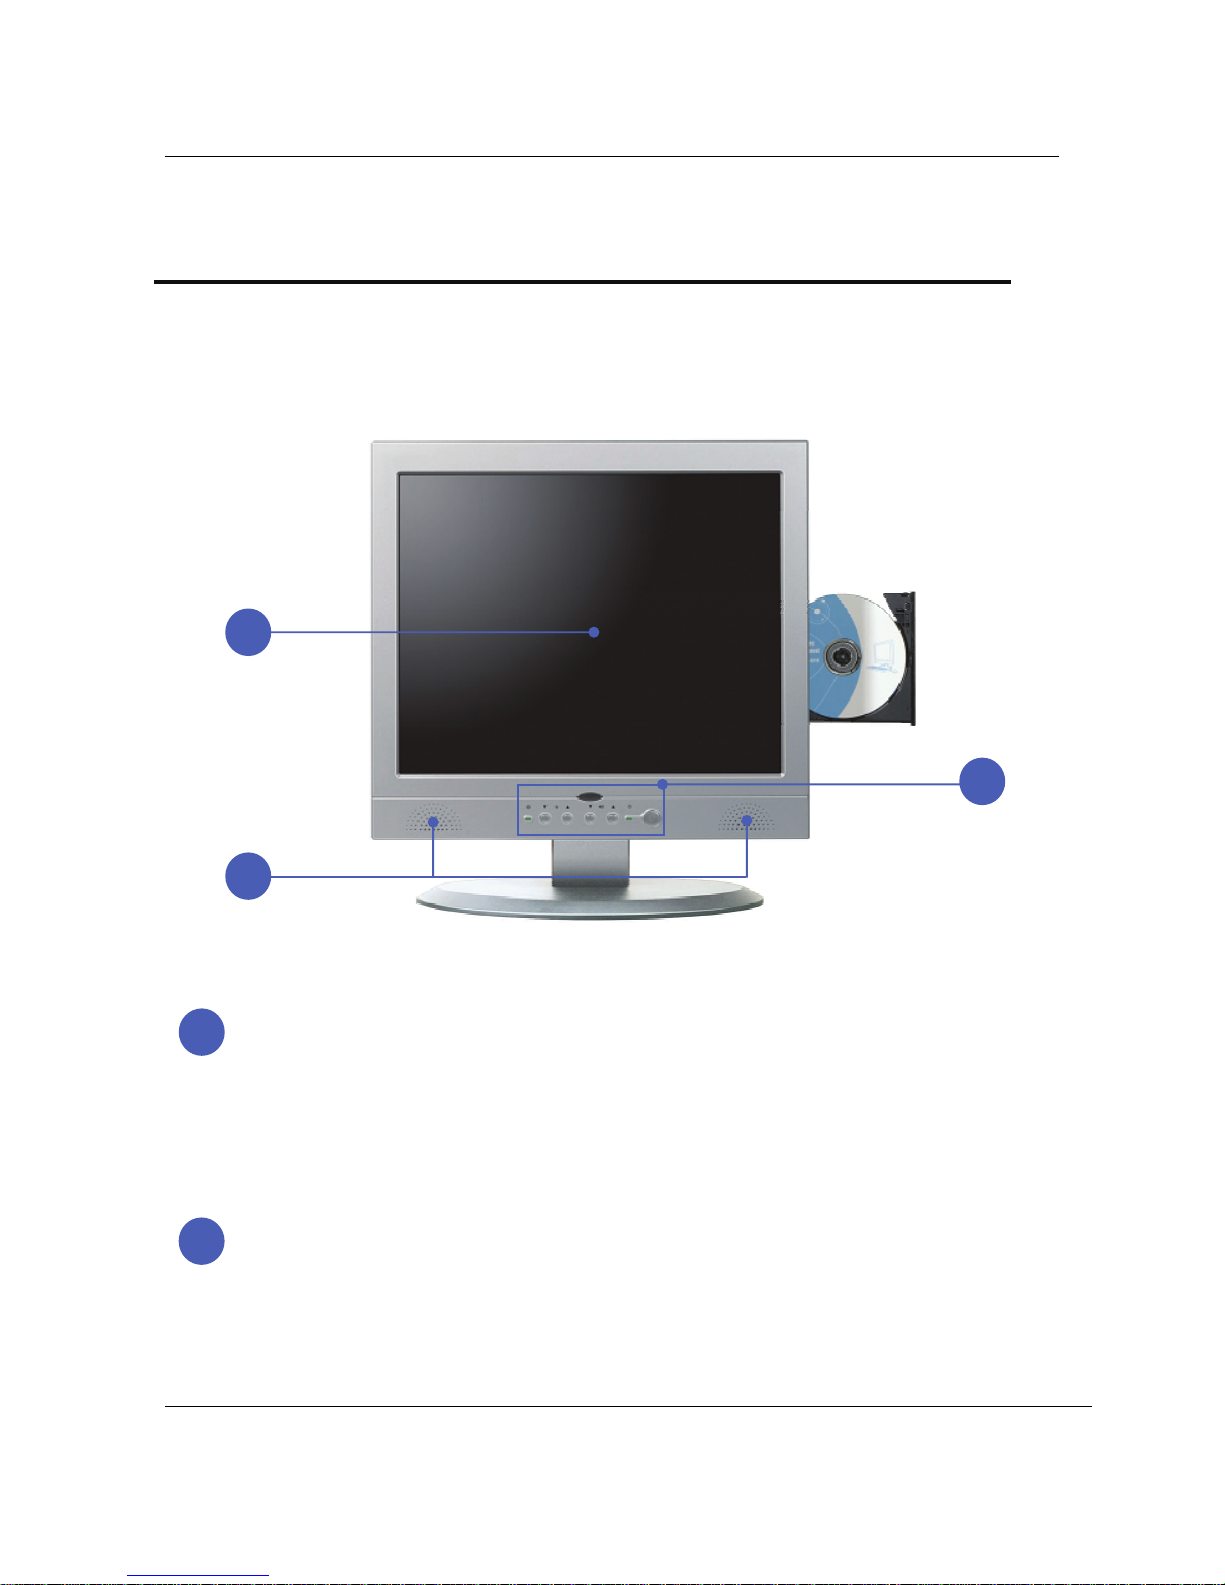
Front sides :
Display Panel
The display panel functions the same as a desktop monitor.
The AIO LCD PC uses an active matrix TFT LCD, which provides excellent viewing like t
hat of desktop monitors. Unlike desktop monitors, the LCD panel does not produce any
radiation or flickering, so it is easier on the eyes. Use a soft cloth without chemical
liquids (use plain water if necessary) to clean the display panel.
Pixels H x V : 1280 x 1024.
Audio Speaker System
The built-in stereo speaker system allows you to hear audio without additional
attachments. The multimedia sound system features an integrated digital audio controller
that produces rich, vibrant sound (results improved with external stereo headphones or
speakers). Audio features are software controlled.
1
2
3
1
2
RS-4702 / RS-4702L User’s Guide
12
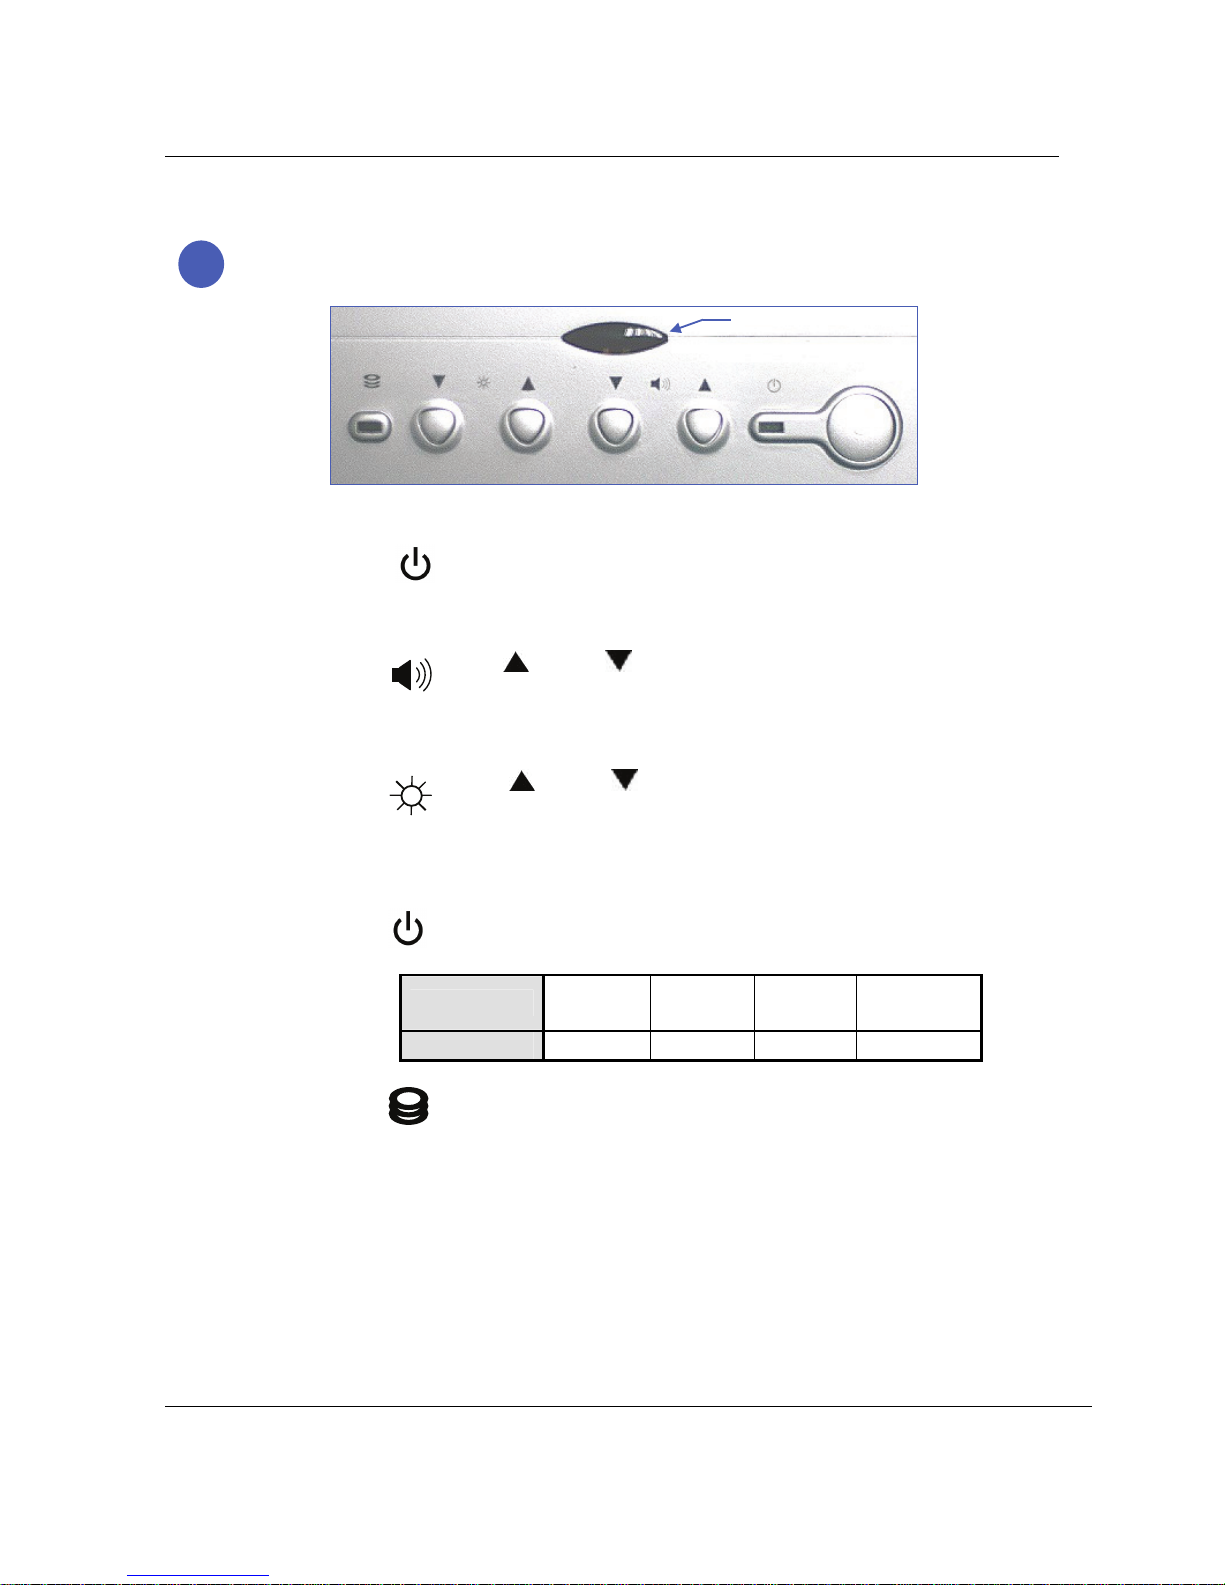
Instant Keys and Status Indicators
zPower button
:Turns the computer on and off.
zButtons for adjusting the speaker volume
: Up( )/Down( ) :
Adjusts the sound volume of the internal speaker.
zButtons for adjusting the screen brightness
: Up( )/Down( ) :
Adjusts the brightness of the TFT-LCD display.
zStatus indicator lights
POWER : Indicates power status.
Power status Working
(G0/S0)
Sleeping
(S1~S4)
Soft Off
(G2/S5)
Mechanical
Off (G3)
LED Color Green Red Red Red
HDD : Indicates the hard disc is working,
LED Color : Green.
3
Remote Control Window
Chapter 2 : Knowing the Parts
13
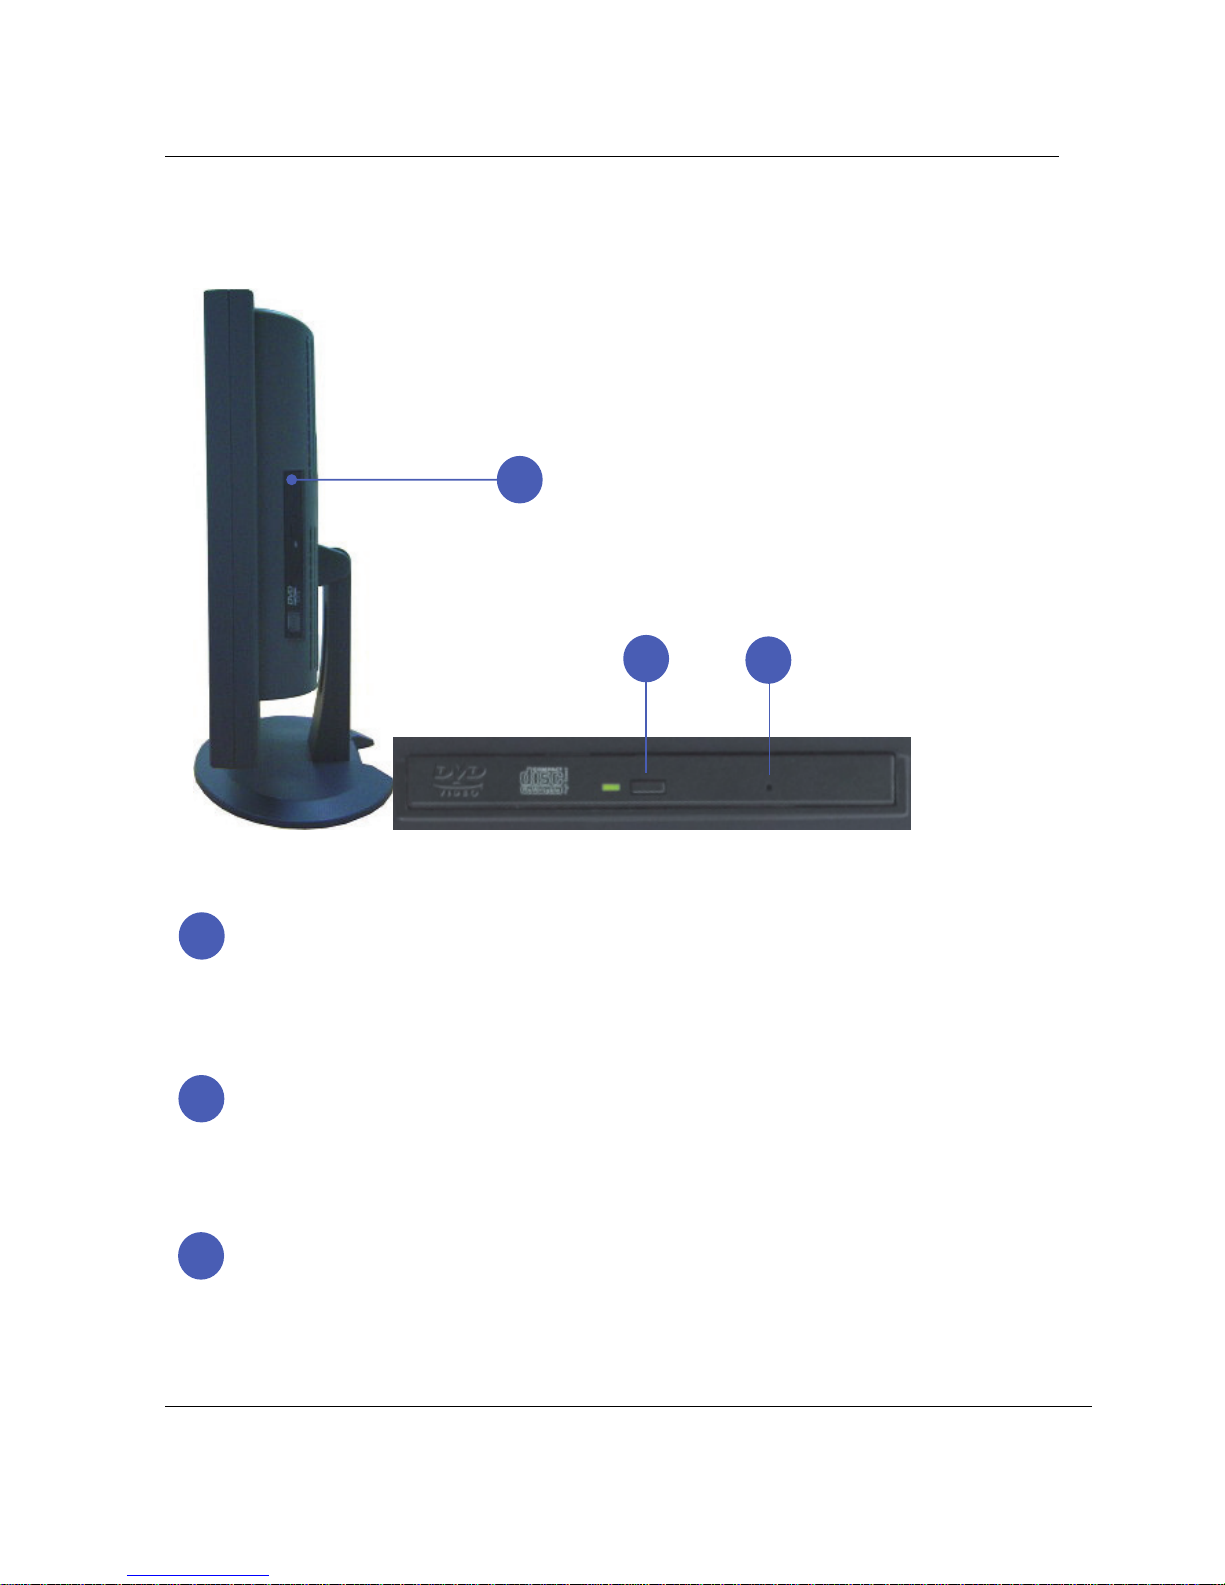
Right Sides :
Optical Drive
The AIO LCD PC comes in various models with different optical drives.
The AIO LCD PC optical drive support Slim DVD Multi (RW)
capabilities. See the marketing specifications for details on each model.
Optical Drive Electronic Eject
The optical drive eject has an electronic eject button for opening the tray.
You can also eject the optical drive tray through any software player or
by right clicking the optical drive in Windows™ “My Computer”
Optical Drive Emergency Eject (location varies by model)
The emergency eject is used to eject the optical drive tray in case the electronic eject
does not work. Do not use the emergency eject in place of the electronic eject.
1
1
2
3
2
3
RS-4702 / RS-4702L User’s Guide
14
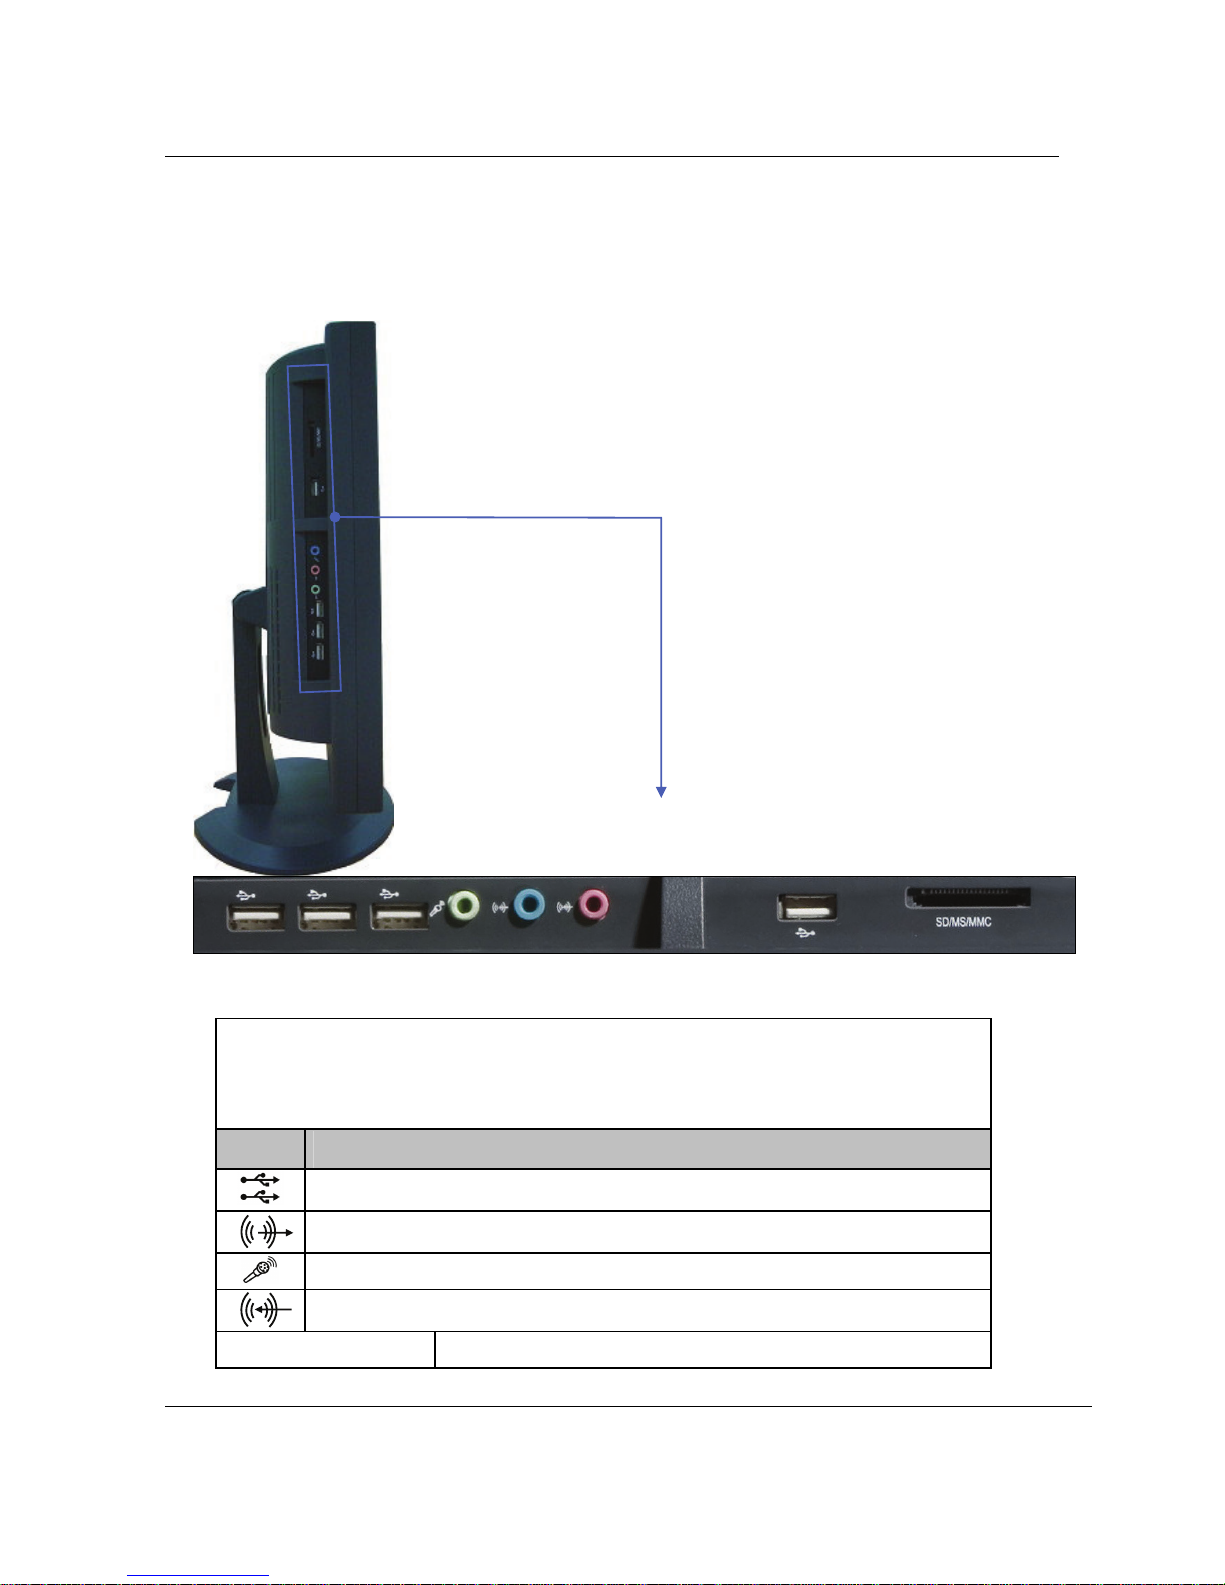
Left Sides :
Side I/O Panel
Side I/O Panel
Icon Connections
USB (2.0/1.1) device connection
External speaker or headphone connection
External microphone device connection
Audio input connections for external audio device connection
SD/MS/MMC Card reader support : SD/MS DUO, HG/MMC.

Chapter 2 : Knowing the Parts
15
Rear Sides :
The following picture shows connectors that are for input/output connections located at the rear side
of the main body. Here we provide a brief explanation about the name and function of each connection port.
Rear I/O Panel
Rear I/O Panel
Icon Connections
Power Adapter (DC) Input
USB (Universal Serial Bus) Port. USB (2.0/1.1) device connection.
LAN (RJ-45) Port. (RS-4702 x2 LAN / RS-4702L x1 LAN)
10/100 /1000 Mbps network (LAN) cable connection
Serial communication device connection (RS-4702 x4 COM /
RS-4702L x2 COM) (
COM1/3/4: 3x RS232 / COM2: 1x RS485/422/232)
LPT port, Printer cable connection
Display (Monitor) Output. The 15pin D-sub and DVI monitor
port support a standard VGA-compatible device such as a mon
itor or projector to allow viewing on a larger external display.
DVI-I

RS-4702 / RS-4702L User’s Guide
16
Chapter 3. Starting the computer for the first time
This chapter will show you how to register a user ID for Windows and for
this computer, and how to set up additional drivers and applications step by
step.
For Windows 7
Step 0: Windows 7 and basic driver pre-setup
This product is pre-setup with the latest driver file for Windows 7,
basic specifications and other optional specifications chosen by the
user before shipping.
The following is a list of operating systems and basic driver files that
are pre-setup.
zMicrosoft Windows 7
zIntel Chipset driver
zIntel ATOM D2550 CPU(Intel® GMA 3650) Video driver
zREALTEK ALC888 Audio driver
zIntel 82574L PCI-E Fast Ethernet NIC LAN driver
Option :
zTouch screen driver
zWireless LAN driver
[For reference]
The touch screen, wireless LAN, must be ordered before the product is
packaged and shipped. We regret to inform you that we cannot
separately supply a touch screen for products sold without this feature.

Chapter 3 : Starting the computer for the first time
17
Step 1: To set up the computer
To set up the computer that is pre-setup with Microsoft Windows 7
in step 0:
1. Connect the mouse and keyboard that come with the main body
and turn on the power of the main body. The following “Install
Windows” dialog box will be displayed.
2. When the “Language”, “Time and Currency format”, “Keyboard or
Input method” dialog box is displayed, select for your location and
click the <Next>. When Install now button displayed, please click it.
3. When the “Please read the license terms” menu is displayed,
select “I accept the license terms” and then click <Next>.
4. When “Which type of installation do you want” displayed, please
select “Upgrade” or “Custom (Advanced).
5. When “Where do you want to install Windows?“ displayed, please
select a Disk and create a new primary partitions for install.
Click <Next> start Installing Windows……reboot...
6. A dialog box will appear asking you to designate a user and
computer name. Enter a user and computer name and computer
description in the blanks and click <Next>.
7. A dialog box will appear asking you to “Set a password for your
user account”, please input password and click <Next>
8. When you see the “Type your product key for activation” page on
the screen, enter the product key specified in Windows 7 user’s
guide that comes with the purchase of this PC and select <Next>.
9. When “Help protect and improve Windows automatically” page on
the screen, click “Use recommended settings”.

RS-4702 / RS-4702L User’s Guide
18
10. When “Review your time and date settings” displayed, please
check and click <Next>
11. When “Select your computer’s current location” displayed, please
select the one that best suits your connection and press <Next>
If your computer is not connected to a network or failed to
establish a network connection, a dialog box with
“failed to establish an Internet connection” will pop up.
If you wish to set up the Internet connection later, click <Skip>.
In that case, you can set up or change the network configuration
at [Start] - [Control panel] - [Network and Internet connection]
after you are finished installing Windows.
12. Setup up Windows complete and reboot into Windows 7.

Chapter 3 : Starting the computer for the first time
19
Step 2: The installation of drivers for other peripherals
Skip this step if you do not use other peripherals.
To use other peripherals this PC supports such as printers, serial
communication devices, USB devices, connect the device to the main
body, press the power button and boot the PC. When booting is
complete, install the pertinent driver in the system. Because the
system automatically senses and installs plug-and-play peripherals,
follow the instructions displayed on the setup menu and refer to the
device’s user’s guide. For peripherals that are not plug-and-play, users
have to install the device and reboot the system for normal operation.
Refer to the user’s guide of each device for detailed instructions.
Step 3: The installation of software for other peripherals
Skip this step if you do not use other peripherals and go to step 4.
For efficient use of other peripherals (printers, serial communication
devices, USB devices), install the appropriate software (e.g. utilities or
other applications provided by the manufacturer of the device)
following the instructions displayed on the setup menu and referring to
the user’s guide.
Step 4: Completion of setup
When you are finished with step 3, basic installation is complete and
the computer is ready to use once it is rebooted.

RS-4702 / RS-4702L User’s Guide
20
Chapter 4. System Upgrades
System upgrades
Hardware upgrades
In order to maintain this product’s normal operation and the user’s
safety, we do not provide warranty services when users upgrade the
system on their own. If you disassemble the computer, it may cause
system damage or electrical shock.
Please contact one of our sales agencies or customer support centers
to upgrade the CPU, hard disk, or memory.
Software upgrades
This product is installed with the latest version of Windows 7 OS and
basic driver files before it is shipped. However, manufacturers
release new improved versions all the time to meet the user’s growing
needs, so please upgrade to the latest version for major software that
is already installed on this PC on a regular basis at the following sites.
zWindows 7
http://update.microsoft.com/
zLatest driver files (Intel video driver, REALTEK audio driver……)
http://www.intel.com (Chipset, Video and LAN driver)
http://www.realtek.com.tw (Audio driver)
This manual suits for next models
1
Table of contents
Other Rise Desktop manuals


