Bendof DC-20MV User manual

DC-20MV
Instruction manual
Bruksanvisning
Brugsanvisning
Bruksanvisning
Käyttöohjeet

2
English
OPERATING/SAFETY ORIGINAL INSTRUCTIONS
DC20MV
CORDLESS REBAR CUTTER
TO REDUCE THE RISK OF INJURY, YOU MUST READ AND
UNDERSTAND THESE INSTRUCTIONS

3
English
CE DECLARATION OF CONFORMITY
We declare under our sole responsibility that these products are in conformity
with the following standards or standardized documents EN62841-1,
EN55014-1 and EN55014-2 in accordance with Council Directives 2006/42EC
and 2004/108/EC.
Model: DCC-2036BLH/DC20MV
Beskrivning: Cordless Rebar Cutter
Vibration Information
Vibration total values (triax vector sum) determined according to EN62841
Vibration emission value <2,5 m/s
Noise Information
The measured values were determined according to EN62841-1.
Measured A-weighted sound pressure level: 91.0 dB(A)
Measured A-weighted sound power level: 80.0 dB(A)
Uncertainty KpA: 1.971 dB(A)
24th February 2022
IKK Co., Ltd.
396-59 Ashitaka, Numazu City,
Shizuoka Pref. 410-0001 Japan

4
English
WARNING!
TO AVOID SEVERE PERSONAL INJURY OR PROPERTY DAMAGE, READ THESE
INSTRUCTIONS CAREFULLY BEFORE ATTEMPTING TO USE THE CUTTERS.
Ignorance of proper operating procedures can lead to accidents.
If in doubt about any procedure, contact your nearest authorized agent.
CONTENTS
GENERAL SAFETY RULES
PARTS NAMES
SPECIFICATIONS
OPERATING INSTRUCTIONS
BASIC CUTTING INSTRUCTIONS
PRE-USE CHECKS
CAUTION ON LI-ION BATTERY
BATTERY REMOVAL/INSTALLATION
CHARGING
WARM-UP
STOPPER BOLT ADJUSTMENT
CUTTING
RELEASE VALVE
POINTS OF ATTENTION
MAINTENANCE
CUTTER BLOCKS
CLEANING
OIL-LEVEL CHECK (ADDING OIL)
OIL CHANGE
BOLT TIGHTNESS
OVERHAUL
THESE TOOLS ARE FOR INDUSTRIAL USE ONLY.
*Specifications are subject to change without prior notice
5
7
8
8
8
8
9
9
10
12
12
13
13
13
14
14
14
14
15
15
15
PAGE

5
English
WARNING: READ AND UNDERSTAND ALL INSTRUCTIONS.
Failure to follow all instructions listed below may result in electric shock, fire and/or serious injury.
The term “power tool” in all of the warnings listed below refers to your mains-operated (corded)
power tool or battery-operated (cordless) power tool.
WORK AREA SAFETY
- Keep work area clean and well lit. Cluttered or dark areas invite accidents.
- Do not operate power tools in explosive atmospheres, such as in the presence of
flammable liquids, gases or dust. Power tools create sparks which may ignite the dust
or fumes.
- Keep children and bystanders away while operating a power tool. Distractions can
cause you to lose control.
ELECTRICAL SAFETY
- Power tools plugs must match the outlet. Never modify the plug in any way. Do not
use any adapter plugs with earthed (grounded) power tools. Unmodified plugs and
matching outlets will reduce risk of electric shock.
- Avoid body contact with earthed or grounded surfaces such as pipes,
radiators, ranges and refrigerators. There is an increased risk of electric shock if your
body is earthed or grounded.
- Do not expose power tools to rain or wet conditions. Water entering a power tools will
increase the risk of electric shock.
- Do not abuse the cord. Never use the cord for carrying, pulling or unplugging the
power tool. Keep cord away from heat, oil sharp edges or moving parts. Damaged or
entangled cords increase the risk of electric shock.
- When operating a power tool outdoors, use an extension cord suitable
for outdoor use. Use of a cord suitable for outdoor use reduces the risk of
electric shock.
- Do not use AC only rated tools with a DC power supply.
PERSONAL SAFETY
- Stay alert, watch what you are doing and use common sense when operating a power
tool. Do not use a power tool while you are tired or under the influence of drugs,
alcohol or medication. A moment of inattention while operating power tools may result
in serious personal injury.
- Use safety equipment. Always wear eye protection. Safety equipment such as
protection goggles, dust mask, non-skid safety shoes, hard hat, or hearing protection
used for appropriate conditions will reduce personal injuries.
- Avoid accidental starting. Ensure the switch is in the off-position before plugging in.
Carrying power tools with your finger on the switch or plugging in power tools that have
the switch on invites accidents.
- Remove any adjusting key or wrench before turning the power tool on. A wrench or a
key left attached to a rotating part of the power tool may result in personal injury.
- Do not overreach. Keep proper footing and balance at all times. This enables better
control of the power tool in unexpected situations.
- Dress properly. Do not wear loose clothing or jewelry. Keep your hair, clothing and
gloves away from moving parts. Loose clothes, jewelry or long hair can be caught in
moving parts.
- If devices are provided for the connection of dust extraction and collection facilities,
ensure these are connected and properly used. Use of these devices can reduce
dust-related hazards.
- Keep handles dry, clean and free from oil and grease. Slippery hands can not safely
control the power tool.
GENERAL SAFETY RULES

6
English
POWER TOOL USE AND CARE
- Do not force the power tool. Use the correct power tools for your application.
The correct power tool will do the job better and safer at the rate for which it was
designed.
- Do not use the power tool if the switch does not turn on and off. Any power tool that
cannot be controlled with the switch is dangerous and must be repaired.
- Disconnect the plug from the power source and/or the battery pack from the power tool
before making any adjustments, changing accessories, or storing power tools. Such
preventive safety measures reduce the risk of starting the power tool accidentally.
- Do not cover the power tool’s air vents nor operate the tool on dirt. Use a plywood base
under the tool to keep armature and fan clean. If the vents are covered, the motor will
overheat and may burn out.
- Store idle power tools out of the reach of children and do not allow persons unfamiliar
with the power tool or these instructions to operate the power tool. Power tools are
dangerous in the hands of untrained users.
- Maintain power tools. Check for misalignment or binding of moving parts, breakage of
parts and any other condition that may affect the power tool’s operation. If damaged,
have the power tool repaired before use. Many accidents are caused by poorly
maintained power tools.
- Keep cutting tools sharp and clean. Properly maintained cutting tools with sharp
cutting edges are less likely to bind and are easier to control.
- Use the power tool, accessories and tool bits etc., in accordance with these
instructions and in the manner intended for the particular type of power tool, taking into
account the working conditions and the work to be performed. Use of the power tool
for operations different from those intended could result in a hazardous situation.
BATTERY TOOL USE AND CARE
- Recharge only with the charger specified by the manufacture. A charger that is
suitable for one type of battery pack may create a risk of fire when used with another
battery pack.
- Use power tools only with specifically designated battery packs. Use of any other
battery packs may create a risk of injury and fire.
- When battery pack is not in use, keep it away from other metal objects, like paperclips,
coins, keys, nails, screws or other small metal objects, that can make a connection
from one terminal to another. Shorting the battery terminals together may cause burns
or a fire.
- Under abusive conditions, liquid may be ejected from the battery; avoid contact.
If contact accidentally occurs, flush with water. If liquid contacts eyes, additionally seek
medical help. Liquid ejected from the battery may cause irritation or burns.
- Do not use a battery pack or tool that is damaged or modified. Damaged or modified
batteries may exhibit unpredictable behavior resulting in fire, explosion or risk of injury.
- Do not expose a battery pack or tool to fire or excessive temperature. Exposure to fire
or temperature above 130°C may cause explosion.
- Follow all charging instructions and do not charge the battery pack or tool outside the
temperature range specified in the instructions. Charging improperly or at
temperatures outside the specified range may damage the battery and increase the
risk of fire.
7
English
SERVICE
- Have your power tool serviced by a qualified repair person using only identical
replacement parts. This will ensure that the safety of the power tool is maintained.
- Never service damaged battery packs. Service of battery packs should only be
performed by the manufacturer or authorized service providers.
SPECIFIC SAFETY RULES
- Hold power tool by insulated gripping surfaces when performing an operation where
the cutting tool may contact hidden wiring or its own cord. Contact with a “live” wire will
make exposed metal parts of the tool “live” and shock the operator.
- Use clamps or other practical ways to secure and support the workpiece to a stable
platform. Holding the work by hand or against your body is unstable and may lead to
loss of control.
- Never leave the trigger locked ”ON”. Before plugging the tool in, check that the trigger
lock is ”OFF”. Accidental start-ups could cause injury.
- Keep hands away from the cutting area and moving parts.
- Do not use dull or damaged blades. Damaged part(s) can break easily or could cause
injury.
- Maintain labels and nameplates.
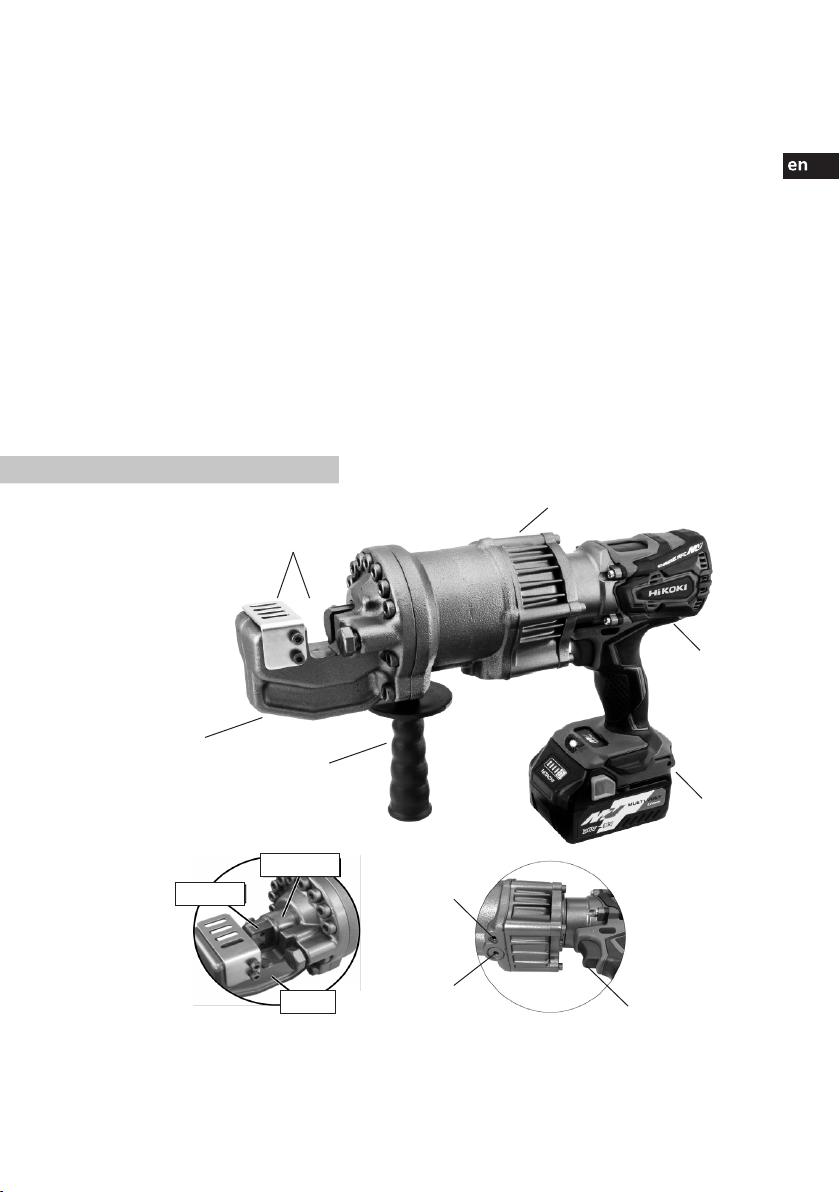
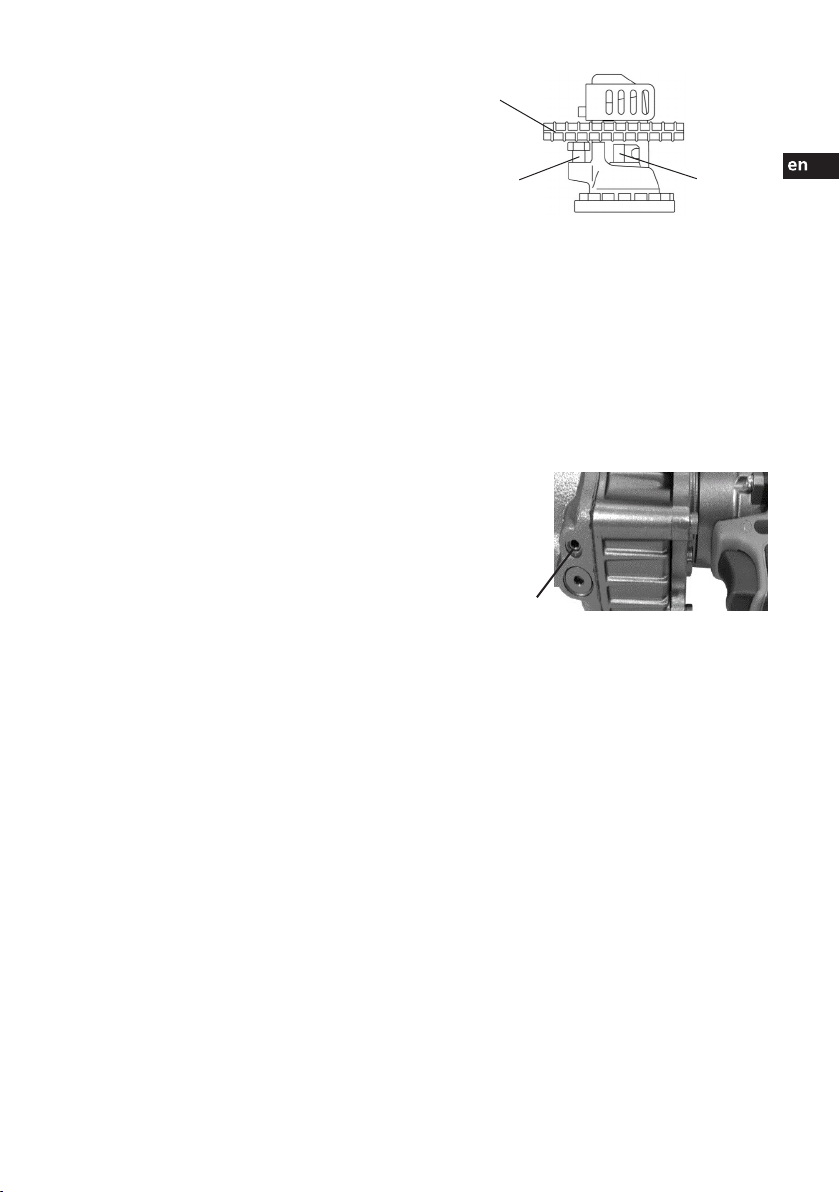
360° Rotatable between pump, case and motor
1. Housing
2. Cutter blocks
3. Switch
4. Oil-plug
5. Release valve
6. Motor
7. Pump case
8. Handle (detachble)
9. Battery
10. Piston
PARTS NAMES
1.
8.
2.
7.
6.
9.
3.
5.
4.
10.
2.
1.

8
English
Model DC20MV
Cutting capacity Up to 20mm (3/4”) diameter
Cutting speed ≥ 4.0 sec. (20mm)
Max. Rebar hardness Tensile strength 490N/mm2
Power Supply Rechargeable battery
Voltage DC36V
Dimensions (LxWxH) 387x103x274 mm (without handle)
Weight 9,3 kg (including battery)
Battery (Li-ion Multi Volt) BSL36A18 : DC36V-2.5Ah / 18V-5.0Ah
Charger UC18YSL3
Charging Time Approx. 32 min.
Battery & Charger (HiKOKI)
OPERATING INSTRUCTIONS
SPECIFICATIONS
BASIC CUTTING INSTRUCTIONS
Important: Always read, understand and obey the safety instructions included with your new
Cordless Rebar Cutters before operating. Use Rebar Cutters on concrete reinforcing bars only.
These tools are not to be used in cutting other kinds of metal or materials. Do not cut ungraded
rebar.
WARNING: There is always a chance that the cut end may shoot out, especially if less than
30 cm in length. Exceeding designated material specifications will greatly increase this risk and
will also damage the tool. Do not attempt to cut rebar harder, thicker or thinner than specified for
the specific tool.
DO NOT CUT SHORT PIECES: Be especially careful when cutting off short lengths (30 cm or less) as
the cut end tends to fly out.
PRE-USE CHECKS
1. WARNING: Do not expose the tool to rain or wet conditions. Water entering a power
tools will increase the risk of electric shock.
2. WARNING: Wear safety goggles, safety glasses with side shields or a face shield when
using these tools.
3. Check that the power source is appropriate to the tool.
CARE: If voltage is too high, the motor will burn out. If voltage is too low, insufficient
power will be generated. Use rechargeable battery BSL36A18/BSL36B18.
4. WARNING: Avoid accidental starting. Ensure the switch is in the off-position before
battery attached.
5. Note that battery must be charged before initial use (see p.10 CHARGING).
6. Check and keep work area clean and enough work space.

9
English
7. Check condition of cutter blocks and tightness of cutter block bolts.
CHECK FOR CRACKS OR DAMAGE, LOOSEN BOLTS
8. Before using, always check that the two bolts on each cutter block are properly
tightened. Using a loose block will result in damage to block and housing. Also check
condition of cutter blocks. If either cutting edge is dull or chipped, remove retaining
bolts and rotate both blocks so that two new edges come into use. Replace and
tighten bolts (Each block has four cutting edges). When all four cutting edges have
been used or if either block is cracked or otherwise damaged, replace both blocks.
CAUTION: A loose or cracked block may result in injury to operator.
CAUTION ON LITHIUM-ION BATTERY
To extend the lifetime, lithium-ion battery equips with the protection to stop the output. In the case
of 1 to 3 described below, when using the tools, even if you are pulling switch, the motor may
stop. This is not the trouble but the result of protection function.
1. When the battery power remaining runs out, the motor stops. In such case, charge it
up immediately.
2. If the tool is overloaded, the motor may stop. In this case, release the switch of the tool
and eliminate causes of overloading. After that, you can use it again.
3. If the battery is overheated under overloaded work, the battery power may stop. In this
case, stop using the battery and let the battery cool. After that, you can use it again.
4. Never short-circuit the battery.
Furthermore, please heed the following warning and caution.
BATTERY REMOVAL/INSTALLATION
1. Battery removal
Hold the handle tightly and push the battery latches to remove the battery.
2. Battery installation
Insert the battery while observing its polarities.
10
English
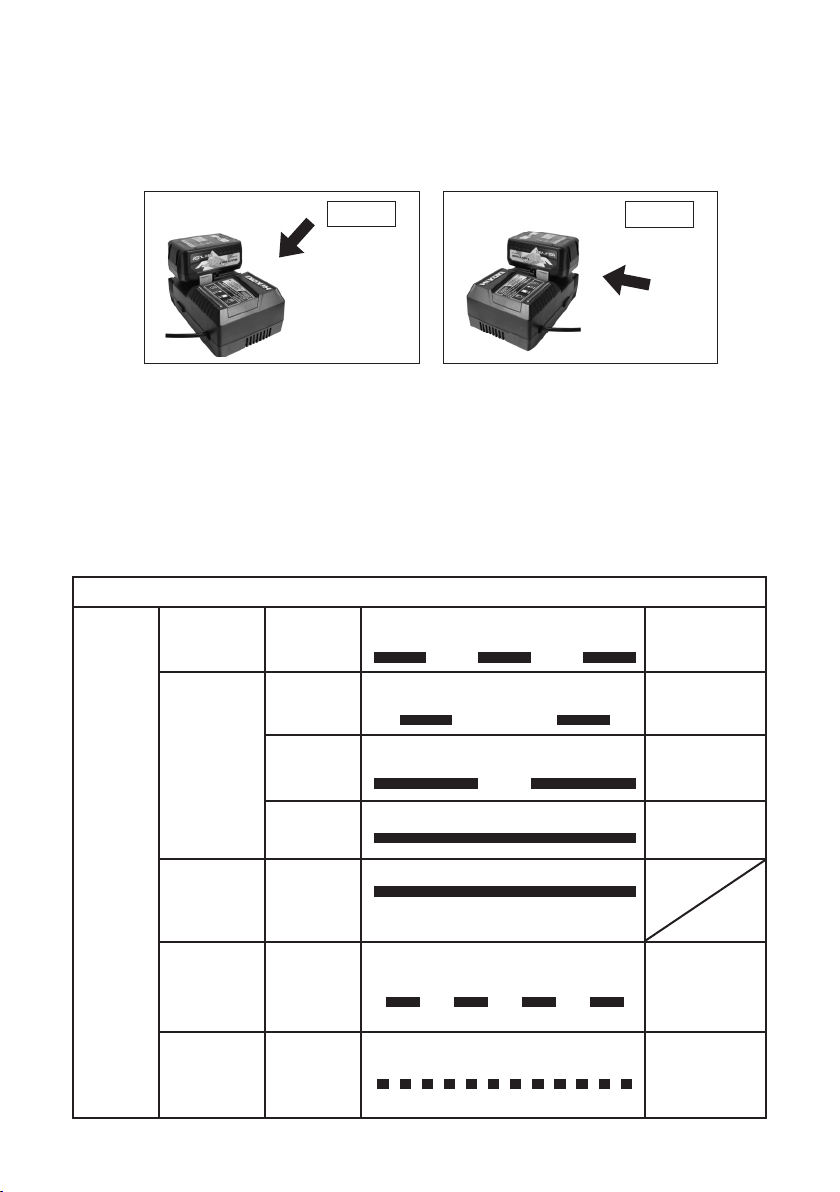
CHARGING (Charger: UC18YSL3)
Before using the tool, charge the battery as follows.
1. Connect the charger’s power cord to a receptacle. When the power cord is connected,
the charger’s pilot lamp will blink in red (At 1-second intervals).
2. Firmly insert the battery into the charger.
3. When inserting a battery in the charger, the charge indicator lamp will blink in blue.
When the battery becomes fully recharged, the charge indicator lamp will light up in
green.
(1) Charge indicator lamp indication
The indications of the charge indicator lamp will be as shown in table below, according
to the condition of the charger or the rechargeable battery.
INSERT
CHARGER
INSERT
CHARGER
BATTERY
Indications of the charge indicator lamp
Charge
indicator lamp
(RED/ BLUE/
GREEN/
PURPLE)
Before charging Blinks
(RED)
Lights for 0,5 seconds. Does not light for 0,5 sec.
(Off for 0,5 sec.) Plugged
into power source
While
charging
Blinks
(BLUE)
Lights for 0,5 seconds. Does not light for 1 sec.
(Off for 1 sec.) Battery
capacity at less than
50%
Blinks
(BLUE)
Lights for 1 second. Does not light for 0,5 sec.
(Off for 0,5 sec.) Battery
capacity at less than
80%
Lights
(BLUE)
Lights continuously Battery
capacity at more than
80%
Charging
complete Lights
(GREEN)
Lights continuously
(Continuous buzzer sound:
about 6 seconds)
Overheat standby Blinks
(RED)
Lights for 0,3 seconds. Does not light for 0,3 sec.
(Off for 0,3 sec.) Battery
overheated. Unable
to charge. (Charging
will commence when
battery cools.)
Charging
impossible Flickers
(PURPLE)
Lights for 0,1 seconds. Does not light for 0,1 sec.
(Off for 0,1 sec.)
(Intermittent buzzer sound: about 2 seconds)
Malfunction in the
battery or the charger
11
English
(2) Regarding the temperatures of the rechargeable battery. The temperatures for
rechargeable batteries are between 0°C ~ 50°C, and batteries that have become hot
should be cooled for a while before being recharged.
(3) Recharging time (At 20°C)
Approx. 32 minutes (BSL36A18), but the charging time may vary according to the
ambient temperature.
4. Disconnect the charger’s power cord from the receptacle.
5. Hold the charger firmly and pull out the battery.
NOTE: After operation, pull out batteries from the charger first, and then keep the
batteries properly.
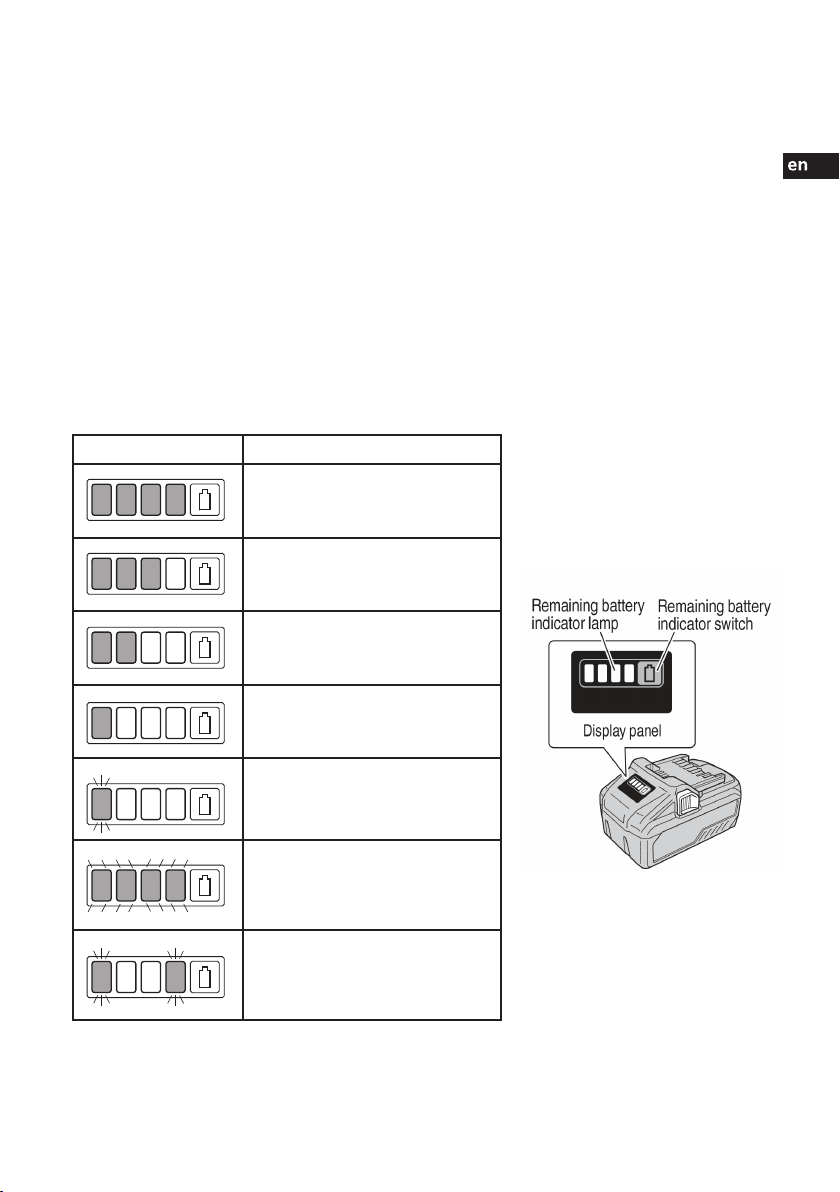
6. About remaining battery indicator
When pressing the remaining battery indicator switch to light the indicator lamp, the
indicator will shut off approximately 3 seconds. It is best to use the remaining battery
indicator as a guide since there are slight differences such as ambient temperature
and the condition of the battery.
State of lamp Battery Remaining Power
Lights:
The battery remaining power is over 75%.
Lights:
The battery remaining power is 50-75%.
Lights:
The battery remaining power is 25-50%.
Lights:
The battery remaining power is less than
25%.
Blinks:
The battery remaining power is nearly
empty. Recharge the battery soonest
possible.
Blinks:
Output suspended due to high temperature.
Remove the battery from the tool and allow
it to fully cool down.
Blinks:
Output suspended due to failure or mal-
function. The problem may be the battery,
please contact your dealer.
12
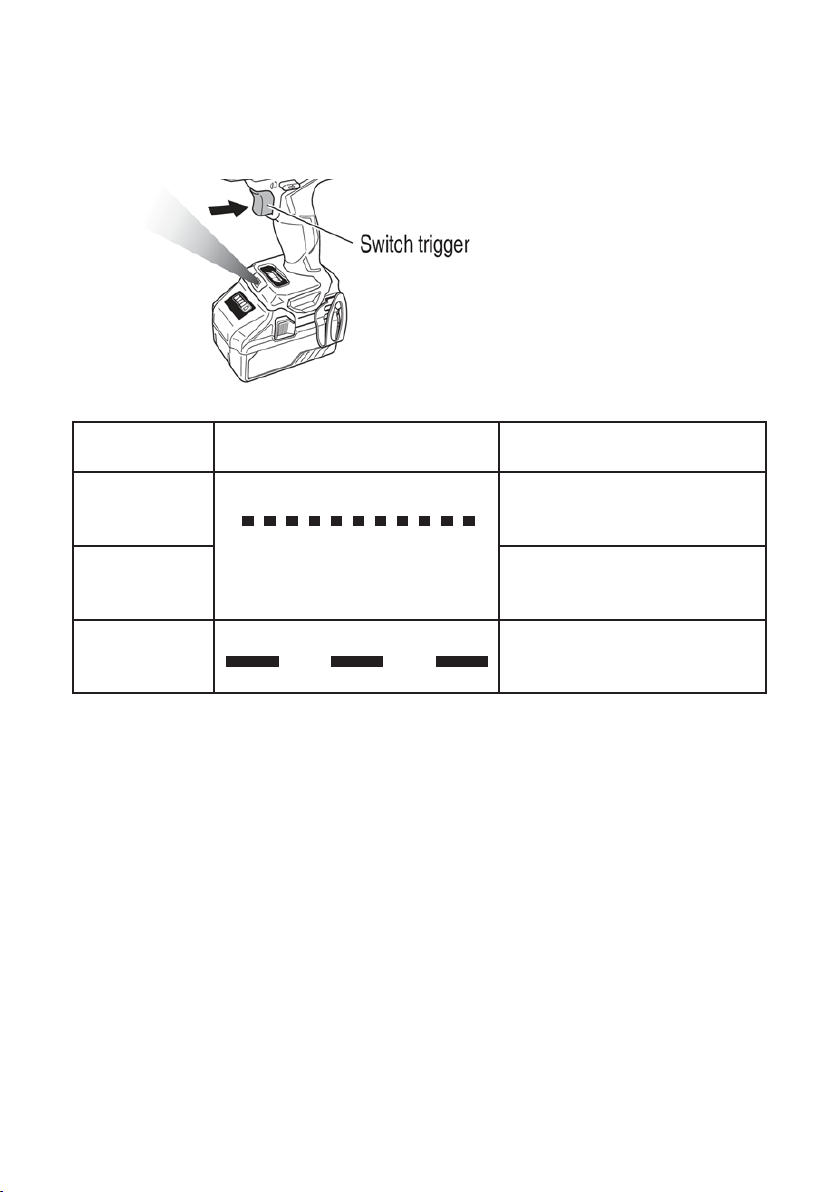
English
Safeguard
Function LED Light Display Corrective Action
Overburden
Protection
On 0,1 second/off 0,1 second If the operating with the shift knob set on
HIGH, adjust to LOW and continue operation.
Remove the cause of the overburdening.
Reactive Force
Control
Remove the cause of the over
burdening. When operating the tool, firmly
hold the tool to make sure it doesn’t jerk.
Temperature
Protection
On 0,5 second/off 0,5 second
Allow the tool and battery thoroughly cool.
7. How to use the LED light
While the switch is pulled, the LED light will automatically light up the tip portion of the
tool. The LED light will automatically turn off 10 seconds after the switch is released.
The LED light also functions as a warning signal that lights up during use.
WARM-UP
If in cold weather, you should warm up the tool for 30-60 seconds so that the hydraulic oil
reaches the proper viscosity. Pull trigger-switch (ON) to extend piston then release the switch
(OFF) when it has reached its full stroke. Repeat 5-7 times without rebar.
STOPPER BOLT ADJUSTMENT
The adjustable stopper functions to maintain the rebar in the correct position during cutting and
must be properly set for each size of rebar before making a cut. Screw in the stopper to provide
sufficient clearance for the rebar. Keeping rebar at right angles (90 degrees) to front cutter block,
screw out the stopper until it is just touching the rebar. Once set, the stopper needs no further
adjustment while cutting rebar of the same diameter, but must be reset for a different size rebar.
WARNING: Failure to correctly set the stopper will result in excessive wear of cutter blocks and
may cause cut end to fly out.
13
English
Release value
WARNING: Failure to correctly set the stopper
will result in excessive wear of cutter blocks
and may cause cut end to fly out.
RELEASE VALVE
In the event that piston should fail to return
automatically for any reason (e.g. the piston
has become jammed by some reasons), use
4 mm hexagon key provided to slightly loosen
release valve. Make sure to tighten the release
valve before making the next cut.
CUTTING
1. Insert rebar between stopper bolt and front cutter block, making sure that it is
properly seated in U-shaped support. Keeping rebar at right angles (90 degrees) to
front cutter block.
2. WARNING: Flying ends are a hazard to all personnel in the vicinity. Erect safety screens.
3. Pull trigger-switch and keep depressed while piston advances and rebar is cut (If the
switch is released at an intermediate point, the piston will stop).
4. When cut is completed, release the switch. The piston retracts automatically (Note that
the switch cannot be re-activated until the piston has fully retracted).
POINTS OF ATTENTION
1. Be especially careful when cutting off short lengths (30cm or less) as the cut end tends
to fly out.
WARNING: Flying ends are a hazard to all personnel in the vicinity. Erect safety screens.
2. Do not cover air vents.
CARE: If vents are covered, motor will overheat and may burn out.
3. If hydraulic oil exceeds 70 degrees C (158 degrees F) in temperature, power will drop.
Allow the tool to cool before resuming operation. Be particularly careful in summer
when the aluminum pump case heats up quicker.
4. If a drop in power is observed and motor is unusually hot, check battery.
5. If piston should ever fail to retract completely, push rear cutter block backwards to
manually retract piston or check under piston to remove any debris keeping the piston
from retracting.
CAUTION: Use a rebar or flat metal bar for this purpose.
Never push cutter block with any part of the hand, even if gloved. Once piston has
been retracted, pull trigger-switch long enough to partially advance the piston.
Disconnect battery. Check piston and housing for accumulated dirt and iron filings that
may be jamming the piston (See p.14 CLEANING). If, after cleaning, the piston still
does not automatically retract when fully extended, the piston itself may be damaged.
Return the tool to an authorized repair center.
6. Check that power source is appropriate to the tool.
CARE: If voltage is too high, the motor will burn out. If voltage is too low, insufficient
power will be generated. Use rechargeable battery BSL36A18/BSL36B18.
Rebar
Adjustable
stopper Cutter
blocks

14
English
CUTTER BLOCKS
Before using, always check that the two bolts on each cutter block are
properly tightened. Using a loose block will result in damage to block
and housing. Also check condition of cutter blocks. If either cutting
edge is dull or chipped, remove retaining bolts and rotate both blocks
so that two new edges come into use. Replace and tighten bolts
(Each block has four cutting edges). When all four cutting edges have
been used or if either block is cracked or otherwise damaged, replace
both blocks.
CAUTION: A loose or cracked block may result in injury to operator.
CLEANING
Clean your tool every day, preferably immediately after use.
CAUTION: Wear gloves to protect hands from metal splinters. Do not use
an air gun: blasting with air can cause metal filings and/or dust to get
into eyes and respiratory system. Wipe or brush away all dirt and metal
filings.
WARNING: DISCONNECT BATTERY before performing any maintenance.
OIL-LEVEL CHECK (ADDING OIL)
As the cutters are hydraulically operated, the oil-level must be checked at frequent intervals,
preferably every day. Failure to maintain the oil at the proper level results in a drop in pressure
and loss of cutting power.
CAUTION: Hydraulic oil is highly flammable. Keep away from sparks and naked flame. Do not
smoke. Hydraulic oil may cause inflammation of the eyes and skin. If ingested, it could cause
diarrhea and vomiting. In case of eye contact, rinse in clean water for at least 15 minutes and
consult a physician. In case of skin contact, wash thoroughly with soap and water. In case of
ingestion, consult a physician immediately. Do not induce vomiting.
1. Oil should be warm but not hot. Warm up the tool if it is cold.
2. If piston is still moving, pinch a piece of rebar, stopping just before it breaks off (It is a
1/2 movement of piston).
3. Disconnect battery and place the tool so that the oil-plug is uppermost.
4. Remove oil-plug and seal washer (packing).
CAUTION: Never remove oil-plug when the tool is hot or oil will spurt out.
5. Check that oil is level with bottom of plug hole (i.e. that pump case is full to the brim).
If oil level is too low, top up with fresh hydraulic oil with anti foam and anti-abrasion
properties (ISO viscosity grade VG32, e.g. Tellus 32 (Shell), DTE-24 (Mobil) or
Uni-Power VG32 (Esso).
6. After topping up, extract air from the system. Gently tilt the tool lengthwise and return it
to a level position. Top up again and tilt in the opposite direction. Repeat this process
until all air has been extracted.
CARE: Tool cannot function properly if oil contains air bubbles.
7. Replace seal washer (packing) and oil-plug. The operation is now complete.
MAINTENANCE

15
English
OIL CHANGE
The hydraulic oil should be changed at least once a year, sooner if it appears dirty.
NOTE: Hydraulic oil should be warm before draining.
1. Disconnect battery. Remove oil-plug and seal washer (packing). Turn the tool over and
drain oil into a suitable receptacle. When oil ceases to drain out, tilt the tool to rear so
that oil trapped in piston housing can run out. When housing is empty, tilt the tool in the
opposite direction to empty the residue in pump case.
2. With drain-hole uppermost, slowly fill the tool with fresh oil. Replace plug and lightly
tighten. Connect battery and advance piston two or three times. Disconnect battery
and remove oil-plug. Top up oil level and replace oil-plug.
3. Finally, follow procedure for OIL-LEVEL CHECK (Steps 2-6)
NOTE: Dispose of hydraulic oil in accordance with local regulations. Do not pour into
the sea, a river, a lake of drains.
BOLT TIGHTENESS
Once a week, or after every 500 cuts, check the tightness of all bolts; especially, those bolts
securing the housing to the cylinder. Loose bolts will result in a loss of power. Always make sure
that the bolts holding both cutter blocks are also tight.
OVERHAUL
Return the tool to an authorized distributor for overhaul at least once every two years, sooner if
subject to heavy use.

16
Svenska
ORIGINAL BRUKS-/SÄKERHETSANVISNINGAR
DC20MV
BATTERIDRIVEN ARMERINGSKLIPPARE
FÖR ATT MINSKA RISKEN FÖR SKADOR SKA DU FÖRST LÄSA
OCH FÖRSTÅ DESSA INSTRUKTIONER

17
Svenska
sv
VARNING!
FÖR ATT UNDVIKA ALLVARLIGA PERSON- ELLER SAKSKADOR SKA BRUKSANVISNINGEN
LÄSAS IGENOM NOGA INNAN VERKTYGET ANVÄNDS.
Om inte anvisningarna följs kan det leda till olyckor.
Kontakta närmaste auktoriserad återförsäljare om det är något du undrar över.
INNEHÅLL
ALLMÄNNA SÄKERHETSBESTÄMMELSER
DELARNAS NAMN
SPECIFIKATIONER
BRUKSANVISNINGAR
GRUNDLÄGGANDE KLIPPANVISNINGAR
KONTROLLER FÖRE ANVÄNDNING
ATT TÄNKA PÅ RÖRANDE LI-ION-BATTERI
BORTTAGNING/INSTALLATION AV BATTERI
LADDNING
UPPVÄRMNING
INSTÄLLNING AV STÄLLSKRUV
KLIPPNING
IMPULSVENTIL
ATT OBSERVERA
UNDERHÅLL
KLIPPHUVUD
RENGÖRING
KONTROLL AV OLJENIVÅ (PÅFYLLNING)
OLJEBYTE
ÅTDRAGNING AV SKRUVAR
SERVICE
DESSA VERKTYG ÄR ENDAST AVSEDDA FÖR PROFESIONELL ANVÄNDNING.
*Specifikationer kan ändras utan föregående meddelande.
18
20
21
21
21
21
22
22
23
25
25
26
26
26
27
27
27
27
28
28
28
Sida

18
Svenska
VARNING! LÄS OCH FÖRSTÅ ALLA ANVISNINGAR.
Om nedanstående instruktioner inte följs kan det medföra elstöt, brand och/ eller allvarlig person-
skada. Termen ”elverktyg” i varningarna nedan syftar på ditt nätanslutna (med sladd) elverktyg
eller batteridrivna (sladdlösa) elverktyg.
SÄKERHET PÅ ARBETSPLATSEN
- Håll arbetsplatsen ren och väl upplyst. Röriga eller mörka platser inbjuder till olyckor.
- Använd inte elverktyg i explosiv miljö, t.ex. i närheten av lättantända vätskor, gaser eller
damm. Elverktyg genererar gnistor som kan antända damm eller ångor.
- Håll barn och åskådare på avstånd när elverktyget används. Om du blir distraherad
kan du förlora kontrollen.
EL-SÄKERHET
- Elverktygets stickkontakt måste passa uttaget. Stickkontakten får inte modifieras på
något sätt. Använd inte adapterkontakter tillsammans med (jordade) elverktyg. Stick-
kontakt i originalutförande och passande uttag minskar risken för elektriska stötar.
- Undvik kroppskontakt med jordade ytor som t.ex. rör, element, spisar och kylskåp.
Risken för elstötar ökar om du är jordad.
- Utsätt inte elverktyg för regn eller väta. Vatten som tränger in i elverktyget ökar risken
för elektriska stötar.
- Var rädd om elkabeln. Använd aldrig elkabeln för att dra ut stickkontakten eller för att
bära/dra verktyget. Skydda elkabeln från värme, oljor, vassa kanter eller rörliga delar.
Skadade eller intrasslade elkablar ökar risken för elektriska stötar.
- Använd en förlängningssladd som är avsedd för utomhusbruk när elverktyget
används utomhus. Risken för elstötar minskar om man använder kabel som är avsedd
för utomhusbruk.
- Använd inte likströmsbaserad strömförsörjning till verktyg som endast är avsedda för
växelström.
PERSONSÄKERHET
- Var uppmärksam, tänk på vad du gör och använd sunt förnuft när du ar- betar med ett
elverktyg. Använd inte elverktyg när du är trött eller påverkad av droger, alkohol eller
mediciner. Ett ögonblicks ouppmärksamhet kan leda till allvarliga personskador.
- Använd säkerhetsutrustning. Använd alltid skyddsglasögon. Skydds- utrustning som
t.ex. skyddsglasögon, andningsmask, halksäkra skyddsskor, hjälm eller hörselskydd
minskar risken för personskador.
- Undvik oavsiktlig start. Kontrollera att strömbrytaren är avstängd innan du ansluter
verktyget. Det inbjuder till olyckor att bära elverktyg med fingret på avtryckaren eller att
ha det tillslaget när spänningen kopplas in.
- Ta bort eventuellt justeringsverktyg eller skruvnycklar innan elverktyget startas.
En skruvnyckel eller liknande som lämnas kvar i en roterande del av elverktyget kan
förorsaka personskada.
- Sträck dig inte för långt. Behåll alltid balansen och stå stadigt på fötterna. Då har du
bättre kontroll över elverktyget i oväntade situationer.
- Bär lämplig klädsel. Bär inte löst hängande plagg eller smycken. Håll hår, kläder och
handskar borta från rörliga delar. Lösa kläder, smycken eller långt hår kan fastna i
rörliga delar.
- Se till att tillbehör för uppsamling och utsug av damm ansluts och används på rätt sätt.
Dessa hjälpmedel kan minska dammrelaterade skador.
- Håll alltid handtagen torra, rena och fria från olja och fett. Hala händer/ handtag gör
det omöjligt att ha kontroll över elverktyget.
ALLMÄNNA SÄKERHETSBESTÄMMELSER

19
Svenska
sv
ANVÄNDING OCH VÅRD AV ELVERKTYG
- Överbelasta inte elverktyget. Använd rätt elverktyg för det aktuella arbetet. Rätt elverk
tyg gör jobbet bättre och säkrare, i den hastighet som det har konstruerats för.
- Använd inte elverktyget om verktyget inte kan styras via strömbrytaren. Elverktyg som
inte kan manövreras med strömbrytaren är farliga och måste repareras.
- Ta ur stickkontakten från strömkällan och/eller batteriet från elverktyget innan du gör
några justeringar, byter tillbehör eller lägger undan elverkty- get. Sådana förebyggan
de säkerhetsåtgärder minskar risken för att verkty- get startar oavsiktligt.
- Täck inte över elverktygets luftventiler, använd inte verktyget direkt på marken. Placera
ett stöd av plywood under verktyget för att hålla beslag och fläkt rena.
Om ventilöppningarna täcks igen överhettas motorn och kan skadas.
- Förvara elverktyg som inte används utom räckhåll för barn och låt inte personer som
inte är bekanta med elverktyg eller dessa instruktioner använda elverktyget. Elverktyg
är farliga i händerna på ovana användare.
- Underhåll elverktygen. Kontrollera om rörliga delar är fel uppriktade eller kärvar, om
några delar är trasiga eller om det är några andra förhållanden som kan påverka
elverktygets funktion. Reparera ett skadat elverktyg innan det används. Många olyckor
orsakas av dåligt underhållna elverktyg.
- Håll skärande verktyg skarpa och rena. Riktigt underhållna skärverktyg med skarpa
skärkanter löper mindre risk att kärva och är lättare att kontrollera.
- Använd elverktyg, tillbehör och verktygsdelar etc. i enlighet med dessa instruktioner
och på sådant sätt som är avsett, med hänsyn tagen till arbetsförhållandena och det
arbete som ska utföras. Användning av elverktyg för andra arbeten än de som
verktygen är konstruerade för kan leda till farliga situationer.
ANVÄNDNING OCH VÅRD AV BATTERIVERKTYG
- Ladda endast med den laddare som tillverkaren har angett. En laddare som är lämplig
för en typ av batteri kan utgöra en risk för brand om den används med ett annat batteri.
- Använd endast el-verktyg med specifikt avsedda batterier. Användning av andra
batterier kan utgöra en risk för personskador och brand.
- När batteriet inte används ska det förvaras på avstånd från andra metall- föremål, till
exempel gem, mynt, nycklar, spik, skruvar eller andra små metallföremål som kan
skapa en förbindelse mellan polerna. Om batteripolerna kortsluts kan det orsaka
brännskador eller brand.
- Vid felaktiga förhållanden kan vätska läcka ut från batteriet. Undvik kontakt. Spola
genast med vatten vid oavsiktlig kontakt med batterivätska. Om vätskan kommer i
kontakt med ögonen ska läkare genast uppsökas. Vätska som läcker ut från batteriet
kan orsaka irritation eller brännskador.
- Använd inte ett batteri eller verktyg som är skadat eller modifierat. Skadade eller
modifierade batterier kan uppvisa oförutsägbart beteende och kan orsaka brand,
explosion eller risk för personskador.
- Utsätt inte ett batteri eller verktyg för eld eller hög temperatur. Exponering för eld eller
temperaturer över 130°C kan orsaka explosion.
- Följ alla laddningsanvisningar och ladda inte batteriet eller verktyget utanför det
temperaturintervall som anges i bruksanvisningen. Felaktig laddning eller laddning vid
temperaturer utanför det specificerade intervallet kan skada batteriet och öka
brandrisken.

20
Svenska
SERVICE
- Serva ditt elverktyg hos en auktoriserad reparatör, som endast använder
originalreservdelar. Därmed säkerställs det att elverktygets säkerhet upprätthålls.
- Utför aldrig service på skadade batterier. Service av batteripaket får endast utföras av
tillverkaren eller auktoriserad serviceleverantör.
SÄRSKILDA SÄKERHETSREGLER
- Håll verktyget i de isolerade handtagen om du utför arbete där det finns risk för att
skärverktyget kommer i kontakt med dolda ledningar eller den egna elkabeln. Kontakt
med spänningsförande ledningar innebär att verktygets nakna metalldelar blir
strömförande och ger elektriska stötar.
- Använd tvingar eller andra praktiska sätt att säkra och stödja arbetsstycket mot en
stabil plattform. Att hålla arbetsstycket med händerna eller mot kroppen är ostabilt och
kan göra att du förlorar kontrollen.
- Håll händerna borta från kapningsområdet och rörliga delar.
- Använd inte slöa eller skadade skär. Skadade delar kan brytas eller leda till
personskador.
- Håll etiketter och märkplåt läsliga.
Kan roteras 360° mellan pump, hölje och motor.
1. Hus
2. Klipphuvud
3. Avtryckare
4. Oljeplugg
5. Returventil
6. Motor
7. Pumphus
8. Handtag (avtagbart)
9. Batteri
10. Kolv
DELARNAS NAMN
1.
8.
2.
7.
6.
9.
3.
5.
4.
10.
2.
1.
Table of contents
Languages:
Other Bendof Cutter manuals


