bene casa BC-61421-3 Technical specifications

Guaranteeing Product Performance Since 1970
Commitment to a Higher Standard
Designed in the USA / Made in China
Connect with us @ClubBeneCasa
www.ClubBeneCasa.com
PRESSURE COOKER
USER MANUAL AND RECIPE GUIDE

2
TABLE CONTENTS
• Important Safeguards....................................................
• Parts Diagram..................................................................
•
•
Before First Use..............................................................
How to Work...................................................................
•
• Troubleshooting...............................................................
• Cooking Timetable .........................................................
02
04
06
06
11
12
IMPORTANT SAFEGUARDS
When using pressure cookers, basic safety precautions should always be followed:
01. Read all instructions.
02. Do not touch hot surfaces. Use handles or knobs.
03. Close supervision is necessary when the pressure cooker is used near children.
04. Do not place the pressure cooker in a heated oven.
05. Extreme caution must be used when moving a pressure cooker containing hot liquids.
06. Do not use pressure cooker for other than intended use.
07. This appliance cooks under pressure. Improper use may result in scalding injury. Make certain unit is
properly closed before operating.
08. Do not fill the unit over 2/3 full. When cooking foods that expand during cooking such as rice or dried
vegetables, do not fill the unit over 1/2 full. Over filling may cause a risk of clogging the vent pipe and
developing excess pressure.
09. Be aware that certain foods, such as applesauce, cranberries, pearl barley, oatmeal or other cereals,
split peas, noodles, macaroni, rhubarb, or spaghetti can foam, froth, and sputter, and clog the
pressure release device (steam vent). These foods should not be cooked in a pressure cooker.
10. Always check the pressure release devices for clogging before use.
11. Do not open the pressure cooker until the unit has cooled and all internal pressure has been released.
If the handles are difficult to push apart, this indicates that the cooker is still pressurized – do not
force it open. Any pressure in the cooker can be hazardous.
12. Do not use pressure cooker for pressure frying with oil.
13. When the normal operating pressure is reached, turn the heat down so all the liquid, which creates
the steam, does not evaporate.
14. SAVE THESE INSTRUCTIONS.
SAVE THESE INSTRUCTIONS
Please read ALL of the instructions in this manual carefully before you begin to use this appliance. Proper
care and maintenance will optimize life and operation of this appliance. Please save these instructions and
refer to them as needed.
CONSUMER ADVIOSRY
Perishable foods such as meat and poultry products, fish, cheese and other dairy products cannot be left
at room temperature for more than 2 hours (No longer than 1 hour if room temperature is above 90°F).
WARNING: DO NOT DEEP FRY OR PRESSURE FRY IN THIS PRESSURE
COOKER. THIS MAY CAUSE FIRE OR OTHER SERIOUS DAMAGES.

5
GETTING TO KNOW YOUR BENE CASA
PRESSURE COOKER
PRESSURE RELEASE VALVE
If the pressure inside the cooker becomes too high, this valve starts working
to release the excess steam.
FLOATING VALVE
Safety feature. As the cooker builds pressure, this valve is pushed up which
creates a seal, locking the lid.
PRESSURE SAFETY VALVE
Safety feature that allows excess pressure to escape if too much pressure
builds up.
SAFETY SYSTEM
4
SPECIAL INSTRUCTION
HOW TO PLACE THE RUBBER GASKET
After washing both cover and rubber gasket in hot suds and then drying both thoroughly
each time the pan is used, please slip the rubber gasket right back into the cover.
NOTE: MUST KEEP THE DIRECTION OF ARROW ON THE RUBBER GASKET POINTING TO
THE COVER. PLEASE DO NOT FORGET THIS POINT. If the rubber is placed up-side down,
the pressure cooker will not be functioning.
RUBBER
GASKET
PRESSURE
ALARM
SAFTY FUSE
COVER
PAN GRIP
HANDLE

67
Remove the sealing ring by pulling it out of the inside rim of the lid.
Wash sealing ring, lid and pressure cooker body in hot, soapy water. Rinse all
parts with warm water and dry. Replace the sealing ring to the inside rim of the lid.
BEFORE FIRST USE
HOW TO WORK
1. Put food in pan and add required amount of water. With gasket in place, set
cover on pan and press it down. (Don't cook applesauce, rhubarb, cranberries,
split peas, pea soup.)
2. Turn cover handle left to close directly, till you hear a "click" sound that means
the cover is locked completely (picture 1). Never attempt to cook with out hearing
a "click" sound. Although the cover may seem to be loose, the gasket automatically
seals the cover when the cover is completely closed. Lubricating the gasket with
cooking oil will help the cover to slide open and close more easily.
3. Place pan with contents over high heat, and then set control over vent tube after
steam begins to escape from vent tube (picture 2) (Foods such as pasta, noodles
and dried vegetables need medium heat at this time.)
4. When the pressure is going up to certain level, the control will jiggle and sputter,
a few drops of water may trickle from the control. At this moment, reduce heat so
that control jiggles slowly (picture 4). Constant jiggling causes excessive loss of
moisture, the occasional jiggle and a hissing sound indicates pressure is being
maintained. If steam escapes in a steady stream after heat is reduced, nudge
control to seal it properly. IF STEAM SHOULD ESCAPE AROUND EDGE OF
COVER AND PRESSURE FAIL. TO RISE, cool pan under faucet, remove control
and open pan. Wipe gasket, pan rim and inside of cover, dry and start over.
5. After the cooking is completed, cool pan and remove control, then open pan.
When pressure has been maintained for the required length of time, remove cooker
from heat and allow pressure to drop BEFORE REMOVING THE CONTROL,
many conditions call for instant reduction of pressure by setting cooker under
faucet or by placing it in a dish of cold water (picture 5&6). This method reduces
pressure in about 15 seconds. Allowing pressure to drop normally without cooling
under faucet takes from ten to twenty - five minutes depending upon amount of
food in the pan.
3 4
21
65

89
CLEANING AND CARE
6. After reducing pressure, please nudge the control to test if pressure is
completely reduced. If steam spurts out, pressure is not yet down. If no steam
spurts out, remove control with a fork. Press down the button on the handle of the
cover with thumb, slide cover right to open position and lift cover (picture 7). Never
TUG the handle or TRY to force cover open. A locked cover indicates STEAM
PRESSURE is still inside the cooker. When pressure is completely reduced and
control removed away, the cover should slide open with ease.
1.To make cleaning easier, pour warm water into the pan immediately after
removing food. Wash in hot and clean suds. If pan should become stained from
“hard” water, boil a solution of 2 level tablespoons cream of tartar to a quart of
water in the cooker. A strong vinegar solution is also effective. Then rinse and dry.
2. The gasket has been designed so that you can slip it out of the cover. This
makes it possible to thoroughly wash both cover and gasket in hot suds each
time the cooker is used. Dry both thoroughly, also clean the filter at the same
time. Then slip the gasket right back into the cover so that the cooker is always
ready for instant use, Note: WHEN YOU SLIP THE GASKET BACK INTO THE
COVER, KEEP THE DIRECTION OF ARROW ON THE GASKET POINTING
TO THE COVER (please read the special instruction attached). If the cover
does not close easily, apply a little cooking oil to the gasket. When storing,
place cover upside down on the cooker and keep the pressure control inside
the cooker.
3. After washing and rinsing the cover, hold it up to the light to see if the vent
tube is clear. It is highly important that the tube be unobstructed. If it should be
clogged by food particle, carefully insert a piece of wire as illustrated. Then rinse
with hot water.
4. Usually the pressure control remains perfectly clean because live steam
cleanses it while it operates. However, washing it in hot clean suds and rinsing
thoroughly will not harm the control and will insure its being free of particles
which might hamper its operation.
8 9 10
1211
7

10 11
IMPORTANT SAFETY REMINDERS
PROBLEMS, CAUSES & SOLUTIONS
The safety
valve is not
rising after
heating for an
extended
time.
1. The cooker is not closed properly.
2. The heat is too low to build up pressure.
3. The sealing ring is dirty, damaged
or improperly placed.
4. There is too little liquid in the cooker.
1. Open and close the lid again.
2. Set the heat source at its highest
setting.
3. Clean or replace the parts.
4. Add at least 8 ounces of liquid.
Steam is
escaping
from the
edges of the
lid.
1. Sealing lid is placed incorrectly in the lid.
2. Sealing ring is damaged.
3. Sealing ring is dirty.
4. Pressure cooker is not closed properly.
1. Correct seal position.
2. Replace sealing ring.
3. Clean or insert a new gasket.
4. Clean or replace the parts.
Noise from
Pressure
Regulator
Valve can be
heard, but no
steam is seen.
1. Pressure regulator valve is blocked.
2. Vent pipe is blocked.
3. Boiled Dry.
4. There is too little liquid in the cooker.
1. Clean valve.
2. Clean vent pipe.
3. Turn off the heat immediately,
release all pressure, open lid and
add liquid.
4. Add at least 8 ounces of liquid.
Steam is
escaping
from safety
valve after
indicator rings
are up.
1. Vent pipe is blocked.
2. Pressure cooker is over filled with food.
3. Temperature is too high.
1. Clean vent pipe.
2. Remove food until it is only
2/3 full or less.
3. Turn down the heat.
Problem Possible reason Solution
1. Don't attempt to cook without having cooker closed properly. Only after hearing a “click"
sound when turning the cover to the left, can you place the cooker on the heat.
2. Don't attempt to open cooker until you remove the pressure control, and don't remove the
control until you are sure the pressure is reduced. See step 5 of "How to cook".
3. Don't tug at handles or try to force cover open if it seems to be locked tight. Cool cooker
again under faucet to reduce every bit of pressure. Cover then slides easily. (In the very unusual
case where the cover might seem to stick in spite of repeated and prolonged celling, before
pushing open the cover, insert a piece of wire into vent tube to make sure it is clear and
pressure completely reduced.)
4. Don't beat spoon, potato masher, etc., on rim of pan as this might mar the rim to the extent
that a perfect seal could not be effected.
5. Don't cook apple sauce, rhubarb, cranberries, pearl barley, split peas or pea soup in the
pressure cooker, because they tend to froth or sputter and sometimes block vent tubes. With
the tube blocked, pressure may appear to be down when the control is removed, whereas,
actually a food like applesauce may remain above boiling point for 40 minutes after the cooker is
removed from the heat unless it is cooled thoroughly under water. This means that some degree
of pressure remains in the cooker, and no attempt should be made to try to force open the cover
while it be locked tight by the pressure.
6. Don't use high heat to cook spaghetti, noodles, dried vegetables, or other foods which can
easily cause a heavy froth in cooking.
7. Donl fill pan oven 2/3 full and more than 1/3 for the foods that can cause froth and foam
when cooking.
8. Donl place cover on hot surface that may damage gasket and melt safety fuse.
9. Don't cook when there is no water in the pan.
10. Don't use high heat after control jiggling. Reduce heat so that control does not jiggle often.
2/3 Maximum Capacity 1/3 Expanding Foods
13 14

12 13
COOKING TIMETABLE DRY BEANS AND PEAS
Pressure Cooking is ideal for preparing dry beans and peas quickly. However, dry beans and peas tend to froth
and foam during cooking, which could cause the vent pipe to become blocked. Therefore, it is necessary to use
the following precautions when pressure cooking dry beans and peas:
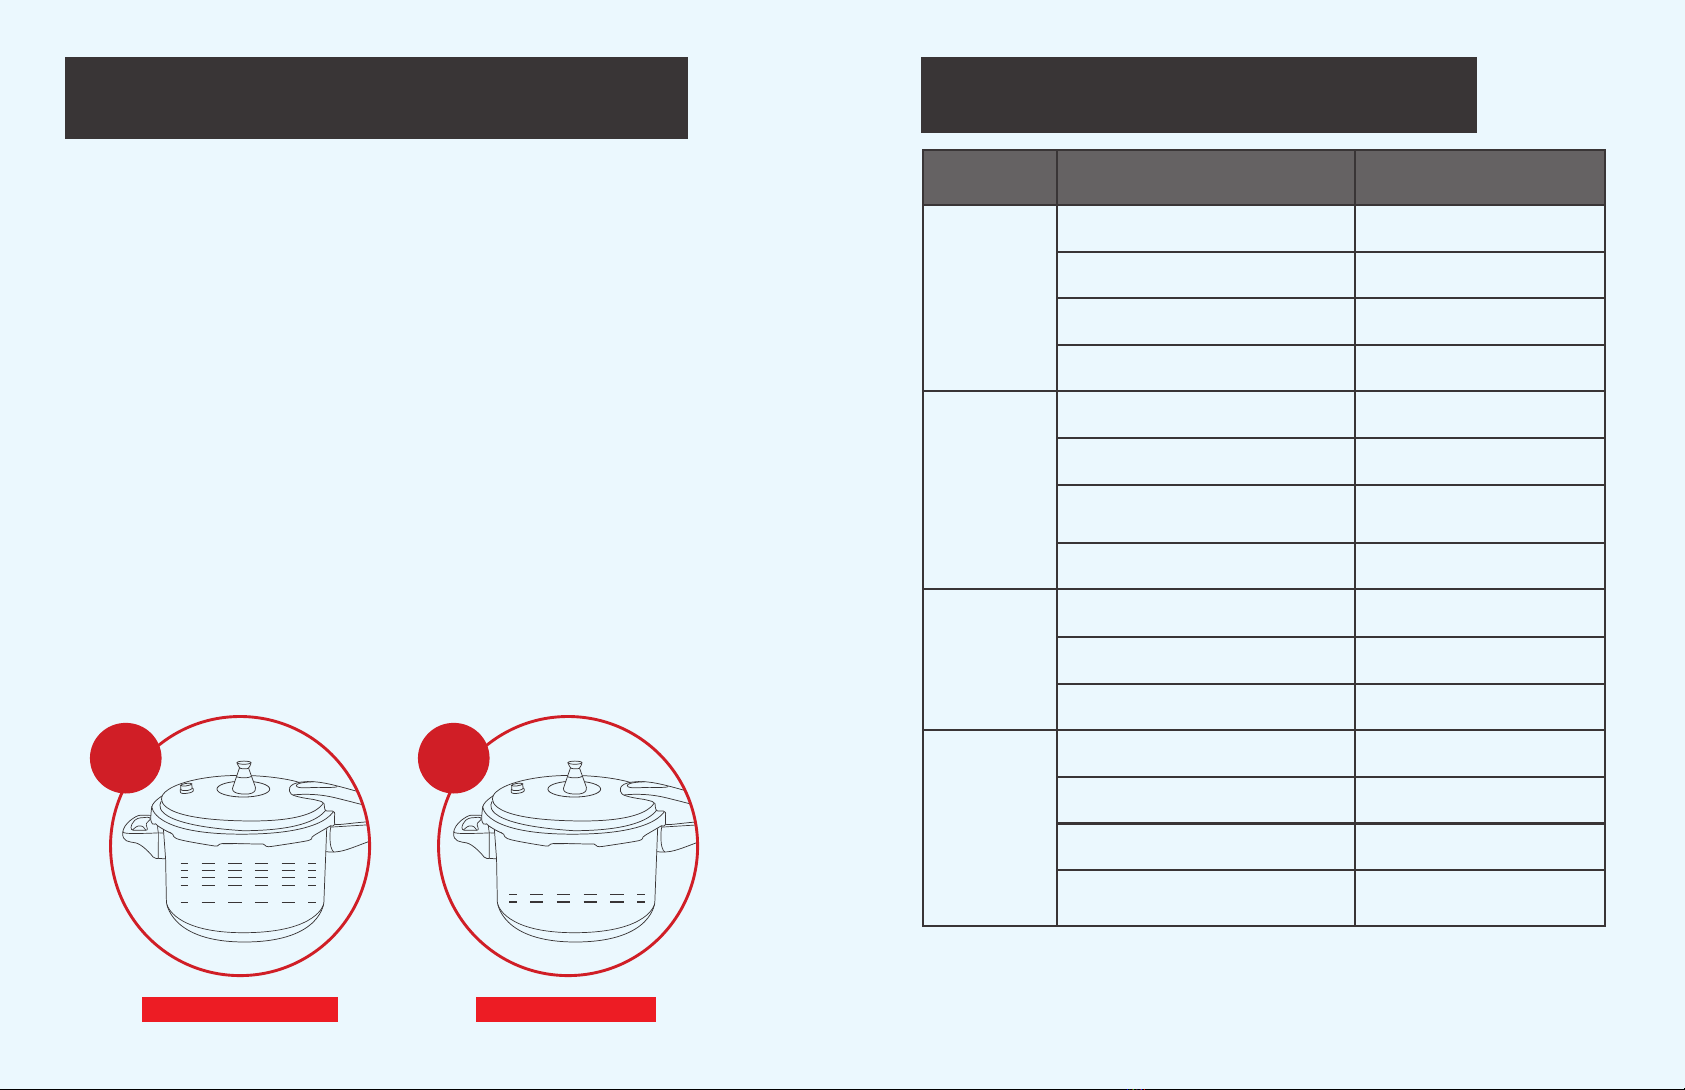
1. Never fill the cooker over the ½ full line (this includes beans, ingredients, and water).
2. Add 1 tablespoon vegetable oil for cooking.
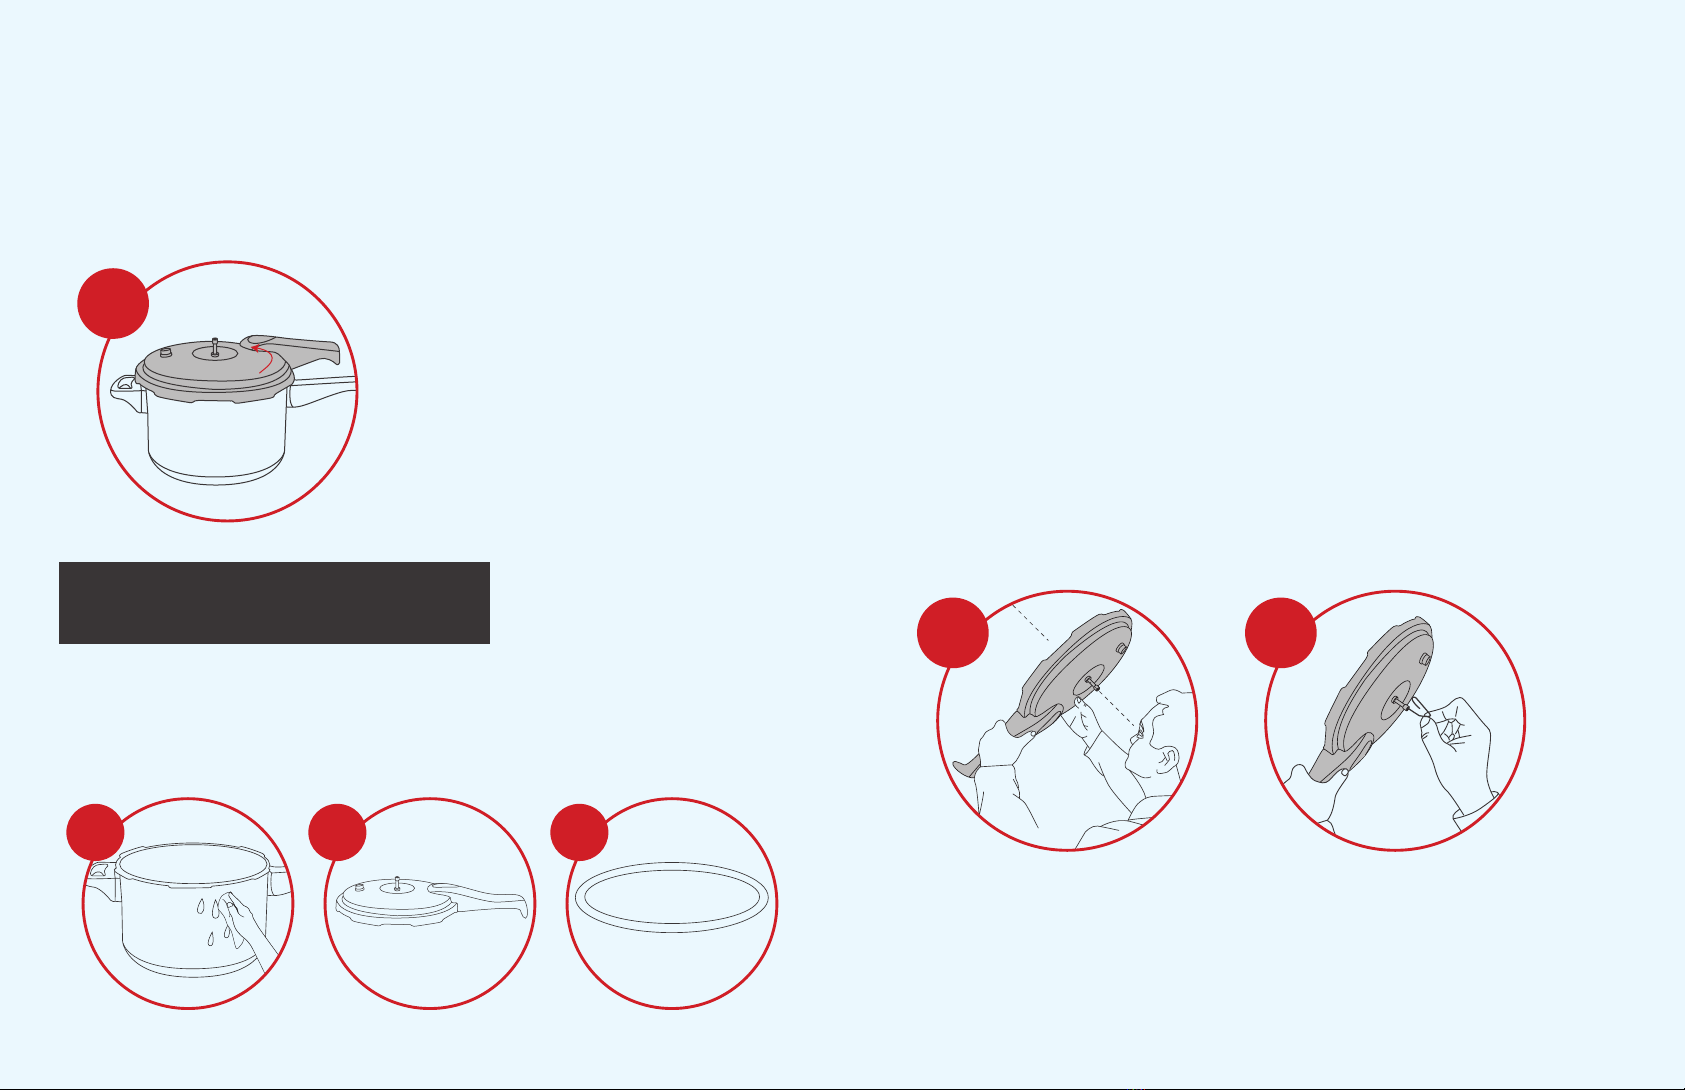
3. Allow pressure to drop of its own accord.
Soaking beans and peas
Soaking is strongly recommended for all beans and peas, except lentils and black-eyed peas, for even cooking
and to remove water-soluble, gas-producing starches. Soaking can be done using the traditional or the
quick-soak method.
Traditional method:
Clean and rinse beans; cover with three times as much water as beans. Soak 4 to 8 hours. Drain.
Quick method:
Clean and rinse beans; cover with three times as much water as beans. Bring beans to a boil and boil for
2 minutes. Remove from heat, cover, and let stand for 1 to 2 hours. Drain.
Cooking beans and peas
After soaking, rinse beans and remove any loose skins. Place beans in pressure cooker. Add fresh water to just
cover the beans and add 1 tablespoon vegetable oil. Close cover securely. Cook according to the times in the
timetable below. For more firm beans for salads and side dishes and when cooking less than 2 cups of beans or
peas, use the shorter time. For soups and stews, use the longer time. After cooking is complete, allow pressure
to drop of its own accord.
*add 1/2 to 1 teaspoon salt to soaking and cooking water to
keep bean skins intact.
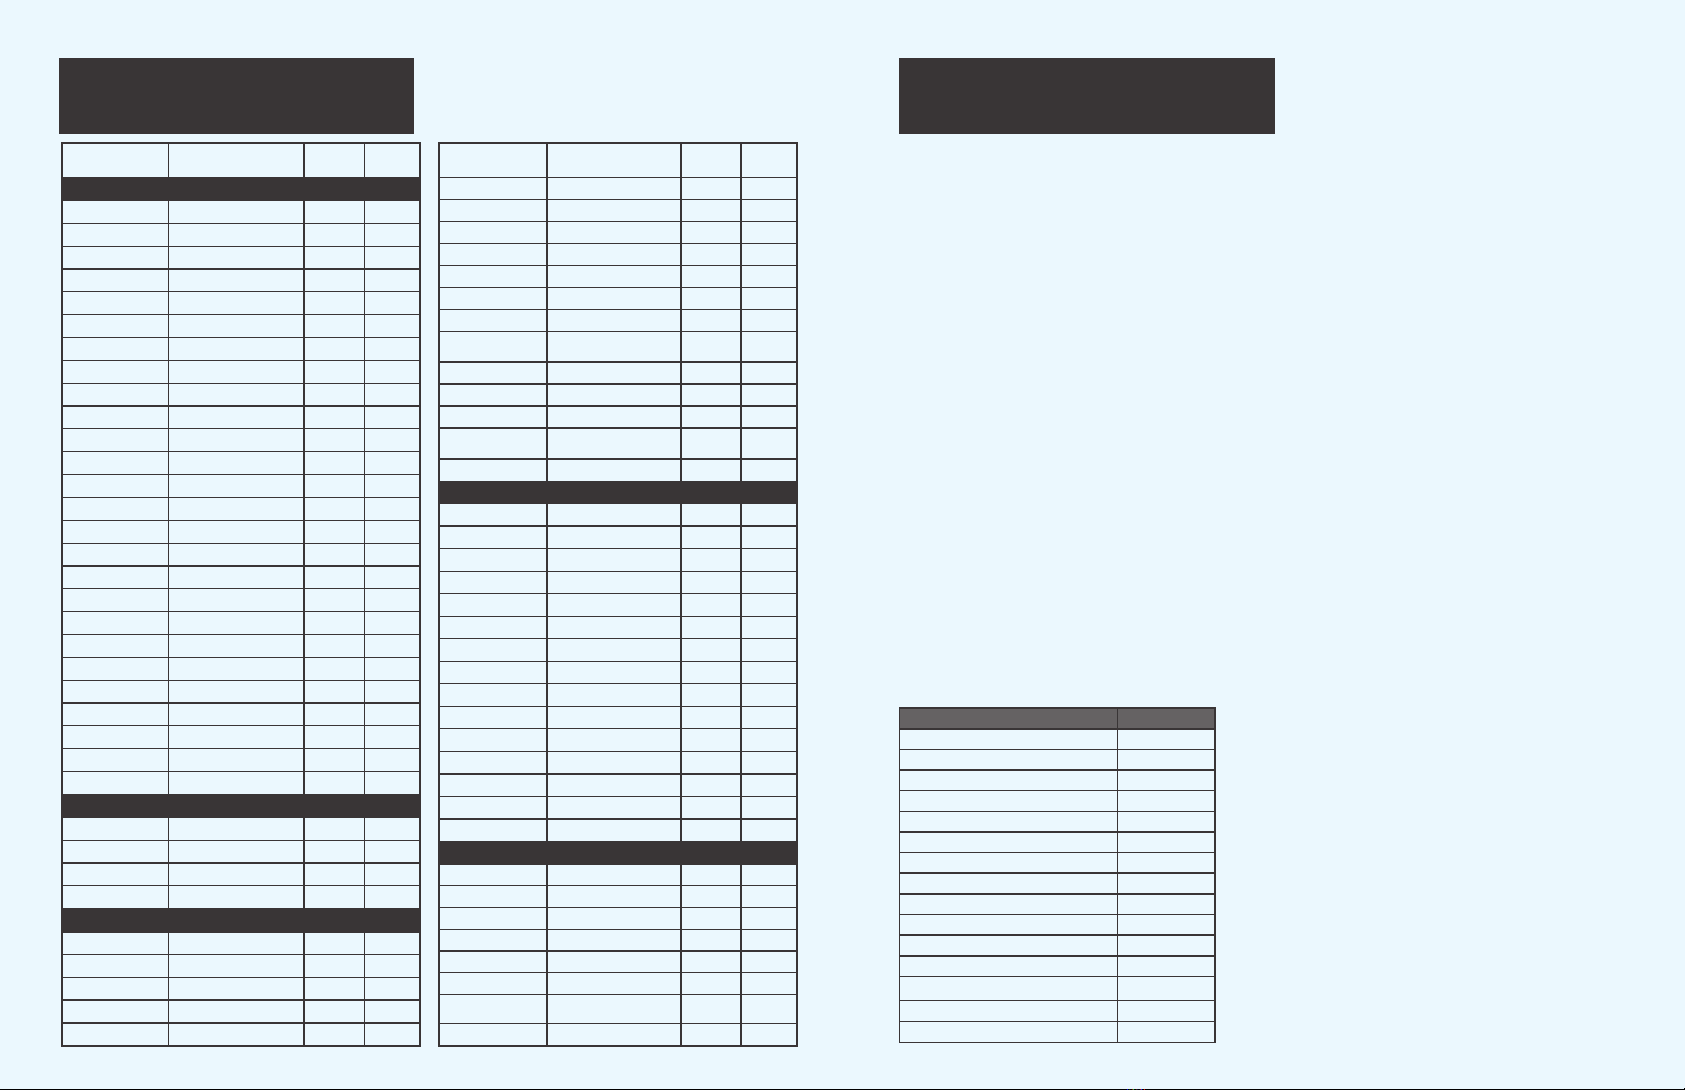
Beans Time
Adzuki 1-3
Anasazi 1-3
Black beans 2-4
Black-eyed peas 2 – 4
Chickpeas (garbanzo) 7 – 10
Great Northern beans 2 – 5
Kidney beans 1 – 3
Lentils (brown, green) 3 – 5
Lima beans (large) 0 – 1
Lima beans (baby) 1 – 3
Navy beans (pea) 1 – 3
Peas (whole yellow, green) 6-9
Pinto beans 3-6
Red beans 3-6
Soy beans (beige) 8-11
QUANTITY
OR SIZE
CUPS OF
LIQUID
TIME
(MINUTES)
MEAT
BEEF
HAM
Chuck Roast 3 pounds 2 45-50
Corned Beef 3 pounds 2 60
Rolled Rib Roast 3 pounds 1½ 30-35
Slice 3 pounds 1½ 30-35
Picnic 3 pounds 1½ 30-35
Leg of Lamb 3 pounds 2 35-45
LAMB
Chops 1˝ thick 1 12*
Chops ½˝ thick 1 5*
Butt Roast 3 pounds 2 55
Fresh Picnic Roast 3 pounds 2 55
Steak 1˝ thick 1 12*
PORK
Chops 1˝ thick 1 15*
Chops ½˝ thick 1 8*
Roast 3 pounds 2 45-50
Steak 1˝ thick 1 10*
VEAL
Steak 1 5*
½˝ thick
1˝ thick
Chops 1 12*
½˝ thick
Chops 1 5*
Round Steak 1˝ thick 1 18*
Round Steak ½˝ thick 1 10*
Short Ribs 3 pounds 1½ 25
POULTRY
Whole Chicken 2-3 pounds 1 13-15
Chicken Cut into portions 1 8
Chicken Breast Boneless 1 3-4
Turkey Breast 3-4 Pounds 1.5 35
Broccoli Flowerets 1 0-2
Brussels Sprouts Small, 1-inch diameter 1 1-3
Cabbage (red, green) Wedges, 2-inch thick 1 3-5
Thinly sliced 1 2-3
Carrots Baby cut 1 3-5
Cauliflower Flowerets 1 0-2
Corn on-the-cob Whole, 2½-inch diameter 1 3
Eggplant Cubed, 1 to 1½-inches thick 1 2-3
Parsnips Sliced, ½-inch thick 1 0-2
Sliced, 1⁄2-inch thick 1 2
Kale Leaves coarsely chopped,
stems thinly sliced
1 1-2
Collards* Leaves coarsely chopped,
stems thinly sliced
1 3-4
½-inch slices 1 3-5
Beans (green, wax) Whole or sliced 1 1-3
VEGETABLES
FRESH
Artichoke Whole, 6 to 8 ounces 1 10
Beets Whole, 2½-inch diameter 11/2 15-16
Asparagus Stems cut into 1-inch pieces 1 0-1
QUANTITY
OR SIZE
CUPS OF
LIQUID
TIME
(MINUTES)
GRAINS
Amaranth 1 cup 1¾ 4-5
Barley (Hulled) 1 cup 2½ 25-28
Barley (Pearl) 1 cup 2½ 9-12
Buckwheat 1 cup 2 3-4
Bulgar 1 cup 1½ 2-3
Millet 1 cup 2 9-10
Oats (whole groats) 1 cup 1½ 20-25
Oats (steel cut) 1 cup 2 4-5
Quinoa 1 cup 1½ 1
Rice (brown) 1 cup 1½ 10-12
Rice (white) 1 cup 1½ 5-8
Rye Berries 1 cup 1½ 20-25
Spelt 1 cup 2 25-30
Wheat berries 1 cup 2 25-30
Wild Rice 1 cup 1½ 20-25
SEAFOOD
Crab Legs 1 1
Fish Filets 1" thick 1 2
Salmon Filets 1" thick 1 2
Tuna Filets 1" thick 1 2
Scallops Large 1 1
Extra Large (21-25 Pieces) 1 1
Camarones Medium to Large
(36-40 pieces)
1 1
FRESH OR FROZEN

14 15
PRECAUCIONES IMPORTANTES
ADVERTENCIA
Nunca use la olla para freír con aceite. Es peligroso y puede causar un incendio o un daño grave.
ADICCIÓN AL CONSUMIDOR
Alimentos perecederos como carne y productos avícolas, pescado, queso. y otros productos lácteos no se pueden dejar a temperatura
ambiente durante más de 2 horas (no más de 1 hora si la temperatura ambiente es superior a 90 ° F).
GUARDA ESTAS INSTRUCCIONES
Por favor, lea todas las instrucciones en este manual antes de comenzar a usar este artefacto. El cuidado y mantenimiento apropiado
asegurarán una larga vida útil y un funcionamiento sin problemas del artefacto. Por favor, guarde estas instrucciones y consúltelos para
consejos de limpieza y cuidado.
Para reducir el riesgo de lesiones o de daños materiales, se deben tomar medidas de seguridad básicas, como las
siguientes:
1. Lea todas las instrucciones.
2. Asegúrese de que las asas estén adecuadamente ensambladas y sujetadas antes de utilizar este producto para el
hogar.
3. Antes de utilizar, verifique siempre el tubo de ventilación. Sostenga la tapa en alto hacia la luz y mire a través del
tubo de ventilación a fin de cerciorarse de que esté limpio.
4. Siempre verifique el cierre de la tapa/ventilación antes de utilizar para asegurarse de que se mueve con facilidad.
5. No llene más de de la olla a presión. En caso de alimentos que se expanden al cocinar, como sopas, granos,
frijoles y arvejas, no llene más de ½ olla. El llenado excesivo puede hacer que el tubo de ventilación se obstruya y que
la presión sea demasiada.
6. No cocine a presión alimentos como puré de manzana, arándanos rojos, ruibarbo, cereales, pastas, sopa
deshidratada en polvo ni ningún tipo de frijoles o arvejas deshidratados que no se encuentren en la tabla. Estos
alimentos tienden a hacer espuma y chisporrotear, lo que puede obstruir el tubo de ventilación, el tapón de
sobrepresión y el cierre de la tapa/ventilación.
7. Este producto para el hogar cocina bajo presión. El uso inadecuado puede causar quemaduras. Asegúrese de que la
olla a presión esté bien cerrada antes de hacerla funcionar; el asa de la tapa debe estar directamente arriba del asa
del cuerpo.
8. No coloque la olla a presión ni intente cocinar a presión en un horno caliente.
9. Manipule con sumo cuidado una olla a presión que contenga líquidos calientes. No toque las superficies calientes.
Use asas o agarraderas.
10. No abra la olla a presión hasta que se haya enfriado y se haya liberado la presión interna, se haya liberado el cierre
de la tapa/ventilación, y no salga vapor cuando quite el regulador de presión. Si le resulta difícil desencajar las asas,
significa que la olla aún está presurizada: no fuerce la
olla para abrirla. Toda presión que se ejerza sobre la olla puede resultar peligrosa.
11. Se recomienda reemplazar el anillo de cierre hermético al menos cada dos años.
12. Es necesaria una atenta supervisión cuando la olla a presión se usa cerca de niños. No se recomienda que los
niños usen la olla a presión.
13. Cuando se alcance la presión normal de funcionamiento, el regulador de presión comenzará a balancearse.
Disminuya el calor gradualmente a fin de mantener un movimiento de balanceo lento y constante. Si deja que el
regulador de presión se balancee vigorosamente, escapará el exceso de
vapor, el líquido se evaporará y los alimentos pueden chamuscarse.
14. No dé a este producto un uso que no sea el indicado.
15. No utilice esta olla a presión para freír a presión con aceite.
16. CONSERVE ESTAS INSTRUCCIONES
CONTENIDO
• Precauciones Importantes............................................
• Descripción del aparato................................................
•
•
Antes de usar por primera vez.....................................
Como Cocinar.................................................................
•
• Solución de problemas..................................................
• Horario de cocina............................................................
14
16
18
18
23
24

16 17
VÁLVULA REGULADORA DE PRESIÓN
Si la presión dentro de la cocina es demasiado alta, esta válvula comienza a
funcionar para liberar el exceso de vapor.
VÁLVULA FLOTANTE
Válvula de seguridad le permite el escape de presión en exceso si se está
acumulando mucha presión en el equipo.
VÁLVULA DE SEGURIDAD DE PRESIÓN
Permite liberar la presión en exceso si mucha presión es acumulada.
SISTEMA DE SEGURIDAD
CONOZCA SU OLLA A PRESIÓN BENE CASA
INSTRUCCIONES ESPECIALES
COMO PONER LA JUNTA DE GOMA
Después de lavar la tapa y la junta de goma en jabonaduras caliente, seca los dos y pon
la junta de goma en la tapa otra vez. Nota: Tiene que tener la dirección de la flecha en la
junta de goma puntando a la tapa. Por favor, no se le olvide esto.
Si la goma esta puesta boca arriba, la olla de presión no funciona.
Control de
Presion
Tapa
Junta de
Goma
Asimiento
de Sarten
Alarma
Espoleta de
Seguridad
Mango

19
18
Antes de utilizar por primera vez, extraiga el anillo de cierre del borde interno de la tapa.
Lave el anillo de cierre, la tapa y cuerpo de la olla a presión con agua jabonosa caliente.
Enjuague todas las piezas con agua tibia y luego seque. Vuelva a colocar en su lugar el
anillo de cierre en el borde interno de la tapa.
ANTES DE USAR POR PRIMERA VEZ
COMO COCINAR
1. Pon comida en el sartén y agregue la cantidad de agua necesaria. Con la junta
en su puesto dentro de la tapa, ajusta la tapa al sartén y aprieta para abajo. (No
cocines salsa de manzana, ruibarbo, arandano agrio, guisante partido, sopa de
guisante o cebada)
2. Darle vuelta a el asa hacia la izquierda para cerrar directamente, hasta que oigas
un ruido ‘‘clic” que significa que la tapa esta cerrada completamente (foto 1).
Nunca intentas a cocinar sin que oigas el ruido “clic." Aunque la tapa puede
parecerse suelto, la junta lo sella automáticamente si la tapa esta cerrada comple-
tamente. Lubrificándola junta con aceite de cocinar ayuda que se resbale la tapa
mas fácilmente cuando lo abres y cierras.
3. Pon el sartén con los contenidos sobre la candela, después pon el control sobre
el tubo de abertura después que el vapor empieza a escapar del tubo de abertura
(foto 2) (Comidas cereal, macaroni, espaguetis, fideos y vegetales seco necesitan
candela mediana a este punto.)
4. Cuando la presión esta subiendo a un nivel cierto, el control vibra y agua gotea
del control. En este momento, reduce la candela para que el control vibre despa-
cio. Vibrando constantemente causa perdida excesivo de humedad, la vibración
ocasional y sonido silbido indica que presión se esta manteniendo. Si vapor se
escapa en una secuencia sostenida después que la candela esta reducida, mueve
el control para sellarlo correctamente. Si el vapor se escapa alrededor de la tapa y
presión no sube, refresca el sartén debajo de un grifo, quita el control y abre el
sartén. Limpia la junta, borde del sartén y dentro de la tapa, seca y empieza otra vez.
5. Después de cocinando esta completo, refresca el sartén y quite el control,
después abre el sartén. Necesita seguir los pasos abajo: Cuando la presión
se mantiene para el periodo de tiempo requerido, quítalo de la candela y deja que
la presión se baje antes de quitar el control, muchas condiciones necesitan
reducción de presionen un instante poniéndolo debajo de un grifo o en agua fria
(foto 5&6). Este método reduce la presión en como 15 segundos. Permitiendo la
presión que baje normalmente sin refrescarlo. Debajo de una grifa quita diez a
veinticinco minutos dependiendo de la comida en el sartén.
3 4
21
65

20 21
LIMPIEZA Y CUIDADO
6. Después de reducir la presión, mueve el control para probar si la presión esta
completamente reducida. Si el vapor sarpica para afuera, la presión no se bajo
todavía. Si vapor no sarpica para afuera, quita el control con un tenedor. Después
aprieta el boton en el asa de la tapa con tu dedo pulgar. Resbale la tapa para la
derecha a posición abierta y levante la tapa (loto 7). Nunca jale las asas o trate de
forzar abierta la tapa si esta cerrado firmamento. Si las asas no se resbalan
fácilmente, refresca el sartén otra vez debajo de agua. La tapa cerrada firmamento
indica la presión de vapor dentro del sartén. Cuando la presión es reducida
completamente y el control quitado, la tapa se debe abrir fácilmente.
1 .Para hacer limpiando mas fácil, hecha agua calida dentro del sartén imediatamente
después se sacar la comida. Lava en jabanaduras caliente y limpio. Manchas se pueden
quitar del sartén con una esponja y jabón. Si el sartén se mancha de agua “dura," pon a
hervir 2 cucharas de crema de tártaro a un litro de agua en el sartén. Una solución de
vinagre también es efectivo. Después enjuague y seca.
2. La junta esta disenado para que lo puedes sacar de la tapa. Esto lo hace
posible lavar la tapa y la junta en jabonaduras caliente cada vez que usa el
sartén. Seca los dos completamente, también limpia el filtro al mismo tiempo.
Después pon la junta a la tapa otra vez para que el sartén siempre este listo
para uso. Nota: Cuando pones la junta a la tapa, pon la dirección de las flechas
apuntando hacia la tapa (por favor lees las instrucciones especiales incluidas).
Si la tapa no se cierra fácilmente, hecha un poco de aceite de cocinar a la junta.
Cuando guardando, pon la tapa boca abajo sobre el sartén y deja el control
dentro del sartén.
3. Después de enjuagar la tapa, levántalo a la luz para ver si el tubo de abertura
esta limpio. Es muy importante que el tubo no este obstruido. Si se tupa con
pedazos de comida, inserta un pedazo de alambre como esta ilustrado.
Después enjuaga con agua.
4. Normalmente, el control de presión se queda limpio porque el vapor lo limpia
cuando esta trabajando. Lavándolo en jabonaduras caliente y enjuagándolo no
le hace daño al control y lo deja libre de obstrucciones.
8 9 10
1211
7

IMPORTANT SAFETY REMINDERS
22 23
PROBLEMAS, CAUSAS Y SOLUCIONES
INFORMACIÓN IMPORTANTE DE SEGURIDAD
La válvula de
seguridad no
sube después
de calentar
durante un
tiempo
prolongado.
1. La cocina no está cerrada correctamente.
2. El calor es demasiado bajo para
acumular presión.
3. El anillo de sellado está sucio, dañado o
colocado incorrectamente.
4. Hay muy poco líquido en la cocina.
1. Abra y vuelva a cerrar la tapa.
2. Establezca la fuente de calor en
su valor más alto.
3. Limpie o reemplace las partes.
4. Agregue al menos 8 onzas
de líquido.
El vapor se
escapa de los
bordes de la
tapa.
1. La tapa de sellado está mal colocada
en la tapa.
2. El anillo de sellado está dañado.
3. El anillo de sellado está sucio.
4. La olla a presión no está cerrada
correctamente.
1. Corregir la posición del sello.
2. Vuelva a colocar el anillo de
sellado.
3. Limpie o inserte una nueva junta.
4. Limpie o reemplace las partes.
Se puede
escuchar el
ruido de la
válvula
reguladora de
presión, pero
no se ve
vapor.
1. La válvula reguladora de presión
está bloqueada.
2. El tubo de ventilación está bloqueado.
3. Hervido en seco.
4. No en posición vertical.
1. Limpie la válvula.
2. Limpie el tubo de ventilación.
3. Apague el fuego inmediatamente,
libere toda la presión, abra la tapa
y agregue líquido.
4. Colocar sobre una superficie de
cocción plana.
El vapor se escapa
de la válvula de
seguridad después
de que los anillos
indicadores están
arriba.
1. El tubo de ventilación está bloqueado.
2. La olla a presión está demasiado llena
de comida.
3. La temperatura es demasiado alta.
1. Limpie el tubo de ventilación.
2. Retire los alimentos hasta que
estén 2/3 llenos o menos.
3. Baje el calor.
Problema Razón posible Solución
1. No trates de cocinar sin tener el sartén cerrado correctamente. El sartén se puede poner en
la candela solamente después que oigas el "clic" cuando le da vuelta a la izquierda para cerrar.
2. No trates de abrir el sartén hasta que quita el control de presión y no quites el control de
presión hasta que sabes que la presión esta reducida. Mira paso 5 de “Como Cocinar."
3. No jales a las asas o trate de forzar la tapa abierta si esta cerrado seguramente. Refresca el
sartén debajo de un grifo para reducir la presión. La tapa se resbala fácilmente. (Algunas veces,
la tapase pega hasta después de refrescarlo. Antes de abrirla tapa, inserta un pedazo de
alambre dentro de la abertura para estar seguro que esta limpio y que la presión es completa-
mente reducida.
4. No le des golpe con cucharas o otros instrumentos a la orilla del sartén porque esto puede
afectar el sello que hace el sartén.
5. No cocines salsa de manzana, ruibarbo, arandino agrio, sopa de guisante o cabada en el
sartén de presión porque pueden tupir los tubos de abertura. Con el tubo tupido, la presión
puede parecer bajo cuando el control esta quitado. Una comida como salsa de manzana puede
estar arriba del punto de hervir hasta 40 minutos después de quitar el sartén de la candela. Si
no lo refresca bajo de agua. Esto quiere decir que presión se queda en el sartén y no se debe
hacer fuerza para abrirlo cuando esta bien ajustado por la presión. Para que no pase esto, no
se debe cocinar las comidas mencionadas.
6. No use alta temperatura para cocinar cereales, espaguetis, fideos, vegetales seco o otras
comidas que pueden hacer mucha espuma cuando se cocinan.
7. No llena el sartén mas de 2/3 lleno y mas de 1/3 para comidas que hacen espuma cuando
se cocinan.
8. No colocas la tapa en una superficie caliente porque puede dañar la junta y derretir la
espoleta de seguridad.
9. No guardes líquidos con mucha sal, sopas agrias o vinagre fuerte en el sartén.
10. No cocines cuando no tiene agua en el sartén.
11. No use candela alta después de vibración del control. Reduce la candela para que el
control no vibre mucho.
2/3 Maxima capacidad 1/3 Alimentos que se expanden
13 14

24 25
HORARIO DE COCINA FRIJOLES Y ARVEJAS DESHIDRATADOS
La olla a presión resulta ideal para preparar rápidamente frijoles y arvejas deshidratados. Sin embargo, durante la
cocción, los frijoles y las arvejas deshidratados tienden a hacer espuma, lo que podría obstruir el tubo de
ventilación. Por lo tanto, es necesario que siga las siguientes pautas de precaución cuando los cocine a presión:
1. Nunca sobrepase el nivel de llenado de ½ de la olla (esto incluye los frijoles, los ingredientes y el agua).
2. Para cocinar, agregue 1 cucharada de aceite vegetal.
3. Deje que la presión disminuya por sí sola. Remojo de frijoles y arvejas . Se recomienda el remojo de todos los
frijoles y las arvejas, excepto las lentejas y los
frijoles de carita, a fin de lograr una cocción uniforme y quitar el almidón soluble en agua y que produce gases. El
remojo se puede hacer mediante el método tradicional o el método de remojo rápido.
Método tradicional:
Limpie y enjuague los frijoles. Cúbralos con una cantidad de agua tres veces mayor a la cantidad de frijoles. Deje
en remojo entre 4 y 8 horas. Escurra.
Método rápido:
Limpie y enjuague los frijoles. Cúbralos con una cantidad de agua tres veces mayor a la cantidad de frijoles.
Hiérvalos durante 2 minutos. Retírelos del calor, cúbralos y déjelos reposar entre 1 y 2 horas. Escurra.
Cocción de frijoles y arvejas.
Luego de remojarlos, enjuague los frijoles y quíteles la piel que quede. Colóquelos en la olla a presión. Agregue
agua fresca hasta cubrir ligeramente los frijoles y una cucharada de aceite vegetal. Cierre y asegure la tapa.
Coloque el regulador de presión sobre el tubo de ventilación y cocine según los tiempos indicados abajo.
Cocine menos tiempo si desea frijoles más firmes para ensaladas y guarniciones, y cuando cocine menos de 2
tazas de frijoles o arvejas. Para sopas y guisos, cocine más tiempo. Luego de que se complete la cocción, deje
que la presión disminuya por sí sola.
Frijoles Tiempo
Arvejas (enteras, amarillas y verdes) 6-9
Frijoles adzuki 1-3
Frijoles anasazi 1-3
Frijoles blancos medianos 2-5
Frijoles blancos (pequeños) 1-3
Frijoles comunes 1-3
Frijoles de carita 2-4
Frijoles de soja (beige) 8-11
Frijoles negros 2-4
Frijoles pintos 3-6
Frijoles rojos 3-6
Garbanzos 7-10
Habas (grandes) 0-1
Habas (pequeñas) 1-3
Lentejas (marrones, verdes) 3-5
TAMAñO TAZAS DE
LÍQUIDO
TIEMPO DE
COCCIÓN
(MINUTOS)
CARNE
RES
JAMÓN
Paleta 3 libras 2 45-50
Carne en conserva
3 libras 2 60
Lomo de aguja enrollado
3 libras 1½ 30-35
Rebanado 3 libras 1½ 30-35
Picnic 3 libras 1½ 30-35
Pata de cordero 3 libras 2 35-45
CORDERO
Chuletas 1 pulgada de espesor 1 12*
Chuletas ½ pulgada de espesor 1 5*
Chuletas 1 pulgada de espesor 1 12*
Chuletas ½ pulgada de espesor 1 5*
Paletilla 3 libras 2 55
Carne fresca de picnic
3 libras 2 55
Bistec 1 pulgada de espesor 1 12*
Bistec ½˝ pulgada de espesor 1 5*
Bistec 1 pulgada de espesor 1 10*
Bistec ½˝ pulgada de espesor 1 5*
CERDO
Chuletas 1 pulgada de espesor 1 15*
Chuletas ½˝ pulgada de espesor 1 8*
Asado 3 libras 2 45-50
TERNERA
Bistec de cadera 1 pulgada de espesor 1 18*
Bistec de cadera ½ pulgada de espesor 1 10*
Costillas cortas 3 libras 1½ 25
VERDURA
Acelga Hojas enteras 1 0-1
Alcachofa Entera, 6 a 8 onzas 1 10
Arvejas Sin vaina 1 0-2
Brócoli Flores 1 0-2
Batatas Rebanadas de 1 a 1½
pulgada de espesor
Rebanadas de ½
pulgada de espesor
1 6-8
1 4-5
Berenjena En cubos, de 1 a 1½
pulgada de espesor
Rebanadas de ½
pulgada de espesor
1 2-3
1 2
Calabaza
(amarilla, calabacín) Rebanadas de 1
pulgada de espesor
Rebanadas de ¼ a ½
pulgada de espesor
1 1
1 0-1
Calabaza (de sidra)
bellota+ En cuartos 1 12
Calabaza (de sidra)
espagueti+ En mitades 1 12
Chirivías Rebanadas de ½
pulgada de espesor 1 0-2
Coliflor Flores 1 0-2
Colinabo En cubos o rebanadas de
1 pulgada de espesor 1 3
Col rizada
Hojas cortadas en trozos
grandes, tallos en rebanadas finas
1 1-2
Espárrago Tallos cortados en trozos
de 1 pulgada 1 0-1
Espinaca Hojas enteras 1 0-1
Berza* Hojas cortadas en
trozos grandes, tallos
en rebanadas finas
1 3-4
TAMAñO TAZAS DE
LÍQUIDO
TIEMPO DE
COCCIÓN
(MINUTOS)
VERDURA
POULTRY
Frijoles (verdes, amarillos)
Enteros o rebanados 1 1-3
Pimientos Enteros 1 0-3
Pollo entero 2 a 3 libras 1 13-15
Pechuga de pollo deshuesada 1 3-4
Pechuga de pavo 3 a 4 libras 1.5 35
Filetes de pescado de 1 pulgada de espesor 1 2
Filetes de salmón de 1 pulgada de espesor 1 2
Filetes de atún de 1 pulgada de espesor 1 2
Vieiras Grandes 1 1
Aforfón 1 taza 2 3-4
Amaranto 1 taza 1¾ 4-5
Arroz (blanco) 1 taza 1½ 5-8
Arroz (integral) 1 taza 1½ 10-12
Arroz silvestre 1 taza 1½ 20-25
Avena (molienda gruesa)
1 taza 1½ 20-25
Avena (semimolida) 1 taza 2 4-5
Cebada (pelada) 1 taza 2½ 25-28
Cebada (perlada) 1 taza 2½ 9-12
Centeno 1 taza 1½ 20-25
Escanda 1 taza 2 25-30
Granos de trigo 1 taza 2 25-30
Mijo 1 taza 2 9-10
Quinua 1 taza 1½ 1
Trigo partido
(trigo bulgur)
1 taza 1½ 2-3
Patas de cangrejo 1 1
Pollo cortado en porciones
para servir 1 8
Camarones Medianos a grandes
(36 a 40 unidades) 1 1
Grandes (21 a 25 unidades) 1 1
Zanahoria En trozos pequeñoss 1 3-5
En rebanadas de ½ pulgada 1 3-5
En rebanadas finas 1 2-3
Mazorca de maíz Entera, de 2½
pulgadas de diámetro 1 3
Remolacha Entera, de 2½
pulgadas de diámetro 1½ 15-16
Repollitos de Bruselas Pequeños, de 1
pulgada de diámetro 1 1-3
Repollo (rojo, verde) Trozos de 2 pulgadas
de espesor 1 3-5
Nabos Rebanadas o cubos
de ¾ pulgada de espesor 1 3-5
Papas (blancas) Enteras, de 2½
pulgadas de diámetro 1½ 15
Enteras, de 1½
pulgadas de diámetro 1 10
Rebanadas de ¾
pulgada de espesor 1 5
Rebanadas de ½
pulgada de espeso 1 3
FRESCOS O DESCONGELADOS
MARISCOS
GRANOS

DIRECTIONS:
• In a blender, combine green pepper, onion,
garlic, 1/4 teaspoon cumin, salt and 1/8 cup
olive oil. Blend until smooth; set aside.
• On medium heat, add 1 tbsp olive oil in
pressure cooker (without top).
• Sauté green pepper mixture for 1 minute
• Stir in achiote powder and 1 tsp cumin.
Cook for 1 minute.
• Add tomato sauce. Mix and let ingredients
return to a simmer.
• Add beef; simmer for 5 minutes.
• Add potatoes, wine, water and bouillon
cubes. Bring to a boil, and cook for 1 minute.
• If necessary, add water to have liquid cover
solid ingredients.
• Place and lock lid of pressure cooker.
• Cook for 40 minutes.
• Remove from heat and wait for pressure to
release.
• Remove lid, then stir.
• Serve with white rice.
INGREDIENTS:
1/2 large green bell pepper, seeded and chopped
1/2 small white onion, chopped
3 cloves garlic, crushed
1/4 tsp ground cumin
1 tsp ground cumin
1/4 tsp salt
1/8 cup olive oil
1 tbsp olive oil
2 tbsp achiote powder
16 oz canned tomato sauce
2 pounds beef stew meat, cut into 1 inch cubes
2 large potatoes, peeled and cubed
1 cup white wine
4 cups water
6 cubes beef bouillon
DIRECTIONS:
• Season chicken with salt and pepper
• On medium heat, melt butter in the pressure
cooker pan.
• Lightly brown chicken in the pressure cooker
for about 30 seconds on each side. cooker.
Remove from pan.
• Add celery, carrots and onions to pan, sauté
for 3 minutes or until onions are soft.
• Add chicken, thyme, sea salt, fresh ground
pepper, uncooked noodles and broth to pan.
• Close the lid of pressure cooker and turn
heat on high.
• Once initial steam is released, reduce heat
to medium and let cook for 6-8 minutes.
• Turn off the heat and leave cooker for 5-10
minutes to release pressure.
• Once pressure has released, open the lid.
• Stir, Serve and Enjoy.
INGREDIENTS:
1 lb. raw, thawed chicken breast, cubed
1/2 large onion diced
3 celery stalks, sliced
3 large carrots, sliced
1 tablespoons butter
1 1/2 tsp dried thyme
Sea Salt and Pepper, season to taste
2 1/2 cups uncooked egg noodles
7 cups chicken broth
Beef Stew (Carne Con Papa) Chicken Noodle Soup
Table of contents
Languages:
Other bene casa Electric Pressure Cooker manuals