Bennett Read SUPER CHEF 6 User manual

DOUBLE-UP YOUR GUARANTEE!
SCAN* TO REGISTER YOUR EXTRA 1 YEAR GUARANTEE
* HOW? IT’S SIMPLE REALLY…
• SWITCH ON YOUR MOBILE CAMERA, POINT IT AT THE QR CODE & TAP THE LINK THAT POPS UP
• IF THAT DOESN’T WORK, YOU’LL NEED TO DOWNLOAD & USE A QR CODE SCANNER APP FROM YOUR PHONE’S APP STORE
10-IN-1 INTELLIGENT MULTI-COOKER
SUPERCHEF 6
USER GUIDE


CONGRATULATIONS ON PURCHASING A BENNETT READ
SUPER CHEF 6.
EXTENDED GUARANTEE:
Your
BENNETT READ SUPER CHEF 6
comes with a 1 year guarantee. If you
register your guarantee online within 14 days of purchase, we will extend the
guarantee to 2 years.
To activate your extended guarantee, scan the QR code on the cover of this user
guide, then tap on the link and complete the online form. Alternatively, visit
www.tevo.co.za, click the “Register guarantee” tab at the top of the page, then
complete the form provided.
We also stand behind it with a knowledgeable, dedicated Customer Care
department, so should you ever have a problem, you'll receive fast, considerate
assistance (see contact details at the end of the
guarantee
section on page 17).
Please read this user guide carefully before using your
BENNETT READ SUPER CHEF 6.
KEEP THIS USER GUIDE FOR FUTURE REFERENCE.
FOR HOME USE ONLY, NOT FOR COMMERCIAL USE.
NOTE:
Images of the product are for illustrative purposes and may vary according to model.

CONTENTS
1 - 2................... SAFETY WARNINGS
3 ....................... SAFETY DEVICES
4 - 5................... PRODUCT OVERVIEW
6........................ LID & VENT INSTRUCTIONS / CONTROL PANEL
7........................ PRE-PROGRAMMED 1-TOUCH SETTINGS GUIDE
8........................ BEFORE FIRST USE
9........................ USING YOUR SUPER CHEF 6
10...................... SLOW COOKING / YOGHURT SETTING
11...................... EGG MAKER / SAUTÉ / STERILIZE / STEAM
11...................... ADJUSTING PRESSURE & COOKING TIME
12...................... ADJUSTING PRESSURE & COOKING TIME TABLE
13...................... KEEP WARM / DELAY START
13 - 14............... CARE, CLEANING & STORAGE
15 - 16............... TROUBLESHOOTING
17...................... GUARANTEE
18...................... ENVIRONMENTALLY FRIENDLY DISPOSAL

• The removable inner pot features a non-stick layer surface. To avoid scratching the non-stick surface, please use
wooden or plastic utensils.
• Make certain that the unit is properly closed before operating.
• Do not clog the joint between the lid and the outer body or cooker bed with a cloth.
• Do not ll the unit over 2/3 full. When cooking foods that expand during cooking such as rice or dried vegetables, do
not ll the unit over 1/2 full. Over-lling may cause a risk of clogging the oat valve and developing excess pressure.
The maximum cooking amount should not exceed the Max (maximum) mark as indicated on the removable inner pot.
• Be aware that certain foods, such as apple sauce, cranberries, pearl barley, oatmeal or other cereals, split peas,
noodles, macaroni, rhubarb, or spaghetti can foam, froth, splatter, and clog the pressure release device (steam vent).
These foods should not be cooked in the SUPER CHEF 6.
• To cook dry foods, please soak them in water for a period before cooking.
• Do not use the SUPER CHEF 6 for pressure frying with oil.
• Do not cover the SUPER CHEF 6 when in use.
• Do not place ammable items such as paper or plastic in the removable inner pot.
• Do not pour cold liquid into the removable inner pot while it is still hot.
• Make sure your hands are dry when operating switches or removing the plug.
• Do not handle the appliance with one hand.
• Do not touch hot surfaces; always use handles.
• This appliance cooks under pressure. Do not move the SUPER CHEF 6 when it is pressurized. Do not open the SUPER
CHEF 6 until the unit has cooled and all internal pressure has been released. The oat valve will be positioned down
once all the pressure has been released. If the lid is difcult to push apart from the outer body, this indicates that the
cooker is still pressurized – do not force it open. Any pressure in the cooker can be hazardous.
• Only open and lift the lid by using the lid handle. Always lift the lid away from your face as escaping steam may
cause injury or scalding. Keep hands, arms and face clear from the escaping steam when opening the lid, adjusting
the pressure limiting safety valve or moving dishes.
• Keep clear from the pressure limiting safety valve (vent) and vent holes during operation to avoid injury or scalding.
• When cooking foods with a high liquid content, use protective oven gloves to manually vent steam from the appliance.
Alternatively allow the appliance to cool and vent steam naturally.
• Use protective oven gloves when removing the removable inner pot.
• While the appliance is in operation and while it is cooling off after the cooking cycle has completed; be careful not to
touch the lid in order to avoid scalding and injury. If you must do so, please use protective oven gloves.
• Do not handle or dispose of oils or other liquids while still hot. Allow to cool rst
• Food should not be kept warm for more than 4 hours in order to maintain its freshness. The SUPER CHEF 6 should not
be used for more than 6 hours continuously. Serious Injury and/or damage may occur if any safeguards are ignored.
• If steam releases around the lid during the cooking process, please unplug from the power supply immediately, let
cool, remove contents and return the product to the manufacturer for exchange or repair.
• If a loud indicator sounds for one continuous minute during use, please unplug from the power supply immediately, let
cool, remove contents and return the product to the manufacturer for exchange or repair.
• Extreme caution must be used when moving a SUPER CHEF 6 containing hot liquids. It is recommended that you do
not move the appliance when it is full, when switched on or before it has cooled down.
• Let the SUPER CHEF 6 cool down completely before you clean it or put it away.
• To reduce the risk of electric shock, do not immerse or expose the appliance, plug or the power cord to water or any
other liquid. If the appliances outer body falls into water while plugged in, do not touch it. Unplug the machine rst
before attempting to remove it.
• Never immerse the unit in water or any other liquid for cleaning purposes.
• Remove the plug from the socket by gripping the plug. Do not pull on the cord to disconnect the appliance from the
mains. Always unplug the unit when not in use, before cleaning or when adding or removing parts.
• Do not place any of the appliance parts in a dishwasher.
• Ensure that the switch is in the “Off” position after each use.
• The manufacturer does not accept responsibility for any damage or injury caused by improper or incorrect use, or for
repairs carried out by unauthorised personnel.
• In case of technical problems, switch off the machine and do not attempt to repair it yourself. Return the appliance to
an authorised service facility for examination, adjustment or repair. Always insist on the use of original spare parts.
Failure to comply with the above-mentioned pre-cautions and instructions, could affect the safe operation of this
machine.
SAFETY WARNINGS
When using any electrical appliance, basic safety precautions should always be followed including the following:
• Please read the instructions carefully before using any appliance.
• Always ensure that the voltage on the rating label corresponds to the mains voltage in your home.
• Incorrect operation and improper use can damage the appliance and cause injury to the user.
• This appliance is intended for household use only. Commercial use invalidates the guarantee and the supplier cannot
be held responsible for injury or damage caused when using the appliance for any other purpose than that intended.
• Avoid any contact with moving parts.
• This appliance is not intended for use by persons (including children) with reduced physical, sensory or mental
capabilities, or lack of experience and knowledge, unless they have been given supervision or instruction concerning
use of the appliance by a person responsible for their safety.
• Keep this appliance out of reach of children. Not for use by children.
• Children should be supervised to ensure that they do not play with the appliance.
• Check the power cord and plug regularly for any damage. If the cord or the plug is damaged, the manufacturer or a
qualied person must replace it in order to avoid an electrical hazard.
• Do not use the appliance if it has been dropped or damaged in any way. In case of damage, take the unit in for
examination and/or repair by an authorised service agent.
• Do not use accessory attachments or parts that are not recommended or supplied by the manufacturer. This may result
in injuries, re or electric shock.
• A short detachable cord is provided to reduce the hazards resulting from becoming entangled in or tripping over a
longer cord.
• Do not let the cord hang over the edge of a table or counter. Ensure that the cord is not in a position where it can be
pulled on inadvertently.
• Do not allow the cord to touch hot surfaces and do not place on or near a hot gas or electric burner or in a heated
oven.
• Do not carry the appliance by the power cord or lid handle. Carry the appliance using its cool-touch side handles.
• Do not use the appliance on a gas or electric cooking top or over or near an open ame.
• Do not use or place the removable inner pot on another appliance to heat or cook. This may cause deformation or
faults with the removable inner pot and prohibit the correct working condition/performance of this appliance.
• Use of an extension cord with the appliance is not recommended. However, if it is necessary to use an extension lead,
ensure that the lead is suited to the power consumption of the appliance to avoid overheating of the extension cord,
appliance or plug point. Do not place the extension cord in a position where it can be pulled on by children or
animals, or tripped over.
• This appliance is not suitable for outdoor use. For indoor use only. Do not use this appliance for anything other than
its intended use.
• Do not operate this appliance by means of an external timer or remote control system.
• Do not leave the appliance unattended during use. Always unplug the unit when not in use or before cleaning.
• Always operate the appliance on a smooth, even, stable and heat-proof surface. Do not place the unit on a hot
surface, on newspaper, foam, or any other material that may block the vent at the bottom.
• Do not use under hanging wall cabinets as escaping steam may cause damage.
• Do not use the SUPER CHEF 6 near explosive objects. Do not place the SUPER CHEF 6 in direct sunlight.
• Do not place the appliance near ammable materials or use in a humid environment.
• Check that the blockage-proof cover, oat valve and pressure limiting safety valve are not jammed before each use;
wipe the external surface of the removable inner pot and the heating plate, remove foreign objects from it; ensure that
the pressure limiting safety valve remains tted to the lid correctly.
• Do not damage the lid seal ring and do not replace it with anything other than the replacement ring designed
especially for this unit. Do not use a tension ring to increase the seal.
• Clean the blockage-proof cover regularly to keep the cooker clean and ensure proper operation. Keep the
blockage-proof cover unblocked by the pressure limiter valve (vent) and the oat valve. Always check the pressure
release devices/vents for clogging before use.
• Never use additional weight on the pressure limiting safety valve (vent) or the oat valve. Do not replace them with
anything not intended for use with this unit.
• The surface of contact between the removable inner pot and the heating plate inside the cooker body should always
be clean. Do not use the removable inner pot with other heating sources. Do not replace the removable inner pot
with a container other than what is recommended by the manufacturer.
1

• The removable inner pot features a non-stick layer surface. To avoid scratching the non-stick surface, please use
wooden or plastic utensils.
• Make certain that the unit is properly closed before operating.
• Do not clog the joint between the lid and the outer body or cooker bed with a cloth.
• Do not ll the unit over 2/3 full. When cooking foods that expand during cooking such as rice or dried vegetables, do
not ll the unit over 1/2 full. Over-lling may cause a risk of clogging the oat valve and developing excess pressure.
The maximum cooking amount should not exceed the Max (maximum) mark as indicated on the removable inner pot.
• Be aware that certain foods, such as apple sauce, cranberries, pearl barley, oatmeal or other cereals, split peas,
noodles, macaroni, rhubarb, or spaghetti can foam, froth, splatter, and clog the pressure release device (steam vent).
These foods should not be cooked in the SUPER CHEF 6.
• To cook dry foods, please soak them in water for a period before cooking.
• Do not use the SUPER CHEF 6 for pressure frying with oil.
• Do not cover the SUPER CHEF 6 when in use.
• Do not place ammable items such as paper or plastic in the removable inner pot.
• Do not pour cold liquid into the removable inner pot while it is still hot.
• Make sure your hands are dry when operating switches or removing the plug.
• Do not handle the appliance with one hand.
• Do not touch hot surfaces; always use handles.
• This appliance cooks under pressure. Do not move the SUPER CHEF 6 when it is pressurized. Do not open the SUPER
CHEF 6 until the unit has cooled and all internal pressure has been released. The oat valve will be positioned down
once all the pressure has been released. If the lid is difcult to push apart from the outer body, this indicates that the
cooker is still pressurized – do not force it open. Any pressure in the cooker can be hazardous.
• Only open and lift the lid by using the lid handle. Always lift the lid away from your face as escaping steam may
cause injury or scalding. Keep hands, arms and face clear from the escaping steam when opening the lid, adjusting
the pressure limiting safety valve or moving dishes.
• Keep clear from the pressure limiting safety valve (vent) and vent holes during operation to avoid injury or scalding.
• When cooking foods with a high liquid content, use protective oven gloves to manually vent steam from the appliance.
Alternatively allow the appliance to cool and vent steam naturally.
• Use protective oven gloves when removing the removable inner pot.
• While the appliance is in operation and while it is cooling off after the cooking cycle has completed; be careful not to
touch the lid in order to avoid scalding and injury. If you must do so, please use protective oven gloves.
• Do not handle or dispose of oils or other liquids while still hot. Allow to cool rst
• Food should not be kept warm for more than 4 hours in order to maintain its freshness. The SUPER CHEF 6 should not
be used for more than 6 hours continuously. Serious Injury and/or damage may occur if any safeguards are ignored.
• If steam releases around the lid during the cooking process, please unplug from the power supply immediately, let
cool, remove contents and return the product to the manufacturer for exchange or repair.
• If a loud indicator sounds for one continuous minute during use, please unplug from the power supply immediately, let
cool, remove contents and return the product to the manufacturer for exchange or repair.
• Extreme caution must be used when moving a SUPER CHEF 6 containing hot liquids. It is recommended that you do
not move the appliance when it is full, when switched on or before it has cooled down.
• Let the SUPER CHEF 6 cool down completely before you clean it or put it away.
• To reduce the risk of electric shock, do not immerse or expose the appliance, plug or the power cord to water or any
other liquid. If the appliances outer body falls into water while plugged in, do not touch it. Unplug the machine rst
before attempting to remove it.
• Never immerse the unit in water or any other liquid for cleaning purposes.
• Remove the plug from the socket by gripping the plug. Do not pull on the cord to disconnect the appliance from the
mains. Always unplug the unit when not in use, before cleaning or when adding or removing parts.
• Do not place any of the appliance parts in a dishwasher.
• Ensure that the switch is in the “Off” position after each use.
• The manufacturer does not accept responsibility for any damage or injury caused by improper or incorrect use, or for
repairs carried out by unauthorised personnel.
• In case of technical problems, switch off the machine and do not attempt to repair it yourself. Return the appliance to
an authorised service facility for examination, adjustment or repair. Always insist on the use of original spare parts.
Failure to comply with the above-mentioned pre-cautions and instructions, could affect the safe operation of this
machine.
2
SAFETY WARNINGS
When using any electrical appliance, basic safety precautions should always be followed including the following:
• Please read the instructions carefully before using any appliance.
• Always ensure that the voltage on the rating label corresponds to the mains voltage in your home.
• Incorrect operation and improper use can damage the appliance and cause injury to the user.
• This appliance is intended for household use only. Commercial use invalidates the guarantee and the supplier cannot
be held responsible for injury or damage caused when using the appliance for any other purpose than that intended.
• Avoid any contact with moving parts.
• This appliance is not intended for use by persons (including children) with reduced physical, sensory or mental
capabilities, or lack of experience and knowledge, unless they have been given supervision or instruction concerning
use of the appliance by a person responsible for their safety.
• Keep this appliance out of reach of children. Not for use by children.
• Children should be supervised to ensure that they do not play with the appliance.
• Check the power cord and plug regularly for any damage. If the cord or the plug is damaged, the manufacturer or a
qualied person must replace it in order to avoid an electrical hazard.
• Do not use the appliance if it has been dropped or damaged in any way. In case of damage, take the unit in for
examination and/or repair by an authorised service agent.
• Do not use accessory attachments or parts that are not recommended or supplied by the manufacturer. This may result
in injuries, re or electric shock.
• A short detachable cord is provided to reduce the hazards resulting from becoming entangled in or tripping over a
longer cord.
• Do not let the cord hang over the edge of a table or counter. Ensure that the cord is not in a position where it can be
pulled on inadvertently.
• Do not allow the cord to touch hot surfaces and do not place on or near a hot gas or electric burner or in a heated
oven.
• Do not carry the appliance by the power cord or lid handle. Carry the appliance using its cool-touch side handles.
• Do not use the appliance on a gas or electric cooking top or over or near an open ame.
• Do not use or place the removable inner pot on another appliance to heat or cook. This may cause deformation or
faults with the removable inner pot and prohibit the correct working condition/performance of this appliance.
• Use of an extension cord with the appliance is not recommended. However, if it is necessary to use an extension lead,
ensure that the lead is suited to the power consumption of the appliance to avoid overheating of the extension cord,
appliance or plug point. Do not place the extension cord in a position where it can be pulled on by children or
animals, or tripped over.
• This appliance is not suitable for outdoor use. For indoor use only. Do not use this appliance for anything other than
its intended use.
• Do not operate this appliance by means of an external timer or remote control system.
• Do not leave the appliance unattended during use. Always unplug the unit when not in use or before cleaning.
• Always operate the appliance on a smooth, even, stable and heat-proof surface. Do not place the unit on a hot
surface, on newspaper, foam, or any other material that may block the vent at the bottom.
• Do not use under hanging wall cabinets as escaping steam may cause damage.
• Do not use the SUPER CHEF 6 near explosive objects. Do not place the SUPER CHEF 6 in direct sunlight.
• Do not place the appliance near ammable materials or use in a humid environment.
• Check that the blockage-proof cover, oat valve and pressure limiting safety valve are not jammed before each use;
wipe the external surface of the removable inner pot and the heating plate, remove foreign objects from it; ensure that
the pressure limiting safety valve remains tted to the lid correctly.
• Do not damage the lid seal ring and do not replace it with anything other than the replacement ring designed
especially for this unit. Do not use a tension ring to increase the seal.
• Clean the blockage-proof cover regularly to keep the cooker clean and ensure proper operation. Keep the
blockage-proof cover unblocked by the pressure limiter valve (vent) and the oat valve. Always check the pressure
release devices/vents for clogging before use.
• Never use additional weight on the pressure limiting safety valve (vent) or the oat valve. Do not replace them with
anything not intended for use with this unit.
• The surface of contact between the removable inner pot and the heating plate inside the cooker body should always
be clean. Do not use the removable inner pot with other heating sources. Do not replace the removable inner pot
with a container other than what is recommended by the manufacturer.

3
SAFETY DEVICES
1. BLOCKAGE-PROOF SAFETY DEVICE
Prevents food from clogging and ensures smooth release of air pressure.
2. SAFETY DEVICE FOR OPENING AND CLOSING THE LID
Ensures that the lid cannot be opened while there is still high pressure inside.
3. TEMPERATURE-LIMITING SAFETY DEVICE
Automatically releases air through the pressure limiting safety valve should the internal temperature
and pressure reach maximum levels.
4. OVER-TEMPERATURE SAFETY DEVICE & EMPTY POT COOKING PROTECTION
These safety devices detect abnormal internal heating of the cooker and of the removable inner
pot. It may be due to a heating malfunction or if the removable inner pot is empty during
operation. The safety devices will shut the power off automatically until the temperature drops to
normal levels.
5. FLOAT VALVE PROTECTION DEVICE
Ensures that the lid and the appliance body will not pressurise if they are not positioned correctly.
6. PRESSURE CONTROL SAFETY DEVICE
Ensures that power is automatically shut off should the internal pressure reach the maximum limit
during operation.
7. OVER-TEMPERATURE SAFETY DEVICE
Ensures that the temperature inside the cooker does not rise above its maximum temperature limit.
Should the temperature reach its maximum limit, the cooker will shut off.
8. PRESSURE RELIEF SAFETY DEVICE
The pressure relief safety device has been developed for instances where a failure could occur with
the other safety devices and if the pressure inside the cooker reaches the maximum level. This
safety device ensures that the heating plate has a exible support which allows the removable
inner pot to move down automatically, allowing the safe release of air from the edge of the lid.
2
3
4
1
8
6
7
5
4
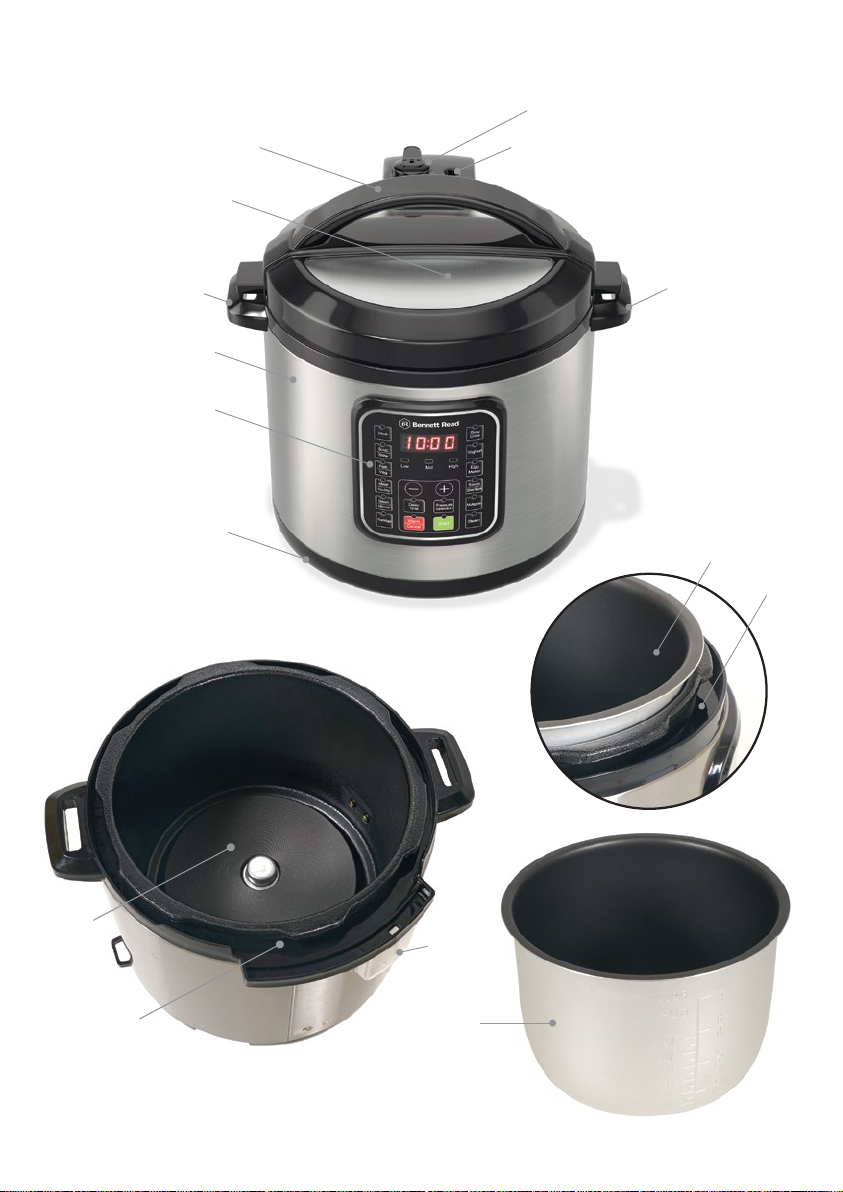
PRODUCT OVERVIEW
7
9
7
5
1
2
3
11
6
12
8
11
10
5
4

19
PRODUCT OVERVIEW
5
1. Lid handle
2. Lid
3. Pressure Limiting Safety Valve
4. Float Valve
5. Removable Inner Pot
6. Outer Body
7. Cooker Bed
8. Control Panel
9. Heating Plate
10. Water Collector
11. Cool-touch Side Handles
12. SUPER CHEF 6 Base
13. Float Valve Seal Ring
14. Blockage-proof Cover
15. Lid Seal Ring
16. Steam Plate
17. Middle Support Pin
18. Power Cord with Plug
19. Spoon
20. Measuring Cup
20
18
15
16
10
13
14
17
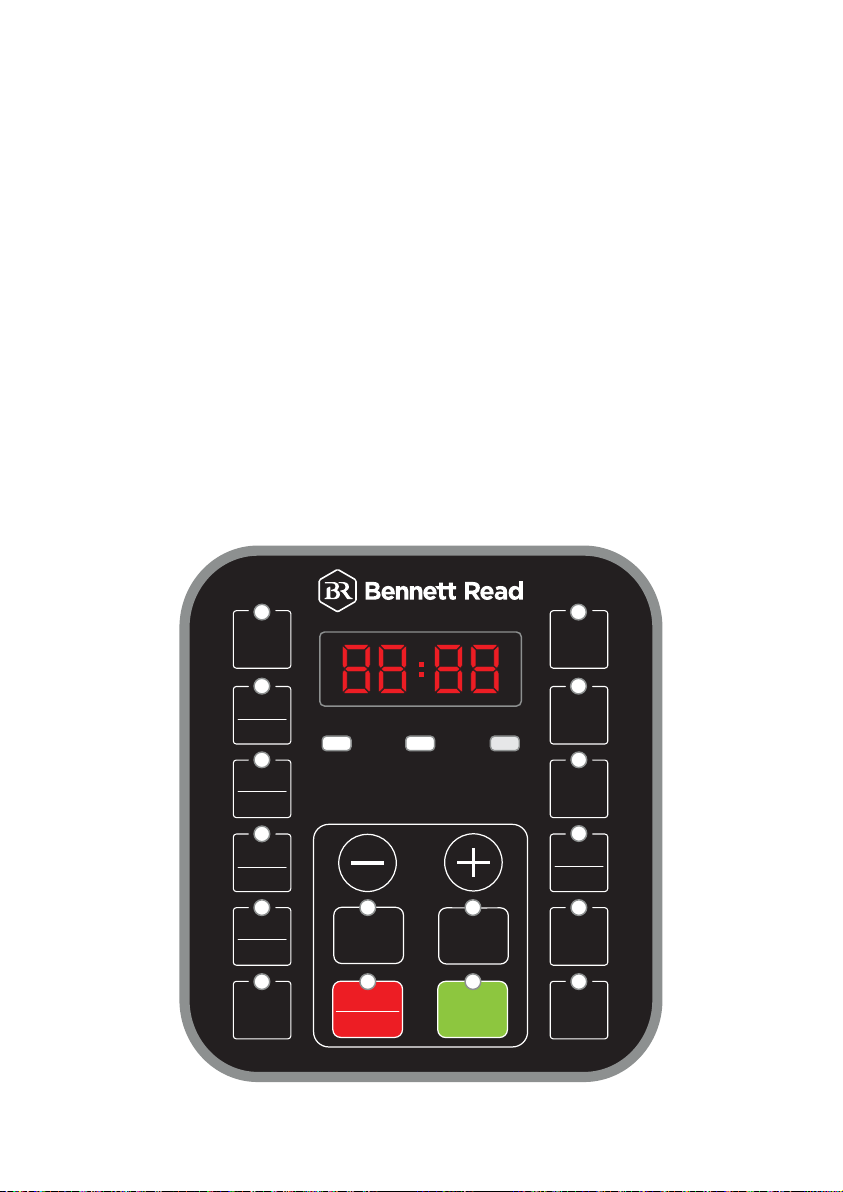
CONTROL PANEL
LID & VENT INSTRUCTIONS
6
• TO CLOSE THE LID: With the lid handle horizontally positioned and pressure valves above the lid
handle, place the lid on the cooker and close the lid by turning it in a clockwise direction.
• TO OPEN THE LID: Turn it in an anticlockwise direction.
• To Pressurize: Turn the Pressure Limiting Safety Valve located on top of the lid to the “SEALED”
position.
• Quick Release Venting Method:
Use this venting method to manually release pressure from the SUPER CHEF 6. This is the faster
release method. Turn the Pressure Limiting Safety Valve to the “EXHAUST” position. Note that the lid
must only be opened after the Float Valve has moved down/dropped.
• Natural Release Venting Method:
This method is used when the SUPER CHEF 6 releases all internal pressure naturally without manual
intervention from the user. It is the slower release method. Note that the lid must only be opened after
the Float Valve has moved down/dropped.
Rice Slow
Cook
Soup
Stew
Yoghurt
Sterilize
Steam
Multigrain
Egg
Maker
Meat
Poultry
Bean
Porridge
Mince
Low Mid High
Delay
Time
Cancel Start
Warm
Pressure
Selection
Sauté
Fish
Veg

7
PRE-PROGRAMMED 1-TOUCH SETTINGS GUIDE
PRE-
PROGRAMMED
FUNCTION
RICE
SOUP/
STEW
FISH/
VEGETABLE
MEAT/
POULTRY
BEAN/
MINCE
PORRIDGE
SLOW
COOK
YOGHURT
EGG
MAKER
SAUTÉ/
STERILIZE
MULTIGRAIN
STEAM
12 mins
35 mins
5 mins
15 mins
40 mins
25 mins
2 hrs
8 hrs
3 mins
5 mins
18 mins
10 mins
1-60 mins
1-60 mins
1-60 mins
1-60 mins
1-60 mins
1-60 mins
1-2 hrs
7-12 hrs
1-60 mins
1-60 mins
1-60 mins
1-60 mins
Yes
Yes
Yes
Yes
Yes
Yes
Yes
No
Yes
Yes
Yes
Yes
125°C
125°C
125°C
125°C
125°C
125°C
100°C
40°C
125°C
125°C
125°C
125°C
12 hrs
12 hrs
12 hrs
12 hrs
12 hrs
12 hrs
12 hrs
No
12 hrs
12 hrs
12 hrs
12 hrs
DEFAULT
COOKING
TIME
ADJUSTABLE
COOKING
TIME RANGE
MAX
COOKING
TEMPERATURE
KEEP
WARM
MODE
ABILITY
TO DELAY
START
(30 MINS-24 HOURS)
8
BEFORE FIRST USE
Remove any packing materials and labels from your SUPER CHEF 6. Be sure to remove the inner pot
and check for parts.
Be sure that all of the appliance parts are included and accounted for before you dispose of the packing
materials. You may however store the box and packing materials away to use at a later time.
Before you use your SUPER CHEF 6 for the rst time, wipe the cooker clean with a damp cloth. Clean
the lid and the removable inner pot. The removable inner pot can be cleaned with warm soapy water.
Do not put the removable pot in the dishwasher. Rinse with clean water, towel dry, and place it back
into the SUPER CHEF 6.
The lid seal ring may already be installed on the steam plate, if not, make sure that it is installed
properly on the steam plate.
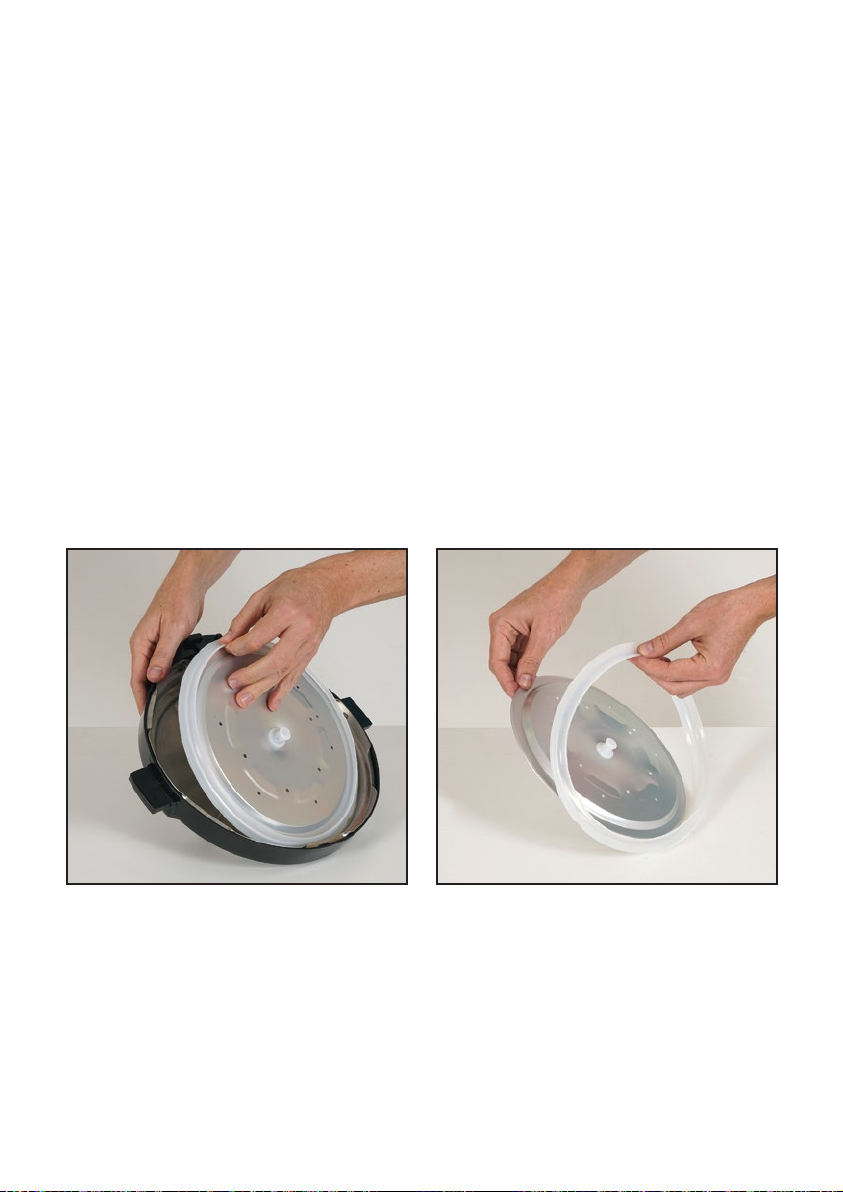
INSTALLING THE LID SEAL RING ON TO THE STEAM PLATE
Place the lid seal ring around the edge of the steam plate and turn it with your hand to secure it evenly.
NOTE: You can remove and clean the steam plate and lid seal ring after cooking. Follow the steps
below to remove the steam plate and lid seal ring:
Clean the steam plate and lid seal ring with warm soapy water. Make sure that they are completely dry
and correctly assembled before inserting back into the lid. Align the steam plate with the middle support
pin on the underside of the lid and press the steam plate down. After installation, check whether the
gap between the lid seal ring and the perimeter of the lid is even. Make sure it can be turned freely
prior to use. Be careful not to install it upside down (the steam plate does not protrude outward).
Remove the lid from the cooker and turn it upside
down. Gently remove the steam plate from the
underside of the lid as shown above.
Remove the lid seal ring from the steam plate as
shown above.

9
USING YOUR SUPER CHEF 6
1. Position the SUPER CHEF 6 on a dry at surface and away from any potential heat source
2. Put the water collector on to the side of the outer body by pushing it inwards
3. Plug the cord into the SUPER CHEF 6 and unwind the length of cord required to reach the mains
electrical outlet. Ensure the cord does not hang over the work surface edge
4. Open the SUPER CHEF 6 lid by holding the lid handle tightly and turning the lid in an anticlockwise
direction
5. Lift the lid upwards and place it on a clean, stable and dry surface
6. Remove the removable inner pot and place your solid and/or liquid ingredients inside of it
7. Wipe the bottom of the removable inner pot and the heating plate. Now place the removable inner
pot back into the SUPER CHEF 6. Turn the removable inner pot gently so that it is well seated on the
heating plate
8. Check that the lid seal ring and steam plate are correctly installed inside the lid
9. Now place the lid back on to the cooker, closing it properly. The lid features a safety lock pin. The
safety lock pin will depress (become exposed) when the lid is properly closed
10. Place the pressure limiting safety valve (vent) in the “SEALED” position and check whether the oat
valve is down. Note that the oat valve is down before heating
11. Plug the SUPER CHEF 6 into the mains electrical outlet and turn the SUPER CHEF 6 on. You will
notice that the heating light turns on and the LED screen will display 00:00. The cooker is now in
standby mode
12. Select your preferred pre-programmed 1-touch setting
13. The screen will display the default pressure for that setting, for example P12. The button indicator
light for the selected pre-programmed setting will illuminate
14. Press the START button to nalise your selections and start the cooking cycle. You will notice that the
pressure indicator light (Low, Mid or High) will also illuminate
Note that if the START button is not pressed within 20 seconds then the cooker will revert back to
standby mode.
NB! The cooking time does not start until there is enough heat and the pressure level has been reached.
15. While the cooker is heating up, the rst two digits on the LED screen will ash.
NOTE: if the pressure limiting safety valve is not placed in the “SEALED” position then it will vent
and release steam during the cooking cycle, resulting in foods being cooked under insufcient or
poor pressure.
Once sufcient pressure has generated inside the pot, the oat valve will automatically rise, further
locking the lid. Do not force the lid open.
You can press the CANCEL button at any time to cancel your previous selections or to cancel the
current cooking cycle. In the instance where you press the CANCEL button for this reason, the
display will show “0000”
16. Once the cooking cycle has completed, the cooker will enter WARM mode. Three indicator sounds
will be heard indicating that the cooking cycle has moved over to the keep warm cycle. The WARM
indicator light will now illuminate and the display will show “bb”
• When you are ready to begin releasing or venting pressure, set the pressure limiting safety valve to
the “EXHAUST” position. This will release all the pressure in the pot until the oat valve has moved
down. Once the oat valve has moved down, the lid can be opened safely. Note: Do not release
pressure (EXHAUST) if cooking foods with a high liquid content such as porridge, stew or soup, until
the pot has cooled naturally and the oat valve has moved down/ dropped to avoid the hot liquid
food from spraying from the vent pipe. You may cover the side of the cooker with a wet towel to
speed up the cooling process, however do not rinse the cooker with water at this time.
17. Unplug the Cord from the mains electrical outlet as well as from the cooker.
18. Hold the lid handle tightly and turn the lid in a clockwise direction to unlock, lift and remove it from
the cooker.
Note: During cooking, the heating plate will cycle on and off intermittently. This is normal as it does so to
maintain the correct balance of temperature and pressure inside the cooking pot. A small amount
of water may appear between the removable inner pot and the cookers inner walls – this is normal.
Note: The following scale pertains to cups of rice:
3L – 6 cups of rice
4L – 8 cups of rice
5L – 10 cups of rice
6L – 12 cups of rice
The ratio of rice to water is usually 1:1 (one cup of rice to one cup of water)
TIP: Rice will taste better if it is kept warm for no longer than 10 minutes with the lid remaining closed.
The taste of rice will be affected if cooking utensils are left in the pot.
SLOW COOKING
Slow cooking involves long, low-temperature cooking. It brings out avour in foods and helps tenderize
less-expensive cuts of meat. Slow cooking is ideally suited to delicious one-pot meals, soups, stews and
casseroles. Remember to add food and liquid into the removable inner pot when using this function.
Use the lid and set the pressure limiting safety valve to “EXHAUST”.
YOGHURT SETTING
Making delicious home-made yoghurt in your SUPER CHEF 6 is incredibly easy:
Pasteurize Milk
1. Fill the Removable Inner Pot with milk.
2. Select the SAUTÉ option and press START to begin the cooking process.
3. Press the CANCEL button once you notice that the milk starts to boil.
4. Remove the lid and use a thermometer to check the temperature of the milk.
Note: Milk must reach a minimum of 72°C for pasteurization to occur.
Add Starter Culture
5. Pour the milk from the Removable Inner Pot into a heat-proof container and allow it to cool down to
just below 43° Celsius. Clean the Removable Inner Pot.
6. After the milk has cooled down, whisk in your starter until it is fully incorporated with the milk.
Note: If using plain yoghurt as a starter, ensure that it contains an active culture. Mix in 2 tbsp of
yoghurt per 3.8L of milk, or follow a trusted recipe.
Ferment Yoghurt
7. Now transfer the milk and yoghurt mixture back into the Removable Inner Pot.
8. Secure the Lid on to the cooker, making sure that the Pressure Limiting Safety Valve is in the
“SEALED” position.
9. Select the YOGHURT button and press START. The longer you incubate your yoghurt, the thicker
and tangier it will be.
10. Once you are done incubating your yoghurt, use the quick-release venting method and carefully
open the lid once all the pressure has been released.
11. Mix the yoghurt and serve warm or store in the fridge.
Pressure Settings for Yoghurt Fermenting and Milk Pasteurizing:
• LOW – Suggested for lower temperature fermentation (e.g., Jiu Jiang, a sweet fermented glutinous
rice dessert). Ensure to adjust fermentation time based on your recipe
• MID – Suggested for fermenting milk after culture has been added. A longer fermentation will result
in tangier yoghurt.
• HIGH – Suggested for pasteurizing milk. For extra thick yoghurt, pasteurize milk twice
EGG MAKER
The egg maker function is ideally used for boiling eggs.
We recommend that you use at least two cups of water. Place the eggs directly in the water.
Use the cooking guidelines below to determine the amount of time and at which pressure level to use for
different types of eggs:
Soft Boiled: 1 minute (low pressure)
Medium Boiled: 2 minutes (low pressure)
Hard Boiled: 5 minutes (low pressure) or 2 minutes (high pressure)
SAUTÉ
The SAUTÉ option cooks small pieces of food rapidly and is often used to brown foods. It does not use
pressure and does not require use of the lid. However, when using this option you must never leave the
SUPER CHEF 6 unattended to prevent the food from burning.
Please leave the lid off of the SUPER CHEF 6 whilst using this function so that you can monitor the
browning colour and texture of the food.
NOTE: Do not leave the SUPER CHEF 6 unattended while using the SAUTÉ function.
STERILIZE
The convenient STERILIZE function can be used to sterilize items such as utensils, heat-resistant baby
equipment, baby bottles, water and canning jars for example.
You may choose to use a steam rack for this option however it depends on the task at hand. Ensure to
pour water into the removable inner pot. Replace the lid and set the pressure limiting safety valve to the
“SEALED” or “EXHAUST” position, depending on the task e.g. if pressure sterilization is required
(SEALED position) or if steam sterilization is required (EXHAUST position).
STEAM
This cooking option will bring liquid to a boil for steaming food. Use a suitably sized steam rack inside
the removable inner pot when using the this function. Ensure to ll the removable inner pot with liquid,
no higher than the steam rack.
ADJUSTING PRESSURE & COOKING TIME
As foods vary in size, thickness and density, you may prefer to personalise the amount of time and in
which type of pressure which you would like your foods to be cooked in.
The Bennett Read SUPER CHEF 6 allows you to control the colour, aroma and taste of foods, simply by
adjusting the cooking time and type of pressure.
1. While in STANDBY mode, select your preferred pre-programmed 1-touch setting. The display will
show the amount of cooking time relevant to each 1-touch setting
2. Press the “+/-“ button to adjust the amount of cooking time which you require. Each press increases
the amount of cooking time by 1 minute
3. Now press the PRESSURE button to select LOW, MEDIUM or HIGH pressure.
4. Press the START button to nalise your selections

10
1. Position the SUPER CHEF 6 on a dry at surface and away from any potential heat source
2. Put the water collector on to the side of the outer body by pushing it inwards
3. Plug the cord into the SUPER CHEF 6 and unwind the length of cord required to reach the mains
electrical outlet. Ensure the cord does not hang over the work surface edge
4. Open the SUPER CHEF 6 lid by holding the lid handle tightly and turning the lid in an anticlockwise
direction
5. Lift the lid upwards and place it on a clean, stable and dry surface
6. Remove the removable inner pot and place your solid and/or liquid ingredients inside of it
7. Wipe the bottom of the removable inner pot and the heating plate. Now place the removable inner
pot back into the SUPER CHEF 6. Turn the removable inner pot gently so that it is well seated on the
heating plate
8. Check that the lid seal ring and steam plate are correctly installed inside the lid
9. Now place the lid back on to the cooker, closing it properly. The lid features a safety lock pin. The
safety lock pin will depress (become exposed) when the lid is properly closed
10. Place the pressure limiting safety valve (vent) in the “SEALED” position and check whether the oat
valve is down. Note that the oat valve is down before heating
11. Plug the SUPER CHEF 6 into the mains electrical outlet and turn the SUPER CHEF 6 on. You will
notice that the heating light turns on and the LED screen will display 00:00. The cooker is now in
standby mode
12. Select your preferred pre-programmed 1-touch setting
13. The screen will display the default pressure for that setting, for example P12. The button indicator
light for the selected pre-programmed setting will illuminate
14. Press the START button to nalise your selections and start the cooking cycle. You will notice that the
pressure indicator light (Low, Mid or High) will also illuminate
Note that if the START button is not pressed within 20 seconds then the cooker will revert back to
standby mode.
NB! The cooking time does not start until there is enough heat and the pressure level has been reached.
15. While the cooker is heating up, the rst two digits on the LED screen will ash.
NOTE: if the pressure limiting safety valve is not placed in the “SEALED” position then it will vent
and release steam during the cooking cycle, resulting in foods being cooked under insufcient or
poor pressure.
Once sufcient pressure has generated inside the pot, the oat valve will automatically rise, further
locking the lid. Do not force the lid open.
You can press the CANCEL button at any time to cancel your previous selections or to cancel the
current cooking cycle. In the instance where you press the CANCEL button for this reason, the
display will show “0000”
16. Once the cooking cycle has completed, the cooker will enter WARM mode. Three indicator sounds
will be heard indicating that the cooking cycle has moved over to the keep warm cycle. The WARM
indicator light will now illuminate and the display will show “bb”
• When you are ready to begin releasing or venting pressure, set the pressure limiting safety valve to
the “EXHAUST” position. This will release all the pressure in the pot until the oat valve has moved
down. Once the oat valve has moved down, the lid can be opened safely. Note: Do not release
pressure (EXHAUST) if cooking foods with a high liquid content such as porridge, stew or soup, until
the pot has cooled naturally and the oat valve has moved down/ dropped to avoid the hot liquid
food from spraying from the vent pipe. You may cover the side of the cooker with a wet towel to
speed up the cooling process, however do not rinse the cooker with water at this time.
17. Unplug the Cord from the mains electrical outlet as well as from the cooker.
18. Hold the lid handle tightly and turn the lid in a clockwise direction to unlock, lift and remove it from
the cooker.
Note: During cooking, the heating plate will cycle on and off intermittently. This is normal as it does so to
maintain the correct balance of temperature and pressure inside the cooking pot. A small amount
of water may appear between the removable inner pot and the cookers inner walls – this is normal.
Note: The following scale pertains to cups of rice:
3L – 6 cups of rice
4L – 8 cups of rice
5L – 10 cups of rice
6L – 12 cups of rice
The ratio of rice to water is usually 1:1 (one cup of rice to one cup of water)
TIP: Rice will taste better if it is kept warm for no longer than 10 minutes with the lid remaining closed.
The taste of rice will be affected if cooking utensils are left in the pot.
SLOW COOKING
Slow cooking involves long, low-temperature cooking. It brings out avour in foods and helps tenderize
less-expensive cuts of meat. Slow cooking is ideally suited to delicious one-pot meals, soups, stews and
casseroles. Remember to add food and liquid into the removable inner pot when using this function.
Use the lid and set the pressure limiting safety valve to “EXHAUST”.
YOGHURT SETTING
Making delicious home-made yoghurt in your SUPER CHEF 6 is incredibly easy:
Pasteurize Milk
1. Fill the Removable Inner Pot with milk.
2. Select the SAUTÉ option and press START to begin the cooking process.
3. Press the CANCEL button once you notice that the milk starts to boil.
4. Remove the lid and use a thermometer to check the temperature of the milk.
Note: Milk must reach a minimum of 72°C for pasteurization to occur.
Add Starter Culture
5. Pour the milk from the Removable Inner Pot into a heat-proof container and allow it to cool down to
just below 43° Celsius. Clean the Removable Inner Pot.
6. After the milk has cooled down, whisk in your starter until it is fully incorporated with the milk.
Note: If using plain yoghurt as a starter, ensure that it contains an active culture. Mix in 2 tbsp of
yoghurt per 3.8L of milk, or follow a trusted recipe.
Ferment Yoghurt
7. Now transfer the milk and yoghurt mixture back into the Removable Inner Pot.
8. Secure the Lid on to the cooker, making sure that the Pressure Limiting Safety Valve is in the
“SEALED” position.
9. Select the YOGHURT button and press START. The longer you incubate your yoghurt, the thicker
and tangier it will be.
10. Once you are done incubating your yoghurt, use the quick-release venting method and carefully
open the lid once all the pressure has been released.
11. Mix the yoghurt and serve warm or store in the fridge.
Pressure Settings for Yoghurt Fermenting and Milk Pasteurizing:
• LOW – Suggested for lower temperature fermentation (e.g., Jiu Jiang, a sweet fermented glutinous
rice dessert). Ensure to adjust fermentation time based on your recipe
• MID – Suggested for fermenting milk after culture has been added. A longer fermentation will result
in tangier yoghurt.
• HIGH – Suggested for pasteurizing milk. For extra thick yoghurt, pasteurize milk twice
EGG MAKER
The egg maker function is ideally used for boiling eggs.
We recommend that you use at least two cups of water. Place the eggs directly in the water.
Use the cooking guidelines below to determine the amount of time and at which pressure level to use for
different types of eggs:
Soft Boiled: 1 minute (low pressure)
Medium Boiled: 2 minutes (low pressure)
Hard Boiled: 5 minutes (low pressure) or 2 minutes (high pressure)
SAUTÉ
The SAUTÉ option cooks small pieces of food rapidly and is often used to brown foods. It does not use
pressure and does not require use of the lid. However, when using this option you must never leave the
SUPER CHEF 6 unattended to prevent the food from burning.
Please leave the lid off of the SUPER CHEF 6 whilst using this function so that you can monitor the
browning colour and texture of the food.
NOTE: Do not leave the SUPER CHEF 6 unattended while using the SAUTÉ function.
STERILIZE
The convenient STERILIZE function can be used to sterilize items such as utensils, heat-resistant baby
equipment, baby bottles, water and canning jars for example.
You may choose to use a steam rack for this option however it depends on the task at hand. Ensure to
pour water into the removable inner pot. Replace the lid and set the pressure limiting safety valve to the
“SEALED” or “EXHAUST” position, depending on the task e.g. if pressure sterilization is required
(SEALED position) or if steam sterilization is required (EXHAUST position).
STEAM
This cooking option will bring liquid to a boil for steaming food. Use a suitably sized steam rack inside
the removable inner pot when using the this function. Ensure to ll the removable inner pot with liquid,
no higher than the steam rack.
ADJUSTING PRESSURE & COOKING TIME
As foods vary in size, thickness and density, you may prefer to personalise the amount of time and in
which type of pressure which you would like your foods to be cooked in.
The Bennett Read SUPER CHEF 6 allows you to control the colour, aroma and taste of foods, simply by
adjusting the cooking time and type of pressure.
1. While in STANDBY mode, select your preferred pre-programmed 1-touch setting. The display will
show the amount of cooking time relevant to each 1-touch setting
2. Press the “+/-“ button to adjust the amount of cooking time which you require. Each press increases
the amount of cooking time by 1 minute
3. Now press the PRESSURE button to select LOW, MEDIUM or HIGH pressure.
4. Press the START button to nalise your selections

11
1. Position the SUPER CHEF 6 on a dry at surface and away from any potential heat source
2. Put the water collector on to the side of the outer body by pushing it inwards
3. Plug the cord into the SUPER CHEF 6 and unwind the length of cord required to reach the mains
electrical outlet. Ensure the cord does not hang over the work surface edge
4. Open the SUPER CHEF 6 lid by holding the lid handle tightly and turning the lid in an anticlockwise
direction
5. Lift the lid upwards and place it on a clean, stable and dry surface
6. Remove the removable inner pot and place your solid and/or liquid ingredients inside of it
7. Wipe the bottom of the removable inner pot and the heating plate. Now place the removable inner
pot back into the SUPER CHEF 6. Turn the removable inner pot gently so that it is well seated on the
heating plate
8. Check that the lid seal ring and steam plate are correctly installed inside the lid
9. Now place the lid back on to the cooker, closing it properly. The lid features a safety lock pin. The
safety lock pin will depress (become exposed) when the lid is properly closed
10. Place the pressure limiting safety valve (vent) in the “SEALED” position and check whether the oat
valve is down. Note that the oat valve is down before heating
11. Plug the SUPER CHEF 6 into the mains electrical outlet and turn the SUPER CHEF 6 on. You will
notice that the heating light turns on and the LED screen will display 00:00. The cooker is now in
standby mode
12. Select your preferred pre-programmed 1-touch setting
13. The screen will display the default pressure for that setting, for example P12. The button indicator
light for the selected pre-programmed setting will illuminate
14. Press the START button to nalise your selections and start the cooking cycle. You will notice that the
pressure indicator light (Low, Mid or High) will also illuminate
Note that if the START button is not pressed within 20 seconds then the cooker will revert back to
standby mode.
NB! The cooking time does not start until there is enough heat and the pressure level has been reached.
15. While the cooker is heating up, the rst two digits on the LED screen will ash.
NOTE: if the pressure limiting safety valve is not placed in the “SEALED” position then it will vent
and release steam during the cooking cycle, resulting in foods being cooked under insufcient or
poor pressure.
Once sufcient pressure has generated inside the pot, the oat valve will automatically rise, further
locking the lid. Do not force the lid open.
You can press the CANCEL button at any time to cancel your previous selections or to cancel the
current cooking cycle. In the instance where you press the CANCEL button for this reason, the
display will show “0000”
16. Once the cooking cycle has completed, the cooker will enter WARM mode. Three indicator sounds
will be heard indicating that the cooking cycle has moved over to the keep warm cycle. The WARM
indicator light will now illuminate and the display will show “bb”
• When you are ready to begin releasing or venting pressure, set the pressure limiting safety valve to
the “EXHAUST” position. This will release all the pressure in the pot until the oat valve has moved
down. Once the oat valve has moved down, the lid can be opened safely. Note: Do not release
pressure (EXHAUST) if cooking foods with a high liquid content such as porridge, stew or soup, until
the pot has cooled naturally and the oat valve has moved down/ dropped to avoid the hot liquid
food from spraying from the vent pipe. You may cover the side of the cooker with a wet towel to
speed up the cooling process, however do not rinse the cooker with water at this time.
17. Unplug the Cord from the mains electrical outlet as well as from the cooker.
18. Hold the lid handle tightly and turn the lid in a clockwise direction to unlock, lift and remove it from
the cooker.
Note: During cooking, the heating plate will cycle on and off intermittently. This is normal as it does so to
maintain the correct balance of temperature and pressure inside the cooking pot. A small amount
of water may appear between the removable inner pot and the cookers inner walls – this is normal.
Note: The following scale pertains to cups of rice:
3L – 6 cups of rice
4L – 8 cups of rice
5L – 10 cups of rice
6L – 12 cups of rice
The ratio of rice to water is usually 1:1 (one cup of rice to one cup of water)
TIP: Rice will taste better if it is kept warm for no longer than 10 minutes with the lid remaining closed.
The taste of rice will be affected if cooking utensils are left in the pot.
SLOW COOKING
Slow cooking involves long, low-temperature cooking. It brings out avour in foods and helps tenderize
less-expensive cuts of meat. Slow cooking is ideally suited to delicious one-pot meals, soups, stews and
casseroles. Remember to add food and liquid into the removable inner pot when using this function.
Use the lid and set the pressure limiting safety valve to “EXHAUST”.
YOGHURT SETTING
Making delicious home-made yoghurt in your SUPER CHEF 6 is incredibly easy:
Pasteurize Milk
1. Fill the Removable Inner Pot with milk.
2. Select the SAUTÉ option and press START to begin the cooking process.
3. Press the CANCEL button once you notice that the milk starts to boil.
4. Remove the lid and use a thermometer to check the temperature of the milk.
Note: Milk must reach a minimum of 72°C for pasteurization to occur.
Add Starter Culture
5. Pour the milk from the Removable Inner Pot into a heat-proof container and allow it to cool down to
just below 43° Celsius. Clean the Removable Inner Pot.
6. After the milk has cooled down, whisk in your starter until it is fully incorporated with the milk.
Note: If using plain yoghurt as a starter, ensure that it contains an active culture. Mix in 2 tbsp of
yoghurt per 3.8L of milk, or follow a trusted recipe.
Ferment Yoghurt
7. Now transfer the milk and yoghurt mixture back into the Removable Inner Pot.
8. Secure the Lid on to the cooker, making sure that the Pressure Limiting Safety Valve is in the
“SEALED” position.
9. Select the YOGHURT button and press START. The longer you incubate your yoghurt, the thicker
and tangier it will be.
10. Once you are done incubating your yoghurt, use the quick-release venting method and carefully
open the lid once all the pressure has been released.
11. Mix the yoghurt and serve warm or store in the fridge.
Pressure Settings for Yoghurt Fermenting and Milk Pasteurizing:
• LOW – Suggested for lower temperature fermentation (e.g., Jiu Jiang, a sweet fermented glutinous
rice dessert). Ensure to adjust fermentation time based on your recipe
• MID – Suggested for fermenting milk after culture has been added. A longer fermentation will result
in tangier yoghurt.
• HIGH – Suggested for pasteurizing milk. For extra thick yoghurt, pasteurize milk twice
EGG MAKER
The egg maker function is ideally used for boiling eggs.
We recommend that you use at least two cups of water. Place the eggs directly in the water.
Use the cooking guidelines below to determine the amount of time and at which pressure level to use for
different types of eggs:
Soft Boiled: 1 minute (low pressure)
Medium Boiled: 2 minutes (low pressure)
Hard Boiled: 5 minutes (low pressure) or 2 minutes (high pressure)
SAUTÉ
The SAUTÉ option cooks small pieces of food rapidly and is often used to brown foods. It does not use
pressure and does not require use of the lid. However, when using this option you must never leave the
SUPER CHEF 6 unattended to prevent the food from burning.
Please leave the lid off of the SUPER CHEF 6 whilst using this function so that you can monitor the
browning colour and texture of the food.
NOTE: Do not leave the SUPER CHEF 6 unattended while using the SAUTÉ function.
STERILIZE
The convenient STERILIZE function can be used to sterilize items such as utensils, heat-resistant baby
equipment, baby bottles, water and canning jars for example.
You may choose to use a steam rack for this option however it depends on the task at hand. Ensure to
pour water into the removable inner pot. Replace the lid and set the pressure limiting safety valve to the
“SEALED” or “EXHAUST” position, depending on the task e.g. if pressure sterilization is required
(SEALED position) or if steam sterilization is required (EXHAUST position).
STEAM
This cooking option will bring liquid to a boil for steaming food. Use a suitably sized steam rack inside
the removable inner pot when using the this function. Ensure to ll the removable inner pot with liquid,
no higher than the steam rack.
ADJUSTING PRESSURE & COOKING TIME
As foods vary in size, thickness and density, you may prefer to personalise the amount of time and in
which type of pressure which you would like your foods to be cooked in.
The Bennett Read SUPER CHEF 6 allows you to control the colour, aroma and taste of foods, simply by
adjusting the cooking time and type of pressure.
1. While in STANDBY mode, select your preferred pre-programmed 1-touch setting. The display will
show the amount of cooking time relevant to each 1-touch setting
2. Press the “+/-“ button to adjust the amount of cooking time which you require. Each press increases
the amount of cooking time by 1 minute
3. Now press the PRESSURE button to select LOW, MEDIUM or HIGH pressure.
4. Press the START button to nalise your selections

12
The table below shows you the adjustable time range and pressure range for each pre-programmed
1-touch setting:
Note: The cooking time does not start until there is enough heat and the pressure level has been reached.
PRE-
PROGRAMMED
FUNCTION
RICE
SOUP/
STEW
FISH/
VEGETABLE
MEAT/
POULTRY
BEAN/
MINCE
PORRIDGE
SLOW
COOK
YOGHURT
EGG
MAKER
SAUTÉ/
STERILIZE
MULTIGRAIN
STEAM
12 mins
35 mins
5 mins
15 mins
40 mins
25 mins
2 hrs
8 hrs
3 mins
5 mins
18 mins
10 mins
1-60 mins
1-60 mins
1-60 mins
1-60 mins
1-60 mins
1-60 mins
1 hr - 12 hrs
7 hrs - 12 hrs
1-60 mins
1-60 mins
1-60 mins
1-60 mins
16 mins
60 mins
10 mins
30 mins
60 mins
35 mins
3 hrs
9 hrs
5 mins
10 mins
25 mins
20 mins
12 mins
35 mins
5 mins
15 mins
40 mins
25 mins
2 hrs
8 hrs
3 mins
5 mins
18 mins
10 mins
8 mins
25 mins
3 mins
10 mins
20 mins
15 mins
1 hr
7 hrs
1 min
1 min
10 mins
5 mins
DEFAULT
COOKING
TIME
ADJUSTABLE
COOKING
TIME RANGE
MID HIGHLOW

13
KEEP WARM MODE
The ideal function when you need to reheat cold food or keep your dishes warmed to serving
temperature while entertaining. The SUPER CHEF 6 will automatically switch to this mode after each
cooking cycle. You can also use this mode independently by pressing the WARM button once your
cooker has turned on. The WARM button indicator light will illuminate and the display will show “bb”.
DELAY START/ DELAYED COOKING TIME
This setting allows you to begin cooking food up to 24 hours later in half hour increments.
NOTE: Perishable foods, such as meats, poultry, sh, cheese, and dairy products cannot be left at room
temperature for more than two hours, not longer than one hour when the temperature of the room is
above 32° Celcius. Be sure to set the delay timer to no more than 2 hours.
Whilst in STANDBY mode, press the DELAY TIME button to delay the start time of the cooking function.
Each press increases the amount of delayed time by 30 minutes. Starting from 30 minutes up to 24
hours.
1. For example, if you would like the SUPER CHEF 6 to cook rice in 1.5 hours time, press the DELAY
TIME button and adjust the time to 01:30.
2. Now select your preferred pre-programmed 1-touch setting. The 1-touch setting button indicator will
illuminate and the display will show “P12”.
3. Press the START button to nalise your selections. The display will now show 01:30 as required and
start counting down whilst in STANDBY mode. The cooking cycle will start 1.5 hours later.
BUILT-IN MEMORY
The SUPER CHEF 6 features convenient built-in memory. Should the power cut off suddenly due to a
power failure on your property or in your residential area, during the operation of your SUPER CHEF 6 ,
the SUPER CHEF 6 will resume the last pre-programmed cooking cycle.
CARE AND CLEANING
1. Always unplug the SUPER CHEF 6 and let it cool down before cleaning
2. Only use a damp, soft cloth or sponge to wipe the SUPER CHEF 6 Outer Body. Do not immerse or
spray the SUPER CHEF 6 with any kind of liquid
3. Remove the water collector by gently pulling it outwards. Clean it with warm soapy water. Rinse and
dry thoroughly. Put the water collector back by gently pushing it back in
4. Take out the removable inner pot and clean it with warm soapy water. Always use a sponge or soft
cloth to clean the pot. Do not use abrasive pot scourers that will damage the non-stick coating
5. Clean the inner side of the lid, including the lid seal ring, pressure limiting safety valve,
blockage-proof cover, vent pipe and oat valve with a soft, damp cloth
LID SEAL RING CLEANING INSTRUCTIONS:
Remove the steam plate as shown on page 8. After cleaning, reassemble the steam plate and lid seal
ring. Align the steam plate with the middle support pin on the underside of the lid and press the steam
plate down. After installation, check whether the gap between the lid seal ring and the perimeter of the
lid is even. Make sure it can be turned freely prior to use. Be careful not to install it upside down (the
steam plate does not protrude outward).

14
BLOCKAGE-PROOF COVER CLEANING FLOAT VALVE CLEANING
After removing the steam plate, remove the
blockage-proof cover by pulling it outwards as
shown above.
Move the oat valve up and down gently by
hand. Rinse the seal ring of the oat valve with
water.
PRESSURE LIMITING SAFETY VALVE (VENT) CLEANING
Lift the pressure limiting safety valve body and clean it with water. Now use a steel needle or wire (less
than 3mm in diameter) to remove any deposits which may be jammed or stuck in the vent pipe. Rinse
them with water. Place the pressure limiting safety valve body on the pressure limiting safety valve seat.
Be careful not to damage the nish of the vent pipe when clearing deposits from the vent pipe.
Note that there is a release preventer on the vent valve. Lift it up slightly when taking it out. Press down
when re-installing it.
STORAGE
• Ensure that all parts are dry before storing
• Never store the appliance while it is still wet or dirty
• Store the appliance in its box in a clean, dry place
• Never wrap the power cord around the appliance

15
The oat valve will not rise Add food and water according to the
directions.
Too little food and water inside the
removable inner pot
Send to an authorized Tevo repair
centre. See page 17 for contact details.
Leakage around the lid or the pressure
limiting safety valve.
Correct its position.The pressure limiting safety valve is not
in the PRESSURE position.
TROUBLESHOOTING
PROBLEM POSSIBLE CAUSE SOLUTION
Difcult to close the lid Put the lid seal ring correctly in
place.
Gently push the rod with your hand.
Difcult to open the lid Gently lift up the oat valve using
chopsticks to release steam until the
oat valve drops, then turn the lid to
open it.
The lid seal ring is not in place.
The oat valve has jammed the push rod.
The oat valve does not drop down after
the steam and pressure has been
vented/ released.
Steam leaking around
the lid Place the lid seal ring correctly on to
the lid.
Clean the lid seal ring.
Lid seal ring has not been put on to the
lid or has not been placed correctly.
Food is stuck in the lid seal ring.
Replace the lid seal ring. See page 16
for contact details.
Damaged or worn lid seal ring.
Check that the lid is secured according
to the directions.
The lid is not properly secured.
Steam leaking around the
oat valve Clean the seal ring of the oat valve.Food stuck in the seal ring of the oat
valve.
Replace the seal ring of the oat valve.
See page 17 for contact details.
The seal ring of the oat valve is worn
out.

TROUBLESHOOTING
PROBLEM POSSIBLE CAUSE SOLUTION
Abnormal heating Replace the removable inner pot.
See page 17 for replacement parts
contact details.
Adjust the removable inner pot and t
it correctly into the cooker, with the
bottom of the pot rmly seated on the
heating plate.
The bottom of the removable inner pot
has become deformed.
There is a poor connection between the
removable inner pot and the heating
plate.
Rice is half cooked or too
hard Add water accordingly.
After the cooking cycle completes,
leave the lid on for 5 more minutes.
Too little water.
Rice is too soft
E1
Reduce water accordingly.Too much water.
Send to an authorized Tevo Repair
Centre. See pg 17 for contact details.
The sensor’s circuit is broken.
E2 Send to an authorized Tevo Repair
Centre. See pg 17 for contact details.
The sensor’s circuit has electrically
shorted.
E3 Add more water into the removable
inner pot for cooking.
The temperature inside the appliance
is too high.
E4 Send to an authorized Tevo Repair
Centre. See pg 17 for contact details.
Pressure cannot build up or the
pressure switch can no longer turn
off.
Lid opened too soon.
16
Table of contents
Other Bennett Read Kitchen Appliance manuals


