Berker 4582 Product guide

Bedienungs- und
Montageanleitung
Operating and
assembly instructions
4582
WLAN Access-Point UP
WLAN Access-Point
fl ush-mounted
4583
WLAN Access-Point UP, PoE
WLAN Access-Point
fl ush-mounted, PoE
e
z
Berker GmbH & Co. KG - Klagebach 38 - 58579 Schalksmühle/Germany - Telefon: +49 (0) 23 55/90 5-0 - Telefax: +49 (0) 23 55/90 5-111 - www.berker.com - 6LE001255A - 03/2015
6LE001255A
Sicherheitshinweise
Einbau und Montage elektrischer Geräte dürfen
nur durch eine Elektrofachkraft gemäß den ein-
schlägigen Installationsnormen, Richtlinien,
Bestimmungen, Sicherheits- und Unfallverhü-
tungsvorschriften des Landes erfolgen.
Gefahr durch elektrischen Schlag. Vor Arbeiten
am Gerät freischalten. Dabei alle Leitungs-
schutzschalter berücksichtigen, die gefährliche
Spannungen an das Gerät liefern.
Bei Nichtbeachtung der Anleitung können
Schäden am Gerät, Brand oder andere Gefah-
ren entstehen.
Diese Anleitung ist Bestandteil des Produktes
und muss beim Endkunden verbleiben.
Geräteaufbau
(8)
(7)
(9)
(1)
(4)
(3)
(6)
(5)
Bild 1: Frontansicht WLAN Access-Point
(7)
(9)
(2)
(4)
(3)
(6)
(5)
Bild 2: Frontansicht WLAN Access-Point, PoE
(1) 5-poliger Klemmblock
(2) 9-poliger Klemmblock
(3) Kontaktstifte
(4) Position Reedkontakt für Reset
(5) blaue LED (WLAN)
(6) orange LED (LAN)
(7) RJ45 Buchse
(8) Anschluss Netzspannung
(9) grüne Kontroll-LED für die an den Klemm-
block (1, 2) angeschlossene Netzwerkleitung
Funktion
Der WLAN Access-Point erweitert die Nutzungs-
möglichkeiten moderner Netzwerktechnologien für
mobile Endgeräte bei geringer Leistungsaufnahme
und Funk-Emission. Über weitere Einstellungen
ist das Gerät von anderen Access-Points abgrenz-
bar, um Überkopplungen der WLAN-Bereiche und
Einbußen bei den Datenraten zu vermeiden.
Dieses Gerät kann in drei Betriebsarten verwendet
werden – und zwar als:
- Zugangspunkt, Access-Point, für drahtlos kom-
munizierende Geräte
- Repeater, um die Reichweite im WLAN-Netz-
werk zu erhöhen
- Client zum Anschluss an Geräte, die über kei-
nen eigenen WLAN-Adapter verfügen.
Ausführliche Informationen zu Konfi guration
und Einstellungen sind zum Download verfüg-
bar unter www.berker.de.
Bestimmungsgemäßer Gebrauch
- ausschließlich für den Betrieb im Innenbereich
geeignet
- Montage in Gerätedose nach DIN 49073
Bedienung
LED-Anzeigen
Zwei farbige LEDs beleuchten die RJ45-Buchse
und zeigen an, in welchem Status sich die Netz-
werkfunktionen des Access-Points befi nden.
Anzeige Status
blaue LED (5)
leuchtet dauerhaft
WLAN ist aktiv.
blaue LED (5)
blinkt
Reset startet.
Gerät wird neu gestartet.
orange LED (6)
leuchtet dauerhaft
LAN ist aktiv, Verbindung
steht.
orange LED (6)
blinkt
LAN ist aktiv, Datentrans-
fer erfolgt.
Oder:
Gerät wird auf Werksein-
stellungen zurückgesetzt.
Tabelle 1: Anzeigen an den Status LEDs
Gerät neu starten
Wenn das Gerät nicht einwandfrei funktioniert,
kann es erforderlich sein, das Gerät neu zu star-
ten.
Einen Dauermagneten für 2 .. 4 Sekunden über
die Position des Reedkontakts (4) an die Abde-
ckung des Access-Points halten.
Der Reedkontakt am Access-Point wird ausge-
löst. Die blaue LED (5) blinkt. Der Reset startet.
Gerät auf Werkseinstellungen zurücksetzen
Einen Dauermagneten für 5 .. 10 Sekunden
über die Position des Reedkontakts (4) an die
Abdeckung des Access-Points halten.
Der Reedkontakt am Access-Point wird aus-
gelöst. Die orange LED (6) blinkt. Das Gerät
startet neu und lädt die Werkseinstellungen.
Wenn kein Zugriff auf den Access-Point mehr
möglich ist, bitte gemäß der Konfi gurations-
Anleitung unter www.berker.de vorgehen.
Informationen für Elektrofachkräfte
Montage und elektrischer Anschluss
Montage und elektrischer Anschluss
GEFAHR!
Elektrischer Schlag bei Berühren
spannungsführender Teile.
Elektrischer Schlag kann zum Tod
führen.
Vor Arbeiten am Gerät Anschlusslei-
tungen freischalten und spannungs-
führende Teile in der Umgebung abde-
cken!
ç
Das Gerät ist unbedingt in einer Höhe von
0,3 … 1,1 m zu montieren, damit die Funktions-
sicherheit gewährleistet ist.
WLAN Access-Point (Bestell-Nr.: 4582)
Gerät an Spannungsversorgung anschließen
N
L
(8)
Bild 3: Anschluss Versorgungsspannung
Stromführende Leitungen und Netzwerkkabel
sind grundsätzlich getrennt voneinander zur
Gerätedose zu verlegen.
Netzkabel von unten in die Gerätedose führen.
Kabel ausreichend abisolieren und Leitungen
an den Steckklemmen (8) anschließen (Bild 3).
Zum Lösen der Steckklemmen die Rastnase
z. B. mit einem kleinen Schlitz-Schraubendre-
her runterdrücken und die Leitungen herauszie-
hen.
Die Spannungsversorgung aktiver Komponen-
ten, wie von diesem Gerät oder einem PC, ist
von der anderer Verbraucher zu trennen, um
Störungen im Netzwerk zu vermeiden. Dazu
einen eigenen Stromkreis abgesichert durch
Leitungstrenn- oder Leitungsschutzschalter und
zusätzlich bei Bedarf einen geeigneten Über-
spannungsschutz einsetzen. Stromkreis und
angeschlossene Steckdosen sind eindeutig,
z. B. mit EDV zu kennzeichnen.
Netzwerkkabel anschließen
Netzwerkkabel von oben in die Gerätedose
führen.
Kabel auf ca. 90 mm Länge ab Boden der
Gerätedose kürzen.
Kabel auf ca. 80 mm abisolieren. Dabei die
Paarschirmung sowie Verdrillung der Paare und
Adern so weit wie möglich beibehalten.
Den äußeren Schirm Sverdrillen und bei Bedarf
in einer Aderendhülse (1 mm²) fi xieren.
5-poligen Klemmblock (1) vom Gerät abziehen
und die Adern entsprechend vorgegebener
Farbcodierung aufl egen (Tabelle 2). Nicht benö-
tigte Adern abschneiden.
Die Belegungen auf dem Klemmblock müssen
mit denen des Patchfeldes im Netzwerk über-
einstimmen.
Klemmblock (1) auf die Kontaktstifte (3) stecken
(Bild 4).
Gerät in Gerätedose montieren.
Abdeckung aufschrauben.
Spannungsversorgung einschalten.
Gerät ist mit den Werkseinstellungen betriebs-
bereit. Für individuelle Einstellungen kann eine
Konfi guration vorgenommen werden.
Bezeichnung Klemme 6 3 2 1
Belegung S
Tabelle 2: Belegung am Klemmblock (1) des
WLAN Access-Points
Bild 4
WLAN Access-Point, PoE (Bestell-Nr. 4583)
Netzwerkkabel anschließen
Netzwerkkabel vorzugsweise von unten in die
Gerätedose führen.
Kabel auf ca. 90 mm Länge ab Boden der
Gerätedose kürzen.
Kabel auf ca. 80 mm abisolieren. Dabei die
Paarschirmung sowie Verdrillung der Paare und
Adern so weit wie möglich beibehalten.
Den äußeren Schirm Sverdrillen und bei Bedarf
in einer Aderendhülse (1 mm²) fi xieren.
9-poligen Klemmblock (2) vom Gerät abziehen
und die Adern entsprechend vorgegebener
Farbcodierung aufl egen (Tabelle 3).
Die Belegungen auf dem Klemmblock (2) müs-
sen mit denen des Patchfeldes im Netzwerk
übereinstimmen.
Klemmblock auf die Kontaktstifte (3) stecken
(Bild 5).
Gerät in Gerätedose montieren.
Abdeckung aufschrauben.
Gerät ist mit den Werkseinstellungen betriebs-
bereit. Für individuelle Einstellungen kann eine
Konfi guration vorgenommen werden.
Bezeichnung
Klemme
8754632 1
Belegung S
Tabelle 3: Belegung am Klemmblock (2) des
WLAN Access-Points, PoE
Bild 5
Hinweise zur Konfi guration
Es wird empfohlen, die Erstkonfi guration mit
Patchkabel über LAN-Schnittstelle des Gerätes
vorzunehmen.
Die WLAN IP-Adresse des konfi gurierenden
Gerätes muß im Bereich 192.168.0.xxx
(x ≥ 0 ≤ 2 55, x ≠ 5), Subnet: 255.255.255.0
liegen.
Nach der Erstkonfi guration sollte unbedingt das
Passwort geändert werden. Bei Änderung von
Passwort oder SSID keine Leerzeichen, Zahlen
oder Zeichen wie z. B. ä, ü, ö, oder ß verwen-
den.
Gerät über Patchkabel konfi gurieren
Die RJ45-Buchse (7) am Access-Point über ein
Patchkabel mit der LAN-Schnittstelle z. B. eines
PCs verbinden.
Im Internet-Browser die IP-Adresse
http://192.168.0.5 eingeben.
Mit dem Passwort admin anmelden.
Das Passwort admin gilt für den Auslieferungs-
zustand.
Gerät über WLAN konfi gurieren
In den WLAN-Einstellungen des zur Konfi gura-
tion vorgesehenen Gerätes, wie z. B. eines Tab-
let-PCs, den WLAN Access-Point auswählen.
Der Access-Point meldet sich mit dem WLAN-
Namen (SSID) Berker im Netzwerk an.
Mit dem WLAN-Passwort wireless123 am
Access-Point anmelden.
Im Internet-Browser die IP-Adresse
http://192.168.0.5 eingeben.
Mit dem Passwort admin anmelden.
Das Passwort admin gilt für den Auslieferungs-
zustand.
Anhang
Technische Daten
RJ45-Anschlussbuchse 10/100 MBit/s
Funkbereich 2,4 GHz
Funk-Datenrate 150 MBit/s
Funk-Standard IEEE 802.11 b/g/n
Verschlüsselungen WEP, WPA, WPA2
Betriebstemperatur -5 ... +45 °C
Schutzgrad gem. DIN 60529 IP20
WLAN Access-Point UP, Best.-Nr. 4582
Nennspannung 100 … 240 V ~
Netzfrequenz 50…60 Hz
Leistungsaufnahme 1,8 W
Leiterquerschnitt (Netzkabel) max. 2,5 mm2
WLAN Access-Point UP, PoE, Best.-Nr. 4583
Spannungsversorgung
gem. IEEE803.2at (Klasse 0) 48 V, PoE
Leistungsaufnahme ≤ 3 W
PoE-Speisung an RJ45-Buchse
gem. IEEE803.2at (Klasse 2) 48 V/6,49 W
Gewährleistung
Technische und formale Änderungen am Produkt,
soweit sie dem technischen Fortschritt dienen,
behalten wir uns vor.
Wir leisten Gewähr im Rahmen der gesetzlichen
Bestimmungen.
Im Gewährleistungsfall bitte an die Verkaufsstelle
wenden.
e

Berker GmbH & Co. KG - Klagebach 38 - 58579 Schalksmühle/Germany - Telefon: +49 (0) 23 55/90 5-0 - Telefax: +49 (0) 23 55/90 5-111 - www.berker.com - 6LE001255A - 03/2015
Safety instructions
Electrical equipment may only be installed and
assembled by a qualifi ed electrician in ac-
cordance with the relevant installation stan-
dards, guidelines, regulations, directives, safe-
ty and accident prevention regulations of the
country.
Hazard due to electric shock. Disconnect befo-
re working on the device. Take into account all
circuit breakers that supply dangerous volta-
ges to the device.
Failure to comply with these instructions may
result in damage to the device, fi re, or other ha-
zards.
These instructions are an integral component
of the product and must be retained by the end
user.
Design and layout of the device
(8)
(7)
(9)
(1)
(4)
(3)
(6)
(5)
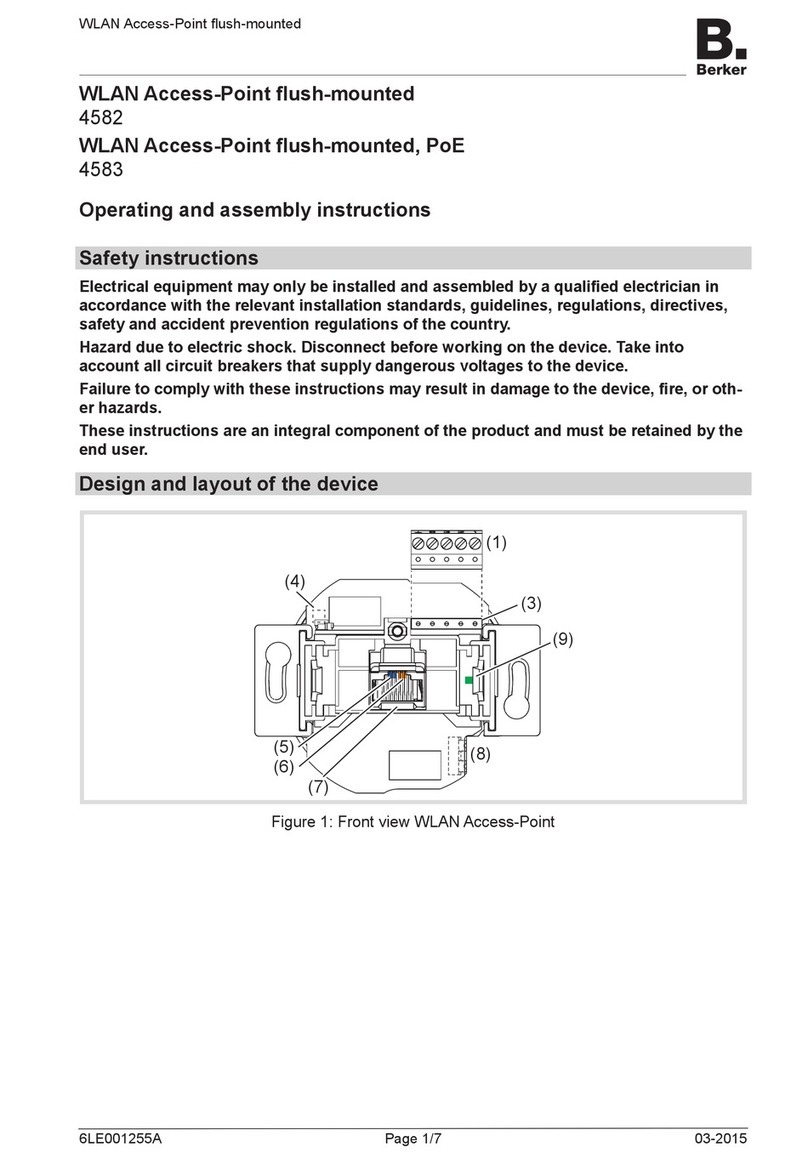
Figure 1: Front view WLAN Access-Point
(7)
(9)
(2)
(4)
(3)
(6)
(5)
Figure 2: Front view WLAN Access-Point, PoE
(1) 5pole terminal block
(2) 9pole terminal block
(3) Contact pins
(4) Position reed contact for reset
(5) blue LED (WLAN)
(6) orange LED (LAN)
(7) RJ45 jack
(8) Mains voltage connection
(9) green control LED for the network cable con-
nected to terminal block (1, 2)
Function
The WLAN Access-Point extends the possible
uses of modern network technologies for mobile
end devices with low power consumption and
radio emission. Additional settings can limit the
device from other Access-Points in order to prevent
overcoupling of the WLAN areas and losses of the
data rates.
This device can be used in three operating modes
– namely as:
- Access-Point for wirelessly communicating de-
vices
- Repeater for increasing the range in the WLAN
network
- Client for connecting to devices that do not ha-
ve their own WLAN adapter.
Detailed information on confi guration and
settings are available for downloading at www.
berker.de.
Correct use
- only suitable for operation in indoor areas
- Installation into wall box according to DIN
49073
Operation
LED displays
Two coloured LEDs illuminate the RJ45 jack and
indicate what status the network functions of the
Access-Points are in.
Display Status
blue LED (5)
lights up perma-
nently
WLAN is active.
blue LED (5)
fl ashes
Reset starts. The device is
restarted.
orange LED (6)
lights up perma-
nently
LAN is active, a connec-
tion is available.
orange LED (6)
fl ashes
LAN is active, data trans-
fer takes place.
Or:
Device is reset to factory
settings.
Table 1: Displays on the status LEDs
Restart device
If the device does not function properly, it might be
necessary to restart the device.
Keep a permanent magnet over the position of
the reed contact (4) on the cover of the Access-
Point for 2 ...4 seconds.
The reed contact on the Access-Point is trigge-
red. The blue LED (5) fl ashes. Reset starts.
Reset device to factory settings
Keep a permanent magnet over the position of
the reed contact (4) on the cover of the Access-
Point for 5 ..10 seconds.
The reed contact on the Access-Point is trig-
gered. The orange LED (6) fl ashes The device
restarts and loads the factory settings.
If access to the Access-Point is no longer possi-
ble, please proceed according to the confi gura-
tion instructions at www.berker.de.
Information for electricians
Installation and electrical connection
DANGER!
Touching live parts can result in an
electric shock.
An electric shock can be lethal.
Disconnect the connecting cables
before working on the device and
cover all live parts in the area!
ç
It is imperative to install the device at a height
of
0.3 … 1.1 m to ensure functional reliability.
WLAN Access-Point (Order no.: 4582)
Connect device to power supply
N
L
(8)
Figure 3: Connection supply voltage
Live cables and network cables must always be
laid separately from each other to the wall box.
Run the mains cable into the wall box from
below.
Strip cable adequately and connect cables to
the plug-in terminals (8) (Figure 3).
To release the plug-in terminal, press down
the retaining lug e.g. using a small fl at-bladed
screwdriver and pull out the cables.
The power supply of active components, such
as from this device or from a PC, must be
disconnected from the other consumers in order
to prevent any disruptions in the network. For
this purpose, use a separate circuit secured by
an automatic cutout or circuit breaker as well as
appropriate overvoltage protection if necessary.
The circuit and connected socket outlets must
be labelled clearly e.g. with EDV.
Connect network cable
Run the mains cable into the wall box from
above.
Shorten the cable to a length of approx. 90 mm
from the bottom of the wall box.
Strip the cable to approx. 80 mm. When doing
so, keep the pair shielding and twist of the pair
and wires as far as possible.
Twist the outer shielding S and affi x it in a con-
ductor sleeve (1 mm²) if necessary.
Pull off 5pole terminal block (1) from the device
and lay the wires according to the prescri-
bed colour coding (Table 2). Cut off wires not
required.
The assignments on the terminal block must
match those of the patch panel in the network.
Mount terminal block (1) onto the contact pins
(3) (Figure 4).
Mount the device into the wall box.
Unscrew cover.
Switch ON power supply.
Device with the factory settings is ready for
operation. A confi guration for individual settings
can be made:
Designation terminal 6 3 2 1
Assignment S
Table 2: Assignment on the terminal block (1) of
the WLAN Access-Point
Figure 4
WLAN Access-Point, PoE (order no. 4583)
Connect network cable
Run the mains cable preferably into the wall
box from below.
Shorten the cable to a length of approx. 90 mm
from the bottom of the wall box.
Strip the cable to approx. 80 mm. When doing
so, keep the pair shielding and twist of the pair
and wires as far as possible.
Twist the outer shielding S and affi x it in a con-
ductor sleeve (1 mm²) if necessary.
Pull off 9pole terminal block (2) from the device
and lay the wires according to the prescribed
colour coding (Table 3).
The assignments on the terminal block (2) must
match those of the patch panel in the network.
Mount terminal block onto the contact pins (3)
(Figure 5).
Mount the device into the wall box.
Unscrew cover.
Device with the factory settings is ready for
operation. A confi guration for individual settings
can be made.
Designation
terminal
8754632 1
Assignment S
Table 3: Assignment on the terminal block (2) of
the WLAN Access-Point, PoE
Figure 5
Information regarding confi guration
It is advisable to carry out the Initial confi gurati-
on with patch cable via the LAN interface of the
device.
The WLAN IP-address of the confi guring device
must be within the range 192.168.0.xxx
(x ≥ 0 ≤ 2 55, x ≠ 5), subnet: 255.255.255.0.
After the initial confi guration, the password
should defi nitely be changed. When changing
the password or SSD, do not use any spaces,
numbers or characters such as ä, ü, ö, or ß.
Confi gure device via patch cable
Connect the RJ45 jack (7) at the Access-Point
via a patch cable to the LAN interface e.g. via
a PC.
In the Internet browser enter the IP address
http://192.168.0.5.
Log on with the password admin.
The password admin applies to the default
state.
Confi gure device via WLAN
In the WLAN settings of the devices intended
for the confi guration, such as a tablet PC, select
the the WLAN Access-Point.
The Access-Point logs on in the network with
the WLAN name (SSID) Berker.
Log on at the Access-Point with the WLAN
password wireless123.
In the Internet browser enter the IP address
http://192.168.0.5.
Log on with the password admin.
The password admin applies to the default
state.
Appendix
Technical data
RJ45 connection socket 10/100 MBit/s
Radio range 2.4 GHz
Radio data rate 150 MBit/s
Radio standard IEEE 802.11 b/g/n
Encryptions WEP, WPA, WPA2
Operating temperature -5 ... +45 °C
Degree of protection accord. to DIN 60529 IP20
WLAN Access-Point UP, order no. 4582
Rated voltage 100 … 240 V ~
Mains frequency 50…60 Hz
Power consumption 1.8 W
Conductor cross-section (mains cable) max. 2.5
mm2
WLAN Access-Point fl ush-mounted, PoE, order
no. 4583
Power supply
accord. to IEEE803.2at (class 0) 48 V, PoE
Power consumption ≤ 3 W
PoE supply to RJ45 jack
accord. to IEEE803.2at (class 2) 48 V/6.49 W
Warranty
We reserve the right to make technical and formal
changes to the product in the interest of technical
progress.
Our products are under guarantee within the scope
of the statutory provisions.
If you have a warranty claim, please contact the
point of sale or ship the device postage free with a
description of the fault to the appropriate regional
representative.
z
This manual suits for next models
1
Table of contents
Languages:
Other Berker Wireless Access Point manuals
