BERMAD BIC1 User manual
User Manual
Landscape
Irrigation
Controller
Drip Irrigation | Micro Sprinklers | Sprinklers

1
Table of Contents
Page
1 Introduction 2
2 About BERMAD BIC 1Controller 2
3 Components Identification 2
4 LCD Display and Keyboard 3-4
5 Installing the Batteries 4
6 Programming the Controller 5
7 Setting Time & Date 6-7
8 Setting Irrigation Days Schedule 8-11
9 Setting Irrigation Start Time 12-13
10 Setting Irrigation Duration 14-15
11 Setting Optional Rain Delay 16
12 Manual Irrigation 17
13 Rain Gauge Connections 18
14 Replacing the Batteries 19
15 Maintenance, Troubleshooting and Repairs 20-21

2
11
10
8
7
6
9
5
4
3
2
1
1. Introduction
2. About BERMAD BIC 1 Controller
3. Components Identification
Thank you for purchasing BERMAD’s BIC 1 Single Station Battery
Operated Irrigation Controller. This manual describes how to get the BIC
1 Controller up and running quickly.
After reading this manual and becoming familiar with the Controller’s
basic functionality, the user may further use this manual as a reference
for the controller’s less common tasks and operations.
The BIC 1 controls a single irrigation station or a single irrigation section
and is powered by two AA Alkaline batteries that can last for up to 3
years. The controller includes a rain sensor connection for efficient and
economical water usage.
The controller enclosed in a compact, outdoor waterproof housing that
protects it from the elements.
1. Lid
2. Quick reference guide
3. LCD display with icon based functions
4. 7 buttons keypad used for programming,
system on/off, manual run and reviewing
programs.
5. Batteries compartment cover for
two AA alkaline batteries (not included).
6. Rain sensor Yellow wire connection
7. Solenoid connection spiral cable
8. DC solenoid
9. Flow control selector
10. Manual operation valve
11. Irrigation valve

3
1
2
3
8
7
6
5
4
11
12
10
9
4. LCD Display and Keyboard
LCD Display
1. Time and Date Icon - Indicates current time and day.
2. Rain Sensor Icon - Appears when a rain sensor is active or when the
yellow wire loop has been cut and watering is halted.
3. Watering Icon – Appears when valve is open.
4. Set Irrigation Days Icon – Select specific irrigation days, odd/even days,
irrigation every X hours, or irrigation in up to every 30 days interval.
hours, or up to once every 30 days.
5. Start-time Icon – Set up to 4 start times per day.
6. Run-time Icon – Select irrigation duration from 1 minute up to 5 hours
and 59 minutes.
7. Rain Delay Icon – Enables irrigation delay from 1 to 99 days, irrigation
resumes automatically.
8. Manual Start Icon – Appears when the manual start button is pressed.
9. Battery Level Indicator – Flashes when the batteries are low and need to
be replaced.
10. Days of the Week Icons – The irrigating days of the week are underscored.
11. Current Month Icon - Displays the current month.
12. Current Year Icon - Displays the current year.

4
Keypad control buttons:
Select programming mode
Turn program(s) ON/OFF
Start/stop a manual cycle
Move left/right to select a value
Raise/lower the selected value
4. LCD Display and Keyboard (cont.)
5. Installing the Batteries
1. Open the batteries compartment cover by turning it counter-clockwise.
2. Install two, fresh, brand name, AA alkaline batteries (not included).
Attention: note for the proper polarity direction as marked on the bottom
underside of the controller’s housing
3. Insert and screw the batteries cover clockwise. Tighten the cover firmly
with hand force only. The controller display starts with the day, PM, and the
hour digit flashing. The controller is ready for programming.

5
6. Programming the Controller
The BIC 1 controller can be programmed for the following irrigation methods:
●
Irrigation on selected days of the week
●
Irrigation on even days of the week only
●
Irrigation on odd days of the week only
●
Irrigation cycle set between every hour to every twelve hours interval
●
Irrigation in days interval, from once a day to once a thirty days interval.
For every irrigation day the BIC 1 controller can be programmed for up to
four start times per day. The duration of irrigation for each such cycle can be
programmed from 1 minute up to 5 hours and 59 minutes.
This section describes the programming method and the steps required for
setting the irrigation schedules.
To program the controller use the button for selecting the desired
irrigation mode. Use the button to select the desired value and make it
flashing. Use the & buttons to change the value.
Remarks:
●
Values can be changed only when they are flashing
●
If the value stops flashing before you finished to program it,
press the button again and repeat the programming steps.

6
Setting the current Time and Date
In order to ensure proper operation make sure that the controller time and date
are matching the actual current time and date.
1. Press the button until the Time/Date Icon appears along with the
current controller’s time and day of the week values.
2. If the displayed time is not correct press the button until the time digits
start flashing.
3. Use the & buttons to update the time.
Please note the AM/PM labels.
4. In order to set the correct minutes press again the button
until the minutes digits start flashing.
Use the & buttons to update the minutes.
5. Repeat the same steps and update the Date.
Please note that the date format is American; Month, then Day and finally the
Year. The day of the week is automatically set according to the date set.
7. Setting Time & Date
The controller displays the time in either a 12 or 24 hour format. Changing the
time format is done at the main screen of the controller:
Press the button for three seconds until the Time/Date icon switches
the time format (the AM/PM label disappears).

7
7. Setting Time & Date
Month Day Year
Press the button for programming the irrigation days ( Icon) or for
checking the existing irrigation programs.
Use the button to return to the previous programming steps.

8
Method 1 - irrigating on specific days of the week:
The next list of steps describes the method of selecting the days of the week for
irrigation.
Choose either irrigating on specific days of the week, EVEN/ODD days or
cyclical from daily up to once every 30 days.
The controller’s default setting is to irrigate on every day of the week.
Example: Irrigating every Tuesday, Thursday and Sunday:
1. Press the button until the icon and
the days of the week appear.
2. Press the button until the letter M (Monday) starts flashing.
3. Press the button until the underscore under the M letter disappears.
This action excludes Monday from the irrigation days.
4. Press the button twice until the letter W (Wednesday) starts flashing.
5. Press the button until the underscore under the W letter disappears.
This action excludes Wednesday from the irrigation days.
6. Press the button twice until the letter F (Friday) starts flashing.
7. Press the button until the underscore under the F letter disappears.
This action excludes Friday from the irrigation days.
8. Press the button twice until the letters Sa (Saturday) start flashing.
9. Press the button until the underscore under the Sa letters disappear.
This action excludes Saturday from the irrigation days.
10. Press the button for setting the start hours (the Icon)
or for checking the existing irrigation programs.
8. Setting Irrigation Days Schedule

9
Method 2 - irrigating on even or odd days of the week only:
The next list of steps describes the method of selecting the even or odd days of
the week irrigation.
Example: irrigating only on the odd days of the week:
1. Press the button until the icon and the days of the week appear.
2. Use the and the buttons to exclude all the days of the week from
the irrigation program.
3. Press the button until the word EVEN appears flashing.
4. Press the button until the word ODD appears flashing.
5. Press the button for setting the start hours (the Icon) or for
checking the existing irrigation programs.
8. Setting Irrigation Days Schedule

10
Method 3 - irrigating every X hours:
Example: irrigating every 7 hours:
1. Press the button until the icon and the days of the week appear.
2. Use the and the buttons to exclude all the days of the week from
the irrigation program.
3. Press the button until the word ODD appears flashing.
4. Press the button again until the digits 1:00 appear flashing.
5. Pres the button several times until the digits 7:00 appear.
Press the button for setting the start hours (the Icon) or for checking
the existing irrigation programs.
8. Setting Irrigation Days Schedule
11
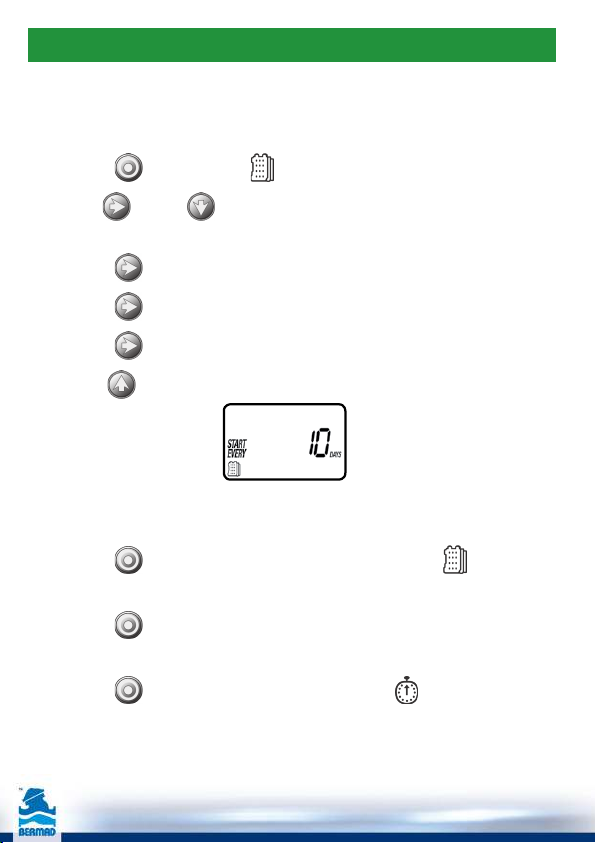
Method 4 - irrigating every X days:
Example: irrigating every 10 days:
1. Press the button until the icon and the days of the week appear.
2. Use the and the buttons to exclude all the days of the week
from the irrigation program.
3. Press the button until the word EVEN appears flashing.
4. Press the button again until the digits 1:00 appear flashing
5. Press the button again until the digit 1 day appears flashing
Pres the button several times until the digits 10 days appear.
How to return to irrigation according to specified days of the week:
1. Press the button until the words START EVERY and the icon appear
on the lower left corner of the screen.
2. Press the button until the days of the week appear on the upper part
of the screen.
3. Press the button for setting the start hours (the Icon)
or for checking the existing irrigation programs.
8. Setting Irrigation Days Schedule

12
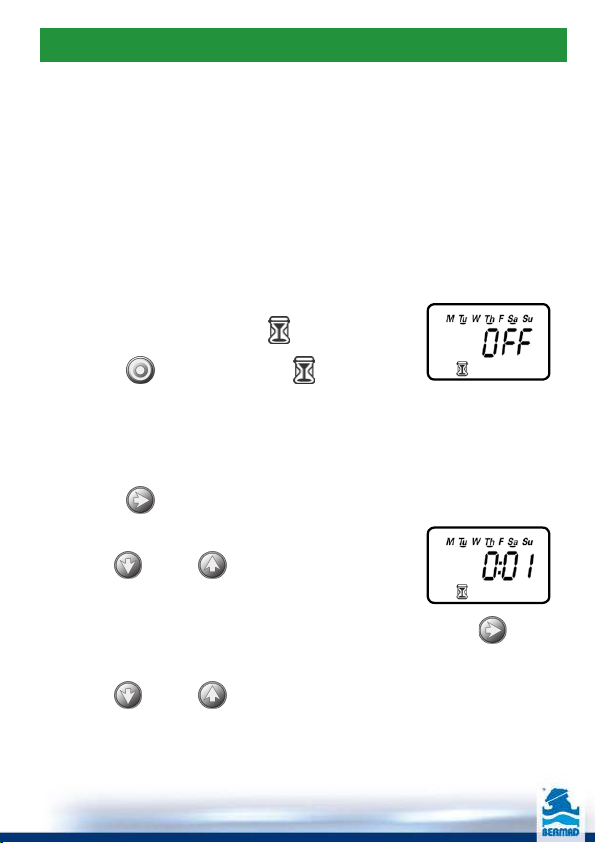
The BIC 1 controller can be programmed for up to 4 start times per each
irrigation day.
(Remark: When the controller is programmed to start irrigation every X hours
only one start time per day can be programmed)
1. Press the button until the icon appears.
The value START 1 (the first start time) displays the value OFF or the value of
the last programmed start time.
2. Press the button until the value OFF
(or the previous programmed value) starts flashing.
3. Use the and the buttons for setting the hour for the first start time.
Please note the AM/PM label.
4. Press the button until the minutes value starts flashing.
5. Use the and the buttons for setting the minutes for the first
start time.
6. Press the button again. The value START 2 (the second start time)
displays the value OFF or the value of the last programmed start time.
Repeat the above mentioned steps to set (if required) the second,
third and fourth start times for the irrigation day.
During programming, if the irrigation is according to the days of the week,
the irrigation days are displayed underscored.
9. Setting Irrigation Start Hours

13
9. Setting Irrigation Start Hours
For canceling a start time:
1. Press the button until START 1 appears.
2. Press the button until the start hour to be canceled appears.
3. Press the button until the word OFF appears.
4. Press the button for moving to the irrigation duration ( ) programming
or for checking the existing irrigation programs.
14
The next list of steps describes the method of setting the duration (length of
time) of irrigation once the controller opens the irrigation valve. The BIC 1
controller allows the valve to remain open from 1 minute up to 5 hours and 59
minutes.
For example, setting the irrigation time to 10 minutes for irrigation on certain
days of the week, will turn-on the water for 10 minutes on each of the selected
irrigation days and at every programmed start time.
Remark: if the controller is set to irrigate every X hours, the maximum
irrigation duration is 59 minutes.
For setting the Irrigation duration:
1. Press the button until the Icon appears.
The irrigation duration value displays OFF or the previously programmed
duration of irrigation. Please note that the word OFF appears when the
duration of irrigation is set to zero.
2. Press the button until the value 0:00
(or the previously programmed value) starts flashing.
3. Use the and the buttons for setting
the hour for the irrigation duration.
4. if the required irrigation duration is less than an hour press the button
in order to move to the minutes digits that start flashing.
5. Use the and the buttons for setting the minutes for the
irrigation duration.
During programming, if the irrigation is according to the days of the week,
the irrigation days are displayed underscored.
10. Setting Irrigation Duration

15
Press the button for programming the rain delay (the Icon).
At this point the controller’s programming is completed.
Exit the programming mode In order to monitor the existing irrigation
programs.
10. Setting Irrigation Duration
16
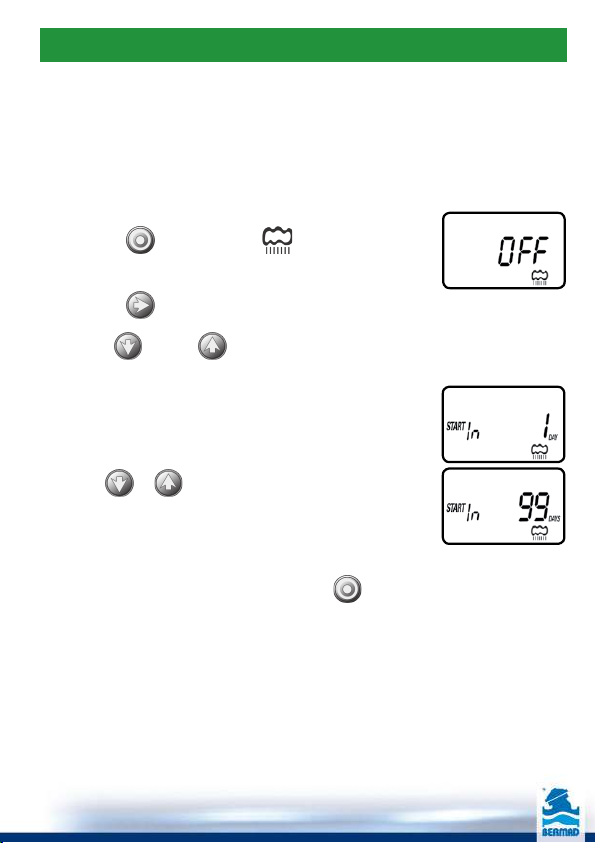
This option is used to suspend the irrigation programs for a predefined number
of days when a signal is received from the rain sensor.
For example, during rainy weather regularly scheduled programs can be
suspended for duration of 1-99 days. At the end of the designated period,
regularly scheduled programming resume operation automatically.
To set a rain delay:
1. Press the button until the icon
and the word OFF appear.
2. Press the button until the value OFF starts flashing.
3. Use the and the buttons for setting the maximal rain suspension
days between 1 to 99 days.
4. The rain suspension of the program can be cancelled
at any time by re-entering the Rain Delay screen and
changing the setting to OFF.
(Press or until the word OFF appears.)
Remark:
The word OFF appears between the 99 and the 1 values.
Exit the programming mode by pressing the button in order to monitor the
existing irrigation programs.
11.
Setting Optional Rain Delay
17
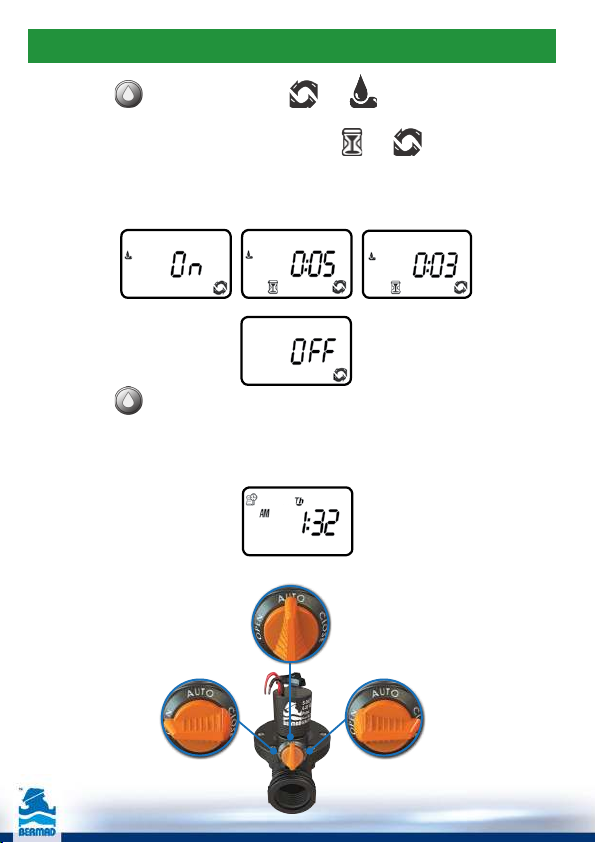
1. Press the button until the Icons and appear.
The value ON appears for short time and afterwards the controller displays
the duration of the previous irrigation by the and icons.
The controller opens the valve and within 5 seconds starts to display the
time left till the end of the current irrigation (time left till the closing of the
valve).
2. Press the button in order to stop the manual irrigation.
3. After 5 seconds the controller resumes displaying the current time and date.
The user may also operate the irrigation valve manually as depicted in this figure.
12. Manual Irrigation
Automatic operation
Manually closedManually opened

18
Most “normally closed” rain sensors can be connected to the BIC 1 Controller.
The function of the sensor is to suspend automatic irrigation during rainfall.
To connect the sensor to the controller, please follow these steps:
1. Cut in the middle the yellow wire loop that hangs out of the controller’s
housing lower side.
2. Strip approximately ½” of the insulation from the ends of the cut
yellow wire.
3. Connect the two yellow wires to the wires of the rain sensor.
Use waterproof wire connectors to secure the connections.
4. When the sensor is active and automatic
irrigation is suspended, the icon appears
on the screen.
Remark: the icon appears when the sensor is active or when the yellow
wire loop is cut opened.
Attention:
The rain sensor is not part of this product and it is not supplied with it.
FIGURE B
13. Rain Gauge Connections

19
The BIC 1 controller’s batteries can last up to 3 years when using good quality
AA alkaline batteries.
Actual battery life depends on the batteries sensitivity to temperature variations
the controller is exposed to, and to the number of valve operations per day.
To ensure proper operation, it is recommended to regularly check the BIC 1
batteries and replace them once the low battery indication starts flashing.
In order not to reset the time and date settings the BIC 1 controller is designed
to retain the current time settings for up to 60 seconds with the batteries
removed.
To change the batteries, see section 5.
14. Replacing the Batteries
Table of contents
Other BERMAD Irrigation System manuals


