BERNHARDT design Serif User manual

serif
electrical installation instructions
january 2018


1
Instructions and Warnings
SAVE THESE INSTRUCTIONS
WARNING:Risk of injury, electrical shock or fire!
Rated at 120 Volts, 12 Amps, 1440 Watts, 60 Hz
Use only grounded SJT 14 AWG cord.
Do not operate this equipment unless properly trained.
See installation and operating instructs for intended use.
Maximum load 200 lbs. Includes weight of worksurface.
Intended for commercial use only.
For use with Powered Table System Series: Bernhardt Multipurpose Training Tables.
Maximum of (8) Power Units can be connected with a single power cord.
Multipurpose tables intended to only be connected by power unit to directly adjacent multipurpose tables.
CONSERVEZ CES INSTRUCTIONS
MISE EN GARDE:Risque de blessure, de choc électrique ou de feu !
Puissance nominale de 120 Volts, 12 Amps, 1 440 Watts, 60 Hz.
Utilisation uniquement relié à la terre Cordon EJS 14 AWG.
N’utilisez pas cet appareil sans une formation adéquate.
Voir Notice de montage et d’exploitation charge pour l’utilisation prévue.
Charge maximale 200 lbs comprend le poids de la surface de travail.
Destiné uniquement à des fins commerciales.
Pour une utilisation avec Powered Table système série : tableaux de formation polyvalente Bernhardt.
Unités de puissance maximale (8) peut être connectées avec un câble d’alimentation unique.
Tables multifonctions destinés à n’être connectés par unité de puissance aux tables multifonctions directement adjacents.
electrical warnings
serif electrical installation instructions
1
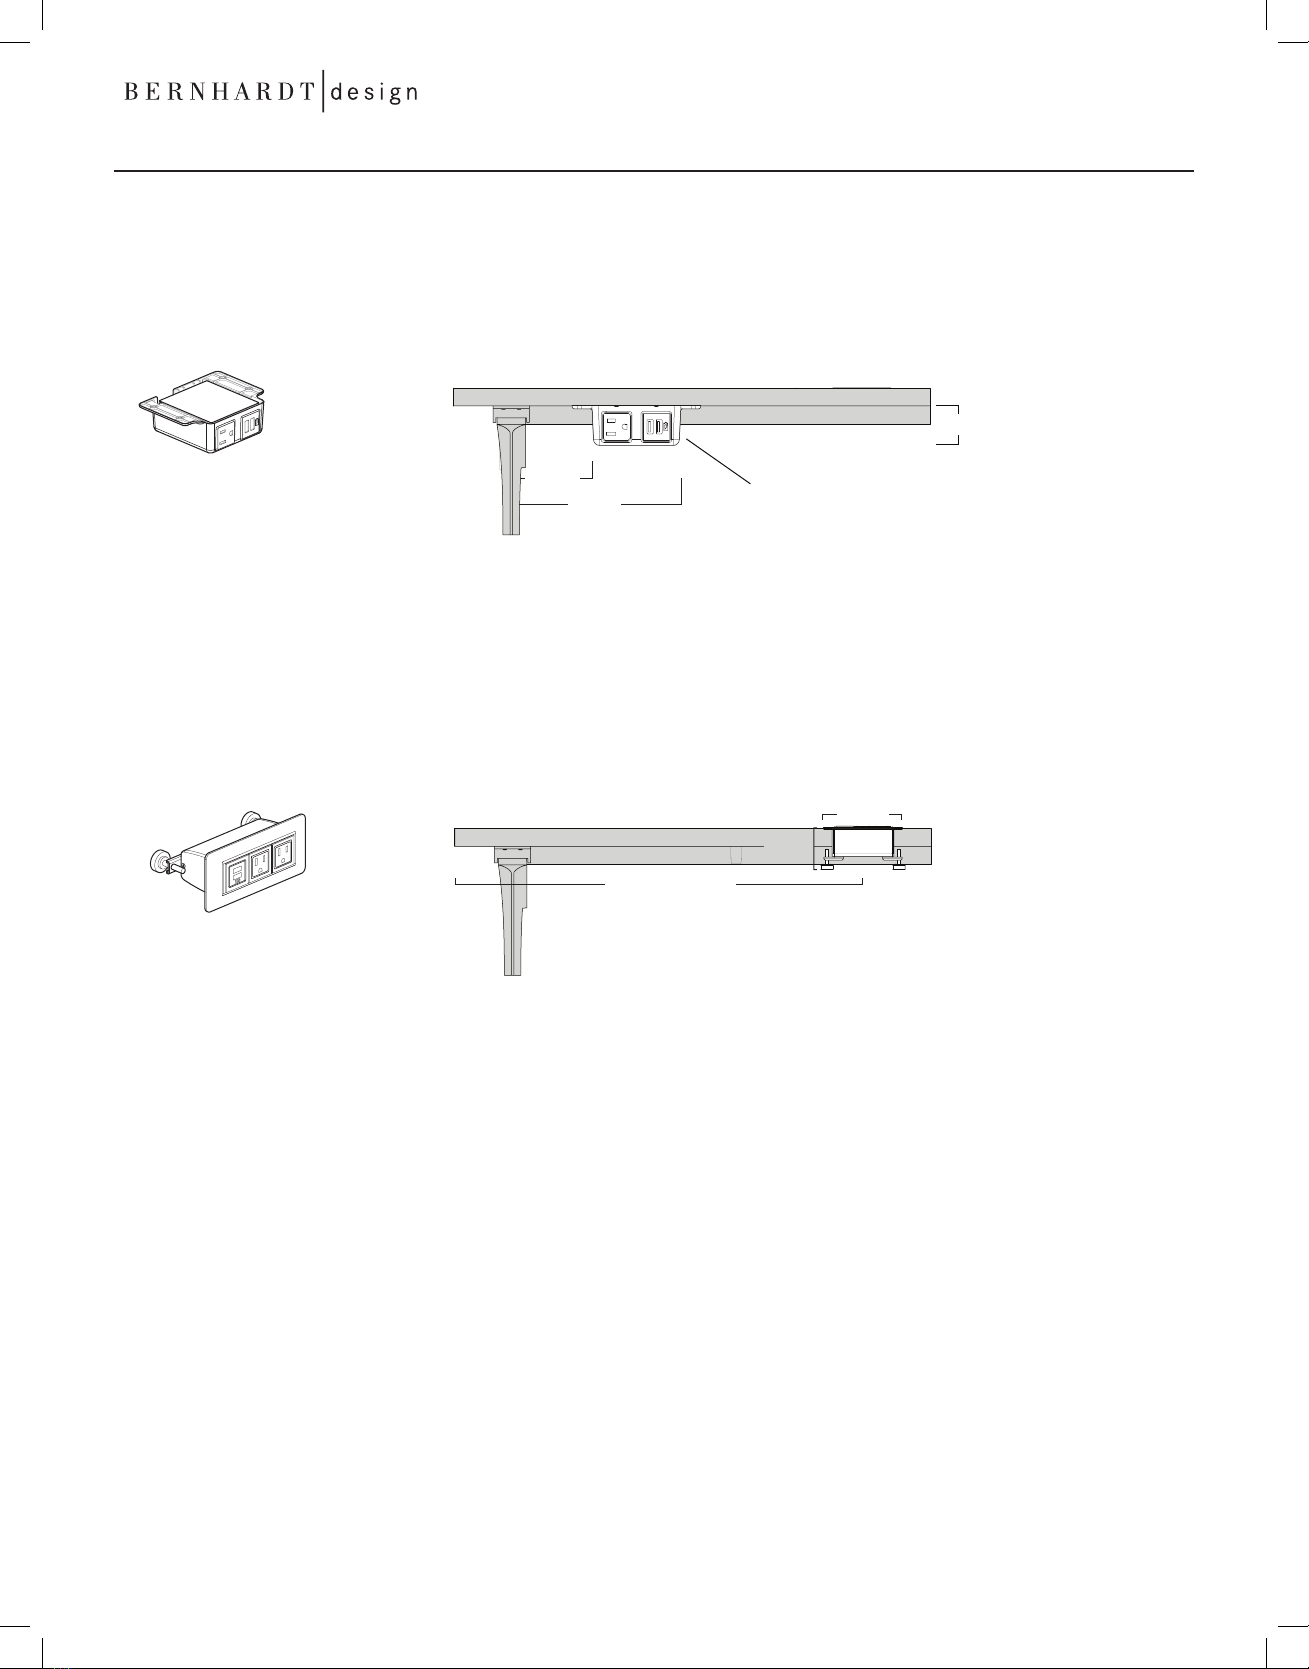
(2) Receptacles
(1) Dual Port USB (2 amps per port)
(1) Receptacle
(1) Dual Port USB (2 amps per port)
Surface Mount Power Module
Dual Under Mount Power Module
The surface mount power module is offered for the Serif training tables. Surface mount offers a flush mount
power and data center, delivering a clean, refined solution for flat work surfaces. The module is available as (2)
receptacles and (1) dual USB port, shown below.
The dual under mount power module is offered for the Serif training table. The module is available as (1)
receptacle and (1) dual port USB, shown below. This unit is a great option because it leaves the worksurface
free of any distraction and allows for the full use of the entire top.
Under mount location creates a clean,
fully-usable workspace.
6 1/2”
3 1/2”
Center of Table
7 5/8”
1 1/2”
4 3/8”
2
power module
serif electrical installation instructions
2
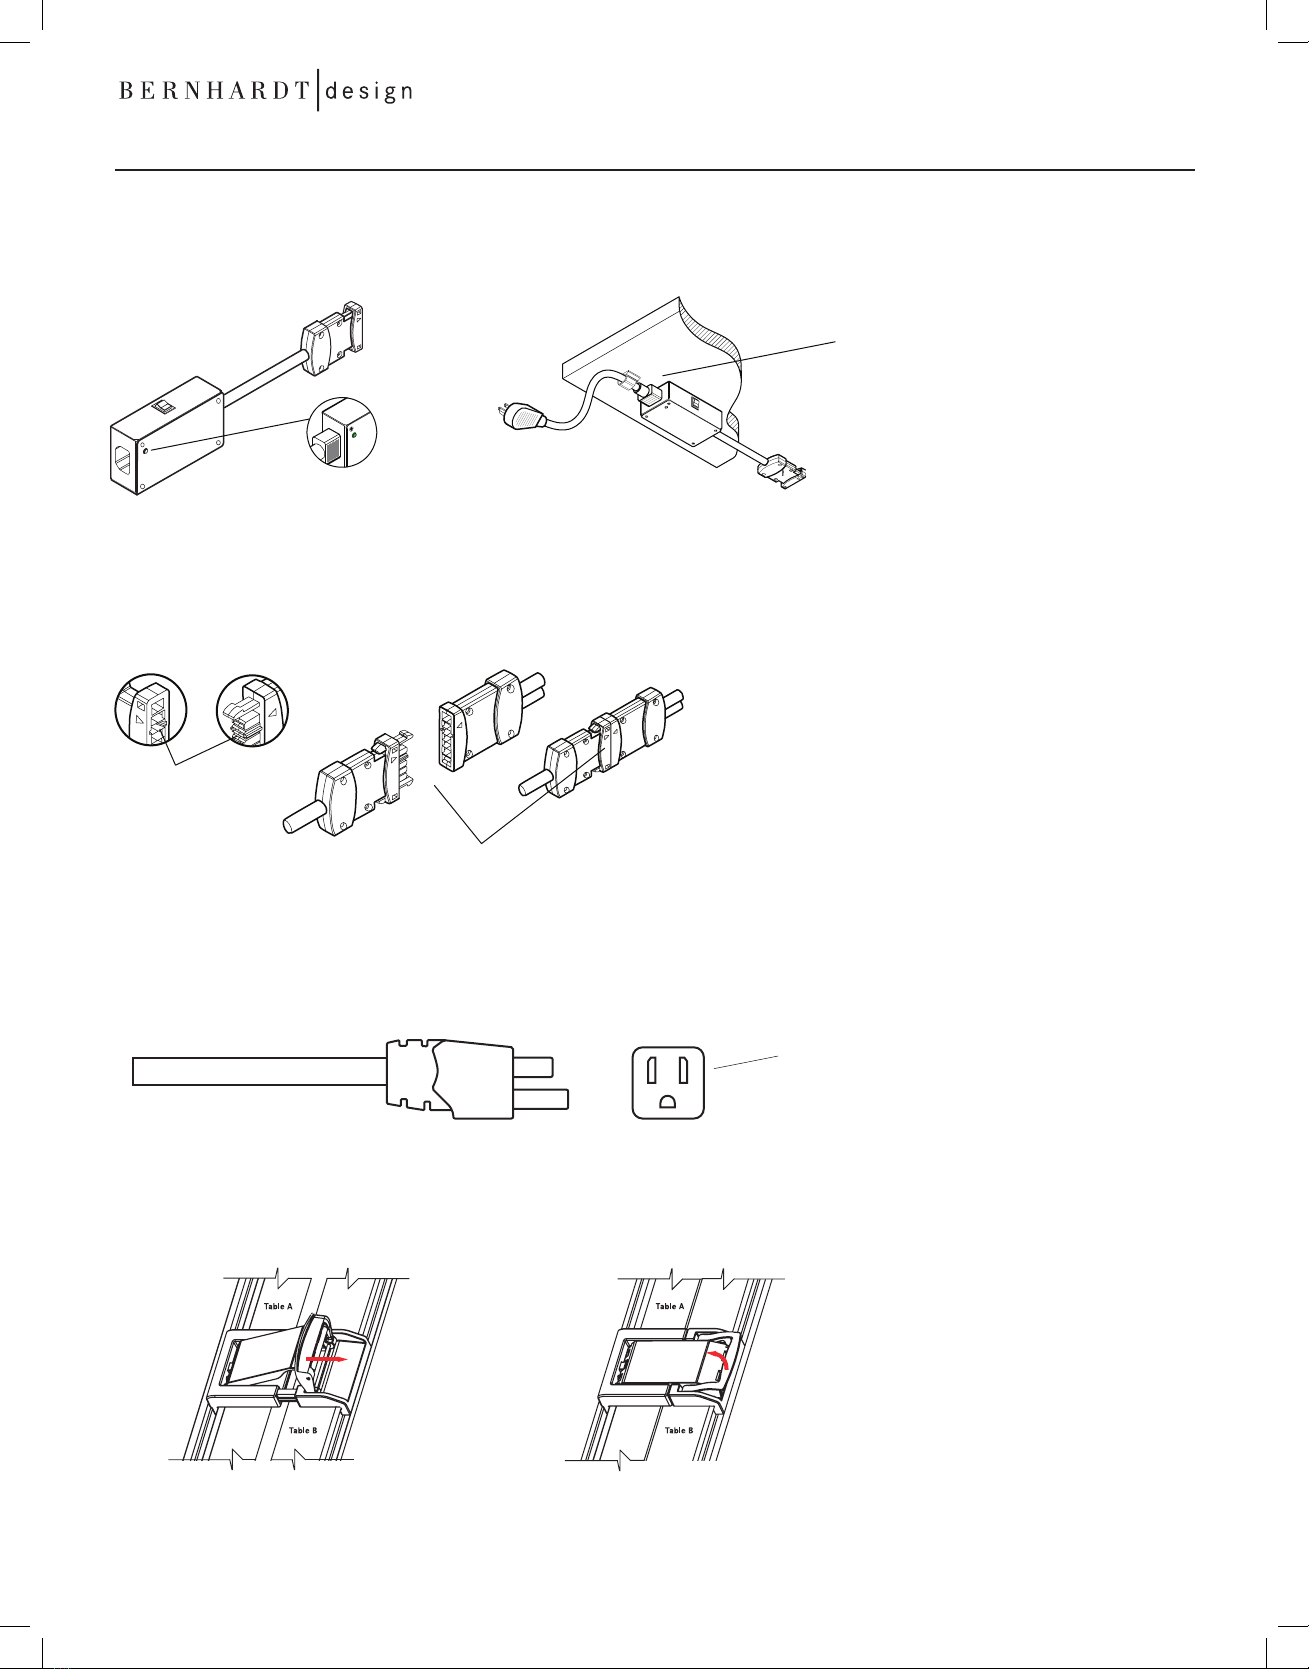
Power Module Control Unit
Bernhardt design explores new ways to connect power with Interlink IQ’s Power Infeed. The power infeed allows
the user to connect up to (8) under mount power modules or (4) surface mount power modules off a single infeed.
The power infeed was also created with smart LED indicators that illuminate green when you’re connected and
ready to plug in.
Modular Connector
Modular connector allows for the use of a specified whip, for longer extension, or the connection of multiple work surfaces on a single power
source. The jumper, for use with the power pantry, is 60” in length and requires the specification of a separate whip and connector. When
connecting whips together make sure that you align the keys and arrows before pushing together the whip connectors, this will
ensure a safe and strong electrical connection.
Electrical Cord
The dual under mount and surface mount power modules are both provided with a grounded, SJT power cord. These products are for use only
with a nominal 120 volt circuit and has a grounded plug as illustrated below. Make sure that these power modules are connected to an outlet
having the same configuration as the plug. No adapter should be used with these power modules.
Ganging Bracket
Ganging brackets are an optional purchase for Serif. This element levels out table tops, lateral or cross linking.
Close grey flap handle to pull tops
together.
Open Position
Lift grey handle to release top.
Closed Position
Indicator
Light
Wire Manager
SJT Power Cord
Keying
Align keying and arrows when
connecting power.
3
electrical accessories
serif electrical installation instructions
3
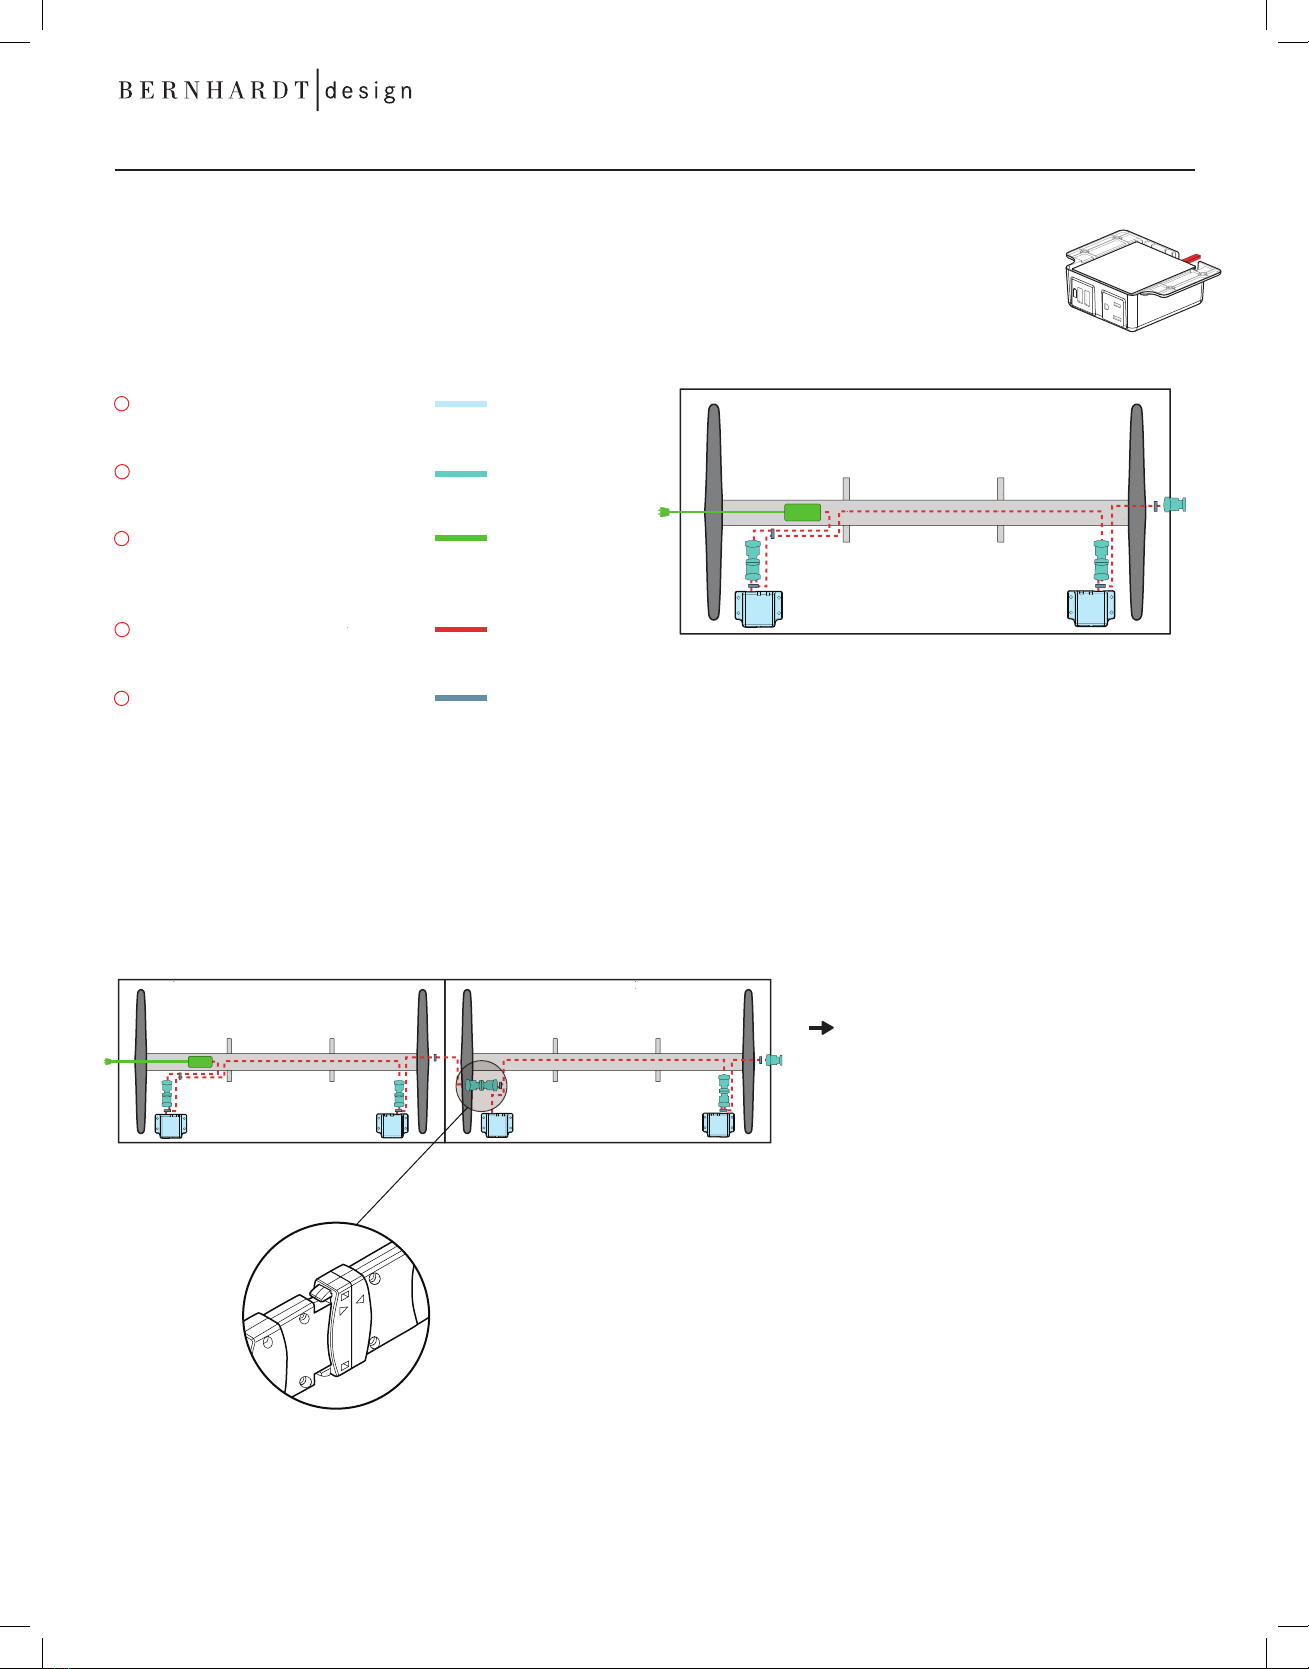
After you have finished connecting your jumper whips you can
tuck them back into the table trough, a concealed under mounted
storage system, and move on to connecting your next table.
Starter Table
Left Power Infeed Left Power Add-On
Add-on Table
Dual Under Mount Power Module and Connection
Installation Accessories
Connection Instructions
Serif offers a proprietary under mount power solution allowing quick and easy “daisy chaining” of tables. For the
dual module configuration, up to (4) tables may be connected from a single power infeed. The dual under mount
configuration uses (1) receptacle and (1) dual port USB module mounted at the edge of the table. The Serif tables
with power assembly are UL 962 and CSA 22.2, No. 203.2 approved. The illustration below is a Serif starter table
which must be specified to begin a run of tables.
Contains (1) 15 amp receptacle and (2) amp USB ports for
each power module.
A modular connection to help the user connect multiple work
surfaces.
Control module with 10’ grounded plug. Allows users to
connect up to 8 power/data centers off of one feed. (4)
dual power tables.
A plug designed to be inserted into a receptacle in one position
only.
When starting to connect your power you first need to identify your starter table SKU (pictured above is a starter table, found with a power
module control unit and grounded plug). Next you will want to gang your starter table with your first add-on table using the separately
purchased ganging brackets. To power the add-on table, pull the long modular connector wire from the starter table through the wire
management clips. Locate the modular connector near the edge of the adjacent table trough. Match the keying, indicated by the arrows on
the modular connects, and press the connectors together. Repeat for all tables in line, up to (8) power modules.
Dual Under Mount Power Module
Modular Connector
Power Module Control Unit
Power Module Wiring
B
C
D
Attaches to the bottom of the table, helps secure whips
when connected. Approved for GSA.
Wire Management Clip
E
A
Note: All power and wiring is pre-installed on starter and add-on
tables. Specify a right or left power infeed for the starter and add-on
table configurations.
4
dual mount power
serif electrical installation instructions
4

Note: All power and wiring is pre-installed on starter and add-on
tables.
Serif offers a proprietary surface mount power solution allowing quick and easy “daisy chaining” of tables. For the
surface mount module configuration, up to 8 tables may be connected from a single power infeed. The surface
mount power configurations uses a (2) receptacle/(1) dual port USB module flush mounted in the center of the
table. The Serif tables with power assembly are UL 962 and CSA 22.2, No. 203.2 approved. The illustration below is
a Serif starter table with must be specified to begin a run of tables.
Surface Mount Power Module and Connection
Installation Accessories
Connection Instructions
Contains (2) 15 Amp receptacles and (2) amp USB ports
for each power module.
A modular connection to help the user connect multiple work
surfaces.
Control module with 10’ grounded plug. Allows users to
connect up to 8 power/data centers off of one feed..
A plug designed to be inserted into a receptacle in one
position only.
When starting to connect your power you first need to identify your starter table SKU (picture above is a starter table, found with a power module
control unit and grounded plug). Next you will want to gang your starter table with your first connecting table using the separately purchased
ganging brackets. To power the add-on table, pull the long modular connector wire from the starter table through the wire management clips.
Locate the module connector near the edge of the adjacent table trough. Match the keying, indicated by the arrows on the modular connects, and
press the connectors together. Repeat for all tables in line. 48”-60”w Tables: A maximum of (7) add-on tables are possible for a total of (8) daisy
chained tables. 66”-70”w Tables: A maximum of (3) add-on tables are possible for a total of (4) daisy chained tables.
Surface Mount Power Module
Modular Connector
Power Module Control Unit
Power Module Wiring
A
B
C
D
Attaches to the bottom of the table, helps secure whips
when connected. Approved for GSA.
Wire Management Clip
E
Starter Table Add-on Table
5
surface mount power
serif electrical installation instructions
After you have finished connecting your jumper whips you can
tuck them back into the table trough, a concealed under mounted
storage system, and move on to connecting your next table.
5

Table of contents
Other BERNHARDT design Indoor Furnishing manuals


