Beseler Dichro 45SL User manual

Dichro 45SL
LED Colorhead/Instruction Manual

1
IMPORTANT SAFETY INSTRUCTIONS
When using your photographic equipment, basic safety
precautions should always be followed, including the following:
1. Read and understand all instructions before using.
2. Close supervision is necessary when any appliance
is used by or near children. Do not leave appliance
unattended while in use.
3. Care must be taken as burns can occur from
touching hot parts.
4. Do not operate appliance with a damaged cord or if
the appliance has been dropped or damaged until it
has been examined by a qualified service provider.
5. Position the cord so that it will not be tripped over,
pulled, or contact hot surfaces.
6. If an extension cord is necessary, a cord with a
current rating at least equal to that of the appliance
should be used. Cords rated for less amperage than
the appliance may overheat.
7. Always unplug appliance from electrical outlet
before cleaning and servicing and when not in use.
Never yank cord to pull plug from outlet. Grasp plug
and pull to disconnect.
8. Let appliance cool completely before putting away.
Loop cord loosely around appliance when storing.
9. To reduce the risk of electric shock, do not immerse
this appliance in water or other liquids.
10. To avoid electric shock hazard, do not disassemble
this appliance, but take it to a qualified service
provider when service or repair work is required.
Incorrect reassembly can cause electric shock when
the appliance is used subsequently.
11. The use of an accessory attachment not
recommended by the manufacturer may cause risk of
fire, electric shock, or injury to persons.
12. Connect this appliance to a grounded outlet.
CONTENTS
Important Safeguards………………………….................1
Specifications…………………..……………….….……………..1
Introduction……………………...…….……………...............1
1Installation Instructions…………………….….….……3-4
2. Controls and Component Descriptions…….....5-6
3. How to Use the Dichro 45SL………..………..…………...5
4. Black & White Printing…………………………….………….6
Warranty/Service…………………………………………………….7
DICHRO 45SL
SPECIFICATIONS
Line Voltage:
Model #8278L 120V ±5%, 60Hz
Electronics: Internally stabilized, solid state
Lamp: 3 Lamps, LED Array, Factory Replace Only
(5 Year Warranty on LED Lamps)
Type of Filtration: Dichroic Interference Filters
Filtration: Yellow, Magenta, Cyan
Auxiliary Filtration: None
Blower: None
Mixing Chambers: Standard 4x5 (Included)
Dimensions: Head – 17”W x 14”H x 13”D
Power Supply – 7”W x 4”H x 10”D
Weight: Head – 17.25 pounds
Power Supply – 5.8 pounds
Shipping Dimensions: Head – 20.5”W x 19”H x 16.5”D
Power Supply – 11”W x 6”H x 13”D
Shipping Weight: Head – 21.5 pounds
Power Supply – 6.5 pounds
INTRODUCTION
Congratulations! With your purchase of the Beseler Dichro 45SL
Colorhead, you have acquired a truly versatile colorhead. The
Dichro 45SL is a solid state, dichroic colorhead incorporating a self-
contained, stabilized power supply. Due to LED technology, a
cooling system is not required. It represents the latest in electronics
& LED technology applied to color printing.
The colorhead is designed to work equally well with the Beseler
45V-XL, or 45M series enlargers and installation is simple. The
Dichro 45SL offers diffusion color and black & white printing for
formats ranging from sub-miniature to 4”x5” negatives.
If you desire to begin printing immediately with your Dichro 45SL,
we suggest that you familiarize yourself with this manual as well as
the colorhead and its controls (Figures 1 and 2 with descriptions)
and then follow the directions in Section 1, Installation Instructions,
and Section IV, How to Use the Dichro 45SL. The remainder of the
manual contains additional valuable information which will increase
your understanding of the Dichro 45SL.

Figure 1
1. Magenta Filtration Control
Set Desired Amount of Magenta Filtration
2. Cyan Filtration Control
Set Desired Amount of Cyan Filtration
3. Yellow Filtration Control
Set Desired Amount of Yellow Filtration
4. Filtration Indicator Windows
Displays Filtration Values of M, C & Y
5. Mounting Collar
To Attach Colorhead to Beseler 45M Series Enlarger
6A & 6B. Sockets for 5 Pin Din Cable
7. Display Dimmer Switch
Allows Dimmer Adjustment of Filtration
Display From Off to Full Bright
8. Power Supply Selector –3 Position
Black & White (Up)
Off –Color Head Off (Middle)
Color (Down)
9. Power Cord
3 Prong, Connects to Timer Power
10. 5 Pin Din Cable
Connects 6A on head to 6B on Power Supply
See Page 4 for Layout
2

1. INSTALLATION
INSTRUCTIONS
The Dichro 45SL Colorhead is a head with a
separate power supply and is shipped with a
4x5 diffusion mixing chamber and LED lamps.
To mount the colorhead onto a Beseler 4x5
enlarger for diffusion printing, just follow these
simple instructions:
A. If your enlarger is equipped with a Resistrol
accessory, unplug it, as it cannot be used in
conjunction with the colorhead.
B. Adjust the negative stage of the enlarger to
the 4”x5” position on the negative size scale.
Lock the negative stage lock knob on your
enlarger.
NOTE: The illumination system of the
colorhead requires that the upper bellows
remain in the 4x5 position (fully collapsed)
during diffusion printing with all negative sizes.
C. Remove the two screws holding the negative
size scale in place and detach scale.
If your enlarger does not have a condenser
lamphouse, pull forward the housing latches
and go on to step E.
D. Unplug the condenser lamphouse power
cord and remove the lamphouse/condenser
assembly by pulling the support latches forward
(see Fig. 2) and lifting the assembly clear of the
enlarger. Store the assembly in a safe , dust
free place.
E. Place the colorhead on the enlarger so that
the colorhead mounting collar (Figure 1, Item
5) slides into the opening in the support stage
(Figure 2).
Figure 2 (Support Stage)
F. Once the colorhead is sitting squarely on the
enlarger, lock it in place by pushing the latches
back .
G. The lamp and the electronic power supply
with the colorhead is stabilized. DO NOT use an
external stabilized power supply. The Dichro
45SL has a 5 pin din cable that connects the
power supply to the head. The power cord (Fig
1, item 9) is on the back of the power supply
and is inserted in the “Enlarger” outlet on your
timer. See Page 4 for typical AC connections.
You are now ready to begin diffusion printing
with your Dichro 45SL
3
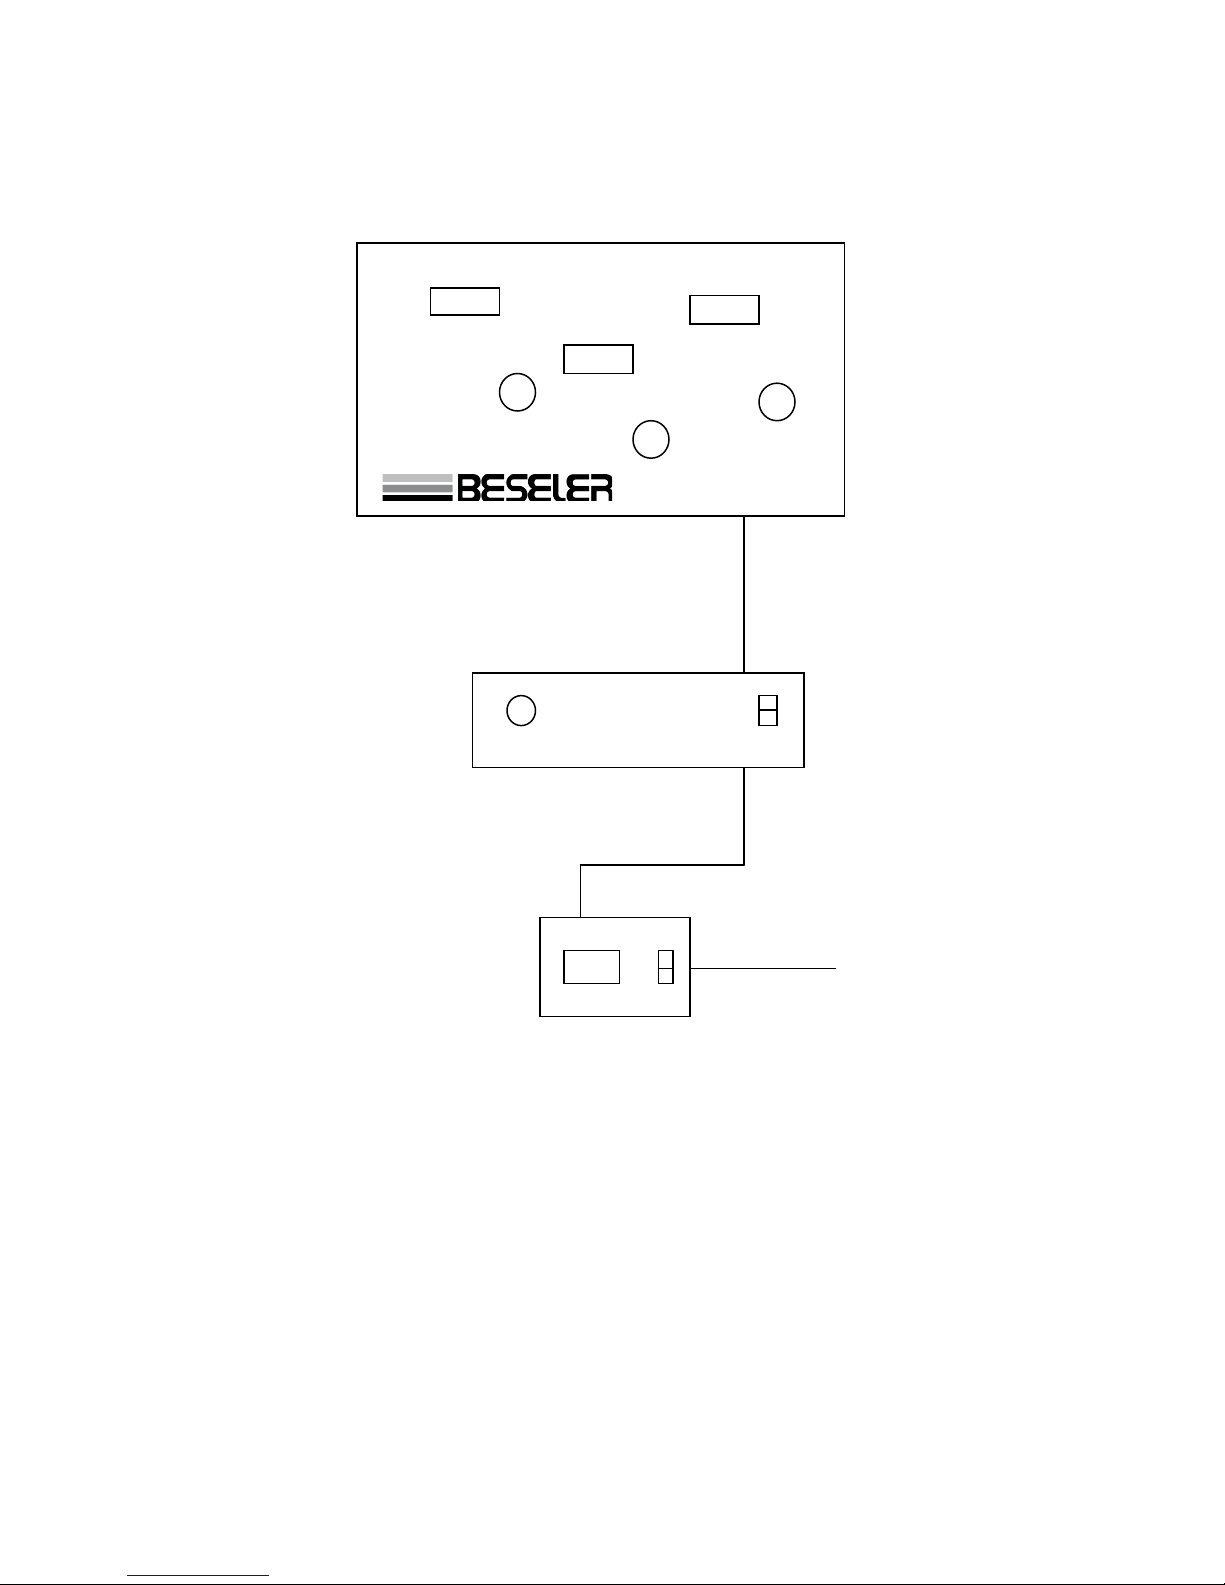
8278L
HEAD
5 PIN DIN CABLE
POWER SUPPLY
POWER CORD
TIMER
CORD TO OUTLET
4

2. CONTROLS AND
COMPONENT DESCRIPTIONS
A. POWER SWITCH Three position switch (B&W, OFF,
COLOR).
B. FILTRATION CONTROLS By turning the appropriate
knob, any desired amount of yellow, magenta or cyan
filtration may be introduced into the light path.
C. MIXING CHAMBERS A special 4x5 diffusion mixing
chamber is standard with the Dichro 45SL.
D. STABILIZED POWER SUPPLY The voltage for the
colorhead’s lighting and electronics are internally
stabilized over an AC line voltage range of ± 5% from
the normal. A separate stabilized power supply is not
required.
E. FILTRATION INDICATOR WINDOWS The analogue
dials are back-lighted when the main power switch is
on. The dimmer switch on the power supply will adjust
the brightness of the back light from full bright to off.
The display lights are intended for adjusting the filters
and should be off when exposing.
The 45SL is LED powered and low heat so therefore no
cooling system is needed.
3. HOW TO USE THE DICHRO 45SL
The following information should help you to get
started making color prints from negatives with your
new Dichro 45SL colorhead.
A. Put your negative into the enlarger. Size, compose
and focus the image as usual.
B. Dial in the recommended starting filter pack of 65-
70Y + 65-70M. Set your lens to f/8 in the DIFFUSION
mode and f/16 in the CONDENSER mode. Then turn the
display off for best results.
C. Make a test strip for density, varying only the
exposure time (not the lens aperture or the filter pack).
D. Evaluate the test strip for density.
1. If any section of the test strip shows exactly
the right density, you’re all done testing. Record the
exposure time which produced it.
2. If one section of the test strip is too light and
the adjoining section is too dark, an intermediate
exposure time is required. For example: If the
exposure time for the light section was 10 seconds and
the exposure time for the dark section was 20 seconds,
the proper exposure time will be somewhere in
between 10 and 20 seconds. (If in doubt, you might
want to make a second test strip using intermediate
exposure times such as 12-14-16-18 seconds.
3. If all four sections are too light, open up the
aperture of your enlarging lens by two full f/stops and
repeat the test using the same exposure times (the
original test strip was under-exposed.)
4. If all four sections are too dark, close down
the aperture of your enlarging lens by two full f/stops
and repeat the test using the same exposure times (the
original test strip was over-exposed.)
5. Once the aperture setting and exposure time
have been determined, the next step is to identify the
PREDOMINANT color on the correctly exposed section
of the test strip.
E. Identify the Predominant Color
If your test strip happens to be perfectly color-balanced,
you are immediately ready to make a color print
without making any adjustment to the filter pack. It’s
far more likely, however, that your test strip will have a
predominant color cast which you will want to remove
before making your full-size color print. You must first
identify the predominant color cast and then refer to
the COLOR BALANCING TABLE for directions on how to
remove it.
The table shows what adjustments are necessary to
color correct prints made from negatives or slides.
5
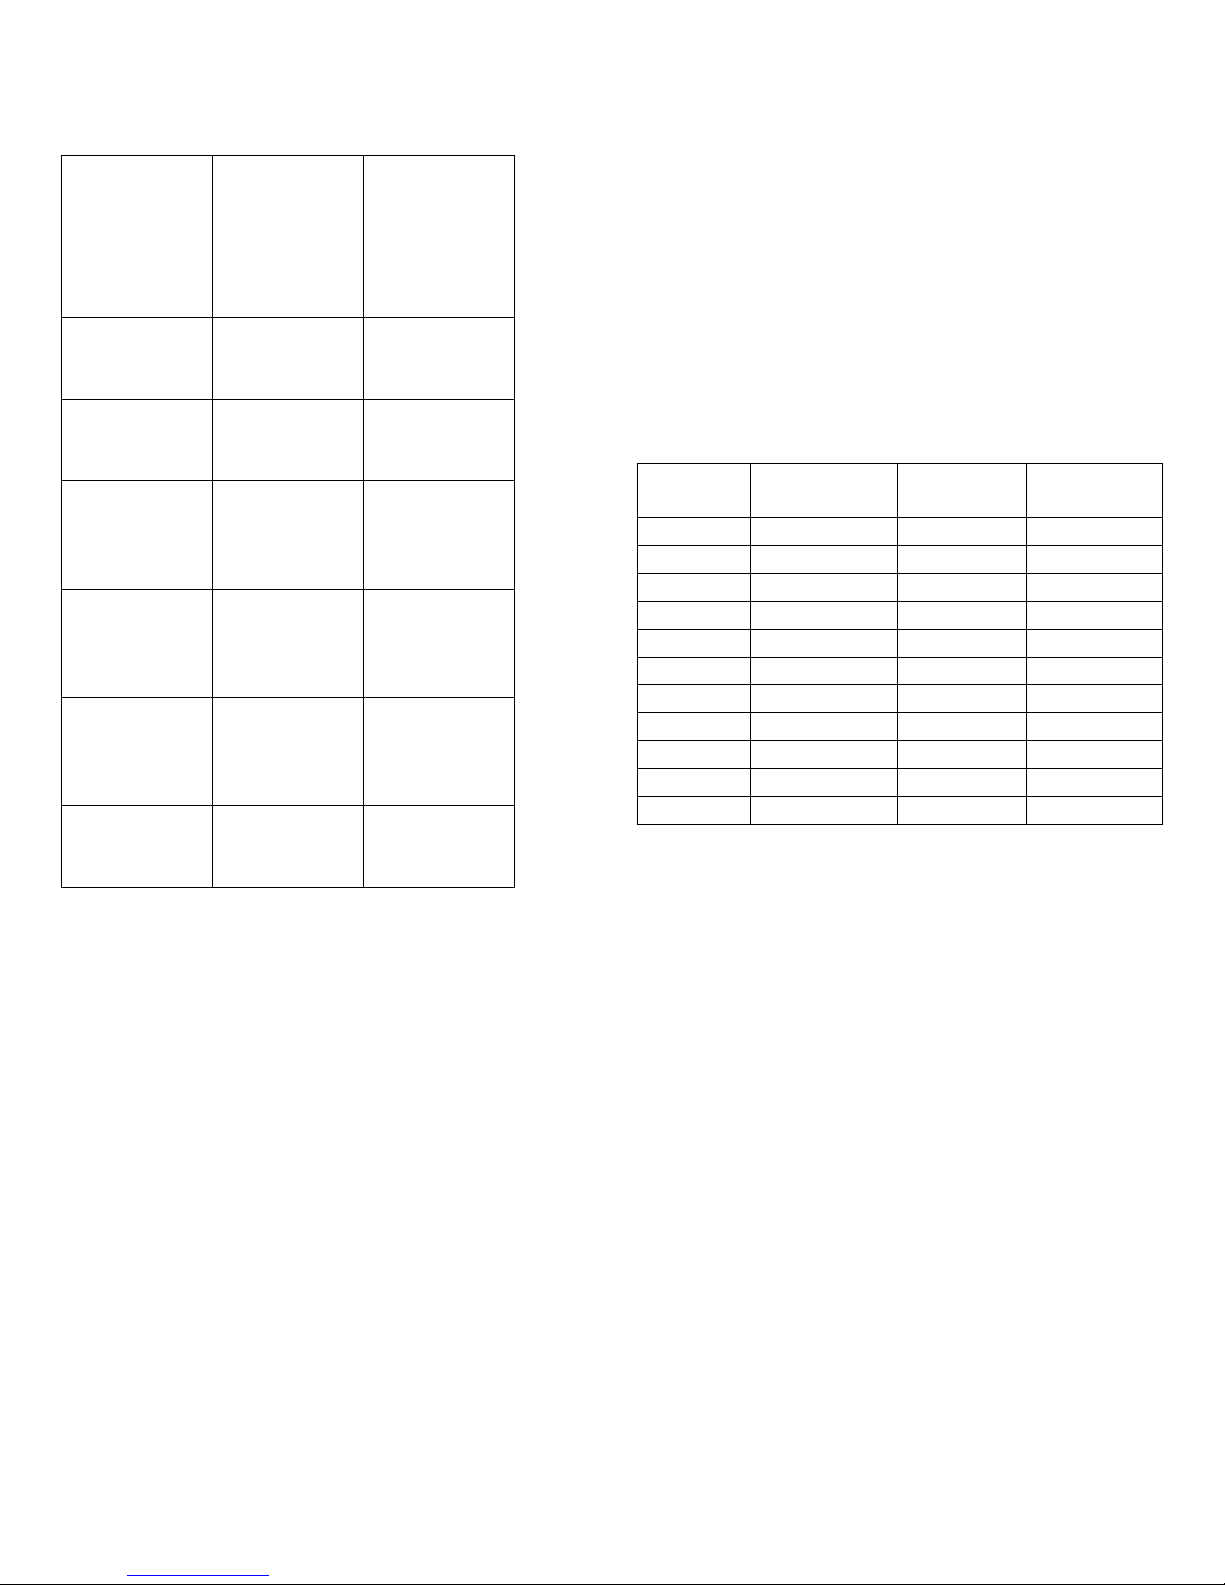
COLOR BALANCING TABLE
If first print
made from a
negative is
too:
Or the first
print made
from a slide is
too:
MAKE THIS
CORRECTION
BEFORE
EXPOSING
THE NEXT
PRINT:
Yellow
Blue
Add Yellow or
Subtract Cyan
& Magenta
Magenta Green Add Magenta
or Subtract
Cyan & Yellow
Cyan Red Add Cyan or
Subtract
Yellow &
Magenta
Blue Yellow Subtract
Yellow or add
Cyan &
Magenta
Green
Magenta
Subtract
Magenta or
add Cyan &
Yellow
Red
Cyan
Subtract Cyan
or add Yellow
& Magenta
Experience will show how much of an adjustment is
necessary for prints requiring varying degrees of
correction and what starting filter pack to use in making
a first print. Note that there are two possibilities for
each correction. Do not dial in the third filter value
since the combination of filtration (Y+M+C) will result in
neutral density causing loss of illumination and the
need to increase exposure.
If you have just started color printing, it is a good idea
to save those prints with which you are not satisfied.
On the back, mark with the filtration and exposure time
with which they were made and compare them to your
final prints. This is the best method of learning the
effects of changing filtration (and exposure) on your
Dichro 45SL Colorhead.
4. BLACK & WHITE PRINTING
The Dichro 45SL may be used for black & white printing
using its diffusion system simply by positioning the
switch on the power supply to the “B&W” setting (up).
When printing with variable contrast papers, the
colorhead can be used to control contrast, without the
need of additional set of filters. The tables below show
what filtration settings will approximate various paper
grades on Agfa Multi-contrast & Ilford Multigrade
papers.
Paper
Grade
Multicontrast
Filtration
Multigrade
Filtration
Polycontrast
Filtration
0
80Y
80Y
75Y
½
70Y
55Y
50Y
1
65Y
30Y
25Y
1 ½ 50Y 15Y 10Y
2 30Y 0 10M
2 ½ 15Y 25M 25M
3 20M 40M 40M
3 ½ 30M 65M 55M
4 45M 100M 70M
4 ½
70M
150M
120M
5
130M
200M
170M
6

7
LIMITED ONE YEAR WARRANTY
(Applicable in U.S.A. - Outside U.S.A. See Local Distributor)
Charles Beseler Company, Stroudsburg, Pennsylvania warrants its
products, to the original purchaser only, to be free from defects in
materials and workmanship for a period of one (1) year from the date of
purchase.
This warranty does not apply to our products which show evidence of
accidental damage, misuse or abuse by you. The warranty also does not
apply to our products which are defective or damaged by tampering or
attempted repair by an unauthorized Beseler agent.
Beseler exclusively limits the warranty to repair or replace (at Beseler’s
option) the defective part of its product. If you decide to send out
product to our authorized repair outlet, you must insure the product
and prepay all transaction expenses. Beseler will not be liable for
damages caused in the course of shipping the product to you. You must
allow at least six (6) weeks for correction of the defect.
ANY IMPLIED WARRANTIES OF FITNESS FOR USE, OR MERCHANTABILITY,
THAT MAY BE CREATED BY OPERATION OF LAW ARE LIMITED TO THE
ONE (1) YEAR WARRANTY PERIOD. Some states do not allow limitations
on how long and implied warranty lasts, so the above limitation may not
apply to you.
NO LIABILITY IS ASSUMED FOR EXPENSES OR DAMAGES RESULTING
FROM INTERRUPTION IN OPERATION OF EQUIPMENT, DAMAGE TO
FILM OR PAPER OR FOR INCIDENTAL, DIRECT OR CONSEQUENTIAL
DAMAGES OF ANY NATURE.
Some states do not allow the exclusion or limitation of incidental or
consequential damages, so the above limitation or exclusion may not
apply to you.
In the event there is any defect in materials and workmanship of our
product you may contact our Customer Service Department at Charles
Beseler Company, 2018 West Main Street, PO Box 431, Stroudsburg, PA
18360. This warranty gives you specific legal rights, and you may also
have other rights which vary from state to state. You may also have
implied warranty service or performance, you may be able to go to a
Small Claims Court, a State Court or a Federal District Court.
IMPORTANT:
THIS WARRANTY SHALL NOT BE VALID AND BESELER SHALL NOT BE
BOUND BY THIS WARRANTY IF OUR PRODUCT IS NOT OPERATED IN
ACCORDANCE WITH BESELER’S WRITTEN INSTRUCTIONS.
You must prove the date of purchase by producing a sales receipt
indicating that you are the original purchaser.
IMPORTANT – KEEP THIS INFORMATION HANDY
KEEP YOUR SALES RECEIPT!
SERVICE INFORMATION:
(Applicable in U.S.A. - Outside U.S.A. See Local Distributor)
Should you need service for your BESELER photographic equipment
after the warranty has expired, please follow these steps:
CALL or EMAIL the customer service department for a return
authorization #. If returned items are not assigned a return
authorization #, they will be returned to sender upon receipt.
Instructions for address and packaging will be provided with the return
authorization process.
PREPAY FREIGHT CHARGE AND INSURE the package against loss or
damage in transit.
ESTIMATES: We will gladly provide estimates upon request. There is a
flat estimate of $25.00 payable in advance. The estimate charge will be
credited toward the cost of the repair. No work will be undertaken or
billed until written approval of the estimate is received.
CHARGES: Your local Beseler dealer has a list of current price ranges to
service Beseler photographic equipment. Any repair likely to exceed the
maximum recommended service price will be estimated and held for
your approval before work is begun.
PAYMENT: Your check for $25.00 must accompany your request for an
estimate, you may charge your VISA or MASTERCARD account. Repairs
must be paid in full prior to return to the owner. Personal checks or
VISA/MASTERCARD are accepted. (If you pay with VISA or
MASTERCARD, please give the account number and expiration date.)
OBSOLETE EQUIPMENT: Beseler reserves the right to refuse repairs to
items that have been discontinued for five (5) years.
IN-WARRANTY SERVICE: There is no charge for service performed
during the warranty period. PROOF OF PURCHASE is required for
warranty service and must be enclosed with the return. Terms of
warranty are explained above.
CHARLES BESELER COMPANY
2018 WEST MAIN STREET
PO BOX 431
STROUDSBURG, PA 18360
1-800-237-3537
customers[email protected]
Table of contents
Other Beseler Lighting Equipment manuals


