BESEN BS20 BA-11kW-APP User manual

IDSV01-0821
User Guide
Bedienungsanleitung
Wallbox
BS20 BA-11kW-APP
BS20 BC-11kW-APP
ENGLISH DEUTSCH
BESEN

PLATE WALLBOX
Model BS20 BC-11kW-APP Overview
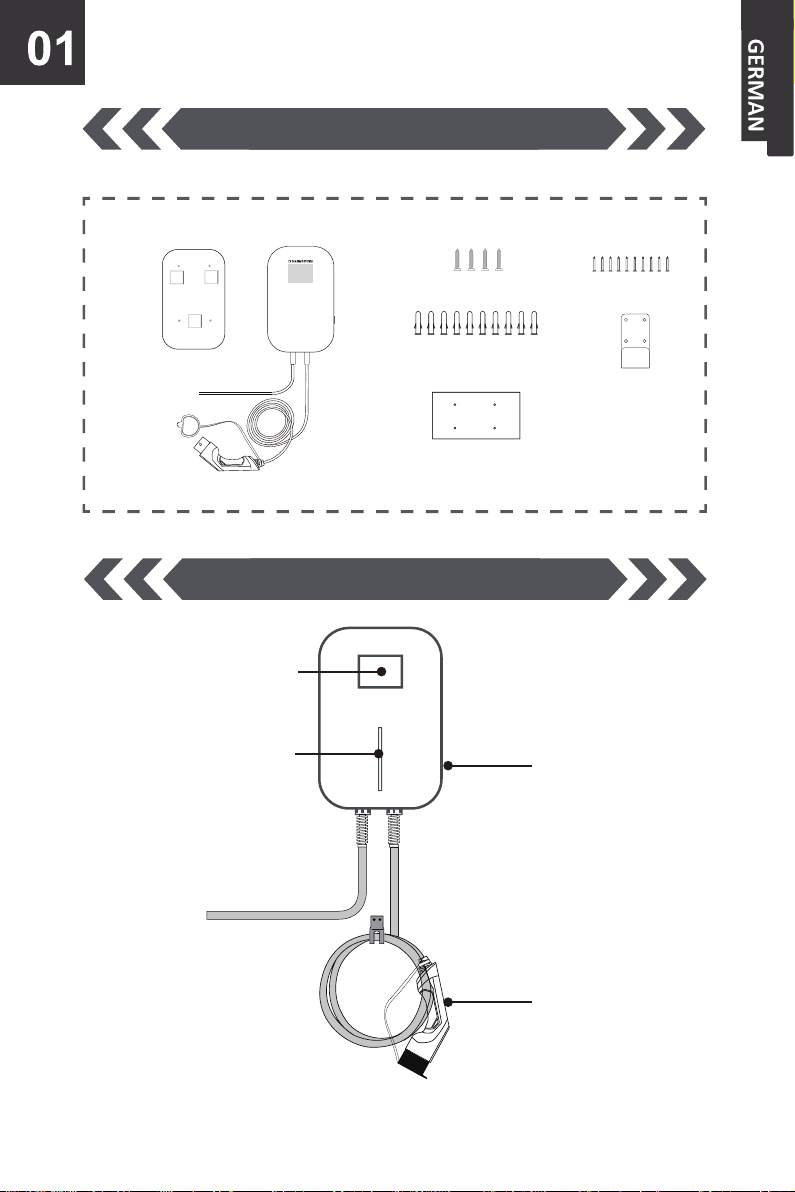
Wallbox Overview
SCREWS FOR HOLDER
HOOK
30mm SCREWS
30mm PLASTIC BOLTS
REFERENCE PAPER
Accessories of BS20 BC-11kW-APP
Display Screen
LED On/Off button
Charging cable with
type 2 charging plug

Technical Parameters Level
2 EV Wallbox BS20 BC-11kW-APP
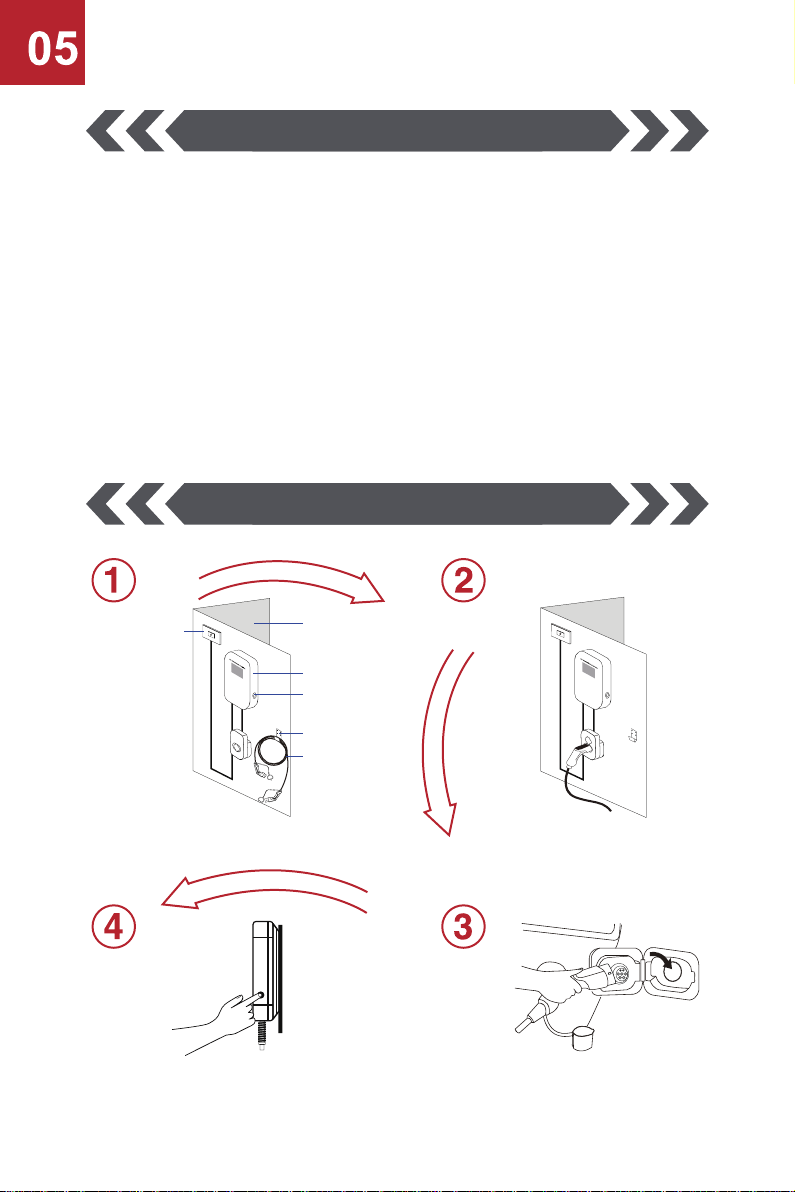
Instruction for Use
Distribution Box
Wall
Charging Station
Holder
Button
Charging Plug
Hook
1 2
3
◆Hang the cable on the hook when it is not in use
Make sure the wallbox
is connected to power Press the button on the
right of the wallbox to
start/stop charging
Connect the EV and the wallbox with the
EV charging cable
Model:
Power connection:
Mains voltage
Output rating (max.):
Output current (max):
Residual current device with
direct current detection:
Operating temperature range:
Operating humidity range: IP
protection class:
Certificates and approval:
Installation type:
Charge start:
Warranty:
With charging cable and type 2 charging plug
3 phase current (3P + N + PE)
AC 230/400 V ± 10%, 50/60 Hz
11 kW
16 A per phase
30 mA AC + 6 mA DC
-25°C 〜 55°C
0 - 95 %
IP 66
IEC 62752 und IEC61851, CE, (EMC und LVD), RoHS
Wall or stand installation (Stand is optional) Start
Start button on the wallbox
2 years

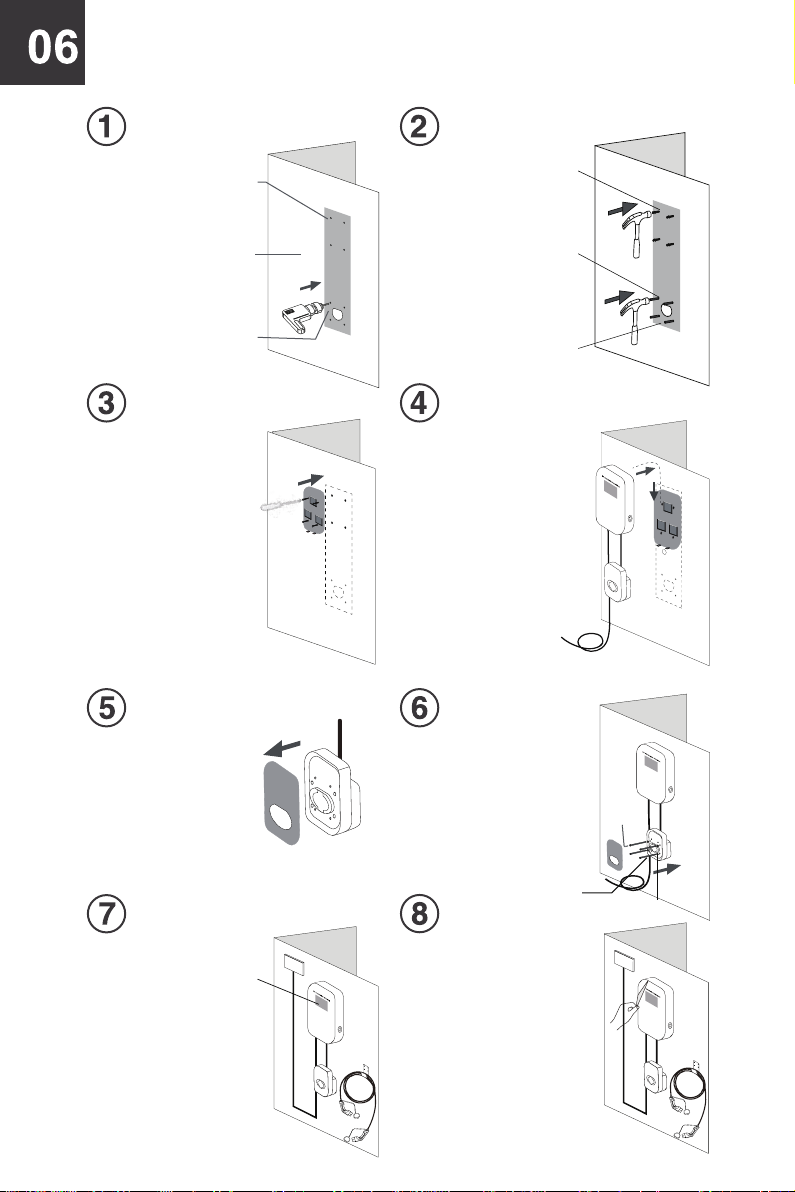
Installation Guide
REFERENCE PAPER
of installing screw hole size
and position
Hammer the 30mm
PLASTIC BOLTS into
the holes
Take down the
REFERENCE PAPER
from the wall later
Mount the STATION into
PLATE on the wall
This is the final completion pic,
you can put the HOOK and
HOLDER anywhere you need
The cable can
be hung on the
HOOK and HOLDER
Fix the PLATE
with 30mm SCREWS
on the wall
Drill the holes
according to the
REFERENCE PAPER
Wall
Tear off the
protective film

:DOOER[2YHUYLHZ
$FFHVVRULHVRI0RGHl BS20 BA-11kW-APP
SOCKETPLATE WALLBOX
95mm SCREWS
HOOK ALLEN KEY
30mm SCREWS
30mm METAL BOLTS
30mm PLASTIC BOLTS
REFERENCE PAPER
SCREW SHIM
Wallbox BS20 BA-11kW-APP2YHUYLHZ
Display Screen
LED On/Off button
Socket type 2
Technical Parameters
Level 2 EV Wallbox
Instruction for use
Distribution Box Wall
Charging Station
Button
Charging Plug
Hook
◆ Hang the cable on the hook when it is not in use
Make sure the walbox
is connected to power
Press the button on the
right side of the wallbox
to start/stop charging
Connect the EV and the wallbox
with the EV charging cable
Insert the plug into socket
Model:
Power connection:
Mains voltage
Output rating (max.):
Output current (max):
Residual current device with
direct current detection:
Operating temperature range:
Operating humidity range: IP
protection class:
Certificates and approval:
Installation type:
Charge start:
Warranty:
With charging socket type 2
3 phase current (3P + N + PE)
AC 230/400 V ± 10%, 50/60 Hz
11 kW
16 A per phase
30 mA AC + 6 mA DC
- 25°C 〜 55°C
0 - 95 %
IP 66
IEC 62752 und IEC61851, CE, (EMC und LVD), RoHS
Wall or stand installation (Stand is optional) Start button
on the wallbox
2 years

Installation Guide
REFERENCE PAPER
of installing screw hole size
and position
Hammer the 30mm
PLASTIC BOLTS
into the holes
Hammer the
30mm METAL BOLTS
into the holes
Take down the
REFERENCE PAPER
from the wall later
Take out the plate
from the body of
charging SOCKET
Connect the inlet cable and
the power supply correctly
Drill the holes according to
the REFERENCE PAPER
Fix the PLATE with
30mm SCREWS on the wall
Embed STATION into
PLATE on the wall
Fix the SOCKET on the wall
with95mm SCREWS
by ALLEN KEY
and put the plate back to the
body of SOCKET
Screw Shim
Wall
This is the final completion pic, you can
put the HOOK anywhere you need
The cable can be hung on the HOOK
95mm SCREWS
Tear off the
protective film
1. Emergency stop
2. Over current
3. Over cemperature
4. Leakage protection
5. Short circuit
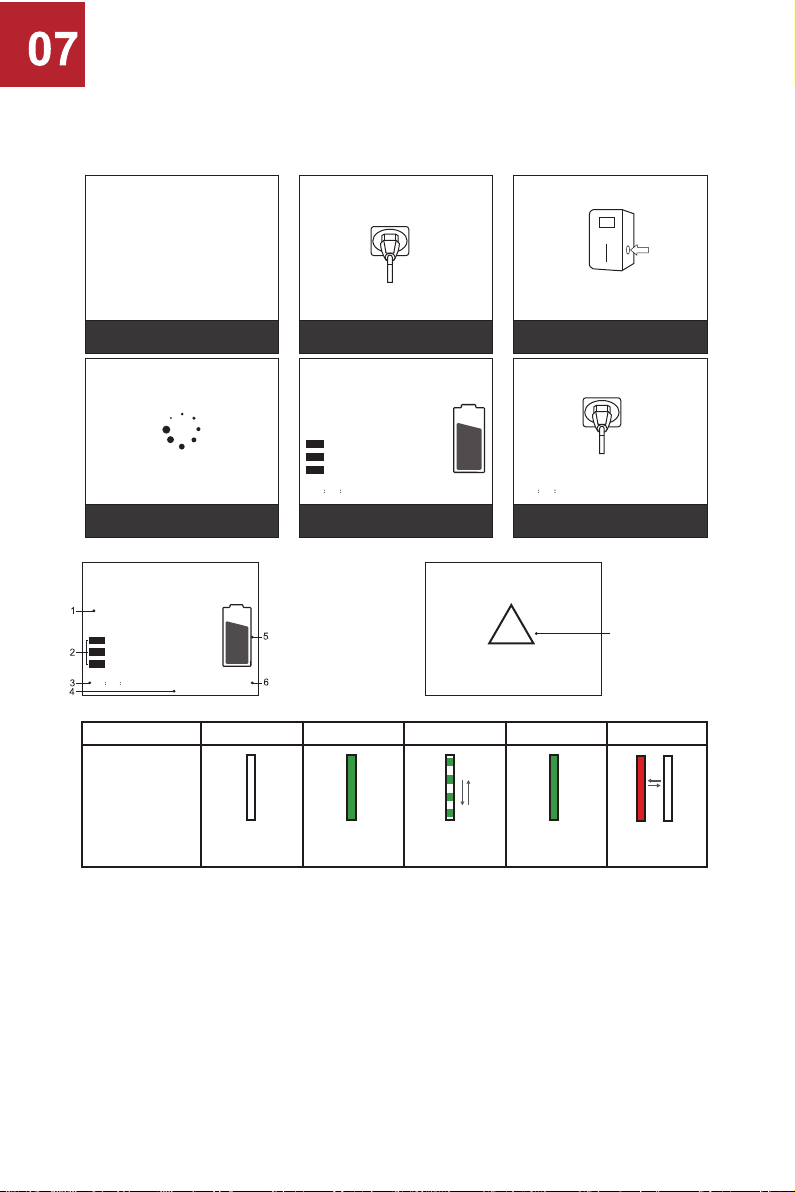
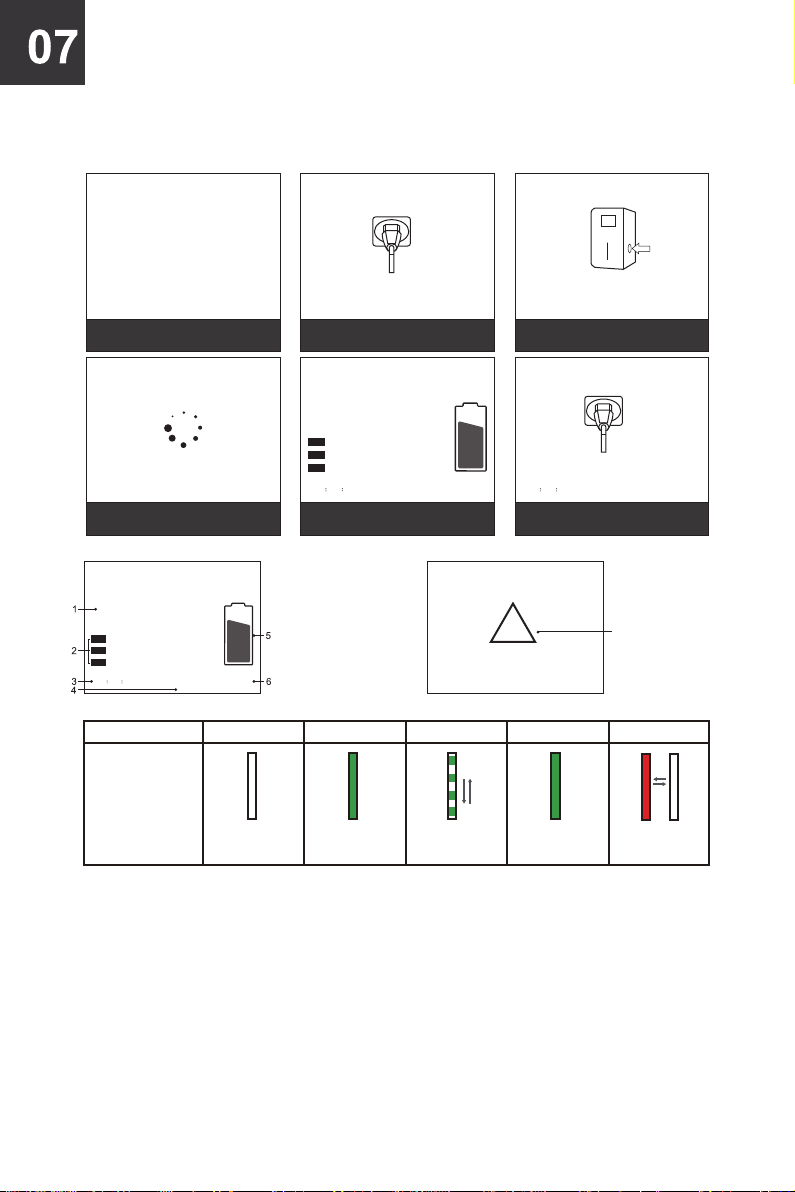
IDLE CONNECTED CHARGING FINISHED ERROR
Explanation
of LED Status OFF light
Con�nuous Con�nuous
light
Rolling Red
flashing
EV Charger
23.7℃00 00 06 0.00Kwh
KW
L1:220V 0.00A
0.08A
0.08A
L2:220V
L3:220V
0.0
Wait for the car to be fully charged During charging process Stop charging and
wait for pulling out the plug
Start-up screen
(the version no. is for reference only)
(9$&&KDUJHU
EV Charger
22.8℃
EV Charger
22.8℃
EV Charger
22.8℃
WAITING
EV Charger
22.8℃00 10 00 0.00Kwh
Disconnect the Charging Connector
&RQQHFWWKH&KDUJLQJ&RQQHFWRU Press The Button
EV Charger
23.7℃00 00 06 0.00Kwh
KW
L1:220V 0.00A
0.08A
0.08A
L2:220V
L3:220V
0.0
THREE PHASE
Illustration of Screen and LED
EV Charger
29.4℃
Short Current
Possible
!fault warning
1. Real-time power
2. Three live wire data
3. Charging time
4. Power consumption
5. Charging power
6. Wallbox temperatur
Wait for identification
Wait for connecting the charging
cable with the Wallbox and car.
When minor problems like short circuit occou, the wallbox will autommatically restart.
During the restart the box will try to solve the minior problem and to continue to charge.
In case of major failures, the wallbox will not be able to recover and restart again. Once the
user pulls out the charging plug, the wallbox will automatically count down 10 seconds and
restart afterwards. In this case, an electrician must perform troubleshooting.
Note:
Maintenance & Cleaning
Security Warning
Intelligent Digital Services GmbH
+ 49 (0) 451 489 78 323
www.ids-digialtv.de, [email protected]
Maria-Goeppert-Straße 5, D-23562 Lübeck
To avoid damage or injury, be sure to observe all safety instructions,
warnings and notes marked with the - symbol must be observed!
The user must have read these instructions including all safety instructions and warnings.
The user must have read and understood this manual including all safety instructions.
Should the user fail to observe and comply with the operating, care and safety instructions in
this manual and on the wallbox, it may result in malfunction, electric shock, fire and/or
serious injury to the user and damage to either the vehicle or the wallbox.
Any damage caused by failure to follow the instructions is excluded from the warranty.
The installation of the wallbox may only be carried out by properly trained electricians.
The wallbox has been designed and manufactured in accordance with the established
directives of the European Union and complies with all required requirements, safety
regulations and standards.
Before use, regularly check the wallbox and charging cable for damage, there is a risk of
electric shock when operating a defective charging station.
DO NOT use the wallbox if the device is damaged and DO NOT attempt to repair any
parts of the charging station yourself! There is a risk of electric shock.
Ensure that all safety devices are available and operational at all times.
The charging station must not be used in flammable environments, such as
environments with volatile gas.
Unauthorized modifications or conversions are not permitted. NEVER open the wallbox.
Ensure that the wallbox is only operated in permissible ambient temperatures , altitudes
and humiditye.
NEVER allow children to handle the wallbox.
Our AC charging stations are subject to strict quality control. Nevertheless, if any
malfunction or problem occurs within two years from the day of purchase, you can report
it to the dealer and we will provide free repair during this period.
Any direct damage or malfunction caused by neglect, incorrect operation or handling,
installation or repair by the user or external influences are not covered by the warranty.
The wallboxes are largely maintenance-free, but this does not release the user from
regularly checking the wallbox, the charging cable and the charging plugs for any
damage.
The user should avoid any shocks to the wallbox, however, if the wallbox is subject to a
shock, the wallbox should be checked for damage
Never clean the wallbox and cables with acids, alkalis.
Never expose the wallbox to corrosive and explosive gases and protect the device as far
as possible from snow, wind and sand.

DECLARATION OF CONFORMITY
Wallbox with type 2 charging socket:
Product:
Brand:
BS20 BA-11kW-APP, Wallbox 11kW-with type 2 charging socket
Besen
Art.-no.: 0010002
EAN: 4260105915043
Wallbox with charging cabel and type 2 charging plug
Product:
Brand:
BS20 BC-11kW-APP, Wallbox 11kW with charging cable and type 2 charging
plug Fte maximal
Art.-no.: 0010001
EAN: 4260105915012
Hereby, Intelligent Digital Services GmbH declares that the radio system type "Fte-WB2-11-
LS-Wallbox 11kW-with type 2 charging socket and Fte-WB2-11-LK-Wallbox 11kW-with 6 m
charging cable and type 2 charging plug" is in compliance with Directive 2014/53/EU. The
full text of the EU Declaration of Conformity is available at the following web address:
https://www.ids-digital.de/content_ids/1_fte_maximal/products/
echarge/0010001/0010001__CE_Konformitaet.pdf
Address of the manufacturer / distributor:
Intelligent Digital Services GmbH
Maria-Goeppert-Straße 5
23562 Lübeck, Germany
Commercial register entry: Lübeck Local Court HRB 12799
WEEE-reg.-no.: DE45546666
Important information for the proper disposal of the product in
accordance with Directive 2012/19/EU. At the end of its service life, the
product must not be disposed of as municipal waste.
It must be taken to a collection point for hazardous waste or to a dealer
offering this service.
Subject to technical changes and errors.
Subject to changes and printing errors. Status 08/21
MONTAGEPLATTE WALLBOX
Übersicht
Wallbox-Übersicht
SCHRAUBEN FÜR
MONTAGEPLATTE
HAKEN
6 mm DÜBEL
30 mm SCHRAUBEN
BOHRSCHABLONE
Zubehör für BS20 BC-11kW-APP
LCD-Anzeige
LED LADEZU-
STANDSANZEIGE An / Aus
Ladekabel mit
Ladestecker Typ 2

Level 2 EV Ladestation
Spezifikation
Bedienungsanleitung
Verteilerkasten
Wand
LADESTATION
Halter (optional)
Taste
Ladestecker
Haken
1 2
3
◆Hängen Sie das Kabel an den Haken, wenn es nicht verwendet wird.
Stellen Sie sicher, dass die Wallbox an
die Stromversorgung angeschlossen ist.
Drücken Sie die Taste auf der
rechten Seite der Wallbox, um
den Ladevorgang zu starten
oder zu stoppen.
Verbinden Sie das Elektrofahrzeug und
die Wallbox mit dem EV-Ladekabel.
mit Ladekabel und Ladestecker Typ 2
Drehstrom, 3 Phasen (3P + N + PE)
AC 230/400 V ± 10%, 50/60 Hz
11 kW
16 A je Phase
30 mA AC + 6 mA DC
-25°C ~ 55°C
0 - 95 %
IP 66
IEC 62752 und IEC61851, CE, (EMC und LVD), RoHS
Wand- oder Standsäuleninstallation
Startschalter an der Wallbox
2 Jahre
Modell:
Netzanschluss:
Netzspannung:
Maximale Ausgangsleistung:
Maximaler Ausgangsstrom:
Fehlerstrom-Schutzeinrichtung
mit Gleichstromerkennung:
Betriebstemperaturbereich:
Betriebsfeuchtigkeitsbereich:
IP-Schutzart:
Zertifikate und Zulassung:
Installationsart:
Ladestart:
Garantie:

Installationsanleitung
Bohrschablone
für die Größe und die
Position der Befestigungs-
bohrung
Hämmern Sie die
6 mm Kunststoffdübel
in die Löcher
Nehmen Sie die
Bohrschablone
von der Wand ab
Sie können den Haken und
den optionalen Halter an jedem
beliebigen Ort installieren
Hängen sie das Kabel
am Haken auf
Befestigen Sie die
Montageplatte mit
den 30 mm Schrauben
an der Wand
Bohren Sie die
Löcher gemäß der
Bohrschablone
Wand
Entfernen Sie
die Schutzfolie
Hängen Sie die
Wallbox in die
Montageplatte an
der Wand

Wallbox-Übersicht
Zubehör für BS20 BA-11kW-APP
STECKDOSE
MONTAGEPLATTE WALLBOX
95mm SCHRAUBEN
HAKEN
IMBUSSCHLÜSSEL
30mm SCHRAUBEN
30mm GEWINDEHÜLSEN
6 mm DÜBEL
BOHRSCHABLONE
UNTERLEGSCHEIBEN
Model LS Wallbox Übersicht
LCD Anzeige
LED LADE -
ZUSTANDSANZEIGE An / Aus Taste
Steckdose Typ 2

Spezifikation
Level 2 EV Ladestation
Bedienungsanleitung
400V Anschluss Wand
Ladestation
Taste
Steckdose
Halter
◆ Hängen Sie das Kabel an den Haken, wenn es nicht verwendet wird
Stellen Sie sicher, dass die Wallbox
an die Stromversorgung
angeschlossen ist.
Drücken Sie die Taste auf der
rechten Seite der Wallbox, um den
Ladevorgang zu starten oder zu
stoppen.
Stecken Sie den
Ladestecker
in die Steckdose
Verbinden Sie das
Fahrzeug mit dem
Ladekabel
Modell:
Netzanschluss:
Netzspannung:
Maximale Ausgangsleistung:
Maximaler Ausgangsstrom:
Fehlerstrom-Schutzeinrichtung
mit Gleichstromerkennung:
Betriebstemperaturbereich:
Betriebsfeuchtigkeitsbereich:
IP-Schutzart:
Zertifikate und Zulassung:
Installationsart:
Ladestart:
Garantie:
mit Ladesteckdose Typ 2
Drehstrom, 3 Phasen (3P + N + PE)
AC 230/400 V ± 10%, 50/60 Hz
11 kW
16 A je Phase
30 mA AC + 6 mA DC
-25°C ~ 55°C
0 - 95 %
IP 66
IEC 62752 und IEC61851, CE, (EMC und LVD),
RoHS Wand- oder Standsäuleninstallation
Startschalter an der Wallbox
2 Jahre
95 mm Schrauben
Unterleg-
scheibe
Installationsanleitung
BOHRSCHABLONE
für die Größe der
Befestigungsbohrung
Hämmern Sie die 6 mm
Dübel in die Bohrlöcher
Hämmern Sie die 30 mm
Gewindehülsen in die
Bohrlöcher für die Steckdose
Nehmen Sie das
Bohrschablone
von der Wand ab
Entfernen Sie die Abdeckung
von dem Steckdosengehäuse
Schließen Sie das
Anschlusskabel an
Bohren Sie die Löcher
gemäß der
Bohrschablone
Befestigen Sie die
Montageplatte mit den
30 mm Schrauben an
der Wand
Hängen Sie die Wallbox
in die Montageplatte an
der Wand
Befestigen Sie die Ladesteckdose
mit den 95 mm langen Schrauben
und Unterlegscheiben an der Wand
und setzen Sie die Abdeckung
wieder auf das Steckdosengehäuse
Wand
Das Kabel kann am HAKEN
aufgehängt werden
Entfernen Sie
die Schutzfolie
1. Aktuelle Ladeleistung
2. Daten zu den 3 Phasen
3. Ladezeit
4. Stromverbrauch
5. Ladesymbol
6. Wallboxtemperatur
1. Not-Aus
2. Überstrom
3. Übertemperatur
4. Fehlerstrom
5. Kurzschluss
LEERLAUF MIT DEM FAHRZEUG
VERBUNDEN LADEN FERTIG FEHLER
LED-Anzeigebalken
Statusbeschreibung
AUS komplette LED-
Anzeigebalken
leuchtet grün
LED-Anzeige-
balken Lauflicht
(grün)
LED-Anzeige-
balken blinkt rot
EV Charger
23.7℃0.00Kwh00 00 06
KW
L1:220V 0.00A
0.08A
0.08A
L2:220V
L3:220V
0.0
Warten Sie auf den
Ladevorgang Ladevorgang Beenden Sie den Ladevorgang
und ziehen den Stecker
Warten Sie bitte auf die
Fahrzeugidentifizirung
Bitte verbinden Sie die Wallbox
mit dem Fahrzeug
Startbildschirm
(die Versionsnummer dient nur als Referenz)
EV AC Charger
EV Charger
22.8℃
EV Charger
22.8℃
EV Charger
22.8℃
WAITING
EV Charger
22.8℃0.00Kwh00 10 00
Disconnect the Charging Connector
Press The ButtonConnect the Charging Connector
EV Charger
23.7℃0.00Kwh00 00 06
KW
L1:220V 0.00A
0.08A
0.08A
L2:220V
L3:220V
0.0
Erklärung zum Bildschirmmenü und
LED Anzeigebalken
DREI PHASEN
EV Charger
29.4℃
Short Current
Possible
fault warning
!
komplette LED-
Anzeigebalken
leuchtet grün
Sollte ein kleiner technische Fehlfunktion auftreten, wie z. B. ein Kurzschluss, wird die Wallbox
automatisch neu gestartet, mit dem Versuch den Fehler automatisch zu beheben und den
Ladevorgang fortzusetzen.
Sollte schwerwiegendere technische Fehlfunktion auftreten, kann die Wallbox nicht
automatisch wiederhergestellt werden. In diesem Fall zählt die Wallbox nach dem Ziehen des
Ladesteckers 10 Sekunden herunter und startet neu. In diesem Fall muss ein
Elektrofachmann die Fehlersuche durchführen.
Hinweis:

Wartung & Reinigung
Überprüfen Sie vor der Nutzung regelmäßig die Wallbox und das Ladekabel auf Schäden,
beim Betrieb einer defekten Ladestation besteht die Gefahr eines elektrischen Schlages.
Verwenden Sie die Wallbox NICHT, wenn das Gerät beschädigt ist, und versuchen Sie
NICHT, irgendwelche Teile der Ladestation selbst zu reparieren! Es besteht
Stromschlaggefahr.
Stellen Sie sicher, dass alle Sicherheitseinrichtungen jederzeit verfügbar sind und
funktionsbereit sind.
Die Ladestation darf nicht in enflammbaren Umgebungen, wie z. B. Umgebungen mit
flüchtigem Gas verwendet werden.
Unbefugte Änderungen oder Umbauten sind nicht gestattet. Öffnen Sie NIE die Wallbox.
Achten Sie darauf, dass die Wallbox nur in zulässigen Umgebungstemperaturen , Höhen und
Luftfeuchtigkeite betrieben wird.
Lassen Sie Kinder NIEMALS mit der Wallbox hantieren.
Unsere AC-Ladestationen unterliegen strengen Qualitätskontrollen. Sollten dennoch ab dem Tag
des Kaufes innerhalb von zwei Jahren Fehlfunktionen und Problem auftreten, können Sie diese
beim Händler anzeigen und wir gewähren in diesem Zeitraum eine kostenlose Reparatur.
Jegliche direkte Beschädigungen oder Fehlfunktionen, die durch Vernachlässigung, falsche
Bedienungen oder Umgang, Installation oder Reparatur durch den Nutzer oder durch äußerliche
Einflüsse verursacht wurden, sind nicht durch die Garantie mit abgedeckt.
Die Wallboxen sind weitestgehend wartungsfrei, das entbindet den Nutzer nicht von einer
regelmäßigen Überprüfung der Wallbox, des Ladekabels und der Ladestecker auf etwaige
Beschädigungen.
Der Nutzer sollte jegliche Stöße an der Wallbox vermeiden, sollte dennoch die Wallbox einem
Stoß unterlegen sein, sollte die Wallbox auf Beschädigungen geprüft werden
Reinigen Sie die Wallbox und Kabel niemals mit Säuren, Laugen
Setzen Sie die Wallbox niemals korrosive- und explosive Gase aus und schützen Sie das Gerät
weitesgehend vor Schnee, Wind und Sand.
Intelligent Digital Services GmbH
+ 49 (0) 451 489 78 323
www.ids-digialtv.de, [email protected]
Maria-Goeppert-Straße 5, D-23562 Lübeck
Sicherheitswarnung
Um Schäden oder Verletzungen zu vermeiden, beachten Sie unbedingt alle mit dem
-Zeichen versehenen Sicherheitsanweisungen, Warnhinweise und Hinweise!
Der Nutzer muss diese Anleitung inklusive alle Sicherheitshinweise gelesen und verstanden
haben. Sollte der Nutzer die Bedien-, Pflege- und Sicherheitshinweise in dieser Anleitung und auf
der Wallbox nicht beachten und einhalten, kann es zu Fehlfunktionen, Stromschlägen, Feuer und/
oder schweren Verletzungen für den Nutzer und Schäden entweder am Fahrzeug oder an der
Wallbox führen.
Alle Schäden, die durch Nichtbeachtung der Anweisungen verursacht werden, sind von der
Garantie ausgeschlossen.
Die Installation der Wallbox darf ausschließlich nur durch entsprechend ausgebildet
Elektrofachkraft vorgenommen werden.
Die Wallbox wurde gemäß den festgesetzten Richtlinien der Europäischen Union entwickelt und
hergestellt und entspricht aller geforderten Anforderungen, Sicherheitsvorschriften und Normen.

KONFORMITÄTSERKLÄRUNG
Mit Type 2 Ladesteckdose:
Produkt:
Marke:
BS20 BC-11kW-APP, Wallbox 11kW-mit Typ 2 Ladesteckdose
Besen
Art.-Nr.:
0010002
EAN: 4260105915043
Mit Ladekabel mit Typ 2 Ladestecker
Name:
Marke:
BS20 BC-11kW-APP, Wallbox 11kW mit 6 m Ladekabel und Typ 2 Ladestecker
Besen
Art.-Nr.:
0010001
EAN: 4260105915012
Hiermit erklärt Intelligent Digital Services GmbH, dass der Funkanlagentyp „BS20 BA-11kW-
APP-Wallbox 11kW-mit Ladesteckdose und BS20 BC-11kW-APP-Wallbox 11kW-mit 6 m
Ladekabel“ der Richtlinie 2014/53/EU entspricht. Der vollständige Text der EU-
Konformitätserklärung ist unter der folgenden Internetadresse verfügbar:
https://www.ids-digital.de/content_ids/1_fte_maximal/products/
echarge/0010001/0010001__CE_Konformitaet.pdf
Adresse des Herstellers / Inverkehrbringers:
Intelligent Digital Services GmbH
Maria-Goeppert-Straße 5
D-23562 Lübeck
Handelsregistereintrag: Amtsgericht Lübeck HRB 12799
WEEE-Reg.-Nr.: DE45546666
Wichtige Informationen für die ordnungsgemäße Entsorgung des Produkts
gemäß der Richtlinie 2012/19/EU. Am Ende seiner Nutzungsdauer darf das
Produkt nicht als Siedlungsabfall entsorgt werden.
Es muss zu einer Sammelstelle für Sonderabfälle oder zu einem Händler, der
diesen Service anbietet, gebracht werden.
Technische Änderungen und Irrtümer vorbehalten.
Änderungen und Druckfehler vorbehalten. Stand 08/21
This manual suits for next models
1
Table of contents
Languages:
Popular Automobile Accessories manuals by other brands


ULTIMATE SPEED
ULTIMATE SPEED 279746 Assembly and Safety Advice

SSV Works
SSV Works DF-F65 manual

ULTIMATE SPEED
ULTIMATE SPEED CARBON Assembly and Safety Advice

Witter
Witter F174 Fitting instructions

WeatherTech
WeatherTech No-Drill installation instructions

TAUBENREUTHER
TAUBENREUTHER 1-336050 Installation instruction