Bessey BV-HW45 User manual

1
VISES
Étaux
El tornillo de banco
USER’S MANUAL
Manuel de l’utilisateur
El manual de usuario
Contact information for questions or concerns :
BESSEY®Tools North America:
• Telephone:18008281004
• Email:[email protected]

2
PRECAUTIONARY STATEMENT
Consignes de sécurité
Declaracionespreventivas
1. Caution:
• Misuseofvisecancauseseriousinjurytoeyes,hands,limbsetc.
• Toensuresafety,thevisemustbesetupandusedproperly
• Beforesetupanduse,read,understandandfollowallinstructionsasoutlinedbelow
1. Mise en garde :
•
Unemauvaiseutilisationdel’étaupeutentraînerdesblessuresgravesauxyeux,auxmains,auxmembres,etc.
• Pourquevotresécuritésoitassurée,l’étaudoitêtreinstalléetutilisécorrectement.
• Veuillezlireetvousassurerdecomprendretouteslesinstructionsci-dessousavantd’installeretd’utiliserl’étau.
1. Precaución:
• Elusoincorrectodeltornillodebancopuedecausarlesionesgravesenlosojos,lasmanos,las
extremidades,etc.
• Paragarantizarlaseguridad,eltornillodebancodebeinstalarseyutilizarseadecuadamente
• Antesdeello,debecomprenderyseguirtodaslasinstruccionestalcomosedetallanacontinuación
2. When setting up the vise:
• Usepropersizebolts,nuts,lockandatwashersinallbasemountingholes.Neverweldthebase
ofthevisetoanymetalobject.
• Onlyhandtightenswivelbaselockdownnutsatthesidesofthevise
• Neveruseapipeextensiontotightenlocknuthandles.Thiscancausethehandlestobendandoverstress
thelockdownbolts
• Makesurethebenchtoptowhichtheviseismountedisproperlysecured
2. Installation de l’étau :
• Utilisezdesboulons,desécrous,desrondellesdeblocageetdesrondellesplatesdedimension
adéquatepourtouslestrousdexationdelabase.Nesoudezjamaislabasedel’étauàunquel
conqueobjetmétallique.
• Utilisezseulementvosmainspourserrerlesboulonsdeblocagedelabasepivotantesituéssurlescôtésdel’étau.
• N’utilisezjamaisderallongepourserrerlespoignéesdesboulonsdeblocage,carcelapeutfaireplier
lespoignéesetcréerunecontraintetropélevéepourlesboulonsdeblocage.
• Vériezqueledessusdel’établisurlequell’étauestinstalléestbienxé..
2. Cuando instale el tornillo de banco:
• Utilicepernos,tuercasyarandelasplanasdeltamañoadecuadoentodoslosoriciosdemontajedelabase.
Nuncasueldelabasedeltornillodebancoaningúnobjetometálico.
• Solamenteaprieteamanolastuercasdebloqueodelabasegiratoriaalosladosdeltornillodebanco
• Nuncautiliceunaextensióndetuberíasparaapretarlosmangosdecontratuerca.Estopuedehacerquelos
mangossedoblenyqueseapliqueunexcesodetensiónenlospernosdebloqueo
• Asegúresedequelapartesuperiordelamesasobrelacualestámontadoeltornillodebancoestécorrectamente
asegurada

3
PRECAUTIONARY STATEMENT
Consignes de sécurité
Declaracionespreventivas
3. When using the vise:
• Alwaysuseaviseofpropersizeandcapacitytoholdyourwork
• Neveruseahammer,pipeextensionorcheaterbaronthehandleofthevise
• Neverunscrewmoveablejawbeyondthemaximumspeciedopeningofthevise
• Neveruseaviseasapressforassemblyordisassemblyofobjects
• Alwaysweareyeandfaceprotectionwhenstrikingobjectsheldbytheviseor,whenusingpowertools
withavise
PleasereferencetheBESSEYToolswebsiteforafullSafeToolUseandSelectionatthefollowingweb
address:http://www.besseytools.com/en/customer_support_safetools.php
3. Utilisation de l’étau :
• Utiliseztoujoursunétaudegrandeuretdecapacitéadéquatespourretenirvotrepièce.
• N’utilisezjamaisderallongesurlapoignéedel’étauetnefrappezpassurcelle-ciavecunmarteau.
• Nedéplacezjamaislamâchoiremobiledefaçonàcequ’elledépassel’ouverturemaximalespéciée
del’étau.
• N’utilisezjamaisunétaucommeunepressepourassembleroudésassemblerdesobjets.
• Porteztoujoursuneprotectionpourlesyeuxetpourlevisagelorsquevousfrappezdesobjetsretenus
parl’étauoulorsquevousutilisezdesoutilsélectriquesaveccelui-ci.
Pourchoisirdesoutilsetlesutiliserdefaçonsécuritaire,veuillez-vousréférerausiteWebdeOutils
BESSEY,àl’adressesuivante:http://www.besseytools.com/fr/customer_support_npc.php
3. Cuando utilice el tornillo de banco :
• Siempreutiliceuntornillodebancodeltamañoylacapacidadadecuadosparasujetarsutrabajo
• Nuncautiliceunmartillo,unaextensióndetuberíasniuntubopalancaenelmangodeltornillode
banco
• Nuncadesatornillelatenazamoviblemásalládelaaperturamáximaespecicadadeltornillodebanco
• Nuncautiliceuntornillodebancocomounaprensaparaarmarydesarmarobjetos
• Siempreuseprotecciónparalosojosylacaracuandogolpeeobjetossostenidosporeltornillode
banco o cuando utilice herramientas eléctricas con un tornillo de banco

4
MOUNTING GUIDELINES -Instructionsd’installation-Pautasdemontaje
Mounting guidelines for vises:
• Placeviseonthebenchandinthepositionwhereyouwouldlikeittobeplaced.NOTE:Mostrighthandedpeople
preferthevisemountedontheleftendofthebench,theoppositeforthelefthanded.
• Placevise1/8"fromthefacingedgeofthebench.Placethebaseofthevisewithoutamountingxture(where
applicable)closesttothefrontofthebench.
• Ensuretheundersideofboltlocationisclearoflegs,brackets,drawersetc.
• Markthecenteroftheboltholelocationsanddrillthecorrectsizedhole(seebelow)
• Mountvisewithcorrectdiameterbolt(1
1⁄2
"longerthanbenchthickness),atwashersandnuts.Usemin.grade5bolt.
• BV-MPV5:Boltholediameter17/32".Boltdiameter1/2".
• BV-HD60:Boltholediameter15/32".Boltdiameter3/8".
• BV-HW45: Boltholediameter7/16".Boltdiameter3/8".
• BV-HD40:Boltholediameter13/32".Boltdiameter5/16".
Instructions d’installation pour étau d’établi :
• Positionnezl’étausurl’établiàl’endroitoùvoussouhaitezqu’ilsoitplacé.REMARQUE:Laplupartdesdroitiers
préfèrentinstallerunétauàl’extrémitégauchedel’établialorsquelesgaucherspréfèrentlefaireàl’extrémitédroite.
• Placezl’étauà1/8podel’extrémitédel’établi.Positionnezlabasesanssupportdexation(lorsquepossible)leplus
prèspossibledudevantdel’établi.
• Assurez-vousqu’iln’yapasdepattes,deferrures,detiroirsoud’autresobstaclesendessousdel’endroitoùles
boulonsserontpossiblementsitués.
• Marquezlecentredestrousdesboulonsetpercezdestrousdubondiamètre(voirci-dessous).
• Installezl’étauavecdesboulonsdubondiamètre(etd’unelongueurdépassantl’épaisseurdel’établide1
1⁄2
po),
desrondellesplatesetdesécrous.Lesboulonsdoiventêtredeclasse5auminimum.
• BV-MPV5:Diamètredetroudeboulonde(17/32po).Diamètredeboulonde(1/2po).
• BV-HD60:Diamètredetroudeboulonde(15/32po).Diamètredeboulonde(3/8po).
• BV-HW45:Diamètredetroudeboulonde(7/16po).Diamètredeboulonde(3/8po).
• BV-HD40:Diamètredetroudeboulonde(13/32po).Diamètredeboulonde(5/16po).
Pautas de montaje para el tornillo de banco:
• Coloqueeltornillodebancosobrelamesayenlaposiciónenlaquelegustaríaqueestuviesecolocado.NOTA:La
mayoríadelaspersonasdiestraspreerenteneruntornillodebancomontadoalaizquierdadelamesa,mientrasque
laspersonaszurdaspreerenloopuesto.
• Coloqueuntornillodebancoa1/8"(0,32cm)delbordedecaradelamesa.Coloquelabasedeltornillodebancosin
unaccesoriodemontaje(cuandocorresponda)lomáscercaposiblealfrentedelamesa.
• Asegúresedequelaparteinferiordelaposibleubicacióndelpernonotengapatas,soportes,cajones,etc.
•
Marqueelcentrodelasubicacionesdelosoriciosdelospernosytaladreeloriciodeltamañocorrecto(véaseacontinuación)
• Monteeltornilloconelpernodeldiámetrocorrecto(1
1⁄2
"[3,81cm]máslargoqueelespesordelamesa),arandelas
planasytuercas.Utilicepernoscomomínimodegrado5.
• BV-MPV5:Diámetrodeloriciodelperno17/32"(1,35cm).Diámetrodelperno1/2"(1,27cm).
• BV-HD60:Diámetrodeloriciodelperno15/32"(1,19cm).Diámetrodelperno3/8"(0,95cm).
• BV-HW45:Diámetrodeloriciodelperno7/16"(1,11cm).Diámetrodelperno3/8"(0,95cm).
• BV-HD40:Diámetrodeloriciodelperno13/32"(1,03cm).Diámetrodelperno5/16"(0,79cm).
5
REPLACEMENT PARTS -Piècesderechange-Piezasderepuesto
Replacement Parts BV-MPV5:
ItemNumber,PartDescription
1. Spindle(1),castingnut(1),washer(1),screws(2),cotterpin(1):part#9050006
2. Jawinserts(2),screws(4):part#9050002
3. Jawinserts(3pcs),screws(4):part#9050003
4. Lockingscrews(3):part#9050004)
5. Swivelbase(2pcs):part#9050005
Pièces de rechange du BV-MPV5 :
Descriptionetnumérodelapièce
1. Mandrin(1),écroucoulée(1),larondelle(1),
lesvis(2),pinceàressort(1):piècenº9050006
2. Jawinsère(2),lesvis(4):piècenº9050002
3. Jawinsère(3pcs),lesvis(4):piècenº9050003
4. Visdeverrouillage(3):piècenº9050004
5. Basepivotante(2pcs):piècenº9050005
Piezas de repuesto BV-MPV5:
Númerodeartículo,descripcióndelapieza
1. Carrete(1),latuercadefundición(1),laarandela(1),lostornillos(2),lachaveta(1):n.°depieza9050006
2. Jawinserta(2),lostornillos(4):n.°depieza9050002)
3. Jawinserta(3piezas),lostornillos(4):n.°depieza9050003
4. Lostornillosdebloqueo(3):n.°depieza9050004
5. Basegiratoria(2unidades):n.°depieza9050005

6
REPLACEMENT PARTS -Piècesderechange-Piezasderepuesto
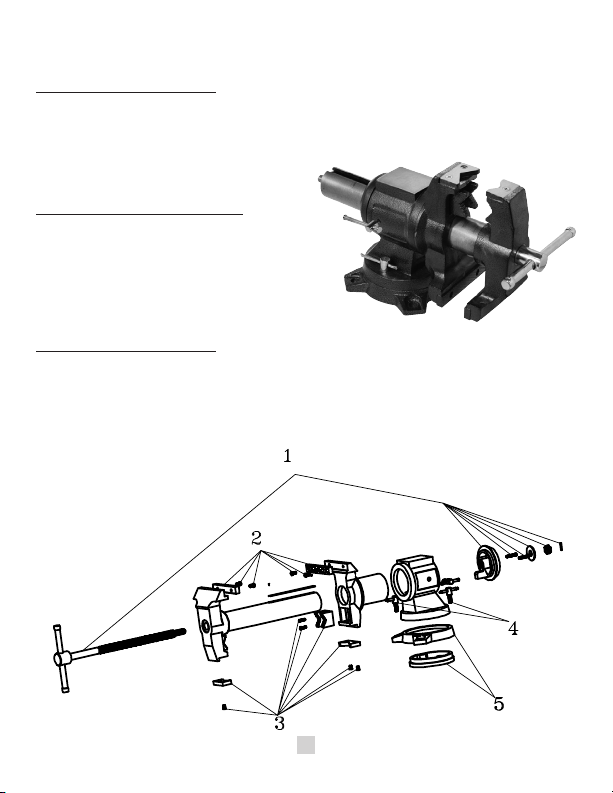
Replacement Parts BV-HD60:
ItemNumber,PartDescription
1. Spindle(1),spring(1),washer(1),cotterpin(1):part#9060006
2. Jawinserts(2),screws(4):part#9060002
3. Lockingscrews(2):part#9060003
4. Swivelbase(2pcs):part#9060004
5. Castingnut(1),washer(1),screw(1):part#9060007
Pièces de rechange du BV-HD60 :
Descriptionetnumérodelapièce
1. Mandrin(1),leressort(1),larondelle(1),
pinceàressort(1):piècenº9060006
2. Jawinsère(2),lesvis(4):piècenº9060002
3. Visdeverrouillage(2):piècenº9060003
4. Basepivotante(2pcs):piècenº9060004
5. Écroucoulée(1),larondelle(1),lavis(1):piècenº9060007
Piezas de repuesto BV-HD60:
Númerodeartículo,descripcióndelapieza
1. Carrete(1),resorte(1),laarandela(1),lachaveta(1):n.°depieza9060006
2. Jawinserta(2),lostornillos(4):n.°depieza9060002
3. Lostornillosdebloqueo(2):n.°depieza9060003
4. Basegiratoria(2unidades):n.°depieza9060004
5. Tuercafundida(1),laarandela(1),
eltornillo(1):n.°depieza9060007
2
1
7
REPLACEMENT PARTS - Pièces de rechange - Piezas de repuesto
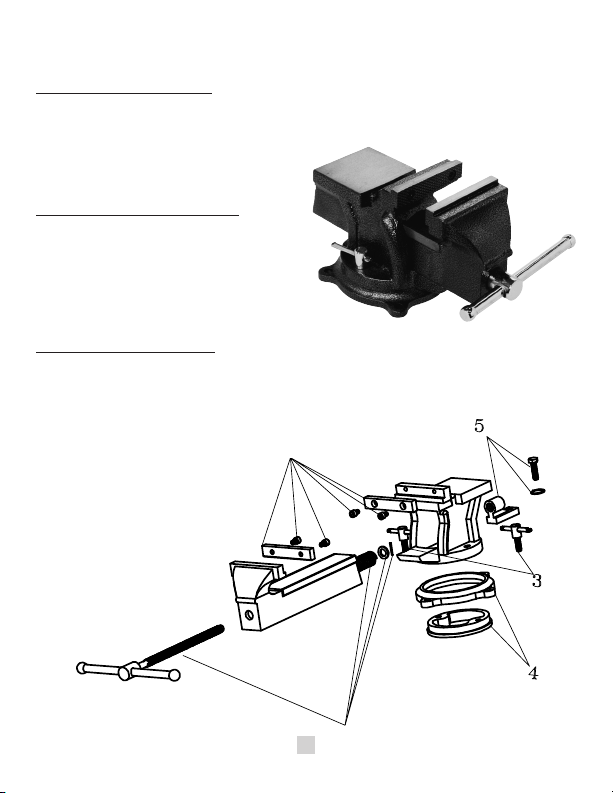
Replacement Parts BV-HD40:
ItemNumber,PartDescription
1. Spindle(1),spring(1),washer(1),cotterpin(1):part#9040001
2. Jawinserts(2),screws(4):part#9040002
3. Lockingscrews(2):part#9040003
4. Swivelbase(2pcs):part#9040004
5. Castingnut(1),washer(1),screw(1):part#9040005
Pièces de rechange du BV-HD40 :
Descriptionetnumérodelapièce
1. Mandrin(1),leressort(1),larondelle(1),
lagoupille(1):piècenº9040001
2. Jawinsère(2),lesvis(4):piècenº9040002
3. Visdeverrouillage(2):piècenº9040003
4. Basepivotante(2pcs):piècenº9040004
5. Écroucoulée(1),larondelle(1),lavis(1):piècenº9040005
Piezas de repuesto BV-HD40:
Númerodeartículo,descripcióndelapieza
1. Carrete(1),resorte(1),laarandela(1),chavetaderetén(1):n.°depieza9040001
2. Jawinserta(2),lostornillos(4):n
.°depieza9040002
3. Lostornillosdebloqueo(2):n.°depieza9040003
4. Basegiratoria(2unidades):n.°depieza9040004
5. Tuercafundida(1),laarandela(1),
eltornillo(1):n.°depieza9040005
2
1

8
REPLACEMENT PARTS - Pièces de rechange - Piezas de repuesto
Miscellaneous Replacement Parts: OTHER VISES:
ItemNumber,PartDescription
1. BV-HW45:Visejawswithscrews(Part#9045001)
2. BV-DP40:Visejawswithscrews(Part#9044001)
3. BV-VB:Visejawsandjawcoverswithscrews(Part#9000001)
4. BV-VB:Rubberizedbasewithwasherandcotterpin(Part#9000002)
Piezas de repuesto varias: OTROS TORNILLOS DE BANCO:
Númerodeartículo,descripcióndelapieza
1. BV-HW45:Tenazasdeltornillodebancocontornillos(N.°depieza9045001)
2. BV-DP40:Tenazasdeltornillodebancocontornillos(N.°depieza9044001)
3. BV-VB:Tenazasdeltornillodebancoycubiertasdelastenazascontornillos(N.°depieza9000001)
4. BV-VB:Baseahuladaconarandelaychavetaderetén(N.°depieza9000002)
Diverses pièces de service pour autres étaux :
Descriptionetnumérodelapièce
1. BV-HW45 :mâchoiresavecvis(piècenº9045001)
2. BV-DP40 :mâchoiresavecvis(piècenº9044001)
3. BV-VB :mâchoiresetcouverturesd’étauxavecvis(piècenº9000001)
4. BV-VB :baseencaoutchoucavecrondelleetgoupillefendue(piècenº9000002)
Warranty, Cautions & Warnings:
•
PleasereferencetheBESSEYToolswebsiteforwarranty,cautionsandwarningsinthe“CustomerSupport”section
Énoncés de garantie, avertissements et mises en garde:
• Veuillez-vousréférerausiteWebdeOutilsBESSEYpourénoncésdegarantie,avertissementetmisesengarde
àlasectionde“Soutiendeclient”
This manual suits for next models
4
Table of contents
Other Bessey Tools manuals


