BESTEK LF-8516 User manual
EN-------01~14
DE-------15~29
FR-------30~45
ES-------46~61
IT --------62~77
A I R F R Y E R
W I T H R A P I D A I R T E C H N O L O G Y
USER GUIDE
Now that you have purchased a BESTEK product you
can rest assured in the knowledge that as well as your
1-year parts and labor warranty you have the added
peace of mind of dedicated helplines and web support
For your safety and continued enjoyment of this product,
always read the instruction manual before using.
READ ALL INSTRUCTIONS BEFORE USE

Contents
1. Important Safeguards····························································································02
2. Other Consumer Safety Information································································03
3. Features and Specification··················································································04
4. Operating Instructions ···························································································08
5. Troubleshooting ·······································································································11
6. Frequently Asked Questions···············································································12
7. Cleaning and Maintenance··················································································13
8. Warranty Card ··········································································································14
01

Important Safeguards
• READ AND FOLLOW all instructions carefully.
• NEVER IMMERSE the housing, which contains
electrical components and heating elements , in
water. Do not rinse under the tap.
• TO AVOID ELECTRICAL SHOCK , do not put
liquid of any kind into the main unit housing cont-
aining the electrical components.
• THIS APPLIANCE HAS A POLARIZED PLUG
(one blade is wider than the other).To reduce the
risk of electric shock , this plug is intended to fit
into a polarized outlet only one way . If the plug
does not fit fully into the outlet, reverse the plug.
If it still does not fit,contact a qualified electrician.
Do not attempt to modify the plug in any way.
• MAKE SURE the appliance is plugged into a
wall socket . Always make sure that the plug is
inserted into the wall socket properly.
• TO PREVENT FOOD CONTACT with the heat-
ing elements, do not overfill the Fry Basket.
• DO NOT cover the air inlet and outlet openings
while the BESTEK Air Fryer is operating . Doing
so will prevent even cooking and may damage
the Unit or cause it to overheat.
• NEVER POUR oil into the Outer Basket . Fire
and personal injury could result.
• WHILE COOKING, the internal temperature of
the Unit reaches several hundred degrees F. To
avoid personal injury, never place hands inside
the Unit unless it is thoroughly cooled down.
• THIS APPLIANCE IS NOT INTENDED FOR
use by persons with reduced physical, sensory,
or mental capabilities, or lack of experience and
knowledge,unless they are under the supervision
of a responsible person or have been given pro-
per instruction in using the appliance.This applia-
nce is not intended for use by children.
• DO NOT use this unit if the plug,the power cord
or the appliance itself is damaged in an way.
• IF THE POWER CORD IS DAMAGED,you must
have it replaced by the manufacturer, its service
agent , or a similarly qualified person in order to
avoid hazard.
• KEEP THE APPLIANCE and its power cord out
of the reach of children when it is in operation or
in the “cooling down” process.
• KEEP THE POWER CORD away from hot sur-
faces.Do not plug in the power cord or operate the
unit controls with wet hands.
• NEVER CONNECT THIS APPLIANCE to an
external timer switch or separate remote-control
system.
• DO NOT USE AN EXTENSION WIRE, if you ac-
cept liability for doing so , only use an extension
wire which is in good condition and is suited to the
power of the air fryer.
• DO NOT OPERATE THE APPLIANCE on or ne-
ar combustible materials such as tablecloths and
curtains.
• WHEN COOKING , do not place the appliance
against a wall or against other appliances . Leave
at least 5 ” free space on the back and sides and
above the appliance.Do not place anything on top
of the appliance.
• DO NOT USE the BESTEK Air Fryer for any pu-
rpose other than described in this manual.
• NEVER operate the appliance unattended.
• WHEN IN OPERATION , hot steam is released
through the air outlet openings . Keep your hands
and face at a safe distance from the air outlet op-
enings . Also avoid the hot steam and air while
removing the Outer Basket and Fry Basket from
the appliance.
• THE UNIT’S OUTER SURFACES may become
hot during use. The Outer Basket and Fry Basket
will be hot... wear oven mitts when handling hot
components or touching hot surfaces.
• SHOULD THE UNIT EMIT BLACK SMOKE, un-
plug immediately and wait for smoking to stop be-
fore removing Outer and Fry Baskets.
Other Consumer Safety Information
Caution
• Always operate the appliance on a horizontal
surface that is level, stable and noncombustible.
• This appliance is intended for normal household
use only. It is not intended for use in commercial
or retail environments.
• If the BETSEK Air Fryer is used improperly or for
professional or semi-professional purposes or if it is
not used according to the instructions in the user
manual, the warranty becomes invalid and we will
not be held liable for damages.
• Always unplug the appliance after use.
• Let the appliance cool down for approximately 30
minutes before handling, cleaning or storing.
• Make sure the ingredients prepared in this unit
come out cooked to a golden-yellow color rather
than dark or brown. Remove burnt remnants.
Automatic Switch-Off
The air fryer is equipped with a timer. To switch off,
press the power button.
Electric Power
If the electrical circuit is overloaded with other
appliances, your new unit may not operate properly.
It should be operated on a dedicated electrical
circuit.
Overheating Protection System
Should the inner temperature control system fail,
the overheating protection system will be activated
and the unit will not function. Should this happen,
unplug the power cord, allow time for the unit to cool
completely before restarting or storing.
Eletromagnetic Fileds (EMF)
This appliance complies with all standards
regarding electromagnetic fields (EMF). If handled
properly and according to the instructions in this
user manual, the appliance is safe to use based on
scientific evidence available today.
Warning
• For your safety, the air fryer complies with the
safety regulations and directives in effect at the
time of manufacture (Low-voltage Directive,
Electromagnetic Compatibility, Food Contact
Materials Regulations )
• Check that the power supply voltage if
corresponds to that shown on the air fryer
(alternating current).
• Given the diverse standards in effect, if the air
fryer is used in a country other than that in which it
is purchased, please contact the service center
before operate the air fryer.
• Read and follow the instructions for use. Keep
them for future reference.
02 03
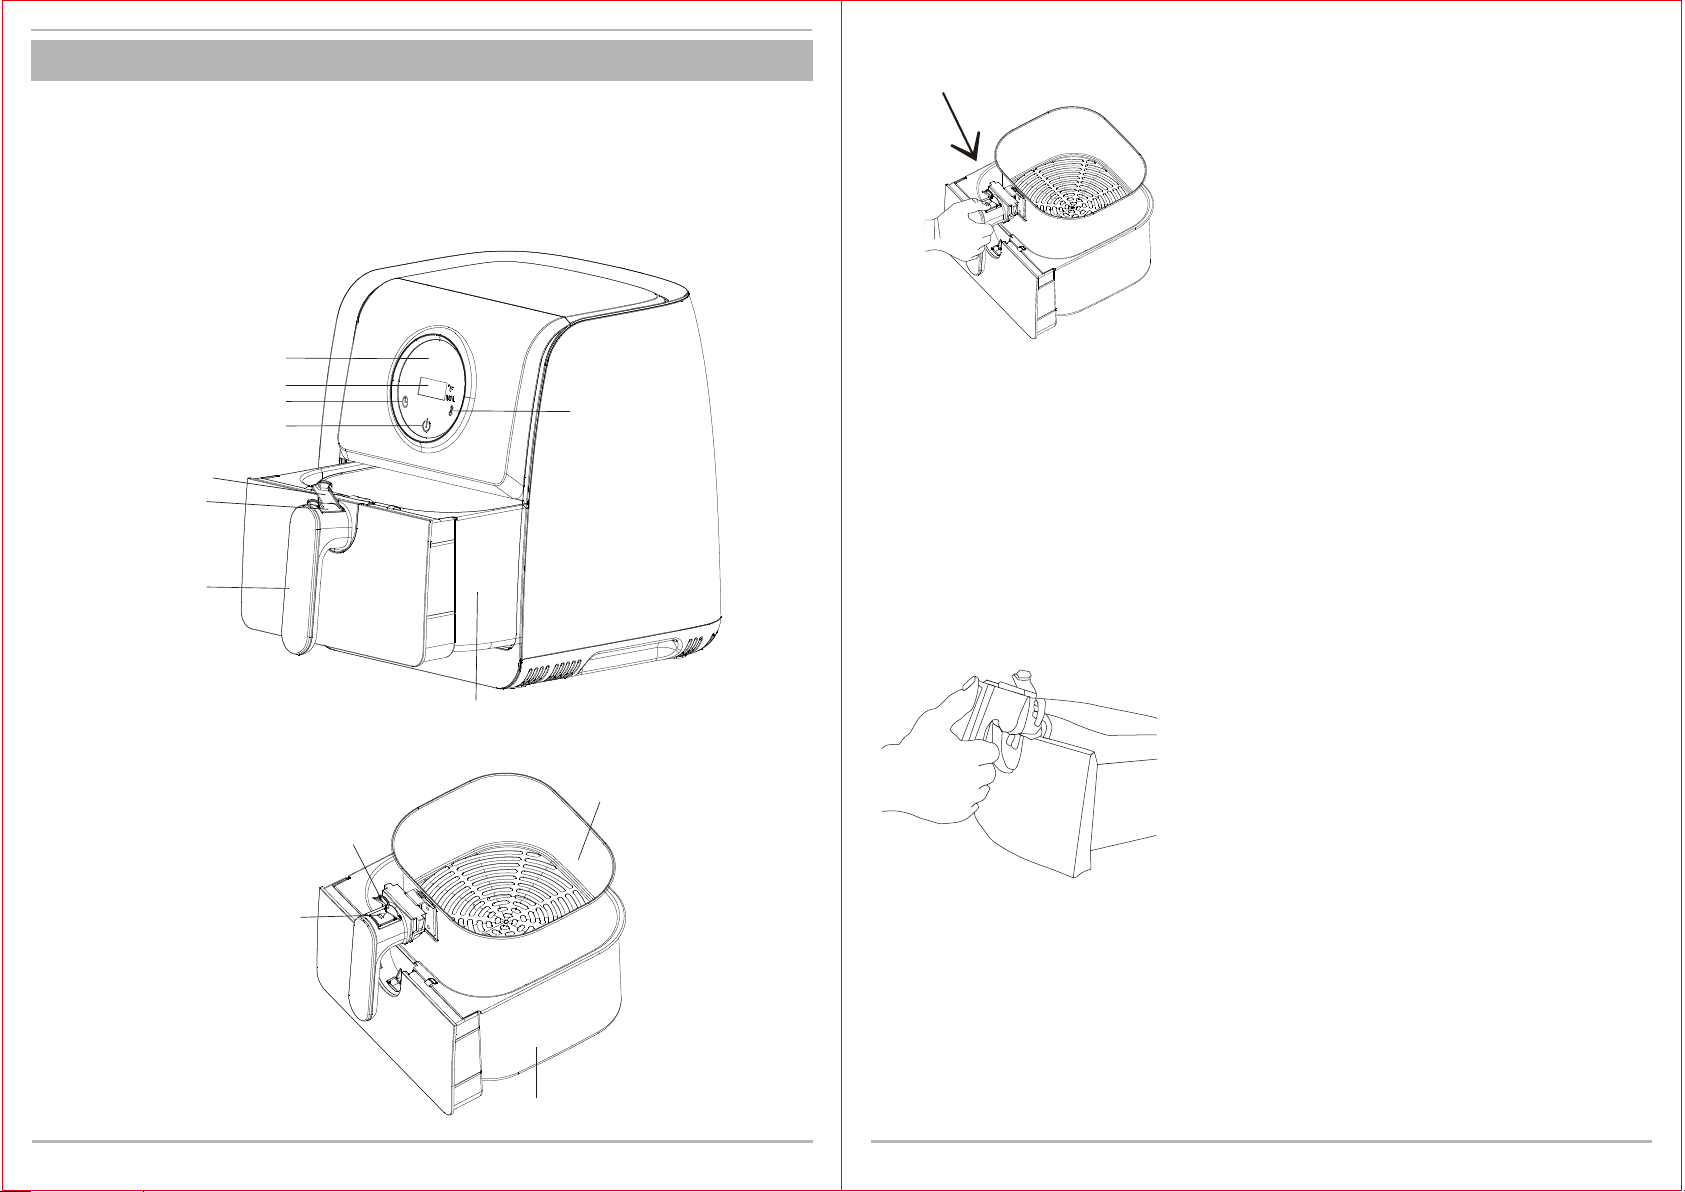
Getting to Know Your Air Fryer
product may vary slightly from illustration
Features and Specification
To unlock and remove the frying basket from the drawer:
push up the clear basket lock forward to expose the basket release button. Press the basket release button
with your thumb while pulling the frying basket straight up and out of the drawer. Refer to Figure 2.
CAUTION: Never push Basket Release Button unless Fry Basket and Outer Basket are resting on a level,
heat-resistant surface.
When removing fry Outer Fry Basket, be careful not to press the Basket Handle button. Outer Basket will
seperate from Fry Basket.
Lock the clean frying basket into the drawer:
There are 2 tabs on each side of the handle. Slide the 2 handle tabs into the notches on the top of the basket
drawer. An audible click can be heard as the frying basket handle locks securely into place. Refer to Figure 3.
IMPORTANT: push up the clear basket lock back over the basket release button to prevent accidental frying
basket release.
Figure 2:
Figure 3:
04 05
LED Display
Time/Temperature Indicator
60 Minutes Timer Control
Power Button
Basket Release Button
Basket Release Button
Clear Basket Lock
Clear Basket Lock
Cool Touch Frying
Basket Handle
Frying Basket Drawer
Removable Frying
Basket with Cool
Touch Handle
Frying Basket Drawer
Temperature Control
140° F-392° F
(60℃-200℃)
Figure 1:
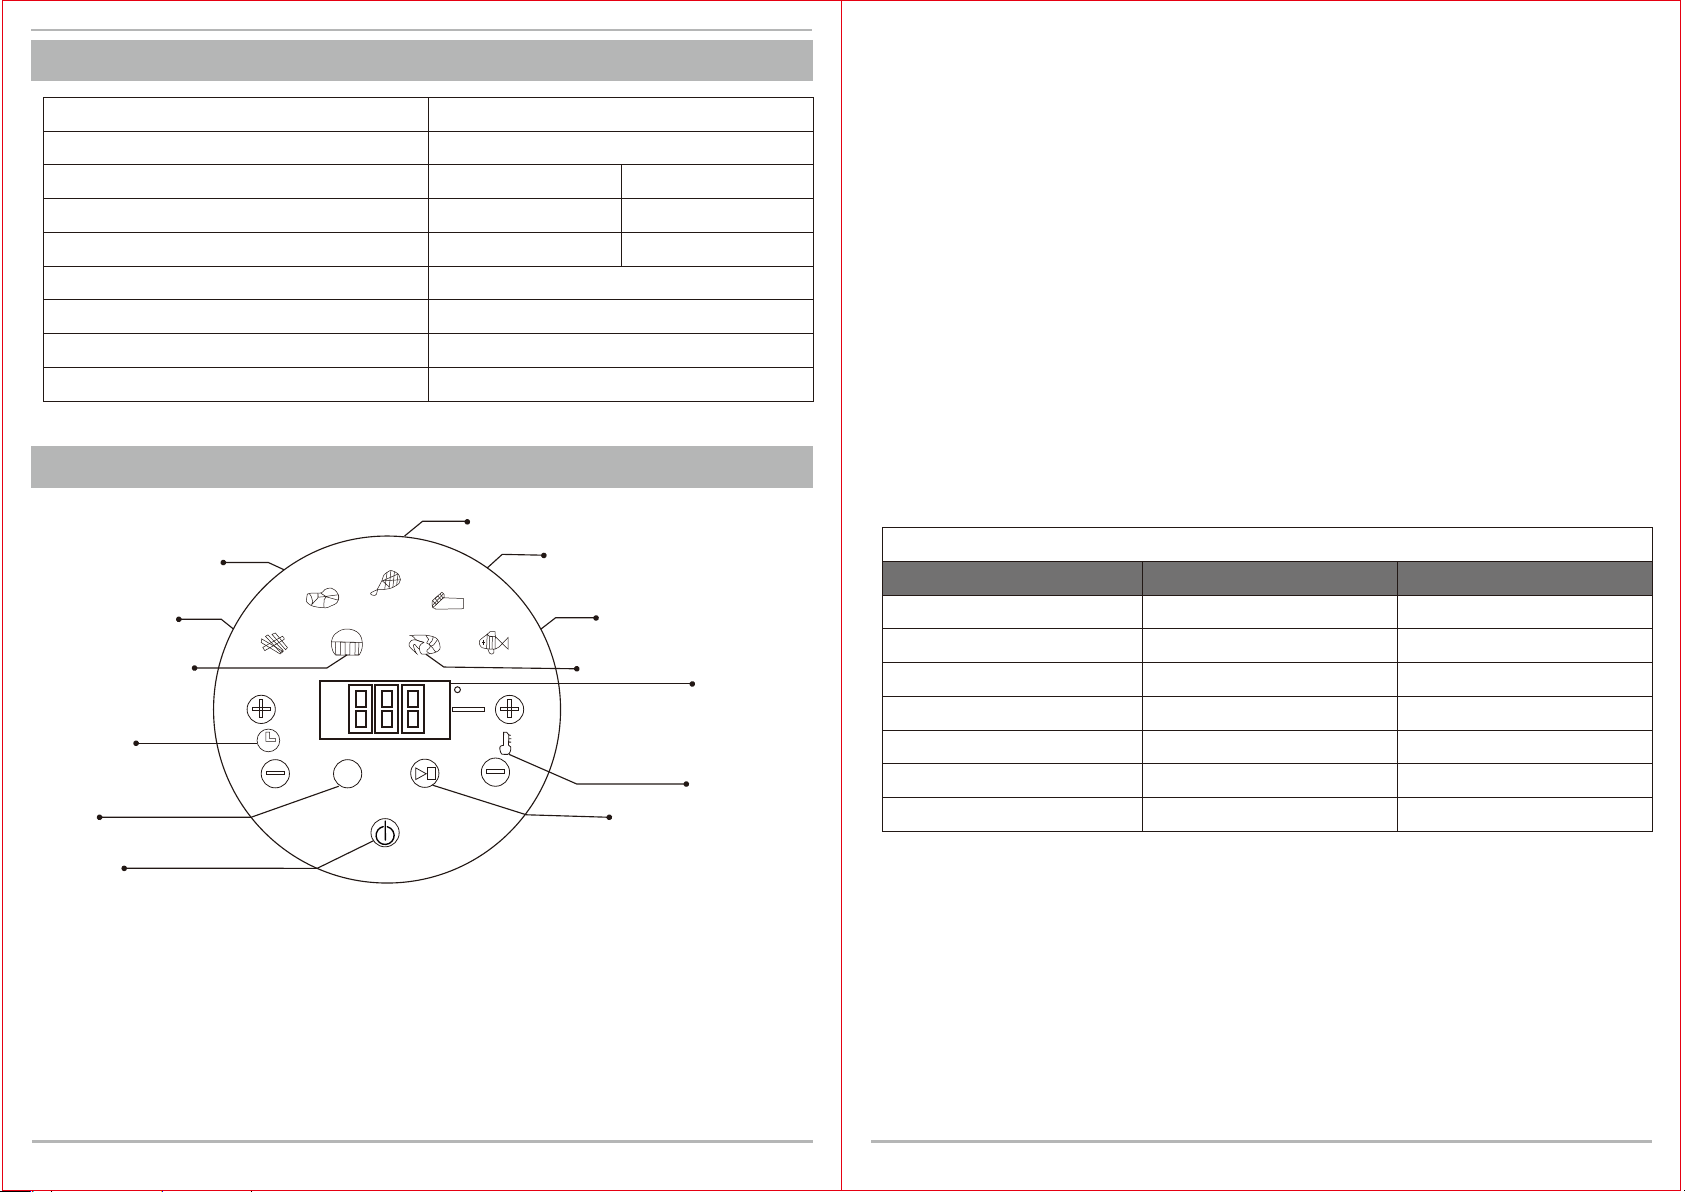
Buttons 3 & 4 - 60 Minute Timer
• Once the timer dial is set, the blue POWER light will illuminate to show the Air Fryer is powered on.
• To assure even cooking/browning, open the frying basket drawer halfway through the cooking time.
Check, turn or vigorously shake foods in the frying basket.
• One beep will sound when the set air frying time has reached 0. The Air Fryer will turn OFF automatically.
IMPORTANT: Unplug the Air Fryer when not in use.
Buttons 5 & 6 - Temperature Control Buttons
Select air frying temperatures from 140°F to 400°F. Temperatures can be adjusted at any time.
Button 7 - Preset Program Button
Selecting the “M” Preset Button enables you to scroll through the seven popular food choices.
Once selected, the predetermined time and cooking temperature function begins.
Note: You can override the preset function by increasing or decreasing time and temperature manually.
Buttons 8 through 14 - Preset Choices
Seven presets to choose from including: fries, chops and other smaller cuts of meat, shrimp, baked goods,
chicken, steak and fish.
Buttons 15 Time and Temperature Display
This display will keep track of the temperature and remaining cook time.
Temperature conversion formula:°F=(°C×9/5)+32
Cooking with the BESTEK Air Fryer Without Presets
Once you are familiar with the BESTEK air fryer you may want to experiment with your own recipes. You do
not need to select a preset function. Simply choose the time and temperature that suits your personal taste.
PRESET BUTTON COOKING CHART
PRESET BUTTON TEMPERATURE TIME
French Fries 392℉15 min
Steak 356℉20 min
Chicken 392℉15 min
Chops 356℉ 20 min
Fish 320℉20 min
Shrimp 248℉10 min
Baked Goods 320℉ 30 min
Specifications
LED Control Screen
Product BESTEK Air Fryer
Model LF-8516
Power 1200W~1400W 1200W
Voltage 220~240V 100~120V
Frequency 50Hz 60Hz
Capacity 3.2L
Product Weight 5.17kg
Dimensions 33.6*27*27cm
Main Components Materials PP housing, Non-stick basket & pot
Button 1 - Power Button
Once the Outer Basket and Fry Basket are properly placed in the main Unit housing, the Power Button will
be illuminated. Selecting the Power Button one time will set the Unit to a default temperature of 140° F, and
the cooking time will be set to 03 minutes.
Button 2 – Start Pause Key
Selecting the pause start key will start the cooking process. Pressing the pause start key during the cooking
cycle will turn the unit off. The time/temperature display will pause, the blue fan light will continue to bright,
F
min
M
1. Power Button:
Press the button 3 seconds
7. Menu: Select one
of 7 pre-set programs
3&4. Timer: Sets timer
up to 60 minutes
14. Cake
8. Fries/chips
9. Steak
10. Chicken
11. Chops
12. Fish
13. Shrimp
15. Time/Temperature Display
5&6. Temperature: Sets
temperature from 60°C
up to 200°C
2. Start/Pause
06 07
Table of contents
Languages:


